Installing the Cisco DCNM

This chapter contains the following sections:

Installing DCNM on Open Virtual Appliance

This chapter contains the following sections:

Downloading the Open Virtual Appliance File

The first step to install the Open Virtual Appliance is to download the dcnm.ova file. Point to that dcnm.ova file on your computer when deploying the OVF template.


Note

If you plan to use HA application functions, you must deploy the dcnm.ova file twice.

Procedure


Step 1

Go to the following site: http://software.cisco.com/download/ .

Step 2

In the Select a Product search box, enter Cisco Data Center Network Manager.

Click Search icon.

Step 3

Click Data Center Network Manager from the search results.

A list of the latest release software for Cisco DCNM available for download is displayed.

Step 4

In the Latest Releases list, choose Release 11.2(1).

Step 5

Locate the DCNM Open Virtual Appliance Installer and click the Download icon.

Step 6

Save the dcnm.ova file to your directory that is easy to find when you start to deploy the OVF template.


Deploying the Open Virtual Appliance as an OVF Template

After you download the Open Virtual Appliance file, you must deploy the OVF template from the vSphere Client application or the vCenter Server.


Note

Deploy two OVAs for the HA setup.

Procedure


Step 1

Open the vCenter Server application and connect to the vCenter Server with your vCenter user credentials.

Note 
ESXi host must be added to the vCenter Server application.

Depending on the version of the VMware vsphere web HTML5 interface may not work properly when deploying Huge or Compute OVA, as it does not allow users to specify extra disk size. Therefore, we recommend that you use Flex interface for deploying VMs.

If you're deploying OVF template using the ESXi 6.7, the installation fails if you use Internet Explorer browser with HTML5. Ensure that you one of the following options to successfully deploy OVF template with ESXi and 6.7:

  • Mozilla Firefox browser, with HTML 5 support

    Use flex interface if HTML 5 is not supported

  • Mozilla Firefox browser, with flex\flash support

  • Google Chrome browser, with HTML 5 support

    Use flex interface if HTML 5 is not supported

Step 2

Navigate to Home > Inventory > Hosts and Clusters and choose the host on which the OVF template is deployed.

Step 3

On the correct Host, right-click and select Deploy OVF Template.

You can also choose Actions > Deploy OVF Template.

Deploy OVF Template Wizard opens.

Step 4

On the Select template screen, navigate to the location where you have downloaded the OVA image.

You can choose the OVA file by one of the following methods:

  • Select the URL radio button. Enter the path of the location of the image file.

  • Select Local File radio button. Click Browse. Navigate to the directory where the image is stored. Click OK.

Click Next.

Step 5

Verify the OVA template details and click Next.

Step 6

On the End User License Agreement screen, read the license agreement.

Click Accept and click Next.

Step 7

On the Select name and location screen, enter the following information:

  • In the Name field, enter an appropriate name for the OVF.

    Note 
    Ensure that the VM name is unique within the Inventory.
  • In the Browse tab, select Datacenter as the deployment location under the appropriate ESXi host.

Click Next.

Step 8

On the Select configuration screen, select the configuration from the drop-down list.

  • Choose Small (Lab or POC) to configure the virtual machine with 8 vCPUs, 24GB RAM.

    Choose Small for proof-of-concept and other small-scale environments with fewer than 50 switches that are not expected to grow with time.

  • Choose Large (Production) to configure the virtual machine with 16 vCPUs, 32GB RAM.

    We recommend that you use a Large deployment configuration when you are managing more than 50 devices to leverage better RAM, heap memory, and CPUs. For setups that could grow, choose Large.

  • Choose Compute to configure the virtual machine with 16 vCPUs, 64GB RAM.

    You must have DCNM deployed in Compute mode to use applications in your deployment.

Click Next.

Step 9

On the Select a resource screen, select the host on which you want to deploy the OVA template.

Click Next.

Step 10

On the Select storage screen, based on the Datastore and Available space choose the disk format and the destination storage for the virtual machine file.

  1. Select the virtual disk format from the drop-down list.

    The available disk formats are:

    Note 
    Choose one of the thick provision types if you have enough storage capacity as required by the virtual appliance and want to set a specific allocation of space for the virtual disks.
    • Thick Provision Lazy Zeroed: The space that is required for the virtual disk is allocated when the virtual disk is created. The data that remains on the physical device is not erased when the virtual disk is created but is zeroed out on demand later on first write from the virtual disk.

    • Thin Provision: The disk space available is less than 100 GB. The initial disk consumption is 3GB and increases as the size of the database increases with the number of devices being managed.

    • Thick Provision Eager Zeroed: The space that is required for the virtual disk is allocated when the virtual disk is created. Unlike the Lazy Zeroed option, the data that remains on the physical device is erased when the virtual disk is created.

      Note 

      With 500G, the DCNM installation will appear to be stuck with option Thick Provision Eager Zeroed. However, it takes longer time to complete.

  2. Select the VM storage policy from the drop-down list.

    By default, no policy is selected.

  3. Check the Show datastores from Storage DRS clusters to view the clusters datastores.

  4. Select the destination storage for the virtual machine, available in the datastore.

Click Next.

Step 11

On the Select Networks screen, map the networks that are used in the OVF template to networks in your inventory.

  • dcnm-mgmt network

    This network provides connectivity (SSH, SCP, HTTP, HTTPS) to the Cisco DCNM Open Virtual Appliance. Associate this network with the portgroup that corresponds to the subnet that is associated with the DCNM Management network.

  • enhanced-fabric-mgmt

    This network provides enhanced fabric management of Nexus switches. You must associate this network with the port group that corresponds to management network of leaf and spine switches.

  • enhanced-fabric-inband

    This network provides in-band connection to the fabric. You must associate this network with port group that corresponds to a fabric in-band connection.

    Note 

    If you do not configure enhanced-fabric-inband network, Endpoint Locator and Telemetry features are not operational.

    However, you can configure the network after installation, if required. For more information, see Configuring Enhanced-Fabric-Inband Interface (eth2) Post DCNM Installation.

From the Destination Network drop-down list, choose to associate the network mapping with the port group that corresponds to the subnet that is associated with the corresponding network.

If you are deploying more than one DCNM Open Virtual Appliance for HA functionality, you must meet the following criteria:

  • Both OVAs must have their management access (eth0), enhanced fabric management (eth1) and inband management (eth2) interfaces in the same subnet.

  • Each OVA must have their eth0-eth1 and eth2 interfaces in different subnets.

  • Both OVAs must be deployed with the same administrative password. This is to ensure that both OVAs are duplicates of each other for application access. Do not use the following characters in your password: <SPACE> " & $ % ' ^ = < > ; : ` \ | / , .*

Click Next.

Step 12

On the Customize template screen, enter the Management Properties information.

Enter the IP Address (for the outside management address for DCNM), Subnet Mask, and Default Gateway.

Note 
During Native HA installation and upgrade, ensure that you provide appropriate Management Properties for both Active and Standby appliances.

Click Next.

Step 13

On the Ready to Complete screen, review the deployment settings.

Click Back to go to the previous screens and modify the configuration.

Click Finish to deploy the OVF template.

You can see the deployment status in the Recent Tasks area on the vSphere Client.

Note 
If this deployment is a part of the upgrade process, do not Power on the VM. Edit and provide the 11.0(1) or 11.1(1) MAC address and power on the VM.
Step 14

After the installation is complete, right click on the installed VM and select Power > Power On.

Note 
Before you power on the VM, ensure that you have reserved appropriate resources for the VM, such as CPU and memory, based on the chosen deployment configuration.

You can see the status in the Recent Tasks area.

Step 15

Navigate to the Summary tab and click Settings icon and select Launch Web Console.

A message indicating that the DCNM appliance is configuring appears on the screen.

***************************************************************
Please point your web browser to
https://<IP-address>:<port-number>
to complete the application
***************************************************************

Copy and paste the URL to the browser to complete the installation, using the Web Installer.


What to do next

The DCNM installer creates a _deviceImage-0.iso in the DCNM VM folder and mounts the ISO permanently to the VM. If this ISO is removed or the CD/DVD is disconnected, the VM will not boot. The VM will enter Emergency Mode and prompt you with the message:Give root password for maintenance. If the VM is down, CD/DVD drive can be disconnected. However, after you power it up again, the VM will enter Emergency Mode and provide a prompt.

You can choose to install DCNM in Standalone mode or Native HA mode. For more information, see Installing the Cisco DCNM OVA in Standalone Mode or Installing the Cisco DCNM OVA in Native HA mode.

Installing the Cisco DCNM OVA in Standalone Mode

Paste the URL displayed on the Console tab and hit Enter key. A welcome message appears.

To complete the installation of Cisco DCNM from the web installer, perform the following procedure.

Procedure


Step 1

On the Welcome to Cisco DCNM screen, click Get Started.

Step 2

On the Cisco DCNM Installer screen, select Fresh Installation – Standalone radio button.

Click Continue.

Step 3

On the Administration tab, enter the password that is used to connect to all the applications in the Cisco DCNM Open Virtual Appliance.

Adhere to the following password requirements. If you do not comply with the requirements, the DCNM application may not function properly.

  • It must be at least eight characters long and contain at least one alphabet and one numeral.

  • It can contain a combination of alphabets, numerals, and special characters.

  • Do not use any of these special characters in the DCNM password for all platforms:

    <SPACE> " & $ % ' ^ = < > ; : ` \ | / , .*

Select the Show passwords in clear text checkbox to view the password you have typed.

Click Next.

Step 4

In the Install Mode tab, from the drop-down list, choose LAN Fabric installation mode for the OVA DCNM Appliance.

Click Next.

Step 5

On the System Settings, configure the settings for the DCNM Appliance.

  • In the Fully Qualified Hostname field, enter the hostname that is a fully qualified domain name (FQDN) as per RFC1123, section 2.1.

  • In the DNS Server Address field, enter the DNS IP address.

    Beginning with Release 11.2(1), you can also configure the DNS server using an IPv6 address.

  • In the NTP Server field, enter the IP address of the NTP server.

    The value must be an IP or IPv6 address or RFC 1123 compliant name.

Click Next.

Step 6

On the Network Settings tab, configure the network parameters.
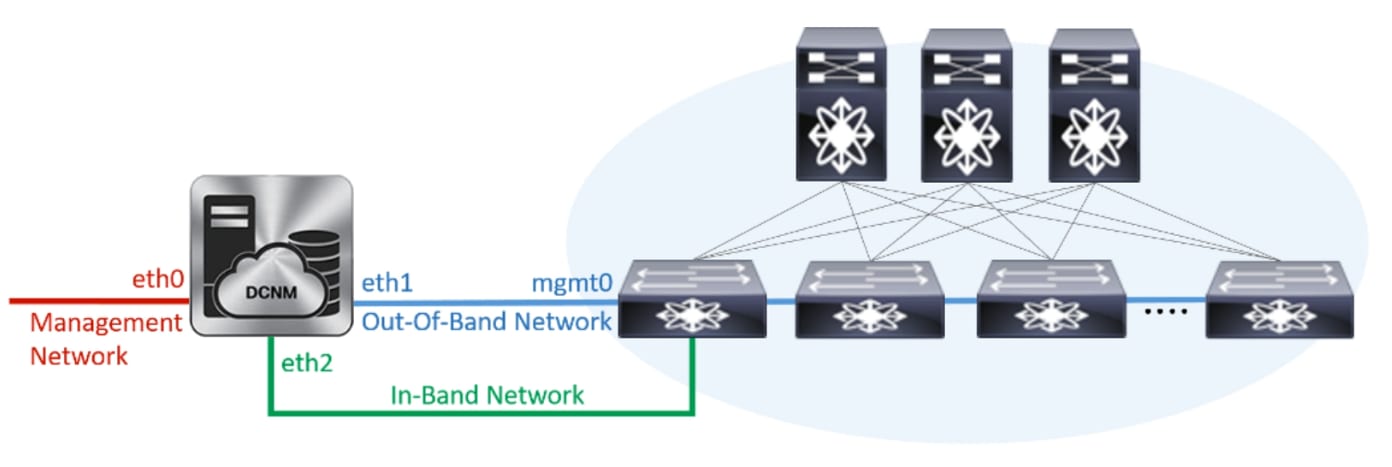
Figure 1. Cisco DCNM Management Network Interfaces
  1. In the Management Network area, verify if the auto-populated IP Address and Default Gateway address are correct. Modify, if necessary.

    Note 
    Beginning with Cisco DCNM Release 11.2(1), you can also use an IPv6 address for the Management Network.

    (Optionally) Enter a valid IPv6 address along with the prefix to configure the Management address and the Management Network Default IPv6 Gateway.

  2. In the Out-of-Band Network area, enter the IP address, gateway IP Address, and DNS server address. If DCNM is on the IPv6 network, configure the network with an IPv6 Address.

    Out-of-band management provides a connection to the device management ports (Typically mgmt0).

    Note 

    If the out-of-band network is not configured, you cannot configure Cisco DCNM in Cluster mode.

  3. In the In-Band Network area, enter the IP Address and gateway IP Address for the in-band network.

    The In-Band Network provides reachability to the devices via the front-panel ports.

    Note 

    If you do not configure in-band network, Endpoint Locator and Telemetry features are not operational.

    However, you can configure the in-band network after installation, if necessary. For more information, see Configuring Enhanced-Fabric-Inband Interface (eth2) Post DCNM Installation.

    Note 
    To modify the already configured in-band network (eth2 interface), execute the ifconfig eth2 0.0.0.0 command and run the appmgr setup inband command again. Refer to Configuring Enhanced-Fabric-Inband Interface (eth2) Post DCNM Installation to run the appmgr setup inband command.
  4. In the Internal Application Services Network area, enter the IP subnet to access the applications that run internally to DCNM.

    All the applications use the IP Address from this subnet.

Click Next.

Step 7

On the Summary tab, review the configuration details.

Click Previous to go to the previous tabs and modify the configuration. Click Start Installation to complete the Cisco DCNM Installation for the chosen deployment mode.

A progress bar appears showing the completed percentage, description of the operation, and the elapsed time during the installation. After the progress bar shows 100%, click Continue.

A success message appears with the URL to access DCNM Web UI.

***************************************************************
Your Cisco Data Center Network Manager software has been installed.
DCNM Web UI is available at
https://<<IP Address>>:2443
You will be redirected there in 60 seconds.
Thank you
***************************************************************
Note 

If the Cisco DCNM is running behind a firewall, ensure that you open the port 2443 to launch Cisco DCNM Web UI.

Note 

If you try to access the DCNM Web UI using the Management IP address while the installation is still in progress, an error message appears on the console.

***************************************
*Preparing Appliance*

***************************************

What to do next

Log on to the DCNM Web UI with appropriate credentials.

Click the Settings icon and choose About DCNM. You can view and verify the Installation type that you have deployed.

If you have configured inband management (eth2) IP addresses for device management, login to standalone server and configure the inband network reachability from eth2 of the server to the switches by using the following commands:
dcnm# appmgr setup inband-route --subnet switches-fabric-links-IP-subnet/mask
dcnm# appmgr setup inband-route --subnet switch-loopback-IP-subnet>/mask
For example: If you have four switches with all fabric links connected through 10.0.0.x/30 subnet, and if all switches are configured with the loopback interface for inband reachability in subnet 40.1.1.0/24, use the following commands:
dcnm# appmgr setup inband-route --subnet 10.0.0.0/24
dcnm# appmgr setup inband-route --subnet 40.1.1.0/24
Installing the Cisco DCNM OVA in Native HA mode

The native HA is supported on DCNM appliances with ISO or OVA installation only.

By default, an embedded PostgreSQL database engine with the Cisco DCNM. The native HA feature allows two Cisco DCNM appliances to run as active and standby applications, with their embedded databases synchronized in real time. Therefore, when the active DCNM is not functioning, the standby DCNM takes over with the same database data and resume the operation.

Perform the following task to set up Native HA for DCNM.

Procedure


Step 1

Deploy two DCNM Virtual Appliances (either OVA or ISO).

For example, let us indicate them as dcnm1 and dcnm2.

Step 2

Configure dcnm1 as the Primary node. Paste the URL displayed on the Console tab of dcnm1 and press Enter key.

A welcome message appears.

  1. On the Welcome to Cisco DCNM screen, click Get Started.

  2. On the Cisco DCNM Installer screen, select Fresh Installation - HA Primary radio button, to install dcnm1 as Primary node.

    Click Continue.

  3. On the Administration tab, enter the password that is used to connect to all the applications in the Cisco DCNM Open Virtual Appliance.

    Adhere to the following password requirements. If you do not comply with the requirements, the DCNM application may not function properly.

    • It must be at least eight characters long and contain at least one alphabet and one numeral.

    • It can contain a combination of alphabets, numerals, and special characters.

    • Do not use any of these special characters in the DCNM password for Linux, Windows, OVA, and ISO platforms:

      <SPACE> " & $ % ' ^ = < > ; : ` \ | / , .*

    Select the Show passwords in clear text checkbox to view the password you have typed.

    Click Next.

  4. In the Install Mode tab, from the drop-down list, choose LAN Fabric installation mode for the DCNM Appliance.

    Click Next.

  5. On the System Settings, configure the settings for the DCNM Appliance.

    • In the Fully Qualified Hostname field, enter the hostname that is a fully qualified domain name (FQDN) as per RFC1123, section 2.1.

    • In the DNS Server Address field, enter the DNS IP address.

      Beginning with Release 11.2(1), you can also configure the DNS server using an IPv6 address.

    • In the NTP Server field, enter the IP address of the NTP server.

      The value must be an IP or IPv6 address or RFC 1123 compliant name.

    Click Next.

  6. On the Network Settings tab, configure the network parameters.

    Figure 2. Cisco DCNM Management Network Interfaces
    • In the Management Network area, verify is the auto-populated IP Address and Default gateway address are correct. Modify, if necessary.

      Note 
      Beginning with Cisco DCNM Release 11.2(1), you can also use an IPv6 address for the Management Network.

      (Optionally) Enter a valid IPv6 address along with the prefix to configure the Management address and the Management Network Default IPv6 Gateway.

    • In the Out-of-Band Network area, enter the IP address, gateway IP Address, and DNS server address. If DCNM is on the IPv6 network, configure the network with an IPv6 Address.

      Out-of-band management provides a connection to the device management ports (Typically mgmt0).

      Note 

      If the out-of-band network is not configured, you cannot configure Cisco DCNM in Cluster mode.

    • In the In-Band Network area, enter the VIP Address and gateway IP Address for the in-band network. The In-Band Network provides reachability to the devices via the front-panel ports.

      Note 

      If you do not configure in-band network, Endpoint Locator and Telemetry features are not operational.

      However, you can configure the in-band network after installation, if necessary. For more information, see Configuring Enhanced-Fabric-Inband Interface (eth2) Post DCNM Installation.

      Note 
      To modify the already configured in-band network (eth2 interface), execute the ifconfig eth2 0.0.0.0 command and run the appmgr setup inband command again. Refer to Configuring Enhanced-Fabric-Inband Interface (eth2) Post DCNM Installation to run the appmgr setup inband command
    • In the Internal Application Services Network area, enter the IP subnet to access the applications that run internally to DCNM.

      All the applications use the IP Address from this subnet.

      Note 

      Ensure that you configure the same IP subnet on both the Primary HA and the Secondary HA node.

    Click Next.

  7. On the HA Settings tab, a confirmation message appears.

    You are installing the primary DCNM HA node.
    Please note that HA setup information will need to
    be provided when the secondary DCNM HA node is
    installed.

    Click Next.

  8. On the Summary tab, review the configuration details.

    Click Previous to go to the previous tabs and modify the configuration. Click Start Installation to complete the Cisco DCNM Installation for the chosen deployment mode.

    A progress bar appears to show the completed percentage, description of the operation, and the elapsed time during the installation. After the progress bar shows 100%, click Continue.

    A warning message appears stating that the setup is not complete until you install the Secondary node.

    WARNING: DCNM HA SETUP IS NOT COMPLETE!
    Your Cisco Data Center Network Manager software has been installed on
    this HA primary node.
    However, the system will be ready to be used only after installation
    of the secondary node has been completed.
    Thank you.
Step 3

Configure dcnm2 as the Secondary node. Paste the URL displayed on the Console tab of dcnm2 and hit Enter.

A welcome message appears.

  1. On the Welcome to Cisco DCNM screen, click Get Started.

  2. On the Cisco DCNM Installer screen, select Fresh Installation - HA Secondary radio button, to install dcnm2 as Secondary node.

    Click Continue.

  3. On the Administration tab, enter the password that is used to connect to all the applications in the Cisco DCNM Open Virtual Appliance.

    Note 

    The password for the secondary node must be the same as the Administrative password for primary, as entered in Step 2.c.

    Click Next.

  4. In the Install Mode tab, from the drop-down list, choose the same installation mode that you selected for the Primary node.

    Note 
    The HA installation fails if you do not choose the same installation mode as Primary node.

    Click Next.

  5. On the System Settings, configure the settings for the DCNM Appliance.

    • In the Fully Qualified Hostname field, enter the hostname that is a fully qualified domain name (FQDN) as per RFC1123, section 2.1.

    • In the DNS Server Address field, enter the DNS IP address.

      Beginning with Release 11.2(1), you can also configure the DNS server using an IPv6 address.

    • In the NTP Server field, enter the IP address of the NTP server.

      The value must be an IP or IPv6 address or RFC 1123 compliant name.

    Click Next.

  6. On the Network Settings tab, configure the network parameters.

    Figure 3. Cisco DCNM Management Network Interfaces
    • In the Management Network area, verify is the auto-populated IP Address and Default gateway address are correct. Modify, if necessary.

      Note 

      Ensure that the IP Address belongs to the same Management Network as configured on the Primary node for HA setup to complete successfully.

      Note 
      Beginning with Cisco DCNM Release 11.2(1), you can also use an IPv6 address for the Management Network.

      (Optionally) Enter a valid IPv6 address along with the prefix to configure the Management address and the Management Network Default IPv6 Gateway.

    • In the Out-of-Band Network area, enter the IP address, gateway IP Address, and DNS server address. If DCNM is on the IPv6 network, configure the network with an IPv6 Address.

      Out-of-band management provides a connection to the device management ports (Typically mgmt0).

      Note 

      Ensure that the IP Address, IP address gateway, and the IPv6 address belong to the same Out-of-Band Network as configured on the Primary node for HA setup to complete successfully.

      Note 

      If the out-of-band network is not configured, you cannot configure Cisco DCNM in Cluster mode.

      You can also configure an IPv6 address for out-of-band management network.

    • In the In-Band Network area, enter the IP Address and gateway IP Address for the in-band network. The In-Band Network provides reachability to the devices via the front-panel ports.

      Note 

      If you do not configure in-band network, Endpoint Locator and Telemetry features are not operational.

      However, you can configure the in-band network after installation, if necessary. For more information, see Configuring Enhanced-Fabric-Inband Interface (eth2) Post DCNM Installation.

    • In the Internal Application Services Network area, enter the IP subnet to access the applications that run internally to DCNM.

      All the applications use the IP Address from this subnet.

      Note 

      Ensure that you configure the same IP subnet on both the Primary HA and the Secondary HA node.

    Click Next.

  7. On the HA Settings tab, configure the system settings..

    • In the Management IP Address of primary DCNM node field, enter the appropriate IP Address to access the DCNM UI.

    • In the VIP Fully qualified Host Name field, enter hostname that is a fully qualified domain name (FQDN) as per RFC1123, section 2.1.

    • Enter the Management Network VIP address, VIPv6 address, and OOB Network VIP address appropriately.

      Note 
      If you have configured the Management network using IPv6 address, ensure that you configure the Management Network VIPv6 Address.
    • Enter OOB Network VIPv6 Address to configure IPv6 address for VIP.

    • In the In-Band Network area, enter the VIP Address for the in-band network.

      This is the VIP address for the In-Band network. This field is mandatory if you have provided an IP address for In-Band network in the Network Settings tab.

    • Enter the HA ping IP address if necessary.

      HA_PING_ADDRESS, must be different from the DCNM Active and Standby addresses.

      You must configure the HA ping IP Address to avoid the Split Brain scenario. This address must belong to Enhanced Fabric management network.

    Click Next.

  8. On the Summary tab, review the configuration details.

    Click Previous to go to the previous tabs and modify the configuration. Click Start Installation to complete the Cisco DCNM OVA Installation for the chosen deployment mode.

    A progress bar appears to show the completed percentage, description of the operation, and the elapsed time during the installation. After the progress bar shows 100%, click Continue.

    A success message appears with the URL to access DCNM Web UI.

    ***************************************************************
    Your Cisco Data Center Network Manager software has been installed.
    DCNM Web UI is available at
    https://<<IP Address>>:2443
    You will be redirected there in 60 seconds.
    Thank you
    ***************************************************************
    Note 

    If the Cisco DCNM is running behind a firewall, ensure that you open the port 2443 to launch Cisco DCNM Web UI.


What to do next

Log on to the DCNM Web UI with appropriate credentials.

Click the Settings icon and choose About DCNM. You can view and verify the Installation type that you have deployed.

If you have configured inband management (eth2) IP addresses for device management, login to standalone server and configure the inband network reachability from eth2 of the server to the switches by using the following commands:
dcnm# appmgr setup inband-route --subnet switches-fabric-links-IP-subnet/mask
dcnm# appmgr setup inband-route --subnet switch-loopback-IP-subnet>/mask
For example: If you have four switches with all fabric links connected through 10.0.0.x/30 subnet, and if all switches are configured with the loopback interface for inband reachability in subnet 40.1.1.0/24, use the following commands:
dcnm# appmgr setup inband-route --subnet 10.0.0.0/24
dcnm# appmgr setup inband-route --subnet 40.1.1.0/24

Installing DCNM on ISO Virtual Appliance

This chapter contains the following sections:

Downloading the ISO Virtual Appliance File

The first step to installing the ISO Virtual Appliance is to download the dcnm.iso file. You must point to that dcnm.iso file on your computer when preparing the server for installing DCNM.


Note

If you plan to use HA application functions, you must deploy the dcnm.iso file twice.

Procedure


Step 1

Go to the following site: http://software.cisco.com/download/ .

Step 2

In the Select a Product search box, enter Cisco Data Center Network Manager.

Click on Search icon.

Step 3

Click on Data Center Network Manager from the search results.

A list of the latest release software for Cisco DCNM available for download is displayed.

Step 4

In the Latest Releases list, choose Release 11.2(1).

Step 5

Locate the DCNM ISO Virtual Appliance Installer and click the Download icon.

Step 6

Locate the DCNM VM templates at DCNM Virtual Appliance definition files for VMWare (.ovf) and KVM (domain XMLs) environment and click Download.

Step 7

Save the dcnm.iso file to your directory that will be easy to find when you being the installation.


What to do next

You can choose to install DCNM On KVM or Baremetal servers. Refer to Installing the DCNM ISO Virtual Appliance on KVM or Installing the DCNM ISO Virtual Appliance on UCS (Bare Metal) for more information.

Installing the DCNM ISO Virtual Appliance on UCS (Bare Metal)

Perform the following tasks to install the DCNM ISO virtual appliance on UCS.

Procedure


Step 1

Launch Cisco Integrated Management Controller (CIMC).

Step 2

Click the Launch KVM button.

You can either launch Java-based KVM or HTML-based KVM.

Step 3

Click the URL displayed on the window to continue loading the KVM client application.

Step 4

On the Menu bar, click Virtual Media > Activate Virtual Devices.

Step 5

Click Virtual Media and choose one of the following mediums to browse and upload DCNM ISO images from the following:

  • Map CD/DVD

  • Map Removable Disk

  • Map Floppy Disk

Navigate to the location where the ISO image is located and load the ISO image.

Step 6

Select Power > Reset System (warm boot) and Ok to continue and restart the UCS box.

Step 7

Press F6 interrupt the reboot process when the server starts to select a boot device. The boot selection menu appears.

For more information about using the UCS KVM Console window, see the Cisco UCS Server Configuration Utility, Release 3.1 User Guide at the following URL:

https://www.cisco.com/c/en/us/td/docs/unified_computing/ucs/sw/ucsscu/user/guide/31/UCS_SCU/booting.html#wp1078073

Step 8

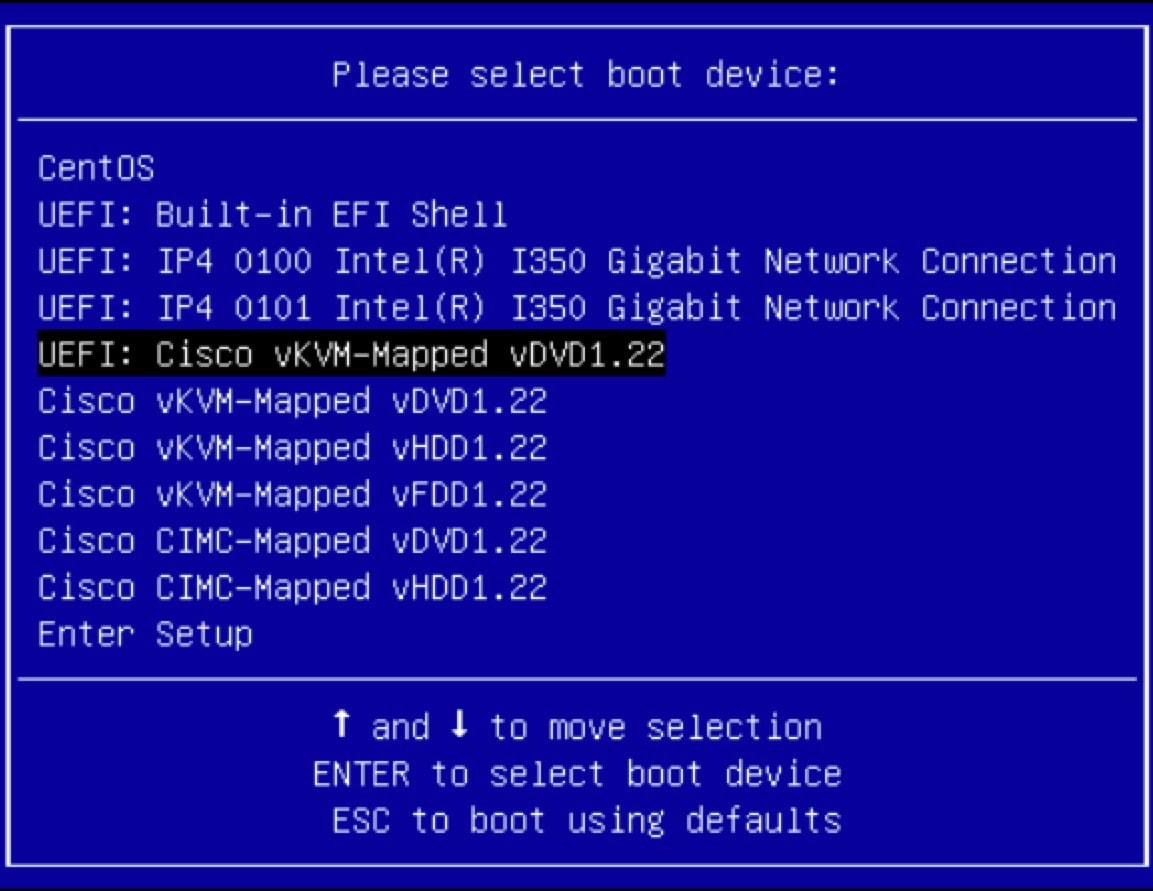
Use the arrow keys to select Cisco Virtual CD/DVD and press Enter. The server boots with the DCNM ISO image from the mapped location.

Note 

The following image highlights UEFI installation. However, you can also choose Cisco vKVM-Mapped vDVD1.22 for BIOS installation. ISO can be booted in both modes, BIOS, and UEFI.

UEFI is mandatory for a system with minimum of 2TB disks.

For Cisco UCS with the disk size of 2TB or higher and with 4K sector size drivers, the UEFI boot option is required. For more information, see UEFI Boot Mode.

Step 9

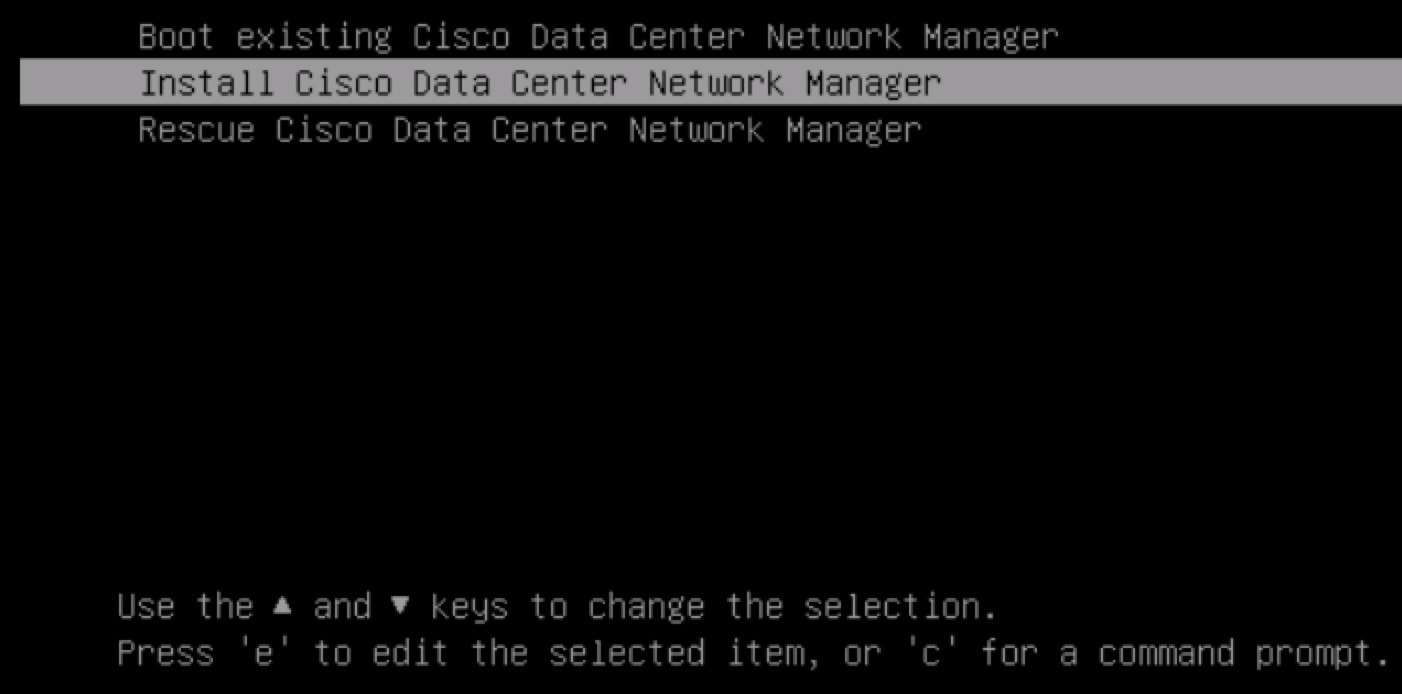
Select Install Cisco Data Center Network Manager using the up or down arrow keys. Press Enter.

The option shown in the following image appears when the ISO image is booted with UEFI.

Step 10

On the Cisco Management Network Management screen, select the interface for the networks. The list of available interfaces is displayed on the screen.

Choose the Management Interface (eth0) and Out-of-Band interface (eth1) from the Network Interface List. You can also configure the in-band interface (eth2) if necessary.

Note 

If you do not configure In-Band interface, Endpoint Locator and Telemetry features are not operational.

However, you can configure the network after installation, if required. For more information, see Configuring Enhanced-Fabric-Inband Interface (eth2) Post DCNM Installation.

Step 11

Review the selected interfaces. Press y to confirm and continue with the installation.

Step 12

Configure the Management Network for Cisco DCNM. Enter the IP address, Subnet Mask, and Gateway. Press y to continue with the installation.

After the installation is complete, the system reboots and a message indicating that the DCNM appliance is configuring appears on the screen.

***************************************************************
Please point your web browser to
http://<IP-address>:<port-number>
to complete the application
***************************************************************

Copy and paste the URL to the browser to complete the installation using the Web Installer.


What to do next

You can choose to install DCNM in Standalone mode or Native HA mode. Refer to Installing Cisco DCNM ISO in Standalone Mode or Installing the Cisco DCNM ISO in Native HA mode for more information.

Installing the DCNM ISO Virtual Appliance on KVM

Perform the following tasks to install the ISO virtual appliance on KVM.

Procedure


Step 1

Unzip and extract dcnm-va-ovf-kvm-files.11.2.1.zip and locate the dcnm-kvm-vm.xml file.

Step 2

Upload this file on the RHEL server that is running KVM to the same location as the ISO.

Step 3

Connect to the RHEL server running KVM via SCP File transfer terminal.

Step 4

Upload the dcnm-va.11.2.1.iso and dcnm-kvm-vm.xml to the RHEL server.

Step 5

Close the file transfer session.

Step 6

Connect to the RHEL server running KVM via SSH terminal.

Step 7

Navigate to the location where both the ISO and domain XMLs is downloaded.

Step 8

Create the VM (or Domains, as they are known in the KVM terminology) using the virsh command.

need info on dcnm-kvm-vm-huge.xml

sudo virsh define [dcnm-kvm-vm-huge.xml | dcnm-kvm-vm-compute.xml | dcnm-kvm-vm-large.xml | dcnm-kvm-vm-small.xml]
Step 9

Enable a VNC server and open the required firewall ports.

Step 10

Close the SSH session.

Step 11

Connect to the RHEL server running KVM via a VNC terminal.

Step 12

Navigate to Applications > System Tools > Virtual Machine Manager (VMM).

A VM is created in the Virtual Machine Manager.

Step 13

From Virtual Machine Manager, edit the VM by selecting the VM in the listing. Click Edit > Virtual Machine Details > Show virtual hardware details.

Step 14

In the Virtual Hardware Details, navigate to Add Hardware > Storage.

Step 15

Create a hard disk with Device type withe the following specifications:

  • device type: IDE disk

  • cache-mode: default

  • storage format: raw

We recommend that you use storage size of 500GB.

Step 16

Select IDE CDROM on the edit window of the Virtual Machine and click Connect.

Step 17

Navigate to dcnm-va.iso and click OK.

Step 18

Select both the NICs and assign appropriate networks that are created.

Step 19

Power on the Virtual Machine.

Note 
Before you power on the VM, ensure that you have reserved appropriate resources for the VM, such as CPU and memory, based on the chosen deployment configuration.

The operating system is installed.

Step 20

On the Cisco Management Network Management screen, select the interface for the networks. The list of available interfaces is displayed on the screen.

Choose the Management Interface (eth0) and Out-of-Band interface (eth1) from the Network Interface List. You can also configure in-band interface (eth2) if necessary.

Note 

If you do not configure in-band interface (eth2), Endpoint Locator and Telemetry features are not operational.

However, you can configure the network after installation, if required. For more information, see Configuring Enhanced-Fabric-Inband Interface (eth2) Post DCNM Installation.

Step 21

Press y to confirm and continue with the installation.

Step 22

Configure the Management Network. Enter the IP address, Subnet Mask, and Gateway. Press y to continue with the installation.

After the installation is complete, the system reboots and a message indicating that the DCNM appliance is configuring appears on the screen.

***************************************************************
Please point your web browser to
http://<IP-address>:<port-number>
to complete the application
***************************************************************

Copy and paste the URL to the browser to complete the installation using the Web Installer.


What to do next

You can choose to install DCNM in Standalone mode or Native HA mode. Refer to Installing Cisco DCNM ISO in Standalone Mode or Installing the Cisco DCNM ISO in Native HA mode for more information.

Installing Cisco DCNM ISO in Standalone Mode

Paste the URL displayed on the Console tab and hit Enter key. A welcome message appears.

To complete the installation of Cisco DCNM from the web installer, perform the following procedure.

Procedure


Step 1

On the Welcome to Cisco DCNM screen, click Get Started.

Step 2

On the Cisco DCNM Installer screen, select Fresh Installation – Standalone radio button.

Click Continue.

Step 3

On the Administration tab, enter the password that is used to connect to all the applications in the Cisco DCNM Open Virtual Appliance.

Adhere to the following password requirements. If you do not comply with the requirements, the DCNM application may not function properly.

  • It must be at least eight characters long and contain at least one alphabet and one numeral.

  • It can contain a combination of alphabets, numerals, and special characters.

  • Do not use any of these special characters in the DCNM password for all platforms:

    <SPACE> " & $ % ' ^ = < > ; : ` \ | / , .*

Select the Show passwords in clear text checkbox to view the password you have typed.

Click Next.

Step 4

In the Install Mode tab, from the drop-down list, choose LAN Fabric installation mode for the OVA DCNM Appliance.

Click Next.

Step 5

On the System Settings, configure the settings for the DCNM Appliance.

  • In the Fully Qualified Hostname field, enter the hostname that is a fully qualified domain name (FQDN) as per RFC1123, section 2.1.

  • In the DNS Server Address field, enter the DNS IP address.

    Beginning with Release 11.2(1), you can also configure the DNS server using an IPv6 address.

  • In the NTP Server field, enter the IP address of the NTP server.

    The value must be an IP or IPv6 address or RFC 1123 compliant name.

Click Next.

Step 6

On the Network Settings tab, configure the network parameters.

Figure 4. Cisco DCNM Management Network Interfaces
  1. In the Management Network area, verify if the auto-populated IP Address and Default Gateway address are correct. Modify, if necessary.

    Note 
    Beginning with Cisco DCNM Release 11.2(1), you can also use an IPv6 address for the Management Network.

    (Optionally) Enter a valid IPv6 address along with the prefix to configure the Management address and the Management Network Default IPv6 Gateway.

  2. In the Out-of-Band Network area, enter the IP address, gateway IP Address, and DNS server address. If DCNM is on the IPv6 network, configure the network with an IPv6 Address.

    Out-of-band management provides a connection to the device management ports (Typically mgmt0).

    Note 

    If the out-of-band network is not configured, you cannot configure Cisco DCNM in Cluster mode.

  3. In the In-Band Network area, enter the IP Address and gateway IP Address for the in-band network.

    The In-Band Network provides reachability to the devices via the front-panel ports.

    Note 

    If you do not configure in-band network, Endpoint Locator and Telemetry features are not operational.

    However, you can configure the in-band network after installation, if necessary. For more information, see Configuring Enhanced-Fabric-Inband Interface (eth2) Post DCNM Installation.

    Note 
    To modify the already configured in-band network (eth2 interface), execute the ifconfig eth2 0.0.0.0 command and run the appmgr setup inband command again. Refer to Configuring Enhanced-Fabric-Inband Interface (eth2) Post DCNM Installation to run the appmgr setup inband command.
  4. In the Internal Application Services Network area, enter the IP subnet to access the applications that run internally to DCNM.

    All the applications use the IP Address from this subnet.

Click Next.

Step 7

On the Summary tab, review the configuration details.

Click Previous to go to the previous tabs and modify the configuration. Click Start Installation to complete the Cisco DCNM Installation for the chosen deployment mode.

A progress bar appears showing the completed percentage, description of the operation, and the elapsed time during the installation. After the progress bar shows 100%, click Continue.

A success message appears with the URL to access DCNM Web UI.

***************************************************************
Your Cisco Data Center Network Manager software has been installed.
DCNM Web UI is available at
https://<<IP Address>>:2443
You will be redirected there in 60 seconds.
Thank you
***************************************************************
Note 

If the Cisco DCNM is running behind a firewall, ensure that you open the port 2443 to launch Cisco DCNM Web UI.

Note 

If you try to access the DCNM Web UI using the Management IP address while the installation is still in progress, an error message appears on the console.

***************************************
*Preparing Appliance*

***************************************

What to do next

Log on to the DCNM Web UI with appropriate credentials.

Click the Settings icon and choose About DCNM. You can view and verify the Installation type that you have deployed.

If you have configured inband management (eth2) IP addresses for device management, login to standalone server and configure the inband network reachability from eth2 of the server to the switches by using the following commands:
dcnm# appmgr setup inband-route --subnet switches-fabric-links-IP-subnet/mask
dcnm# appmgr setup inband-route --subnet switch-loopback-IP-subnet>/mask
For example: If you have four switches with all fabric links connected through 10.0.0.x/30 subnet, and if all switches are configured with the loopback interface for inband reachability in subnet 40.1.1.0/24, use the following commands:
dcnm# appmgr setup inband-route --subnet 10.0.0.0/24
dcnm# appmgr setup inband-route --subnet 40.1.1.0/24

Installing the Cisco DCNM ISO in Native HA mode

The native HA is supported on DCNM appliances with ISO or OVA installation only.

By default, an embedded PostgreSQL database engine with the Cisco DCNM. The native HA feature allows two Cisco DCNM appliances to run as active and standby applications, with their embedded databases synchronized in real time. Therefore, when the active DCNM is not functioning, the standby DCNM takes over with the same database data and resume the operation.

Perform the following task to set up Native HA for DCNM.

Procedure


Step 1

Deploy two DCNM Virtual Appliances (either OVA or ISO).

For example, let us indicate them as dcnm1 and dcnm2.

Step 2

Configure dcnm1 as the Primary node. Paste the URL displayed on the Console tab of dcnm1 and press Enter key.

A welcome message appears.

  1. On the Welcome to Cisco DCNM screen, click Get Started.

  2. On the Cisco DCNM Installer screen, select Fresh Installation - HA Primary radio button, to install dcnm1 as Primary node.

    Click Continue.

  3. On the Administration tab, enter the password that is used to connect to all the applications in the Cisco DCNM Open Virtual Appliance.

    Adhere to the following password requirements. If you do not comply with the requirements, the DCNM application may not function properly.

    • It must be at least eight characters long and contain at least one alphabet and one numeral.

    • It can contain a combination of alphabets, numerals, and special characters.

    • Do not use any of these special characters in the DCNM password for Linux, Windows, OVA, and ISO platforms:

      <SPACE> " & $ % ' ^ = < > ; : ` \ | / , .*

    Select the Show passwords in clear text checkbox to view the password you have typed.

    Click Next.

  4. In the Install Mode tab, from the drop-down list, choose LAN Fabric installation mode for the DCNM Appliance.

    Click Next.

  5. On the System Settings, configure the settings for the DCNM Appliance.

    • In the Fully Qualified Hostname field, enter the hostname that is a fully qualified domain name (FQDN) as per RFC1123, section 2.1.

    • In the DNS Server Address field, enter the DNS IP address.

      Beginning with Release 11.2(1), you can also configure the DNS server using an IPv6 address.

    • In the NTP Server field, enter the IP address of the NTP server.

      The value must be an IP or IPv6 address or RFC 1123 compliant name.

    Click Next.

  6. On the Network Settings tab, configure the network parameters.

    Figure 5. Cisco DCNM Management Network Interfaces
    • In the Management Network area, verify is the auto-populated IP Address and Default gateway address are correct. Modify, if necessary.

      Note 
      Beginning with Cisco DCNM Release 11.2(1), you can also use an IPv6 address for the Management Network.

      (Optionally) Enter a valid IPv6 address along with the prefix to configure the Management address and the Management Network Default IPv6 Gateway.

    • In the Out-of-Band Network area, enter the IP address, gateway IP Address, and DNS server address. If DCNM is on the IPv6 network, configure the network with an IPv6 Address.

      Out-of-band management provides a connection to the device management ports (Typically mgmt0).

      Note 

      If the out-of-band network is not configured, you cannot configure Cisco DCNM in Cluster mode.

    • In the In-Band Network area, enter the VIP Address and gateway IP Address for the in-band network. The In-Band Network provides reachability to the devices via the front-panel ports.

      Note 

      If you do not configure in-band network, Endpoint Locator and Telemetry features are not operational.

      However, you can configure the in-band network after installation, if necessary. For more information, see Configuring Enhanced-Fabric-Inband Interface (eth2) Post DCNM Installation.

      Note 
      To modify the already configured in-band network (eth2 interface), execute the ifconfig eth2 0.0.0.0 command and run the appmgr setup inband command again. Refer to Configuring Enhanced-Fabric-Inband Interface (eth2) Post DCNM Installation to run the appmgr setup inband command
    • In the Internal Application Services Network area, enter the IP subnet to access the applications that run internally to DCNM.

      All the applications use the IP Address from this subnet.

      Note 

      Ensure that you configure the same IP subnet on both the Primary HA and the Secondary HA node.

    Click Next.

  7. On the HA Settings tab, a confirmation message appears.

    You are installing the primary DCNM HA node.
    Please note that HA setup information will need to
    be provided when the secondary DCNM HA node is
    installed.

    Click Next.

  8. On the Summary tab, review the configuration details.

    Click Previous to go to the previous tabs and modify the configuration. Click Start Installation to complete the Cisco DCNM Installation for the chosen deployment mode.

    A progress bar appears to show the completed percentage, description of the operation, and the elapsed time during the installation. After the progress bar shows 100%, click Continue.

    A warning message appears stating that the setup is not complete until you install the Secondary node.

    WARNING: DCNM HA SETUP IS NOT COMPLETE!
    Your Cisco Data Center Network Manager software has been installed on
    this HA primary node.
    However, the system will be ready to be used only after installation
    of the secondary node has been completed.
    Thank you.
Step 3

Configure dcnm2 as the Secondary node. Paste the URL displayed on the Console tab of dcnm2 and hit Enter.

A welcome message appears.

  1. On the Welcome to Cisco DCNM screen, click Get Started.

  2. On the Cisco DCNM Installer screen, select Fresh Installation - HA Secondary radio button, to install dcnm2 as Secondary node.

    Click Continue.

  3. On the Administration tab, enter the password that is used to connect to all the applications in the Cisco DCNM Open Virtual Appliance.

    Note 

    The password for the secondary node must be the same as the Administrative password for primary, as entered in Step 2.c.

    Click Next.

  4. In the Install Mode tab, from the drop-down list, choose the same installation mode that you selected for the Primary node.

    Note 
    The HA installation fails if you do not choose the same installation mode as Primary node.

    Click Next.

  5. On the System Settings, configure the settings for the DCNM Appliance.

    • In the Fully Qualified Hostname field, enter the hostname that is a fully qualified domain name (FQDN) as per RFC1123, section 2.1.

    • In the DNS Server Address field, enter the DNS IP address.

      Beginning with Release 11.2(1), you can also configure the DNS server using an IPv6 address.

    • In the NTP Server field, enter the IP address of the NTP server.

      The value must be an IP or IPv6 address or RFC 1123 compliant name.

    Click Next.

  6. On the Network Settings tab, configure the network parameters.

    Figure 6. Cisco DCNM Management Network Interfaces
    • In the Management Network area, verify is the auto-populated IP Address and Default gateway address are correct. Modify, if necessary.

      Note 

      Ensure that the IP Address belongs to the same Management Network as configured on the Primary node for HA setup to complete successfully.

      Note 
      Beginning with Cisco DCNM Release 11.2(1), you can also use an IPv6 address for the Management Network.

      (Optionally) Enter a valid IPv6 address along with the prefix to configure the Management address and the Management Network Default IPv6 Gateway.

    • In the Out-of-Band Network area, enter the IP address, gateway IP Address, and DNS server address. If DCNM is on the IPv6 network, configure the network with an IPv6 Address.

      Out-of-band management provides a connection to the device management ports (Typically mgmt0).

      Note 

      Ensure that the IP Address, IP address gateway, and the IPv6 address belong to the same Out-of-Band Network as configured on the Primary node for HA setup to complete successfully.

      Note 

      If the out-of-band network is not configured, you cannot configure Cisco DCNM in Cluster mode.

      You can also configure an IPv6 address for out-of-band management network.

    • In the In-Band Network area, enter the IP Address and gateway IP Address for the in-band network. The In-Band Network provides reachability to the devices via the front-panel ports.

      Note 

      If you do not configure in-band network, Endpoint Locator and Telemetry features are not operational.

      However, you can configure the in-band network after installation, if necessary. For more information, see Configuring Enhanced-Fabric-Inband Interface (eth2) Post DCNM Installation.

    • In the Internal Application Services Network area, enter the IP subnet to access the applications that run internally to DCNM.

      All the applications use the IP Address from this subnet.

      Note 

      Ensure that you configure the same IP subnet on both the Primary HA and the Secondary HA node.

    Click Next.

  7. On the HA Settings tab, configure the system settings..

    • In the Management IP Address of primary DCNM node field, enter the appropriate IP Address to access the DCNM UI.

    • In the VIP Fully qualified Host Name field, enter hostname that is a fully qualified domain name (FQDN) as per RFC1123, section 2.1.

    • Enter the Management Network VIP address, VIPv6 address, and OOB Network VIP address appropriately.

      Note 
      If you have configured the Management network using IPv6 address, ensure that you configure the Management Network VIPv6 Address.
    • Enter OOB Network VIPv6 Address to configure IPv6 address for VIP.

    • In the In-Band Network area, enter the VIP Address for the in-band network.

      This is the VIP address for the In-Band network. This field is mandatory if you have provided an IP address for In-Band network in the Network Settings tab.

    • Enter the HA ping IP address if necessary.

      HA_PING_ADDRESS, must be different from the DCNM Active and Standby addresses.

      You must configure the HA ping IP Address to avoid the Split Brain scenario. This address must belong to Enhanced Fabric management network.

    Click Next.

  8. On the Summary tab, review the configuration details.

    Click Previous to go to the previous tabs and modify the configuration. Click Start Installation to complete the Cisco DCNM OVA Installation for the chosen deployment mode.

    A progress bar appears to show the completed percentage, description of the operation, and the elapsed time during the installation. After the progress bar shows 100%, click Continue.

    A success message appears with the URL to access DCNM Web UI.

    ***************************************************************
    Your Cisco Data Center Network Manager software has been installed.
    DCNM Web UI is available at
    https://<<IP Address>>:2443
    You will be redirected there in 60 seconds.
    Thank you
    ***************************************************************
    Note 

    If the Cisco DCNM is running behind a firewall, ensure that you open the port 2443 to launch Cisco DCNM Web UI.


What to do next

Log on to the DCNM Web UI with appropriate credentials.

Click the Settings icon and choose About DCNM. You can view and verify the Installation type that you have deployed.

If you have configured inband management (eth2) IP addresses for device management, login to standalone server and configure the inband network reachability from eth2 of the server to the switches by using the following commands:
dcnm# appmgr setup inband-route --subnet switches-fabric-links-IP-subnet/mask
dcnm# appmgr setup inband-route --subnet switch-loopback-IP-subnet>/mask
For example: If you have four switches with all fabric links connected through 10.0.0.x/30 subnet, and if all switches are configured with the loopback interface for inband reachability in subnet 40.1.1.0/24, use the following commands:
dcnm# appmgr setup inband-route --subnet 10.0.0.0/24
dcnm# appmgr setup inband-route --subnet 40.1.1.0/24

Installing Cisco DCNM Compute Node

Paste the URL displayed on the Console tab and hit Enter key. A welcome message appears.


Note

Compute nodes allows users to scale DCNM, as application load can be shared across all the compute nodes, instead of the usual 1 or 2 (if you have HA) nodes.

Note

If Enable Clustered Mode was selected during DCNM installation, applications such as, Config Compliance, EPL, NIA, and NIR won’t work until you install the compute nodes.


To complete the installation of Cisco DCNM Compute Node from the web installer, perform the following procedure.

Before you begin

Ensure that you have 16 vCPUs, 64GB RAM, and 500GB hard disc to install compute node.

Procedure


Step 1

On the Welcome to Cisco DCNM screen, click Get Started.

Step 2

On the Cisco DCNM Installer screen, select the Fresh Installation – Standalone radio button.

Click Continue.

Step 3

On the Administration tab, enter the password that is used to connect to all the applications in the Cisco DCNM Open Virtual Appliance.

Adhere to the following password requirements. If you don’t comply with the requirements, the DCNM application may not function properly.

  • It must be at least eight characters long and contain at least one alphabet and one numeral.

  • It can contain a combination of alphabets, numerals, and special characters.

  • Don’t use any of these special characters in the DCNM password for all platforms:

    <SPACE> " & $ % ' ^ = < > ; : ` \ | / , .*

Select the Show passwords in clear text checkbox to view the password you have typed.

Click Next.

Step 4

In the Install Mode tab, from the drop-down list, choose Compute to deploy a DCNM Compute node.

Click Next.

Step 5

On the System Settings, configure the settings for the DCNM Compute node.

  • In the Fully Qualified Hostname field, enter the hostname that is a fully qualified domain name (FQDN) as per RFC1123, section 2.1.

  • In the DNS Server Address field, enter the DNS IP address.

  • In the NTP Server field, enter the IP address of the NTP server.

    The value must be an IP address or RFC 1123 compliant name.

  • In the DCNM Server IP address field, enter the IP address that is assigned to the DCNM Server on the Management Network.

    Note 

    If you are installing Compute node on a Cisco DCNM Native HA setup, enter the VIP address.

Click Next.

Step 6

On the Network Settings tab, configure the network parameters.

Figure 7. Cisco DCNM Management Network Interfaces
  1. In the Management Network area, verify is the autopopulated IP Address and Default gateway address are correct. Modify, if necessary.

    (Optionally) Enter a valid IPv6 address along with the prefix to configure the Management address and the Management Network Default IPv6 Gateway.

  2. In the Out-of-Band Network area, enter the IP address, gateway IP Address, and DNS server address. If DCNM is on the IPv6 network, configure the IP Address.

    Out-of-band management provides a connection to the device management ports (Typically mgmt0).

  3. (Optional) In the In-Band Network area, enter the IP Address and gateway IP Address for the in-band network.

    The In-Band Network provides reachability to the devices via the front-panel ports.

    Note 

    If you don’t configure in-band network, Endpoint Locator and Telemetry features aren’t operational.

    However, you can configure the in-band network after installation, if necessary. For more information, see Configuring Enhanced-Fabric-Inband Interface (eth2) Post DCNM Installation.

Click Next.
Step 7

In the Applications tab, in the Internal Application Services Network area, enter the IP subnet to access the applications that run internally to DCNM.

All the applications use the IP Address from this subnet.

Note 

You must configure the same subnet across all nodes of the cluster.

Click Next.

Step 8

On the Summary tab, review the configuration details.

Click Previous to go to the previous tabs and modify the configuration. Click Start Installation to complete the Cisco DCNM Installation for the chosen deployment mode.

A progress bar appears to show the completed percentage, description of the operation, and the elapsed time during the installation. After the progress bar shows 100%, click Continue.

A success message appears with the URL to access DCNM Compute Node.

***************************************************************
Your Cisco DCNM Compute Node has been installed.
Click on the following link to go to DCNM GUI's Application page:
DCNM GUI's Applications
You will be redirected there in 60 seconds.
Thank you
***************************************************************
Step 9

Logon to the compute node via SSH, using sysadmin@<dcnm-compute-eth0-ip-address> .

Step 10

Run the sudo reboot command to ensure that this compute node joins the Cluster in a fully initialized state.

dcnm-compute# sudo reboot

After reboot, verify if you can SSH into the compute node using sysadmin@<dcnm-compute-eth0-ip-address> .


What to do next

Log on to the DCNM Web UI with appropriate credentials.

The Applications tab displays all the services running on the DCNM deployment that you have installed. Click Compute tab to view the new Compute in Discovered state on the Cisco DCNM Web UI.

Refer to the Applications chapter in your deployment-specific Cisco DCNM Configuration Guide for more information.

To set up compute cluster and to deploy applications, refer to the Deploying Applications in Clustered Mode in your Cisco DCNM Configuration Guide for your deployment.