Editing Network Properties Post DCNM Installation
The Cisco DCNM OVA or the ISO installation consists of 3 network interfaces:
-
dcnm-mgmt network (eth0) interface
This network provides connectivity (SSH, SCP, HTTP, HTTPS) to the Cisco DCNM Open Virtual Appliance. Associate this network with the port group that corresponds to the subnet that is associated with the DCNM Management network.
-
enhanced-fabric-mgmt (eth1) interface
This network provides enhanced fabric management of Nexus switches. Associate this network with the port group that corresponds to management network of leaf and spine switches.
-
enhanced-fabric-inband (eth2) interface
This network provides in-band connection to fabric. Associate this network with the port group that corresponds to a fabric in-band connection.
The following figure shows the network diagram for the Cisco DCNM Management interfaces.
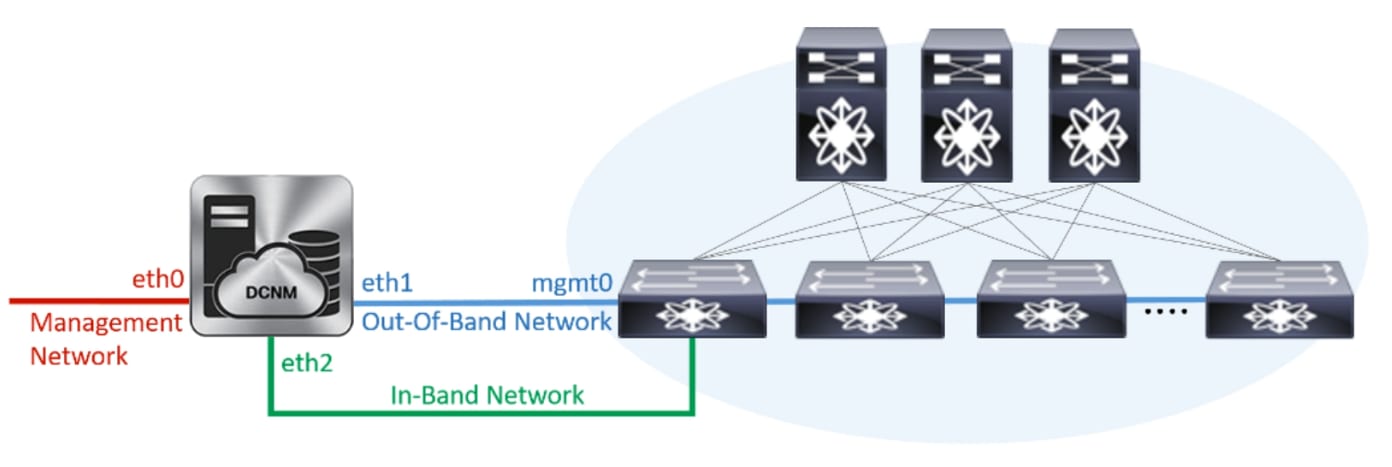
During Cisco DCNM installation for your deployment type, you can configure these interfaces. However, from Cisco DCNM Release 11.2(1), you can edit and modify the network settings post installation.
You can modify the parameters as explained in the following sections:
Modifying Network Interfaces (eth0 and eth1) Post DCNM Installation
Along with the eth0 and eth1 IP address (IPv4 and\or IPv6), you can also modify the DNS and the NTP server configuration using the appmgr update network-properties command.
For step-by-step instructions on how to modify the network parameters using the appmgr update network-properties commands, see the following sections.
-
Modifying Network Properties on DCNM in Standalone Mode
Sample Command Output for Modifying Network Parameters in the Cisco DCNM Standalone Setup
-
Modifying Network Properties on DCNM in Native HA Mode
Sample Command Output for Modifying Network Parameters in the Cisco DCNM Native HA Setup
Modifying Network Properties on DCNM in Standalone Mode
The following sample shows the output for the appmgr update network-properties command for a Cisco DCNM Standalone Appliance.
 Note |
Execute the following commands on the DCNM Appliance console to avoid a premature session timeout. |
-
Initiate a session on the console, using the following command:
appmgr update network-properties session start
-
Update the Network Properties using the following command:
appmgr update network-properties set ipv4 {eth0|eth1} <ipv4-address> <network-mask> <gateway>
Enter the new IPv4 address for the Management (eth0) interface, along with the subnet mask and gateway IP addresses.
-
View and verify the changes by using the following command:
appmgr update network-properties session show {config | changes | diffs}
-
After you validate the changes, apply the configuration using the following command:
appmgr update network-properties session applyWait for a few minutes before you can logon to the Cisco DCNM Web UI using the eth0 Management Network IP address.
Sample Command Output for Modifying Network Parameters in the Cisco DCNM Standalone Setup
The following sample example shows how to modify the network parameters post installation for a Cisco DCNM Standalone setup.
dcnm# appmgr update network-properties session start

dcnm# appmgr update network-properties set ipv4 eth0 172.28.10.244 255.255.255.0 172.28.10.1
dcnm# appmgr update network-properties set ipv4 eth1 100.0.0.244 255.0.0.0
*****************************************************************
 WARNING: fabric/poap configuration may need to be changed
 manually after changes are applied.
*****************************************************************

dcnm# appmgr update network-properties session show changes
eth0 IPv4 addr  172.28.10.246/255.255.255.0  ->  172.28.10.244/255.255.255.0
eth1 IPv4 addr  1.0.0.246/255.0.0.0          ->  100.0.0.244/255.0.0.0

dcnm# appmgr update network-properties session apply
*********************************************************************
                           WARNING

Applications of both nodes of the DCNM HA system need to be stopped
for the changes to be applied properly.

            PLEASE STOP ALL APPLICATIONS MANUALLY
*********************************************************************

Have applications been stopped? [y/n]: y
Applying changes
DELETE 1
Node left the swarm.
Server configuration file loaded: /usr/local/cisco/dcm/fm//conf/server.properties
log4j:WARN No appenders could be found for logger (fms.db).
log4j:WARN Please initialize the log4j system properly.
log4j:WARN See http://logging.apache.org/log4j/1.2/faq.html#noconfig for more info.
UPDATE 1
UPDATE 1
DELETE 1
server signaled
INFO      : [ipv6_wait_tentative] Waiting for interface eth0 IPv6 address(es) to leave the 'tentative' state
INFO      : [ipv6_wait_tentative] Waiting for interface eth0 IPv6 address(es) to leave the 'tentative' state
**********************************************************************
Please run 'appmgr start afw; appmgr start all' to restart your nodes.
**********************************************************************

dcnm# appmgr start afw; appmgr start all
Started AFW Server Processes
Started AFW Agent Processes
Started AFW Server Processes
Started AFW Agent Processes
Started applications managed by heartbeat..
Check the status using 'appmgr status all'
Starting High-Availability services: INFO:  Resource is stopped
Done.

Warning: PID file not written; -detached was passed.
AMQP User Check
Started AFW Server Processes
Started AFW Agent Processes
dcnm#
Modifying Network Properties on DCNM in Native HA Mode
The following sample shows output to modify the network parameters using the appmgr update network-properties command for a Cisco DCNM Native HA Appliance.
Note |
|
-
Stop the DCNM Applications on the Standby node by using the following command:
appmgr stop allWait until all the applications stop on the Standby node before you go proceed.
-
Stop the DCNM Applications on the Active node by using the following command:
appmgr stop all
-
Initiate a session on the Cisco DCNM console of both the Active and Standby nodes by using the following command:
appmgr update network-properties session start -
On the Active node, modify the network interface parameters by using the following commands:
-
Configure the IP address for eth0 and eth1 address by using the following command:
appmgr update network-properties set ipv4 {eth0|eth1} <ipv4-address> <network-mask> <gateway>
Enter the new IPv4 or IPv6 address for the eth1 interface, along with the subnet mask and gateway IP addresses.
-
Configure the VIP IP address by using the following command:
appmgr update network-properties set ipv4 {vip0|vip1} <ipv4-address> <network-mask>
Enter the vip0 address for eth0 interface. Enter the vip1 address for eth1 interface.
-
Configure the peer IP address by using the following command:
appmgr update network-properties set ipv4 {peer0|peer1} <ipv4-address>
Enter the eth0 address of the Standby node as peer0 address for Active node. Enter the eth1 address of the Standby node as peer1 address for Active node.
-
View and validate the changes that you have made to the network parameters by using the following command:
appmgr update network-properties session show {config | changes | diffs}
View the changes that you have configured by using the following command:
-
-
On the Standby node, modify the network interface parameters using the commands described in Step 4.
-
After you validate the changes, apply the configuration on the Active node by using the following command:
appmgr update network-properties session applyWait until the prompt returns, to confirm that the network parameters are updated.
-
After you validate the changes, apply the configuration on the Standby node by using the following command:
appmgr update network-properties session apply -
Start all the applications on the Active node by using the following command:
appmgr start all
Note
Wait until all the applications are running successfully on the Active node, before proceeding to the next step.
-
Start all the applications on the Standby node by using the following command:
appmgr start all
-
Establish peer trust key on the Active node by using the following command:
appmgr update ssh-peer-trust -
Establish peer trust key on the Standby node by using the following command:
appmgr update ssh-peer-trust
Sample Command Output for Modifying Network Parameters in the Cisco DCNM Native HA Setup
The following sample example shows how to modify the network parameters post installation for a Cisco DCNM Native HA setup.
Note |
For example, let us indicate Active and Standby appliances as dcnm1 and dcnm2 respectively. |
[root@dcnm2]# appmgr stop all
Stopping AFW Applications...
Stopping AFW Server Processes
Stopping AFW Agent Processes
Stopped Application Framework...
Stopping High-Availability services: Done.

Stopping and halting node rabbit@dcnm2 ...
Note: Forwarding request to 'systemctl enable rabbitmq-server.service'.
Stopping AFW Applications...
Stopping AFW Server Processes
Stopping AFW Agent Processes
Stopped Application Framework...
[root@dcnm2]#

[root@dcnm1]# appmgr stop all
Stopping AFW Applications...
Stopping AFW Server Processes
Stopping AFW Agent Processes
Stopped Application Framework...
Stopping High-Availability services: Done.

Stopping and halting node rabbit@dcnm1 ...
Note: Forwarding request to 'systemctl enable rabbitmq-server.service'.
Stopping AFW Applications...
Stopping AFW Server Processes
Stopping AFW Agent Processes
Stopped Application Framework...
[root@dcnm1]#

[root@dcnm1]# appmgr update network-properties session start
[root@dcnm2]# appmgr update network-properties session start

[root@dcnm1]# appmgr update network-properties set ipv4 eth0 172.28.10.244 255.255.255.0 172.28.10.1
[root@dcnm1]# appmgr update network-properties set ipv4 eth1 100.0.0.244 255.0.0.0
*****************************************************************
 WARNING: fabric/poap configuration may need to be changed
 manually after changes are applied.
*****************************************************************
[root@dcnm1]# appmgr update network-properties set ipv4 vip0 172.28.10.238 255.255.255.0
[root@dcnm1]# appmgr update network-properties set ipv4 vip1 100.0.0.238 255.0.0.0
[root@dcnm1]# appmgr update network-properties set ipv4 peer0 172.28.10.245
[root@dcnm1]# appmgr update network-properties set ipv4 peer1 100.0.0.245
[root@dcnm1]# appmgr update network-properties session show changes

[root@dcnm2]# appmgr update network-properties set ipv4 eth0 172.28.10.245 255.255.255.0 172.28.10.1
[root@dcnm2]# appmgr update network-properties set ipv4 eth1 100.0.0.245 255.0.0.0
*****************************************************************
 WARNING: fabric/poap configuration may need to be changed
 manually after changes are applied.
*****************************************************************
[root@dcnm2]# appmgr update network-properties set ipv4 vip0 172.28.10.238 255.255.255.0
[root@dcnm2]# appmgr update network-properties set ipv4 vip1 100.0.0.238 255.0.0.0
[root@dcnm2]# appmgr update network-properties set ipv4 peer0 172.28.10.244
[root@dcnm2]# appmgr update network-properties set ipv4 peer1 100.0.0.244
[root@dcnm2]# appmgr update network-properties session show changes

[root@dcnm1]# appmgr update network-properties session show changes
eth0 IPv4 addr  172.28.10.246/255.255.255.0  ->  172.28.10.244/255.255.255.0
eth1 IPv4 addr  1.0.0.246/255.0.0.0          ->  100.0.0.244/255.0.0.0
eth0 VIP        172.28.10.248/24             ->  172.28.10.238/24
eth1 VIP        1.0.0.248/8                  ->  100.0.0.238/8
Peer eth0 IP    172.28.10.247                ->  172.28.10.245
Peer eth1 IP    1.0.0.245                    ->  100.0.0.245

[root@dcnm1]# appmgr update network-properties session show config
======= Current configuration ======
NTP Server      1.ntp.esl.cisco.com
eth0 IPv4 addr  172.28.10.246/255.255.255.0
eth0 IPv4 GW    172.28.10.1
eth0 DNS        171.70.168.183
eth0 IPv6 addr  2001:420:284:2004:4:112:210:20/112
eth0 IPv6 GW    2001:420:284:2004:4:112:210:1
eth1 IPv4 addr  1.0.0.246/255.0.0.0
eth1 IPv4 GW
eth1 DNS        1.0.0.246
eth1 IPv6 addr
eth2 IPv4 addr  /
eth2 IPv4 GW
Peer eth0 IP    172.28.10.247
Peer eth1 IP    1.0.0.247
Peer eth2 IP
eth0 VIP        172.28.10.248/24
eth1 VIP        1.0.0.248/8
eth2 VIP        /
eth0 VIPv6      /
eth1 VIPv6      /

====== Session configuration ======
NTP Server      1.ntp.esl.cisco.com
eth0 IPv4 addr  172.28.10.244/255.255.255.0
eth0 IPv4 GW    172.28.10.1
eth0 DNS        171.70.168.183
eth0 IPv6 addr  2001:420:284:2004:4:112:210:20/112
eth0 IPv6 GW    2001:420:284:2004:4:112:210:1
eth1 IPv4 addr  100.0.0.244/255.0.0.0
eth1 IPv4 GW
eth1 DNS        1.0.0.246
eth1 IPv6 addr
eth2 IPv4 addr  /
eth2 IPv4 GW
Peer eth0 IP    172.28.10.245
Peer eth1 IP    100.0.0.245
Peer eth2 IP
eth0 VIP        172.28.10.238/24
eth1 VIP        100.0.0.238/8
eth2 VIP        /
eth0 VIPv6      /
eth1 VIPv6      /
[root@dcnm1]#

[root@dcnm2]# appmgr update network-properties session show config
======= Current configuration ======
NTP Server      1.ntp.esl.cisco.com
eth0 IPv4 addr  172.28.10.247/255.255.255.0
eth0 IPv4 GW    172.28.10.1
eth0 DNS        171.70.168.183
eth0 IPv6 addr
eth0 IPv6 GW
eth1 IPv4 addr  1.0.0.247/255.0.0.0
eth1 IPv4 GW
eth1 DNS        1.0.0.247
eth1 IPv6 addr
eth2 IPv4 addr  /
eth2 IPv4 GW
Peer eth0 IP    172.28.10.246
Peer eth1 IP    1.0.0.246
Peer eth2 IP
eth0 VIP        172.28.10.248/24
eth1 VIP        1.0.0.248/8
eth2 VIP        /
eth0 VIPv6      /
eth1 VIPv6      /

====== Session configuration ======
NTP Server      1.ntp.esl.cisco.com
eth0 IPv4 addr  172.28.10.245/255.255.255.0
eth0 IPv4 GW    172.28.10.1
eth0 DNS        171.70.168.183
eth0 IPv6 addr
eth0 IPv6 GW
eth1 IPv4 addr  100.0.0.245/255.0.0.0
eth1 IPv4 GW
eth1 DNS        1.0.0.247
eth1 IPv6 addr
eth2 IPv4 addr  /
eth2 IPv4 GW
Peer eth0 IP    172.28.10.244
Peer eth1 IP    100.0.0.244
Peer eth2 IP
eth0 VIP        172.28.10.238/24
eth1 VIP        100.0.0.238/8
eth2 VIP        /
eth0 VIPv6      /
eth1 VIPv6      /
[root@dcnm2]#

[root@dcnm1]# appmgr update network-properties session apply
*********************************************************************
                           WARNING

Applications of both nodes of the DCNM HA system need to be stopped
for the changes to be applied properly.

            PLEASE STOP ALL APPLICATIONS MANUALLY
*********************************************************************

Have applications been stopped? [y/n]: y
Applying changes
DELETE 1
Node left the swarm.
Server configuration file loaded: /usr/local/cisco/dcm/fm//conf/server.properties
log4j:WARN No appenders could be found for logger (fms.db).
log4j:WARN Please initialize the log4j system properly.
log4j:WARN See http://logging.apache.org/log4j/1.2/faq.html#noconfig for more info.
UPDATE 1
UPDATE 1
DELETE 1
server signaled
INFO      : [ipv6_wait_tentative] Waiting for interface eth0 IPv6 address(es) to leave the 'tentative' state
INFO      : [ipv6_wait_tentative] Waiting for interface eth0 IPv6 address(es) to leave the 'tentative' state
**********************************************************************
Please run 'appmgr start afw; appmgr start all' to restart your nodes.
**********************************************************************
*********************************************************************
Please run 'appmgr update ssh-peer-trust' on the peer node.
*********************************************************************
[root@dcnm1]#

[root@dcnm2]# appmgr update network-properties session apply
*********************************************************************
                           WARNING

Applications of both nodes of the DCNM HA system need to be stopped
for the changes to be applied properly.

            PLEASE STOP ALL APPLICATIONS MANUALLY
*********************************************************************

Have applications been stopped? [y/n]: y
Applying changes
DELETE 1
Node left the swarm.
Server configuration file loaded: /usr/local/cisco/dcm/fm//conf/server.properties
log4j:WARN No appenders could be found for logger (fms.db).
log4j:WARN Please initialize the log4j system properly.
log4j:WARN See http://logging.apache.org/log4j/1.2/faq.html#noconfig for more info.
UPDATE 1
UPDATE 1
DELETE 1
afwnetplugin:0.1
server signaled
**********************************************************************
Please run 'appmgr start afw; appmgr start all' to restart your nodes.
**********************************************************************
*********************************************************************
Please run 'appmgr update ssh-peer-trust' on the peer node.
*********************************************************************
[root@dcnm2]#

[root@dcnm1]# appmgr start afw; appmgr start all
Started AFW Server Processes
Started AFW Agent Processes
Started AFW Server Processes
Started AFW Agent Processes
Started applications managed by heartbeat..
Check the status using 'appmgr status all'
Starting High-Availability services: INFO:  Resource is stopped
Done.

Warning: PID file not written; -detached was passed.
AMQP User Check
Started AFW Server Processes
Started AFW Agent Processes
[root@dcnm1]#

Wait until dcnm1 becomes active again.

[root@dcnm2]# appmgr start afw; appmgr start all
Started AFW Server Processes
Started AFW Agent Processes
Started AFW Server Processes
Started AFW Agent Processes
Started applications managed by heartbeat..
Check the status using 'appmgr status all'
Starting High-Availability services: INFO:  Resource is stopped
Done.

Warning: PID file not written; -detached was passed.
AMQP User Check
Started AFW Server Processes
Started AFW Agent Processes
[root@dcnm2]#

[root@dcnm1]# appmgr update ssh-peer-trust
/usr/bin/ssh-copy-id: INFO: Source of key(s) to be installed: "/root/.ssh/id_rsa.pub"
Number of key(s) added: 1

Now try logging into the machine, with:   "ssh -o 'StrictHostKeyChecking=no' '172.28.10.245'"
and check to make sure that only the key(s) you wanted were added.
/usr/bin/ssh-copy-id: INFO: Source of key(s) to be installed: "/root/.ssh/id_rsa.pub"
Number of key(s) added: 1

Now try logging into the machine, with:   "ssh -o 'StrictHostKeyChecking=no' '100.0.0.245'"
and check to make sure that only the key(s) you wanted were added.
/usr/bin/ssh-copy-id: INFO: Source of key(s) to be installed: "/root/.ssh/id_rsa.pub"
Number of key(s) added: 1
Now try logging into the machine, with:   "ssh -o 'StrictHostKeyChecking=no' 'dcnm-247.cisco.com'"
and check to make sure that only the key(s) you wanted were added.
[root@dcnm1]#

[root@dcnm2]# appmgr update ssh-peer-trust
/usr/bin/ssh-copy-id: INFO: Source of key(s) to be installed: "/root/.ssh/id_rsa.pub"
Number of key(s) added: 1

Now try logging into the machine, with:   "ssh -o 'StrictHostKeyChecking=no' '172.28.10.244'"
and check to make sure that only the key(s) you wanted were added.
/usr/bin/ssh-copy-id: INFO: Source of key(s) to be installed: "/root/.ssh/id_rsa.pub"
Number of key(s) added: 1

Now try logging into the machine, with:   "ssh -o 'StrictHostKeyChecking=no' '100.0.0.244'"
and check to make sure that only the key(s) you wanted were added.
/usr/bin/ssh-copy-id: INFO: Source of key(s) to be installed: "/root/.ssh/id_rsa.pub"
Number of key(s) added: 1

Now try logging into the machine, with:   "ssh -o 'StrictHostKeyChecking=no' 'dcnm-246.cisco.com'"
and check to make sure that only the key(s) you wanted were added.
[root@dcnm2]#
Configuring Enhanced-Fabric-Inband Interface (eth2) Post DCNM Installation
During the DCNM installation, you can configure the In-Band Management interface. You must associate this network with the port group that corresponds to a fabric in-band connection. The In-Band Network provides reachability to the devices via the front-panel ports.
Note |
If you need to modify the already configured in-band network (eth2 interface), execute the ifconfig eth2 0.0.0.0 command and run the appmgr setup inband command again. |
Note |
You cannot use Endpoint Locator and Telemetry features if the eth2 interface is not configured. |
To configure the eth2 interface for the in-band management network, use the appmgr setup inband command.
The following example shows a sample output for the appmgr setup inband command for a Cisco DCNM Standalone Appliance.
[root@dcnm]# appmgr setup inband
Configuring Interface for InBand Connectivity...
Please enter the information as prompted:
InBand Physical IP [e.g. 2.2.2.69]: 2.0.0.250
InBand Network Mask [e.g. 255.255.255.0]: 255.0.0.0
InBand Gateway [e.g. 2.2.2.1]: 2.0.0.1
Validating Inputs ...

You have entered these values..
PIP=2.0.0.250
NETMASK=255.0.0.0
GATEWAY=2.0.0.1

Press 'y' to continue configuration, 'n' to discontinue [y] y
{"ResponseType":0,"Response":"Refreshed"}
{"ResponseType":0,"Response":{"AfwServerEnabled":true,"AfwServerReady":true,"InbandSubnet":"2.0.0.0/8",
"InbandGateway":"2.0.0.1","OutbandSubnet":"0.0.0.0/8","OutbandGateway":"0.0.0.0","UnclusteredMode":true}}

Done.
[root@dcnm]#
The following example shows a sample output for the appmgr setup inband command for a Cisco DCNM Native HA Appliance.
On Cisco DCNM Primary appliance:
[root@dcnm-primary]# appmgr setup inband
Configuring Interface for InBand Connectivity...
Please enter the information as prompted:
InBand Physical IP [e.g. 2.2.2.69]: 2.0.0.244
InBand Network Mask [e.g. 255.255.255.0]: 255.0.0.0
InBand Gateway [e.g. 2.2.2.1]: 2.0.0.1
InBand Virtual IP for HA setup [e.g. 2.2.2.60]: 2.0.0.243
InBand Virtual Network Mask [mandatory for HA setup] [e.g. 255.255.255.0]: 255.0.0.0
Peer Inband IP [mandatory for HA setup] [e.g. 2.2.2.59]: 2.0.0.244
Validating Inputs ...

You have entered these values..
PIP=2.0.0.244
NETMASK=255.0.0.0
GATEWAY=2.0.0.1
VIP=2.0.0.243
VIP_NETMASK=255.0.0.0
PEER_ETH2=2.0.0.244

Press 'y' to continue configuration, 'n' to discontinue [y] y

Done.
[root@dcnm-primary]#
On Cisco DCNM Secondary appliance:
[root@dcnm-secondary]# appmgr setup inband
Configuring Interface for InBand Connectivity...
Please enter the information as prompted:
InBand Physical IP [e.g. 2.2.2.69]: 2.0.0.245
InBand Network Mask [e.g. 255.255.255.0]: 255.0.0.0
InBand Gateway [e.g. 2.2.2.1]: 2.0.0.1
InBand Virtual IP for HA setup [e.g. 2.2.2.60]: 2.0.0.243
InBand Virtual Network Mask [mandatory for HA setup] [e.g. 255.255.255.0]: 255.0.0.0
Peer Inband IP [mandatory for HA setup] [e.g. 2.2.2.59]: 2.0.0.244
Validating Inputs ...

You have entered these values..
PIP=2.0.0.245
NETMASK=255.0.0.0
GATEWAY=2.0.0.1
VIP=2.0.0.243
VIP_NETMASK=255.0.0.0
PEER_ETH2=2.0.0.244

Press 'y' to continue configuration, 'n' to discontinue [y] y
HA Role is Active {"ResponseType":0,"Response":"Refreshed"}
Done.

[root@dcnm-secondary]#
Changing the DCNM Server Password Post DCNM Installation
The password to access Cisco DCNM Web UI is configured while installing the Cisco DCNM for your deployment type. However, you can modify this password post installation also, if required.
To change the password post installation, perform the following steps:
Procedure
| Step 1 |
Stop the applications using the appmgr stop all command. Wait until all the applications stop running. |
| Step 2 |
Change the password for the management interface by using the appmgr change_pwd ssh {root|poap} [password] command. Ensure that the new password adheres to the following password requirements. If you do not comply with the requirements, the DCNM application might not function properly:
|
| Step 3 |
Start the application using the appmgr start all command. |
 Feedback