Advanced BGP
BGP is an interdomain routing protocol that provides loop-free routing between organizations or autonomous systems. Cisco NX-OS supports BGP version 4. BGP version 4 includes multiprotocol extensions that allow BGP to carry routing information for IP multicast routes and multiple Layer 3 protocol address families. BGP uses TCP as a reliable transport protocol to create TCP sessions with other BGP-enabled devices called BGP peers. When connecting to an external organization, the router creates external BGP (eBGP) peering sessions. BGP peers within the same organization exchange routing information through internal BGP (iBGP) peering sessions.
Beginning with Cisco NX-OS Release 10.5(1)F, Configuring Basic BGP and Configuring Advanced BGP chapters are merged to create Configuring BGP chapter.
Peer templates
BGP peer templates allow you to create blocks of common configuration that you can reuse across similar BGP peers. Each block allows you to define a set of attributes that a peer then inherits. You can choose to override some of the inherited attributes as well, making it a very flexible scheme for simplifying the repetitive nature of BGP configurations.
Cisco NX-OS implements three types of peer templates:
-
The peer-session template: This template defines BGP peer session attributes, such as the transport details, remote autonomous system number of the peer, and session timers. A peer-session template can also inherit attributes from another peer-session template (with locally defined attributes that override the attributes from an inherited peer-session).
-
A peer-policy template: This template defines the address-family dependent policy aspects for a peer including the inbound and outbound policy, filter-lists, and prefix-lists. A peer-policy template can inherit from a set of peer-policy templates. Cisco NX-OS evaluates these peer-policy templates in the order specified by the preference value in the inherit configuration. The lowest number is preferred over higher numbers.
-
The peer template: This template can inherit the peer-session and peer-policy templates to allow for simplified peer definitions. It is not mandatory to use a peer template but it can simplify the BGP configuration by providing reusable blocks of configuration.
Authentication
You can configure authentication for a BGP neighbor session. This authentication method adds an MD5 authentication digest to each TCP segment sent to the neighbor to protect BGP against unauthorized messages and TCP security attacks.
 Note |
The MD5 password must be identical between BGP peers. |
Route Policies and Resetting BGP Sessions
You can associate a route policy to a BGP peer. Route policies use route maps to control or modify the routes that BGP recognizes. You can configure a route policy for inbound or outbound route updates. The route policies can match on different criteria, such as a prefix or AS_path attribute, and selectively accept or deny the routes. Route policies can also modify the path attributes.
When you change a route policy applied to a BGP peer, you must reset the BGP sessions for that peer. Cisco NX-OS supports the following three mechanisms to reset BGP peering sessions:
-
Hard reset—A hard reset tears down the specified peering sessions, including the TCP connection, and deletes routes coming from the specified peer. This option interrupts packet flow through the BGP network. Hard reset is disabled by default.
-
Soft reconfiguration inbound—A soft reconfiguration inbound triggers routing updates for the specified peer without resetting the session. You can use this option if you change an inbound route policy. Soft reconfiguration inbound saves a copy of all routes received from the peer before processing the routes through the inbound route policy. If you change the inbound route policy, Cisco NX-OS passes these stored routes through the modified inbound route policy to update the route table without tearing down existing peering sessions. Soft reconfiguration inbound can use significant memory resources to store the unfiltered BGP routes. Soft reconfiguration inbound is disabled by default.
-
Route Refresh—A route refresh updates the inbound routing tables dynamically by sending route refresh requests to supporting peers when you change an inbound route policy. The remote BGP peer responds with a new copy of its routes that the local BGP speaker processes with the modified route policy. Cisco NX-OS automatically sends an outbound route refresh of prefixes to the peer.
-
BGP peers advertise the route refresh capability as part of the BGP capability negotiation when establishing the BGP peer session. Route refresh is the preferred option and enabled by default.
Note |
BGP also uses route maps for route redistribution, route aggregation, route dampening, and other features. See Configuring Route Policy Manager, for more information on route maps. |
eBGP
External BGP (eBGP) allows you to connect BGP peers from different autonomous systems to exchange routing updates.
Connecting to external networks enables traffic from your network to be forwarded to other networks and across the Internet. Typically eBGP peerings need to be over directly connected interfaces so that convergence will be faster when the interface goes down.
iBGP
Internal BGP (iBGP) is a type of Border Gateway Protocol (BGP) that
-
is used to exchange routing information between BGP peers within the same autonomous system (AS)
-
used within an AS to distribute external routes learned from other ASes (via eBGP) to all routers within that same AS, typically in multihomed BGP networks that have multiple connections to the same external AS
-
ensures all routers have a consistent view of external networks, and
-
enforces routing policies for traffic leaving the AS.
The figure shows an iBGP network within a larger BGP network.
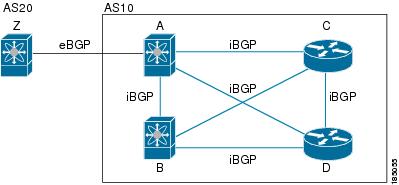
iBGP networks are fully meshed. Each iBGP peer has a direct connection to all other iBGP peers to prevent network loops.
For single-hop iBGP peers with update-source configured under neighbor configuration mode, the peer supports fast external fall-over.
You should use loopback interfaces for establishing iBGP peering sessions because loopback interfaces are less susceptible to interface flapping. An interface flap occurs when the interface is administratively brought up or down because of a failure or maintenance issue. See the Configuring eBGP section for information on multihop, fast external fallovers, and limiting the size of the AS_path attribute.
Note |
You should configure a separate interior gateway protocol in the iBGP network. |
AS confederations
An AS confederation is a BGP architectural technique that divides a large autonomous system (AS) into multiple smaller subautonomous systems, called sub-ASes, which are grouped together to appear as a single AS to external networks. This approach reduces the complexity of a fully meshed iBGP network by limiting the number of iBGP peer connections required within the overall AS.
You can reduce the iBGP mesh by dividing the autonomous system into multiple subautonomous systems and grouping them into a single confederation. A confederation use the same autonomous system number to communicate to external networks. Each subautonomous system is fully meshed within itself and has a few connections to other subautonomous systems in the same confederation.
The figure shows the BGP network, split into two subautonomous systems and one confederation.
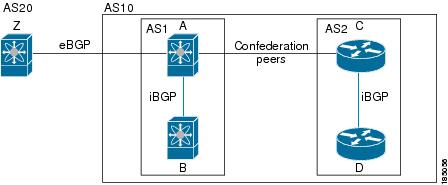
In this example, AS10 is split into two subautonomous systems, AS1 and AS2. Each subautonomous system is fully meshed, but there is only one link between the subautonomous systems. By using AS confederations, you can reduce the number of links compared to the fully meshed autonomous system.
Route reflectors
Route reflectors are a BGP architectural technique that reduces the complexity of a fully meshed iBGP network by allowing certain routers, called route reflectors, to redistribute routes learned from one iBGP peer to other iBGP peers. This eliminates the need for every iBGP peer to be directly connected to every other iBGP peer.
Reflectors pass learned routes to neighbors so that all iBGP peers do not need to be fully meshed.
When you configure an iBGP peer to be a route reflector, it becomes responsible for passing iBGP learned routes to a set of iBGP neighbors sp iBGP peers do not need to be fully meshed.
The figure shows a simple iBGP configuration with four meshed iBGP speakers (routers A, B, C, and D). Without route reflectors, when router A receives a route from an external neighbor, it advertises the route to all three iBGP neighbors.
In the figure, router B is the route reflector. When the route reflector receives routes advertised from router A, it advertises (reflects) the routes to routers C and D. Router A no longer has to advertise to both routers C and D.

The route reflector and its client peers form a cluster. You do not have to configure all iBGP peers to act as client peers of the route reflector. You must configure any nonclient peer as fully meshed to guarantee that complete BGP updates reach all peers.
Capabilities negotiation
A BGP speaker can learn about BGP extensions that are supported by a peer by using the capabilities negotiation feature. Capabilities negotiation allows BGP to use only the set of features supported by both BGP peers on a link.
If a BGP peer does not support capabilities negotiation, Cisco NX-OS attempts a new session to the peer without capabilities negotiation if you have configured the address family as IPv4. Any other multiprotocol configuration (such as IPv6) requires capabilities negotiation.
Route dampening
Route dampening is a BGP feature that minimizes the propagation of flapping routes across an internetwork. It works by assigning a penalty to routes that frequently alternate between available and unavailable states (flapping). When the penalty exceeds a configured suppression limit, the route is suppressed (dampened) and not advertised to neighbors until the penalty decays below a reuse threshold.
For example, consider a network with three BGP autonomous systems: AS1, AS2, and AS3. Suppose that a route in AS1 flaps (it becomes unavailable). Without route dampening, AS1 sends a withdraw message to AS2. AS2 propagates the withdrawal message to AS3. When the flapping route reappears, AS1 sends an advertisement message to AS2, which sends the advertisement to AS3. If the route repeatedly becomes unavailable, and then available, AS1 sends many withdrawal and advertisement messages that propagate through the other autonomous systems.
Route dampening can minimize flapping. Suppose that the route flaps. AS2 (in which route dampening is enabled) assigns the route a penalty of 1000. AS2 continues to advertise the status of the route to neighbors. Each time that the route flaps, AS2 adds to the penalty value. When the route flaps so often that the penalty exceeds a configurable suppression limit, AS2 stops advertising the route, regardless of how many times that it flaps. The route is now dampened.
The penalty placed on the route decays until the reuse limit is reached. At that time, AS2 advertises the route again. When the reuse limit is at 50 percent, AS2 removes the dampening information for the route.
Note |
The router does not apply a penalty to a resetting BGP peer when route dampening is enabled, even though the peer reset withdraws the route. |
Load sharing and multipath
BGP can install multiple equal-cost eBGP or iBGP paths into the routing table to reach the same destination prefix. Traffic to the destination prefix is then shared across all the installed paths.
To configure as-path multipath-relax command effectively, configure the command per VRF under BGP. Also, configure as-path multipath-relax command under the custom VRF so that multiple routers get installed in the custom VRF Route-Target (RT).
The BGP best-path algorithm considers the paths as equal-cost paths if these attributes are identical:
-
Weight
-
Local preference
-
AS_path
-
Origin code
-
Multi-exit discriminator (MED)
-
IGP cost to the BGP next hop
BGP selects only one of these multiple paths as the best path and advertises the path to the BGP peers. For more information, see the BGP Additional Paths section.
Note |
Paths that are received from different AS confederations are considered as equal-cost paths if the external AS_path values and the other attributes are identical. |
Note |
When you configure a route reflector for iBGP multipath, and the route reflector advertises the selected best path to its peers, the next hop for the path is not modified. |
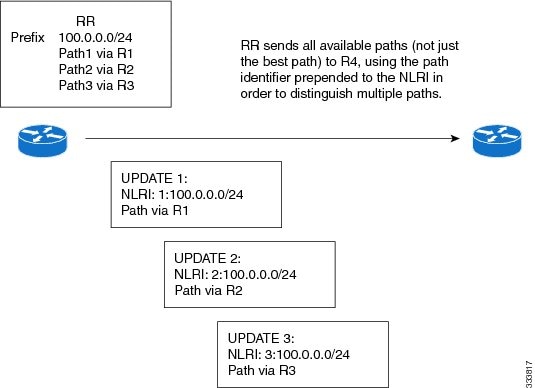
BGP additional paths
BGP supports the additional paths feature, which allows the BGP speaker to propagate and accept multiple paths for the same prefix without the new paths replacing any previous ones. This feature allows BGP speaker peers to negotiate whether they support advertising and receiving multiple paths per prefix and advertising such paths. A special 4-byte path ID is added to the network layer reachability information (NLRI) to differentiate multiple paths for the same prefix sent across a peer session. Figure BGP Route Advertisement with the Additional Paths Capability illustrates the BGP additional paths capability.
Only one BGP best path is advertised, and the BGP speaker accepts only one path for a given prefix from a given peer. If a BGP speaker receives multiple paths for the same prefix within the same session, it uses the most recent advertisement.
For information on configuring BGP additional paths, see the Configure BGP Additional Pathssection.
Route aggregation
Route aggregation simplifies route tables by replacing a number of more specific addresses with an address that represents all the specific addresses. For example, you can replace these three more specific addresses, 10.1.1.0/24, 10.1.2.0/24, and 10.1.3.0/24 with one aggregate address, 10.1.0.0/16.
Aggregate prefixes are present in the BGP route table so that fewer routes are advertised.
Note |
Cisco NX-OS does not support automatic route aggregation. |
Route aggregation can lead to forwarding loops. To avoid this problem, when BGP generates an advertisement for an aggregate address, it automatically installs a summary discard route for that aggregate address in the local routing table. BGP sets the administrative distance of the summary discard to 220 and sets the route type to discard. BGP does not use discard routes for next-hop resolution.
A summary entry is created in the BGP table when you issue the aggregate-address command, but the summary entry is not eligible for advertisement until a subset of the aggregate is found in the table.
BGP conditional advertisement
BGP conditional advertisement allows you to configure BGP to advertise or withdraw a route based on whether or not a prefix exists in the BGP table. This feature is useful, for example, in multihomed networks, in which you want BGP to advertise some prefixes to one of the providers only if information from the other provider is not present.
Consider an example network with three BGP autonomous systems: AS1, AS2, and AS3, where AS1 and AS3 connect to the Internet and to AS2. Without conditional advertisement, AS2 propagates all routes to both AS1 and AS3. With conditional advertisement, you can configure AS2 to advertise certain routes to AS3 only if routes from AS1 do not exist (if for example, the link to AS1 fails).
BGP conditional advertisement adds an exist or not-exist test to each route that matches the configured route map. See the Configuring BGP Conditional Advertisement section for more information.
BGP next-hop address tracking
BGP monitors the next-hop address of installed routes to verify next-hop reachability and to select, install, and validate the BGP best path. BGP next-hop address tracking speeds up this next-hop reachability test by triggering the verification process when routes change in the Routing Information Base (RIB) that may affect BGP next-hop reachability.
BGP receives notifications from the RIB when the next-hop information changes (event-driven notifications). BGP is notified when any of these events occurs:
-
The next hop becomes unreachable.
-
The next hop becomes reachable.
-
The fully recursed Interior Gateway Protocol (IGP) metric to the next hop changes.
-
The first hop IP address or first hop interface changes.
-
The next hop becomes connected.
-
The next hop becomes unconnected.
-
The next hop becomes a local address.
-
The next hop becomes a nonlocal address.
Note |
Reachability and recursed metric events trigger a best-path recalculation. |
Event notifications from the RIB are classified as critical and noncritical. Notifications for critical and noncritical events are sent in separate batches. However, a noncritical event is sent with the critical events if the noncritical event is pending and there is a request to read the critical events.
-
Critical events are related to next-hop reachability, such as the loss of next hops resulting in a switchover to a different path. A change in the IGP metric for a next hop resulting in a switchover to a different path can also be considered a critical event.
-
Non-critical events are related to next hops being added without affecting the best path or changing the IGP metric to a single next hop.
See Configuring BGP Next-Hop Address Tracking for more information.
Route Redistribution
You can configure BGP to redistribute static routes or routes from other protocols. You must configure a route map with the redistribution to control which routes are passed into BGP. A route map allows you to filter routes based on attributes such as the destination, origination protocol, route type, route tag, and so on. See Configuring Route Policy Manager, for more information.
You can use route maps to override the default behavior in both scenarios, but be careful when doing so as incorrect use of route maps can result in network loops. The following examples show how to use route maps to change the default behavior.
Note |
When you redistribute BGP to IGP, the match route-type internal command is a requirement for iBGP routes to be redistributed into IGP. By default, only eBGP routes are redistributed into IGP. |
You can change the default behavior for scenario 1 by modifying the route map as follows:
route-map foo permit 10
   match route-type internal
router ospf 1
   redistribute bgp 100 route-map foo
Similarly, you can change the default behavior for scenario 2 by modifying the route map as follows:
route-map foo deny 10
  match route-type internal
router ospf 1
   vrf bar
     redistribute bgp 100 route-map foo
Labeled and unlabeled unicast routes
In release 7.0(3)I7(6), SAFI-1 (unlabeled unicast) and SAFI-4 (labeled unicast routing) are now supported for IPv4 BGP on a single session. For more information, see the Cisco Nexus 9000 Series NX-OS Label Switching Configuration Guide, Release 7.x.
BFD
Bidirectional forwarding detection (BFD) is a detection protocol designed to provide fast forwarding-path failure detection times. BFD provides subsecond failure detection between two adjacent devices and can be less CPU-intensive than protocol hello messages because some of the BFD load can be distributed onto the data plane on supported modules. Advanced BGP supports BFD for IPv4 and IPv6.
BFD for BGP is supported on eBGP peers and iBGP single-hop peers. Configure the update-source option in neighbor configuration mode for iBGP single-hop peers using BFD.
See the Cisco Nexus 9000 Series NX-OS Interfaces Configuration Guide for more information.
Tune BGP
You can modify the default behavior of BGP through BGP timers and by adjusting the best-path algorithm.
BGP timers
BGP timers are protocol timers used in the Border Gateway Protocol (BGP) that
-
control the timing of periodic keepalive messages sent between BGP peers,
-
determine the timeout period for detecting lost neighbor sessions when keepalives are not received, and
-
manage other specific protocol events and features.
These timers are typically configured in seconds and include a random adjustment to prevent synchronization of timer events across different BGP peers.
BGP uses different types of timers for neighbor session and global protocol events. Each established session has a minimum of two timers for sending periodic keepalive messages and for timing out sessions when peer keepalives do not arrive within the expected time. In addition, there are other timers for handling specific features. The timers include a random adjustment so that the same timers on different BGP peers trigger at different times.
Tune the best-path algorithm
You can modify the default behavior of the best-path algorithm through optional configuration parameters, including changing how the algorithm handles the multi-exit discriminator (MED) attribute and the router ID.
Multiprotocol BGP
BGP on Cisco NX-OS supports multiple address families. Multiprotocol BGP (MP-BGP) carries different sets of routes depending on the address family. For example, BGP can carry one set of routes for IPv4 unicast routing, one set of routes for IPv4 multicast routing, and one set of routes for IPv6 multicast routing. You can use MP-BGP for reverse-path forwarding (RPF) checks in IP multicast networks.
Multicast BGP does not propagate multicast state information, so you need a multicast protocol such as Protocol Independent Multicast (PIM).
Use the router address-family and neighbor address-family configuration modes to support multiprotocol BGP configurations. MP-BGP maintains separate RIBs for each configured address family, such as a unicast RIB and a multicast RIB for BGP.
A multiprotocol BGP network is backward compatible but BGP peers that do not support multiprotocol extensions cannot forward routing information, such as address family identifier information, that the multiprotocol extensions carry.
RFC 5549
BGP supports RFC 5549, which allows an IPv4 prefix to be carried over an IPv6 next hop. Because BGP is running on every hop, all routers can forward IPv4 and IPv6 traffic. Therefore, there is no need to support IPv6 tunnels between any routers. BGP installs IPv4 over an IPv6 route to the Unicast Route Information Base (URIB).
Beginning with Cisco NX-OS Release 9.2(2), Cisco Nexus 9500 platform switches with -R line cards support RFC 5549.
Currently, NX-OS does not support IPv6 recursive next-hops (RNH) for an IPv4 route.
BGP monitoring protocol
BGP Monitoring Protocol (BMP) monitors BGP updates and peer statistics and is supported for all Cisco Nexus 9000 Series switches.
Using this protocol, the BGP speaker connects to external BMP servers and sends them information regarding BGP events. A maximum of two BMP servers can be configured in a BGP speaker, and each BGP peer can be configured for monitoring by all or a subset of the BMP servers. The BGP speaker does not accept any information from the BMP server.
Graceful restart and high availability
Cisco NX-OS supports nonstop forwarding and graceful restart for BGP.
You can use nonstop forwarding (NSF) for BGP to forward data packets along known routes in the Forward Information Base (FIB) while the BGP routing protocol information is being restored following a failover. With NSF, BGP peers do not experience routing flaps. During a failover, the data traffic is forwarded through intelligent modules while the standby supervisor becomes active.
If a Cisco NX-OS router experiences a cold reboot, the network does not forward traffic to the router and removes the router from the network topology. In this scenario, BGP experiences a nongraceful restart and removes all routes. When Cisco NX-OS applies the startup configuration, BGP reestablishes peering sessions and relearns the routes.
A Cisco NX-OS router that has dual supervisors can experience a stateful supervisor switchover. During the switchover, BGP uses nonstop forwarding to forward traffic based on the information in the FIB, and the system is not removed from the network topology. A router whose neighbor is restarting is referred to as a "helper." After the switchover, a graceful restart operation begins. When it is in progress, both routers reestablish their neighbor relationship and exchange their BGP routes. The helper continues to forward prefixes pointing to the restarting peer, and the restarting router continues to forward traffic to peers even though those neighbor relationships are restarting. When the restarting router has all route updates from all BGP peers that are graceful restart capable, the graceful restart is complete, and BGP informs the neighbors that it is operational again.
BGP needs to converge before graceful-restart timer expires. BGP graceful-restart timer needs to be increased in high route scale network accordingly in order to avoid temporary traffic loss. If BGP itself provides the reachability to open other BGP sessions, then stalepath-time should also be increased to accommodate for the extra time needed to converge the overlay session after the initial underlay session has already converged.
When a router detects that a graceful restart operation is in progress, both routers exchange their topology tables. When the router has route updates from all BGP peers, it removes all the stale routes and runs the best-path algorithm on the updated routes.
After the switchover, Cisco NX-OS applies the running configuration, and BGP informs the neighbors that it is operational again.
For single-hop iBGP peers with update-source configured under neighbor configuration mode, the peer supports fast external fall-over.
With the additional BGP paths feature, if the number of paths advertised for a given prefix is the same before and after restart, the choice of path ID guarantees the final state and removal of stale paths. If fewer paths are advertised for a given prefix after a restart, stale paths can occur on the graceful restart helper peer.
Low memory handling
BGP low memory handling is a mechanism that manages BGP peer sessions and memory usage when the router experiences low memory conditions. It helps maintain stability and performance by controlling peer establishment and shutdown based on the severity of the memory alert.
BGP reacts to low memory for theses conditions:
-
Minor alert: BGP does not establish any new eBGP peers. BGP continues to establish new iBGP peers and confederate peers. Established peers remain, but reset peers are not re-established.
-
Severe alert: BGP shuts down select established eBGP peers every two minutes until the memory alert becomes minor. For each eBGP peer, BGP calculates the ratio of total number of paths received to the number of paths selected as best paths. The peers with the highest ratio are selected to be shut down to reduce memory usage. You must clear a shutdown eBGP peer before you can bring the eBGP peer back up to avoid oscillation.
Note
You can exempt important eBGP peers from this selection process.
-
Critical alert: BGP gracefully shuts down all the established peers. You must clear a shutdown BGP peer before you can bring the BGP peer back up.
See the Tuning BGP section for more information on how to exempt a BGP peer from a shutdown due to a low memory condition.
Virtualization support
You can configure one BGP instance. BGP supports virtual routing and forwarding (VRF) instances.
 Feedback