- New and Changed Information
- Preface
- Overview
- Part 1: IP
- Configuring IPv4
- Configuring IPv6
- Part 2: Routing
- Configuring OSPFv2
- Configuring OSPFv3
- Configuring EIGRP
- Configuring Basic BGP
- Configuring Advanced BGP
- Configuring Bidirectional Forwarding Detection for BGP
- Configuring BFD for OSPFv2
- Configuring ECMP for Host Routes
- Configuring RIP
- Configuring Static Routing
- Configuring Layer 3 Virtualization
- Managing the Unicast RIB and FIB
- Configuring Route Policy Manager
- Part 3: First-Hop Redundancy Protocol
- Configuring HSRP
- Configuring VRRP
- Configuring Object Tracking
- IETF RFCs
- Glossary
- Index
Configuring Bidirectional Forwarding Detection for OSPFv2
This chapter describes how to configure Bidirectional Forwarding Detection (BFD) for OSPFv2.
This chapter includes the following sections:
•![]() Licensing Requirements for BFD
Licensing Requirements for BFD
•![]() Verifying the BFD Configuration
Verifying the BFD Configuration
Information About BFD
BFD is a detection protocol designed to provide fast forwarding-path failure detection times for media types, encapsulations, topologies, and routing protocols. You can use BFD to detect forwarding path failures at a uniform rate, rather than the variable rates for different protocol hello mechanisms. BFD makes network profiling and planning easier and reconvergence time consistent and predictable.
BFD provides subsecond failure detection between two adjacent devices.
This section includes the following topics:
Asynchronous Mode
Cisco NX-OS supports the BFD asynchronous mode, which sends BFD control packets between two adjacent devices to activate and maintain BFD neighbor sessions between the devices. You configure BFD on both devices (or BFD neighbors). Once BFD has been enabled on the appropriate protocols, Cisco NX-OS creates a BFD session, negotiates BFD session parameters, and begins to send BFD control packets to each BFD neighbor at the negotiated interval. The BFD session parameters include the following:
•![]() Desired minimum transmit interval—The interval at which this device wants to send BFD hello messages.
Desired minimum transmit interval—The interval at which this device wants to send BFD hello messages.
•![]() Required minimum receive interval—The minimum interval at which this device can accept BFD hello messages from another BFD device.
Required minimum receive interval—The minimum interval at which this device can accept BFD hello messages from another BFD device.
•![]() Detect multiplier—The number of missing BFD hello messages from another BFD device before this local device detects a fault in the forwarding path.
Detect multiplier—The number of missing BFD hello messages from another BFD device before this local device detects a fault in the forwarding path.
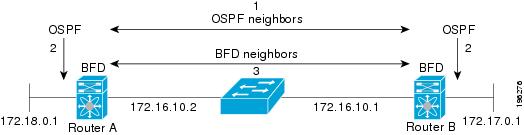
The following figure shows how a BFD session is established. The figure shows a simple network with two routers running OSPF and BFD. When OSPF discovers a neighbor (1), it sends a request to the local BFD process to initiate a BFD neighbor session with the OSPF neighbor router (2). The BFD neighbhor session with the OSPF neighbor router is now established (3).
Figure 10-1 Establishing a BFD Neighbor Relationship
BFD Detection of Failures
Once a BFD session has been established and timer negotiations are complete, BFD neighbors send BFD control packets that act in the same manner as an IGP hello protocol to detect liveliness, except at a more accelerated rate. BFD detects a failure, but the protocol must take action to bypass a failed peer.
BFD sends a failure detection notice to the BFD-enabled protocols when it detects a failure in the forwarding path. The local device can then initiate the protocol recalculation process and reduce the overall network convergence time.
The process is as follows:
1. ![]() The BFD neighbor session with the BFD neighbor router is torn down.
The BFD neighbor session with the BFD neighbor router is torn down.
2. ![]() BFD notifies the local BFD process that the BFD neighbor is no longer reachable.
BFD notifies the local BFD process that the BFD neighbor is no longer reachable.
3. ![]() The local BFD process tears down the BFD neighbor relationship.
The local BFD process tears down the BFD neighbor relationship.
4. ![]() If an alternative path is available, the routers immediately start converging on it.
If an alternative path is available, the routers immediately start converging on it.
The following figure shows what happens when a failure occurs in the network (1). The BFD neighbor session with the OSPF neighbor is torn down (2). BFD notifies the local Open Shortest Path First (OSPF) process that the BFD neighbor is no longer reachable (3). The local OSPF process tears down the OSPF neighbor relationship (4). If an alternative path is available, the routers immediately start converging on it.

Note ![]() The BFD failure detection occurs in less than a second, which is must faster than the OSPF Hello messages could detect the same failure.
The BFD failure detection occurs in less than a second, which is must faster than the OSPF Hello messages could detect the same failure.
Figure 10-2 Tearing Down an OSPF Neighbor Relationship

BFD Echo Function
The BFD echo function sends echo packets from the forwarding engine to the remote BFD neighbor. The BFD neighbor forwards the echo packet back along the same path in order to perform detection; the BFD neighbor does not participate in the actual forwarding of the echo packets. The echo function and the forwarding engine are responsible for the detection process. BFD can use the slow timer to slow down the asycnhronous session when the echo function is enabled and to reduce the number of BFD control packets that are sent between two BFD neighbors. Also, the forwarding engine tests the forwarding path on the remote (neighbor) system without involving the remote system, so there is less interpacket delay variability and faster failure detection times.
The echo function is symmetrical when both BFD neighbors are running the echo function.
Security
Cisco NX-OS uses the packet Time-to-Live (TTL) value to verify that the BFD packets came from an adjacent BFD peer. For all asynchronous and echo request packets, the BFD neighbor sets the TTL value to 255 and the local BFD process verifies the TTL value as 255 before processing the incoming packet. For the echo response packet, BFD sets the TTL value to 254.
Virtualization Support
BFD supports virtual routing and forwarding (VRFs) instances. VRFs exist within virtual device contexts (VDCs). By default, Cisco NX-OS places you in the default VDC and default VRF unless you specifically configure another VDC and VRF.
Licensing Requirements for BFD
The following table shows the licensing requirements for this feature:
Prerequisites for BFD
BFD has the following prerequisites:
•![]() You must enable the BFD feature (see the "Enabling the BFD Feature" section).
You must enable the BFD feature (see the "Enabling the BFD Feature" section).
•![]() For any client protocols that you want to enable BFD on, you enable BFD in that client protocol. See the "Configuring BFD on OSPFv2" section.
For any client protocols that you want to enable BFD on, you enable BFD in that client protocol. See the "Configuring BFD on OSPFv2" section.
•![]() Disable Internet Control Message Protocol (ICMP) redirect messages on BFD-enabled interfaces.
Disable Internet Control Message Protocol (ICMP) redirect messages on BFD-enabled interfaces.
•![]() See other detailed prerequisites that are listed with the configuration tasks.
See other detailed prerequisites that are listed with the configuration tasks.
Guidelines and Limitations
BFD has the following configuration guidelines and limitations:
•![]() BFD supports BFD version 1.
BFD supports BFD version 1.
•![]() BFD supports IPv4.
BFD supports IPv4.
•![]() BFD supports single-hop BFD.
BFD supports single-hop BFD.
•![]() BFD for OSPFv2 supports single-hop OSPFv2 peers and single-hop OSPFv2 peers.
BFD for OSPFv2 supports single-hop OSPFv2 peers and single-hop OSPFv2 peers.
•![]() BFD supports the following Layer 3 interfaces: physical interfaces, port channels, subinterfaces, and VLAN interfaces (SVI).
BFD supports the following Layer 3 interfaces: physical interfaces, port channels, subinterfaces, and VLAN interfaces (SVI).
•![]() BFD for OSPFv2 does not support authentication for BFD or per-link BFD sessions on a port channel.
BFD for OSPFv2 does not support authentication for BFD or per-link BFD sessions on a port channel.
•![]() BFD depends on Layer 3 adjacency information to discover topology changes, including Layer 2 topology changes. A BFD session on a VLAN interface (SVI) might not be up after the convergence of the Layer 2 topology if there is no Layer 3 adjacency information available.
BFD depends on Layer 3 adjacency information to discover topology changes, including Layer 2 topology changes. A BFD session on a VLAN interface (SVI) might not be up after the convergence of the Layer 2 topology if there is no Layer 3 adjacency information available.
•![]() Port channel configuration limitations:
Port channel configuration limitations:
–![]() For Layer 3 port channels used by BFD, you must enable the Link Aggregation and Control Protocol (LACP) on the port channel.
For Layer 3 port channels used by BFD, you must enable the Link Aggregation and Control Protocol (LACP) on the port channel.
–![]() For Layer 2 port channels used by switch virtual interface (SVI) sessions, you must enable LACP on the port channel.
For Layer 2 port channels used by switch virtual interface (SVI) sessions, you must enable LACP on the port channel.
•![]() SVI limitations:
SVI limitations:
An ASIC reset will cause traffic disruption for other ports. This event could possibly cause SVI sessions on other ports to flap.
–![]() When you change the topology (for example, add or delete a link into a VLAN, delete a member from a Layer 2 port channel, and so on), the SVI session could be affected. It may go down first and then come up after the topology discovery is finished.
When you change the topology (for example, add or delete a link into a VLAN, delete a member from a Layer 2 port channel, and so on), the SVI session could be affected. It may go down first and then come up after the topology discovery is finished.

Tip ![]() If you do not want the SVI sessions to flap and you need to change the topology, you can disable the BFD feature before making the changes and reenable BFD after the changes have been made. You can also configure the BFD timer to be a large value (for example, 5 seconds), and change it back to a fast timer after the above events complete.
If you do not want the SVI sessions to flap and you need to change the topology, you can disable the BFD feature before making the changes and reenable BFD after the changes have been made. You can also configure the BFD timer to be a large value (for example, 5 seconds), and change it back to a fast timer after the above events complete.
•![]() BFD control packet processing limit (Rx and Tx) is 544 packets per second (PPS).
BFD control packet processing limit (Rx and Tx) is 544 packets per second (PPS).
Note ![]() Once the control packet processing limit is reached, the newly configured BFD session will be in a down state. A syslog message at the LOG_NOTICE level is logged after the BFD session is installed again. The following is an example of the syslog message:
Once the control packet processing limit is reached, the newly configured BFD session will be in a down state. A syslog message at the LOG_NOTICE level is logged after the BFD session is installed again. The following is an example of the syslog message:
2010 Jun 25 00:23:47 BLR-QS1 %BFD-5-SESSION_NO_RESOURCES: No resource for session to neighbor 251.1.1.2 on interface Eth1/29.14
•![]() Cisco NX-OS does not distribute the BFD operation to compatible modules to offload the CPU for BFD packet processing.
Cisco NX-OS does not distribute the BFD operation to compatible modules to offload the CPU for BFD packet processing.
•![]() BFD does not support stateless restarts and in-service software upgrades (ISSUs).
BFD does not support stateless restarts and in-service software upgrades (ISSUs).
•![]() If you want to enable BFD for a peer reachable through a port channel, you must configure LACP on the port channel.
If you want to enable BFD for a peer reachable through a port channel, you must configure LACP on the port channel.
•![]() BFD echo mode and Unicast Reverse Path Forwarding (URPF) are mutually exclusive and cannot both be enabled on a BFD interface. If you want to configure an interface for BFD, you must disable either BFD echo mode or URPF.
BFD echo mode and Unicast Reverse Path Forwarding (URPF) are mutually exclusive and cannot both be enabled on a BFD interface. If you want to configure an interface for BFD, you must disable either BFD echo mode or URPF.
Default Settings
Table 10-1 lists the default settings for BFD parameters.
Configuring BFD
This section includes the following topics:
•![]() Task Flow for Configuring BFD
Task Flow for Configuring BFD
•![]() Configuring Global BFD Parameters
Configuring Global BFD Parameters
•![]() Configuring BFD on an Interface
Configuring BFD on an Interface
•![]() Configuring BFD on a Port Channel
Configuring BFD on a Port Channel
•![]() Configuring BFD Echo Function
Configuring BFD Echo Function
•![]() Optimizing BFD on Subinterfaces
Optimizing BFD on Subinterfaces
Configuration Hierarchy
You can configure BFD at the global level, VRF level, at the interface or port channel level, or at the subinterface level (for physical interfaces and port channels). The VRF configuration overrides global configuration. The interface or port channel configuration overrides VRF or global configuration. On supported interfaces, the subinterface-level configuration overrides the interface or port channel configuration unless subinterface optimization is enabled. See the "Optimizing BFD on Subinterfaces" section for more information.
For physical ports that are members of a port channel, the member port inherits the master port channel BFD configuration. The member port subinterfaces can override the master port channel BFD configuration, unless subinterface optimization is enabled.
Task Flow for Configuring BFD
Follow these steps to configure BFD:
Step 1 ![]() Enabling the BFD Feature.
Enabling the BFD Feature.
Step 2 ![]() Configuring Global BFD Parameters or Configuring BFD on an Interface.
Configuring Global BFD Parameters or Configuring BFD on an Interface.
Step 3 ![]() Configuring BFD on OSPFv2.
Configuring BFD on OSPFv2.
Enabling the BFD Feature
SUMMARY STEPS
1. ![]() configure terminal
configure terminal
2. ![]() feature bfd
feature bfd
3. ![]() (Optional) show feature | include bfd
(Optional) show feature | include bfd
4. ![]() (Optional) copy running-config startup-config
(Optional) copy running-config startup-config
DETAILED STEPS
Use the no feature bfd command to disable the BFD feature and remove all associated configuration.
|
|
|
|---|---|
no feature bfd
Example: switch(config)# no feature bfd |
Disables the BFD feature and removes all associated configuration. |
Configuring Global BFD Parameters
You can configure the BFD session parameters for all BFD sessions on the device. The BFD session parameters are negotiated between the BFD peers in a three-way handshake.
See the "Configuring BFD on an Interface" section to override these global session parameters on an interface.
BEFORE YOU BEGIN
Enable the BFD feature. See the "Enabling the BFD Feature" section.
SUMMARY STEPS
1. ![]() configure terminal
configure terminal
2. ![]() bfd interval mintx min_rx msec multiplier value
bfd interval mintx min_rx msec multiplier value
3. ![]() bfd slow-timer [interval]
bfd slow-timer [interval]
4. ![]() (Optional) show running-config bfd
(Optional) show running-config bfd
5. ![]() (Optional) copy running-config startup-config
(Optional) copy running-config startup-config
DETAILED STEPS
Configuring BFD on an Interface
You can configure the BFD session parameters for all BFD sessions on an interface. The BFD session parameters are negotiated between the BFD peers in a three-way handshake.
This configuration overrides the global session parameters for the configured interface.
BEFORE YOU BEGIN
Enable the BFD feature. See the "Enabling the BFD Feature" section.
SUMMARY STEPS
1. ![]() configure terminal
configure terminal
2. ![]() interface int-if
interface int-if
3. ![]() bfd interval mintx min_rx msec multiplier value
bfd interval mintx min_rx msec multiplier value
4. ![]() (Optional) show running-config bfd
(Optional) show running-config bfd
5. ![]() (Optional) copy running-config startup-config
(Optional) copy running-config startup-config
DETAILED STEPS
Configuring BFD on a Port Channel
You can configure the BFD session parameters for all BFD sessions on a port channel. The BFD session parameters are negotiated between the BFD peers in a three-way handshake.
This configuration overrides the global session parameters for the configured port channel. The member ports of the port channel inherit the port channel BFD session parameters, unless you configure subinterface-level BFD parameters on a member port. In that case, the member port subinterface uses the subinterface BFD configuration if subinterface optimization is not enabled. See the "Optimizing BFD on Subinterfaces" section for more information.
BEFORE YOU BEGIN
Ensure that you enable LACP on the port channel before you enable BFD.
Enable the BFD feature. See the "Enabling the BFD Feature" section.
SUMMARY STEPS
1. ![]() configure terminal
configure terminal
2. ![]() interface port-channel number
interface port-channel number
3. ![]() (Optional) bfd interval mintx min_rx msec multiplier value
(Optional) bfd interval mintx min_rx msec multiplier value
4. ![]() (Optional) show running-config bfd
(Optional) show running-config bfd
5. ![]() (Optional) copy running-config startup-config
(Optional) copy running-config startup-config
DETAILED STEPS
Configuring BFD Echo Function
You can configure the BFD echo function on one or both ends of a BFD-monitored link. The echo function slows down the required minimum receive interval, based on the configured slow timer. The RequiredMinEchoRx BFD session parameter is set to zero if the echo function is disabled. The slow timer becomes the required minimum receive interval if the echo function is enabled.
BEFORE YOU BEGIN
Enable the BFD feature. See the "Enabling the BFD Feature" section.
Configure the BFD session parameters. See the "Configuring Global BFD Parameters" section or the "Configuring BFD on an Interface" section.
Ensure that Internet Control Message Protocol (ICMP) redirect messages are disabled on BFD-enabled interfaces. Use the no ip redirects command on the interface.
SUMMARY STEPS
1. ![]() configure terminal
configure terminal
2. ![]() bfd slow-timer echo-interval
bfd slow-timer echo-interval
3. ![]() interface int-if
interface int-if
4. ![]() bfd echo
bfd echo
5. ![]() (Optional) show running-config bfd
(Optional) show running-config bfd
6. ![]() (Optional) copy running-config startup-config
(Optional) copy running-config startup-config
DETAILED STEPS
Optimizing BFD on Subinterfaces
You can optimize BFD on subinterfaces. BFD creates sessions for all configured subinterfaces. BFD sets the subinterface with the lowest configured VLAN ID as the master subinterface and that subinterface uses the BFD session parameters of the parent interface. The remaining subinterfaces use the slow timer. If the optimized subinterface session detects an error, BFD marks all subinterfaces on that physical interface as down.
BEFORE YOU BEGIN
Enable the BFD feature. See the "Enabling the BFD Feature" section.
Configure the BFD session parameters. See the "Configuring Global BFD Parameters" section or the "Configuring BFD on an Interface" section.
Ensure that these subinterfaces connect to another Cisco NX-OS device. This feature is supported on Cisco NX-OS only.
SUMMARY STEPS
1. ![]() configure terminal
configure terminal
2. ![]() interface int-if
interface int-if
3. ![]() bfd optimize subinterface
bfd optimize subinterface
4. ![]() (Optional) show running-config bfd
(Optional) show running-config bfd
5. ![]() (Optional) copy running-config startup-config
(Optional) copy running-config startup-config
DETAILED STEPS
Configuring BFD on OSPFv2
You can configure BFD for the Open Shortest Path First Protocol (OSPFv2).
BEFORE YOU BEGIN
Enable the BFD feature. See the "Enabling the BFD Feature" section.
Configure the BFD session parameters. See the "Configuring Global BFD Parameters" section or the "Configuring BFD on an Interface" section.
Enable the OSPFv2 feature. See the Cisco Nexus 3000 Series NX-OS Unicast Routing Configuration Guide for more information.
SUMMARY STEPS
1. ![]() configure terminal
configure terminal
2. ![]() router ospf as-number
router ospf as-number
3. ![]() neighbor {ip-address | ipv6-address} remote-as as-number
neighbor {ip-address | ipv6-address} remote-as as-number
4. ![]() bfd
bfd
5. ![]() (Optional) show running-config ospf
(Optional) show running-config ospf
6. ![]() (Optional) copy running-config startup-config
(Optional) copy running-config startup-config
DETAILED STEPS
Verifying the BFD Configuration
To display BFD configuration information, perform one of the following tasks:
|
|
|
|---|---|
show running-config bfd |
Displays the running BFD configuration. |
show startup-config bfd |
Displays the BFD configuration that will be applied on the next system startup. |
For detailed information about the fields in the output from these commands, see the Cisco Nexus 3000 Series NX-OS Unicast Routing Configuration Guide.
Monitoring BFD
Use the following commands to display BFD:
For detailed information about the fields in the output from these commands, see the Cisco Nexus 3000 Series Command Reference,.
Feature History for BFD
Table 10-2 lists the release history for this feature.
|
|
|
|
|---|---|---|
BFD for OSPFv2 |
5.0(3)U2(2) |
Added support for BFD for OSPFv2. See Chapter 10 "Configuring Bidirectional Forwarding Detection for OSPFv2" for more information. |
BFD for OSPFv2 |
5.0(3)U2(2a) |
Added guidelines and limitations for LACP configuration, and for BFD echo and URFP. See the "Guidelines and Limitations" section for more information. |
 Feedback