- Preface
- New and Changed Information
- Overview
- Configuring Authentication, Authorization, and Accounting
- Configuring RADIUS
- Configuring TACACS+
- Configuring SSH and Telnet
- Configuring Access Control Lists
- Configuring DHCP Snooping
- Configuring Dynamic ARP Inspection
- Configuring Unicast RPF
- Configuring Control Plane Policing
- Index
- Configuring RADIUS
- Information About RADIUS
- Prerequisites for RADIUS
- Guidelines and Limitations for RADIUS
- Configuring RADIUS Servers
- Configuring RADIUS Server Hosts
- Configuring RADIUS Global Preshared Keys
- Configuring RADIUS Server Preshared Keys
- Configuring RADIUS Server Groups
- Configuring the Global Source Interface for RADIUS Server Groups
- Allowing Users to Specify a RADIUS Server at Login
- Configuring the Global RADIUS Transmission Retry Count and Timeout Interval
- Configuring the RADIUS Transmission Retry Count and Timeout Interval for a Server
- Configuring Accounting and Authentication Attributes for RADIUS Servers
- Configuring Periodic RADIUS Server Monitoring
- Configuring the Dead-Time Interval
- Manually Monitoring RADIUS Servers or Groups
- Verifying RADIUS Configuration
- Displaying RADIUS Server Statistics
- Example RADIUS Configuration
- Default RADIUS Settings
Configuring RADIUS
This chapter contains the following sections:
Configuring RADIUS
Information About RADIUS
The Remote Access Dial-In User Service (RADIUS) distributed client/server system allows you to secure networks against unauthorized access. In the Cisco implementation, RADIUS clients run on Cisco Nexus 3000 Series switches and send authentication and accounting requests to a central RADIUS server that contains all user authentication and network service access information.
RADIUS Network Environments
RADIUS can be implemented in a variety of network environments that require high levels of security while maintaining network access for remote users.
You can use RADIUS in the following network environments that require access security:
- Networks with multiple-vendor network devices, each supporting RADIUS. For example, network devices from several vendors can use a single RADIUS server-based security database.
- Networks already using RADIUS. You can add a Cisco Nexus 3000 Series switch with RADIUS to the network. This action might be the first step when you make a transition to a AAA server.
- Networks that require resource accounting. You can use RADIUS accounting independent of RADIUS authentication or authorization. The RADIUS accounting functions allow data to be sent at the start and end of services, indicating the amount of resources (such as time, packets, bytes, and so on) used during the session. An Internet service provider (ISP) might use a freeware-based version of the RADIUS access control and accounting software to meet special security and billing needs.
- Networks that support authentication profiles. Using the RADIUS server in your network, you can configure AAA authentication and set up per-user profiles. Per-user profiles enable the Nexus 5000 Series switch to better manage ports using their existing RADIUS solutions and to efficiently manage shared resources to offer different service-level agreements.
RADIUS Operations
When a user attempts to log in and authenticate to a Cisco Nexus 3000 Series switch using RADIUS, the following process occurs:
- The user is prompted for and enters a username and password.
- The username and encrypted password are sent over the network to the RADIUS server.
-
The user receives one of the following responses from the RADIUS server:
- ACCEPT—The user is authenticated.
- REJECT—The user is not authenticated and is prompted to reenter the username and password, or access is denied.
- CHALLENGE—A challenge is issued by the RADIUS server. The challenge collects additional data from the user.
- CHANGE PASSWORD—A request is issued by the RADIUS server, asking the user to select a new password.
The ACCEPT or REJECT response is bundled with additional data that is used for EXEC or network authorization. You must first complete RADIUS authentication before using RADIUS authorization. The additional data included with the ACCEPT or REJECT packets consists of the following:
RADIUS Server Monitoring
An unresponsive RADIUS server can cause delay in processing of AAA requests. You can configure the Cisco Nexus 3000 Series switch to periodically monitor a RADIUS server to check whether it is responding (or alive) to save time in processing AAA requests. The Cisco Nexus 3000 Series switch marks unresponsive RADIUS servers as dead and does not send AAA requests to any dead RADIUS servers. The switch periodically monitors the dead RADIUS servers and brings them to the alive state once they respond. This monitoring process verifies that a RADIUS server is in a working state before real AAA requests are sent its way. Whenever a RADIUS server changes to the dead or alive state, a Simple Network Management Protocol (SNMP) trap is generated and the Cisco Nexus 3000 Series switch displays an error message that a failure is taking place.
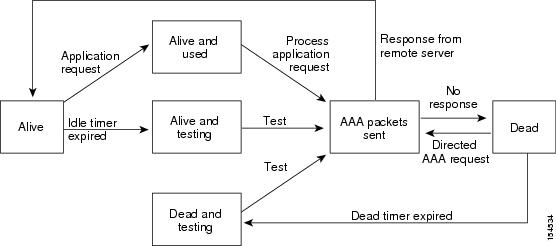
 Note |
The monitoring interval for alive servers and dead servers are different and can be configured by the user. The RADIUS server monitoring is performed by sending a test authentication request to the RADIUS server. |
Vendor-Specific Attributes
The Internet Engineering Task Force (IETF) draft standard specifies a method for communicating vendor-specific attributes (VSAs) between the network access server and the RADIUS server. The IETF uses attribute 26. VSAs allow vendors to support their own extended attributes that are not suitable for general use. The Cisco RADIUS implementation supports one vendor-specific option using the format recommended in the specification. The Cisco vendor ID is 9, and the supported option is vendor type 1, which is named cisco-av-pair. The value is a string with the following format:
protocol : attribute separator value *
The protocol is a Cisco attribute for a particular type of authorization, the separator is an equal sign (=) for mandatory attributes, and an asterisk (*) indicates optional attributes.
When you use RADIUS servers for authentication on a Cisco Nexus 3000 Series switch, the RADIUS protocol directs the RADIUS server to return user attributes, such as authorization information, along with authentication results. This authorization information is specified through VSAs.
The following VSA protocol options are supported by the Cisco Nexus 3000 Series switch:
- Shell— Used in access-accept packets to provide user profile information.
- Accounting— Used in accounting-request packets. If a value contains any white spaces, you should enclose the value within double quotation marks.
Cisco Nexus 3000 Series switches support the following attributes:
- roles—Lists all the roles to which the user belongs. The value field is a string that lists the role names delimited by white space.
- accountinginfo—Stores accounting information in addition to the attributes covered by a standard RADIUS accounting protocol. This attribute is sent only in the VSA portion of the Account-Request frames from the RADIUS client on the switch. It can be used only with the accounting protocol data units (PDUs).
Prerequisites for RADIUS
RADIUS has the following prerequisites:
Guidelines and Limitations for RADIUS
RADIUS has the following guidelines and limitations:
Configuring RADIUS Servers
To configure RADIUS servers, perform this task:
1. Establish the RADIUS server connections to the Cisco Nexus 3000 Series switch.
2. Configure the preshared secret keys for the RADIUS servers.
3. If needed, configure RADIUS server groups with subsets of the RADIUS servers for AAA authentication methods.
4. If needed, configure any of the following optional parameters:
5. If needed, configure periodic RADIUS server monitoring.
DETAILED STEPS
Configuring RADIUS Server Hosts
You must configure the IPv4 address or the host name for each RADIUS server that you want to use for authentication. All RADIUS server hosts are added to the default RADIUS server group. You can configure up to 64 RADIUS servers.
1. configure terminal
2. radius-server host {ipv4-address | host-name}
3. exit
4. (Optional) show radius-server
5. (Optional) copy running-config startup-config
DETAILED STEPS
Configuring RADIUS Global Preshared Keys
You can configure preshared keys at the global level for all servers used by the Cisco Nexus 3000 Series switch. A preshared key is a shared secret text string between the switch and the RADIUS server hosts.
Obtain the preshared key values for the remote RADIUS servers
1. configure terminal
2. radius-server key [0 | 7] key-value
3. exit
4. (Optional) show radius-server
5. (Optional) copy running-config startup-config
DETAILED STEPS
Configuring RADIUS Server Preshared Keys
A preshared key is a shared secret text string between the Cisco Nexus 3000 Series switch and the RADIUS server host.
Obtain the preshared key values for the remote RADIUS servers.
1. configure terminal
2. radius-server host {ipv4-address | host-name} key [0 | 7] key-value
3. exit
4. (Optional) show radius-server
5. (Optional) copy running-config startup-config
DETAILED STEPS
| Command or Action | Purpose | |||
|---|---|---|---|---|
| Step 1 | configure terminal Example: switch# configure terminal switch(config) # |
Enters global configuration mode. |
||
| Step 2 | radius-server host {ipv4-address | host-name} key [0 | 7] key-value Example: switch(config)# radius-server host 10.10.1.1 key 0 PlIjUhYg |
Specifies a preshared key for a specific RADIUS server. You can specify a clear text ( 0 ) or encrypted ( 7 ) preshared key. The default format is clear text. The maximum length is 63 characters. This preshared key is used instead of the global preshared key. |
||
| Step 3 | exit Example: switch(config)# exit |
Exits configuration mode. |
||
| Step 4 | show radius-server Example: switch# show radius-server |
(Optional) Displays the RADIUS server configuration.
|
||
| Step 5 | copy running-config startup-config Example: switch(config) # copy running-config-startup-config switch(config) # |
(Optional) Saves the change persistently through reboots and restarts by copying the running configuration to the startup configuration. |
Configuring RADIUS Server Groups
You can specify one or more remote AAA servers for authentication using server groups. All members of a group must belong to the RADIUS protocol. The servers are tried in the same order in which you configure them.
You can configure these server groups at any time but they only take effect when you apply them to an AAA service.
1. configure terminal
2. aaa group server radius group-name
3. server {ipv4-address | server-name}
4. (Optional) deadtime minutes
5. (Optional) switch(config-radius)# source-interface interface
6. exit
7. (Optional) show radius-server group [group-name]
8. (Optional) copy running-config startup-config
DETAILED STEPS
| Command or Action | Purpose | |||
|---|---|---|---|---|
| Step 1 | configure terminal Example: switch# configure terminal switch(config) # |
Enters global configuration mode. |
||
| Step 2 | aaa group server radius group-name Example: switch(config)# aaa group server radius RadServer |
Creates a RADIUS server group and enters the RADIUS server group configuration submode for that group. The group-name argument is a case-sensitive alphanumeric string with a maximum length of 127 characters. |
||
| Step 3 | server {ipv4-address | server-name} Example: switch(config-radius)# 10.10.1.1 |
Configures the RADIUS server as a member of the RADIUS server group. If the specified RADIUS server is not found, configure it using the radius-server host command and retry this command. |
||
| Step 4 | deadtime minutes Example: switch(config-radius)# deadtime 30 |
(Optional) Configures the monitoring dead time. The default is 0 minutes. The range is from 1 through 1440.
|
||
| Step 5 | switch(config-radius)# source-interface interface Example: switch(config-radius)# source-interface mgmt 0 |
(Optional) Assigns a source interface for a specific RADIUS server group. The supported interface types are management and VLAN.
|
||
| Step 6 | exit Example: switch(config-radius)# exit |
Exits configuration mode. |
||
| Step 7 | show radius-server group [group-name] Example: switch(config) # show radius-server group |
(Optional) Displays the RADIUS server group configuration. |
||
| Step 8 | copy running-config startup-config Example: switch(config) # copy running-config-startup-config switch(config) # |
(Optional) Saves the change persistently through reboots and restarts by copying the running configuration to the startup configuration. |
Apply them to an AAA service
Configuring the Global Source Interface for RADIUS Server Groups
You can configure a global source interface for RADIUS server groups to use when accessing RADIUS servers. You can also configure a different source interface for a specific RADIUS server group. Refer to the Related Commands for additional information.
1. configure terminal
2. ip radius source-interface interface
3. exit
4. (Optional) show radius-server
5. (Optional) copy running-config startup config
DETAILED STEPS
| Command or Action | Purpose | |
|---|---|---|
| Step 1 | configure terminal Example: switch# configure terminal switch(config) |
Enters global configuration mode. |
| Step 2 | ip radius source-interface interface Example: switch(config)# ip radius source-interface mgmt 0 |
Configures the global source interface for all RADIUS server groups configured on the device. The source interface can be the management or the VLAN interface. |
| Step 3 | exit Example: switch(config)# exit switch# |
Exits configuration mode. |
| Step 4 | show radius-server Example: switch# show radius-server |
(Optional) Displays the RADIUS server configuration information. |
| Step 5 | copy running-config startup config Example: switch# copy running-config startup-config |
(Optional) Copies the running configuration to the startup configuration. |
Related Commands
| Command | Description |
|---|---|
| aaa group server radius group-name | Creates a RADIUS server group and enters the RADIUS server group configuration submode for that group. The group-name argument is a case-sensitive alphanumeric string with a maximum length of 127 characters. |
Allowing Users to Specify a RADIUS Server at Login
To allow users to specify a RADIUS server at login, perform this task:
1. switch# configure terminal
2. switch(config)# radius-server directed-request
3. switch(config)# exit
4. (Optional) switch# show radius-server directed-request
5. (Optional) switch# copy running-config startup-config
DETAILED STEPS
| Command or Action | Purpose | |
|---|---|---|
| Step 1 | switch# configure terminal |
Enters configuration mode. |
| Step 2 | switch(config)# radius-server directed-request |
Allows users to specify a RADIUS server to send the authentication request when logging in. The default is disabled. |
| Step 3 | switch(config)# exit |
Exits configuration mode. |
| Step 4 | switch# show radius-server directed-request |
(Optional) Displays the directed request configuration. |
| Step 5 | switch# copy running-config startup-config |
(Optional) Copies the running configuration to the startup configuration. |
Configuring the Global RADIUS Transmission Retry Count and Timeout Interval
You can configure a global retransmission retry count and timeout interval for all RADIUS servers. By default, a switch retries transmission to a RADIUS server only once before reverting to local authentication. You can increase this number up to a maximum of five retries per server. The timeout interval determines how long the Cisco Nexus 3000 Series switch waits for responses from RADIUS servers before declaring a timeout failure.
To configure the global RADIUS transmission retry count and timeout interval, perform this task:
1. switch# configure terminal
2. switch(config)# radius-server retransmit count
3. switch(config)# radius-server timeout seconds
4. switch(config)# exit
5. (Optional) switch# show radius-server
6. (Optional) switch# copy running-config startup-config
DETAILED STEPS
| Command or Action | Purpose | |
|---|---|---|
| Step 1 | switch# configure terminal |
Enters configuration mode. |
| Step 2 | switch(config)# radius-server retransmit count |
Specifies the retransmission count for all RADIUS servers. The default retransmission count is 1 and the range is from 0 to 5. |
| Step 3 | switch(config)# radius-server timeout seconds |
Specifies the transmission timeout interval for RADIUS servers. The default timeout interval is 5 seconds and the range is from 1 to 60 seconds. |
| Step 4 | switch(config)# exit |
Exits configuration mode. |
| Step 5 | switch# show radius-server |
(Optional) Displays the RADIUS server configuration. |
| Step 6 | switch# copy running-config startup-config |
(Optional) Copies the running configuration to the startup configuration. |
Configuring the RADIUS Transmission Retry Count and Timeout Interval for a Server
By default, a Cisco Nexus 3000 Series switch retries transmission to a RADIUS server only once before reverting to local authentication. You can increase this number up to a maximum of five retries per server. You can also set a timeout interval that the switch waits for responses from RADIUS servers before declaring a timeout failure.
1. configure terminal
2. radius-server host {ipv4-address | host-name} retransmit count
3. radius-server host {ipv4-address | host-name} timeout seconds
4. exit
5. (Optional) switch# show radius-server
6. (Optional) copy running-config startup-config
DETAILED STEPS
| Command or Action | Purpose | |||
|---|---|---|---|---|
| Step 1 | configure terminal Example: switch# configure terminal switch(config) # |
Enters global configuration mode. |
||
| Step 2 | radius-server host {ipv4-address | host-name} retransmit count Example: #switch(config)# radius-server host server1 retransmit 3 |
Specifies the retransmission count for a specific server. The default is the global value.
|
||
| Step 3 | radius-server host {ipv4-address | host-name} timeout seconds Example: switch(config)# radius-server host server1 timeout 10 |
Specifies the transmission timeout interval for a specific server. The default is the global value.
|
||
| Step 4 | exit Example: switch(config)# exit |
Exits configuration mode. |
||
| Step 5 | switch# show radius-server Example: switch# show radius-server |
(Optional) Displays the RADIUS server configuration. |
||
| Step 6 | copy running-config startup-config Example: switch(config) # copy running-config-startup-config switch(config) # |
(Optional) Saves the change persistently through reboots and restarts by copying the running configuration to the startup configuration. |
Configuring Accounting and Authentication Attributes for RADIUS Servers
You can specify that a RADIUS server is to be used only for accounting purposes or only for authentication purposes. By default, RADIUS servers are used for both accounting and authentication. You can also specify the destination UDP port numbers where RADIUS accounting and authentication messages should be sent.
1. configure terminal
2. (Optional) radius-server host {ipv4-address | host-name} acct-port udp-port
3. (Optional) radius-server host {ipv4-address | host-name} accounting
4. (Optional) radius-server host {ipv4-address | host-name} auth-port udp-port
5. (Optional) radius-server host {ipv4-address | host-name} authentication
6. exit
7. (Optional) show radius-server
8. (Optional) copy running-config startup-config
DETAILED STEPS
| Command or Action | Purpose | |
|---|---|---|
| Step 1 | configure terminal Example: switch# configure terminal switch(config) # |
Enters global configuration mode. |
| Step 2 | radius-server host {ipv4-address | host-name} acct-port udp-port Example: switch(config)# radius-server host 10.10.1.1 acct-port 2004 |
(Optional) Specifies a UDP port to use for RADIUS accounting messages. The default UDP port is 1812. The range is from 0 to 65535. |
| Step 3 | radius-server host {ipv4-address | host-name} accounting Example: switch(config)# radius-server host 10.10.1.1 accounting |
(Optional) Specifies that the specified RADIUS server it to be used only for accounting purposes. The default is both accounting and authentication. |
| Step 4 | radius-server host {ipv4-address | host-name} auth-port udp-port Example: switch(config)# radius-server host 10.10.2.2 auth-port 2005 |
(Optional) Specifies a UDP port to use for RADIUS authentication messages. The default UDP port is 1812. The range is from 0 to 65535. |
| Step 5 | radius-server host {ipv4-address | host-name} authentication Example: switch(config)# radius-server host 10.10.2.2 authentication |
(Optional) Specifies that the specified RADIUS server only be used for authentication purposes. The default is both accounting and authentication. |
| Step 6 | exit Example: switch(config)# exit |
Exits configuration mode. |
| Step 7 | show radius-server Example: switch# show radius-server |
(Optional) Displays the RADIUS server configuration. |
| Step 8 | copy running-config startup-config Example: switch(config) # copy running-config-startup-config switch(config) # |
(Optional) Saves the change persistently through reboots and restarts by copying the running configuration to the startup configuration. |
Configuring Periodic RADIUS Server Monitoring
You can monitor the availability of RADIUS servers. These parameters include the username and password to use for the server and an idle timer. The idle timer specifies the interval during which a RADIUS server receives no requests before the switch sends out a test packet. You can configure this option to test servers periodically.
Note |
For security reasons, we recommend that you do not configure a test username that is the same as an existing user in the RADIUS database. |
The test idle timer specifies the interval during which a RADIUS server receives no requests before the switch sends out a test packet.
The default idle timer value is 0 minutes. When the idle time interval is 0 minutes, the switch does not perform periodic RADIUS server monitoring.
1. configure terminal
2. radius-server host {ipv4-address | host-name} test {idle-time minutes | password password [idle-time minutes] | username name [password password [idle-time minutes]]}
3. radius-server deadtime minutes
4. exit
5. (Optional) show radius-server
6. (Optional) copy running-config startup-config
DETAILED STEPS
| Command or Action | Purpose | |||
|---|---|---|---|---|
| Step 1 | configure terminal Example: switch# configure terminal switch(config) # |
Enters global configuration mode. |
||
| Step 2 | radius-server host {ipv4-address | host-name} test {idle-time minutes | password password [idle-time minutes] | username name [password password [idle-time minutes]]} Example: switch(config)# radius-server host 10.10.1.1 test username user1 password Ur2Gd2BH idle-time 3 |
Specifies parameters for server monitoring. The default username is test and the default password is test. The default value for the idle timer is 0 minutes. The valid range is 0 to 1440 minutes.
|
||
| Step 3 | radius-server deadtime minutes Example: switch(config)# radius-server deadtime 5 |
Specifies the number of minutes before the switch checks a RADIUS server that was previously unresponsive. The default value is 0 minutes. The valid range is 1 to 1440 minutes. |
||
| Step 4 | exit Example: switch(config)# exit |
Exits configuration mode. |
||
| Step 5 | show radius-server Example: switch# show radius-server |
(Optional) Displays the RADIUS server configuration. |
||
| Step 6 | copy running-config startup-config Example: switch(config) # copy running-config-startup-config switch(config) # |
(Optional) Saves the change persistently through reboots and restarts by copying the running configuration to the startup configuration. |
Configuring the Dead-Time Interval
You can configure the dead-time interval for all RADIUS servers. The dead-time interval specifies the time that the Cisco Nexus 3000 Series switch waits after declaring a RADIUS server is dead, before sending out a test packet to determine if the server is now alive. The default value is 0 minutes.
Note |
When the dead-time interval is 0 minutes, RADIUS servers are not marked as dead even if they are not responding. You can configure the dead-time interval for a RADIUS server group. |
To configure dead time interval, perform this task:
1. switch# configure terminal
2. #switch(config)# radius-server deadtime
3. switch(config)# exit
4. (Optional) switch# show radius-server
5. (Optional) switch# copy running-config startup-config
DETAILED STEPS
| Command or Action | Purpose | |
|---|---|---|
| Step 1 | switch# configure terminal |
Enters configuration mode. |
| Step 2 | #switch(config)# radius-server deadtime |
Configures the dead-time interval. The default value is 0 minutes. The range is from 1 to 1440 minutes. |
| Step 3 | switch(config)# exit |
Exits configuration mode. |
| Step 4 | switch# show radius-server |
(Optional) Displays the RADIUS server configuration. |
| Step 5 | switch# copy running-config startup-config |
(Optional) Copies the running configuration to the startup configuration. |
Manually Monitoring RADIUS Servers or Groups
1. test aaa server radius {ipv4-address | server-name} [vrf vrf-name] username password
2. test aaa group group-name username password
DETAILED STEPS
| Command or Action | Purpose | |
|---|---|---|
| Step 1 | test aaa server radius {ipv4-address | server-name} [vrf vrf-name] username password Example: switch# test aaa server radius 10.10.1.1 user1 Ur2Gd2BH |
Sends a test message to a RADIUS server to confirm availability. |
| Step 2 | test aaa group group-name username password Example: switch# test aaa group RadGroup user2 As3He3CI |
Sends a test message to a RADIUS server group to confirm availability. |
Verifying RADIUS Configuration
To display RADIUS configuration information, perform one of the following tasks:
1. show running-config radius [all]
2. show startup-config radius
3. show radius-server [server-name | ipv4-address] [directed-request | groups | sorted | statistics]
DETAILED STEPS
| Command or Action | Purpose | |
|---|---|---|
| Step 1 | show running-config radius [all] Example: switch# show running-config radius |
Displays the RADIUS configuration in the running configuration. |
| Step 2 | show startup-config radius Example: switch# show startup-config radius |
Displays the RADIUS configuration in the startup configuration. |
| Step 3 | show radius-server [server-name | ipv4-address] [directed-request | groups | sorted | statistics] Example: switch# show radius-server radServer1 |
Displays all configured RADIUS server parameters. |
Displaying RADIUS Server Statistics
1. show radius-server statistics {hostname | ipv4-address}
DETAILED STEPS
| Command or Action | Purpose | |
|---|---|---|
| Step 1 | show radius-server statistics {hostname | ipv4-address} Example: switch# show radius-server statistics 10.10.1.1 |
Displays the RADIUS statistics. |
Example RADIUS Configuration
The following example shows how to configure RADIUS:
switch# configure terminal
switch(config)# radius-server key 7 "ToIkLhPpG"
switch(config)# radius-server host 10.10.1.1 key 7 "ShMoMhTl" authentication accounting
switch(config)# aaa group server radius RadServer
switch(config-radius)# server 10.10.1.1
switch(config-radius)# exit
switch(config-radius)# use-vrf management
Default RADIUS Settings
The following table lists the default settings for RADIUS parameters.
| Parameters |
Default |
|---|---|
| Server roles |
Authentication and accounting |
| Dead timer interval |
0 minutes |
| Retransmission count |
1 |
| Retransmission timer interval |
5 seconds |
| Idle timer interval |
0 minutes |
| Periodic server monitoring username |
test |
| Periodic server monitoring password |
test |
 Feedback