- Index
- New and Changed Information
- Preface
-
- Configuring and Managing VSANs
- SAN Device Virtualization
- Creating Dynamic VSANs
- Configuring Inter-VSAN Routing
- Configuring and Managing Zones
- Distributing Device Alias Services
- Configuring Fibre Channel Routing Services and Protocols
- Dense Wavelength Division Multiplexing
- Managing FLOGI, Name Server, FDMI, and RSCN Databases
- Discovering SCSI Targets
- Configuring FICON
- Advanced Features and Concepts
-
- Configuring FIPS
- Configuring Users and Common Roles
- Configuring SNMP
- Configuring RADIUS and TACACS+
- Configuring IPv4 Access Control Lists
- Configuring Certificate Authorities and Digital Certificates
- Configuring IPsec Network Security
- Configuring FC-SP and DHCHAP
- Configuring Port Security
- Configuring Fabric Binding
- Launching Fabric Manager in Cisco SAN-OS Releases Prior to 3.2(1)
- Cisco Fabric Manager Unsupported Feature List
- Interface Nonoperational Reason Codes
- Managing Cisco FabricWare
- Fabric Manager Web Services
Managing Configuration Files
This chapter describes how to initially configure switches using the configuration files so they can be accessed by other devices. This chapter includes the following sections:
•![]() About Flash Devices, page 16-1
About Flash Devices, page 16-1
•![]() Formatting Flash Devices and File Systems, page 16-2
Formatting Flash Devices and File Systems, page 16-2
•![]() Using the File System, page 16-2
Using the File System, page 16-2
•![]() Downloading Configuration Files to the Switch, page 16-7
Downloading Configuration Files to the Switch, page 16-7
About Flash Devices
Every switch in the Cisco MDS 9000 Family contains one internal bootflash (see Figure 16-1). The Cisco MDS 9500 Series additionally contains one external CompactFlash called slot0 (see Figure 16-1 and Figure 16-2).
Figure 16-1 Flash Devices in the Cisco MDS 9000 Supervisor Module
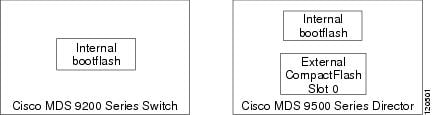
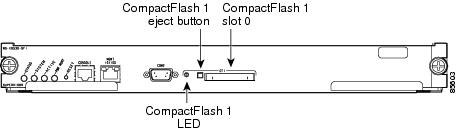
Figure 16-2 External CompactFlash in the Cisco MDS 9000 Supervisor Module
Internal bootflash:
All switches in the Cisco MDS 9000 Family have one internal bootflash: that resides in the supervisor or switching module.You have access to two locations within the internal bootflash: file system.
•![]() The volatile: file system provides temporary storage, and it is also the default location for file system commands. Files in temporary storage (volatile:) are erased when the switch reboots.
The volatile: file system provides temporary storage, and it is also the default location for file system commands. Files in temporary storage (volatile:) are erased when the switch reboots.
•![]() The bootflash: (nonvolatile storage) file system provides permanent storage. The files in bootflash: are preserved through reboots and power outages.
The bootflash: (nonvolatile storage) file system provides permanent storage. The files in bootflash: are preserved through reboots and power outages.
Formatting Flash Devices and File Systems
By formatting a Flash devices or a file system, you are clearing out the contents of the device or the file system and restoring it to its factory-shipped state.
See the "About Flash Devices" section on page 16-1 and the "Using the File System" section on page 16-2.
Using the File System
All switches in the Cisco MDS 9000 Family have one internal bootflash: that resides in the supervisor or switching module.You have access to two directories within the internal bootflash: file system.
•![]() The volatile: directory provides temporary storage, and it is also the default. Files in temporary storage (volatile:) are erased when the switch reboots.
The volatile: directory provides temporary storage, and it is also the default. Files in temporary storage (volatile:) are erased when the switch reboots.
•![]() The bootflash: (nonvolatile storage) directory provides permanent storage. Files in permanent storage (bootflash:) are preserved through reboots and power outages.
The bootflash: (nonvolatile storage) directory provides permanent storage. Files in permanent storage (bootflash:) are preserved through reboots and power outages.
Cisco MDS 9500 Series directors contain an additional external CompactFlash referred to as the slot0: directory. The external CompactFlash, an optional device for MDS 9500 Series directors, can be used for storing software images, logs, and core dumps.
You can use Device Manager to perform the following functions to help you manage software image files and configuration files:
•![]() Creating a Directory, page 16-3
Creating a Directory, page 16-3
•![]() Deleting an Existing File or Directory, page 16-4
Deleting an Existing File or Directory, page 16-4
•![]() Performing Other File Manipulation Tasks, page 16-7
Performing Other File Manipulation Tasks, page 16-7
Flash Files
To list the files in a directory using Device Manager, follow these steps:
Step 1 ![]() Click Admin > Flash Files.
Click Admin > Flash Files.
By default, you see the bootflash directory listed for the supervisor's local partition (see Figure 16-3).
Figure 16-3 Flash Files Dialog Box
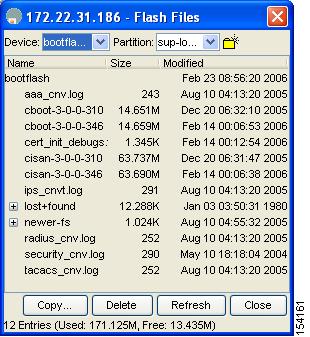
Step 2 ![]() Select the device and partition for the directory you want to view from the drop-down lists.
Select the device and partition for the directory you want to view from the drop-down lists.
You see a list of files and directories.
Creating a Directory
To create a directory using Device Manager, follow these steps:
Step 1 ![]() Click Admin > Flash Files.
Click Admin > Flash Files.
By default, you see the bootflash directory listed for the supervisor's local partition (see Figure 16-4).
Figure 16-4 Flash Files Dialog Box
Step 2 ![]() Select the device and partition from the drop-down lists for the directory where you want to create the directory.
Select the device and partition from the drop-down lists for the directory where you want to create the directory.
Step 3 ![]() Click the Create Directory icon to create a directory.
Click the Create Directory icon to create a directory.
You see the Create New Directory dialog box as shown in Figure 16-5.
Figure 16-5 New Directory Dialog Box
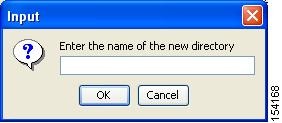
Step 4 ![]() Enter the name of the new directory, and click OK.
Enter the name of the new directory, and click OK.
You see the new directory in the directory listing.

Tip ![]() Any directory saved in the volatile: file system is erased when the switch reboots.
Any directory saved in the volatile: file system is erased when the switch reboots.
Deleting an Existing File or Directory
To delete a file or directory using Device Manager, follow these steps:
Step 1 ![]() Click Admin > Flash Files.
Click Admin > Flash Files.
By default, you see the bootflash: directory listed for the supervisor's local partition (see Figure 16-6).
Figure 16-6 Flash Files Dialog Box
Step 2 ![]() Select a device and partition from the drop-down lists.
Select a device and partition from the drop-down lists.
Step 3 ![]() Click the file or directory you want to delete.
Click the file or directory you want to delete.
Step 4 ![]() Click Delete to delete the file or directory.
Click Delete to delete the file or directory.

Caution
Copying Files
To copy a file using Device Manager, follow these steps:
Step 1 ![]() Select Admin > Flash Files.
Select Admin > Flash Files.
By default, you see the bootflash: directory listed for the supervisor's local partition (see Figure 16-7).
Figure 16-7 Flash Files Dialog Box
Step 2 ![]() Select the device and partition from the drop-down lists for the directory containing the file you want to copy.
Select the device and partition from the drop-down lists for the directory containing the file you want to copy.
Step 3 ![]() Click Copy.
Click Copy.
You see the Copy dialog box shown in Figure 16-8.
Figure 16-8 Copy Flash Files in Device Manager
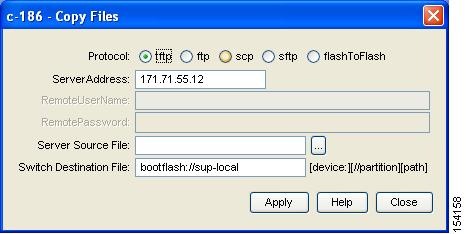
Step 4 ![]() Choose the protocol you want to use for the copy process: tftp, ftp, scp, or flashToFlash.
Choose the protocol you want to use for the copy process: tftp, ftp, scp, or flashToFlash.
Step 5 ![]() Enter the address of the source server for a flash to flash copy only.
Enter the address of the source server for a flash to flash copy only.
Step 6 ![]() Click the ... button to browse for the source file on your local PC or on the server, depending on the type of copy.
Click the ... button to browse for the source file on your local PC or on the server, depending on the type of copy.

Note ![]() If you are copying from flash, the filename must be in the format:
If you are copying from flash, the filename must be in the format:
[device>:][<partition>:]<file>
Where device is a value obtained from FlashDeviceName, partition is a value obtained from FlashPartitionName and file is the name of a file in flash.
Step 7 ![]() Enter the Switch Destination File name. (See the note in Step 6.)
Enter the Switch Destination File name. (See the note in Step 6.)
Step 8 ![]() Click Apply.
Click Apply.
Performing Other File Manipulation Tasks
To perform the following CLI-specific tasks, refer to the Cisco MDS 9000 Family CLI Configuration Guide:
•![]() Displaying file contents
Displaying file contents
•![]() Displaying the last line in a file
Displaying the last line in a file
•![]() Saving output to a file
Saving output to a file
•![]() Moving files
Moving files
•![]() Compressing and uncompressing files
Compressing and uncompressing files
•![]() Executing commands specified in a script
Executing commands specified in a script
•![]() Setting the delay time
Setting the delay time
Working with Configuration Files
Configuration files can contain some or all of the commands needed to configure one or more switches. For example, you might want to download the same configuration file to several switches that have the same hardware configuration so that they have identical module and port configurations.
This section describes how to work with configuration files and has the following topics:
•![]() Downloading Configuration Files to the Switch, page 16-7
Downloading Configuration Files to the Switch, page 16-7
•![]() Saving the Configuration, page 16-8
Saving the Configuration, page 16-8
•![]() Backing Up the Current Configuration, page 16-9
Backing Up the Current Configuration, page 16-9
Downloading Configuration Files to the Switch
You can configure a switch in the Cisco MDS 9000 Family by using configuration files you create or download from another switch. In addition, you can store configuration files on a bootflash device on the supervisor module and you can configure the switch using a configuration stored on an external CompactFlash disk.
Before you begin downloading a configuration file using a remote server, do the following:
•![]() Ensure the configuration file to be downloaded is in the correct directory on the remote server.
Ensure the configuration file to be downloaded is in the correct directory on the remote server.
•![]() Ensure that the permissions on the file are set correctly. Permissions on the file should be set to world-read.
Ensure that the permissions on the file are set correctly. Permissions on the file should be set to world-read.
•![]() Ensure the switch has a route to the remote server. The switch and the remote server must be in the same subnetwork if you do not have a router or default gateway to route traffic between subnets.
Ensure the switch has a route to the remote server. The switch and the remote server must be in the same subnetwork if you do not have a router or default gateway to route traffic between subnets.
Check connectivity to the remote server using ping.
Saving the Configuration
To save the configuration file using Device Manager, follow these steps:
Step 1 ![]() Click Admin > Save Configuration.
Click Admin > Save Configuration.
You see this message:
Really save running to startup configuration?
Step 2 ![]() Click Yes to save the configuration. Click No to close the pop-up window without saving the configuration.
Click Yes to save the configuration. Click No to close the pop-up window without saving the configuration.
Saving the Running Configuration
After you have created a running configuration in system memory, you can save it to the startup configuration in NVRAM.
To save the configuration file using Device Manager, follow these steps:
Step 1 ![]() Click Admin > Copy Configuration.
Click Admin > Copy Configuration.
You see the Copy Configuration dialog box shown in Figure 16-9.
Figure 16-9 Copy Configuration Dialog Box
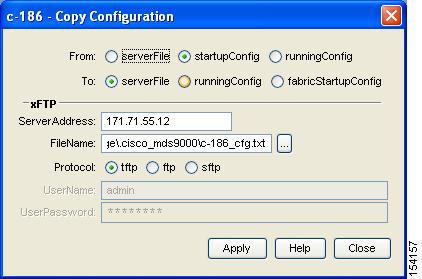
Step 2 ![]() Select the location of the file you will copy from (serverFile, startupConfig, runningConfig).
Select the location of the file you will copy from (serverFile, startupConfig, runningConfig).
Step 3 ![]() Select the location of the file you will copy to (serverFile, runningConfig, fabricStartupConfig).
Select the location of the file you will copy to (serverFile, runningConfig, fabricStartupConfig).
Note ![]() You can copy a file fabric-wide using the fabricStartupConfig option, available in Cisco MDS SAN-OS Release 2.1(1a) or later.
You can copy a file fabric-wide using the fabricStartupConfig option, available in Cisco MDS SAN-OS Release 2.1(1a) or later.
Step 4 ![]() Enter the server address of the source server.
Enter the server address of the source server.
Step 5 ![]() Click the ... button to browse for the source file on the switch or the server, depending on the type of copy.
Click the ... button to browse for the source file on the switch or the server, depending on the type of copy.
Step 6 ![]() Select the protocol you want to use to perform the copy procedure: tftp, ftp, or sftp.
Select the protocol you want to use to perform the copy procedure: tftp, ftp, or sftp.
Step 7 ![]() Enter the user name and password you use to access the switch or server.
Enter the user name and password you use to access the switch or server.
Step 8 ![]() Click Apply.
Click Apply.
Saving Startup Configurations in the Fabric
You can use Cisco Fabric Services (CFS) to instruct the other switches in the fabric to save their configurations to their local NVRAM. You can copy the running configuration to the startup configuration across the entire fabric by using the fabricStartupConfig option. This triggers every switch in the fabric to copy its running configuration to its startup configuration.
Note ![]() If any switch fails during this fabric-wide copy, that switch and the switch that you used to initiate this process will keep the existing startup configuration. This does not affect the other switches in the fabric.
If any switch fails during this fabric-wide copy, that switch and the switch that you used to initiate this process will keep the existing startup configuration. This does not affect the other switches in the fabric.
Backing Up the Current Configuration
Before installing or migrating to any software configuration, back up the startup configuration. To back up the startup configuration using Device Manager, follow these steps:
Step 1 ![]() Select Admin > Copy Configuration.
Select Admin > Copy Configuration.
You see the Copy Configuration dialog box as shown in Figure 16-10.
Figure 16-10 Copy Configuration Dialog Box
Step 2 ![]() Select the location of the file you want to back up (server file, startup configuration, or running configuration).
Select the location of the file you want to back up (server file, startup configuration, or running configuration).
Step 3 ![]() Select the destination of the file (server file, running configuration, fabric startup configuration).
Select the destination of the file (server file, running configuration, fabric startup configuration).
Step 4 ![]() Enter the server address.
Enter the server address.
Step 5 ![]() Click the ... button to select the file name.
Click the ... button to select the file name.
Step 6 ![]() Choose the file transfer protocol (tftp, ftp, or sftp).
Choose the file transfer protocol (tftp, ftp, or sftp).
Step 7 ![]() Enter the user name and password for the server you specified in Step 4.
Enter the user name and password for the server you specified in Step 4.
Step 8 ![]() Click Apply to copy the file.
Click Apply to copy the file.
 Feedback