The documentation set for this product strives to use bias-free language. For the purposes of this documentation set, bias-free is defined as language that does not imply discrimination based on age, disability, gender, racial identity, ethnic identity, sexual orientation, socioeconomic status, and intersectionality. Exceptions may be present in the documentation due to language that is hardcoded in the user interfaces of the product software, language used based on RFP documentation, or language that is used by a referenced third-party product. Learn more about how Cisco is using Inclusive Language.
The Cisco ACI App Center allows you to fully enable the capabilities of the APIC by writing applications running on the controller. Using the Cisco ACI App Center, customers, developers, and partners will be able to build applications to simplify, enhance, and visualize their use cases.
These applications are hosted and shared at the Cisco ACI App Center and installed in the APIC.
APIC supports two types of applications:
Stateful
Stateless
About Stateless Applications
A stateless application (app) is a simple HTML, CSS, or JavaScript based front-end that is run as part of the APIC UI. These
apps are also referred to as front-end only applications. They can be launched from the Apps tab in the APIC UI or can be inserted as a separate tab in any part of the APIC UI.
Stateless apps are inserted in the APIC UI as an IFRAME. In this type of applications, app specific state is stored on the
APIC for that app. The app queries APIC using its northbound REST APIs and retrieves information from the APIC. In stateless
app, no state is maintained in the between two invocations of the app.
Figure 1. Stateless Application
Some of the common examples for stateless app include the following:
Data visualization apps that gather data available from querying the APIC and that can present them in a visual format.
L4-L7 vendor specific configuration apps.
Launching a Stateless Application
Depending on how the stateless application is designed, it can be launched in the following ways:
If the app is inserted as part of the APIC’s UI, the admin or user can navigate to the specific section in the APIC UI and
access the app by clicking on the corresponding tab for the app.
In the APIC UI, the admin can navigate to Apps > Installed Apps and then double-click the app to create a tab in the APIC UI that will contain the application.
In both cases, an app stops functioning when admin or user navigates away from the App tab. An admin or tenant may invoke the app by navigating to the specific section of the APIC UI.
Single Sign On for Stateless Application
An admin or tenant does not require a new log in mechanism to launch a stateless app. Stateless apps use the same session
as the admin or tenant that is currently logged in to the APIC UI.
When an admin installs an app, APIC creates an user and role for the app. This user and role has the privilege as described
by the app's metadata in the app.json file.
Figure 2. SSO Sequence for Stateless Application
The SSO sequence for stateless apps consists of the following steps:
When an admin user clicks on the app to launch the app, the APIC UI launches the app in the IFRAME.
APIC UI makes a request to APIC server for a token that can be used by the app for SSO.
Upon receiving the token, the APIC UI passes the token to the app by using the token passing mechanism provided in the app-start.html file included in the app.
The app uses this token to make REST API calls to APIC.
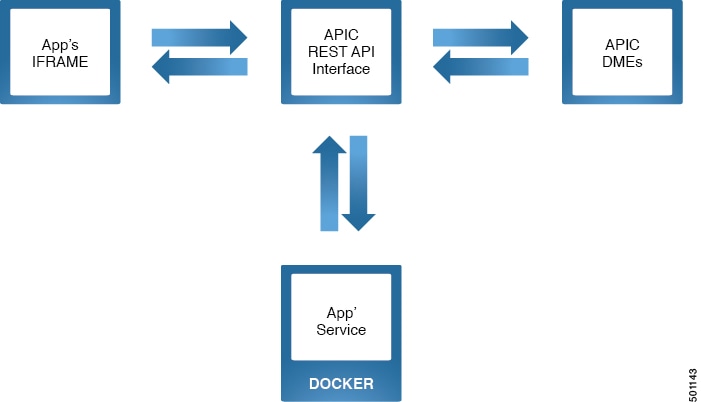
About Stateful Applications
A stateful application (app) has a backend service that runs continuously on the APIC. Consequently, the app may store a state
in this backend for specific functions. Stateful app’s backend service is run on APIC in a sandboxed containerized environment;
namely a docker container. The service makes queries to the APIC using the APIC’s REST API interface. A stateful app may also
have a front-end component in addition to backend component. This front-end component is inserted in the APIC UI as an IFRAME,
in the same way as a stateless app. If a stateful app is developed without a front-end, then it is installed using REST APIs.
Figure 3. Stateful Application with a Front-End
Figure 4. Stateful Application without a Front-End
Some of the common examples for stateful app include the following:
Visualization Apps that can plot graphs for the historical data for a specific time interval.
Alerts apps that can send alerts based on certain events that are not supported natively in APIC.
Monitoring apps that can track APIC’s events, faults, and statistics and analyze it for detecting anomalies.
Apps to sync the data between APIC and a third party vendor.
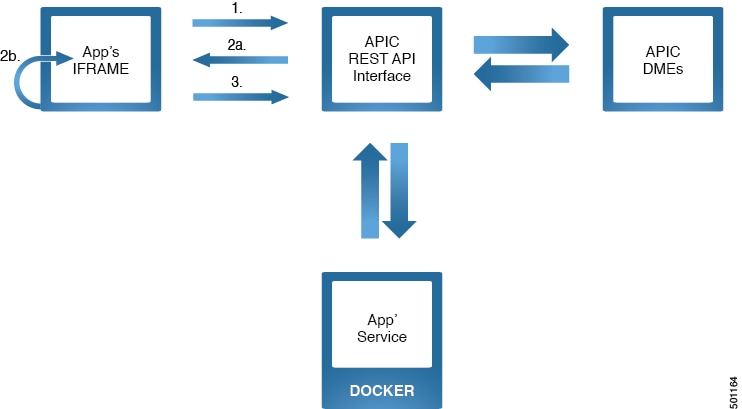
Single Sign On for Stateful Application
When an admin installs an app, APIC creates an user and role for the app. This user and role has the privilege as described
by the app's metadata in the app.json file.
Figure 5. SSO Sequence for Stateful Application
The SSO sequence for stateful apps consists of the following steps:
When an admin user clicks on the app to launch the app, the APIC UI launches the app in the IFRAME.
SSO between the app UI and the APIC backend
APIC UI makes a request to APIC server for a token that can be used by the app for SSO.
Upon receiving the token, the APIC UI passes the token to the app by using the token passing mechanism provided in the app-start.html file included in the app.
The app uses this token to make REST API calls to APIC.
SSO between the app container and the APIC backend
APIC provides a private key to the app's container. In the container, the key is available in the directory /home/app/credentials.
The app uses the key to authenticate.
APIC authenticates based on key and replies accordingly.
Understanding Permissions for an Application
The APIC provides access according to a user’s role through role-based access control (RBAC). A Cisco Application Centric
Infrastructure (ACI) app user (aaaAppUser) is associated with the following:
A set of roles called permissions
Permission level: read-only or write (read and write)
One or more security domain tags that identify the portions of the management information tree (MIT) that a user can access
The permissions and permission level for an application are defined in the app.json file. See Metadata Required for Developing an Application. The security domains for an app are associated when it is installed. Before you install an app, you can review the permissions,
permission level, and security domain for an app.
When an app is installed in APIC, an app user and role is created for the app using the meta data from the app.json file. Both the app user and the role have the same name, corresponding to the following format:
vendordomain_appid
All the queries made by the app is restricted to user, role, and the security domain created for this app. You can limit the
managed objects an app can access using RBAC. It is recommended to assign the minimum set of permissions that is required
for the app's functionality. See Permissions.
See Cisco ACI AAA RBAC Rules and Privileges for more information about user roles, privileges, and security domains.
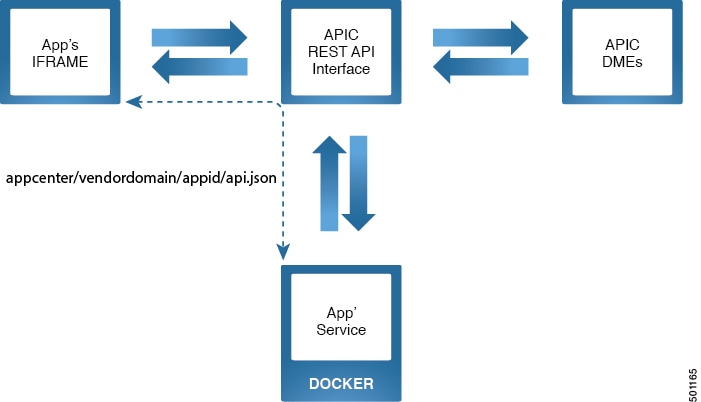
Understanding Application Communication
Figure 6. Application Communication
The front-end of an app communicates with the backend by issuing the following API call to the app backend running in docker,
where api.json or api.xml in an API path provided by the application.
GET/POST https://APIC_IP/appcenter/vendordomain/appid/api.json
Or
GET/POST https://APIC_IP/appcenter/vendordomain/appid/api.xml
The vendordomain and appid are specific to the app and is defined in the app.json file.
Note
The IP address of APIC IP is always 172.17.0.1 in relation to the docker. When the backend makes calls to the APIC, it uses
the IP address 172.17.0.1.
You can retrieve the APIC_IP in JavaScript, using document.location.origin.
The request is then forwarded to the docker instance where the app is running. The app returns a response which is then forwarded
back to the front-end. The API URLs must be declared in the app.json file and only authenticated users can make the API call.
During the installation of an app, a user and role are created and then a certificate key pair is assigned to the user. When
the app is installed, the private key is added to the docker image. The private key is located in the docker image in the
directory /home/apps/credentials. Using the private key, the app then creates a session with NGINX for the user. Once the session is created, API calls can
be made to retrieve the MIT information. Since the session was created for a user, the app is limited to access the information
only available to the user and user is limited to the permission as defined in the app.json file.
Docker instances can be located on different APICs. It is not recommended to have communication between docker instances located
on different APICs or the same APIC.
Stateless app can be developed using the APIC Simulator. To develop and test a stateless app, download the APIC Simulator
OVA.
To develop a stateful app, you must have access to the Cisco APIC image, release 2.2(1x) and later. You will also need access
to a docker environment running a docker container.
Stateless apps are web applications containing HTML, CSS, or JavaScript files.
A stateful app can be developed using any language inside the docker container. Since APIC supports python bindings for its
API, python may be preferred for developing a stateful app.


 Feedback