Developing a Stateful Application

This chapter contains the following sections:

Components of Stateful Application

A Stateful application includes the following files:

  • app.json — A JSON file containing the metadata required for developing an application. The metadata also informs the APIC on where to insert the app in the APIC UI. See Metadata Required for Developing an Application.

  • app.html — A HTML file that implements the UI or the front-end of the application.

  • app-start.html — It contains information to receive the tokens from the APIC and coverts the data into a cookie.

  • .tgz — A .tgz file such as aci_appcenter_docker_image.tgz containing the docker image. A docker image contains all the packages required by the app to implement the backend. The image can contain packages such as web server to open the API, OpenSSL for security, Cisco APIC Python SDK (cobra) for querying the APIC.

  • start.sh— A script containing the initializations required by the application. This script is executed automatically after the docker image is installed.

Workflow for Developing a Stateful Application

Use this procedure to develop a stateful application.

Procedure


Step 1

Setting up the directory structure and the files required for the application.

See Creating Directory Structure for a Stateless Application.

Step 2

Creating the metadata for the application.

See Metadata Required for Developing an Application.

Step 3

Signing on to the APIC from the app.

See Signing in to the APIC from the Application Using RBAC

Step 4

Packaging the application.

See Packaging an Application.

Step 5

(Optional) Enabling signature validation for an application.

This step is applicable only if you are publishing the app to Cisco ACI App Center.See Enabling Signature Validation for an Application

Step 6

Do one of the following:

Step 7

Download the app from Cisco ACI App Center.

This step is required only if you are publishing the app to Cisco ACI App Center. See Downloading Application From Cisco ACI App Center.

Step 8

Installing and launching the application.

See Installing an Application.


Guidelines and Limitations

  • The size of the docker image should not exceed 1 GB.

  • Every stateful application must have a separate docker image. Sharing of docker images is currently not supported.

  • You must configure NTP policy to keep the time in all APICs in sync. This requirement is necessary since the X509 certificate could be generated on one APIC and validated on a different APIC.

Directory Structure for Stateful Application

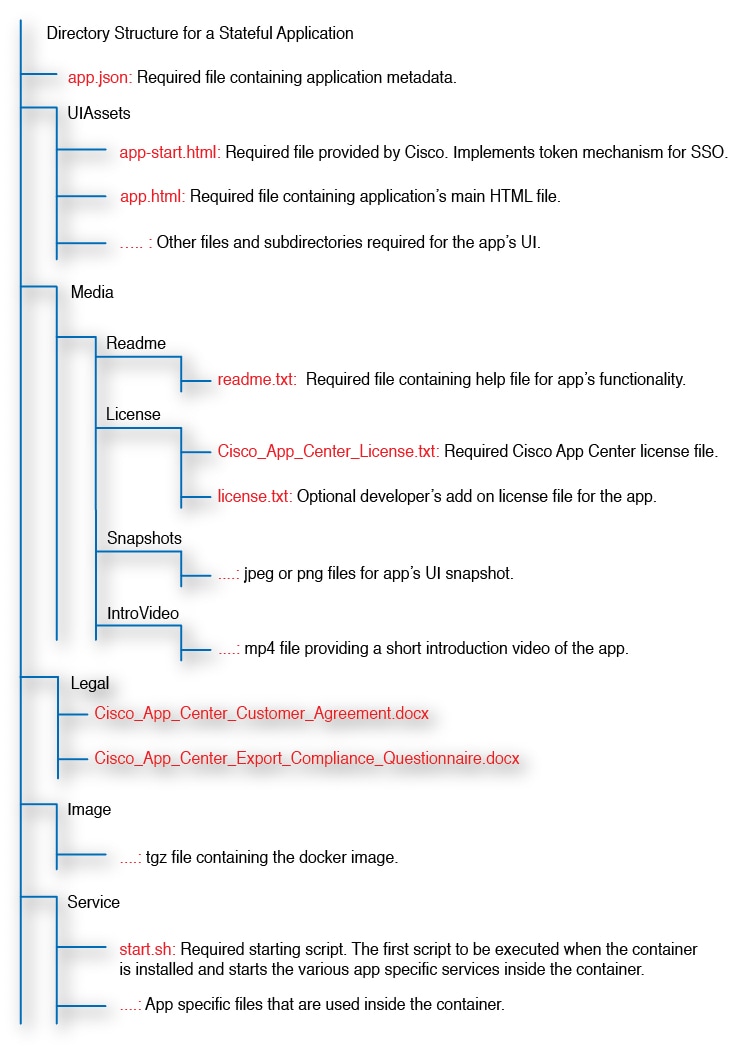
Figure 1. Recommended Directory Structure for a Stateful Application

Creating Directory Structure for a Stateful Application

Use this procedure to create the directory structure and all the files required for developing a stateful application for the Cisco ACI App Center. See the Appendix for examples of the various files required to develop the application.

Procedure


Step 1

Create a directory for the app you are developing in your workspace. All the folders and files required for developing the application must be added to this folder.

Step 2

Create the metadata for the app in the app.json file.

This file is required and has information required by the Cisco ACI App Center to recognize the app and validate it. See Metadata Required for Developing an Application for information regarding the metadata required for the app.json file.

Step 3

Create a Media folder and the files specified in this folder for your app.

This folder contains the following folders and files:

  • Readme (Required) — The readme directory only contains the readme.txt file and cannot be empty. When you publish the app to the Cisco ACI App Center, the readme.txt file is used to present the information about the app to the user on the app description page in the Cisco ACI App Center.

  • License (Required) — The license folder contains the Cisco_App_Center_License.txt file. It is the Cisco license file for the app and is added automatically when using the Cisco packager. Optionally, the developer can also add a separate app specific license file for the app in this location.

  • Snapshots (Optional) — The snapshot folder contains files which provide a preview of the app before the user downloads the app from the Cisco ACI App Center. It is optional and provides information regarding the app in various modes.

  • IntroVideo (Optional) — The IntroVideo folder is optional. It contains a video which introduces the app and give information on how the app works. The supported format for the video is mp4.

Step 4

Create a Legal folder and add the files containing the legal information required for your app.

The directory must include the following two files. These files are automatically provided when using the Cisco packager to package an app.

  • Cisco_App_Center_Customer_Agreement.docx

  • Cisco_App_Center_Export_Compliance_Questionnaire.docx

Step 5

Create a UIAssets folder and the files specified in this folder for your app.

The UIAssets folder is the core folder which contains all the intelligence about the app. This folder contains the HTML, CSS, and JavaScript files for the app. This folder must at least include the following files:
  • app.html (Required) — A HTML file that implements the UI or the front-end of the application. The content of this file is specific to the app. This file contains the HTML page that will be embedded in APIC’s UI. It can import various others files such as CSS or Javascript files provided within the UIAssets folder. This file must contain the function to use the tokens specified in app-start.html.

  • app-start.html (Required) — A HTML file provided by Cisco and can be downloaded from Cisco DevNet. Every application must include this file for single-sign on to work. It is recommended that you do not modify this file.

    It contains the cookie information to implement the single sign-on in an application. It contains the cookie data and the mechanism to retrieve the data from APIC. This file must contain the data for the cookies, token and challenge. The value of the cookie is sent to APIC as headers as part of each request made from app’s UI to avail single sign-on.

    This file also includes the loading sequence for an app. It contains a message which is displayed when the app is being loaded.

    It contains information to receive the tokens from the APIC and coverts the data into a cookie. You must then get the tokens used in a cookie and use it in further requests.

    APIC regularly sends a token to the application. The app must have the mechanism to receive and update its token accordingly. You can retrieve the token using Ext.util.Cookies.get, each time you make a request.

    
    <script type="text/javascript">
        window.addEventListener('message', function (e) {
            if (e.source === window.parent) {
                var tokenObj = Ext.decode(e.data, true);
                if (tokenObj) {
    // Setting the cookie with the tokens received by the APIC
                    Ext.util.Cookies.set('app_' + tokenObj.appID + '_token', tokenO
    bj.token);                
                    Ext.util.Cookies.set('app_' + tokenObj.appID + '_urlToken', tokenO
    bj.urlToken);
                }
            }
        });
      </script>


    Another option for implementation, is to store the tokens from the cookie in variables. In this example, the application HelloAci uses window.APIC_DEV_COOKIE and window.APIC_URL_TOKEN when sending a request.

    
    <script type="text/javascript">
        window.APIC_DEV_COOKIE = Ext.util.Cookies.get("app_Cisco_HelloAciStateful_token");
        window.APIC_URL_TOKEN =  Ext.util.Cookies.get("app_Cisco_HelloAciStateful_urlToken");
    
        window.addEventListener('message', function (e) {
            if (e.source === window.parent) {
                var tokenObj = Ext.decode(e.data, true);
                if (tokenObj) {
                    window.APIC_DEV_COOKIE = tokenObj.token;
                    window.APIC_URL_TOKEN = tokenObj.urlToken;
                }
    } });
    </script>


    App requests made to the APIC require a custom DevCookie and APIC-Challenge header to be set for proper authentication. After accessing the tokens, you must include them in the HTTP requests headers.

    
    window.APIC_DEV_COOKIE = Ext.util.Cookies.get("app_Cisco_HelloAciStateful_token");
    window.APIC_URL_TOKEN =  Ext.util.Cookies.get("app_Cisco_HelloAciStateful_urlToken");
     
    HttpRequest.prototype.query = function (query, success_func)
    {
        var Http = new XMLHttpRequest();
        var url1 = 'https://'+gSystem+'/'+query;
     
        Http.open("GET", url1, false);
     
        Http.setRequestHeader("DevCookie",window.APIC_DEV_COOKIE);
        Http.setRequestHeader("APIC-Challenge",window.APIC_URL_TOKEN);
        Http.setRequestHeader ("Accept", "application/json");
     
        Http.onreadystatechange = function(){
            if (Http.readyState==4){
                if (Http.status==200){
                    success_func(Http.responseText);
                }
            }
        }
     
        Http.send();
    };
    
    
Step 6

Create a Image folder.

This folder contains the required docker image such as aci_appcenter_docker_image.tgz for the application. A docker image contains all the packages required by the app to implement the backend. The image can contain packages such as Web server to open the API, OpenSSL for security, Cisco APIC Python SDK (cobra) for querying the APIC. The execution environment for the app should be provided in this image. See Creating a Docker Image on how to create a docker image and add it to the image folder.

Cisco also provides reference docker images and this image can be downloaded from Cisco DevNet. Cisco provides the following docker images:

  • Docker image containing Cobra SDK.

  • Docker image containing SQLite database, Cobra SDK, and Acitoolkit.

  • Docker image containing MySQL database, Cobra SDK, and Acitoolkit.

Note 

The size of the docker image should not exceed 1 GB. Every stateful application must have a separate docker image. Sharing of docker images is currently not supported.

If you bring your own docker image or update the Cisco's reference image, you must first unzip or untar the docker.tgz file, then remove the manifest.json file, and finally tar or zip the docker.tgz file.

When the docker image is mounted, it contains the following directories located in /home/app:

  • src — Contains all the source files for the app.

  • credentials — Contains the private key to query the APIC.

  • data — Contains the data for the distributed file system in the APIC cluster.

  • log — Contains the logs for the app that is collected as part of tech support.

Step 7

Create a Service folder and the files specified in this folder for your app.

This folder contains the service files.
  • start.sh (Required) — It contains the first script that is executed after the docker container is installed. It includes all the initializations required for the application. It also allows you to start any script specified in the docker image.

  • Other files (Optional) — This folder could contain a server.py file that runs a Web server providing an API for the application. In this case, start.sh file must contain the line starting server.py. In this release, only python is supported as an execution environment.

  • stop.sh (Optional) — It contains the script that will be executed when the application is uninstalled. It allows to gracefully stop the sensitive processes in the container if required. For example, it can be used in the case of leadership change.


Creating a Docker Image

Use this procedure to create the docker image for a stateful app and add it to the image directory. Creating a docker image is necessary, only if you want to deviate from the reference docker image provided by Cisco for the ACI App Center. The docker image must be created on a local machine or on a VM that has a docker engine installed.

Before you begin

  • You have obtained the reference docker image provided by Cisco.

Procedure


Step 1

Log in to your local workspace.

Step 2

Enter the command docker load -i path to base docker image to upload the reference docker image.

Step 3

(Optional) To remove the Cobra SDK and Acitoolkit package from the reference image perform the following steps. Removing the packages, will decrease the size of the container.

  1. Remove the Cobra SDK and Acitoolkit packages from the reference image.

  2. Enter the commands pip uninstall acicobra and pip uninstall acimodel to remove the Cobra SDK package provided in the reference image.

  3. Enter the command pip uninstall acitoolkit to remove the Acitoolkit package provided in the reference image.

Step 4

Enter the command docker images to retrieve the image ID.

Step 5

Enter the command docker run -d Image_ID tail -f /dev/null to run the docker container and mount the packages.

Step 6

Enter the command docker ps to retrieve the docker container ID.

Step 7

Enter the command docker exec -it Container_ID /bin/bash to connect to the docker container.

Step 8

Install the packages in the container.

Step 9

Enter the command docker commit Container_ID Image_Name: Tag to commit the updates.

Step 10

Enter the command docker save Image_Name: Tag | gzip -c > path to the output directory to save the image as a tgz file.

Note 

In the docker save command, use Image_Name : Tag and do not use Image_ID .

Step 11

Add the tgz file to the image folder of the app.


Metadata Required for Developing an Application

The app.json file contains metadata for the app. The following table lists the metadata required for developing an app for the Cisco ACI App Center.

Table 1. Metadata to be Specified in the app.json File

Parameter

Mandatory

Can Be Updated

Description

Restrictions

appid

Yes

No

The unique ID for the app which is used to identify the app in the Cisco ACI App Center and in the APIC.

The ID is a string and can be up to 32 alpha numeric characters only.

version

Yes

Yes

Version of the application specifying a major M version and a minor m version.

The version is a string M.m and M and m are positive integers. The values of M and m are in the range 0 to 9999.

iconfile

Yes

Yes

The path to the icon file in the UIAssets folder. The icon file contains the thumbnail for the app. The thumbnail is used to uniquely identify the app in the Cisco ACI App Center.

The path to the icon file is a string and the file name can be up to 256 characters. The supported file formats are jpeg or png.

name

Yes

No

The name of the application.

The name is a string and can be up to 256 characters.

shortdescr

Yes

Yes

The description of the app. This information is displayed when the app is listed in the Cisco ACI App Center.

The short description is a string and can be up to 1024 characters.

vendor

Yes

No

The name of the company.

The name is a string and can be up to 256 alpha numeric characters only.

vendordomain

Yes

No

The domain ID of the company.

The ID is a string and can be up to 32 alpha numeric characters only.

apicversion

Yes

Yes

The minimum APIC software version required for the app’s functionality.

Must be unique and greater than last approved application.

The format is major.minor(mp), where

  • m=maintenance

  • p=patch

  • major,minor,maintenance is 0 <= and <=999

  • Patch is character [a-z]

signature

No

Yes

The signature required for the application files. The signature is issued by Cisco ACI App Center after an app is approved and is allowed to be distributed.

Note 

Only apps with the signature are supported by Cisco. Apps without the signature are not supported.

None

price

No

Yes

Total cost to download the app. The default is $0.

The format for the value is float.

contact

No

Yes

The contact information for the app.

The format is JSON dictionary.

contact-phone

No

Yes

The contact phone number of the company.

The phone number is a string.

contact-email

No

Yes

The contact email of the company.

The email is a string.

contact-url

No

Yes

The contact URL of the company.

The URL is a string.

permissions

Yes

Yes

The permissions required by the app to access the various managed objects and utilities in the MIT. See Cisco ACI AAA RBAC Rules and Privileges for more information about user roles, privileges, and security domains.

Note 

It is recommended to assign the minimum set of permissions that is required for the app's functionality.

The format is JSON array.

permissionslevel

Yes

No

The permission level required for the application. The permission level defines if the user has read or write access to the app.

The permission level is a string and can be either read or write.

api

Note 

The metadata is only applicable for a stateful app.

Yes

Yes

The API supported by the application. Each entry in the API list contains the API URL and the corresponding description. The API is used to query the backend.

Note 

In the API, only POST and GET operations are supported.

The format is JSON dictionary. The key and value are strings.

author

Yes

Yes

The name of the app developer.

The author is a string and can be up to 256 characters.

insertionURL

No

Yes

The insertion URL of the app in the APIC UI. The URL informs the APIC on where to insert the app in the APIC UI. By default, the user will be able to run the app from the Installed Apps tab. See Integrating the App's UI in the APIC UI.

The insertion URL is a string.

category

Yes

Yes

The categories of the app used by Cisco ACI App Center to filter the apps.

The allowed categories allowed are:

  • Tools and Utilities

  • Visibility and Monitoring

  • Optimization

  • Security

  • Networking

  • Cisco Automation and Orchestration

The format is JSON array.

Data Types for a Stateful App

Important Notes for Persisting, Encrypting, Storing, and Logging Data

  • An app can create, write, or read directories or files into the /home/app/data directory. The app’s /home/app/data directory is persisted and available between two invocations of the app. This directory is persisted even during APIC switch over due to APIC failure or during upgrades.

  • An app must write its data into the /home/app/data directory and tech support logs must be written into the /home/app/log directory.

  • The app data is already protected in the APIC, but App can implement its own encryption mechanism to store the data and decryption mechanism to read the data.

  • If an App needs faster queries to the stored data, it can store the data in a database as opposed to a file. Cisco provides the following two docker images that have database support. See Cisco DevNet.

    • Docker image providing SQLite database support

    • Docker image providing MySQL database support

  • An app can log errors, debugs, and warnings into the /home/app/log directory. These logs are local to an APIC, unlike the App data directory. Logs can be collected using tech support. See Collecting Tech Support Logs for a Stateful App.

Signing in to the APIC from the Application Using RBAC

Use the procedure to sign in to the APIC from the app using RBAC.

Procedure


Step 1

Perform the following steps on the front-end files.

  1. Link app.js to your app.html front-end form.

  2. From the app.js, obtain the APIC_DEV_COOKIE and APIC_URL_Token based on the app vendor and app name.

    Example:

    window.APIC_DEV_COOKIE = Ext.util.Cookies.get("app_Infoblox_InfobloxAci_token");
    window.APIC_URL_TOKEN =  Ext.util.Cookies.get("app_Infoblox_InfobloxAci_urlToken");
    
    
  3. Target the API of the backend server. Ensure the API is defined in the app.json metadata file.

    Example:

    var infobloxUrl = document.location.origin + "/appcenter/Infoblox/InfobloxAci/run_infoblox.json";
    
  4. Make an AJAX call to send the front-end form data to the server on the backend.

    Example:

    $(document).ready(function(){
      $('#submit_button').click(function(e){
        // e.preventDefault();
        console.log('sending form data...');
        $.ajax({
          type: 'post',
          url: infobloxUrl,
          headers: {
           "DevCookie": window.APIC_DEV_COOKIE,
           "APIC-challenge": window.APIC_URL_TOKEN
          },
          // data: $(this).serialize(),
          data: JSON.stringify({
            'ip_address': document.getElementById('inputIPAddress').value,
            'username': document.getElementById('inputUsername').value,
            'password': document.getElementById('inputPassword').value
          }),
          contentType: 'application/json;charset=UTF-8',
          dataType: 'json',
          success: function(){
            alert('success');
          }
        });
      });
    });
    
    
Step 2

Perform the following steps on the backend files.

  1. Use COBRA to convert App-Username (Vendor_AppID) to a Cert-User.

    Example:

    from cobra.model.pol import Uni as PolUni
    from cobra.model.aaa import UserEp as AaaUserEp
    from cobra.model.aaa import AppUser as AaaAppUser
    from cobra.model.aaa import UserCert as AaaUserCert
    
    certUser = 'Infoblox_InfobloxAci'
    polUni = PolUni('')
    aaaUserEp = AaaUserEp(polUni)
    aaaAppUser = AaaAppUser(aaaUserEp, certUser)
    aaaUserCert = AaaUserCert(aaaAppUser, certUser)
    
    
  2. Unpack pKey from the plugin.key file on app. This file is automatically generated when the app is installed.

    Example:

    pKeyFile = '/home/app/credentials/plugin.key'
    with open(pKeyFile, "r") as file:
        pKey = file.read()
    
    
  3. On the server, receive the IP address, username, and password of the app from the front-end input form through the AJAX call. Forward this data along with the aaaUserCert and pKey to the service's starting script of the app.

    Example:

    @app.route('/run_infoblox.json', methods=['GET', 'POST'])
    def run_infoblox():
        infoblox_url = request.json["ip_address"]
        infoblox_user = request.json["username"]
        infoblox_pw = request.json["password"]
    
    	infoblox.StartScript(infoblox_url, infoblox_user, infoblox_pw, aaaUserCert, pKey)
    
    
Step 3

Perform the following steps on the service’s starting script file.

  1. Sign a POST request to /api/requestAppToken.json including the pKey.

    Example:

    from OpenSSL.crypto import FILETYPE_PEM, load_privatekey, sign
    
    uri = "/api/requestAppToken.json"
    
    app_token_payload={"aaaAppToken":{"attributes":{"appName": "Infoblox_InfobloxAci"}}}
    data = json.dumps(app_token_payload)
    payLoad= "POST" + uri + data
    
    p_key = load_privatekey(FILETYPE_PEM, self.p_key_str)
    
    signedDigest = sign(p_key, payLoad.encode(), 'sha256')
    signature = base64.b64encode(signedDigest).decode()
    
    
  2. Create a custom-signed token specific to the /api/requestAppToken.json request.

    Example:

    user_cert_str= str(self.user_cert.dn)
    token = "APIC-Request-Signature=" + signature + ";"
    token += "APIC-Certificate-Algorithm=v1.0;"
    token += "APIC-Certificate-Fingerprint=fingerprint;"
    token += "APIC-Certificate-DN=" + user_cert_str
    
    
  3. Make a request to /api/requestAppToken.json using the payload specified before and validate with the token created. The IP address of APIC in relation to the app is 172.17.0.1.

    Example:

    session= requests.session()
    r= session.post("http://172.17.0.1/api/requestAppToken.json", data=data, headers={'Cookie' : token })
    auth = json.loads(r.text)
    auth_token = auth['imdata'][0]['aaaLogin']['attributes']['token']
    
    
  4. Use this auth_token to create more requests and to create a WebSocket connection. Refresh the auth_token every five minutes using the /api/aaaRefresh.json method. See Cisco APIC REST API Configuration Guide for more information.