Tour of the Wizard
Welcome to Secure Workload where assigning labels and grouping your workloads is essential to the power of Secure Workload. In Secure Workload, onboarding is a user-friendly and guided approach to help you set up and deploy applications securely in your environment. You can segment your network to allow only the traffic that is required for your business, and block all other communications.
To help you get started, from the navigation menu, choose Overview to navigate to the Quick Start wizard. The wizard typically prepares Secure Workload to start creating segmentation policies to control traffic on your network, presents a series of steps, each focusing on a specific security aspect, and prompts users to make informed choices for configuring their workload securely.
The following user roles can access the wizard:
-
Site Administrator: Provides the ability to manage users, agents, and more. The site administrator can view and edit all features and data. There must be at least one site admin.
-
Customer Support: Provides access to cluster maintenance features. Allows the same access as a Site Administrator but cannot modify users. Typically for Technical Support or Advanced Services roles.
-
Scope Owner: Manages and defines the scope of workloads, ensures policy compliance, and oversees workload security within the designated scope.
For more information on roles and responsibilities, see the Secure Workload User Guide.
Install Software Agents
Cisco Secure Workload supports various types of software agents for different environments, including virtual machines, bare metal servers, containers, Windows servers, Windows desktops, Linux servers, Kubernetes, AIX, and Solaris systems. These agents provide deep visibility and enforcement capabilities. The agent installer can be downloaded directly from Secure Workload, and it supports installation, upgrade, and monitoring functionalities. For more information see the Cisco Secure Workload Guide.
You can install software agents on your application workloads. The software agents collect information about the network interfaces and the active processes running on the host system.
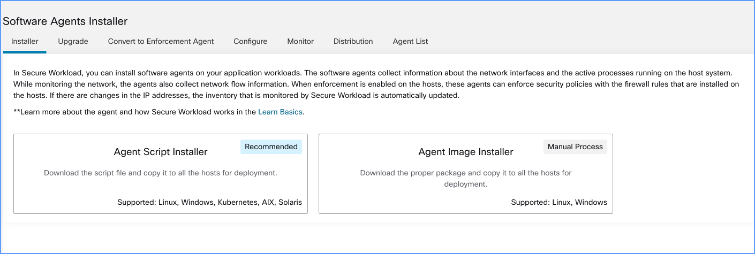
There are two ways how you can install the software agents:
-
Agent Script installer: Use this method for installing, tracking, and troubleshooting of issues while installing the software agents. Supported platforms are Linux, Windows, Kubernetes, AIX, and Solaris.
-
Agent Image installer: Download the software agent image to install a specific version and software agent type for your platform. Supported platforms are Linux and Windows.
The onboarding wizard walks you through the process of installing the agents based on the selected installer method. For information on software agent installation, see the instructions on the Secure Workload UI and the Secure Workload User Guide.
Group and Label Workloads
The organization assigns labels to a group of workloads to create a scope. The hierarchical scope tree helps to divide the workloads into smaller groups, while reserving the lowest branch in the scope tree for individual applications.
Select a parent scope from the scope tree to create a new scope, which contains a subset of the members from the parent scope.
On this window, organize your workloads into groups in a hierarchical structure. Break down your network into hierarchical groups to allow more flexibility and scalable policy discovery and definition.
The wizard helps to apply labels to their workloads, which are key parameters that describe a workload or endpoint represented as a key-value pair. These labels are then grouped into scopes, and workloads are automatically grouped into scopes based on their associated labels. You can define segmentation policies based on scopes.
Hover over each block or scope in the tree for more information about the type of workloads or hosts it includes.
 Note |
In the Get Started with Scopes and Labels window, Organization, Infrastructure, Environment and Application are the keys and the text in the gray boxes in-line with each key are the values. For example, all workloads belonging to Application 1 are defined by these set of labels:
|
Power of Labels and Scope Trees
Labels drive the power of Secure Workload, and the scope tree created from your labels is more than just a summary of your network. Few of the benefits of using labels are:
-
Labels let you instantly understand your policies, for example:
"Deny all traffic from Pre-Production to Production"Compare the same policy without labels, which is:
"Deny all traffic from 172.16.0.0/12 to 192.168.0.0/16" -
Policies based on labels automatically apply (or stop applying) when you add labeled workloads to (or removed from) inventory. Over time, these dynamic groupings based on labels greatly reduce the amount of effort required to maintain your deployment.
-
Workloads are grouped into scopes based on their labels. These groupings let you easily apply policy to related workloads. For example, you can easily apply policy to all applications in the Pre-Production scope.
-
After you create policies in a single scope, the policies can automatically be applied to all workloads in descendant scopes in the tree, minimizing the number of policies you must manage.
For example, you can easily define and apply policy broadly to all workloads in your organization or narrowly (which is on just the workloads that are part of a specific application) or to any level in between, for example, to all workloads in a data center.
-
You can assign responsibility for each scope to different administrators, delegating policy management to the people who are more familiar with your network.
Build the Hierarchy for Your Organization
Start building your hierarchy or scope tree; this involves identifying and categorizing the assets, determining the scope, defining roles and responsibilities, developing policies and procedures to create a branch of the scope tree.
The wizard guides you through creating a branch of the scope tree. Enter IP addresses or subnets for each blue-outlined scope, the labels are automatically applied based on the scope tree.
Pre-requisites:
-
Gather IP Addresses or Subnets associated with your Pre-Production environment, your data centers, and your Internal network.
-
Gather as many IP addresses or subnets as you can, you can add the additional IP addresses or subnets later.
-
As you build your tree, you can add IP addresses or subnets for the other scopes in the tree (the gray blocks).
To create the scope tree, perform the following tasks:
Define the Internal Scope
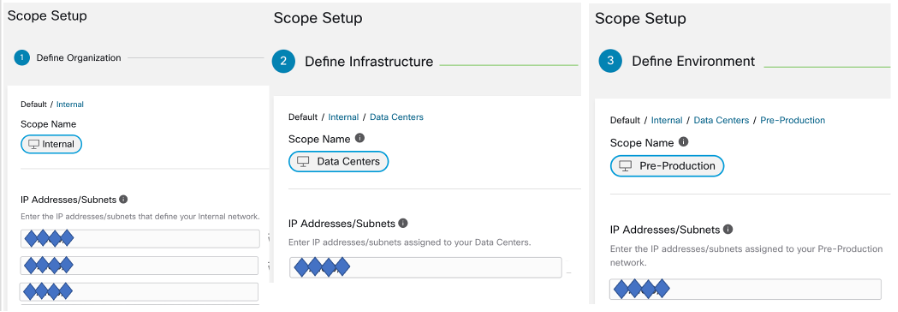
The internal scope includes all IP addresses that define your organization's internal network, including public and private IP addresses.
The wizard walks you through adding IP addresses to each scope in the tree branch. As you add addresses, the wizard assigns labels to each address that defines the scope.
Organization=InternalBy default, the wizard adds the IP addresses in the private internet address space as defined in RFC 1918
Note |
All the IP addresses need not be entered at once, but you must include the IP addresses associated with your chosen application, you can add the rest of the IP addresses at a later time. |
Define the Data Center Scope
This scope includes the IP addresses that define your on-premises data centers. Enter the IP addresses/subnets that define your internal network
Note |
Scope names should be short and meaningful. |
On this window, enter the IP addresses that you have entered for the organization, these addresses must be a subset of the addresses for your internal network. If you have multiple data centers, include all of them in this scope so you can define a single set of policies.
Note |
You can always add more addresses at a later stage. For instance, the wizard assigns these labels to each of the IP addresses: |
Define the Pre-Production Scope
This scope includes IP addresses of non-production applications and hosts, such as development, lab, test, or staging systems.
Note |
Ensure you do not include addresses of any applications that are used to conduct actual business, use them for the production scope that you define later. |
The IP addresses you enter on this window must be a subset of the addresses you entered for your data centers, include the addresses of your chosen application. Ideally, they should also include pre-production addresses that are not part of the chosen application.
Note |
You can always add more addresses at a later stage. |
Review Scope Tree, Scopes, and Labels
Before you start creating the scope tree, review the hierarchy that you can see on the left window. The root scope shows labels that were automatically created for all configured IP addresses and subnets. At a later stage in the process, applications are added to this scope tree.
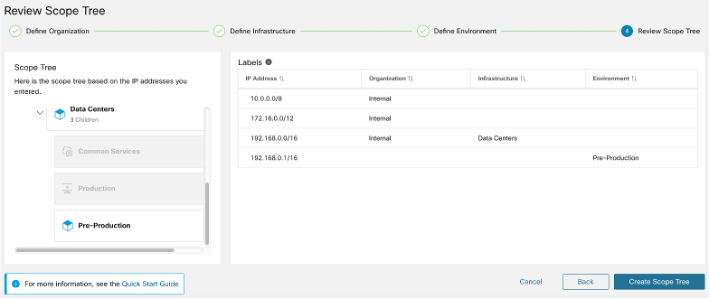
You can expand and collapse branches and scroll down to choose a specific scope. Onthe right pane, you can see the IP addresses and labels assigned to the workloads for the specific scope. On this window, you can review, modify the scope tree before you add an application to this scope.
Note |
If you want to view this information after you exit the wizard, from the navigation menu, choose . |
Review Scope Tree
Before you start creating the scope tree, you must review the scope hierarchy. The root scope shows labels that were automatically created for all configured IP addresses and subnets. At a later stage in the process, applications are added to this scope tree.
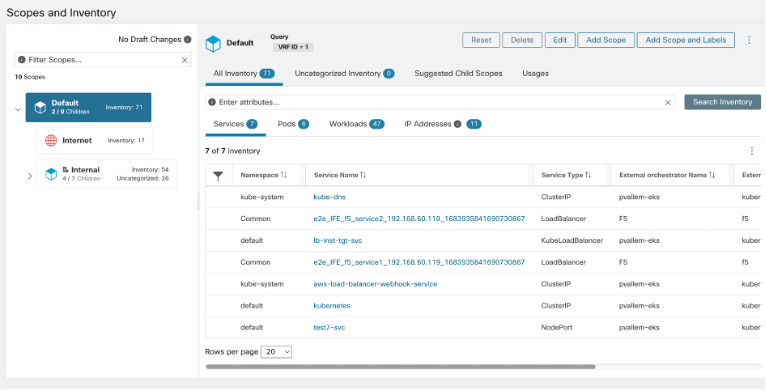
You can expand and collapse branches and scroll down to choose a specific scope. On the right pane, you can see the IP addresses and labels assigned to the workloads for the specific scope. In this window, you can review and modify the scope tree before you add an application to the scope.
Note |
If you want to view this information after you exit the wizard, from the navigation pane, choose Organize > Scopes and Inventory. |
Create Scope Tree
After you review the scope tree, create the scope tree.
For information on the scope tree, see the Scopes and Inventory section in the Secure Workload User Guide.
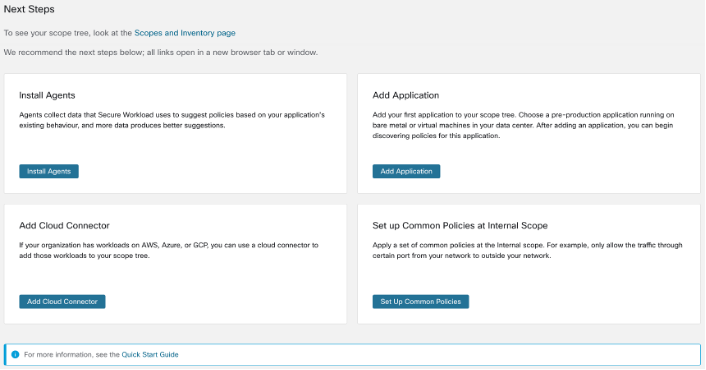
Next Steps
Install Agents
Install the SecureWorkload agents on the workloads associated with your chosen application.The data that the agents gather is used to generate suggested policies based on the existing traffic on your network. More the data, more accurate policies are produced. For details, see the Software Agents section in the Secure Workload user guide.
Add Application
Add the first application to your scope tree. Choose a pre-production application running on bare metal or virtual machines in your data center. After adding an application, you can begin discovering policies for this application. For more information, see the Scopes and Inventory section of the Secure Workload user guide.
Set up Common Policies at Internal Scope
Apply a set of common policies at the Internal scope. For example, only allow the traffic through certain port from your network to outside your network.
Users can define policies manually using Clusters, Inventory Filters and Scopes or these can be discovered and generated from flow data using Automatic Policy Discovery.
After you install agents and allow at least a few hours for traffic flow data to accumulate, you can enable Secure Workload to discover policies based on that traffic. For details, see Automatically Discover Policies section of the Secure Workload User Guide.
Apply these policies at Internal (or Inside or Root) scope to effectively review policies.
Add Cloud Connector
If your organization has workloads on AWS, Azure, or GCP, use a cloud connector to add the workloads to your scope tree. For more information, see the Cloud Connectors section in the Secure Workload User Guide.
 ).
).

 Feedback