Secure Workload On-Premises Cluster to SaaS Migration

This chapter focuses on Secure Workload on-premises cluster migration to Secure Workload SaaS deployment. In this scenario, each on-premises cluster tenant is migrated to a dedicated tenant on the SaaS. If the on-premises appliance has multiple tenants, migrate each tenant to a corresponding dedicated tenant on the SaaS so that each migrated new SaaS tenant is therefore accessible using a unique URL.

This chapter contains the following sections:

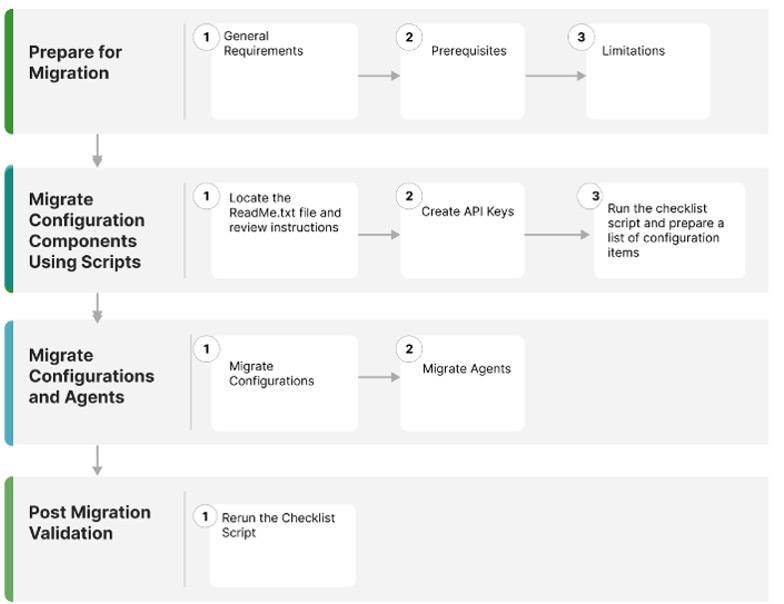
Overview of Data Migration from On-Premises Cluster to SaaS Deployment

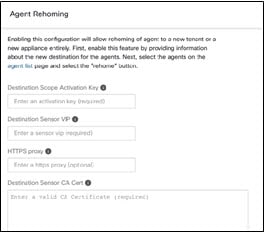
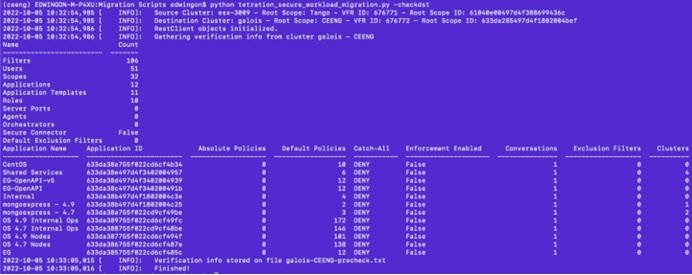
When migrating data from an on-premises cluster to a SaaS deployment in Secure Workload, use APIs to automate the migration process; however, you will require manual configurations for certificates and keys for Orchestrators, Connectors, Virtual Appliances and User Accounts. While migrating user accounts, users must reset their passwords on the new Cisco Secure Workload instance.


Note


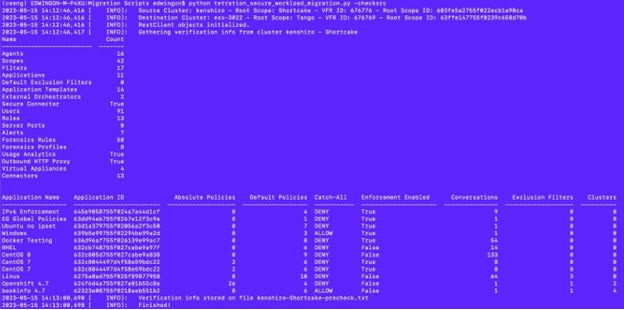
Configuration data, flow data, audit logs, conversations, and ADM history are not a part of this migration.


End-to-End Migration Workflow

To ensure a smooth migration, follow the following end-to-end workflow that outlines the necessary steps for migrating data and configurations from an on-premise appliance to a SaaS deployment. It is important to complete each step sequentially to maximize the migration activity.

Figure 1. Prepare for Migration

Prepare for Migration

Prepare for the migration that includes general requirements, prerequisites, and limitations.

Migrate Configuration Components Using Scripts

After downloading the migration script, locate the ReadMe.txt file and review the instructions in the text file. Ensure to install the Python environment and the required libraries for the migration scripts on the client machine.

Migrate Configurations and Agents

After building the premigration checklist, proceed with the migration of configurations and software agents.

Post Migration Validation

After migrating the automated and manual configuration items, rerun the checklist script to verify the migration.

Assumptions

This document assumes familiarity with the Cisco Secure Workload solution and provides other assumptions that are related to the migration process. These assumptions include:

  • If there is an on-premises cluster, which is involved in the migration process, then it either has a single tenant or each tenant on the on-premises cluster is migrated to a dedicated SaaS tenant separately.

  • Appropriate licenses are available on the destination tenant, and Admin access is available for the SaaS migration.

  • No configuration changes on the on-premises cluster environment during the migration period.

  • Frozen configuration changes on the on-premises cluster environment for the time period of migration..

  • On-premises appliances and services are working as expected and are healthy.

  • Ensure that there are no critical or warning level alerts from the on-premises appliances.

  • As of release 3.8 the following features are deprecated:

    • Hardware sensors and universal agents.

    • Data Platform – Tetration Lookout Apps (Organize > Look Out)

    • Dashboard – Flows (Investigate > Traffic Dashboard).

    • Performance Dashboard (Investigate > Performance Dashboard).

    • Neighborhood App (Investigate > Neighborhood).

    • Policy chord view within Workspace.

Prepare for Migration

General Requirements

  • The on-premises cluster and software agents must be on 3.8 version or later. If the on-premises appliance is running older versions, we recommend upgrading the cluster and software agent to 3.8 version before proceeding with the migration.

    For information on how to upgrade, see Cisco Secure Workload Upgrade Guide.

  • Create a list of external systems that communicate with Secure Workload platform APIs. When the migration is complete, make sure you create the appropriate Secure Workload API credentials on the new SaaS tenant and update the external systems with the new keys.

  • Expect temporary agent enforcement interruptions during the migration, therefore, plan a maintenance window accordingly.

Prerequisites

  • When you create the SaaS tenant, either manually or through automated APIs, transition local users from an on-premises environment to a SaaS tenant

    There are two types of external authentication:

    • Lightweight Directory Access Protocol (LDAP): To migrate unsupported local users in the SaaS environment, you must first migrate users to an Identity Provider (IdP). For migrating the users to an IdP, submit a request in the SaaS platform for manual migration of users and the roles.

    • Single Sign-On(SSO): For SSO migration, use Federation with the customer IdP. This type of external authentication involves establishing a trust relationship between the SaaS platform and the IdP. Raise a request in the SaaS platform for manual migration of users and the roles.

  • Change the URL to access the Secure Workload tenant.

  • Review the CMDB entries and Retention aspects (On-premises versus SaaS).

    For more information, see Cisco Secure Workload as a Service for details on data retention and deletion.

  • When migrating from on-premises to SaaS, the Secure Workload UI options under the Platform > Troubleshoot sections on the On-premise appliance are not available; also, external infrastructure monitoring is not required in a SaaS deployment.

    • HTTP Outbound/Proxy configuration is not required in a SaaS deployment.

    • Usage Analytics option is not available in a SaaS deployment.

  • Ensure that your enterprise outbound firewall rules allow outbound access to the Secure Workload SaaS destination. The SaaS welcome email has a detailed list of IPs that must be in the allowed list.

  • Ensure you document the verification outputs while you are performing the migration workflow.

  • Review the release notes for detailed information on the new features. As of release 3.8, the following features are deprecated:

    • Hardware sensors and universal agents

    • Data Platform–Tetration Lookout Apps (Organize > Look Out)

    • Dashboard–Flows (Investigate > Traffic Dashboard Out)

    • Performance Dashboard (Investigate > Performance Dashboard)

    • Neighborhood App (Investigate > Neighborhood)

    • Policy chord view within workspaces

Limitations

  • The following data items are not migrated:

    • Historical flow data

    • Change logs

    • API Keys (recreate and add to the external systems)

  • Within a Workspace, the following data items are not migrated:

    • Activity logs and policy version history

    • ADM conversations and historical ADM results and revision history

    • Only the latest version of the policy is migrated. After the migration is complete, reenable the policy analysis.

  • The following data items are not available or supported on a SaaS deployment:

    • Agent Remote VRF configuration and Interface configuration intents

    • Login Page Message and SSL certificate options

    • STIX-TAXII

    • Federation

  • During migration, the following are either not available or not required in a SaaS deployment:

    • Nonavailability of the GUI options Platform > Troubleshoot on the on-premises appliance

    • Nonavailability of the Usage Analytics option

    • Avoid any external infrastructure monitoring.

    • Avoid any HTTP outbound or proxy configurations.

Migrate Configuration Components Using Scripts

Procedure


Step 1

After downloading the migration script, locate the ReadMe.txt file and review the instructions to ensure that you create the Python environment and install the required libraries for the migration scripts on the client machine.

Note


Open a TAC case and request access to on-premises to SaaS migration scripts . The actual command usages and output varies in this document; see the README document with the specifics provided at the time of migration.

Step 2

Log in to Secure Workload tenants as a Site Admin on both the source and destination cluster tenants.

Step 3

On the Secure Workload UI, choose the human icon > API Keys.

Step 4

To create API keys, choose Create API Key and check at least one API capability from the following list:

Figure 2. API Key Capabilities

Step 5

Download the API key file and save it in the same location as the migration scripts.

Step 6

Run the checklist script on the on-premises tenant to prepare a list of configuration items for migration. Ensure that you record the output from the checklist script.

Step 7

Rerun the checklist script against the new SaaS tenant at various stages of migration to ensure proper migration of all the configuration items.

Figure 3. Checklist Script Output

Note


Use the migration scripts to automate some of the configuration items while some may not be automated. The last set of configuration items require manual migration because of lack of API support at this point.

The following table shows the complete list of configuration items for migration:

Table 1. Configuration Components for Migration

Configuration Component

Migration Method

Manual Labels

Automated

Scopes

Automated

Inventory Filters

Automated

Agent Profiles

Automated

Agent Intents

Automated

Workspaces

Automated

Workspace Policies (latest version)

Automated

Workspace Clusters

Automated

Roles

Automated

Users

Automated

Exclusion Filters-Default & Workspace

Automated

External Orchestrators

Automated (Credentials are required)

Client Server Config (Server Ports)

Automated

Forensics - Profiles and Intents

Automated

Policy Templates (custom templates)

Manual (API available, not automated yet)

Collection Rules

Automated

Default ADM configuration

Automated

Alert config/Publishers

Automated

Secure Connector

Manual (APIs not available)

Virtual Appliances (Ingest or edge)

Manual (APIs not available)

Connectors

Manual (API available, not automated yet)

Data tap configuration

Manual (APIs not available)

Note


If you are using External Orchestrators and Connectors, keep the credentials handy before proceeding to the next phase of migration.


Migrate Configurations and Software Agents

As a first step to migrating the configurations and agents, prepare a premigration checklist. After the premigration checklist is ready, start migrating the configurations and the agents. While migrating some configurations in parallel that are without dependencies, we recommend scheduling a maintenance window for disruptive actions such as agent migration, moving, installing, or uninstalling and enforcement cutover activities.

Customer Experience (CX) engineers and partners prepare a plan, detailing the entire migration process considering your environment and specific requirements.

Migrate Configurations

Before you begin

To proceed with migration, we recommend that you redeploy the Virtual Appliances (Injest and Edge) and Secure Connectors if they are already in use.

For more information, see Virtual Appliances for Connectors in the Secure Workload User Guide.

If you can access the External orchestrators or Connectors only from an on-premises cluster and the migration is to a SaaS tenant, we recommend you deploy a Secure Connector on the on-premises appliance for the connectivity between SaaS and on-premise infrastructure.

For more information, see Secure Connectors in the Secure Workload User Guide.

Procedure


Step 1

Run the migration script to migrate the configuration:

Figure 4. Label Migration
Figure 5. Scope Tree Migration

Note


Any queries for filters, scopes, and intents that are based on labels from Orchestrators and Connectors, or Agents are migrated to the new SaaS tenant, but the status might display ‘unknown annotations’. After you complete the migration of the agents, Connectors and Orchestrators to the new SaaS tenent, the warning no longer displays on the GUI.

Figure 6. Unknown Annotations

Note


The migration script disables the enforcement for workspaces in the SaaS tenant, therefore, you must manually reenable the enforcement after completing the agent migration.

Step 2

Run the summary script option to compare each automated configuration item against the output recorded during premigration. For discrepancies on any specific items, identify the configuration item by running a comparison of on-premises tenant configuration versus the SaaS tenant configuration.

Note


Work with TAC and SRE teams for further investigation on the migration failures.

Step 3

You cannot automate the migration of Connectors using the shared automation scripts, however APIs are available for automated migration. Recreate the API keys, secrets, or credentials for the Connectors and add them to the new configuration on the destination SaaS tenant. For more information, see Secure Connectors in the Secure Workload User Guide.


Migrate Software Agents

Before you begin

Ensure that the on-premises cluster and the Software agents are on the same version˗Secure Workload 3.8.x.x.

Before you begin the migration process, prepare a list of functional tests for the required applications. Run the tests and make sure you are receiving expected outcomes and are recording them.

Procedure


Step 1

Disable the enforcement for the chosen set of agents for migration. Depending on the migration plan, choose either a single or a phased approach for migrating all the agents.

Step 2

From the navigation pane, choose Manage > Agents and select the Agent Rehoming option to add the agent rehoming configurations.

Scope Activation Key: From the navigation pane, choose Menu > Workloads > Agents > Installer Tab > Agent Image Installer.

Destination Sensor CA Cert: From the navigation pane, choose Menu > Platform > Cluster Configuration on destination cluster.

Destination Sensor VIP: From the navigation pane, choose Menu > Platform > Cluster Configuration on destination cluster.

Note


For the SaaS deployment, use the sensor VIP-"wss<cluster_name>.tetrationcloud.com" and the "cluster_name" from the agent installer script name. The filename for the installer script follows the format- tetration_installer_<tenant_name>_<agent_type>_<os>_<cluster_name>.

Figure 7. Agent Rehoming

Step 3

For rehoming the agents, choose all or only the required set of agents for migration and click Re-home Agents.

Step 4

Verify that each of the agents registers correctly under the Manage > Agents > Agent list on the Secure Workload UI.

Step 5

After you migrate the agents, enable enforcement on the relevant workspaces.

Step 6

Ensure that you provision the policies on the workspace. From the navigation pane, choose Defend > Enforcement status on the Secure Workload UI, and verify the following:

  • Concrete Policies in Sync status displays Yes and is in Green.

  • Concrete Policies in Sync status displays No and is in Red.

    From the navigation pane, choose Workload profile for the given workload and look for errors in the Download logs > Initiate log collection.

Note


Make sure you complete all the required checks before proceeding for the verification check.


Post-Migration Validation

After migrating the automated and manual configurations, rerun the checklist script and make sure that the configuration items (including the number of agents) on the SaaS tenant matches with the items on the on-premises tenant.
Figure 8. Post-Migration Validation