Secure Workload Cluster to Cluster Migration

This chapter outlines a step-by-step process on migration paths, prerequisites, limitations, and the workflow guidance to execute and verify a successful migration. In this process, migrate data and configurations from a Secure Workload M4 or M5 cluster to an M6 cluster with a matching form factor, such as 39RU or 8RU.

This chapter contains the following sections:

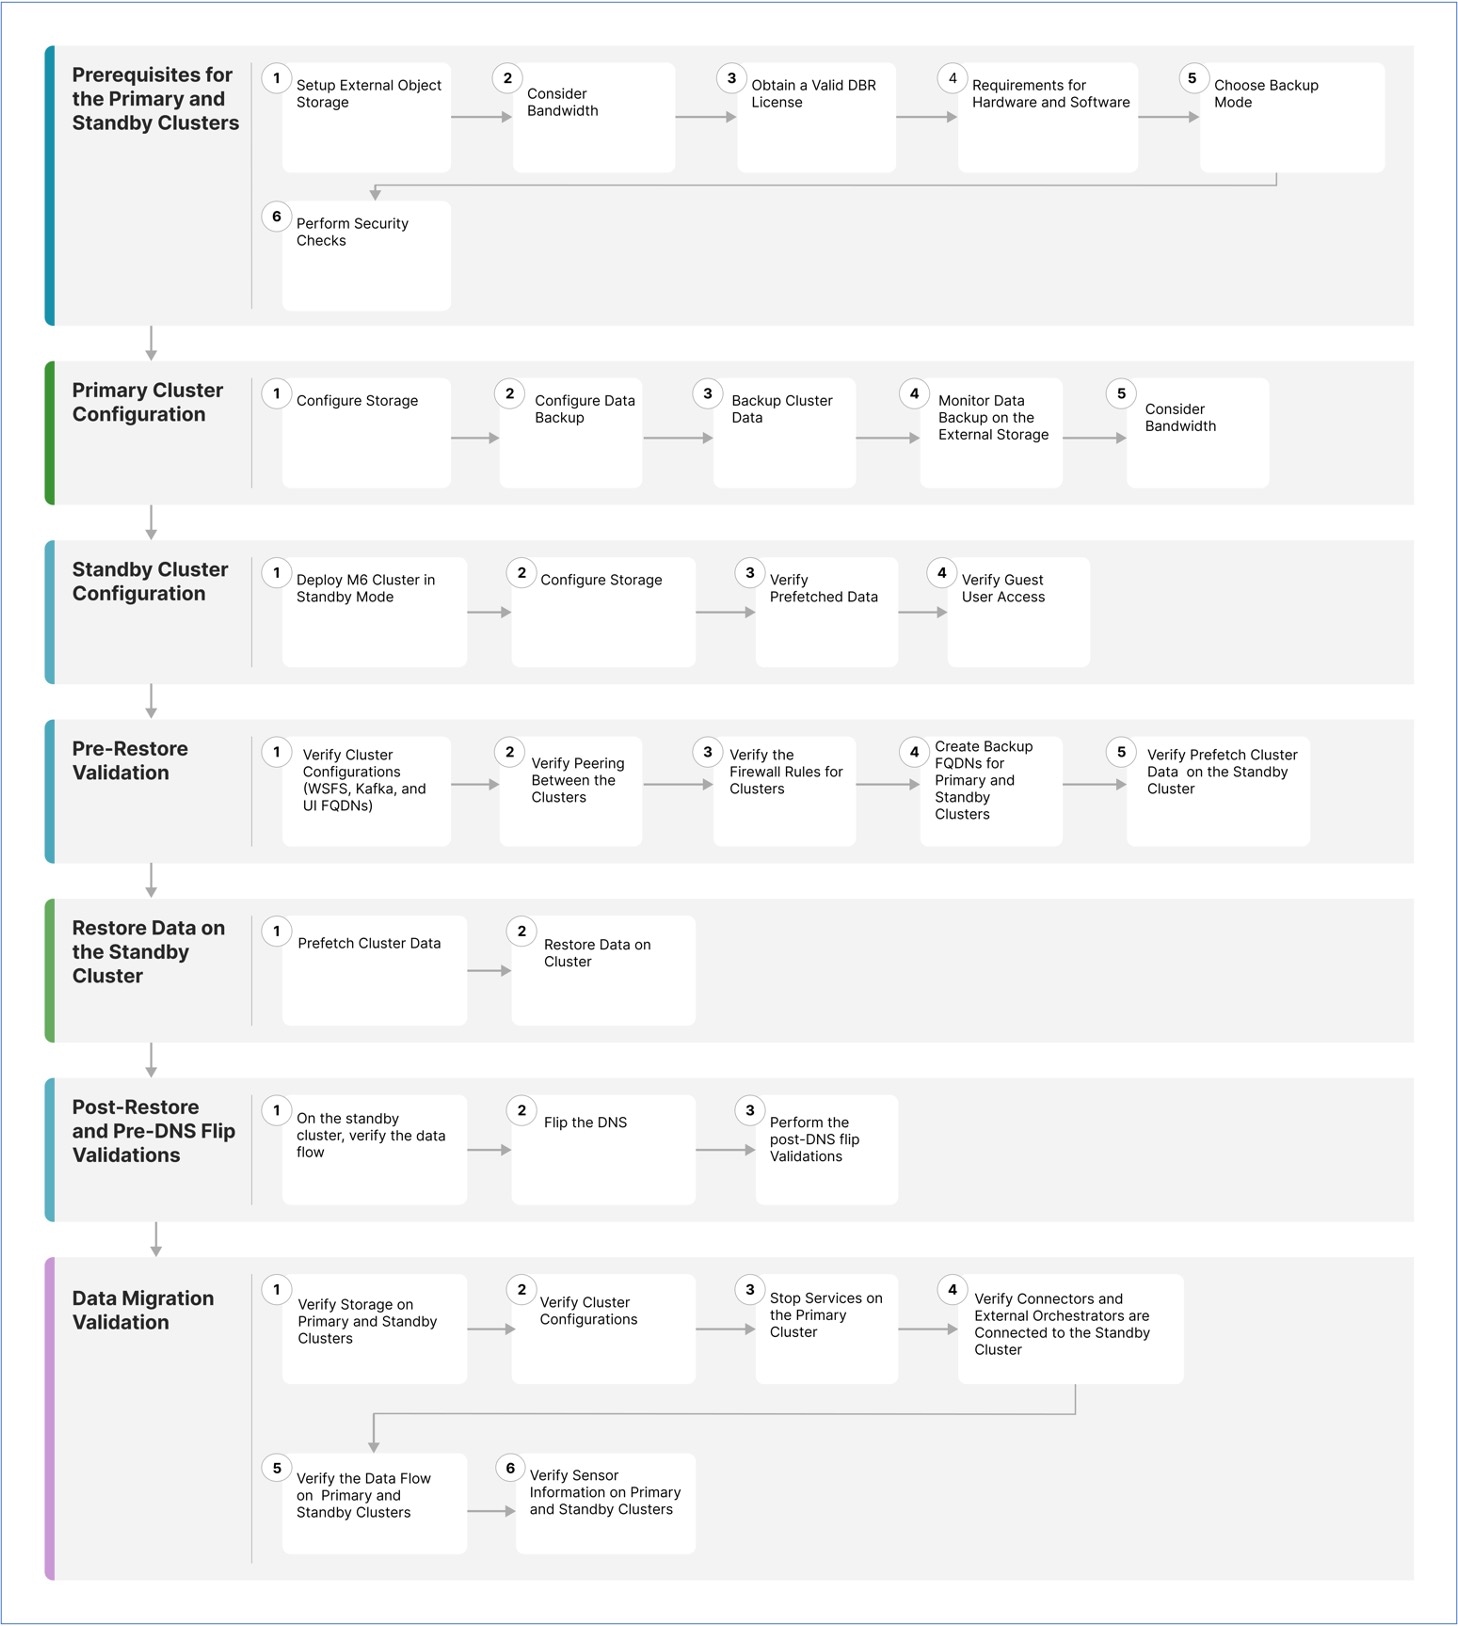
Overview of Cluster to Cluster Migration

When transferring data from a primary cluster to a standby cluster in Secure Workload, it is recommended to use the data backup and restore (DBR) method. DBR involves copying the data from the primary cluster to an S3-compatible storage and then restoring the same data to the standby cluster from the storage. You can choose either the "lean mode" or "full mode" backup, depending on your specific migration needs.

For more information on lean or full backup mode, see the Data Backup and Restore (DBR) section in the Cisco Secure Workload User Guide.


Note


The primary cluster in this guide is either M4 or M5, while M6 is referred to as the standby cluster.


End-to-End Migration Workflow

In Secure Workload, migrating from one cluster to another cluster is a complex process. To ensure a smooth migration, follow the end-to-end workflow that outlines the necessary steps for migrating data from a primary cluster to a standby cluster. It is important to complete each step sequentially to maximize the migration activity.

Figure 1. Prepare for Migration

Prerequisites for Primary and Standby Clusters

Prerequisites for the primary and standby clusters include several steps and considerations.

Primary Cluster Configurations

Primary cluster configurations include configuring storage, data backup, cluster data backup, bandwidth, and WAN Links management.

Standby Cluster Configuration

Configuring standby clusters include deploying the standby cluster in standby mode, configuring the storage location and verifying the prefetched data.

Pre Restore Validation

Before initiating the restore process, verify the standby data storage configuration, cluster configurations for primary and standby, peering between the clusters and verify if the firewall rules for both clusters are identical.

Restore Data on the Standby Cluster

Restore data on the standby cluster to prefetch cluster data and restore cluster data.

Post Restore and Pre-DNS Flip Validations

After restoring data on the standby clusters, perform a comprehensive verification process. This process includes verifying the inventory and labels, activation of pipelines, validating services' green status, persisting scope tree, and verifying flow counts match the primary cluster.

Data Migration Validation

You can use scripts to validate the flow data coming into both the primary and standby cluster after the restore process is complete.

Prepare for Cluster to Cluster Migration

When migrating data from a primary cluster to a standby cluster in Secure Workload, we recommend using the data backup and restore approach. This involves copying the data from the primary cluster to an S3 compatible storage and then restoring it to the standby cluster from that storage. Depending on your specific migration requirement, you can choose either the lean mode or full mode backup.

For more information on lean or full mode backup, see the Data Backup and Restore (DBR) section in the Secure Workload User Guide.

Prerequisites for the Primary and Standby Clusters

Ensure that your environment meets the following hardware and software requirements:

Set Up External Object Storage

  • Ensure that an external object storage, compliant with the S3v4 standard, is available.

  • For full backups, we recommend a storage capacity of 50TB for 39RU and 8RU clusters, while for a lean backup, a minimum of 1TB is sufficient. For more information, see Object Store Requirements.

  • The list of combinations for the primary and standby clusters:

    Table 1. Cluster SKUs

    Primary Cluster SKU 

    Standby Cluster SKU

    8RU-PROD

    8RU-M4 

    8RU-M5 

    8RU-M6 

    39RU-GEN1

    39RU-M4

    39RU-M5

    39RU-M6 

Obtain a Valid Data Backup Restore license

To obtain a valid Data Backup Restore (DBR) license, raise a case with Cisco TAC. The license entitlement is only for the primary cluster and not for the standby cluster.

Bandwidth Considerations

  • We recommend a minimum bandwidth of 10Mbps for backing up data from the primary cluster to the S3 server, and then restoring the data onto the standby cluster.

  • Ensure that the object store is in a location that is close to both the primary and standby clusters.

Hardware and Software Requirements

  • Ensure that the primary and standby clusters have the same form-factor (8RU or 39RU) before starting the migration. Note that data migration can happen only between clusters with the same form-factor. For more information, see the Cisco Secure Workload M6 Cluster Deployment Guide.

  • Ensure that you upgrade the primary cluster to the latest version of Secure Workload 3.9 and deploy the same version on the standby cluster. Note that the Software Agent version on the primary and standby clusters must be the same. For more information, see Upgrade to Secure Workload, Release 3.9.1.1.

  • Ensure that the software agent version is 3.3 or higher for the Data Backup and Restore functionality. To check for the agent version, from the navigation pane, choose Manage > Workloads > Agents > Agent List.

    Figure 2. Agent List
  • Check and validate the requirements for Kafka and WSS Fully Qualified Domain Name (FQDN). Ensure that the Kafka configuration aligns with FQDN standards to maintain communication between the clusters during migration. For more information, see Kafka FQDN Requirements

Back Up Modes

  • Full Backup Mode

    • Choose Full Backup mode for a comprehensive backup option that includes configurations, data, server settings, and historical telemetry. This mode ensures a thorough duplication of the primary cluster onto the standby cluster. Depending on the amount of flow data to back up, for a full backup mode, ensure that the required storage capacity is up to 50TB.

  • Lean Mode

    • Choose Lean mode for backing up configuration data. This mode replicates only essential settings from the primary onto the standby cluster without any historical telemetry, the minimum storage requirement is 1TB. Migration is streamlined when data redundancy is not a primary concern.


Note


Full backup requires more time and storage space compared to lean backup when transferring data between clusters. For a quick migration involving only basic configuration settings, we recommend using the lean mode. The original data on the primary cluster is still accessible, and if necessary, the data is transferred to the standby cluster using the full backup mode.


Security Checks

To check for any alerts or warnings related to the primary cluster during the migration, perform these steps:

  • From the navigation pane, select Overview > Security Dashboard. Review the Security Dashboard page for any alerts or warnings that are related to the primary cluster.

    For more information, see the Cluster Status section in the Secure Workload User Guide.

  • From the navigation pane, choose Platform > Cluster Configuration, on this page, ensure that the primary cluster FQDN configuration for WSS and KAFKA matches the ones on the standby cluster.

Primary Cluster Configurations

Procedure


Step 1

Configure Storage

  1. To configure the storage of 50TB for full backup and 1TB for lean backup modes, create a new bucket in your S3V4 compliant object store. Some commonly used S3V4 storage devices are:

    • Amazon S3

    • Google Cloud Storage

    • Microsoft Azure Blob Storage

    • MinIO Object Storage

  2. Enter the following details:

    • Name of the storage

    • S3 compliant bucket name configured on the storage

    • URL of an S3 compliant storage endpoint

    • (Optional for certain storage) Region of the S3 compliant storage

    • Access key of the storage

    • Secret key of the storage

    Ensure that you have recorded all these details accurately for future reference.

  3. Grant exclusive READ/WRITE access to the clusters for the bucket.

  4. On the primary cluster, from the navigation pane, choose Platform > Data Backup. Enter the information gathered in Step b.

  5. (Optional) If you want to use multipart uploads of the backed data, enable Use Multipart Upload.

  6. (Optional) If required, you can enable HTTP proxy.

  7. (Optional) To authenticate the storage server, ensure the following:

    • Details of the CA certificate are available.

    • Enable Use Server CA certificate.

  8. Click the Test button to confirm.

Step 2

Configure Data Backup

To configure data backup on the primary cluster, perform the steps mentioned in the Configure Data Backup section in the Secure Workload user guide.

Step 3

Backup Cluster Data

After you configure data backup on the primary cluster, the cluster data backup is triggered automatically at a scheduled time during the day, unless you have disabled continuous mode. The primary cluster continues to back up the data, the status of which you can check on the Data Backup dashboard (Platform > Data Backup). For more information, see Backup Status in the Secure Workload user guide.

Step 4

Monitor Data Backup on the External Storage

Monitor the replication process to verify the accurate transfer of all data. Promptly address any issues that may arise during this phase.

Step 5

Bandwidth Recommendation

When you set up a backup and restore system between clusters and S3 compatible storages, it is important to consider the bandwidth of the links connecting them. Connect the primary and standby clusters to the storage to facilitate data backup and restoration. Each migration consumes a specific amount of bandwidth per second, and therefore, the potential saturation of links should be evaluated and planned for accordingly.

Step 6

WAN Links Management

It is important to consider the possibility of WAN links becoming saturated, particularly during peak business hours when migration traffic is high. If required, schedule data transfers to avoid disruptions and perform the migration within a designated migration window.


Standby Cluster Configuration

Procedure


Step 1

To restore the backed-up data, deploy the standby cluster in standby mode. For more information, see Deploying Cluster in Standby Mode in the Secure Workload User Guide.

  1. On the standby cluster, navigate to Platform > Data Backup.

  2. Provide the following details:

    • Name of the storage

    • S3 compliant bucket name configured on the storage

    • URL of the S3 compliant storage endpoint

    • (Optional) The S3 compliant storage region (for certain storages)

    • Access key of the storage

    • Secret key of the storage

  3. (Optional) If required, you can enable HTTP proxy.

  4. (Optional) To authenticate the storage server, ensure:

    • Details of the CA certificate are available..

    • Enable Use Server CA certificate..

  5. Click the Test button and verify that S3 tests are complete. If there is a failure, check the storage accessibility and verify the permissions on the cluster.

  6. Click Next after the test is complete.

Verify that the backup data is prefetched correctly and ensure to monitor the backup for errors. For more information, see Data Restore in the Secure Workload User guide.

Step 2

To confirm if the ta_guest user has access to the standby cluster, add an SSH key when you create or edit a user. To add or modify users, from the navigation pane, choose User Access > User.

Figure 3. User Details in Standby Cluster

Pre-Restore Validation

Before initiating the restore process, verify the following data is prefetched from the primary to the standby cluster:

Procedure


Step 1

To verify that the standby data storage configuration matches the configurations on the primary data storage, navigate to Data Backup on the primary cluster and Data Restore on the standby cluster. Make sure that the cluster configurations for WSFS, Kafka, and UI FQDNs on both the clusters are identical.

Step 2

On the standby cluster, from the navigation pane, choose Platforms > Cluster Configuration. Ensure that the Primary Cluster Sitename field contains the correct primary cluster name.

Step 3

Verify that the primary cluster is accessible from all agents, connectors, and external orchestrators in the same way as the standby cluster. If you're using LDAP or SSO for authentication and authorization purposes, make sure you have access to the endpoints associated with LDAP and SSO.

Step 4

To ensure that agents can communicate with the standby cluster in the same way as with the primary cluster, ensure that the firewall rules for both clusters are identical. This includes the firewalls on the workload and any firewalls on the network between the workload and the cluster.

Step 5

Configure the cluster Fully Qualified Domain Names (FQDNs) and verify that software agents can resolve Fully Qualified Domain Names (FQDNs).

Step 6

Verify that all agents on the agent list page have the green checkmark to indicate they are Ready for Failover. Additionally, ensure that all agents are connected to the standby cluster for a smooth agent failover.

Step 7

To ensure uninterrupted access to the primary cluster UI, we recommend that you create backup fully qualified domain names (FQDNs) for both the primary and standby clusters. For example, after you have restored the data on the primary cluster and flipped the DNS, both FQDNs 'cluster1.enterprise.com' and 'cluster2.enterprise.com' will point to the standby cluster. As a result, you will not be able to access the GUI for cluster1.enterprise.com. However, you can still access the GUI by creating an FQDN in the DNS Server 'cluster1-backup.enterprise.com' that points to the same IP address as the primary cluster. After you have restored the data and flipped over the DNS, both 'cluster1-backup.enterprise.com' and 'cluster2-backup.enterprise.com' will point to the standby cluster, while 'cluster1-backup.enterprise.com' will continue to point to the primary cluster.

Step 8

Verify that the standby cluster data prefetch is working correctly. To validate that the prefetched data matches the data on the primary cluster, from the navigation pane, choose Platform > Data Restore.

Step 9

From the navigation pane, choose Troubleshoot > Cluster Status and verify the health status of both the primary and standby clusters. For more information, see Cluster Status in the Secure Workload user guide.

Step 10

From the navigation pane, choose Troubleshoot > Snapshot and create a snapshot of the primary cluster. This is useful for troubleshooting any issues that occur during the migration.

Verify that the backup data prefetched on the standby cluster is current and up-to-date.

Step 11

Verify if the user "ta_guest" has access to the standby cluster. The user is authorized to access the standby cluster for troubleshooting purposes in the event of any migration-related issues. For more information about the "ta_guest" user, see Users in the Secure Workload user guide.

Step 12

Save the cluster configuration information to primary-config-data.txt by running the Cluster Configuration Validation. For more information, see Cluster Configuration Validation in the Secure Workload user guide.

Step 13

Save data from the Connector and External Orchestrator functional on the primary cluster to primary-ext-orch-data.txt. For more information, see Connector and External Orchestrator Functional Validation in the Secure Workload user guide.

Step 14

Save the data from running the Validating Data Flow workflow on the primary cluster to a file named primary-flow-data.txt. For more information, see Data Flow Validation in the Secure Workload user guide.


Cluster Data on the Standby Cluster

You can restore cluster data in two phases:

  • Mandatory Phase: Restore the data needed to restart services so that you can use the cluster. The time taken by the mandatory phase depends on the configuration, number of software agents installed, and flow metadata. During the mandatory phase, depending on the scale of the configuration, the GUI is not accessible for an hour. However, make sure that the TA guest keys are available for any support during the mandatory phase.

  • Lazy Phase: While you restore the cluster flow data in the background, you can continue to use the cluster and access the GUI. During this phase, the cluster is operational with normal functioning of data pipelines, flow searches, and new data sent by agents to the cluster.

For more information, see Cluster Restore in the Secure Workload user guide.

To restore data on the standby cluster, perform these steps:

Verify the storage configuration.

Procedure


Step 1

On the standby cluster, from the navigation pane, choose Platform > Data Restore and verify that the storage configuration is successful. You can also reconfigure the storage.

Step 2

Click Perform Check to verify the cluster health.

Figure 4. Prerequisite for Data Restore

Note

 
  • If you receive a warning message while restoring, you can still proceed with the restoration process.

  • However, if an error occurs, the Start Restore Process button is disabled automatically. We recommend fixing the error and then checking the status. To view a service health status, from the navigation pane, choose Troubleshooting > Service Status.

Step 3

Ensure that there are no ongoing backups to stop the primary cluster backup schedule. If a backup is in progress, wait for it to finish before deactivating the schedule.

Step 4

To begin the restoration process, click Start Restore Process. You can view the stages of the restoration process on the GUI as shown in the following figure:

Figure 5. Stages of Data Restore Process

Step 5

Click the Restore now button located at the bottom of the Restore page.

Step 6

On the Confirmation Data Restore window, click the Confirm button. After the confirmation, the data restore process proceeds sequentially; the standby cluster becomes the primary at the end of the process. Monitor the data restoration process to ensure it progresses as expected.

Note


From the Preparing to Restore and Clean up Post Restore stages, the GUI is not accessible. Ensure that you have completed all necessary actions before starting the restoration process to avoid any inconvenience.


Prefetch Cluster Data 

Before you start restoring the cluster data, the cluster must prefetch the data. Prefetch the checkpoint data from the same storage bucket that is used for backing up the data. To prefetch data and verify its status, perform the steps listed in the Prefetch Cluster Data section of the Secure Workload User Guide.

Cluster Data on the Standby Cluster

You can restore cluster data in two phases:

  • Mandatory Phase: Restore the data needed to restart services so that you can use the cluster. The time taken by the mandatory phase depends on the configuration, number of software agents installed, and flow metadata. During the mandatory phase, depending on the scale of the configuration, the GUI is not accessible for an hour. However, make sure that the TA guest keys are available for any support during the mandatory phase.

  • Lazy Phase: While you restore the cluster flow data in the background, you can continue to use the cluster and access the GUI. During this phase, the cluster is operational with normal functioning of data pipelines, flow searches, and new data sent by agents to the cluster.

For more information, see Cluster Restore in the Secure Workload user guide.

To restore data on the standby cluster, perform these steps:

Verify the storage configuration.

Procedure


Step 1

On the standby cluster, from the navigation pane, choose Platform > Data Restore and verify that the storage configuration is successful. You can also reconfigure the storage.

Step 2

Click Perform Check to verify the cluster health.

Figure 6. Prerequisite for Data Restore

Note

 
  • If you receive a warning message while restoring, you can still proceed with the restoration process.

  • However, if an error occurs, the Start Restore Process button is disabled automatically. We recommend fixing the error and then checking the status. To view a service health status, from the navigation pane, choose Troubleshooting > Service Status.

Step 3

Ensure that there are no ongoing backups to stop the primary cluster backup schedule. If a backup is in progress, wait for it to finish before deactivating the schedule.

Step 4

To begin the restoration process, click Start Restore Process. You can view the stages of the restoration process on the GUI as shown in the following figure:

Figure 7. Stages of Data Restore Process

Step 5

Click the Restore now button located at the bottom of the Restore page.

Step 6

On the Confirmation Data Restore window, click the Confirm button. After the confirmation, the data restore process proceeds sequentially; the standby cluster becomes the primary at the end of the process. Monitor the data restoration process to ensure it progresses as expected.

Note


From the Preparing to Restore and Clean up Post Restore stages, the GUI is not accessible. Ensure that you have completed all necessary actions before starting the restoration process to avoid any inconvenience.


Post-Restore and Pre-DNS Flip Validations

After a standby cluster interface goes down, try to connect to the cluster. You can log in to the GUI after the data restore process is complete.


Note


After you complete the data restore process, several services will be in an UNHEALTHY state for an hour (approximately). After all services are able to access their data, the statuses change to HEALTHY.


After you restore the data on the standby cluster, verify the following:

Procedure


Step 1

Prepare a copy of the licenses and compare them to the previous version.

Step 2

Check the availability of all inventory and annotations, and verify IP addresses on the cluster configuration page and site information.

Step 3

The pipelines will initially appear UNHEALTHY until data is ingested. Ensure that all pipelines are active.

Step 4

Ensure that all services display a green status. It may take up to an hour for the status of some services to turn green. Services that require flow data such as pipelines may take the longest because these services wait for the data restore process to complete. It is safe to ignore any issues with the Data Backup service currently.

Step 5

An important step is to verify that the cluster certificate is on the same CA as that of the WSS. To verify this, from the navigation pane, choose Platform > Cluster Configuration. Download the sensor CA certificate and check if the cluster certificate is on the same CA with that of the WSS.

Step 6

Ensure that the scope tree persists by taking the standby cluster snapshots for troubleshooting.

Step 7

Run the Cluster Configuration Validation and perform the following steps:

  • Review and confirm the configuration information on the standby cluster.

  • Compare and verify the configurations on both the primary and standby clusters and make sure that they match, except for the list of users on the standby cluster.

    Note


    The list of users on the standby is greater than the primary list because the standby list includes both the primary and standby users.

Step 8

Verify that the flow count matches between the primary and standby clusters. If the flow data is large, it may take a while to restore it on the standby cluster. For more information, see the How to Validate Flow Input Data section and then compare the standby cluster data with the data on the primary cluster.

Note


The standby cluster may have fewer flows than the primary cluster because there are several dependencies such as:

  • Timestamp of the last backup on the primary cluster

  • Timestamp of the data restored on the standby cluster

  • Data that was sent by the agents to the primary cluster

    Note that the data sent by the agents to the primary cluster (after the last backup) is not restored onto the standby cluster because the data is lost in transit.


Flip DNS

DNS Flip is the action of changing DNS server records to point the primary cluster FQDNs to the standby cluster VIPs. This step enables the agents, external orchestrators, and connectors to connect to the standby cluster rather than the primary cluster.


Note


Ensure that you perform the DNS Flip action outside the cluster, on the DNS server, which is configured to handle workloads and clusters.


To flip DNS, perform these steps:

Procedure


Step 1

Stop Services on the Primary Cluster

  • It is necessary to stop all services within the primary cluster that engage with agents, connectors, and external orchestrators before modifying the Domain Name System (DNS) entries to point towards the standby cluster. By doing so, these components lose connection to the primary cluster and then try to reestablish connections.

  • After you flip the DNS entry, the agents, connectors, and external orchestrators will automatically reconnect to the standby cluster. For step-by-step instructions on stopping the services on the primary cluster, see the Service Stop Workflow section.

Step 2

Flip the FQDNs

Flip the following FQDNs and verify that the IP addresses associated with these FQDNs are now pointing to the VIPs associated with the standby cluster:

  • WSS FQDN

  • From the navigating pane, choose Platform > Cluster Configuration and verify the Kafka FQDNs. Up to three Kafka FQDNs could be present.

The FQDN checks on the cluster Data Restore page will turn green after you flip the DNS for the cluster WSS and Kafka.

Figure 8. Data Restore Successful

Post DNS Flip Validation

After flipping the DNS on the standby cluster, ensure that you verify these scenarios:

Procedure


Step 1

Create snapshots of both primary and standby clusters.

Step 2

Ensure that all versions of the agents, whether with or without proxies, are reconnected.

  • To restore data in the standby cluster, from the navigation pane, choose Platform > Data Restore.

  • After reconnecting the agents, make sure that the same number of agents are reconnected to the standby cluster as in the primary cluster. This may take some time to validate, as agents may reconnect at different times. Monitor the number of active agents on the primary cluster and ensure that the same number of agents are reconnected in the standby cluster, which can be verified from the Agents Restored data in the Data Restore page.

    For more information on the agents, see the Sensor Validation section.

Step 3

Verify that the connectors and external orchestrators are connected. If the connectors are not connected, verify that there are routes to the connectors from the standby cluster and the firewall rules are configured to allow these connections. From the navigation pane, choose Workloads > Connectors and verify the logs to identify failures. For step-by-step validation instructions, see the Connector and External Orchestrator Functional Validation section.

Step 4

You cannot transfer all alert notifications, email, and syslog data, but all alerts will be reissued.

Step 5

Ensure that pipelines are functioning properly and optionally migrate the primary cluster GUI FQDN onto the standby cluster.

Step 6

To achieve the desired outcome, you need to modify the cluster GUI FQDN of the primary cluster, replacing it with the IP address of the standby cluster.

After completing this step, accessing the primary cluster FQDN through the browser or using the cluster APIs will redirect you to the standby cluster.


Data Migration Validation

This section outlines the steps to verify successful data migration from a primary to a standby cluster.

Storage Validation

Complete the storage validation before configuring the storage on primary and standby clusters. Use the s3-test.py Python script to validate storage. The script requires Python 3 and the specific packages listed in the requirements.txt file.

To validate the configuration of the S3 storage, perform these steps:

Procedure


Step 1

Enter storage details to the s3-test.conf configuration file. The details include the storage URL with the port number, the S3 Access Key, the S3 Secret Key, and the bucket details.

Step 2

Run the script on these operating systems:

  • On Linux and Mac: pythons3-test.py

  • Windows: python s3-test.py

The s3-test.py script tests access the bucket by validating the bucket, read, write from the bucket and bulk deleting objects from the bucket. These basic tests ensure correct configurations of the S3 compatible storage.

The script generates the following output:

Figure 9. Validation Failure
Figure 10. Validation Successful
Figure 11. Help Screen

Cluster Configuration Validation

Capture the configuration summaries from both the primary and standby clusters. After the migration process is complete, ensure that the configurations of both clusters are identical by comparing them. Make sure that you verify the following aspects:

  • Capture the primary cluster configuration before the restore process.

  • Capture the standby cluster configuration after the mandatory restore phase is complete. This is when the configuration is migrated to the standby cluster.

Procedure


Step 1

The validation script uses OpenAPI. You can obtain the API key using the steps mentioned in the OpenAPI section of the Secure Workload User Guide.

Step 2

Select all API key permissions and download the JSON file containing the API keys.

Figure 12. JSON File Containing API Keys

Step 3

Run the checklist script on the primary cluster to prepare a list of configuration items that must be verified and record the output of the script. This script provides a summary of the configuration from both clusters, which can be compared. If there is a discrepancy, compare the full configuration of the primary and standby clusters to determine if there are any mismatches.

Figure 13. Sample Output
Table 2. List of Configuration Components
Configuration Components Is Validated?
Manual Labels   Yes
Scopes   Yes
Inventory Filters   Yes
Agent Profiles   Yes
Agent Intents   Yes
Workspaces   Yes
Workspace Policies (latest version)   Yes
Workspace Clusters   Yes
Roles   Yes
Users   Yes
Exclusion Filters-Default & Workspace   Yes
External Orchestrators   Yes
Client Server Config (Server Ports)   Yes
Forensics - Profiles and Intents   Yes
Policy Templates (custom templates)   No
Collection Rules   Yes
Default ADM configuration   Yes
Alert config/Publishers   Yes
Secure Connector   Yes
Virtual Appliances (Ingest or edge)   Yes
Connectors    Yes
Data tap configuration   Yes

Note


To ensure that all the configuration items are migrated properly and there are no discrepancies, the script will run against the Standby cluster after migration.

Step 4

Run the checklist script in the mode that downloads all cluster configurations. Download the JSON configuration files from both clusters using the download-src and download-dst commands. Ensure that this configuration is stored securely.

Step 5

After the data restore process is complete, repeat Step 2 through Step 7 on the standby cluster.

Step 6

Compare the configuration details between the primary and the standby cluster. If there is a mismatch in the cluster configurations, compare the configuration details with the data collected in Step 5 to identify the difference.


Stop Services on the Primary Cluster

You can use this script to stop services on the primary cluster so that you can disconnect the agents, connectors, and external orchestrators.


Caution


You can stop services only on the Primary cluster. Do not run this script on the Standby cluster or when you are not migrating any services.


To run the service stop script, perform these steps:

Procedure


Step 1

From the navigation pane, choose Troubleshoot > Maintenance Explorer. Set the Action as POST.

Step 2

Enter the Snapshot Host as orchestrator.service.consul.

Step 3

Enter the file service_shutdown.sh.asc details into the Body field.

Step 4

Click Send.

Figure 14. Run the Service Stop Script

Connector and External Orchestrator Functional Validation

This section describes how to verify the connectivity between Connectors and External Orchestrators with the standby cluster after the migration.

  • Perform the validation steps on the primary cluster and collect the data.

  • Perform the same steps on the standby server after the restore is complete.

    Compare the two sets of data to ensure that they are identical.

Run the validation script from the Maintenance Explorer page on the GUI as a signed script. For more information, see Explore/Snapshot Endpoints Overview in the Secure Workload User Guide.


Note


Refer to the ext_appliances_health_README.md file for details regarding the validation script and the output it generates.


To verify the connections between the Connectors and External Orchestrators and details of the log files, perform these steps:

Procedure


Step 1

From the navigation pane, choose Troubleshoot > Maintenance Explorer.

  • Select Action as POST

  • Enter the Snapshot Host as orchestrator.service.consul

  • Enter the Snapshot Path as runsigned?log2file=true

  • Enter the file ext_appliances_health.sh.asc details into the Body field

  • Click Send

Figure 15. Sample Output Log File

Step 2

From the navigation pane, choose Troubleshoot > Maintenance Explorer and perform these steps:

  • Select Action as POST.

  • Enter the Snapshot Host as orchestrator.service.consul.

  • Enter the Snapshot Path as cat?args=/local/logs/tetration/snapshot/cmdlogs/snapshot_runsigned_log.txt

  • Click Send.

Figure 16. Sample Output Log File

Step 3

The output shows the status of the connectors and external orchestrators and summarizes the results as FAIL or PASS. If the result is FAIL, then from the navigation pane, choose Troubleshoot > Maintenance Explorer and perform these steps:

  • Select Action as POST.

  • Enter the Snapshot Host as orchestrator.service.consul.

  • Enter the Snapshot Path as unsigned?log2file=true&args=--dry_run -d

  • Click Send.

Refer to the log file for detailed information about the connectors and external orchestrators. A detailed explanation of why the migration status is FAIL is displayed in the output from every connector and external orchestrator.


Data Flow Validation

Use the script to validate the data flow data coming into the primary and standby clusters after you complete the data restore process.

Procedure


Step 1

From the navigation pane, choose Troubleshoot > Maintenance Explorer and perform these steps:

  • Select Action as POST.

  • Enter the Snapshot Host as orchestrator.service.consul.

  • Enter the Snapshot Path as runsigned.

  • Enter the file dbr_druid_m6_migration.sh.asc details into the Body field.

  • Click Send.

Step 2

Store the data in a file flow_stats_primary.txt, which is displayed in the GUI. The validation output has two parts in the output:

  • The top part of the output provides the data source and flow count for each data source. It also provides a comparison of the data for flows contained within each data source.

  • The bottom part of the output is a JSON output that is used to manipulate and pull information.

Step 3

After the restore process is complete and the standby cluster has been restored, including Lazy restore, repeat the Step 1 for the standby cluster and store the results in flow_stats_standby.txt.

Step 4

Compare the output of the primary and the standby cluster, which should be identical:

Figure 17. Verify the Output for Primary and Standby Cluster

Sensor Information Validation

After the migration is complete, collect the sensor information on the Standby cluster using the same steps. Verify that the agents have migrated correctly by comparing the output of the two clusters. To collect sensor information on the Primary cluster before migration, perform these steps:

Procedure


Step 1

From the navigation pane, choose Troubleshoot > Maintenance Explorer.

  • Select Action as POST.

  • Enter the Snapshot Host as orchestrator.service.consul.

  • Enter the Snapshot Path as runsigned.

  • Enter the file tenant_sensor_summary.sh.asc details into the Body field.

  • Click Send.

Step 2

The sensor information will be written to a CSV file and the information is displayed on the GUI as well. The data from the CSV file is used to analyse the data.

To fetch the data from the CSV file, from the navigation pane, choose Troubleshoot > Maintenance Explorer:

  • Select Action as POST.

  • Enter the Snapshot Host as orchestrator.service.consul

  • Enter the Snapshot Path as cat?args=/tmp/summary.csv

  • Do not enter any details into the Body field.

  • Click Send.

The data is displayed on the screen. Save the CSV data to a file.


Troubleshooting: Data Backup and Restore

S3 Configuration Checks Are Unsuccessful

If the storage test is unsuccessful, identify the failure scenarios that are displayed on the right pane and ensure that:

  • S3 compliant storage URL is correct.

  • The access and secret keys of the storage are correct.

  • Bucket on the storage exists and correct access (read/write) permissions are granted.

  • Proxy is configured if the storage must be accessed directly.

  • The multipart upload option is disabled if you are using Cohesity.

Error Scenarios of S3 Configuration Checks

The table lists the common error scenarios with resolution and is not an exhaustive list.

Table 3. Error Messages with Resolution During S3 Configuration Checks
Error Message

Scenario

Resolution

Not found

Incorrect bucket name Enter correct name of the bucket that is configured on the storage

SSL connection error

SSL certificate expiry or verification error

Verify the SSL certificate

Invalid HTTPS URL

  • Re-enter correct HTTPS URL of the storage.

  • Resolve any failures during verification of SSL certificate.

Connection that is timed out

IP address of the S3 server is unreachable

Verify the network connectivity between the cluster and S3 server

Unable to connect to URL

Incorrect bucket region

Enter correct region of the bucket

Invalid URL

Re-enter correct URL of the S3 storage endpoint

Forbidden

Invalid secret key

Enter correct secret key of the storage

Invalid access key

Enter correct access key of the storage

Unable to verify S3 configuration

Other exceptions or generic errors

Try to configure the S3 storage after some time

Error Codes of Checkpoints

The table lists the common error codes of checkpoints and is not an exhaustive list.

Table 4. Error Codes of Checkpoints

Error Code

Description

E101: DB checkpoint failure

Unable to snapshot Mongodb oplogs

E102: Flow data checkpoint failure

Unable to snapshot Druid database

E103: DB snapshot upload failure

Unable to upload Mongo DB snapshot

E201: DB copy failure

Unable to upload Mongo snapshot to HDFS

E202: Config copy failure

Unable to upload Consul-Vault snapshot to HDFS

E203: Config checkpoint failure

Unable to checkpoint consul-vault data

E204: Config data mismatch during checkpoint

Cannot generate consul/vault checkpoint after maximum retry attempts

E301: Backup data upload failure

HDFS checkpoint failure

E302: Checkpoint upload failure

Copydriver failed to upload data to S3

E401: System upgrade during checkpoint

Cluster got upgraded during this checkpoint; checkpoint cannot be used

E402: Service restart during checkpoint

Bkpdriver restarted in the create state; checkpoint cannot be used

E403: Previous checkpoint failure

Checkpoint failed on previous run

E404: Another checkpoint in progress

Another checkpoint is in progress

E405: Unable to create checkpoint

Error in checkpoint subprocess

Failed: Completed

Some preceding checkpoint failed; likely an overlap of multiple checkpoints starting together.

Errors During the Data Restore Process

  • Storage configuration phase: For suggested resolution to troubleshoot errors during configuration of S3 storage, see the Error Scenarios of S3 Configuration Checks section.

  • Prechecks to verify the health of secondary cluster: For services which are unhealthy or those with warnings, go to the Service Status page for more information to render services healthy.

  • Prechecks to verify connectivity to the storage:

    Table 5. Errors During Storage Connectivity Prechecks

    Error Scenario

    Description

    Unable to download data from the configured S3 storage.

    Due to network connectivity, access to S3 storage has failed. The error message persists until a new checkpoint is prefetched from S3 storage after the connectivity is restored.

    Secondary (backup) cluster SKU is incompatible with primary cluster.

    Ensure that you are restoring data from a 39 RU to another 39 RU cluster only, similarly 8 RU cluster data can be restored only to a 8 RU cluster.

    Secondary (backup) cluster version is different from the primary.

    Ensure that primary and secondary clusters are running the same version.

    MongoDB restore failed.

    Unable to restore MongoDB metadata. The issue will be fixed during the next checkpoint prefetch.

    DBRInfo document is in unknown format.

    The checkpoint metadata in the S3 storage is corrupted or the document is in an incorrect storage. Download the dbrinfo.json file from S3 storage and share it with Cisco TAC for verification.

    Unable to sync with the copy service.

    Internal errors between the data restore manager and the S3 copy service. Contact Cisco TAC to troubleshoot the issue.

  • FQDN Prechecks: If a warning sign is displayed against the FQDN prechecks, then the DNS entry for the FQDNs is not pointing to the secondary cluster.

    Resolution: After restoring data, change the DNS entry to enable connectivity between software agents and the secondary cluster.

  • Data Restore phase: In the data restore confirmation dialog box, if the external orchestrator check box is not a green tick, then verify the connectivity between the secondary cluster and the external orchestrators.


    Note


    After data is restored and the secondary cluster has reached primary state, the data restore page is still made available to check the time that is taken and the number of agents that have reconnected. For a cluster where the data is never restored, the data restore page is blank.