Firepower System User Management

The following topics describe how a user with Administrator access can manage user accounts in the Firepower System:

User Roles

The Firepower System lets you allocate user privileges based on the user’s role. For example, you can grant analysts predefined roles such as Security Analyst and Discovery Admin and reserve the Administrator role for the security administrator managing the Firepower System. You can also create custom user roles with access privileges tailored to your organization’s needs.

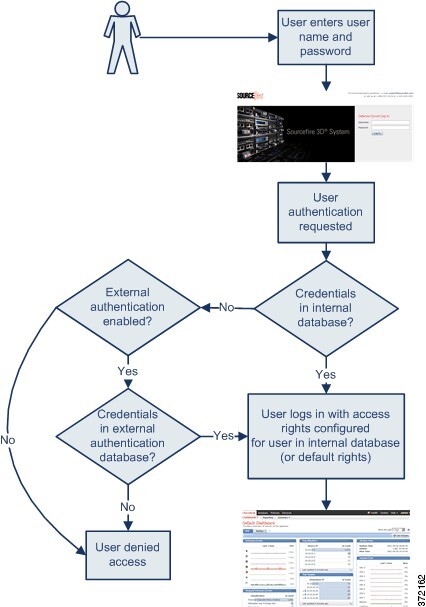
In the platform settings policy for a managed device, you set a default access role for all users from that device who are externally authenticated. After an externally authenticated user logs in for the first time, you can add or remove access rights for that user on the User Management page. If you do not modify the user’s rights, the user has only the rights granted by default. Because you create internally authenticated users manually, you set the access rights when you create them.

If you configured management of access rights through LDAP groups, the access rights for users are based on their membership in LDAP groups. They receive the default access rights for the group that they belong to that has the highest level of access. If they do not belong to any groups and you have configured group access, they receive the default user access rights configured in the authentication object for the LDAP server. If you configure group access, those settings override the default access setting in the platform settings policy.

Similarly, if you assign a user to specific user role lists in a RADIUS authentication object, the user receives all assigned roles, unless one or more of those roles are mutually incompatible. If a user is on the lists for two mutually incompatible roles, the user receives the role that has the highest level of access. If the user does not belong to any lists and you have configured a default access role in the authentication object, the user receives that role. If you configure default access in the authentication object, those settings override the default access setting in the platform settings policy.

In a multidomain deployment, you can assign users roles in multiple domains. For example, you can assign a user read-only privileges in the Global domain, but Administrator privileges in a subdomain.

Predefined User Roles

The Firepower System includes ten predefined user roles that provide a range of access privilege sets to meet the needs of your organization. Note that 7000 and 8000 Series devices have access to only three of the ten predefined user roles: Administrator, Maintenance User, and Security Analyst.

Although you cannot edit predefined user roles, you can use their access privilege sets as the basis for custom user roles. In addition, you cannot configure them to escalate to another user role.

The following table briefly describes the predefined roles available to you.

Access Admin

Provides access to access control policy and associated features in the Policies menu. Access Admins cannot deploy policies.

Administrator

Administrators have access to all functionality; their sessions present a higher security risk if compromised, so you cannot make them exempt from login session timeouts.

You should limit use of the Administrator role for security reasons.

Discovery Admin

Provides access to network discovery, application detection, and correlation features in the Policies menu. Discovery Admins cannot deploy policies.

External Database User

Provides read-only access to the Firepower System database using an application that supports JDBC SSL connections. For the third-party application to authenticate to the Firepower System appliance, you must enable database access in the system settings. On the web interface, External Database Users have access only to online help-related options in the Help menu. Because this role’s function does not involve the web interface, access is provided only for ease of support and password changes.

Intrusion Admin

Provides access to all intrusion policy, intrusion rule, and network analysis policy features in the Policies and Objects menus. Intrusion Admins cannot deploy policies.

Maintenance User

Provides access to monitoring and maintenance features. Maintenance Users have access to maintenance-related options in the Health and System menus.

Network Admin

Provides access to access control, SSL inspection, DNS policy, and identity policy features in the Policies menu, as well as device configuration features in the Devices menus. Network Admins can deploy configuration changes to devices.

Security Analyst

Provides access to security event analysis features, and read-only access to health events, in the Overview, Analysis, Health, and System menus.

Security Analyst (Read Only)

Provides read-only access to security event analysis features and health event features in the Overview, Analysis, Health, and System menus.

Security Approver

Provides limited access to access control and associated policies and network discovery policies in the Policies menu. Security Approvers can view and deploy these policies, but cannot make policy changes.

Externally authenticated users, if assigned no other roles, have minimum access rights based on the settings in LDAP or RADIUS authentication objects and in platform settings. You can assign additional rights to these users, but to remove or change minimum access rights, you must perform the following tasks:

  • Move the user from one list to another in the authentication object or change the user's attribute value or group membership on the external authentication server.

  • Update platform settings.

  • Use the User Management page to remove the access from that user account.

Custom User Roles

In addition to the predefined user roles, you can also create custom user roles with specialized access privileges. Custom user roles can have any set of menu-based and system permissions, and may be completely original or based on a predefined user role. Like predefined user roles, custom roles can serve as the default role for externally authenticated users. Unlike predefined roles, you can modify and delete custom roles.

Selectable permissions are hierarchical, and are based on the Firepower System menu layout. Permissions are expandable if they have sub-pages or if they have more fine-grained permissions available beyond simple page access. In that case, the parent permission grants page view access and the children granular access to related features of that page. Permissions that contain the word “Manage” grant the ability to edit and delete information that other users create.


Tip


For pages or features not included in the menu structure, privileges are granted by parent or related pages. For example, the Modify Intrusion Policy privilege also allows you to modify network analysis policies.


You can apply restricted searches to a custom user role. These constrain the data a user may see in the event viewer. You can configure a restricted search by first creating a private saved search and selecting it from the Restricted Search drop-down menu under the appropriate menu-based permission.

When you configure a custom user role on a Firepower Management Center, all menu-based permissions are available for you to grant. When you configure a custom user role on a managed device, only some permissions are available — those relevant to device functions.

The selectable options under System Permissions allow you to create a user role that can make queries to the external database or escalate to the permissions of a target user role.

Optionally, instead of creating a new custom user role, you can export a custom user role from another appliance, then import it onto your appliance. You can then edit the imported role to suit your needs before you apply it.

Example: Custom User Roles and Access Control

You can create custom user roles for access control-related features to designate whether Firepower System users can view and modify access control and associated policies.

The following table lists custom roles that you could create and user permissions granted for each example. The table lists the privileges required for each custom role. In this example, Policy Approvers can view (but not modify) access control and intrusion policies. They can also deploy configuration changes to devices.

Table 1. Example Access Control Custom Roles

Custom Role Permission

Example: Access Control Editor

Example: Intrusion & Network Analysis Editor

Example: Policy Approver

Access Control

yes

no

yes

Access Control Policy

yes

no

yes

Modify Access Control Policy

yes

no

no

Intrusion Policy

no

yes

yes

Modify Intrusion Policy

no

yes

no

Deploy Configuration to Devices

no

no

yes

User Account Privileges

The following sections provide a list of the configurable user permissions in the Firepower System and the predefined user roles that can access them. Not all permissions are available on managed devices; permissions available only on the Firepower Management Center are marked accordingly.

Overview Menu

The following table lists, in order, the user role privileges required to access each option in the Overview menu and whether the user role has access to the sub-permissions within. The Security Approver, Discovery Admin, Intrusion Admin, Access Admin, Network Admin, and External Database User roles have no permissions in the Overview menu.

Table 2. Overview Menu

Permission

Admin

Maint User

Security Analyst

Security Analyst (RO)

Dashboards

yes

yes

yes

yes

Manage Dashboards

yes

no

no

no

Appliance Information Widget

yes

yes

yes

yes

Appliance Status Widget (FMC only)

yes

yes

yes

yes

Correlation Events Widget

yes

no

yes

yes

Current Interface Status Widget

yes

yes

yes

yes

Current Sessions Widget

yes

no

no

no

Custom Analysis Widget (FMC only)

yes

no

yes

yes

Disk Usage Widget

yes

yes

yes

yes

Interface Traffic Widget

yes

yes

yes

yes

Intrusion Events Widget (FMConly)

yes

no

yes

yes

Network Correlation Widget (FMC only)

yes

no

yes

yes

Product Licensing Widget (FMC only)

yes

yes

no

no

Product Updates Widget

yes

yes

no

no

RSS Feed Widget

yes

yes

yes

yes

System Load Widget

yes

yes

yes

yes

System Time Widget

yes

yes

yes

yes

White List Events Widget (FMC only)

yes

no

yes

yes

Reporting (FMC only)

yes

no

yes

yes

Manage Report Templates (FMC only)

yes

no

yes

yes

Summary

yes

no

yes

yes

Intrusion Event Statistics (FMC only)

yes

no

yes

yes

Intrusion Event Performance

yes

no

no

no

Intrusion Event Graphs (FMC only)

yes

no

yes

yes

Discovery Statistics (FMC only)

yes

no

yes

yes

Discovery Performance (FMConly)

yes

no

no

no

Connection Summary (FMC only)

yes

no

yes

yes

Analysis Menu

The following table lists, in order, the user role privileges required to access each option in the Analysis menu and whether the user role has access to the sub-permissions within. Permissions that appear multiple times under different headings will be listed on the table only where they first appear, except to indicate submenu headings. The Security Approver, Intrusion Admin, Access Admin, Network Admin, and External Database User roles have no permissions in the Analysis menu. The Analysis menu is only available on the Firepower Management Center.

Table 3. Analysis Menu

Menu

Admin

Discovery Admin

Maint User

Security Analyst

Security Analyst (RO)

Context Explorer

yes

no

no

yes

yes

Connection Events

yes

no

no

yes

yes

Modify Connection Events

yes

no

no

yes

no

Connection Summary Events

yes

no

no

yes

yes

Modify Connection Summary Events

yes

no

no

yes

no

Security Intelligence Events

yes

no

no

yes

yes

Modify Security Intelligence Events

yes

no

no

yes

no

Intrusion

yes

no

no

yes

yes

Intrusion Events

yes

no

no

yes

yes

Modify Intrusion Events

yes

no

no

yes

no

View Local Rules

yes

no

no

yes

yes

Reviewed Events

yes

no

no

yes

yes

Clipboard

yes

no

no

yes

yes

Incidents

yes

no

no

yes

yes

Modify Incidents

yes

no

no

yes

no

Files

yes

no

no

yes

yes

Malware Events

yes

no

no

yes

yes

Modify Malware Events

yes

no

no

yes

no

File Events

yes

no

no

yes

yes

Modify File Events

yes

no

no

yes

no

Captured Files

yes

no

no

yes

yes

Modify Captured Files

yes

no

no

yes

no

File Trajectory

yes

no

no

yes

yes

File Download

yes

no

no

yes

yes

Dynamic File Analysis

yes

no

no

yes

no

Hosts

yes

no

no

yes

yes

Network Map

yes

no

no

yes

yes

Hosts

yes

no

no

yes

yes

Modify Hosts

yes

no

no

yes

no

Indications of Compromise

yes

no

no

yes

yes

Modify Indications of Compromise

yes

no

no

yes

no

Servers

yes

no

no

yes

yes

Modify Servers

yes

no

no

yes

no

Vulnerabilities

yes

no

no

yes

yes

Modify Vulnerabilities

yes

no

no

yes

no

Host Attributes

yes

no

no

yes

yes

Modify Host Attributes

yes

no

no

yes

no

Applications

yes

no

no

yes

yes

Application Details

yes

no

no

yes

yes

Modify Application Details

yes

no

no

yes

no

Host Attribute Management

yes

no

no

no

no

Discovery Events

yes

no

no

yes

yes

Modify Discovery Events

yes

no

no

yes

no

Users

yes

yes

no

yes

yes

Active Sessions

yes

yes

no

yes

yes

Modify Active Sessions

yes

yes

no

yes

no

User Activity

yes

yes

no

yes

yes

Modify User Activity Events

yes

yes

no

yes

no

Users

yes

yes

no

yes

yes

Modify Users

yes

yes

no

yes

no

Indications of Compromise

yes

no

no

yes

yes

Modify Indications of Compromise

yes

no

no

yes

no

Vulnerabilities

yes

no

no

yes

yes

Third-party Vulnerabilities

yes

no

no

yes

yes

Modify Third-party Vulnerabilities

yes

no

no

yes

no

Correlation

yes

yes

no

yes

yes

Correlation Events

yes

yes

no

yes

yes

Modify Correlation Events

yes

yes

no

yes

no

White List Events

yes

yes

no

yes

yes

Modify White List Events

yes

yes

no

yes

no

White List Violations

yes

yes

no

yes

yes

Remediation Status

yes

yes

no

no

no

Modify Remediation Status

yes

yes

no

no

no

Custom

yes

no

no

yes

yes

Custom Workflows

yes

no

no

yes

yes

Manage Custom Workflows

yes

no

no

yes

yes

Custom Tables

yes

no

no

yes

yes

Manage Custom Tables

yes

no

no

yes

yes

Search

yes

no

yes

yes

yes

Manage Search

yes

no

no

no

no

Bookmarks

yes

no

no

yes

yes

Manage Bookmarks

yes

no

no

yes

yes

Application Statistics

yes

no

no

yes

yes

Geolocation Statistics

yes

no

no

yes

yes

User Statistics

yes

no

no

yes

yes

URL Category Statistics

yes

no

no

yes

yes

URL Reputation Statistics

yes

no

no

yes

yes

DNS Queries by Record Types

yes

no

no

yes

yes

SSL Statistics

yes

no

no

yes

yes

Intrusion Event Statistics by Application

yes

no

no

yes

yes

Intrusion Event Statistics by User

yes

no

no

yes

yes

Security Intelligence Category Statistics

yes

no

no

yes

yes

File Storage Statistics by Disposition

yes

no

no

yes

yes

File Storage Statistics by Type

yes

no

no

yes

yes

Dynamic File Analysis Statistics

yes

no

no

yes

yes

Policies Menu

The following table lists, in order, the user role privileges required to access each option in the Policies menu and whether the user roles has access to the sub-permissions within. The External Database User, Maintenance User, Security Analyst, and Security Analyst (Read Only) roles have no permissions in the Policies menu. The Policies menu is only available on the Firepower Management Center.

Note that the Intrusion Policy and Modify Intrusion Policy privileges also allow you to create and modify network analysis policies.

Table 4. Policies Menu

Menu

Access Admin

Admin

Discovery Admin

Intrusion Admin

Network Admin

Security Approver

Access Control

yes

yes

no

no

yes

yes

Access Control Policy

yes

yes

no

no

yes

yes

Modify Access Control Policy

yes

yes

no

no

yes

no

Modify Administrator Rules

yes

yes

no

no

yes

no

Modify Root Rules

yes

yes

no

no

yes

no

Intrusion Policy

no

yes

no

yes

no

yes

Modify Intrusion Policy

no

yes

no

yes

no

no

Malware & File Policy

yes

yes

no

no

no

yes

Modify Malware & File Policy

yes

yes

no

no

no

no

DNS Policy

yes

yes

no

no

yes

yes

Modify DNS Policy

yes

yes

no

no

yes

no

Identity Policy

yes

yes

no

no

yes

no

Modify Identity Policy

yes

yes

no

no

yes

no

Modify Administrator Rules

yes

yes

no

no

yes

no

Modify Root Rules

yes

yes

no

no

yes

no

SSL Policy

yes

yes

no

no

yes

yes

Modify SSL Policy

yes

yes

no

no

yes

no

Modify Administrator Rules

yes

yes

no

no

yes

no

Modify Root Rules

yes

yes

no

no

yes

no

Prefilter Policy

yes

yes

no

no

yes

yes

Modify Prefilter Policy

yes

yes

no

no

yes

no

Network Discovery

no

yes

yes

no

no

yes

Custom Fingerprinting

no

yes

yes

no

no

no

Modify Custom Fingerprinting

no

yes

yes

no

no

no

Custom Topology

no

yes

yes

no

no

no

Modify Custom Topology

no

yes

no

no

no

no

Modify Network Discovery

no

yes

yes

no

no

no

Application Detectors

no

yes

yes

no

no

no

Modify Application Detectors

no

yes

yes

no

no

no

User 3rd Party Mappings

no

yes

yes

no

no

no

Modify User 3rd Party Mappings

no

yes

no

no

no

no

Custom Product Mappings

no

yes

yes

no

no

no

Modify Custom Product Mappings

no

yes

no

no

no

no

Correlation

no

yes

no

no

no

no

Policy Management

no

yes

no

no

no

no

Modify Policy Management

no

yes

yes

no

no

no

Rule Management

no

yes

no

no

no

no

Modify Rule Management

no

yes

yes

no

no

no

White List

no

yes

no

no

no

no

Modify White List

no

yes

yes

no

no

no

Traffic Profiles

no

yes

no

no

no

no

Modify Traffic Profiles

no

yes

yes

no

no

no

Actions

no

yes

yes

no

no

yes

Alerts

no

yes

yes

no

no

yes

Impact Flag Alerts

no

yes

yes

no

no

no

Modify Impact Flag Alerts

no

yes

yes

no

no

no

Discovery Event Alerts

no

yes

yes

no

no

no

Modify Discovery Event Alerts

no

yes

yes

no

no

no

Email

no

yes

no

yes

no

no

Modify Email

no

yes

no

yes

no

no

Modify Alerts

no

yes

yes

no

no

no

Scanners

no

yes

yes

no

no

no

Scan Results

no

yes

yes

no

no

no

Modify Scan Results

no

yes

yes

no

no

no

Modify Scanners

no

yes

yes

no

no

no

Groups

no

yes

no

no

no

no

Modify Groups

no

yes

yes

no

no

no

Modules

no

yes

no

no

no

no

Modify Modules

no

yes

yes

no

no

no

Instances

no

yes

no

no

no

no

Modify Instances

no

yes

yes

no

no

no

Devices Menu

The Devices menu table lists, in order, the user role privileges required to access each option in the Devices menu and the sub-permissions within. The Discovery Admin, External Database User, Intrusion Admin, Maintenance User, Security Analyst, and Security Analyst (Read Only) have no permissions in the Devices menu. The Devices menu is only available on the Firepower Management Center.

Table 5. Devices Menu

Menu

Access Admin

Admin

Network Admin

Security Approver

Device Management

no

yes

yes

yes

Modify Devices

no

yes

yes

no

NAT

yes

yes

yes

yes

NAT List

yes

yes

yes

yes

Modify NAT Policy

yes

yes

yes

no

VPN

no

yes

yes

yes

Modify VPN

no

yes

yes

no

Certificates

no

yes

yes

yes

Modify Certificates

no

yes

yes

no

QoS

yes

yes

yes

no

Modify QoS Policy

yes

yes

yes

no

FlexConfig Policy

no

yes

no

no

Modify FlexConfig Policy

no

yes

no

no

Device Management

no

yes

yes

no

Modify Devices

no

yes

yes

no

Object Manager Menu

The Object Manager menu table lists, in order, the user role privileges required to access each option in the Object Manager menu and the sub-permission within. The Discovery Admin, Security Approver, Maintenance User, External Database User, Security Analyst, and Security Analyst (Read Only) have no permissions in the Object Manager menu. The Object Manager menu is available only on theFirepower Management Center.

Table 6. Object Manager Menu

Menu

Access Admin

Admin

Intrusion Admin

Network Admin

Object Manager

yes

yes

no

yes

Rule Editor

no

yes

yes

no

Modify Rule Editor

no

yes

yes

no

NAT List

yes

yes

no

yes

Modify Object Manager

no

yes

no

no

Cisco AMP

The Cisco AMP permission is available only to the Administrator user role. This permission is available only on the Firepower Management Center.

Deploy Configuration to Devices

The Deploy Configuration to Devices permission is available to the Administrator, Network Admin, and Security Approver roles. This permission is available only on the Firepower Management Center.

System Menu

The following table lists, in order, the user role privileges required to access each option in the System menu and whether the user role has access to the sub-permissions within. The External Database User role has no permissions in the System Menu.

Table 7. System Menu

Menu

Access Admin

Admin

Discovery Admin

Intrusion Admin

Maint User

Network Admin

Security Approver

Security Analyst

Security Analyst (RO)

Configuration

no

yes

no

no

no

no

no

no

no

Domains

no

yes

no

no

no

no

no

no

no

Integration

no

yes

no

no

no

yes

yes

no

no

Cisco CSI

yes

yes

no

no

no

yes

yes

no

no

Identity Realms (FMC only)

yes

yes

no

no

no

yes

yes

no

no

Modify Identity Realms (FMC only)

yes

yes

no

no

no

yes

no

no

no

Identity Sources (FMC only)

yes

yes

no

no

no

yes

yes

no

no

Modify Identity Sources (FMC only)

yes

yes

no

no

no

yes

no

no

no

eStreamer

no

yes

no

no

no

no

no

no

no

Host Input Client (FMC only)

no

yes

no

no

no

no

no

no

no

Smart Software Satellite (FMC only)

yes

yes

no

no

no

yes

yes

no

no

Modify Smart Software Satellite (FMC only)

yes

yes

no

no

no

yes

no

no

no

User Management

no

yes

no

no

no

no

no

no

no

Users

no

yes

no

no

no

no

no

no

no

User Roles

no

yes

no

no

no

no

no

no

no

External Authentication (FMC only)

no

yes

yes

no

no

no

no

no

no

Updates

no

yes

no

no

no

no

no

no

no

Rule Updates (FMC only)

no

yes

no

yes

no

no

no

no

no

Rule Update Import Log (FMC only)

no

yes

no

no

no

no

no

no

no

Licenses

no

yes

no

no

no

no

no

no

no

Smart Licences

no

yes

no

no

no

no

no

no

no

Modify Smart Licenses

no

yes

no

no

no

no

no

no

no

Classic Licenses

no

yes

no

no

no

no

no

no

no

Health (FMC only)

no

yes

no

no

yes

no

no

yes

yes

Health Policy (FMC only)

no

yes

no

no

yes

no

no

yes

no

Modify Health Policy (FMC only)

no

yes

no

no

yes

no

no

yes

no

Apply Health Policy (FMC only)

no

yes

no

no

yes

no

no

yes

no

Health Events (FMC only)

no

yes

no

no

yes

no

no

yes

yes

Modify Health Events (FMC only)

no

yes

no

no

yes

no

no

yes

no

Monitoring

no

yes

no

no

yes

yes

yes

yes

no

Audit

no

yes

no

no

yes

no

no

no

no

Modify Audit Log

no

yes

no

no

yes

no

no

no

no

Syslog

no

yes

no

no

yes

no

no

no

no

Statistics

no

yes

no

no

yes

no

no

no

no

Tools

no

yes

no

no

yes

no

no

yes

no

Backup Management

no

yes

no

no

yes

no

no

no

no

Restore Backup

no

yes

no

no

yes

no

no

no

no

Scheduling

no

yes

no

no

yes

no

no

no

no

Delete Other Users’ Scheduled Tasks

no

yes

no

no

no

no

no

no

no

Import/Export

no

yes

no

no

no

no

no

no

no

Discovery Data Purge (FMC only)

no

yes

no

no

no

no

no

yes

no

Whois (FMC only)

no

yes

no

no

yes

no

no

yes

yes

REST VDI Menu

The REST VDI menu table lists, in order, the user role privileges required to access each option in the REST VDI menu and the sub-permissions within. REST VDI permissions are required to use the TS Agent for user awareness and user control. For more information about the TS Agent, see:

Table 8. REST VDI Menu

Menu

Access Admin

Admin

Network Admin

Security Approver

REST VDI

yes

yes

yes

yes

Modify REST VDI

yes

yes

yes

no

Help Menu

The Help menu and its permissions are accessible to all user roles. You cannot restrict Help menu options.

Managing User Roles

Smart License

Classic License

Supported Devices

Supported Domains

Access

Any

Any

Any

Any

Admin

Each Firepower System user is associated with a user access role or roles. These user roles are assigned permissions that determine access to menus and other options in the system. For example, an analyst needs access to event data to analyze the security of your network, but might not require access to administrative functions for the Firepower System itself. You can grant Security Analyst access to analysts while reserving the Administrator role for the user or users managing the Firepower System.

The Firepower System includes ten predefined user roles designed for a variety of administrators and analysts. These predefined user roles have a set of predetermined access privileges.

You can also create custom user roles with more granular access privileges.

You can also restrict the data that a user role can view in the event viewer by applying a restricted search to that role. To create a custom role with restricted access, you must choose the tables you want to restrict from the Menu Based Permissions list, then choose private saved searches from the Restrictive Search drop-down lists.

You cannot delete predefined user roles, but you can delete custom roles that are no longer necessary. If you want to disable a custom role without removing it entirely, you can deactivate it instead. Note that you cannot delete your own user role or a role that is set as a default user role in a platform settings policy.

Procedure


Step 1

Choose System > Users.

Step 2

Click the User Roles tab.

Step 3

Manage user roles:

  • Activate — Activate or deactivate a predefined user role as described in Activating and Deactivating User Roles.

  • Create — Create custom user roles as described in Creating Custom User Roles

  • Copy — Copy an existing user role to create a new custom user role as described in Copying User Roles.

  • Edit — Edit a custom user role as described in Editing Custom User Roles.

  • Delete — Click Delete (delete icon) next to the custom role you want to delete. If the controls are dimmed, the configuration belongs to an ancestor domain, or you do not have permission to modify the configuration.

  • Note


    If a deleted role is the only role assigned to a given user, that user can log in and access the User Preferences menu, but is otherwise unable to access the Firepower System.


Activating and Deactivating User Roles

Smart License

Classic License

Supported Devices

Supported Domains

Access

Any

Any

Any

Any

Admin

You cannot delete predefined user roles, but you can deactivate them. Deactivating a role removes that role and all associated permissions from any user who is assigned that role.

In a multidomain deployment, the system displays custom user roles created in the current domain, which you can edit. It also displays custom user roles created in ancestor domains, which you cannot edit. To view and edit custom user roles in a lower domain, switch to that domain.


Caution


If a deactivated role is the only role assigned to a given user, that user can log in and access the User Preferences menu, but is otherwise unable to access the Firepower System.


Procedure

Step 1

Choose System > Users.

Step 2

Click the User Roles tab.

Step 3

Click the slider next to the user role you want to activate or deactivate.

If the controls are dimmed, the configuration belongs to an ancestor domain, or you do not have permission to modify the configuration.

If you deactivate, then reactivate, a role with Lights-Out Management while a user with that role is logged in, or restore a user or user role from a backup during that user’s login session, that user must log back into the web interface to regain access to IPMItool commands.


Creating Custom User Roles

Smart License

Classic License

Supported Devices

Supported Domains

Access

Any

Any

Any

Any

Admin


Caution


Users with menu-based User Management permissions have the ability to elevate their own privileges or create new user accounts with extensive privileges, including the Administrator user role. For system security reasons we strongly recommend you restrict the list of users with User Management permissions appropriately.


Procedure

Step 1

Choose System > Users.

Step 2

Click the User Roles tab.

Step 3

Click Create User Role.

Step 4

In the Name field, enter a name for the new user role. User role names are case sensitive.

Step 5

Optionally, add a Description.

Step 6

Choose menu-based permissions for the new role.

When you choose a permission, all of its children are chosen, and the multi-value permissions use the first value. If you clear a high-level permission, all of its children are cleared also. If you choose a permission but not its children, it appears in italic text.

Copying a predefined user role to use as the base for your custom role preselects the permissions associated with that predefined role.

Step 7

Optionally, set database access permissions for the new role by checking or unchecking the External Database Access checkbox.

Step 8

Optionally, on Firepower Management Centers, set escalation permissions for the new user role as described in Configuring a Custom User Role for Escalation.

Step 9

Click Save.


Copying User Roles

Smart License

Classic License

Supported Devices

Supported Domains

Access

Any

Any

Any

Any

Admin

You can copy an existing role to use as the basis for a new custom role. This preselects the existing role’s permissions in the User Role Editor so you can model one role on another.

You can copy any existing role, including predefined user roles and custom user roles inherited from ancestor domains.

Procedure

Step 1

Choose System > Users.

Step 2

Click the User Roles tab.

Step 3

Click Copy (copy icon) next to the user role you want to copy.

Step 4

Enter a new Name.

The system creates a default name for the new user role by combining the name of the original user role and the (copy) suffix.

Step 5

Enter a new Description.

The system retains the description of the original user role if you do not overwrite it.

Step 6

Optionally, modify the menu-based permissions inherited from the original user role.

When you choose a permission, all of its children are chosen, and the multi-value permissions use the first value. If you clear a high-level permission, all of its children are cleared also. If you choose a permission but not its children, the permission appears in italic text.

Step 7

Optionally, set the database access permissions for the new role by checking or unchecking the External Database Access checkbox.

Step 8

Optionally, set escalation permissions for the new user role as described in Configuring a Custom User Role for Escalation.

Step 9

Click Save.


Editing Custom User Roles

Smart License

Classic License

Supported Devices

Supported Domains

Access

Any

Any

Any

Any

Admin

You cannot edit predefined user roles.

In a multidomain deployment, the system displays custom user roles created in the current domain, which you can edit. It also displays custom user roles created in ancestor domains, which you cannot edit. To view and edit custom user roles in a lower domain, switch to that domain.

Procedure

Step 1

Choose System > Users.

Step 2

Click the User Roles tab.

Step 3

Click Edit (edit icon) next to the custom user role you want to modify.If View (view button) appears instead, the configuration belongs to an ancestor domain, or you do not have permission to modify the configuration.

Step 4

Modify the Name and Description fields. User role names are case sensitive.

Step 5

Choose menu-based permissions for the user role.

When you choose a permission, all of its children are chosen, and the multi-value permissions use the first value. If you clear a high-level permission, all of its children are cleared also. If you choose a permission but not its children, the permission appears in italic text.

Step 6

Optionally, set the database access permissions for the role by checking or unchecking the External Database Access checkbox.

Step 7

Optionally, on Firepower Management Centers, set escalation permissions for the user role as described in Configuring a Custom User Role for Escalation.

Step 8

Click Save.


User Role Escalation

You can give custom user roles the permission, with a password, to temporarily gain the privileges of another, targeted user role in addition to those of the base role. This allows you to easily substitute one user for another during an absence, or to more closely track the use of advanced user privileges.

For example, a user whose base role has very limited privileges may escalate to the Administrator role to perform administrative actions. You can configure this feature so that users can use their own passwords, or so they use the password of another user that you specify. The second option allows you to easily manage one escalation password for all applicable users.

Note that only one user role at a time can be the escalation target role. You can use a custom or predefined user role. Each escalation lasts for the duration of a login session and is recorded in the audit log.

Setting the Escalation Target Role

Smart License

Classic License

Supported Devices

Supported Domains

Access

Any

Any

Any

Any

Admin

You can assign any of your user roles, predefined or custom, to act as the system-wide escalation target role. This is the role to which any other role may escalate, if it has the ability.

Procedure

Step 1

Choose System > Users.

Step 2

Click User Roles.

Step 3

Click Configure Permission Escalation.

Step 4

Choose a user role from the drop-down list.

Step 5

Click OK to save your changes.

Note


Changing the escalation target role is effective immediately. Users in escalated sessions now have the permissions of the new escalation target.


Configuring a Custom User Role for Escalation

Smart License

Classic License

Supported Device

Supported Domains

Access

Any

Any

Any

Any

Admin

Consider the needs of your organization when you configure the escalation password for a custom role. If you want to easily manage many escalating users, you may want to choose another user whose password serves as the escalation password. If you change that user’s password or deactivate that user, all escalating users who require that password are affected. This allows you to manage user role escalation more efficiently, especially if you choose an externally authenticated user that you can manage centrally.

Procedure

Step 1

Begin configuring your custom user role as described in Creating Custom User Roles.

Step 2

In System Permissions, choose the Set this role to escalate to: check box.

The current escalation target role is listed beside the check box.

Step 3

Choose the password that this role uses to escalate. You have two options:

  • If you want users with this role to use their own passwords when they escalate, choose Authenticate with the assigned user’s password.
  • If you want users with this role to use the password of another user, choose Authenticate with the specified user’s password and enter that username.

    Note


    When authenticating with another user’s password, you can enter any username, even that of a deactivated or nonexistent user. Deactivating the user whose password is used for escalation makes escalation impossible for users with the role that requires it. You can use this feature to quickly remove escalation powers if necessary.

Step 4

Click Save.

Users with this role can now escalate to the target user role.

Escalating Your User Role

Smart License

Classic License

Supported Device

Supported Domains

Access

Any

Any

FMC

Any

Any

When a user has an assigned custom user role with permission to escalate, that user may escalate to the target role’s permissions at any time. Note that escalation has no effect on user preferences.

Before you begin
Procedure

Step 1

From the drop-down list under your user name, choose Escalate Permissions.

Step 2

Enter the authentication password.

Step 3

Click Escalate. You now have all permissions of the escalation target role in addition to your current role.

Note


Escalation lasts for the remainder of your login session. To return to the privileges of your base role only, you must log out, then begin a new session.


User Accounts

The admin account and optional, custom user accounts on a Firepower Management Center or Firepower 7000 and 8000 Series device allow users to log into these. For internally-authenticated users, accounts must be created manually. For externally-authenticated users, accounts are created automatically.

For Firepower Threat Defense, you can create separate CLI users. These users can access the device through SSH to do additional troubleshooting and system monitoring. However, you must create these users in the CLI, you cannot create them in Firepower Management Center.

Managing User Accounts

Smart License

Classic License

Supported Devices

Supported Domains

Access

Any

Any

Any

Any

Admin

Procedure


Step 1

Choose System > Users.

Step 2

Manage user accounts:

  • Activate/Deactivate — Click the slider next to a user to reactivate a deactivated user, or to disable an active user account without deleting it. Only internally authenticated users can be activated and deactivated.
  • Create — Create a new user account; see Creating a User Account.
  • Edit — Edit an existing user account; see Editing a User Account.
  • Delete — If you want to delete a user, click Delete (delete icon). You can delete user accounts from the system at any time, with the exception of the admin account, which cannot be deleted.

Creating a User Account

Smart License

Classic License

Supported Devices

Supported Domains

Access

Any

Any

FMC

7000 & 8000 Series

Any

Admin

When you set up a new user account, you can control which parts of the system the account can access. You can set password expiration and strength settings for the user account during creation. For a local account on a 7000 or 8000 Series device, you can also configure the level of command line access the user will have.

In a multidomain deployment, you can create user accounts in any domain in which you have been assigned Admin access. You can also create accounts in a higher-level domain and assign the users lower-level access only. For example, you might want a single user to be an administrator of two domains, but deny them access to the ancestor domain. This kind of user account can only be modified by switching to a subdomain in which access is assigned.

Procedure


Step 1

Choose System > Users.

Step 2

Click Create User.

Step 3

Enter a User Name.

Step 4

Modify the login options; see User Account Login Options.

Step 5

Enter values in Password and Confirm Password.

The values you construct must be based on the password options you set earlier.

Step 6

If you are creating a user account on a 7000 or 8000 Series device, assign the appropriate level of Command-Line Interface Access as described in Command Line Access Levels.

Step 7

Assign user roles:

  • Check or uncheck the check box next to the user role(s) you want to assign the user.
  • In a multidomain deployment, if you are adding a user account to a domain with descendant domains, click the Add Domains button that displays instead of the user role check boxes. Continue as described in Assigning User Roles in Multiple Domains.

Note


User roles determine the user's access rights. For more information, see Managing User Roles.

Step 8

Click Save.


Editing a User Account

Smart License

Classic License

Supported Devices

Supported Domains

Access

Any

Any

Any

Any

Admin

After adding user accounts to the system, you can modify access privileges, account options, or passwords at any time. Note that password management options do not apply to users who authenticate to an external directory server. You manage those settings on the external server. However, you must configure access rights for all accounts, including those that are externally authenticated.

Note


For externally authenticated users, you cannot remove the minimum access rights through the Firepower System user management page for users assigned an access role because of LDAP group or RADIUS list membership or attribute values. You can, however, assign additional rights. When you modify the access rights for an externally authenticated user, the Authentication Method column on the User Management page provides a status of External - Locally Modified.


If you change the authentication for a user from externally authenticated to internally authenticated, you must supply a new password for the user.

Procedure


Step 1

Choose System > Users.

Step 2

Click Edit (edit icon) next to the user you want to modify.

Step 3

Modify settings described in Creating a User Account.

Step 4

Click Save.


Assigning User Roles in Multiple Domains

Smart License

Classic License

Supported Devices

Supported Domains

Access

Any

Any

Any

Any

Admin

In a multidomain deployment, you can assign users roles in ancestor and descendant domains. For example, you can assign a user read-only privileges in the Global domain, but Admin privileges in a descendant domain.

Procedure


Step 1

In the user account editor, click Add Domain.

Step 2

Choose a domain from the Domain drop-down list.

Step 3

Check the user roles you want to assign the user.

Step 4

Click Save.


Converting a User from Internal to External Authentication

Smart License

Classic License

Supported Devices

Supported Domains

Access

Any

Any

Any

Any

Admin


Note


When you convert a user from internal to external authentication, the user account retains the permissions already present in that account. The existing permissions override any permissions associated with the associated authentication object group or the default user role set in the platform settings policy.


Before you begin

  • A user record with the same user name must be present on the external authentication server.

Procedure


Step 1

Enable LDAP (with or without CAC) or RADIUS authentication. For more information, see LDAP Authentication or RADIUS Authentication.

Step 2

Instruct the user to log in with the password stored for that user on the external server.


User Account Login Options

The following table describes some of the options you can use to regulate passwords and account access for Firepower System users.


Note


  • Password management options do not apply to users who authenticate to an external directory server. You manage those settings on the external authentication server. After you enable Use External Authentication Method, the system removes password management options from the display.

  • If you enable security certifications compliance or Lights-Out Management (LOM) on an appliance, different password restrictions apply. For more information on security certifications compliance, see Security Certifications Compliance .


Table 9. User Account Login Options

Option

Description

Use External Authentication Method

Select this check box if you want this user's credentials to be externally authenticated. If you enable this option, the password management options are no longer displayed.

Note

 
  • For users to authenticate to an external directory server, you must also create an authentication object for the server you want to use, and deploy a platform settings policy with authentication enabled.

  • Note that for externally authenticated users, if the authentication object for the server is disabled, the Authentication Method column in the Users list displays External (Disabled).

  • If you select this option for the user and the external authentication server is unavailable, that user can log into the web interface but cannot access any functionality.

Maximum Number of Failed Logins

Enter an integer, without spaces, that determines the maximum number of times each user can try to log in after a failed login attempt before the account is locked. The default setting is five tries; use 0 to allow an unlimited number of failed logins. The admin account is exempt from being locked out after a maximum number of failed logins unless you have enabled security certification compliance.

Minimum Password Length

Enter an integer, without spaces, that determines the minimum required length, in characters, of a user’s password. The default setting is 8. A value of 0 indicates that no minimum length is required.

If you enable the Check Password Strength option, and set a value for Minimum Password Length that exceeds 8 characters, the higher value applies.

Days Until Password Expiration

Enter the number of days after which the user’s password expires. The default setting is 0, which indicates that the password never expires. If you set this option, the Password Lifetime column of the Users list indicates the days remaining on each user’s password.

Days Before Password Expiration Warning

Enter the number of warning days users have to change their password before their password actually expires. The default setting is 0 days.

Note


The number of warning days must be less than the number of days before the password expires.

Force Password Reset on Login

Select this option to force users to change their passwords the next time they log in.

Check Password Strength

Select this option to require strong passwords. A strong password must be at least eight alphanumeric characters of mixed case and must include at least one numeric character and one special character. It cannot be a word that appears in a dictionary or include consecutive repeating characters.

Exempt from Browser Session Timeout

Select this option if you do not want a user’s login sessions to terminate due to inactivity. Users with the Administrator role cannot be made exempt.

Command Line Access Levels

You can use the local web interface on a 7000 or 8000 Series device to assign command line interface access to local device users. Note that you can also assign command line access for users on an NGIPSv, but you use commands from the command line interface.

The commands a user can run depend on the level of access you assign to the user. Possible values for the Command-Line Interface Access setting include:

None

The user cannot log into the appliance on the command line. Any session the user starts will close when the user provides credentials. The access level defaults to None on user creation.

Configuration

The user can access any of the command line options. Exercise caution in assigning this level of access to users.


Caution


Command line access granted to externally authenticated users defaults to the Configuration level of command line access, granting rights to all command line utilities.


Basic

A specific set of commands can be run by the user, listed below.

Table 10. Basic Command Line Commands

configure password

interfaces

end

lcd

exit

link-state

help

log-ips-connection

history

managers

logout

memory

?

model

??

mpls-depth

access-control-config

NAT

alarms

network

arp-tables

network-modules

audit-log

ntp

bypass

perfstats

high-availability

portstats

cpu

power-supply-status

database

process-tree

device-settings

processes

disk

routing-table

disk-manager

serial-number

dns

stacking

expert

summary

fan-status

time

fastpath-rules

traffic-statistics

gui

version

hostname

virtual-routers

hyperthreading

virtual-switches

inline-sets

Creating Local User Accounts for the FTD CLI

You can create users for CLI access on Firepower Threat Defense devices. These accounts do not allow access to the management application, but to the CLI only. The CLI is useful for troubleshooting and monitoring purposes.

You cannot create local user accounts on more than one device at a time. Each device has its own set of unique local user CLI accounts.

Procedure


Step 1

Log into the device CLI using an account with config privileges.

The admin user account has the required privileges, but any account with config privileges will work. You can use an SSH session or the Console port.

For certain device models, the Console port puts you into the FXOS CLI. Use the connect ftd command to get to the Firepower Threat Defense CLI.

Step 2

Create the user account.

configure user add username {basic | config}

You can define the user with the following privilege levels:

  • config —Gives the user configuration access. This gives the user full administrator rights to all commands.

  • basic —Gives the user basic access. This does not allow the user to enter configuration commands.

Example:

The following example adds a user account named joecool with config access rights. The password is not shown as you type it.


> configure user add joecool config
Enter new password for user joecool: newpassword
Confirm new password for user joecool: newpassword
> show user
Login              UID   Auth Access  Enabled Reset    Exp Warn  Str Lock Max
admin             1000  Local Config  Enabled    No  Never  N/A  Dis   No N/A
joecool           1001  Local Config  Enabled    No  Never  N/A  Dis   No   5

Note


Tell users they can change their passwords using the configure password command.

Step 3

(Optional.) Adjust the characteristics of the account to meet your security requirements.

You can use the following commands to change the default account behavior.

  • configure user aging username max_days warn_days

    Sets an expiration date for the user's password. Specify the maximum number of days for the password to be valid followed by the number of days before expiration the user will be warned about the upcoming expiration. Both values are 1 to 9999, but the warning days must be less than the maximum days. When you create the account, there is no expiration date for the password.

  • configure user forcereset username

    Forces the user to change the password on the next login.

  • configure user maxfailedlogins username number

    Sets the maximum number of consecutive failed logins you will allow before locking the account, from 1 to 9999. Use the configure user unlock command to unlock accounts. The default for new accounts is 5 consecutive failed logins.

  • configure user minpasswdlen username number

    Sets a minimum password length, which can be from 1 to 127.

  • configure user strengthcheck username { enable | disable}

    Enables or disables password strength checking, which requires a user to meet specific password criteria when changing their password. When a user’s password expires or if the configure user forcereset command is used, this requirement is automatically enabled the next time the user logs in.

Step 4

Manage user accounts as necessary.

Users can get locked out of their accounts, or you might need to remove accounts or fix other issues. Use the following commands to manage the user accounts on the system.

  • configure user access username { basic | config}

    Changes the privileges for a user account.

  • configure user delete username

    Deletes the specified account.

  • configure user disable username

    Disables the specified account without deleting it. The user cannot log in until you enable the account.

  • configure user enable username

    Enables the specified account.

  • configure user password username

    Changes the password for the specified user. Users should normally change their own password using the configure password command.

  • configure user unlock username

    Unlocks a user account that was locked due to exceeding the maximum number of consecutive failed login attempts.


Firepower System User Authentication

When a user logs into the web interface on a Firepower Management Center or a managed device, the appliance looks for a match for the user name and password in the local list of users. This process is called authentication.

There are two types of authentication:

  • internal authentication — The system checks the list in the local database for the user.

  • external authentication — The system checks the list in the local database for the user and, if the user is not present on that list, queries an external authentication server for its user list.

The authentication process is illustrated below.

Diagram illustrating internal and external authentication. User credentials are authenticated against an internal database and, if enabled, an external database.

When you create a user account, you specify either internal or external authentication for that user.

Internal Authentication

In internal authentication, user credentials are verified against records in the internal Firepower System database. This is the default authentication type.

You set the access rights for internal authentication users when you create the user's account.


Note


When an internally authenticated user is converted to external authentication, you cannot revert to internal authentication.


External Authentication

In external authentication, the Firepower Management Center or managed device retrieves user credentials from a repository on an external server. External servers can be either a Lightweight Directory Access Protocol (LDAP) directory server or a Remote Authentication Dial In User Service (RADIUS) authentication server.

You enable external authentication using a platform settings policy and settings in individual user accounts. Note the following guidelines:

  • You can use multiple external authentication objects to authenticate users to access the Firepower Management Center web interface. In other words, if you have five external authentication objects, users from any of them can be authenticated to access the web interface.

  • You can use only one external authentication object for shell access to the Firepower Management Center. If you have more than one external authentication object set up, users can authenticate using only the first object in the list.

When the user logs into an appliance for the first time, the appliance associates the external credentials with a set of permissions by creating a local user record. The user is assigned permissions based on either:

  • the group or access list they belong to

  • the default user access role you set in the platform settings policy for the appliance

If permissions are granted through group or list membership, they cannot be modified. However, if they are assigned by default user role, you can modify them in the user account, and the modifications you make override the default settings. For example:

  • If the default role for externally authenticated user accounts is set to a specific access role, users can log into the appliance using their external account credentials without any additional configuration by the system administrator.

  • If an account is externally authenticated and by default receives no access privileges, users can log in but cannot access any functionality. You (or your system administrator) can then change the permissions to grant the appropriate access to user functionality.

You cannot manage passwords for externally authenticated users or deactivate externally authenticated users through the Firepower System interface. For externally authenticated users, you cannot remove the minimum access rights through the Firepower System user management page for users assigned an access role because of LDAP group or RADIUS list membership or attribute values. On the Edit User page for an externally authenticated user, rights granted because of settings on an external authentication server are marked with a status of Externally Modified.

You can, however, assign additional rights. When you modify the access rights for an externally authenticated user, the Authentication Method column on the User Management page provides a status of External - Locally Modified.

LDAP Authentication

LDAP, or the Lightweight Directory Access Protocol, allows you to set up a directory on your network that organizes objects, such as user credentials, in a centralized location. Multiple applications can then access those credentials and the information used to describe them. If you ever need to change a user's credentials, you can change them in one place.

You must create LDAP authentication objects on a Firepower Management Center, but you can use the external authentication object on any managed devices that have a web interface (that is, on 7000 and 8000 Series devices) by deploying a platform settings policy where the object is enabled to the device. When you deploy the policy, the object is copied to the device.


Note


Before enabling external authentication on 7000 and 8000 Series devices, remove any internally-authenticated shell or CLI users that have the same user name as externally-authenticated users included in your shell access filter.


You can use LDAP naming standards for address specification and for filter and attribute syntax in your authentication object. For more information, see the RFCs listed in the Lightweight Directory Access Protocol (v3): Technical Specification, RFC 3377. Examples of syntax are provided throughout this procedure. Note that when you set up an authentication object to connect to a Microsoft Active Directory Server, you can use the address specification syntax documented in the Internet RFC 822 (Standard for the Format of ARPA Internet Text Messages) specification when referencing a user name that contains a domain. For example, to refer to a user object, you might type JoeSmith@security.example.com rather than the equivalent user distinguished name of cn=JoeSmith,ou=security, dc=example,dc=com when using Microsoft Active Directory Server.


Note


Currently, the Firepower System supports LDAP external authentication on LDAP servers running Microsoft Active Directory on Windows Server 2008, Oracle Directory Server Enterprise Edition 7.0 on Windows Server 2008, or OpenLDAP on Linux. However, the Firepower System does not support external authentication for NGIPSv or ASA FirePOWER devices.


Microsoft has announced that Active Directory servers will start enforcing LDAP binding and LDAP signing in 2020. Microsoft is making these a requirement because when using default settings, an elevation of privilege vulnerability exists in Microsoft Windows that could allow a man-in-the-middle attacker to successfully forward an authentication request to a Windows LDAP server. For more information, see 2020 LDAP channel binding and LDAP signing requirement for Windows on the Microsoft support site.

If you have not done so already, we recommend you start using TLS/SSL encryption to authenticate with an Active Directory server.

Required Information for Creating LDAP Authentication Objects

Before you configure a connection to your LDAP server, you should collect the information that you need to create the LDAP authentication object.


Note


You must have TCP/IP access from your local appliance to the authentication server where you want to connect.


You need the following, at minimum, to create a basic authentication object:

  • the server name or IP address for the server where you plan to connect

  • the server type of the server where you plan to connect

  • the user name and password for a user account with sufficient privileges to browse the LDAP tree; Cisco recommends that you use a domain admin user account for this purpose

  • if there is a firewall between the appliance and the LDAP server, an entry in the firewall to allow outgoing connections

  • if possible, the base distinguished name for the server directory where the user names reside


Tip


You can use a third-party LDAP client to browse the LDAP tree and see base DN and attribute descriptions. You can also use that client to confirm that your selected user can browse the base DN you select. Ask your LDAP administrator to recommend an approved LDAP client for your LDAP server.


Depending on how you plan to customize your advanced LDAP authentication object configuration, you might also need the information in the following table.

Table 11. Additional LDAP Configuration Information

To...

You need...

connect over a port other than 389

the port number

connect via an encrypted connection

the certificate for the connection

filter the users who can access your appliance based on an attribute value

the attribute-value pair to filter by

use an attribute as a UI access attribute rather than checking the user distinguished name

the name of the attribute

use an attribute as a shell login attribute rather than checking the user distinguished name

the name of the attribute

filter the users who can access your appliance via the shell based on an attribute value

the attribute-value pair to filter by

associate groups with specific user roles

the distinguished name of each group, as well as the group member attribute if the groups are static groups or the group member URL attribute if the groups are dynamic groups

use CACs for authentication and authorization

your CAC, a server certificate signed by the same CA that issued your CAC, and the certificate chain for both certificates

CAC Authentication

If your organization uses Common Access Cards (CACs), you can configure LDAP authentication to authenticate users logging into the web interface and authorize access to specific functionality based on group membership or default access rights. With CAC authentication and authorization configured, users have the option to log in directly without providing a separate username and password for the appliance.


Note


You must have a valid user certificate present in your browser (in this case, a certificate passed to your browser via your CAC) to enable user certificates as part of the CAC configuration process. After you configure CAC authentication and authorization, users on your network must maintain the CAC connection for the duration of their browsing session. If you remove or replace a CAC during a session, your web browser terminates the session and the system logs you out of the web interface.


CAC-authenticated users are identified in the system by their electronic data interchange personal identifier (EDIPI) numbers. After users log in using their CAC credentials for the first time, you can manually add or remove access privileges for those users on the User Management page. If you did not preconfigure a user’s privileges using group-controlled access roles, the user has only the privileges granted by default in the platform settings policy.


Tip


The system purges manually configured access privileges when it purges CAC-authenticated users from the User Management page after 24 hours of inactivity. The users are restored to the page after each subsequent login, but you must reconfigure any manual changes to their access privileges.


Configuring CAC Authentication

Smart License

Classic License

Supported Devices

Supported Domains

Access

Any

Any

FMC

7000 and 8000 Series

Any

Admin/Network Admin

Before users on your network can log into Firepower Management Centers and 7000 and 8000 Series devices using their CAC credentials, a user with appropriate permissions must complete the multi-step configuration process for CAC authentication and authorization.

Before you begin
Procedure

Step 1

Insert a CAC as directed by your organization.

Step 2

Direct your browser to the web interface of the FMC or device.

Step 3

If prompted, enter the PIN associated with the CAC you inserted in step 1.

Step 4

If prompted, choose the appropriate certificate from the drop-down list.

Step 5

On the Login page, in the Username and Password fields, log in as a user with Administrator privileges. User names are case sensitive.

You cannot log in using your CAC credentials until you have fully configured CAC authentication and authorization.

Step 6

Navigate to System > Users and click the External Authentication tab.

Step 7

Create an LDAP authentication object exclusively for CAC authentication and authorization.

See Creating Advanced LDAP Authentication Objects. You must configure:

  • The User Name Template in the advanced options of the LDAP-Specific Parameters section.

  • The UI Access Attribute in the Attribute Mapping section.

  • The distinguished names for existing LDAP groups in the Group Controlled Access Roles section, if you want to preconfigure access rights through LDAP group membership.

You cannot configure both CAC authentication and shell access in the same authentication object. If you also want to authorize users for shell access, create and enable separate authentication objects.

Step 8

Click Save.

Step 9

Enable external authentication and CAC authentication.

Step 10

Select System > Configuration and click HTTPS Certificate.

Step 11

Import a HTTPS server certificate, if necessary.

See Importing HTTPS Server Certificates. The same certificate authority (CA) must issue the HTTPS server certificate and the user certificates on the CACs you plan to use for authentication and authorization.

Step 12

Under HTTPS User Certificate Settings, choose Enable User Certificates.

For more information, see Requiring Valid HTTPS Client Certificates .


What to do next
  • After the user logs in for the first time, you can manually add or remove the user's access rights. If you do not modify the rights, the user has only the rights granted by default. For more information, see Editing a User Account.

Creating Basic LDAP Authentication Objects

Smart License

Classic License

Supported Devices

Supported Domains

Access

Any

Any

Any

Any

Admin

You can set up an LDAP authentication object where you customize many of the values. However, if you just want to authenticate all the users in a particular directory, you can create a basic authentication object with the base DN for that directory. If you set defaults to those for your server type and supply authentication credentials for the account used to retrieve user data from the server, you can quickly create an authentication object. Follow the procedure below to do so.


Note


If you prefer to consider and possibly customize each authentication setting when creating the authentication object (to grant shell access, for example), use the advanced procedure to create the object. You should also use the advanced procedure if you plan to encrypt your connection to the server, set user timeouts, customize the user name template, or assign Firepower user roles based on LDAP group membership.


In a multidomain deployment, external authentication objects are only available in the domain in which they are created.

Before you begin

Procedure


Step 1

Choose System > Users.

Step 2

Click the External Authentication tab.

Step 3

Click Add External Authentication Object.

Step 4

Choose LDAP from the Authentication Method drop-down list.

Step 5

Provide a Name, Description, Server Type, and Primary Server Host Name/IP Address as described in Identifying the LDAP Authentication Server.

Tip


If you click Set Defaults, the system populates the User Name Template, UI Access Attribute, Shell Access Attribute, Group Member Attribute, and Group Member URL Attribute fields with default values.

Step 6

Choose Fetch DNs to specify a base distinguished name and, optionally, provide a Base Filter as described in Configuring LDAP-Specific Parameters.

Step 7

Enter a distinguished name as the User Name and the Password for a user who has sufficient credentials to browse the LDAP server as described in Configuring LDAP-Specific Parameters.

Step 8

Re-enter the password in the Confirm Password field.

Step 9

Test the connection as described in Testing LDAP Authentication Connections.

Step 10

Click Save.


Example

The following figures illustrate a basic configuration of an LDAP login authentication object for a Microsoft Active Directory Server. The LDAP server in this example has an IP address of 10.11.3.4. The connection uses port 389 for access.

Screenshot of an LDAP authentication object configuration.

This example shows a connection using a base distinguished name of OU=security,DC=it,DC=example,DC=com for the security organization in the information technology domain of the Example company.

Screenshot of an LDAP authentication object configuration.

However, because this server is a Microsoft Active Directory server, it uses the sAMAccountName attribute to store user names rather than the uid attribute. Choosing the MS Active Directory server type and clicking Set Defaults sets the UI Access Attribute to sAMAccountName. As a result, the system checks the sAMAccountName attribute for each object for matching user names when a user attempts to log into the system.

In addition, a Shell Access Attribute of sAMAccountName causes each sAMAccountName attribute to be checked for all objects in the directory for matches when a user logs into a shell or CLI account on the appliance.

Note that because no base filter is applied to this server, the system checks attributes for all objects in the directory indicated by the base distinguished name. Connections to the server time out after the default time period (or the timeout period set on the LDAP server).

What to do next

Creating Advanced LDAP Authentication Objects

Smart License

Classic License

Supported Devices

Supported Domains

Access

Any

Any

Any

Any

Admin

When you create a basic authentication object, you define basic settings that let you connect to an authentication server. When you create an advanced authentication object, you define basic settings and you also choose the directory context and search criteria you want to use to retrieve user data from the server. Optionally, you can configure shell access authentication.

Although you can use the default settings for your server type to quickly set up an LDAP configuration, you can also customize advanced settings to control whether the appliance makes an encrypted connection to the LDAP server, the timeout for the connection, and which attributes the server checks for user information.

For the LDAP-specific parameters, you can use LDAP naming standards and filter and attribute syntax. For more information, see the RFCs listed in the Lightweight Directory Access Protocol (v3): Technical Specification, RFC 3377. Examples of syntax are provided throughout this procedure. Note that when you set up an authentication object to connect to a Microsoft Active Directory Server, you can use the address specification syntax documented in the Internet RFC 822 (Standard for the Format of ARPA Internet Text Messages) specification when referencing a user name that contains a domain. For example, to refer to a user object, you might enter JoeSmith@security.example.com rather than the equivalent user distinguished name of cn=JoeSmith,ou=security, dc=example,dc=com when using Microsoft Active Directory Server.


Note


If you are configuring an LDAP authentication object for use with CAC authentication, do not remove the CAC inserted in your computer. You must have a CAC inserted at all times after enabling user certificates.


In a multidomain deployment, external authentication objects are only available in the domain in which they are created.

Before you begin

Procedure


Step 1

Choose System > Users.

Step 2

Click External Authentication, then Add External Authentication Object.

Step 3

Identify the authentication server as described in Identifying the LDAP Authentication Server.

Step 4

Configure authentication settings as described in Configuring LDAP-Specific Parameters.

Step 5

Optionally, configure LDAP groups to use as the basis for default access role assignments as described in Configuring Access Rights by Group.

If you plan to use this object for CAC authentication and authorization, we recommend you configure LDAP groups to manage access role assignments.

Step 6

Optionally, configure authentication settings for shell access as described in Configuring LDAP Shell Access.

Step 7

Test your configuration as described in Testing LDAP Authentication Connections.

Step 8

Click Save.


Example

This example illustrates an advanced configuration of an LDAP login authentication object for a Microsoft Active Directory Server. The LDAP server in this example has an IP address of 10.11.3.4. The connection uses port 636 for access.

Screenshot of LDAP login authentication object configuration.

This example shows a connection using a base distinguished name of OU=security,DC=it,DC=example,DC=com for the security organization in the information technology domain of the Example company. However, note that this server has a base filter of (cn=*smith). The filter restricts the users retrieved from the server to those with a common name ending in smith.

Screenshot of LDAP login authentication object configuration filtering retrieved names.

The connection to the server is encrypted using SSL and a certificate named certificate.pem is used for the connection. In addition, connections to the server time out after 60 seconds because of the Timeout setting.

Because this server is a Microsoft Active Directory server, it uses the sAMAccountName attribute to store user names rather than the uid attribute. Note that the configuration includes a UI Access Attribute of sAMAccountName. As a result, the Firepower System checks the sAMAccountName attribute for each object for matching user names when a user attempts to log into the Firepower System.

In addition, a Shell Access Attribute of sAMAccountName causes each sAMAccountName attribute to be checked for all objects in the directory for matches when a user logs into a shell account on the appliance.

This example also has group settings in place. The Maintenance User role is automatically assigned to all members of the group with a member group attribute and the base domain name of CN=SFmaintenance,DC=it,DC=example,DC=com.

Screenshot of Group Controlled Access Roles settings.

The shell access filter is set to be the same as the base filter, so the same users can access the appliance through the shell or CLI as through the web interface.

Screenshot of the Shell Access Filter settings.

LDAP Authentication Server Fields

CAC

Select this checkbox if you want to use CAC for authentication and authorization.

Name

A name for the authentication server.

Description

A description for the authentication server.

Server Type

The type of LDAP server you plan to connect to. You have the following options when selecting a type:

  • If you are connecting to a Microsoft Active Directory server, select MS Active Directory.

  • If you are connecting to a Sun Java Systems Directory Server or Oracle Directory Server, select Oracle Directory.

  • If you are connecting to an OpenLDAP server, select OpenLDAP.

  • If you are connecting to a LDAP server other than those listed above and want to clear default settings, select Other.


Tip


If you click Set Defaults, the system populates the User Name Template, UI Access Attribute, Shell Access Attribute, Group Member Attribute, and Group Member URL Attribute fields with default values.


Primary Server Host Name/IP Address

The IP address or host name for the primary server where you want to obtain authentication data.


Note


If you are using a certificate to connect via TLS or SSL, the host name in the certificate must match the host name used in this field. In addition, IPv6 addresses are not supported for encrypted connections.


Primary Server Port

The port used by the primary authentication server.

Backup Server Host Name/IP Address

The IP address or host name for the backup server where you want to obtain authentication data.

Backup Server Port

The port used by the backup authentication server.

Identifying the LDAP Authentication Server

Smart License

Classic License

Supported Devices

Supported Domains

Access

Any

Any

Any

Any

Admin

When you create an authentication object, you first specify the primary and backup server and server port where you want the managed device or Firepower Management Center to connect for authentication.


Note


If you are configuring an LDAP authentication object for use with CAC authentication, do not remove the CAC inserted in your computer. You must have a CAC inserted at all times after enabling user certificates.


In a multidomain deployment, external authentication objects are only available in the domain in which they are created.

Procedure

Step 1

Choose System > Users.

Step 2

Click the External Authentication tab.

Step 3

Click Add External Authentication Object.

Step 4

Choose LDAP from the Authentication Method drop-down list.

Step 5

Optionally, check the check box for CAC if you plan to use this authentication object for CAC authentication and authorization.

Note


You must follow the procedure in Configuring CAC Authentication to fully configure CAC authentication and authorization.

Step 6

Enter a name and description for the authentication server in the Name and Description fields.

Step 7

Choose a Server Type from the drop-down list as described in LDAP Authentication Server Fields. Optionally, click Set Defaults.

Step 8

Enter a Primary Server Host Name/IP Address.

Note


If you are using a certificate to connect via TLS or SSL, the host name in the certificate must match the host name used in this field. In addition, IPv6 addresses are not supported for encrypted connections.

Step 9

Optionally, enter a Primary Server Port.

Step 10

Optionally, enter a Backup Server Host Name/IP Address.

Step 11

Optionally, enter a Backup Server Port.


What to do next

LDAP-Specific Fields

The following table describes each of the LDAP-specific parameters.

Table 12. LDAP-Specific Parameters

Setting

Description

Examples

Base DN

Supplies the base distinguished name of the directory where the appliance searches for user information on the LDAP server.

Typically, the base DN has a basic structure indicating the company domain and operational unit.

Note that after you identify a primary server, you can automatically retrieve a list of available base DNs from the server and select the appropriate base DN.

The Security organization of the Example company might have a base DN of ou=security, dc=example,dc=com

Base Filter

Focuses your search by only retrieving objects in the base DN that have the specific attribute-value pair set in the filter. The base filter is an attribute type, a comparison operator, and the attribute value you want to use as a filter enclosed in parentheses.

To filter for only users with a common name starting with F, use the filter (cn=F*).

User Name/ Password

Allows the local appliance to access the user objects. Supplies user credentials for a user with appropriate rights to the authentication objects you want to retrieve. The distinguished name for the user you specify must be unique to the directory information tree for the LDAP server. Server user names associated with a Microsoft Active Directory Server cannot end with the $ character.

The user name for the admin user in the Security organization of the Example company might have a user name of cn=admin,
ou=security,
dc=example,dc=com

Encryption

Determines whether and how the communications are encrypted. You can choose no encryption, Transport Layer Security (TLS), or Secure Sockets Layer (SSL) encryption. Note that if you are using a certificate to authenticate when connecting via TLS or SSL, the name of the LDAP server in the certificate must match the User Name you supply.

If you change the encryption method after specifying the port, the port resets to the default value for the selected server type.

If you enter 10.10.10.250 in the external authentication settings and computer1.
example.com in the certificate, the connection fails, even if computer1.
example.com has an IP address of 10.10.10.250. Changing the name of the server in the external authentication settings to computer1.
example.com causes the connection to succeed.

SSL Certificate Upload Path

Indicates the path on your local computer to the certificate to be used for encryption.

c:/server.crt

User Name Template

Indicates how user names entered on login should be formatted, by mapping the string conversion character (%s) to the value of the UI Access Attribute for the user. The user name template is the format for the distinguished name used for authentication. When a user enters a user name into the login page, the appliance substitutes the name for the string conversion character and uses the resulting distinguished name to search for the user credentials.

If you want to use this object for CAC authentication and authorization, you must enter a User Name Template.

%s@security.example.com,

%s@mail.com,

%s@mil,

%s@smil.mil,

Timeout

Sets a timeout for the connection attempt to the primary server, so the connection rolls over to the backup server. If the number of seconds indicated in this field (or the timeout on the LDAP server) elapses without a response from the primary authentication server, the appliance then queries the backup server.

However, if LDAP is running on the port of the primary LDAP server and for some reason refuses to service the request, the failover to the backup server does not occur.

If the primary server has LDAP disabled, the appliance queries the backup server.

UI Access Attribute

Tells the local appliance to match the value of a specific attribute rather than the value of the user distinguished name. You can use any attribute, if the value of the attribute is a valid user name for the Firepower System web interface. If one of the objects has a matching user name and password, the user login request is authenticated.

Selecting a server type and setting defaults prepopulates the UI Access Attribute with a value typically appropriate for that type of server.

If you leave this field blank, the local appliance checks the user distinguished name value for each user record on the LDAP server to see if it matches the user name.

If you want to use this object for CAC authentication and authorization, you must enter a value that corresponds with your User Name Template value.

sAMAccountName,

userPrincipalName,

mail

Configuring LDAP-Specific Parameters

Smart License

Classic License

Supported Devices

Supported Domains

Access

Any

Any

Any

Any

Admin

The settings in the LDAP-specific parameters section determine the area of the LDAP directory where the appliance searches for user names, and control details of how the appliance connects to the LDAP server.

Valid user names are unique, and can include underscores (_), periods (.), hyphens (-), and alphanumeric characters.

In addition for most LDAP-specific settings, you can use LDAP naming standards and filter and attribute syntax. For more information, see the RFCs listed in the Lightweight Directory Access Protocol (v3): Technical Specification, RFC 3377. Examples of syntax are provided throughout this procedure. Note that when you set up an authentication object to connect to a Microsoft Active Directory Server, you can use the address specification syntax documented in the Internet RFC 822 (Standard for the Format of ARPA Internet Text Messages) specification when referencing a user name that contains a domain. For example, to refer to a user object, you might enter JoeSmith@security.example.com rather than the equivalent user distinguished name of cn=JoeSmith,ou=security, dc=example,dc=com when using Microsoft Active Directory Server.


Note


If you are configuring an LDAP authentication object for use with CAC authentication, do not remove the CAC inserted in your computer. You must have a CAC inserted at all times after enabling user certificates.


Procedure

Step 1

In the LDAP-Specific Parameters section of the Create External Authentication Object page, you have two options for setting the base DN:

  • Click Fetch DNs, and choose the appropriate base distinguished name from the drop-down list.
  • Enter the base distinguished name for the LDAP directory you want to access in the Base DN field. For example, to authenticate names in the Security organization at the Example company, enter ou=security,dc=example,dc=com.

Step 2

Optionally, enter a Base Filter.

Example:
For example, if the user objects in a directory tree have a physicalDeliveryOfficeName attribute and users in the New York office have an attribute value of NewYork for that attribute, to retrieve only users in the New York office, enter (physicalDeliveryOfficeName=NewYork).

Step 3

Enter a distinguished name as the User Name and the Password for a user who has sufficient credentials to browse the LDAP server.

Example:
For example, if you are connecting to an OpenLDAP server where user objects have a uid attribute and the object for the administrator in the Security division at our example company has a uid value of NetworkAdmin, you might enter uid=NetworkAdmin,ou=security,dc=example,dc=com.

Caution


If you are connecting to a Microsoft Active Directory Server, you cannot provide a server user name that ends with the $ character.

Step 4

Re-enter the password in the Confirm Password field.

Step 5

After you configure the basic LDAP-specific parameters, you have several options:

  • To access advanced options, click the arrow next to Show Advanced Options and continue with the next step.
  • If you want to configure user default roles based on LDAP group membership, continue with Configuring Access Rights by Group.
  • If you are not using LDAP groups for authentication, continue with Configuring LDAP Shell Access.

Step 6

Choose an Encryption mode for your LDAP connection.

Note


Note that if you change the encryption method after specifying a port, you reset the port to the default value for that method. For none or TLS, the port uses the default value of 389. If you choose SSL encryption, the port uses the default of 636.

Step 7

If you choose TLS or SSL encryption and you want to use a certificate to authenticate, Browse to the location of a valid TLS or SSL certificate.

Note


If you previously uploaded a certificate and want to replace it, upload the new certificate and redeploy the configuration to your appliances to copy over the new certificate.

Step 8

Optionally, provide a User Name Template that corresponds with your UI Access Attribute.

Example:
For example, to authenticate all users who work in the Security organization of our example company by connecting to an OpenLDAP server where the UI access attribute is uid, you might enter uid=%s,ou=security,dc=example,dc=com in the User Name Template field. For a Microsoft Active Directory server, you could enter %s@security.example.com.

Note


If you want to use CAC credentials for authentication and authorization, you must enter a value in the User Name Template field.

Step 9

Optionally, in the Timeout field, enter the number of seconds that should elapse before rolling over to the backup connection.

Step 10

Optionally, to retrieve users based on an attribute instead of the Base DN and Base Filter, you have two options:

  • Click Fetch Attrs to retrieve a list of available attributes, and choose the appropriate attribute.
  • Enter a UI Access Attribute. For example, on a Microsoft Active Directory Server, you may want to use the UI Access Attribute to retrieve users, because there may not be a uid attribute on Active Directory Server user objects. Instead, you can search the userPrincipalName attribute by typing userPrincipalName in the UI Access Attribute field.

Note


If you want to use CAC credentials for authentication and authorization, you must enter a value in the UI Access Attribute field.


What to do next

LDAP Group Fields

Any group you reference must exist on the LDAP server. You can reference static LDAP groups or dynamic LDAP groups. Static LDAP groups are groups where membership is determined by group object attributes that point to specific users, and dynamic LDAP groups are groups where membership is determined by creating an LDAP search that retrieves group users based on user object attributes. Group access rights for a role only affect users who are members of the group.

The access rights granted when a user logs into the Firepower System depend on the LDAP configuration:

  • If no group access rights are configured for your LDAP server, when a new user logs in, the Firepower System authenticates the user against the LDAP server and then grants user rights based on the default minimum access role set in the platform settings policy.

  • If you configure any group settings, new users belonging to specified groups inherit the minimum access setting for the groups where they are members.

  • If a new user does not belong to any specified groups, the user is assigned the default minimum access role specified in the Group Controlled Access Roles section of the authentication object.

  • If a user belongs to more than one configured group, the user receives the access role for the group with the highest access as a minimum access role.

You cannot use the Firepower System user management page to remove the minimum access rights for users assigned an access role because of LDAP group membership. You can, however, assign additional rights. When you modify the access rights for an externally authenticated user, the Authentication Method column on the User Management page provides a status of External - Locally Modified.


Note


If you use a dynamic group, the LDAP query is used exactly as it is configured on the LDAP server. For this reason, the Firepower System limits the number of recursions of a search to four to prevent search syntax errors from causing infinite loops. If a user’s group membership is not established in those recursions, the default access role defined in the Group Controlled Access Roles section is granted to the user.


Firepower System User Roles

The distinguished names for the LDAP groups that contain users who should be assigned each user role.

Default User Role

The default minimum access role for users that do not belong to any of the specified groups.

Group Member Attribute

The LDAP attribute that contains the LDAP search string in a static group.

Group Member URL Attribute

The LDAP attribute that designates membership in a dynamic group

Configuring Access Rights by Group

Smart License

Classic License

Supported Devices

Supported Domains

Access

Any

Any

Any

Any

Admin

If you prefer to base default access rights on a user’s membership in an LDAP group, you can specify distinguished names for existing groups on your LDAP server for each of the access roles used by your Firepower System. When you do so, you can configure a default access setting for those users detected by LDAP that do not belong to any specified groups. When a user logs in, the Firepower System dynamically checks the LDAP server and assigns default access rights according to the user’s current group membership.

If you do not configure a user’s privileges using group-controlled access roles, a user has only the privileges granted by default in the platform settings policy.

If you plan to use an object for CAC authentication and authorization, Cisco recommends configuring LDAP groups to manage access role assignments for CAC-authenticated users.


Note


If you are configuring an LDAP authentication object for use with CAC authentication, do not remove the CAC inserted in your computer. You must have a CAC inserted at all times after enabling user certificates.


Before you begin
  • Confirm that the group you plan to reference exists on the LDAP server.

Procedure

Step 1

On the Create External Authentication Object page, click the down arrow next to Group Controlled Access Roles.

Step 2

Optionally, in the DN fields that correspond to Firepower System user roles, enter the distinguished name for the LDAP groups that contain users who should be assigned to those roles.

Example:
For example, you might enter the following in the Administrator field to authenticate names in the information technology organization at the Example company:

	cn=itgroup,ou=groups, dc=example,dc=com

Step 3

Choose a Default User Role.

Step 4

If you use static groups, enter a Group Member Attribute.

Example:
For example, if the member attribute is used to indicate membership in the static group you reference for default Security Analyst access, enter member.

Step 5

If you use dynamic groups, enter a Group Member URL Attribute.

Example:
For example, if the memberURL attribute contains the LDAP search that retrieves members for the dynamic group you specified for default Admin access, enter memberURL.

What to do next

LDAP Shell Access Fields

With the exception of the admin account, shell access is controlled entirely though the shell access attribute you set. The shell access filter you set determines which set of users on the LDAP server can log into the shell.

Note that a home directory for each shell user is created on login, and when an LDAP shell access user account is disabled (by disabling the LDAP connection), the directory remains, but the user shell is set to /bin/false in /etc/password to disable the shell. If the user then is re-enabled, the shell is reset, using the same home directory.

Shell users can log in using user names with lowercase, uppercase, or mixed case letters. Login authentication for the shell is case sensitive.

Shell Access Attribute

The access attribute you want to use for filtering. You can use any attribute if the value of the attribute is a valid user name for shell access.

If you leave this field blank, the user distinguished name is used for shell access authentication.


Tip


Selecting a server type and setting defaults prepopulates this field with an attribute typically appropriate for that type of server.


Shell Access Filter

The attribute value you want to use to retrieve administrative user entries for shell access. The filter is an attribute name, a comparison operator, and the attribute value.

The Same as Base Filter check box allows you to search more efficiently if all users qualified in the base DN are also qualified for shell access privileges. Normally, the LDAP query to retrieve users combines the base filter with the shell access filter. If the shell access filter was the same as the base filter, the same query runs twice, which is unnecessarily time-consuming. You can use the Same as Base Filter option to run the query only once for both purposes.

If you leave this field blank, you prevent LDAP authentication of shell access.

Configuring LDAP Shell Access

Smart License

Classic License

Supported Devices

Supported Domains

Access

Any

Any

Any

Any

Admin

You can use the LDAP server to authenticate accounts for shell access on your managed device or Firepower Management Center. Specify a search filter that retrieves entries for users you want to grant shell access.

You cannot configure CAC authentication and authorization and shell access in the same authentication object. Instead, create and enable separate authentication objects.

The authentication object for shell access must be the first authentication object on the Firepower Management Center.

Cisco does not support external authentication for NGIPSv devices or ASA FirePOWER devices. In addition, IPv6 is not supported for shell access authentication.


Caution


On all appliances, users with shell access (whether obtained through external authentication or through using the CLI expert command) have sudoers privileges in the shell, which can present a security risk. If you establish external authentication, make sure that you restrict the list of users with shell access appropriately. Similarly, when granting CLI access privileges, restrict the list of users with Configuration level access. Cisco strongly recommends that you do not establish additional shell users on the Firepower Management Center.


You cannot configure CAC authentication and authorization and shell access in the same authentication object. Checking the CAC check box disables the shell access configuration options on the page. Instead, create and enable separate authentication objects.

Before you begin
  • Remove any internally-authenticated CLI or shell users that have the same user name as externally-authenticated users included in your shell access filter.

Procedure

Step 1

On the Create External Authentication Object page, if you want to use a shell access attribute other than the user distinguished type a Shell Access Attribute.

Example:
For example, on a Microsoft Active Directory Server, use the sAMAccountName shell access attribute to retrieve shell access users by typing sAMAccountName in the Shell Access Attribute field.

Step 2

Set a shell access account filter. You have multiple options:

  • To retrieve administrative user entries based on attribute value, enter the attribute name, a comparison operator, and the attribute value you want to use as a filter, enclosed in parentheses, in the Shell Access Filter field. For example, if all network administrators have a manager attribute which has an attribute value of shell, you can set a base filter of (manager=shell).
  • To use the same filter you specified when configuring authentication settings, choose Same as Base Filter.
  • To prevent LDAP authentication of shell access, leave the field blank.

What to do next

Testing LDAP Authentication Connections

Smart License

Classic License

Supported Devices

Supported Domains

Access

Any

Any

Any

Any

Admin

After you configure LDAP server and authentication settings, you can specify user credentials for a user who should be able to authenticate to test those settings.

For the User Name, you can enter the value for the uid attribute for the user you want to test with. If you are connecting to a Microsoft Active Directory Server and supplied a UI access attribute in place of uid, use the value for that attribute as the user name. You can also specify a fully qualified distinguished name for the user.

Use the Password for the same user.

The test output lists valid and invalid user names. Valid user names are unique, and can include underscores (_), periods (.), hyphens (-), and alphanumeric characters.

Note that testing the connection to servers with more than 1000 users only returns 1000 users because of web interface page size limitations.


Tip


If you mistype the name or password of the test user, the test fails even if the server configuration is correct. Test the server configuration without the additional test parameters first. If that succeeds supply a user name and password to test with the specific user.


Procedure

Step 1

On the Add External Authentication Object page, enter a User Name and Password.

Example:
For example, to test to see if you can retrieve the JSmith user credentials at the Example company, enter JSmith and password.

Step 2

Click Test. You have two options:


Troubleshooting LDAP Authentication Connections

If you create an LDAP authentication object and it either does not succeed in connecting to the server you select, or does not retrieve the list of users you want, you can tune the settings in the object.

If the connection fails when you test it, try the following suggestions to troubleshoot your configuration:

  • Use the messages displayed at the top of the screen and in the test output to determine which areas of the object are causing the issue.

  • Check that the user name and password you used for the object are valid:

    • Check that the user has the rights to browse to the directory indicated in your base distinguished name by connecting to the LDAP server using a third-party LDAP browser.

    • Check that the user name is unique to the directory information tree for the LDAP server.

    • If you see an LDAP bind error 49 in the test output, the user binding for the user failed. Try authenticating to the server through a third-party application to see if the binding fails through that connection as well.

  • Check that you have correctly identified the server:

    • Check that the server IP address or host name is correct.

    • Check that you have TCP/IP access from your local appliance to the authentication server where you want to connect.

    • Check that access to the server is not blocked by a firewall and that the port you have configured in the object is open.

    • If you are using a certificate to connect via TLS or SSL, the host name in the certificate must match the host name used for the server.

    • Check that you have not used an IPv6 address for the server connection if you are authenticating shell access.

    • If you used server type defaults, check that you have the correct server type and click Set Defaults again to reset the default values.

  • If you typed in your base distinguished name, click Fetch DNs to retrieve all the available base distinguished names on the server, and select the name from the list.

  • If you are using any filters, access attributes, or advanced settings, check that each is valid and typed correctly.

  • If you are using any filters, access attributes, or advanced settings, try removing each setting and testing the object without it.

  • If you are using a base filter or a shell access filter, make sure that the filter is enclosed in parentheses and that you are using a valid comparison operator.

  • To test a more restricted base filter, try setting it to the base distinguished name for the user to retrieve just that user.

  • If you are using an encrypted connection:

    • Check that the name of the LDAP server in the certificate matches the host name that you use to connect.

    • Check that you have not used an IPv6 address with an encrypted server connection.

  • If you are using a test user, make sure that the user name and password are typed correctly.

  • If you are using a test user, remove the user credentials and test the object.

  • Test the query you are using by connecting to the LDAP server via the command line on the appliance you want to connect from using this syntax:

    ldapsearch -x -b 'base_distinguished_name'
    -h LDAPserver_ip_address -p port -v -D
    'user_distinguished_name' -W 'base_filter'

    For example, if you are trying to connect to the security domain on myrtle.example.com using the domainadmin@myrtle.example.com user and a base filter of (cn=*), you could test the connection using this statement:

    ldapsearch -x -b 'CN=security,DC=myrtle,DC=example,DC=com'
    -h myrtle.example.com -p 389 -v -D
    'domainadmin@myrtle.example.com' -W '(cn=*)'

If you can test your connection successfully but authentication does not work after you deploy a platform settings policy, check that authentication and the object you want to use are both enabled in the platform settings policy that is applied to the appliance.

If you connect successfully but want to adjust the list of users retrieved by your connection, you can add or change a base filter or shell access filter or use a more restrictive or less restrictive base DN.

RADIUS Authentication

The Remote Authentication Dial In User Service (RADIUS) is an authentication protocol used to authenticate, authorize, and account for user access to network resources. You can create an authentication object for any RADIUS server that conforms to RFC 2865.

When a user authenticated on a RADIUS server logs in for the first time, the user receives the roles specified for that user in the authentication object. If the user is not listed for any of the user roles, they receive the default access role you selected in the authentication object. If no default access role is selected in the authentication object, they receive the default access role set in the platform settings policy. You can modify a user’s roles, if needed, unless the settings are granted through the user lists in the authentication object. Note that when a user authenticated on a RADIUS server using attribute matching attempts to log in for the first time, the login is rejected as the user account is created. The user must log in a second time.


Note


Before enabling external authentication on 7000 or 8000 Series devices, remove any internally-authenticated CLI users that have the same user name as externally-authenticated users included in your shell access filter.


The Firepower System implementation of RADIUS supports the use of SecurID® tokens. When you configure authentication by a server using SecurID, users authenticated against that server append the SecurID token to the end of their SecurID PIN and use that as their password when they log into a Cisco system. As long as SecurID is configured correctly to authenticate users outside the Firepower System, those users can log into a Firepower Management Center or 7000 or 8000 Series device using their PIN plus the SecurID token without any additional configuration.

Creating RADIUS Authentication Objects

Smart License

Classic License

Supported Devices

Supported Domains

Access

Any

Any

Any

Any

Admin

When you create a RADIUS authentication object, you define settings that let you connect to an authentication server. You also grant user roles to specific and default users. If your RADIUS server returns custom attributes for any users you plan to authenticate, you must define those custom attributes. Optionally, you can also configure CLI or shell access authentication.

In a multidomain deployment, external authentication objects are only available in the domain in which they are created.

Before you begin

  • Confirm that you have TCP/IP access from your local appliance to the authentication server where you want to connect.

Procedure


Step 1

Choose System > Users.

Step 2

Click the External Authentication tab.

Step 3

Click Add External Authentication Object.

Step 4

Choose RADIUS from the Authentication Method drop-down list.

Step 5

Identify the authentication server as described in Configuring RADIUS Connection Settings.

Step 6

Configure user roles as described in Configuring RADIUS User Roles.

Step 7

Optionally, configure shell access as described in Configuring RADIUS Shell Access.

Step 8

Optionally, define custom attributes as described in Defining Custom RADIUS Attributes.

Step 9

Test your configuration as described in Testing RADIUS Authentication Connections.


Example

The following figure illustrates a sample RADIUS login authentication object for a server running FreeRADIUS with an IP address of 10.10.10.98. Note that the connection uses port 1812 for access, and note that connections to the server time out after 30 seconds of disuse, then retry three times before attempting to connect to a backup authentication server.

This example illustrates important aspects of RADIUS user role configuration:

Users ewharton and gsand are granted administrative access to appliances where this authentication object is enabled.

The user cbronte is granted Maintenance User access to appliances where this authentication object is enabled.

The user jausten is granted Security Analyst access to appliances where this authentication object is enabled.

The user ewharton can log into the appliance using a shell account.

The following graphic depicts the role configuration for the example:

Screenshot of RADIUS-specific role configuration.

Example

You can use an attribute-value pair to identify users who should receive a particular user role. If the attribute you use is a custom attribute, you must define the custom attribute.

The following figure illustrates the role configuration and custom attribute definition in a sample RADIUS login authentication object for the same FreeRADIUS server as in the previous example.

In this example, however, the MS-RAS-Version custom attribute is returned for one or more of the users because a Microsoft remote access server is in use. Note the MS-RAS-Version custom attribute is a string. In this example, all users logging in to RADIUS through a Microsoft v. 5.00 remote access server should receive the Security Analyst (Read Only) role, so you enter the attribute-value pair of MS-RAS-Version=MSRASV5.00 in the Security Analyst (Read Only) field.

Screenshot of role configuration and custom attribute definition in a sample RADIUS login authentication object.

Configuring RADIUS Connection Settings

Smart License

Classic License

Supported Devices

Supported Domains

Access

Any

Any

Any

Any

Admin

When you create a RADIUS authentication object, you first specify the primary and backup server and server port where you want the local appliance (managed device or Firepower Management Center) to connect for authentication.


Note


For RADIUS to function correctly, you must open its authentication and accounting ports (by default, 1812 and 1813) on your firewall.


If you specify a backup authentication server, you can set a timeout for the connection attempt to the primary server. If the number of seconds indicated in the Timeout field (or the timeout on the LDAP server) elapses without a response from the primary authentication server, the appliance then re-queries the primary server.

After the appliance re-queries the primary authentication server the number of times indicated by the Retries field and the number of seconds indicated in the Timeout field again elapses without a response from the primary authentication server, the appliance then rolls over to the backup server.

If, for example, the primary server has RADIUS disabled, the appliance queries the backup server. If RADIUS is running on the port of the primary RADIUS server and for some reason refuses to service the request (due to misconfiguration or other issues), however, the failover to the backup server does not occur.

Procedure

Step 1

Choose System > Users.

Step 2

Click the External Authentication tab.

Step 3

Click Create External > Authentication Object.

Step 4

Choose RADIUS from the Authentication Method drop-down list.

Step 5

Enter a Name and Description for the authentication server.

Step 6

Enter the IP address or host name for the primary RADIUS server where you want to obtain authentication data in the Primary Server Host Name/IP Address field.

Note


IPv6 addresses are not supported for shell authentication. To allow shell authentication when using an IPv6 address for your primary RADIUS server, set up an authentication object using an IPv4 address for the server and use that IPv4 object as the first authentication object on the Firepower Management Center.

Step 7

Optionally, modify the port used by the primary RADIUS authentication server in the Primary Server Port field.

Note


If your authentication port and accounting port numbers are not sequential, leave this field blank. The system then determines RADIUS port numbers from the radius and radacct data in your appliance’s /etc/services file.

Step 8

Enter the RADIUS Secret Key for the primary RADIUS authentication server.

Step 9

Optionally, enter the IP address or host name for the backup RADIUS authentication server where you want to obtain authentication data in the Backup Server Host Name/IP Address field.

Step 10

If you set a backup server, modify the Backup Server Port, RADIUS Secret Key, and Timeout and enter the number of times the primary server connection should be tried before rolling over to the backup connection in the Retries field.

Note


If your authentication port and accounting port numbers are not sequential, leave this field blank. The system then determines RADIUS port numbers from the radius and radacct data in your appliance’s /etc/services file.


What to do next

Configuring RADIUS User Roles

Smart License

Classic License

Supported Devices

Supported Domains

Access

Any

Any

Any

Any

Admin

When a user logs in, the Firepower System checks the RADIUS server and grants access rights depending on the RADIUS configuration:

  • If specific access rights are not configured for a user and a default access role is not specified, when a new user logs in, the Firepower System authenticates the user against the RADIUS server and then grants user rights based on the default access role (or roles) set in the platform settings policy.

  • If a new user is not specified on any lists and default access roles are specified in the Default User Role list of the authentication object, the user is assigned those access roles.

  • If you add a user to the list for one or more specific role, that user receives all assigned access roles.

You can also use attribute-value pairs, rather than user names, to identify users who should receive a particular user role. For example, if you know all users who should be Security Analysts have the value Analyst for their User-Category attribute, you can enter User-Category=Analyst in the Security Analyst List field to grant that role to those users.

You can assign a default user role (or roles) to be assigned to any users that are authenticated externally but not listed for a specific role. You can specify multiple roles in the Default User Role list.

You cannot remove the minimum access rights for users assigned an access role because of RADIUS user list membership through the Firepower System user management page. You can, however, assign additional rights.


Caution


If you want to change the minimum access setting for a user, you must not only move the user from one list to another in the RADIUS Specific Parameters section or change the user’s attribute on the RADIUS server, you must redeploy the configuration to the managed device and remove the assigned user right on the user management page.


Before you begin
Procedure

Step 1

On the Create External Authentication Object page, in the fields that correspond to Firepower System user roles, enter the name of each user or identifying attribute-value pair that should be assigned to those roles.

Separate usernames and attribute-value pairs with commas.

Example:
For example, to grant the Administrator role to the users jsmith and jdoe, enter jsmith, jdoe in the Administrator field. As another example, to grant the Maintenance User role to all users with a User-Category value of Maintenance, enter User-Category=Maintenance in the Maintenance User field.

Step 2

Choose the default minimum access role for users that do not belong to any of the specified groups from the Default User Role list.


What to do next

Configuring RADIUS Shell Access

Smart License

Classic License

Supported Devices

Supported Domains

Access

Any

Any

Any

Any

Admin

You can also use the RADIUS server to authenticate accounts for CLI or shell access on your local appliance (managed device or Firepower Management Center). Specify user names for users you want to grant CLI or shell access.


Note


IPv6 addresses are not supported for shell authentication. If you configure a primary RADIUS server with an IPv6 address and also configure administrative shell access, the shell access settings are ignored. To allow shell authentication when using an IPv6 address for your primary RADIUS server, set up another authentication object using an IPv4 address for the server and use that object as the first authentication object on the Firepower Management Center.


With the exception of the admin account, the shell access list you set on the RADIUS authentication object entirely controls CLI or shell access on the appliance. CLI or shell users are configured as local users on the appliance when you deploy the platform settings policy. Note that when a user authenticated on a RADIUS server using attribute matching attempts to log in for the first time, the login is rejected as the user account is created. The user must log in a second time.

Note that a home directory for each CLI or shell user is created on login, and when an RADIUS shell access user account is disabled (by disabling the RADIUS connection), the directory remains, but the user shell is set to /bin/false in /etc/password to disable the shell. If the user then is re-enabled, the shell is reset, using the same home directory.

CLI or shell users can log in using user names with lowercase, uppercase, or mixed case letters. Login authentication for the CLI or shell is case sensitive.


Caution


On all appliances, users with shell access (whether obtained through external authentication or through using the CLI expert command) have sudoers privileges in the shell, which can present a security risk. If you establish external authentication, make sure that you restrict the list of users with shell access appropriately. Similarly, when granting CLI access privileges, restrict the list of users with Configuration level access. Cisco strongly recommends that you do not establish additional shell users on the Firepower Management Center.


Procedure

On the Create External Authentication Object page, enter the user names, separated by commas, in the Administrator Shell Access User List field.

Note


If you choose not to specify a shell access filter, a warning displays when you save the authentication object to confirm that you meant to leave the filter blank.


What to do next

Defining Custom RADIUS Attributes

Smart License

Classic License

Supported Devices

Supported Domains

Access

Any

Any

Any

Any

Admin

If your RADIUS server returns values for attributes not included in the dictionary file in /etc/radiusclient/ and you plan to use those attributes to set user roles for users with those attributes, you need to define those attributes in the login authentication object. You can locate the attributes returned for a user by looking at the user’s profile on your RADIUS server.

When you define an attribute, you provide the name of the attribute, which consists of alphanumeric characters. Note that words in an attribute name should be separated by dashes rather than spaces. You also provide the attribute ID, which should be an integer and should not conflict with any existing attribute IDs in the etc/radiusclient/dictionary file. You also specify the type of attribute: string, IP address, integer, or date.

When you create a RADIUS authentication object, a new dictionary file for that object is created on the appliance in the /var/sf/userauth directory. Any custom attributes you add to the authentication object are added to the dictionary file.

In a multidomain deployment, external authentication objects are only available in the domain in which they are created.

Procedure

Step 1

On the Add External Authentication Object page, click the arrow to expand the Define Custom RADIUS Attributes section.

Step 2

Enter an attribute name in the Attribute Name field.

Step 3

Enter the attribute ID, in integer form, in the Attribute ID field.

Step 4

Choose the type of attribute from the Attribute Type drop-down list.

Step 5

Click Add to add the custom attribute to the authentication object.

Tip


You can remove a custom attribute from an authentication object by clicking Delete next to the attribute.


Example

If a RADIUS server is used on a network with a Cisco router, you might want to use the Ascend-Assign-IP-Pool attribute to grant a specific role to all users logging in from a specific IP address pool. Ascend-Assign-IP-Pool is an integer attribute that defines the address pool where the user is allowed to log in, with the integer indicating the number of the assigned IP address pool.

To declare that custom attribute, you create a custom attribute with an attribute name of Ascend-IP-Pool-Definition, an attribute ID of 218, and an attribute type of integer.

You could then enter Ascend-Assign-IP-Pool=2 in the Security Analyst (Read Only) field to grant read-only security analyst rights to all users with an Ascend-IP-Pool-Definition attribute value of 2.

What to do next

Testing RADIUS Authentication Connections

Smart License

Classic License

Supported Devices

Supported Domains

Access

Any

Any

Any

Any

Admin

After you configure RADIUS connection, user role, and custom attribute settings, you can specify user credentials for a user who should be able to authenticate to test those settings.

For the user name, you can enter the user name for the user you want to test with.

Note that testing the connection to servers with more than 1000 users only returns 1000 users because of UI page size limitations.


Tip


If you mistype the name or password of the test user, the test fails even if the server configuration is correct. To verify that the server configuration is correct, click Test without entering user information in the Additional Test Parameters field first. If that succeeds, supply a user name and password to test with the specific user.


Procedure

Step 1

On the Add External Authentication Object page, in the User Name and Password fields, enter the user name and password for the user whose credentials should be used to validate access to the RADIUS server.

Example:
For example, to test to see if you can retrieve the jsmith user credentials at our example company, enter jsmith.

Step 2

Choose Show Details, and click Test.

Step 3

If the test succeeds, click Save.


Single Sign-on (SSO)

Single sign-on (SSO) enables integration between Cisco Security Manager (CSM) Version 4.7 or higher and the Firepower Management Center, which allows you to access the Firepower Management Center from CSM without additional authentication to log in. When managing an ASA FirePOWER module, you may want to modify the policies deployed to the module. You can select the managing Firepower Management Center in CSM and launch it in a web browser.

If you have access based on your user role, the system navigates you to the Device tab of the Device Management page for the device you cross-launched from in CSM. Otherwise, the system navigates you to the Summary Dashboard page (Overview > Dashboards), except for user accounts with no dashboard access, which use the Welcome page.


Note


You cannot login with single sign-on if your organization uses CACs for authentication.


Configuring SSO

Smart License

Classic License

Supported Devices

Supported Domains

Access

Any

Any

ASA FirePOWER

Any

Admin

You must set up a one-way, encrypted authentication path from CSM to the Firepower Management Center before you configure Single sign-on.

In NAT environments, the Firepower Management Center and CSM must reside on the same side of the NAT boundary. You must provide specific criteria to enable communications between CSM and the Firepower Management Center.


Note


You cannot login with single sign-on if your organization uses CACs for authentication.


Procedure


Step 1

From CSM, generate an SSO shared encryption key that identifies the connection. See your CSM documentation for more information.

Step 2

From the Firepower Management Center, choose System > Users.

Step 3

Choose CSM Single Sign-on.

Step 4

Enter the CSM hostname or IP address and the server Port.

Step 5

Enter the Shared key that you generated from CSM.

Step 6

Optionally, if you want to use the Firepower Management Center’s proxy server to communicate with CSM, choose the Use Proxy For Connection check box.

Step 7

Click Submit.

Step 8

Click Confirm Certificate to save the Certificate.

You can now log in from CSM to the Firepower Management Center without an additional login.