Email Authentication

This chapter contains the following sections:

Email Authentication Overview

AsyncOS supports email verification and signing to prevent email forgery. To verify incoming mail, AsyncOS supports Sender Policy Framework (SPF), Sender ID Framework (SIDF), DomainKeys Identified Mail (DKIM), Domain-based Message Authentication, Reporting and Conformance (DMARC), and Forged Email Detection. To authenticate outbound mail, AsyncOS supports DomainKeys and DKIM signing.

Related Topics

DomainKeys and DKIM Authentication

With DomainKeys or DKIM email authentication, the sender signs the email using public key cryptography. The verified domain can then be used to detect forgeries by comparing it with the domain in the From: (or Sender:) header of the email.

DomainKeys and DKIM consist of two main parts: signing and verification. AsyncOS supports the “signing” half of the process for DomainKeys, and it supports both signing and verification for DKIM. You can also enable bounce and delay messages to use DomainKeys and DKIM signing.

Related Topics

DomainKeys and DKIM Authentication Workflow
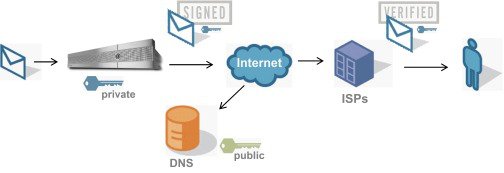
Figure 1. Authentication Work Flow


  1. Administrator (domain owner) publishes a public key into the DNS name space.
  2. Administrator loads a private key in the outbound Mail Transfer Agent (MTA).
  3. Email submitted by an authorized user of that domain is digitally signed with the respective private key. The signature is inserted in the email as a DomainKey or DKIM signature header and the email is transmitted.
  4. Receiving MTA extracts the DomainKeys or DKIM signature from the header and the claimed sending domain (via the Sender: or From: header) from the email. The public key is retrieved from the claimed signing domain which is extracted from DomainKeys or DKIM signature header fields.
  5. The public key is used to determine whether the DomainKeys or DKIM signature was generated with the appropriate private key.

To test your outgoing DomainKeys signatures, you can use a Yahoo! or Gmail address, as these services are free and provide validation on incoming messages that are DomainKeys signed.

DomainKeys and DKIM Signing in AsyncOS

DomainKeys and DKIM signing in AsyncOS is implemented via domain profiles and enabled via a mail flow policy (typically, the outgoing “relay” policy). For more information, see the “Configuring the Gateway to Receive Mail” chapter. Signing the message is the last action performed by the appliance before the message is sent.

Domain profiles associate a domain with domain key information (signing key and related information). As email is sent via a mail flow policy on the appliance , sender email addresses that match any domain profile are DomainKeys signed with the signing key specified in the domain profile. If you enable both DKIM and DomainKeys signing, the DKIM signature is used. You implement DomainKeys and DKIM profiles via the domainkeysconfig CLI command or via the Mail Policies > Domain Profiles and the Mail Policies > Signing Keys pages in the GUI.

DomainKeys and DKIM signing works like this: a domain owner generates two keys — a public key stored in the public DNS (a DNS TXT record associated with that domain) and a private key that is stored on the appliance is used to sign mail that is sent (mail that originates) from that domain.

As messages are received on a listener used to send messages (outbound), the appliance checks to see if any domain profiles exist. If there are domain profiles created on the appliance (and implemented for the mail flow policy), the message is scanned for a valid Sender: or From: address. If both are present, the Sender: header is always used for Domain Keys and DKIM Signing, but the From: header is also required even though it is not used for DKIM signing. When only the Sender: header is present, the DomainKeys or DKIM Signing profiles are not matched. The From: header is only used when:
  • There is no Sender: header.

  • You select the Use From Header for DKIM Signing option in the DKIM Global Setting page in the web interface.


Note

From Async0S 10.0 and later, you can select whether you want to use the From: header for DKIM Signing option in the DKIM Global Settings page of the web interface. It is mainly important to use the From: header with DKIM Signing for proper DMARC verification.

If a valid address is not found, the message is not signed and the event is logged in the mail_logs.


Note

If you create both a DomainKey and DKIM profile (and enable signing on a mail flow policy), AsyncOS signs outgoing messages with both a DomainKeys and DKIM signature.

If a valid sending address is found, the sending address is matched against the existing domain profiles. If a match is found, the message is signed. If not, the message is sent without signing. If the message has an existing DomainKeys (a “DomainKey-Signature:” header) the message is only signed if a new sender address has been added after the original signing. If a message has an existing DKIM signature, a new DKIM signature is added to the message.

AsyncOS provides a mechanism for signing email based on domain as well as a way to manage (create new or input existing) signing keys.

The configuration descriptions in this document represent the most common uses for signing and verification. You can also enable DomainKeys and DKIM signing on a mail flow policy for inbound email, or enable DKIM verification on a mail flow policy for outbound email.


Note

When you configure domain profiles and signing keys in a clustered environment, note that the Domain Key Profile settings and Signing Key settings are linked. Therefore, if you copy, move or delete a signing key, the same action is taken on the related profile.

Configuring DomainKeys and DKIM Signing

Related Topics

Signing Keys

A signing key is the private key stored on the appliance . When creating a signing key, you specify a key size. Larger key sizes are more secure; however, larger keys also can impact performance. The appliance supports keys from 512 bits up to 2048 bits. The 768 - 1024 bit key sizes are considered secure and used by most senders today. Keys based on larger key sizes can impact performance and are not supported above 2048 bits. For more information about creating signing keys, see Creating or Editing a Signing Key.

If you are entering an existing key, simply paste it into the form. Another way to use existing signing keys is to import the key as a text file. For more information about adding existing signing keys, see Importing or Entering Existing Signing Keys.

Once a key is entered, it is available for use in domain profiles, and will appear in the Signing Key drop-down list in the domain profile.

Related Topics

Exporting and Importing Signing Keys

You can export your signing keys to a text file on the appliance . When you export keys, all of the keys currently existing on the appliance are put into a text file. For more information about exporting keys, see Exporting Signing Keys.

You can import keys that have been exported as well.


Note

Importing keys causes all of the current keys on the appliance to be replaced.

For more information, see Importing or Entering Existing Signing Keys.

Public Keys

Once you have associated a signing key with a domain profile, you can create DNS text record which contains your public key. You do this via the Generate link in the DNS Text Record column in the domain profile listing (or via domainkeysconfig -> profiles -> dnstxt in the CLI):

For more information about generating a DNS Text Record, see Generating a DNS Text Record.

You can also view the public key via the View link on the Signing Keys page:

Figure 2. View Public Key Link on Signing Keys Page


Domain Profiles

A domain profile associates a sender domain with a signing key, along with some other information needed for signing.

  • A name for the domain profile.
  • A domain name (the domain to be included in the “d=” header).
  • A selector (a selector is used to form the query for the public key. In the DNS query type, this value is prepended to the “_domainkey.” namespace of the sending domain).
  • A canonicalization method (the method by which the headers and content are prepared for presentation to the signing algorithm). AsyncOS supports both “simple” and “nofws” for DomainKeys and “relaxed” and “simple” for DKIM.
  • A signing key (see Signing Keys for more information).
  • A list of headers and the body length to sign (DKIM only).
  • A list of tags you want to include in the signature’s header (DKIM only). These tags store the following information:
    • The identity of the user or agent (e.g., a mailing list manager) on whose behalf the message is signed.
    • A comma-separated list of query methods used to retrieve the public key.
    • The timestamp of when the signature was created.
    • The expiration time of the signature, in seconds.
    • A vertical bar-separated (i.e., | ) list of header fields present when the message was signed.
  • The tags you want to include in the signature (DKIM only).
  • A list of Profile Users (addresses allowed to use the domain profile for signing).

Note

The domain in the addresses specified in the profile users must match the domain specified in the Domain field.

You can search through all of your existing domain profiles for a specific term. See Searching Domain Profiles for more information.

Additionally, you can choose whether to:

Related Topics

Exporting and Importing Domain Profiles

You can export your existing domain profiles to a text file on the appliance . When you export the domain profiles, all of the profiles existing on the appliance are put into a single text file. See Exporting Domain Profiles.

You can import domain profiles that you have previously exported. Importing domain profiles causes all of the current domain profiles on the machine to be replaced. See Importing Domain Profiles.

Enabling Signing for Outgoing Mail

DomainKeys and DKIM signing is enabled on mail flow policies for outbound mail. For more information, see the “Configuring the Gateway to Receive Mail” chapter.

Procedure


Step 1

On the Mail Flow Policies page (from the Mail Policies menu), click on the RELAYED mail flow policy (outgoing).

Step 2

From the Security Features section, enable DomainKeys/DKIM Signing by selecting On.

Step 3

Submit and commit your changes.


Enabling Signing for Bounce and Delay Messages

In addition to signing outbound messages, you may want to sign bounce and delay messages. You may want to do this to alert recipients that the bounce and delay messages they receive from your company are legitimate. To enable DomainKeys and DKIM signing for bounce and delay messages, you enable DomainKeys/DKIM signing for the bounce profile associated with the public listener.

Procedure


Step 1

On the bounce profile associated with the public listener where you will send signed outbound messages, go to Hard Bounce and Delay Warning Messages.

Step 2

Enable “Use Domain Key Signing for Bounce and Delay Messages”:

Note 

You must have completed all steps listed in Configuring DomainKeys/DKIM Signing (GUI) to sign bounced and delay messages.

The From: address in the domain profile must match the address used for the bounce return address. To ensure these addresses match, you can configure a return address for the bounce profile (System Administration > Return Addresses), and then use the same name in the Profile Users list in the domain profile. For example, you would configure a return address of MAILER-DAEMON@example.com for the bounce return address, and add MAILER-DAEMON@example.com as a profile user in the domain profile.


Configuring DomainKeys/DKIM Signing (GUI)

Procedure


Step 1

Create a new or import an existing private key. For information on creating or importing signing keys, see Signing Keys.

Step 2

Create a domain profile and associate the key with the domain profile. For information on creating a domain profile, see Domain Profiles.

Step 3

Create the DNS text record. For information about creating the DNS text record, see Generating a DNS Text Record.

Step 4

If you have not already done so, enable DomainKeys/DKIM signing on a mail flow policy for outbound mail (see Enabling Signing for Outgoing Mail).

Step 5

Optionally, enable DomainKeys/DKIM signing for bounced and delay messages. For information about enabling signing for bounce and delay messages, see Enabling Signing for Bounce and Delay Messages.

Step 6

Send email. Mail sent from a domain that matches a domain profile will be DomainKeys/DKIM signed. In addition, bounce or delay messages will be signed if you configured signing for bounce and delay messages.

Note 
If you create both a DomainKey and DKIM profile (and enable signing on a mail flow policy), AsyncOS signs outgoing messages with both a DomainKeys and DKIM signature.

What to do next

Related Topics

Creating Domain Profiles for DomainKeys Signing

Procedure

Step 1

Choose Mail Policies > Signing Profiles.

Step 2

In the Domain Signing Profiles section, click Add Profile.

Step 3

Enter a name for the profile.

Step 4

For the Domain Key Type, choose Domain Keys.

Additional options appear on the page.

Step 5

Enter the domain name.

Step 6

Enter a selector. Selectors are arbitrary names prepended to the "_domainkey" namespace, used to help support multiple concurrent public keys per sending domain. A selector value and length must be legal in the DNS namespace and in email headers with the additional provision that they cannot contain a semicolon.

Step 7

Select the canonicalization (no forwarding whitespaces or simple).

Step 8

If you have already created a signing key, select a signing key. Otherwise, skip to the next step. You must create (or import) at least one signing key in order to have signing keys to choose from in the list. See Creating or Editing a Signing Key.

Step 9

Enter users (email addresses, hosts, etc.) that will use the domain profile for signing.

Step 10

Submit and commit your changes.

Step 11

At this point (if you have not already) you should enable DomainKeys/DKIM signing on an outgoing mail flow policy (see Enabling Signing for Outgoing Mail).

Note 
If you create both a DomainKeys and DKIM profile, AsyncOS performs both DomainKeys and DKIM signing on outgoing mail.

Creating a New Domain Profile for DKIM Signing

Procedure

Step 1

Choose Mail Policies > Signing Profiles.

Step 2

In the Domain Signing Profiles section, click Add Profile.

Step 3

Enter a name for the profile.

Step 4

For the Domain Key Type, choose DKIM.

Additional options appear on the page.

Step 5

Enter the domain name.

Step 6

Enter a selector. Selectors are arbitrary names prepended to the "_domainkey." namespace, used to help support multiple concurrent public keys per sending domain. A selector value and length must be legal in the DNS namespace and in email headers with the additional provision that they cannot contain a semicolon.

Step 7

Select the canonicalization for the header. Choose from the following options:

  • Relaxed. The “relaxed” header canonicalization algorithm performs the following: header names are changed to lowercase, headers are unfolded, linear white spaces are reduced to a single space, leading and trailing spaces are stripped.

  • Simple. No changes to headers are made.

Step 8

Select the canonicalization for the body. Choose from the following options:

  • Relaxed. The “relaxed” header canonicalization algorithm performs the following: empty lines are stripped at the end of the body, white spaces are reduced to a single space within lines, and trailing white spaces are stripped in lines.

  • Simple. Empty lines at the end of the body are stripped.

Step 9

If you have already created a signing key, select a signing key. Otherwise, skip to the next step. You must create (or import) at least one signing key in order to have signing keys to choose from in the list. See Creating or Editing a Signing Key.

Step 10

Select the list of headers to sign. You can select from the following headers:

  • All. AsyncOS signs all the headers present at the time of signature. You may want to sign all headers if you do not expect headers to be added or removed in transit.

  • Standard. You may want to select the standard headers if you expect that headers may be added or removed in transit. AsyncOS signs only the following standard headers (if the header is not present in the message, the DKIM signature indicates a null value for the header):

    • From

    • Sender, Reply To-

    • Subject

    • Date, Message-ID

    • To, Cc

    • MIME-Version

    • Content-Type, Content-Transfer-Encoding, Content-ID, Content-Description

    • Resent-Date, Resent-From, Resent-Sender, Resent-To, Resent-cc, Resent-Message-ID

    • In-Reply-To, References

    • List-Id, List-Help, List-Unsubscribe, LIst-Subscribe, List-Post, List-Owner, List-Archive

Note 
When you select “Standard”, you can add additional headers to sign.
Step 11

Specify how to sign the message body. You can choose to sign the message body, and/or how many bytes to sign. Select one of the following options:

  • Whole Body Implied. Do not use the “l=” tag to determine body length. The entire message is signed and no changes are allowed.

  • Whole Body Auto-determined. The entire message body is signed, and appending some additional data to the end of body is allowed during transit.

  • Sign first _ bytes. Sign the message body up to the specified number of bytes.

Step 12

Select the tags you want to include in the message signature’s header field. The information stored in these tags are used for message signature verification. Select one or more of the following options:

  • “i” Tag. The identity of the user or agent (e.g., a mailing list manager) on behalf of which this message is signed. Enter the domain name prepended with the @ symbol, such as the domain @example.com .
  • “q” Tag. A colon-separated list of query methods used to retrieve the public key. Currently, the only valid value is dns/txt.
  • “t” Tag. A timestamp for when the signature was created.
  • “x” Tag. The absolute date and time when the signature expires. Specify an expiration time (in seconds) for the signature. The default is 31536000 seconds.
  • “z” Tag. A vertical bar-separated (i.e., | ) list of header fields present when the message was signed. This includes the names of the header fields and their values. For example:

z=From:admin@example.come|To:joe@example.com| Subject:test%20message|Date:Date:August%2026,%202011%205:30:02%20PM%20-0700

Step 13

Enter users (email addresses, hosts, etc.) that will use the domain profile for signing.

Note 
When you create domain profiles, be aware that a hierarchy is used in determining the profile to associate with a particular user. For example, you create a profile for example.com and another profile for joe@example.com. When mail is sent from joe@example.com, the profile for joe@example.com is used. However, when mail is sent from adam@example.com, the profile for example.com is used.
Step 14

Submit and commit your changes.

Step 15

At this point (if you have not already) you should enable DomainKeys/DKIM signing on an outgoing mail flow policy (see Enabling Signing for Outgoing Mail).

Note 
If you create both a DomainKeys and DKIM profile, AsyncOS performs both DomainKeys and DKIM signing on outgoing mail.

Creating or Editing a Signing Key

Create a New Signing Key

Signing keys are required for domain profiles for DomainKeys and DKIM signing.

Procedure

Step 1

Choose Mail Policies > Signing Keys.

Step 2

Click Add Key.

Step 3

Enter a name for the key.

Step 4

Click Generate and select a key size.

Step 5

Submit and commit your changes.

Note 
If you have not done so already, you may need to edit your domain profile to assign the key.

Edit an Existing Signing Key
Procedure

Step 1

Choose Mail Policies > Signing Keys.

Step 2

Click the intended signing key.

Step 3

Edit the intended fields as described in Create a New Signing Key.

Step 4

Submit and commit your changes.


Exporting Signing Keys

All keys on the appliance are exported together in a single text file.

Procedure

Step 1

Choose Mail Policies > Signing Keys.

Step 2

Click Export Keys.

Step 3

Enter a name for the file and click Submit.


Importing or Entering Existing Signing Keys

Related Topics
Pasting a Key
Procedure

Step 1

Choose Mail Policies > Signing Keys.

Step 2

Click Add Key.

Step 3

Paste the key into the Paste Key field (must be PEM-formatted and must be RSA keys only).

Step 4

Submit and commit your changes.


Importing Keys from an Existing Export File

Note

To obtain a key file, see Exporting Signing Keys.
Procedure

Step 1

Choose Mail Policies > Signing Keys.

Step 2

Click Import Keys.

Step 3

Select the file that contains the exported signing keys.

Step 4

Click Submit. You are warned that importing will replace all existing signing keys. All of the keys in the text file are imported.

Step 5

Click Import.


Deleting Signing Keys

Related Topics
Removing Selected Signing Keys
Procedure

Step 1

Choose Mail Policies > Signing Keys.

Step 2

Mark the checkbox to the right of each signing key to remove.

Step 3

Click Delete.

Step 4

Confirm the deletion.


Removing All Signing Keys
Procedure

Step 1

Choose Mail Policies > Signing Keys.

Step 2

Click Clear All Keys on the Signing Keys page.

Step 3

Confirm the deletion.


Generating a DNS Text Record

Procedure

Step 1

Choose Mail Policies > Signing Profiles.

Step 2

In the Domain Signing Profiles section, in the DNS Text Record column, click the Generate link for the corresponding domain profile.

Step 3

Mark the checkbox for the attributes you wish to include in the DNS text record.

Step 4

Click Generate Again to re-generate the key with any changes you have made.

Step 5

The DNS text record is displayed in the text field at the bottom of the window (where you can now copy it). In some cases, multi-string DNS text records are generated. See Multi-string DNS Text Records.

Step 6

Click Done.


What to do next

Related Topics

Multi-string DNS Text Records

Multi-string DNS text records may be generated if the key size of the signing key used to generate the DNS text records are larger than 1024 bits. This is because not more than 255 characters are allowed in a single string of a DNS text record. The DKIM authentication may fail as some of the DNS servers do not accept or serve multi-string DNS text records.

To avoid this scenario, it is recommended that you use double quotes to break up the multi-string DNS text record into smaller strings not exceeding 255 bytes. The following is an example.


s._domainkey.domain.com. IN TXT "v=DKIM1;" 
"p=MIIBIjANBgkqhkiG9w0BAQEFAAOCAQ8AMIIBCgKCAQE"
"A4Vbhjq2n/3DbEk6EHdeVXlIXFT7OEl81amoZLbvwMX+bej"
"CdxcsFV3uS7G8oOJSWBP0z++nTQmy9ZDWfaiopU6k7tzoi"
"+oRDlKkhCQrM4oP2B2F5sTDkYwPY3Pen2jgC2OgbPnbo3o"
"m3c1wMWgSoZxoZUE4ly5kPuK9fTtpeJHNiZAqkFICiev4yrkL"
"R+SmFsJn9MYH5+lchyZ74BVm+16Xq2mptWXEwpiwOxWI"
"YHXsZo2zRjedrQ45vmgb8xUx5ioYY9/yBLHudGc+GUKTj1i4"
"mQg48yCD/HVNfsSRXaPinliEkypH9cSnvgvWuIYUQz0dHU;" 

DKIM implementations reassemble DNS text records broken down this way into the full original single string before processing them.

Testing Domain Profiles

Once you have created a signing key, associated it with a domain profile, and generated and inserted the DNS text into your authorized DNS, you can test your domain profile.

Procedure

Step 1

Choose Mail Policies > Signing Profiles.

Step 2

In the Domain Signing Profiles section, in the Test Profile column, click the Test link for the domain profile.

Step 3

A message is displayed at the top of the page, indicating success or failure. If the test fails, a warning message is displayed, including the error text.


Exporting Domain Profiles

All domain profiles on the appliance are exported together in a single text file.

Procedure

Step 1

Choose Mail Policies > Signing Profiles.

Step 2

Click Export Domain Profiles.

Step 3

Enter a name for the file and click Submit.


Importing Domain Profiles

Procedure

Step 1

Choose Mail Policies > Signing Profiles.

Step 2

Click Import Domain Profiles.

Step 3

Select the file that contains the exported domain profiles.

Step 4

Click Submit. You are warned that importing will replace all existing domain profiles. All of the domain profiles in the text file are imported.

Step 5

Click Import.


Deleting Domain Profiles

Related Topics
Removing Selected Domain Profiles
Procedure

Step 1

Choose Mail Policies > Signing Profiles.

Step 2

Mark the checkbox to the right of each domain profile to remove.

Step 3

Click Delete.

Step 4

Confirm the deletion.


Removing All Domain Profiles
Procedure

Step 1

Choose Mail Policies > Signing Profiles.

Step 2

Click Clear All Profiles.

Step 3

Confirm the deletion.


Searching Domain Profiles

Procedure

Step 1

Choose Mail Policies > Signing Profiles.

Step 2

In the Find Domain Profiles section, specify the search term.

Step 3

Click Find Profiles.

Step 4

The search scans the following fields for each domain profile: email, domain, selector, and signing key name.

Note 
If you do not enter search terms, the search engine returns all domain profiles.

Editing DKIM Global Settings

You can use the DKIM Global Settings to choose whether to:

  • Sign system-generated messages with a DKIM signature. The appliance will sign the following messages:
    • Cisco IronPort Spam Quarantine notifications
    • Content filter-generated notifications
    • Configuration messages
    • Support requests
  • Use From header for DKIM signing
Procedure

Step 1

Choose Mail Policies > Signing Profiles.

Step 2

Under DKIM Global Settings, click Edit Settings.

Step 3

Depending on your requirements, configure the following fields:

  • DKIM Signing of System Generated Messages
  • Use From header for DKIM Signing
Note 
If you are not using From header for DKIM signing or if a valid From header is missing, Sender header will be used. For DMARC verification of DKIM signed messages, you must use the From header during DKIM signing.
Step 4

Submit and commit your changes.


Domain Keys and Logging

Lines such as the following are added to the mail logs upon DomainKeys signing:


Tue Aug 28 15:29:30 2007 Info: MID 371 DomainKeys: signing with dk-profile - matches user123@example.com
Tue Aug 28 15:34:15 2007 Info: MID 373 DomainKeys: cannot sign - no profile matches user12@example.com

Lines such as these are added to the mail logs upon DKIM signing:


Tue Aug 28 15:29:54 2007 Info: MID 372 DKIM: signing with dkim-profile - matches user@example.com
Tue Aug 28 15:34:15 2007 Info: MID 373 DKIM: cannot sign - no profile matches user2@example.com

How to Verify Incoming Messages Using DKIM

How to Verify Incoming Messages Using DKIM

Do This

More Info

Step 1

Create a profile for verifying messages using DKIM.

Creating a DKIM Verification Profile

Step 2

(Optional) Create a custom mail flow policy to use for verifying incoming messages using DKIM.

Defining Rules for Incoming Messages Using a Mail Flow Policy

Step 3

Configure your mail flow policies to verify incoming messages using DKIM.

Configuring DKIM Verification on the Mail Flow Policy

Step 4

Define the action that the appliance takes on verified messages.

Configuring an Action for DKIM Verified Mail

Step 5

Associate the action with groups of specific senders or recipients.

Configuring Mail Policies

Related Topics

DKIM Verification Checks Performed by AsyncOS

When you configure an AsyncOS appliance for DKIM verification, the following checks are performed:

Procedure


Step 1

AsyncOS checks for the DKIM-Signature field in incoming mail, the syntax of the signature header, valid tag values, and required tags. If the signature fails any of these checks, AsyncOS returns a permfail .

Step 2

After the signature check is performed, the public key is retrieved from the public DNS record, and the TXT record is validated. If errors are encountered during this process, AsyncOS returns a permfail . A tempfail occurs if the DNS query for the public key fails to get a response.

Step 3

After retrieving the public key, AsyncOS checks the hashed values and verifies the signature. If any failures occur during this step, AsyncOS returns a permfail .

Step 4

If the checks all pass, AsyncOS returns a pass .

Note 
When the message body is greater than the specified length, AsyncOS returns the following verdict:

dkim = pass (partially verified [x bytes])

where X represents the number of bytes verified.

The final verification result is entered as an Authentication-Results header. For example, you might get a header that looks like one of the following:

Authentication-Results: example1.com

header.from=From:user123@example.com; dkim=pass (signature verified)

Authentication-Results: example1.com

header.from=From:user123@example.com; dkim=pass (partially verified [1000 bytes])

Authentication-Results: example1.com

header.from=From:user123@example.com; dkim=permfail (body hash did not verify)

Note 

Current DKIM verification stops at the first valid signature. It is not possible to verify using the last signature encountered. This functionality may be available in a later release.

When the domain has its DNS TXT record in DKIM Test Mode (t=y), the appliance completely skips any DKIM Verifications and Actions.


Managing DKIM Verification Profiles

A DKIM verification profile is a list of parameters that the appliance's mail flow policies use for verifying DKIM signatures. For example, you can create two verification profiles, one that allows 30 seconds before a query times out and a second that allows only 3 seconds before a query times out. You can assign the second verification profile to the Throttled mail flow policy to prevent connection starvation in case of a DDoS. A verification profile consists of the following information:

  • A name for the verification profile.
  • The smallest and largest acceptable public key size. The default key sizes are 512 and 2048, respectively.
  • The maximum number of signatures in the message to verify. If a message has more signatures than the maximum amount you defined, the appliance skips verification of the remaining signatures and continues to process the message. The default is 5 signatures.
  • The maximum allowed difference in time (in seconds) between the sender’s system time and verifier’s. For example, if the message signature expires at 05:00:00 and the verifier’s system time is 05:00:30, the message signature is still valid if the allowed difference in time is 60 seconds but it is invalid if the allowed difference is 10 seconds. The default is 60 seconds.
  • An option whether to use a body length parameter.
  • The SMTP action to take in case of a temporary failure.
  • The SMTP action to take in case of a permanent failure.

You can search through all of your existing verification profiles by the profile name.

You can export your DKIM verification profiles as a text file in your appliance's configure directory. When you export the verification profiles, all of the profiles existing on the appliance are put into a single text file. See Exporting DKIM Verification Profiles for more information.

You can import DKIM verification profiles that you previously exported. Importing DKIM verification profiles causes all of the current DKIM verification profiles on the machine to be replaced. See Importing DKIM Verification Profiles for more information.

Related Topics

Creating a DKIM Verification Profile

Procedure

Step 1

Click Mail Policies > Verification Profiles.

Step 2

Click Add Profile.

Step 3

Enter the name of the profile.

Step 4

Select the minimum key size you want the appliance to accept for signing keys.

Step 5

Select the maximum key size you want the appliance to accept for signing keys.

Step 6

Select the maximum number of signatures to verify in a single message. The default is five signatures.

Step 7

Select the number of seconds before the key query times out. The default is 10 seconds.

Step 8

Select maximum allowed difference in time (in seconds) between the sender’s system time and verifier’s. The default is 60 seconds.

Step 9

Select whether to use the body-length parameter in the signature to verify the message.

Step 10

Select whether the appliance accepts or rejects the message if there is a temporary failure when verifying its signature. If you want the appliance to reject the message, you can choose to have it send the default 451 SMTP response code or another SMTP response code and text.

Step 11

Select whether the appliance accepts or rejects the message if there is a permanent failure when verifying its signature. If you want the appliance to reject the message, you can choose to have it send the default 451 SMTP response code or another SMTP response code and text.

Step 12

Submit your changes.

The new profile appears in the DKIM Verification Profiles table.

Step 13

Commit your changes.

Step 14

At this point you should enable DKIM verification on an incoming mail flow policy and select the verification profile you want to use.


Exporting DKIM Verification Profiles

All DKIM verification profiles on the appliance are exported as a single text file and saved in the configuration directory on the appliance .

Procedure

Step 1

Choose Mail Policies > Verification Profiles.

Step 2

Click Export Profiles.

Step 3

Enter a name for the file and click Submit.


Importing DKIM Verification Profiles

Procedure

Step 1

Choose Mail Policies > Verification Profiles.

Step 2

Click Import Profiles.

Step 3

Select the file that contains the DKIM verification profiles.

Step 4

Click Submit. You are warned that importing will replace all existing DKIM verification profiles.

Step 5

Click Import.


Deleting DKIM Verification Profiles

Related Topics
Removing Selected DKIM Verification Profiles
Procedure

Step 1

Choose Mail Policies > Verification Profiles.

Step 2

Mark the checkbox to the right of each DKIM verification profile you want to delete.

Step 3

Click Delete.

Step 4

Confirm the deletion.


Removing All DKIM Verification Profiles
Procedure

Step 1

Choose Mail Policies > Verification Profiles.

Step 2

Click Clear All Profiles.

Step 3

Confirm the deletion.


Searching DKIM Verification Profiles

To search all DKIM verification profiles for a specific term in the profile name:

Procedure

Step 1

Choose Mail Policies > Verification Profiles.

Step 2

In the Search DKIM Verification Profiles section, specify the search term.

Step 3

Click Find Profiles.

The search scans the profile name for each DKIM verification profile.

If you do not enter search terms, the search engine returns all DKIM verification profiles.


Configuring DKIM Verification on the Mail Flow Policy

DKIM verification is enabled on mail flow policies for incoming email.

Procedure


Step 1

Choose Mail Policies > Mail Flow Policies.

Step 2

Click the incoming mail policy for the listener where you want to perform verification.

Step 3

In the Security Features section of the mail flow policy, enable DKIM Verification by selecting On.

Step 4

Select the DKIM verification profile that you want to use for the policy.

Step 5

Commit your changes.


What to do next

Related Topics

DKIM Verification and Logging

Lines such as the following are added to the mail logs upon DKIM verification:

mail.current:Mon Aug 6 13:35:38 2007 Info: MID 17 DKIM: no signature

mail.current:Mon Aug 6 15:00:37 2007 Info: MID 18 DKIM: verified pass

Configuring an Action for DKIM Verified Mail

When you verify DKIM mail, an Authentication-Results header is added to the mail, but the mail is accepted regardless of the authentication result. To configure actions based on these authentication results, you can create a content filter to perform actions on the DKIM-verified mail. For example, if DKIM verification fails, you may want configure the mail to be delivered, bounced, dropped, or sent to a quarantine. To do this, you must configure an action using a content filter.

Procedure


Step 1

Choose Mail Policies > Incoming Content Filters.

Step 2

Click Add Filter.

Step 3

In the Conditions section, click Add Condition.

Step 4

Select DKIM Authentication from the list of conditions.

Step 5

Choose a DKIM condition. Select one of the following options:

  • Pass. The message passed the authentication tests.

  • Neutral. Authentication was not performed.

  • Temperror. A recoverable error occurred.

  • Permerror. An unrecoverable error occurred.

  • Hardfail. The authentication tests failed.

  • None. The message was not signed.

Step 6

Select an action to associate with the condition. For example, if the DKIM verification fails, you may want to notify the recipient and bounce the message. Or, if DKIM verification passes, you may want to deliver the message immediately without further processing.

Step 7

Submit the new content filter.

Step 8

Enable the content filter on the appropriate incoming mail policy.

Step 9

Commit your changes.


Overview of SPF and SIDF Verification

AsyncOS supports Sender Policy Framework (SPF) and Sender ID Framework (SIDF) verification. SPF and SIDF are methods for verifying authenticity of email based on DNS records. SPF and SIDF allow the owner of an Internet domain to use a special format of DNS TXT records to specify which machines are authorized to transmit email for that domain. Compliant mail receivers then use the published SPF records to test the authorization of the sending Mail Transfer Agent’s identity during a mail transaction.

When you use SPF/SIDF authentication, the senders publish SPF records specifying which hosts are permitted to use their names, and compliant mail receivers use the published SPF records to test the authorization of the sending Mail Transfer Agent’s identity during a mail transaction.


Note

Because SPF checks require parsing and evaluation, AsyncOS performance may be impacted. In addition, be aware that SPF checks increase the load on your DNS infrastructure.


When you work with SPF and SIDF, note that SIDF is similar to SPF, but it has some differences. To get a full description of the differences between SIDF and SPF, see RFC 4406. For the purposes of this documentation, the two terms are discussed together except in the cases where only one type of verification applies.


Note

AsyncOS does not support SPF for incoming relays.


Related Topics

A Note About Valid SPF Records

To use SPF and SIDF with an appliance , publish the SPF record according to the RFCs 4406, 4408, and 7208. Review RFC 4407 for a definition of how the PRA identity is determined. You may also want to refer to the following website to view common mistakes made when creating SPF and SIDF records:

http://www.openspf.org/FAQ/Common_mistakes

Related Topics

Valid SPF Records

To pass the SPF HELO check, ensure that you include a “v=spf1 a –all” SPF record for each sending MTA (separate from the domain). If you do not include this record, the HELO check will likely result in a None verdict for the HELO identity. If you notice that SPF senders to your domain return a high number of None verdicts, these senders may not have included a “v=spf1 a –all” SPF record for each sending MTA.

Valid SIDF Records

To support the SIDF framework, you need to publish both “v=spf1” and “spf2.0” records. For example, your DNS record may look like the following example:

example.com. TXT "v=spf1 +mx a:colo.example.com/28 -all"

smtp-out.example.com TXT "v=spf1 a -all"

example.com. TXT "spf2.0/mfrom,pra +mx a:colo.example.com/28 -all"

SIDF does not verify the HELO identity, so in this case, you do not need to publish SPF v2.0 records for each sending MTA.


Note

If you choose not to support SIDF, publish an “spf2.0/pra ~all” record.

Testing Your SPF Records

In addition to reviewing the RFCs, it is a good idea to test your SPF records before you implement SPF verification on an appliance . There are several testing tools available on the openspf.org website:

http://www.openspf.org/Tools

You can use the following tool to determine why an email failed an SPF record check:

http://www.openspf.org/Why

In addition, you can enable SPF on a test listener and use Cisco’s trace CLI command (or perform trace from the GUI) to view the SPF results. Using trace, you can easily test different sending IPs.

How to Verify Incoming Messages Using SPF/SIDF

Do This

More Info

Step 1

(Optional) Create a custom mail flow policy to use for verifying incoming messages using SPF/SIDF.

Defining Rules for Incoming Messages Using a Mail Flow Policy

Step 2

Configure your mail flow policies to verify incoming messages using SPF/SIDF.

Enabling SPF and SIDF

Step 3

Define the action that the appliance takes on verified messages.

Determining the Action to Take for SPF/SIDF Verified Mail

Step 4

Associate the action with groups of specific senders or recipients.

Configuring Mail Policies

Step 5

(Optional) Test the results of message verification.

Testing the SPF/SIDF Results


Caution

Although Cisco strongly endorses email authentication globally, at this point in the industry's adoption, Cisco suggests a cautious disposition for SPF/SIDF authentication failures. Until more organizations gain greater control of their authorized mail sending infrastructure, Cisco urges customers to avoid bouncing emails and instead quarantine emails that fail SPF/SIDF verification.


Note

The AsyncOS command line interface (CLI) provides more control settings for SPF level than the web interface. Based on the SPF verdict, the appliance can accept or reject a message, in SMTP conversation, on a per listener basis. You can modify the SPF settings when editing the default settings for a listener’s Host Access Table using the listenerconfig command. See the Enabling SPF and SIDF via the CLI for more information on the settings.

Enabling SPF and SIDF

To use SPF/SIDF, you must enable SPF/SIDF for a mail flow policy on an incoming listener. You can enable SPF/SIDF on the listener from the default mail flow policy, or you can enable it for particular incoming mail flow policies.

Procedure


Step 1

Choose Mail Policies > Mail Flow Policy.

Step 2

Click Default Policy Parameters.

Step 3

In the default policy parameters, view the Security Features section.

Step 4

In the SPF/SIDF Verification section, click On.

Step 5

Set the level of conformance (the default is SIDF-compatible). This option allows you to determine which standard of SPF or SIDF verification to use. In addition to SIDF conformance, you can choose SIDF-compatible, which combines SPF and SIDF

SPF/SIDF Conformance Levels

Conformance Level

Description

SPF

The SPF/SIDF verification behaves according to RFC4408 and RFC7208.

- No purported responsible address (PRA) identity verification takes place.

NOTE: Select this conformance option to test against the HELO identity.

SIDF

The SPF/SIDF verification behaves according to RFC4406.

-The PRA Identity is determined with full conformance to the standard.

- SPF v1.0 records are treated as spf2.0/mfrom,pra.

- For a nonexistent domain or a malformed identity, a verdict of Fail is returned.

SIDF Compatible

The SPF/SIDF verification behaves according to RFC4406 except for the following differences:

- SPF v1.0 records are treated as spf2.0/mfrom.

- For a nonexistent domain or a malformed identity, a verdict of None is returned.

NOTE: This conformance option was introduced at the request of the OpenSPF community (www.openspf.org).

Note 
More settings are available via the CLI. See Enabling SPF and SIDF via the CLI for more information.
Step 6

If you choose a conformance level of SIDF-compatible, configure whether the verification downgrades a Pass result of the PRA identity to None if there are Resent-Sender: or Resent-From: headers present in the message. You might choose this option for security purposes.

Step 7

If you choose a conformance level of SPF, configure whether to perform a test against the HELO identity. You might use this option to improve performance by disabling the HELO check. This can be useful because the spf-passed filter rule checks the PRA or the MAIL FROM Identities first. The appliance only performs the HELO check for the SPF conformance level.


What to do next

Related Topics

Enabling SPF and SIDF via the CLI

The AsyncOS CLI supports more control settings for each SPF/SIDF conformance level. When configuring the default settings for a listener’s Host Access Table, you can choose the listener’s SPF/SIDF conformance level and the SMTP actions (ACCEPT or REJECT) that the appliance performs, based on the SPF/SIDF verification results. You can also define the SMTP response that the appliance sends when it rejects a message.

Depending on the conformance level, the appliance performs a check against the HELO identity, MAIL FROM identity, or PRA identity. You can specify whether the appliance proceeds with the session (ACCEPT) or terminates the session (REJECT) for each of the following SPF/SIDF verification results for each identity check:

  • None. No verification can be performed due to the lack of information.

  • Neutral. The domain owner does not assert whether the client is authorized to use the given identity.

  • SoftFail. The domain owner believes the host is not authorized to use the given identity but is not willing to make a definitive statement.

  • Fail. The client is not authorized to send mail with the given identity.

  • TempError. A transient error occurred during verification.

  • PermError. A permanent error occurred during verification.

The appliance accepts the message for a Pass result unless you configure the SIDF Compatible conformance level to downgrade a Pass result of the PRA identity to None if there are Resent-Sender: or Resent-From: headers present in the message. The appliance then takes the SMTP action specified for when the PRA check returns None.

If you choose not to define the SMTP actions for an identity check, the appliance automatically accepts all verification results, including Fail.

The appliance terminates the session if the identity verification result matches a REJECT action for any of the enabled identity checks. For example, an administrator configures a listener to accept messages based on all HELO identity check results, including Fail, but also configures it to reject messages for a Fail result from the MAIL FROM identity check. If a message fails the HELO identity check, the session proceeds because the appliance accepts that result. If the message then fails the MAIL FROM identity check, the listener terminates the session and then returns the STMP response for the REJECT action.

The SMTP response is a code number and message that the appliance returns when it rejects a message based on the SPF/SIDF verification result. The TempError result returns a different SMTP response from the other verification results. For TempError, the default response code is 451 and the default message text is #4.4.3 Temporary error occurred during SPF verification . For all other verification results, the default response code is 550 and the default message text is #5.7.1 SPF unauthorized mail is prohibited . You can specify your own response code and message text for TempError and the other verification results.

Optionally, you can configure the appliance to return a third-party response from the SPF publisher domain if the REJECT action is taken for Neutral, SoftFail, or Fail verification result. By default, the appliance returns the following response:

550-#5.7.1 SPF unauthorized mail is prohibited.

550-The domain example.com explains:

550 <Response text from SPF domain publisher>

To enable these SPF/SIDF settings, use the listenerconfig -> edit subcommand and select a listener. Then use the hostaccess -> default subcommand to edit the Host Access Table’s default settings.

The following SPF control settings are available for the Host Access Table

SPF Control Settings via the CLI

Conformance Level

Available SPF Control Settings

SPF Only

  • Whether to perform HELO identity check

  • SMTP actions taken based on the results of the following identity checks:

    • HELO identity (if enabled)

    • MAIL FROM Identity

  • SMTP response code and text returned for the REJECT action

  • Verification time out (in seconds)

SIDF Compatible

  • Whether to perform a HELO identity check

  • Whether the verification downgrades a Pass result of the PRA identity to None if the Resent-Sender: or Resent-From: headers are present in the message.

  • SMTP actions taken based on the results of the following identity checks:

    • HELO identity (if enabled)

    • MAIL FROM Identity

    • PRA Identity

  • SMTP response code and text returned for the REJECT action.

  • Verification timeout (in seconds)

SIDF Strict

  • SMTP actions taken based on the results of the following identity checks:

    • MAIL FROM Identity

    • PRA Identity

  • SMTP response code and text returned in case of SPF REJECT action.

  • Verification timeout (in seconds)

The appliance performs the HELO identity check and accepts the None and Neutral verification results and rejects the others. The CLI prompts for the SMTP actions are the same for all identity types. The user does not define the SMTP actions for the MAIL FROM identity. The appliance automatically accepts all verification results for the identity. The appliance uses the default reject code and text for all REJECT results.

You can also configure this in the command-line interface using the listenerconfig command.

The Received-SPF Header

When you configure AsyncOS for SPF/SIDF verification, it places an SPF/SIDF verification header ( Received-SPF ) in the email. The Received-SPF header contains the following information:

  • verification result - the SPF verification result (see Verification Results).
  • identity - the identity that SPF verification checked: HELO, MAIL FROM, or PRA.
  • receiver - the verifying host name (which performs the check).
  • client IP address - the IP address of the SMTP client.
  • ENVELOPE FROM - the envelope sender mailbox. (Note that this may be different from the MAIL FROM identity, as the MAIL FROM identity cannot be empty.)
  • x-sender - the value of the HELO, MAIL FROM, or PRA identity.
  • x-conformance - the level of conformance (see Table - SPF/SIDF Conformance Levels ) and whether a downgrade of the PRA check was performed.

The following example shows a header added for a message that passed the SPF/SIDF check:

Received-SPF: Pass identity=pra; receiver=box.example.com;

client-ip=1.2.3.4; envelope-from="alice@fooo.com";

x-sender="alice@company.com"; x-conformance=sidf_compatible


Note

The spf-status and spf-passed filter rules use the received-SPF header to determine the status of the SPF/SIDF verification.

Determining the Action to Take for SPF/SIDF Verified Mail

When you receive SPF/SIDF verified mail, you may want to take different actions depending on the results of the SPF/SIDF verification. You can use the following message and content filter rules to determine the status of SPF/SIDF verified mail and perform actions on the messages based on the verification results:

  • spf-status . This filter rule determines actions based on the SPF/SIDF status. You can enter a different action for each valid SPF/SIDF return value.
  • spf-passed . This filter rule generalizes the SPF/SIDF results as a Boolean value.

Note

The spf-passed filter rule is only available in message filters.

You can use the spf-status rule when you want to address more granular results, and use the spf-passed rule when you want to create a simple Boolean.

Related Topics

Verification Results

If you use the spf-status filter rule, you can check against the SPF/SIDF verification results using the following syntax:


if (spf-status == "Pass")

If you want a single condition to check against multiple status verdicts, you can use the following syntax:


if (spf-status == "PermError, TempError")

You can also check the verification results against the HELO, MAIL FROM, and PRA identities using the following syntax:


if (spf-status("pra") == "Fail")

Note

You can only use the spf-status message filter rule to check results against HELO, MAIL FROM, and PRA identities. You cannot use the spf-status content filter rule to check against identities. The spf-status content filter checks only the PRA identity.

You can receive any of the following verification results:

  • None - no verification can be performed due to the lack of information.
  • Pass - the client is authorized to send mail with the given identity.
  • Neutral - the domain owner does not assert whether the client is authorized to use the given identity.
  • SoftFail - the domain owner believes the host is not authorized to use the given identity but is not willing to make a definitive statement.
  • Fail - the client is not authorized to send mail with the given identity.
  • TempError - a transient error occurred during verification.
  • PermError - a permanent error occurred during verification.

Using the spf-status Filter Rule in the CLI

The following example shows the spf-status message filter in use:

skip-spam-check-for-verified-senders:


if (sendergroup == "TRUSTED" and spf-status == "Pass"){

skip-spamcheck();

}

quarantine-spf-failed-mail:

if (spf-status("pra") == "Fail") {

if (spf-status("mailfrom") == "Fail"){

# completely malicious mail

quarantine("Policy");

} else {

if(spf-status("mailfrom") == "SoftFail") {

# malicious mail, but tempting

quarantine("Policy");

}

}

} else {

if(spf-status("pra") == "SoftFail"){

if (spf-status("mailfrom") == "Fail"

or spf-status("mailfrom") == "SoftFail"){

# malicious mail, but tempting

quarantine("Policy");

}

}

}

stamp-mail-with-spf-verification-error:

if (spf-status("pra") == "PermError, TempError"

or spf-status("mailfrom") == "PermError, TempError"

or spf-status("helo") == "PermError, TempError"){

# permanent error - stamp message subject

strip-header("Subject");

insert-header("Subject", "[POTENTIAL PHISHING] $Subject"); 

}

.

spf-status Content Filter Rule in the GUI

You can also enable the spf-status rule from the content filters in the GUI. However, you cannot check results against HELO, MAIL FROM, and PRA identities when using the spf-status content filter rule.

To add the spf-status content filter rule from the GUI, click Mail Policies > Incoming Content Filters. Then add the SPF Verification filter rule from the Add Condition dialog box. Specify one or more verification results for the condition.

After you add the SPF Verification condition, specify an action to perform based on the SPF status. For example, if the SPF status is SoftFail, you might quarantine the message.

Using the spf-passed Filter Rule

The spf-passed rule shows the results of SPF verification as a Boolean value. The following example shows an spf-passed rule used to quarantine emails that are not marked as spf-passed:

quarantine-spf-unauthorized-mail:

if (not spf-passed) {


quarantine("Policy");

}

Note

Unlike the spf-status rule, the spf-passed rule reduces the SPF/SIDF verification values to a simple Boolean. The following verification results are treated as not passed in the spf-passed rule: None, Neutral, Softfail, TempError, PermError, and Fail. To perform actions on messages based on more granular results, use the spf-status rule.

Testing the SPF/SIDF Results

Test the results of SPF/SIDF verification and use these results to determine how to treat SPF/SIDF failures because different organizations implement SPF/SIDF in different ways. Use a combination of content filters, message filters, and the Email Security Monitor - Content Filters report to test the results of the SPF/SIDF verification.

Your degree of dependence on SPF/SIDF verification determines the level of granularity at which you test SPF/SIDF results.

Related Topics

Basic Granularity Test of SPF/SIDF Results

To get a basic measure of the SPF/SIDF verification results for incoming mail, you can use content filters and the Email Security Monitor - Content Filters page. This test provides a view of the number of messages received for each type of SPF/SIDF verification result.

Procedure


Step 1

Enable SPF/SIDF verification for a mail flow policy on an incoming listener, and use a content filter to configure an action to take. For information on enabling SPF/SIDF, see Enabling SPF and SIDF.

Step 2

Create an spf-status content filter for each type of SPF/SIDF verification. Use a naming convention to indicate the type of verification. For example, use “SPF-Passed” for messages that pass SPF/SIDF verification, or “SPF-TempErr” for messages that weren’t passed due to a transient error during verification. For information about creating an spf-status content filter, see spf-status Content Filter Rule in the GUI.

Step 3

After you have processed a number of SPF/SIDF verified messages, click Monitor > Content Filters to see how many messages triggered each of the SPF/SIDF verified content filters.


Greater Granularity Test of SPF/SIDF Results

For more comprehensive information about SPF/SIDF verification results, only enable SPF/SIDF verification for specific groups of senders, and review the results for those specific senders. Then, create a mail policy for that particular group and enable SPF/SIDF verification on the mail policy. Create content filters and review the Content Filters report as explained in Basic Granularity Test of SPF/SIDF Results. If you find that the verification is effective, then you can use SPF/SIDF verification as a basis for deciding whether to drop or bounce emails for this specified group of senders.

Procedure


Step 1

Create a mail flow policy for SPF/SIDF verification. Enable SPF/SIDF verification for the mail flow policy on an incoming listener. For information about enabling SPF/SIDF, see Enabling SPF and SIDF.

Step 2

Create a sender group for SPF/SIDF verification and use a naming convention to indicate SPF/SIDF verification. For information about creating sender groups, see the “Configuring the Gateway to Receive Mail” chapter.

Step 3

Create an spf-status content filter for each type of SPF/SIDF verification. Use a naming convention to indicate the type of verification. For example, use “SPF-Passed” for messages that pass SPF/SIDF verification, or “SPF-TempErr” for messages that weren’t passed due to a transient error during verification. For information about creating an spf-status content filter, see spf-status Content Filter Rule in the GUI.

Step 4

After you process a number of SPF/SIDF-verified messages, click Monitor > Content Filters to see how many messages triggered each of the SPF/SIDF-verified content filters.


DMARC Verification

Domain-based Message Authentication, Reporting and Conformance (DMARC) is a technical specification created to reduce the potential for email-based abuse. DMARC standardizes how email receivers perform email authentication using SPF and DKIM mechanisms. To pass DMARC verification, an email must pass at least one of these authentication mechanisms, and the Authentication Identifiers must comply with RFC 5322.

The appliance allows you to:

  • Verify incoming emails using DMARC.
  • Define profiles to override (accept, quarantine, or reject) domain owners’ policies.
  • Send feedback reports to domain owners, which helps to strengthen their authentication deployments.
  • Send delivery error reports to the domain owners if the DMARC aggregate report size exceeds 10 MB or the size specified in the RUA tag of the DMARC record.

AsyncOS can handle emails that are compliant with the DMARC specification as submitted to Internet Engineering Task Force (IETF) on March 31, 2013. For more information, see http://tools.ietf.org/html/draft-kucherawy-dmarc-base-02 .


Note

The appliance will not perform DMARC verification of messages from domains with malformed DMARC records. However, the appliance can receive and process such messages.

Related Topics

DMARC Verification Workflow

The following describes how AsyncOS performs DMARC verification.

  1. A listener configured on AsyncOS receives an SMTP connection.
  2. AsyncOS performs SPF and DKIM verification on the message.
  3. AsyncOS fetches the DMARC record for the sender’s domain from the DNS.
    • If no record is found, AsyncOS skips the DMARC verification and continues processing.
    • If the DNS lookup fails, AsyncOS takes action based on the specified DMARC verification profile.
  4. Depending on DKIM and SPF verification results, AsyncOS performs DMARC verification on the message.


    Note

    If DKIM and SPF verification is enabled, DMARC verification reuses the DKIM and SPF verification results.
  5. Depending on the DMARC verification result and the specified DMARC verification profile, AsyncOS accepts, quarantines, or rejects the message. If the message is not rejected due to DMARC verification failure, AsyncOS continues processing.
  6. AsyncOS sends an appropriate SMTP response and continues processing.
  7. If sending of aggregate reports is enabled, AsyncOS gathers DMARC verification data and includes it in the daily report sent to the domain owners. For more information about the DMARC aggregate feedback report, see DMARC Aggregate Reports.


    Note

    If the aggregate report size exceeds 10 MB or the size specified in the RUA tag of the DMARC record, AsyncOS sends delivery error reports to the domain owners.

How to Verify Incoming Messages Using DMARC

How to Verify Incoming Messages Using DMARC

Do This

More Information

Step 1

Create a new DMARC verification profile or modify the default DMARC verification profile to meet your requirements.

Create a DMARC Verification Profile

Edit a DMARC Verification Profile

Step 2

(Optional) Configure global DMARC settings to meet your requirements.

Configure Global DMARC Settings

Step 3

Configure your mail flow policies to verify incoming messages using DMARC.

Configuring DMARC Verification on the Mail Flow Policy

Step 4

(Optional) Configure a return address for DMARC feedback reports.

Configure a Return Address for DMARC Feedback Reports

Step 5

(Optional) Review the following:

  • DMARC Verification and Incoming Mail reports
  • Messages that failed DMARC verification using Message Tracking

Related Topics

Managing DMARC Verification Profiles

A DMARC verification profile is a list of parameters that the mail flow policies of the appliance use for verifying DMARC. For example, you may want to create a stringent profile that rejects all non-compliant messages from a particular domain and a less stringent profile that quarantines all non-compliant messages from another domain.

A DMARC verification profile consists of the following information:

  • A name for the verification profile.
  • Message action to take when the policy in the DMARC record is reject.
  • Message action to take when the policy in the DMARC record is quarantine.
  • Message action in case of a temporary failure.
  • Message action in case of a permanent failure.
Related Topics
Create a DMARC Verification Profile

Use this procedure to create a new DMARC verification profile.


Note

By default, AsyncOS provides a default DMARC verification profile. If you do not want to create a new DMARC verification profile, you can use the default DMARC verification profile. The default DMARC verification profile is available on Mail Policies > DMARC page. For instructions to edit the default DMARC verification profile, see Edit a DMARC Verification Profile.
Procedure

Step 1

Choose Mail Policies > DMARC.

Step 2

Click Add Profile.

Step 3

Enter the name of the profile.

Step 4

Set the message action that AsyncOS takes when the policy in the DMARC record is reject. Choose one of the following:

  • No Action. AsyncOS does not take any action on the messages that fail DMARC verification.
  • Quarantine. AsyncOS quarantines the messages that fail DMARC verification to a specified quarantine.
  • Reject. AsyncOS rejects all messages that fail DMARC verification and returns a specified SMTP code and response. The default values are, respectively: 550 and #5.7.1 DMARC unauthenticated mail is prohibited.
Step 5

Set the message action that AsyncOS takes when the policy in the DMARC record is quarantine. Choose one of the following:

  • No Action. AsyncOS does not take any action on the messages that fail DMARC verification.
  • Quarantine. AsyncOS quarantines the messages that fail DMARC verification to a specified quarantine.
Step 6

Set the message action that AsyncOS takes on the messages that result in temporary failure during DMARC verification. Choose one of the following:

  • Accept. AsyncOS accepts messages that result in temporary failure during DMARC verification.
  • Reject. AsyncOS rejects messages that result in temporary failure during DMARC verification and returns a specified SMTP code and response. The default values are, respectively: 451 and #4.7.1 Unable to perform DMARC verification.
Step 7

Set the message action that AsyncOS takes on the messages that result in permanent failure during DMARC verification. Choose one of the following:

  • Accept. AsyncOS accepts messages that result in permanent failure during DMARC verification.
  • Reject. AsyncOS rejects messages that result in permanent failure during DMARC verification, and returns a specified SMTP code and response. The default values are, respectively: 550 and #5.7.1 DMARC verification failed.
Step 8

Submit and commit your changes.


Edit a DMARC Verification Profile
Procedure

Step 1

Choose Mail Policies > DMARC.

Step 2

Click the intended verification profile name.

Step 3

Edit the intended fields as described in Create a DMARC Verification Profile.

Step 4

Submit and commit your changes.


Exporting DMARC Verification Profiles

You can export all DMARC verification profiles on your appliance to a single text file in the configuration directory.

Procedure

Step 1

Choose Mail Policies > DMARC.

Step 2

Click Export Profiles.

Step 3

Enter a name for the file.

Step 4

Click Submit.


Importing DMARC Verification Profiles
Procedure

Step 1

Choose Mail Policies > DMARC.

Step 2

Click Import Profiles.

Step 3

Choose the file that contains the DMARC verification profiles.

Step 4

Click Submit. You are warned that importing will replace all existing DMARC verification profiles.

Step 5

Click Import.

Step 6

Commit your changes.


Deleting DMARC Verification Profiles
Procedure

Step 1

Choose Mail Policies > DMARC.

Step 2

Select the verification profiles that you want to delete.

Step 3

Click Delete.

Step 4

Confirm the deletion.


Configure Global DMARC Settings

Procedure

Step 1

Choose Mail Policies > DMARC.

Step 2

Click Edit Global Settings.

Step 3

Make changes to the settings defined in the following table.

DMARC Global Settings

Global Setting

Description

Specific senders bypass address list

Skip DMARC verification of messages from specific senders. Choose an address list from the drop-down list.

Note 
Address lists that are created using full email addresses or domains only can be used to bypass DMARC verification. For more information, see Using a List of Sender Addresses for Incoming Connection Rules.

Bypass verification for messages with headers

Skip DMARC verification of messages that contain specific headers. For example, use this option to skip DMARC verification of messages from mailing lists and trusted forwarders.

Enter a header or multiple headers separated by commas.

Schedule for report generation

The time when you want AsyncOS to generate DMARC aggregate reports. For example, you can choose non-peak hours for generating aggregate reports to avoid impact on mail flow.

Entity generating reports

The entity generating DMARC aggregate reports. This helps the domain owners who receive DMARC aggregate reports to identify the entity that generated the report.

Enter a valid domain name.

Additional contact information for reports

Additional contact information, for example, details of your organization’s customer support, if the domain owners who receive DMARC aggregate reports want to contact the entity that generated the report.

Send copy of all aggregate reports to

Send a copy of all DMARC aggregate reports to specific users, for example, internal users who perform analysis on the aggregate reports.

Enter an email address or multiple addresses separated by commas.

Error Reports

Send delivery error reports to the domain owners if the DMARC aggregate report size exceeds 10 MB or the size specified in the RUA tag of the DMARC record.

Check the check box.

Step 4

Submit and commit your changes.


Configuring DMARC Verification on the Mail Flow Policy

Procedure

Step 1

Choose Mail Policies > Mail Flow Policies.

Step 2

Click the incoming mail policy for the listener where you want to perform verification.

Step 3

In the Security Features section of the mail flow policy, enable DMARC Verification by choosing On.

Step 4

Select the DMARC verification profile that you want to use for the policy.

Step 5

(Optional) Enable sending of DMARC aggregate feedback reports to email addresses in the RUA tag of DMARC-enabled domains from whom messages are received.

Aggregate feedback reports are generated daily.

Step 6

Submit and commit your changes.


What to do next

Related Topics

DMARC Verification Logs

Log messages are added to the mail logs during the following stages of DMARC verification.

  • DMARC verification attempted on a message
  • DMARC verification is complete
  • DMARC verification details including DKIM and SPF alignment results
  • DMARC verification on a message is skipped
  • DMARC record is fetched and parsed or DNS failures
  • DMARC aggregate report delivery for a domain failed
  • Error report generated for a domain
  • Error report delivery for a domain succeeded
  • Error report delivery for a domain failed

Configure a Return Address for DMARC Feedback Reports

Procedure

Step 1

Choose System Administration > Return Addresses.

Step 2

Click Edit Settings.

Step 3

Provide a return address for DMARC aggregate feedback reports.

Step 4

Submit and commit your changes.


DMARC Aggregate Reports

DMARC relies on a feedback mechanism to enforce domain owner policies safely and in a scalable manner. This feedback mechanism helps the domain owners to strengthen their authentication deployments.

If you are using AsyncOS to perform DMARC verification and you have enabled sending of aggregate feedback reports in the mail flow policy, AsyncOS generates aggregate feedback reports daily, and sends it to the domain owners. These reports are in XML format and are archived into a GZip file.


Note

All DMARC aggregate feedback reports that AsyncOS generates are DMARC compliant.

A DMARC aggregate feedback report contains the following sections:

  • Metadata of the report sender such as email address and report ID number.
  • Details of the published DMARC policy.
  • Details of DMARC policy disposition such as source IP address and disposition summary.
  • Domain identifiers
  • DMARC verification results and authentication summary.
Related Topics
Sample DMARC Aggregate Feedback Report

<?xml version="1.0" encoding="UTF-8" ?>
<feedback>
  <version>1.0</version> 	
  <report_metadata>
    <org_name>cisco.com</org_name>
    <email>noreply-dmarc-support@cisco.com</email>
    <extra_contact_info>http://cisco.com/dmarc/support</extra_contact_info>
    <report_id>b1d925$4ecceab=0694614b826605cd@cisco.com</report_id>
    <date_range>
      <begin>1335571200</begin>
      <end>1335657599</end>
    </date_range>
  </report_metadata>
  <policy_published>
    <domain>example.com</domain>
    <adkim>r</adkim>
    <aspf>r</aspf>
    <p>none</p>
    <sp>none</sp>
    <pct>100</pct>
  </policy_published>
  <record>
    <row>
      <source_ip>1.1.1.1</source_ip>
      <count>2</count>
      <policy_evaluated>
        <disposition>none</disposition>
        <dkim>fail</dkim>
        <spf>pass</spf>
      </policy_evaluated>
    </row>
    <identifiers>
	  <envelope_from>example.com</envelope_from>	
      <header_from>example.com</header_from>
    </identifiers>
    <auth_results>
      <dkim>
        <domain>example.com</domain>
	    <selector>ny</selector>
        <result>fail</result>
      </dkim>
      <dkim>
        <domain>example.net</domain>
<selector></selector>
        <result>pass</result>
      </dkim>
      <spf>
        <domain>example.com</domain>
<scope>mfrom</scope>
        <result>pass</result>
      </spf>
    </auth_results>
  </record>
</feedback>

Forged Email Detection

Email forging (also known as spoofing, CEO fraud, or business email compromise) is the process of altering the message header to hide the real identity of the sender and to make it look like a legitimate message from someone you know. Assume that a fraudster impersonating as an executive of an organization, is sending a forged message to an employee asking to send a list of clients and their personally identifiable information (PII). The employee, unaware of the real identity of the sender, provides a list of clients and their PII. The fraudster uses the PII to perform identity theft.

The appliance can detect fraudulent messages with forged sender address (From: header) and perform specified actions on such messages. For example, your appliance can detect messages with forged sender address and replace the From: header with the Envelope Sender. In this case, the employee will see the email address of the real sender (fraudster’s) instead of the forged email address.

Related Topics

Setting Up Forged Email Detection

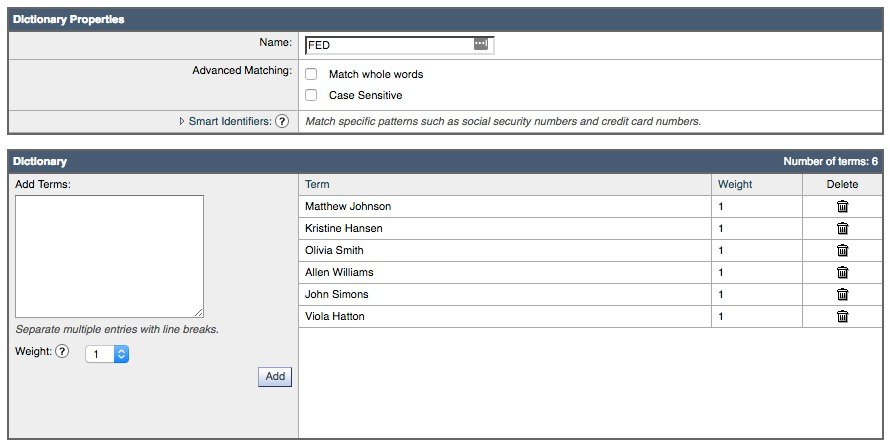
  1. Identify the users in your organization (for example, executives) whose messages are likely to be forged. Create a new content dictionary and add the names of the identified users to it.

    While creating a content dictionary,

    • Enter the name of the user and not the email address. For example, enter “ Olivia Smith ” instead of “ olivia.smith@example.com .”
    • Do not configure Advanced Matching and Smart Identifiers.
    • Do not choose weight for the terms used.
    • Do not use regular expressions.

    The following figure shows a sample content dictionary created for Forged Email Detection.

    Figure 3. Content Dictionary for Forged Email Detection


    For instructions to configure a content dictionary, see Adding Dictionaries.

  2. Create an incoming content or message filter to detect forged messages and the actions that the appliance must take on such messages. Use the following:
  3. Add the newly created content filter to an incoming mail policy. See How to Enforce Mail Policies on a Per-User Basis.

Monitoring Forged Email Detection Results

To view data about forged messages detected, see the Forged Email Matches report page (Monitor > Forged Email Matches). This report page includes the following reports:

  • Top Forged Email Matches. Displays the top ten users in the content dictionary that matched the forged From: header in the incoming messages.
  • Forged Email Matches: Details. Displays a list of all the users in the content dictionary that matched the forged From: header in the incoming messages and for a given user, the number of messages matched. Click on the number to view a list of messages in Message Tracking.

Displaying Forged Email Detection Details in Message Tracking

To display details of forged messages detected by the appliance in Message Tracking, make sure that:

  • Message Tracking is enabled. See Tracking Messages.
  • Content or message filters for detecting forged messages are operational.