Get Started with Cisco Cyber Vision

Certificate Fingerprint

Use the certificate fingerprint to register a Global Center with its synchronized centers and vice versa. To access the Center Fingerprint, choose Admin > System from the main menu. Click the copy icon to copy the Fingerprint and enroll your center with a global center.

For more information, refer the Centers Installation Guides.

Data Management

The Data Management interface allows you to do the following: manage data stored on Cisco Cyber Vision by clearing data to optimize the Center performances, setting data expiration time, and customize traffic ingestion. To access Data Management, choose Admin > Data Management from the main menu.

The Cisco Cyber Vision update procedure will not purge data automatically. The Center's 3.2.x database will be migrated to the new 4.0.0 schema. All components, activities, flows, events, etc. will be migrated. Since the migration process can take hours (from 1 to 24 hours), you can perform a data purge in release 3.2.x to shorten the migration process. Launch the purge either from the Clear data page or from the Command Line Interface (CLI), using the following command. Also, different options are offered.

sbs-db --help

Once migrated, the database content is managed with version 4.4.1 new data retention policies. Expiration settings apply. By default, the system will purge the following:

  • Events after 6 months

  • Flows after 6 months

  • Variables after 2 years


Important


You have 3 days once the migration from 3.2.x to 4.0.0 is done to set expiration settings as needed, before the default settings are applied by the system.

Clear Data

Clear data stored on Cisco Cyber Vision to optimize the Center's performances. You can clear the data partially or completely, as follows:

To clear data, choose Admin > Data Management > Clear Data from the main menu.

Clear the data carefully. Clearing any data can impact monitoring of the network. Read the implications about all following data clearance.

Data Clearance: If database overload issues occur, clear all data as a final option. This action deletes the entire database content. It removes network data like components, flows, events, and baselines from Cisco Cyber Vision and leaves the GUI empty. Your configurations, like capture modes, event severity setup, and syslog configurations, stay intact.

Purge components in Cisco Cyber Vision

Each component represents an object in the industrial network, such as:

  • Network interface of a PLC

  • PC

  • SCADA station

  • Broadcast address

  • Multicast address

The system limits the number of components stored in the database to ensure protection.

  • When the system reaches over 120,000 components, a pop-up and a red banner alert inform you that a purge is required.

  • When the system reaches 150,000 components, ingestion stops. The system deletes incoming sensor data without processing or storing it. A pop-up and a red banner alert appear to inform you that a purge is required.

You can manually purge components and devices by providing the selection criteria. Once you provide the criteria, the system identifies and purges the matching components and related devices. The system then sends a request to synchronize with the global center.

Before you begin

Ensure that you have Admin access to proceed.

Procedure

Step 1

Open the main menu and select Admin > Data Management > Clear Data.

Step 2

Select Components selection.

Step 3

Select the Component Type: IT, OT, or both.

Step 4

To proceed, enter the required details:

  • IP Subnet (optional)

  • VLAN ID (optional)

    Note


    You can pass only one VLAN ID at a time.

  • Inactivity since date (optional)

  • Creation Start Time (optional), and

  • Creation End Time (optional).

Step 5

To proceed, click Clear data, and then click Yes, remove to confirm the action.


After you clear the data, go to Explore > All Data to see the updated Devices count.

Expiration Settings

To configure the Expiration Settings, choose Admin > Data Management > Expiration Settings from the main menu.

On this page, you can manage the duration for which data and reports remain available. Select expiration times for reports and their versions. Use the drop-down menu to choose expiration periods of 3 months, 6 months, 1 year, 2 years, or 3 years. You can also set the maximum number of report versions from 1 to 100.


Note


Selecting a high value may rapidly fill up storage and adversely affect system performance. The recommended value is 10 versions.


Ingestion Configuration

The Ingestion Configuration page allows you to configure flow and variable traffic storage. You can choose whether to store flows and variables. Flows and variables storage is disabled by default.

To access the Ingestion Configuration, choose Admin > Data Management > Ingestion Configurationfrom the main menu.

Messages can appear in Cisco Cyber Vision's user interface to indicate to the user that features may be limited due to absence of flows in the database. For example, in the activity technical sheet, at the top of the flows table:

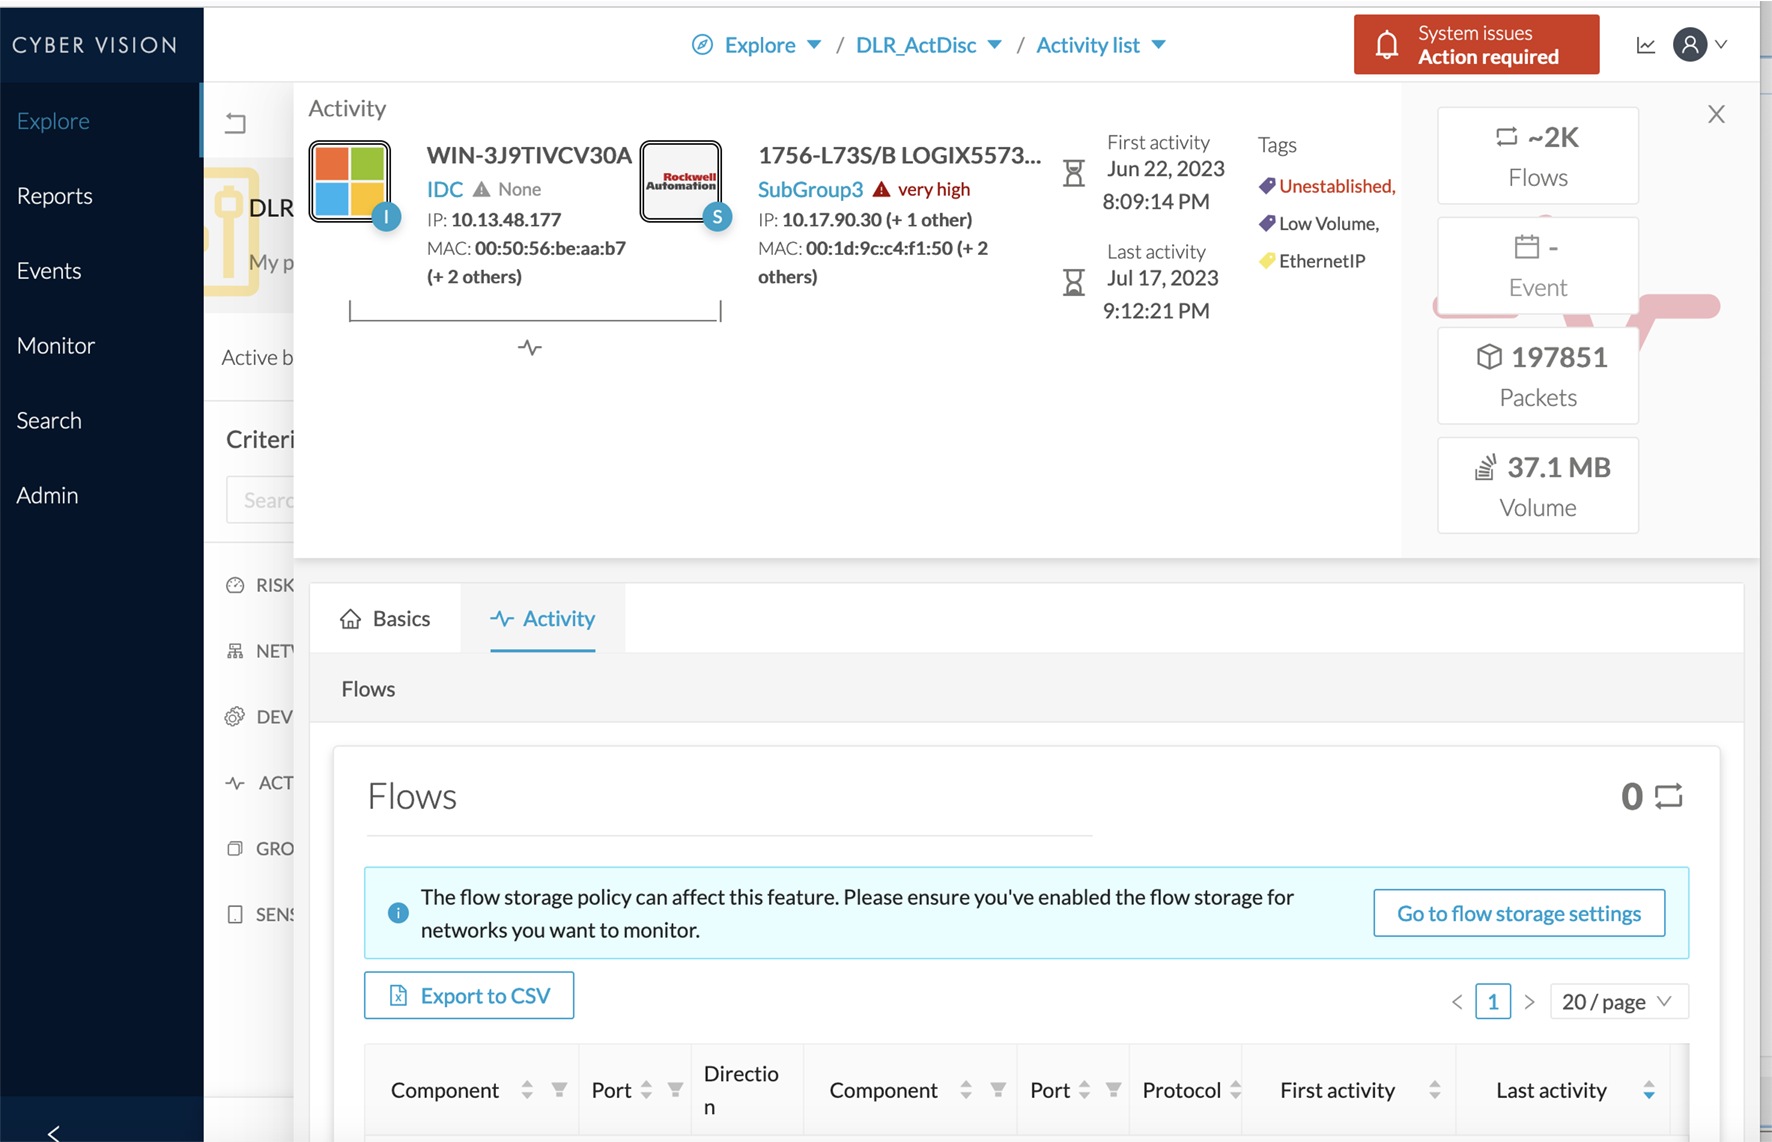
In this case, you can click Go to flow storage settings and enable Flow Storage.

If Flow Storage is enabled, it is possible to choose from which subnetworks flows should be stored. These subnetworks can be set on the Network organization page. The option "others" includes flows that are not part of the industrial private network.

An automatic purge will occur on selected flows when a period of inactivity exceeds 7 days.

You can click the Flows Aggregation and port scan detection toggle buttons to enable them.

Users

Management

You can create, edit and delete users through the Users management page. To access the Users management page, choose Admin > Users > Management from the main menu.

During their creation each user must be assigned with one of the following user roles (from full rights to read-only) or with a custom role (refer to Role Management).

  • Admin

    The Admin user has full rights on the platform. Users who have this role assigned oversee all sensitive actions like user rights management, system updates, syslog configuration, reset and capture modes configuration on sensors.

  • Product

    The product user has access to several features of the system administration page (i.e. the system, sensors and events administration pages). This access level is for users who manage sensors from a remote location. In addition, they can manage the severity of events and, if enabled by the Admin user, can manage their export to syslog.

  • Operator

    This access level is for users who use the Monitor mode and manage groups but do not have to work with the platform administration. Thus, the Operator user has access to all pages, except the system administration page.

  • Auditor

    This access level provides read-only access to the Explore, Reports, Events and Search pages. Auditors can use sorting features (such as search bars and filters) that do not require persistent changes to the data (unlike Autolayout), and generate reports.

You can create as many users as needed with any user rights. Thus, several administrators can use and administrate the whole platform. To access the CREATE A NEW USER window, choose Admin > Users > Management from the main menu. Click Add a new user, and the window appears.

However, each user must have their own account. That is:

  • Accounts must be nominative.

  • One email address for several accounts is not allowed (note that email will be requested for login access).

    Passwords must contain at least 6 characters and comply with the rules below. Passwords:

    • Must contain a lower case character: a-z.

    • Must contain an upper case character: A-Z.

    • Must contain a numeric character: 0-9.

    • Cannot contain the user id.

    • Must contain a special character: ~!"#$%&’()*+,-./:;<=>?@[]^_{|}.


      Important


      Passwords should be changed regularly to ensure the platform and the industrial network security.

Passwords' lifetime is defined in the Security settings page.

You can create custom user roles in the Role Management page.

You can map Cisco Cyber Vision user roles with an external directory's user groups in the LDAP settings page.

Role Management

In addition to the four Cisco Cyber Vision default roles (i.e. Admin, Auditor, Operator and Product), customized roles can be created and modified from the Role management page. To access the Role management page, choose Admin > Users > Role Management from the main menu.

These roles will help you defining specific privileges and accesses for each group of users.

Default roles cannot be edited or deleted.

You can map Cisco Cyber Vision custom roles with an external directory's user groups in the LDAP settings page.

Create roles

This section explains how to create customized user roles on Cisco Cyber Vision. The user roles can later be mapped to groups in Active Directory.

Procedure

Step 1

From the main menu, choose Admin > Users > Role Management.

Step 2

Click the + button at the end of listed navigation tabs.

A NEW ROLE tab appears.

Step 3

Enter a Role Name and Role Description in their respective fields.

Step 4

Click the drop-down arrow from the Search/Add existing permission field.

Step 5

Select an existing role from the drop-down list, or click Add New Permissions to build the new user role from scratch.

Step 6

In the Classic Mode Permissions drop-down list, check the checkboxes to select or deselect permissions from the list as read or write.

By default, Explore is enabled with read permission.

Step 7

In the Beta Mode Permissions drop-down list, check the checkboxes to select or deselect permissions from the list as read or write.

Note


The Beta Mode Permissions drop-down list is enabled, only if the Cisco Cyber Vision beta is enabled for a center. See Dashboard for more information.

Step 8

Click Save.

A message User role has been created successfully appears.

The new user role is displayed in the tab list.

Note


You can modify or delete a role directly in the tab.


What to do next

Custom roles created can be mapped with an external directory's user groups in the LDAP settings page.

Security Settings

From the Users security settings page, you can configure the security settings of users' password, such as its lifetime, the number of authorized login attempts, and the number of days before a password can be reused, etc.

To access Users security settings, from the main menu, choose Admin > Users > Security settings.

Center Web Server Certificate

The Center web server certificate page is to configure Cisco Cyber Vision user interface security with an enterprise certificate. You will have the option to upload a .p12 or to generate a CSR.

To access Center web server certificate page, from the main menu, choose Admin > Web Server Certificate.

For more information, see to the corresponding Center Installation Guide.