Is This Use Case for You?
This use case is intended for:
-
Users of Multicloud Defense and Amazon Web Services (AWS) platform who are looking at protecting their assets over the cloud.
-
AWS cloud service providers.
-
Customer administration teams and administrators who are both external and internal to Cisco.
Overview of Site-to-Site VPN in Multicloud Defense
A site-to-site Virtual Private Network (VPN) tunnel facilitates secure connections between networks located in different geographic areas by establishing Internet Protocol Security (IPSec) connections between Multicloud Defense gateways. Once the VPN connection is active, hosts behind the local gateway can securely connect to hosts behind the remote gateway. Connection validation is achieved using preshared keys, Internet Key Exchange (IKE) settings, and IPSec configurations. Until the remote peer initiates the connection, the outbound traffic matching VPN tunnel access control rules is dropped to ensure that data remains encrypted and protected by VPN security.
Multicloud Defense supports site-to-site VPN tunnel connections for the following platforms and products:
-
Amazon Web Services (AWS)
-
Azure
-
Google Cloud Platform (GCP)
-
Adaptive Security Appliance (ASA) device
-
Firewall Threat Defense (FTD) device
-
Extranet or a third-party firewall.
You can configure a site-to-site VPN tunnel for gateways hosted on AWS.
Workflow for Site-to-Site VPN Between AWS-Hosted Multicloud Defense Gateways
Consider a scenario where you need to communicate between two AWS VPCs, for example, Protected VPC1 and Protected VPC2, which are present in different geographies. The two protected VPCs should communicate over a site-to-site tunnel.

To establish a secure connection between the two sites, deploy Multicloud Defense gateways and create a VPN tunnel between Protected VPC1 and Protected VPC2. Host a Multicloud Defense gateway in each of the VPCs and set up an IPSec VPN tunnel between the gateways. As shown in the image, an IPSec VPN is established between Multicloud Defense gateways present in Sin_VPC and HK_VPC. With the VPN connection established, the hosts in Protected VPC1 can connect to the hosts in Protected VPC2 through the secure VPN tunnel.
Guidelines for Creating a Site-to-Site VPN Tunnel
Consider the following aspects before you create a site-to-site VPN tunnel between Multicloud Defense gateways:
-
Create the VPN only in egress or east-west mode because only these modes are supported in these scenarios for Multicloud Defense gateways.
-
Site-to-site VPN connections support up to 10 VPN peers.
Prerequisites for Creating a Site-to-Site VPN Tunnel
Ensure that the following prerequisites are in place before creating a site-to-site VPN tunnel between Multicloud Defense gateways:
-
An active AWS account connected to Multicloud Defense.
-
Multicloud Defense Gateway and Multicloud Defense Terraform Provider Version 24.04 or a later version.
-
Multicloud defense gateways must be 8 core instance type; 2 core and 4 core are not supported.
-
You must have at least one IPSec profile and this profile must be attached to the VPN tunnel connection. For more information, see Create an IPSec profile in the Cisco Multicloud Defense User Guide.
-
Create at least one Border Gateway Protocol (BGP) profile. This profile must be attached to the gateway instance associated with the VPN tunnel connection. VPN tunnels can be more effective when paired with a BGP profile because the profile offers additional control over how traffic flows in your networks. For more information, see BGP Profile.
-
VPC and VNet must be deployed without Network Address Translation (NAT) gateway on both sides.
-
VPCs for the AWS environment must be created with a single availability zone. Multiple availability zones are not supported currently.
Limitations for Creating a Site-to-Site VPN Tunnel
-
Forward-proxy firewall rules are not supported for site-to-site VPN tunnels.
Configure a Site-to-Site VPN Tunnel Between AWS-Hosted Multicloud Defense Gateways
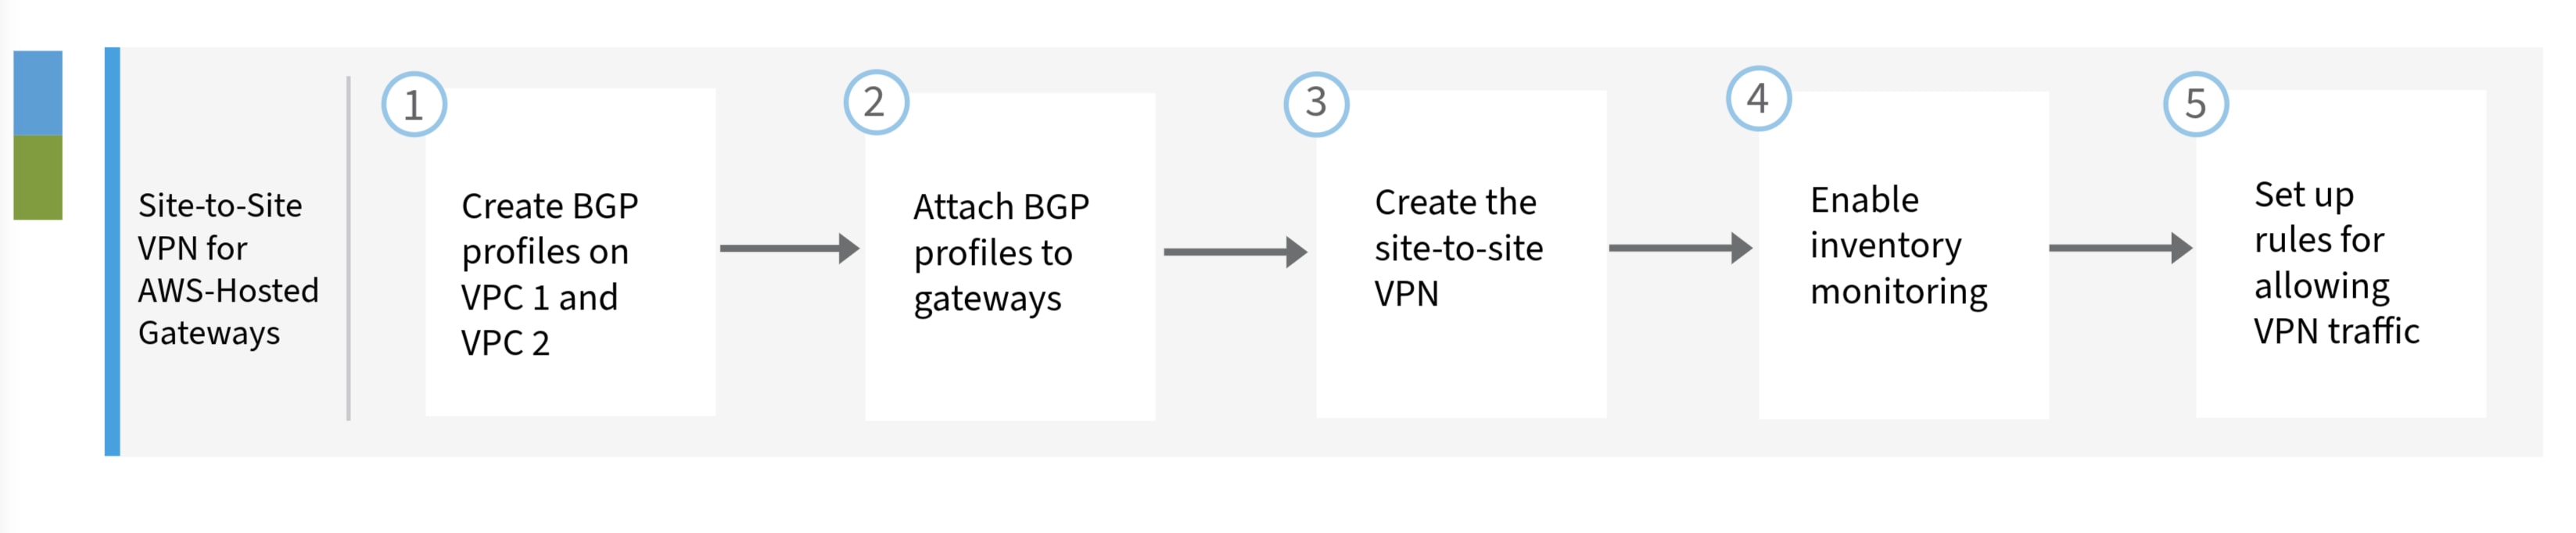
This is a workflow that guides you through the setting up of a site-to-site VPN tunnel between Multicloud Defense gateways that are hosted on AWS.
|
Number |
Step |
|---|---|
|
1 |
Create two BGP profiles (bgp-sin-hk) and (bgp-hk-sin), one for each Multicloud Defense gateway (hk-gw and sin-gw). For more information, see Create a BGP Profile for the Gateway on VPC1 and, Create a BGP Profile for the Gateway on VPC2. |
|
2 |
Attach the BGP profiles to the gateways. For more information, see Attach a BGP Profile to the Gateway. |
|
3 |
Create the site-to-site VPN. For more information, see Create the Site-to-Site VPN. |
|
4 |
Enable Inventory Monitoring. For more information, see Enable Inventory Monitoring. |
|
5 |
Set up rules for allowing VPN traffic. For more information, see Set Up Rules for Allowing VPN Traffic. |
Create a BGP Profile for a Gateway on VPC1
Procedure
|
Step 1 |
Log in to Security Cloud Control. |
|
Step 2 |
In the left pane, click Multicloud Defense. |
|
Step 3 |
In the upper-right corner, click Multicloud Defense Controller to open the controller in a new browser tab. |
|
Step 4 |
From the Multicloud Defense Controller dashboard, navigate to . |
|
Step 5 |
Click Create. |
|
Step 6 |
Under the General Settings tab, enter a unique Profile Name, for example, |
|
Step 7 |
(Optional) Enter a Description. This helps to differentiate profiles with a similar name. |
|
Step 8 |
Enter the LocalAS value. This value represents the local autonomous system (AS) in which the BGP4 device resides, for example, 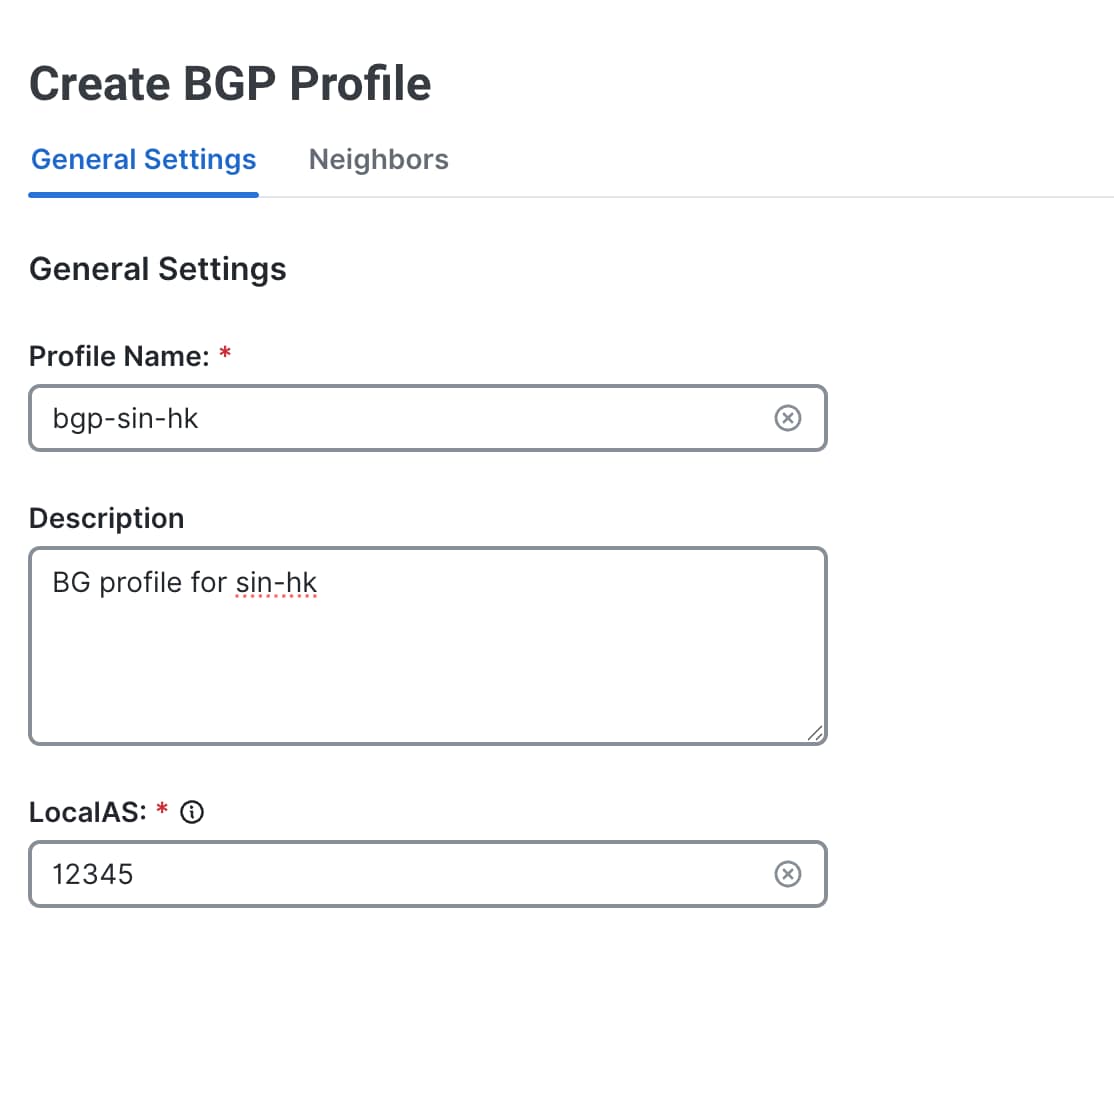
|
|
Step 9 |
Click the Neighbors tab to switch views. For more information on the BGP router and what this configuration can do for your environment, see BGP Neighbors and Path Selection. 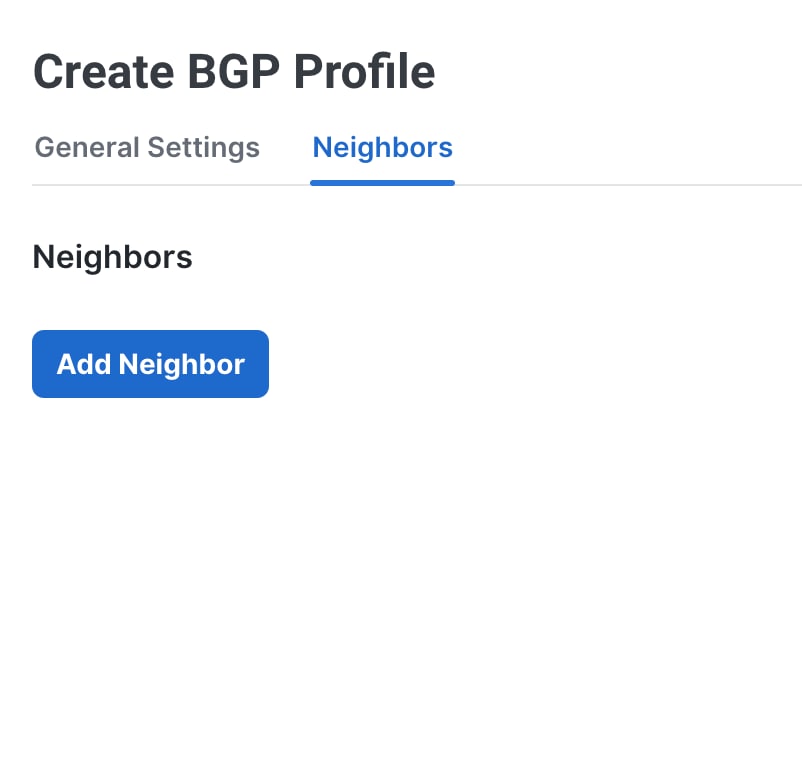
|
|
Step 10 |
Click Add Neighbor. The Neighbor 1 section is displayed. |
|
Step 11 |
Expand the Neighbor 1 section. |
|
Step 12 |
Enter a singular address or a range of IP addresses and BGP peer groups in the IP Address field. If you are adding multiple addresses, separate each address with a space, for example, |
|
Step 13 |
In the Autonomous System field, enter the LocalAS in which the neighbor resides, for example, 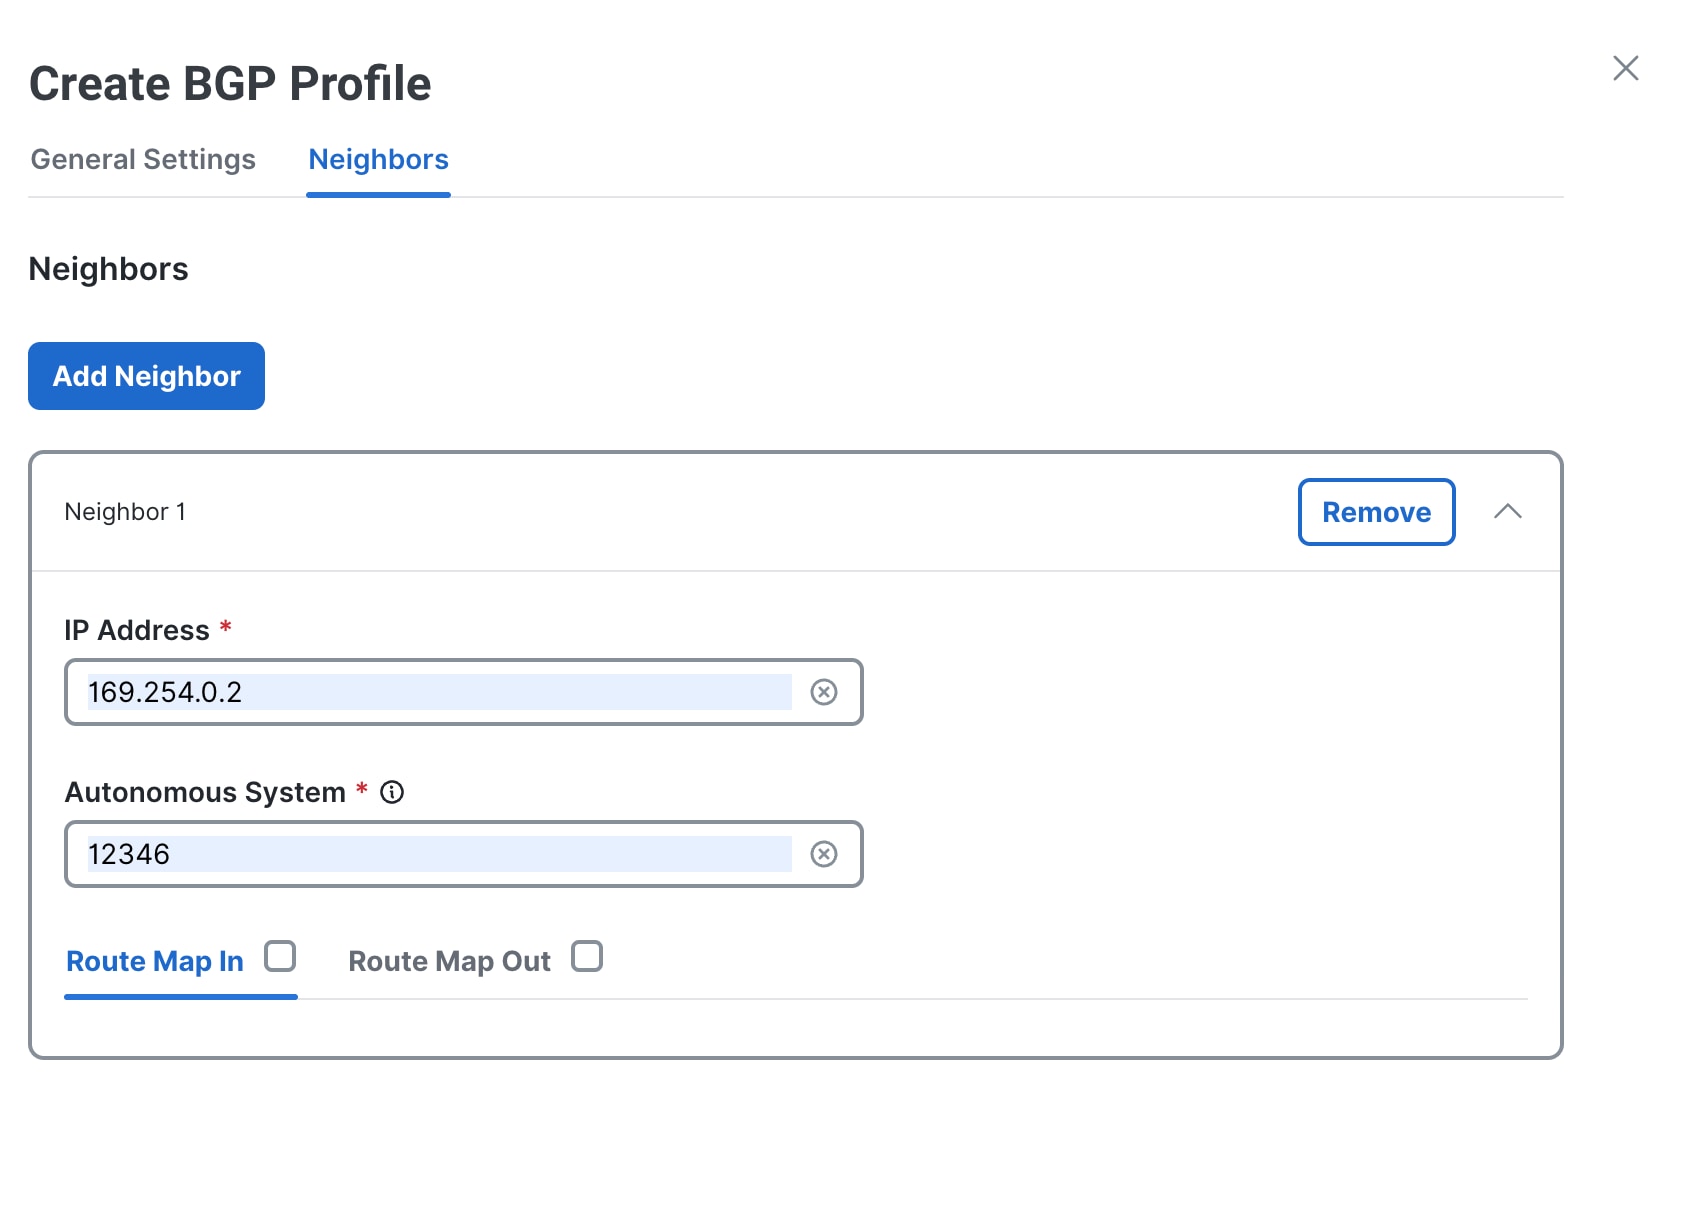
|
|
Step 14 |
Click Save. |
Create a BGP Profile for a Gateway on VPC2
Procedure
|
Step 1 |
From the Multicloud Defense Controller dashboard, navigate to . |
|
Step 2 |
Click Create. |
|
Step 3 |
Under the General Settings tab, enter a unique Profile Name, for example, |
|
Step 4 |
(Optional) Enter a Description. This helps differentiate profiles with a similar name. |
|
Step 5 |
Enter the LocalAS value. This value represents the local autonomous system (AS) in which the BGP4 device resides, for example, 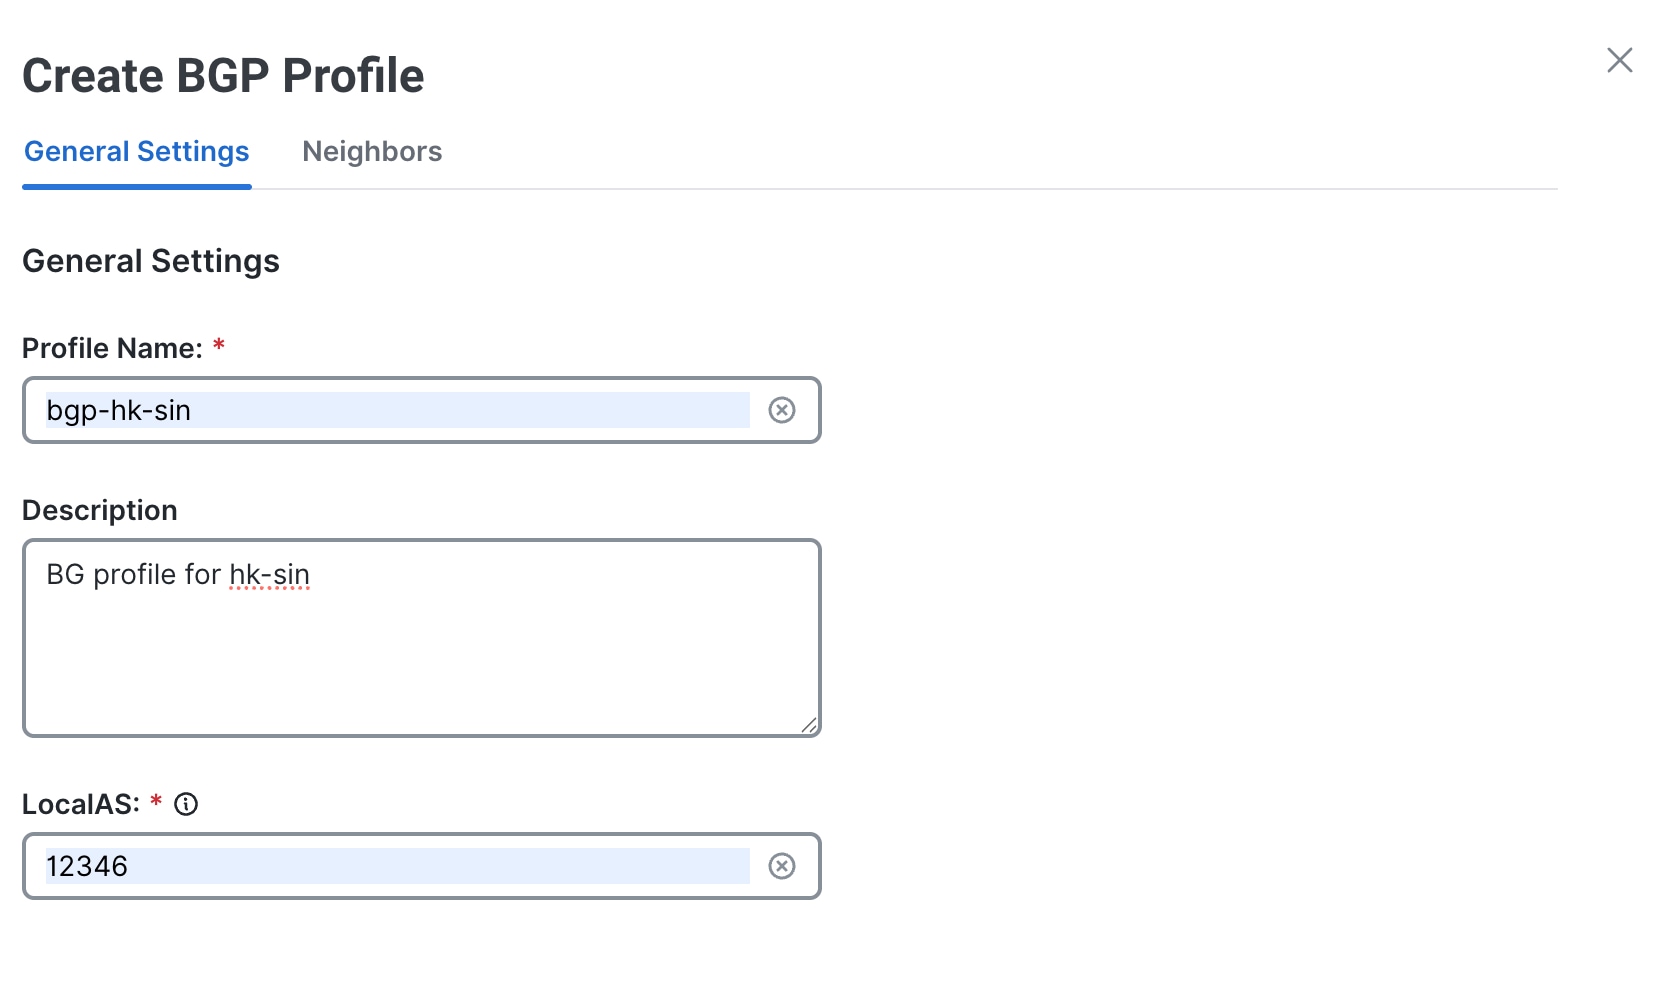
|
|
Step 6 |
Click the Neighbors tab to switch views. For more information on this BGP router and what this configuration can do for your environment, see BGP Neighbors and Path Selection. |
|
Step 7 |
Click Add Neighbor. The Neighbor 1 section is displayed. |
|
Step 8 |
Expand the Neighbor 1 section. |
|
Step 9 |
Enter a singular address or a range of IP addresses and BGP peer groups in the IP Address field. If you are adding multiple addresses, separate each address with a space, for example, |
|
Step 10 |
In the Autonomous System field, enter the LocalAS for where the neighbor resides, for example, 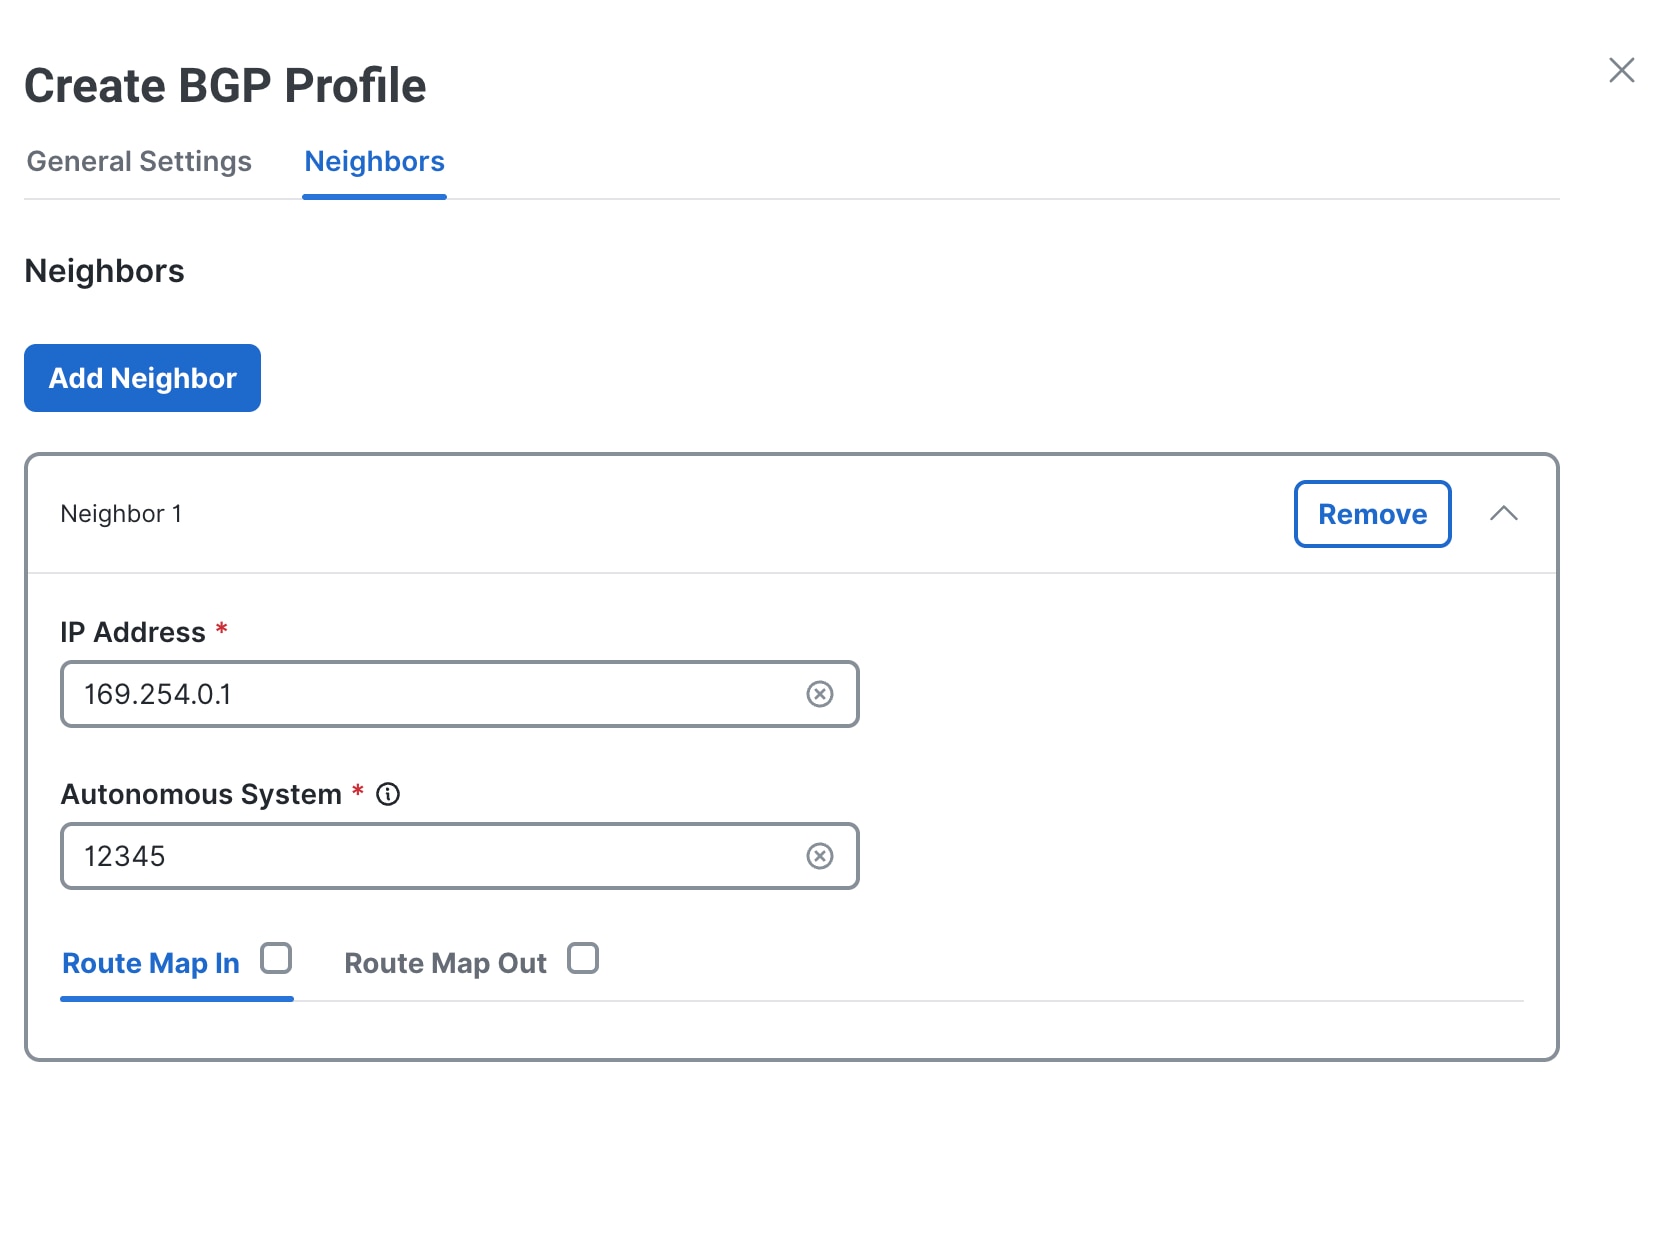
|
|
Step 11 |
Click Save. |
Attach a BGP Profile to a Gateway
Attach the BPG profile bgp-hk-sin to the gateway hk-gw.
Procedure
|
Step 1 |
From the Multicloud Defense Controller dashboard, navigate to . |
|
Step 2 |
Select a gateway, for example, |
|
Step 3 |
Click Edit in the Actions drop-down menu. |
|
Step 4 |
In Edit Gateway, under VPN Settings, from the BGP Profile drop-down list, choose a profile for the gateway. 
|
|
Step 5 |
Repeat Step 1 to Step 4 for attaching a BGP Profile to your other gateway, and select 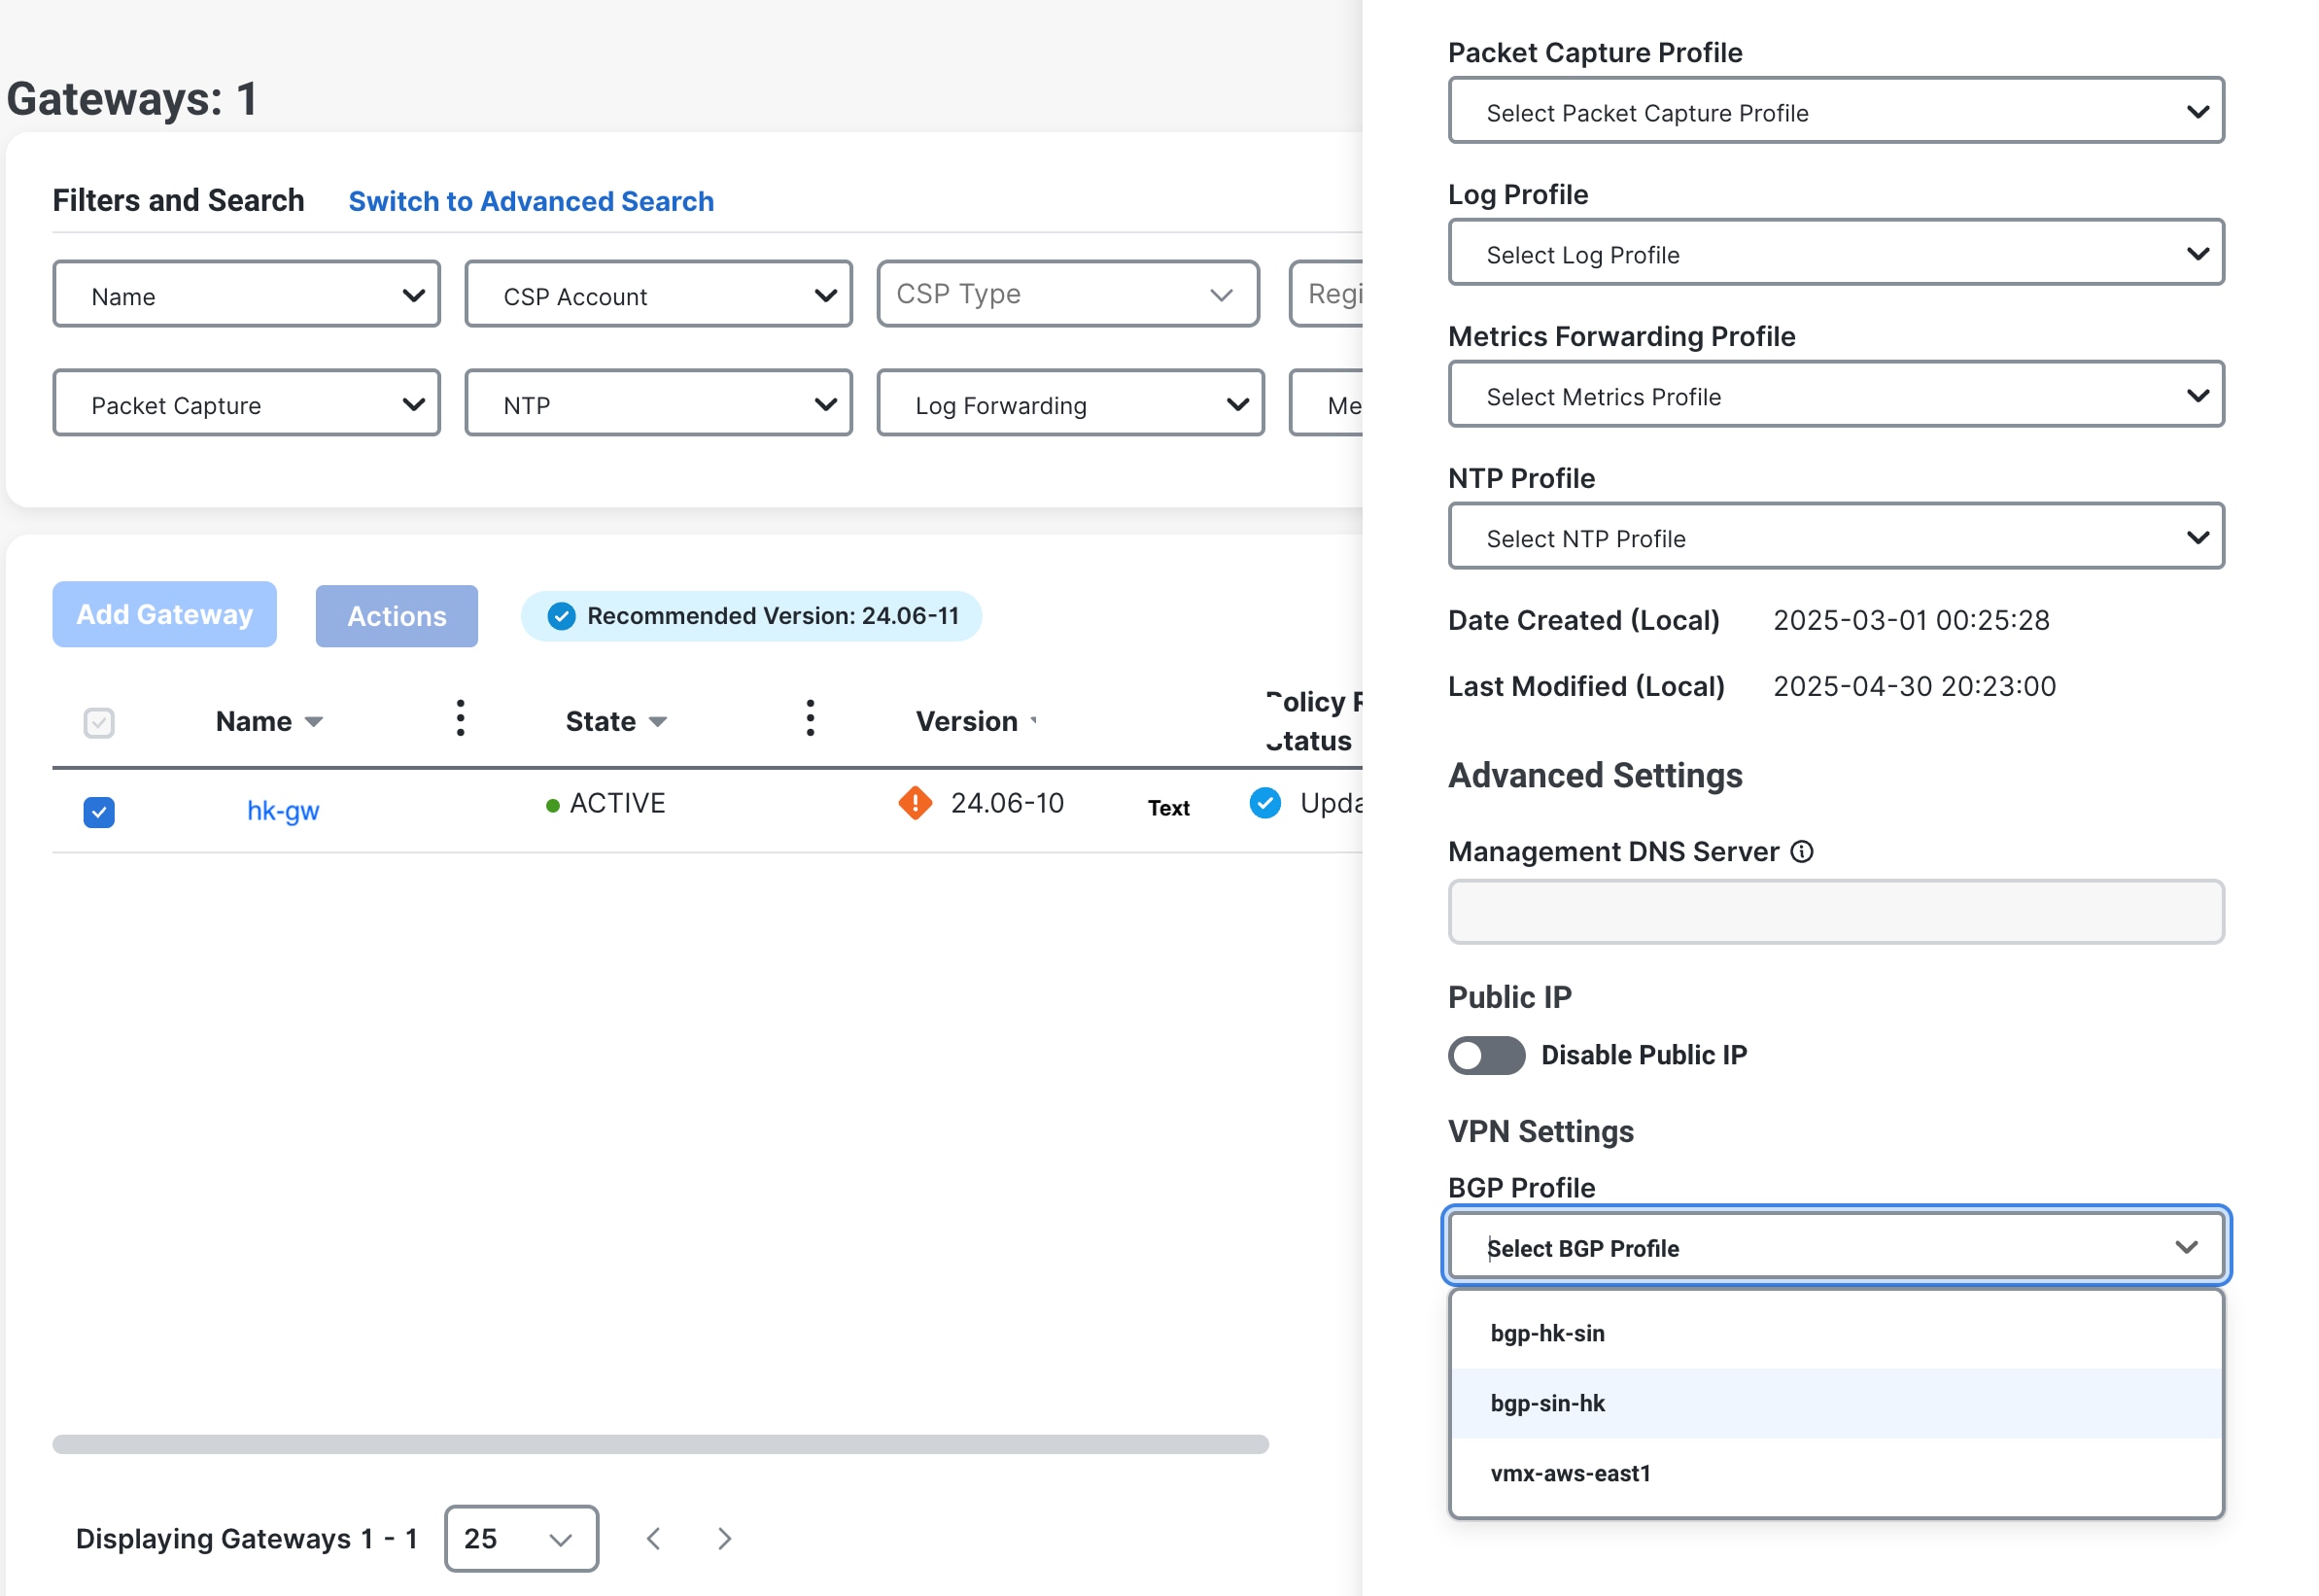
|
Create a Site-to-Site VPN
Create a site-to-site VPN connection for sin-gw gateway and hk-gw gateway.
Procedure
|
Step 1 |
From the Multicloud Defense Controller dashboard, navigate to . |
|
Step 2 |
Click Create VPN Connection. |
|
Step 3 |
Enter a name for the connection, for example, 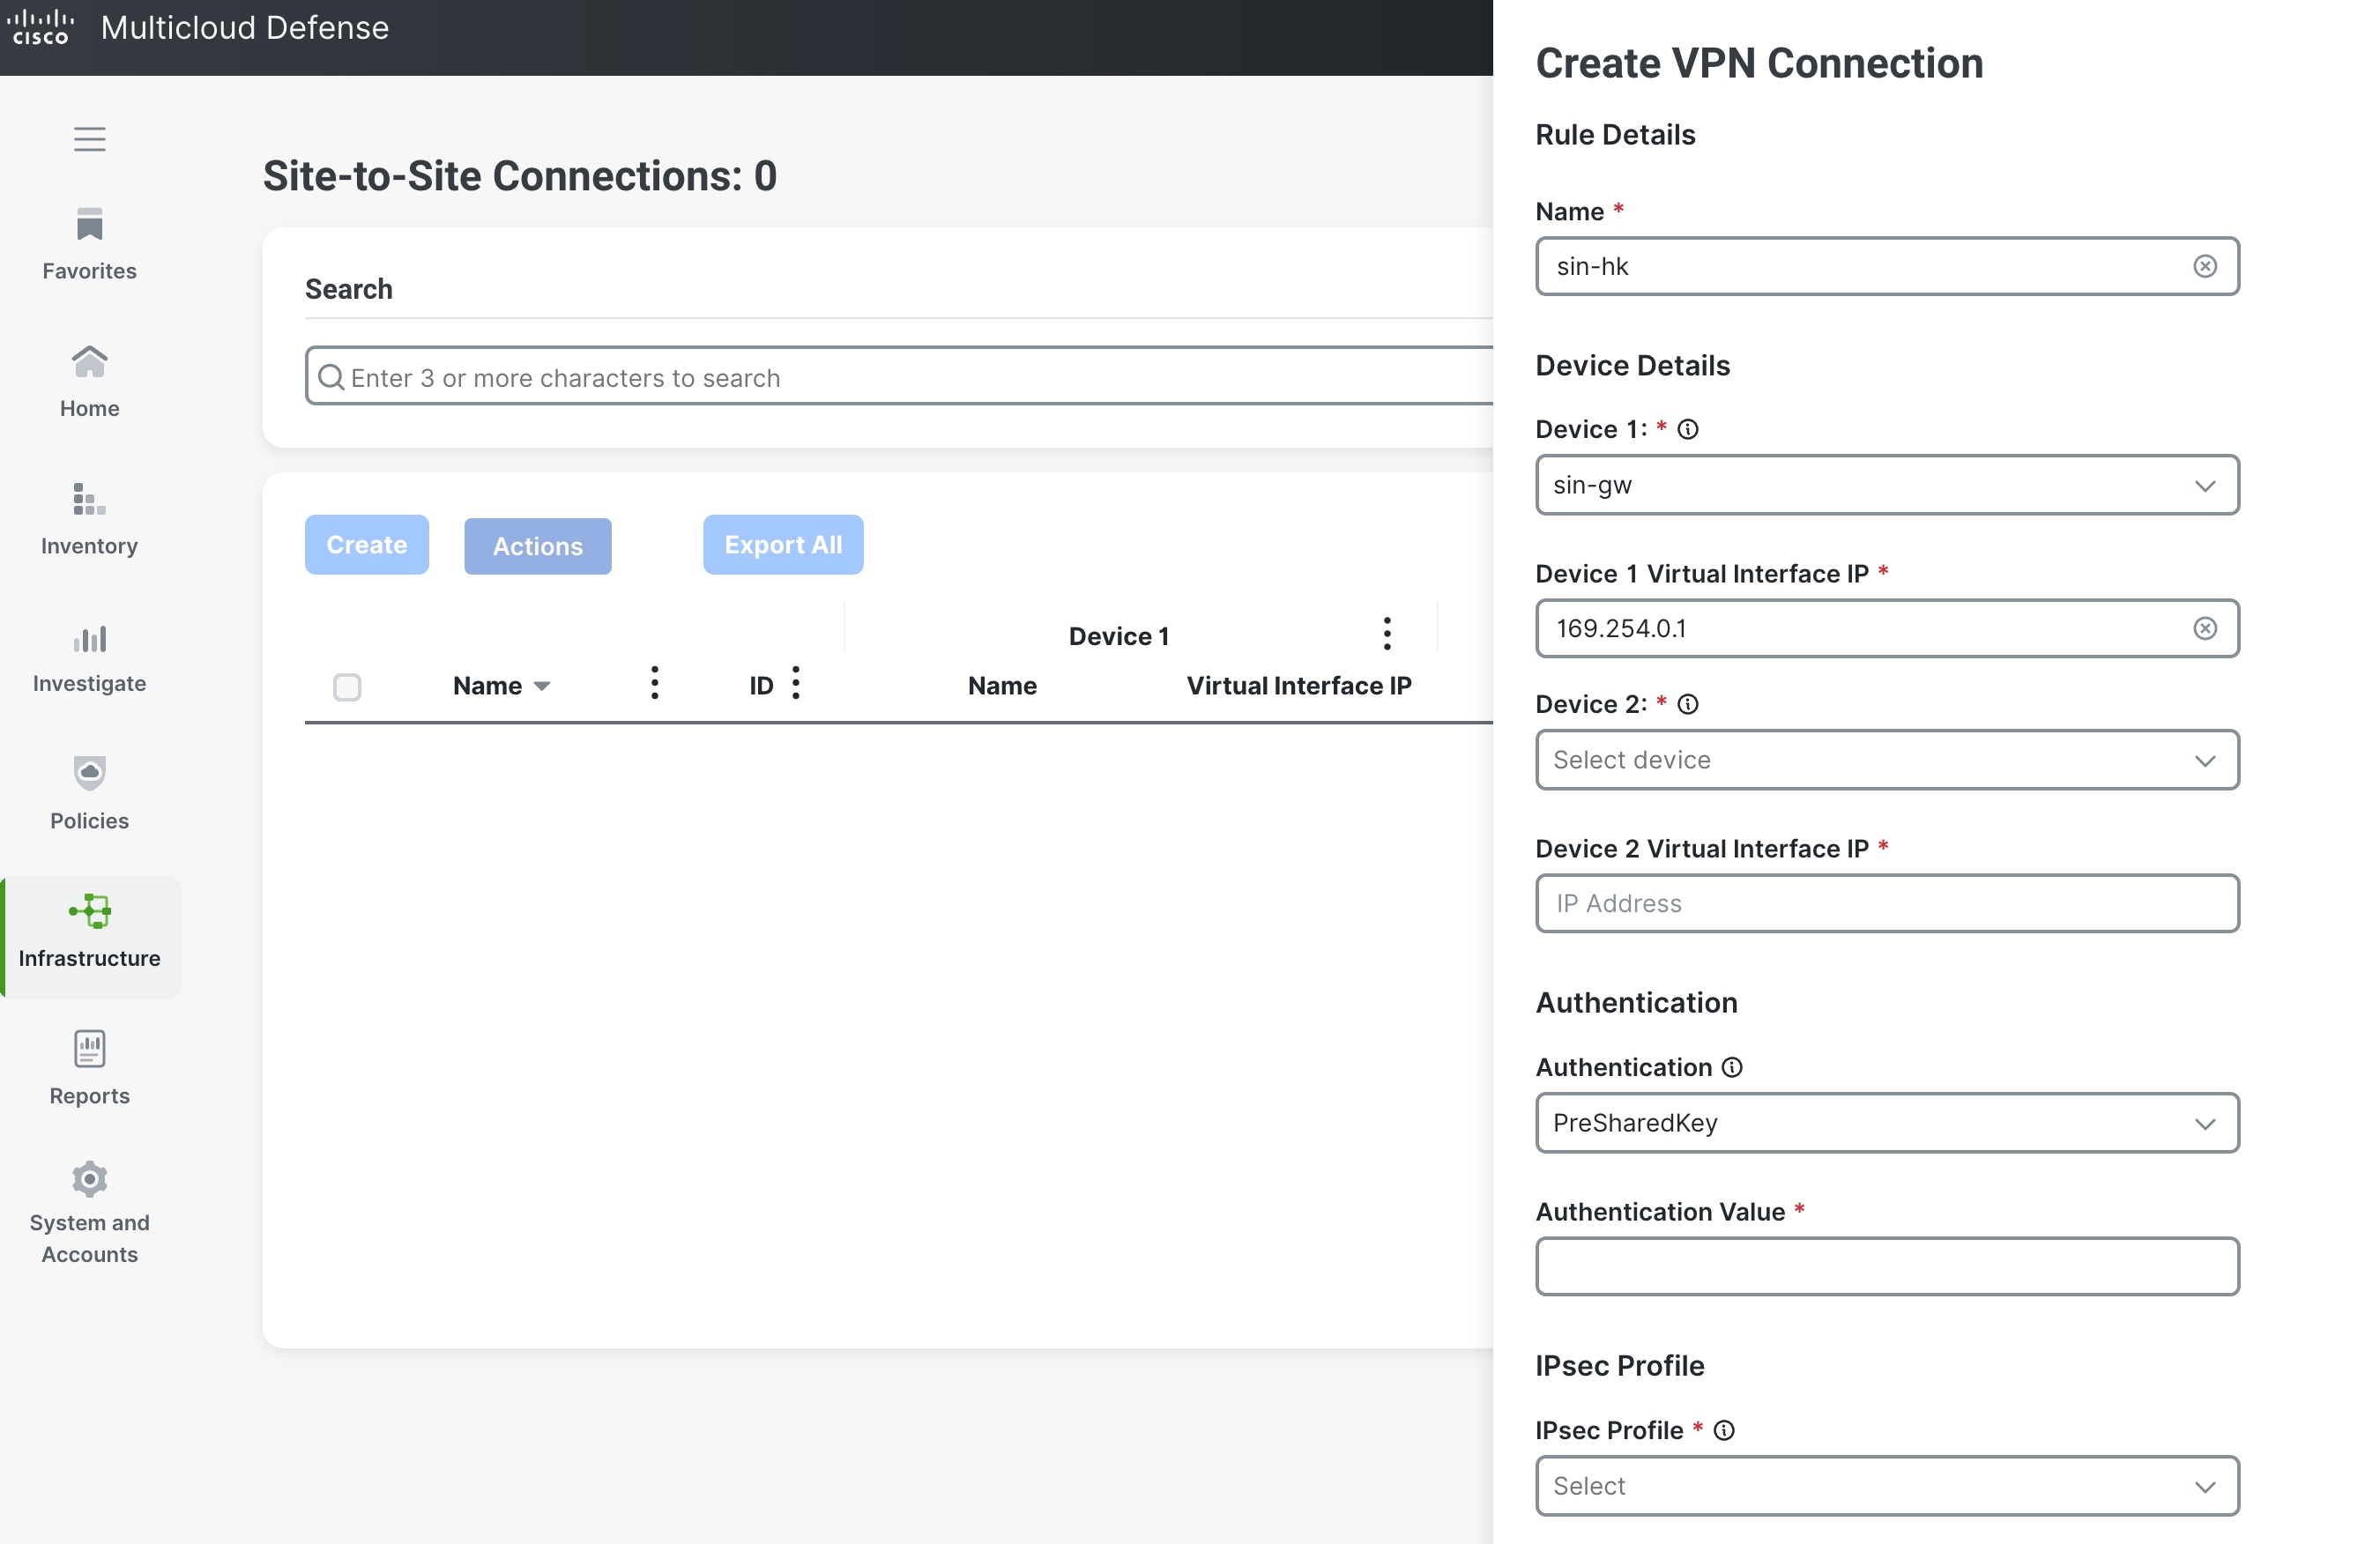
|
|
Step 4 |
Under Device Details, from the Device 1 drop-down list, choose a Multicloud Defense Gateway or enter a public IP address of a remote endpoint, for example, |
|
Step 5 |
In the Device 1 Virtual Interface IP field, enter the IP address for Device 1. For example, |
|
Step 6 |
From the Device 2 drop-down list, choose your Multicloud Defense Gateway or manually enter a public IP address of a remote endpoint, for example,
|
|
Step 7 |
In the Device 2 Virtual Interface IP field, enter the IP address for Device 2, for example, |
|
Step 8 |
Enter the authentication value for the tunnel. PreShared Key is the preferred authentication method. |
|
Step 9 |
From the IPSec Profile drop-down list, choose a profile that has already been created. 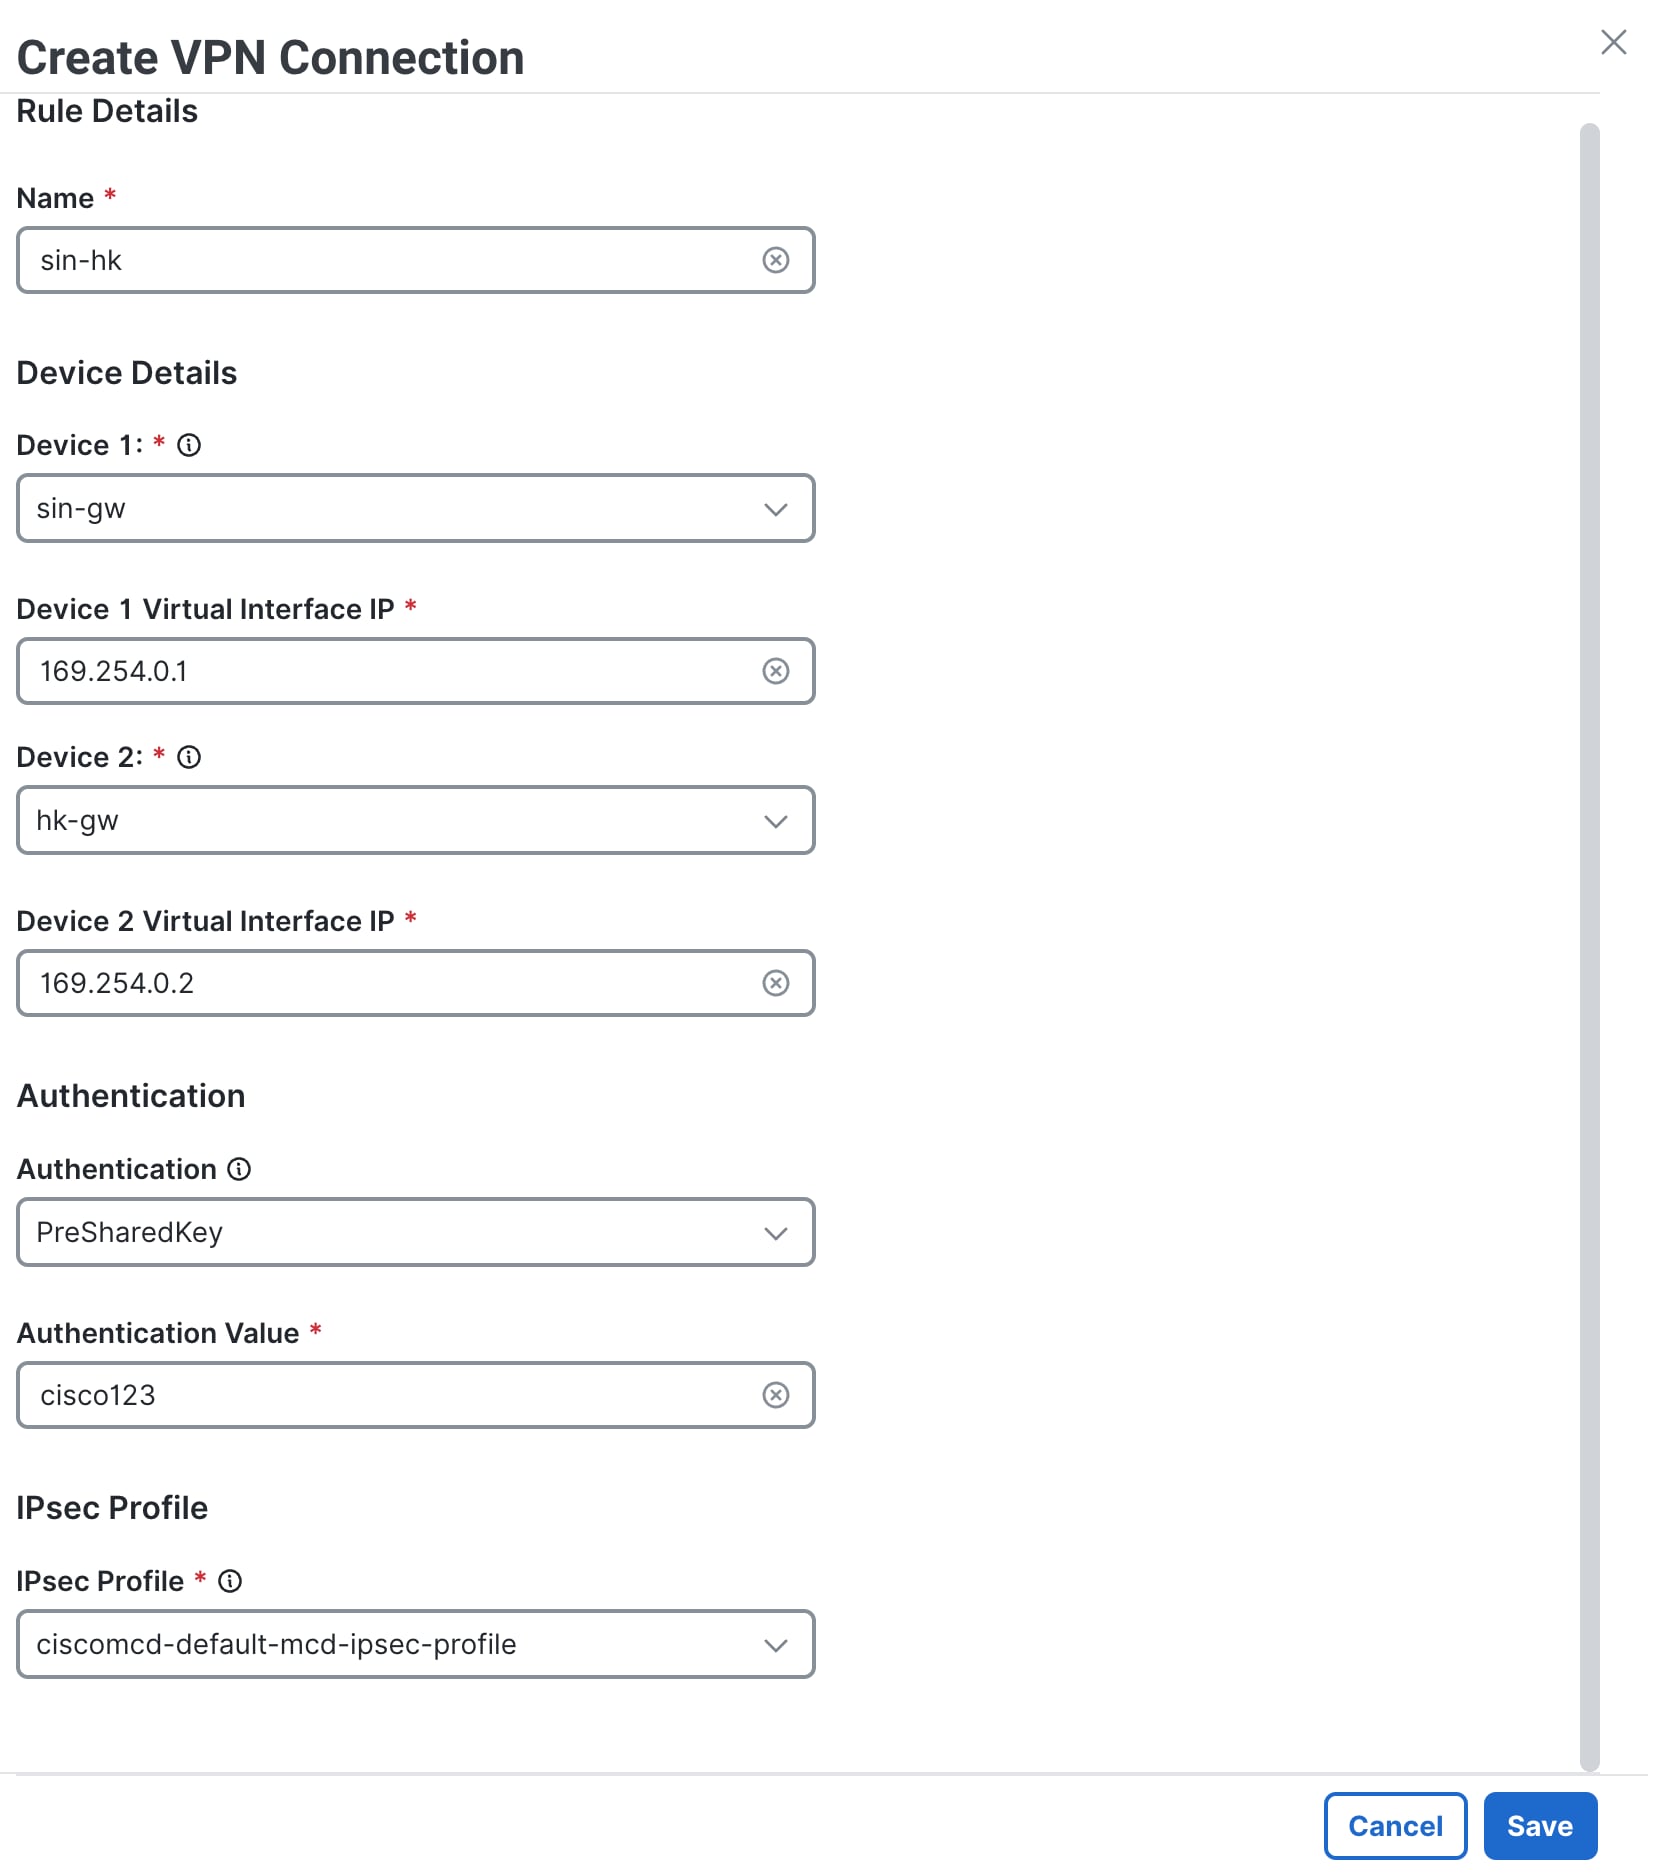
|
|
Step 10 |
Click Save. The site-to-site VPN connection is now established for both the gateways. |
Enable Inventory Monitoring
When a site-to-site VPN is deployed between Multicloud Defense gateways, the traffic that needs to be sent over the VPN is determined by the security rules that you have created in Multicloud Defense. You should use dynamic objects while creating these rules since these rules help the gateway understand what type of traffic needs to be sent over VPN. To achieve this, you must enable Inventory Monitoring.
Procedure
|
Step 1 |
From the Multicloud Defense Controller dashboard, navigate to . |
|
Step 2 |
Select the account and click Manage Inventory. |
|
Step 3 |
In the Inventory Management Regions section, under Regions, select the regions where the protected instances are deployed. The Inventory Monitoring functionality is enabled. |
Set Up Rules for Allowing VPN Traffic
Procedure
|
Step 1 |
From the Multicloud Defense Controller dashboard, navigate to . |
|
Step 2 |
Select a rule set. |
|
Step 3 |
Click Add Rule. Enter a name for the rule, for example, |
|
Step 4 |
(Optional) Provide a Description. |
|
Step 5 |
From the Type drop-down list, choose Forwarding. |
|
Step 6 |
Under Service drop-down list, choose Create Connection. 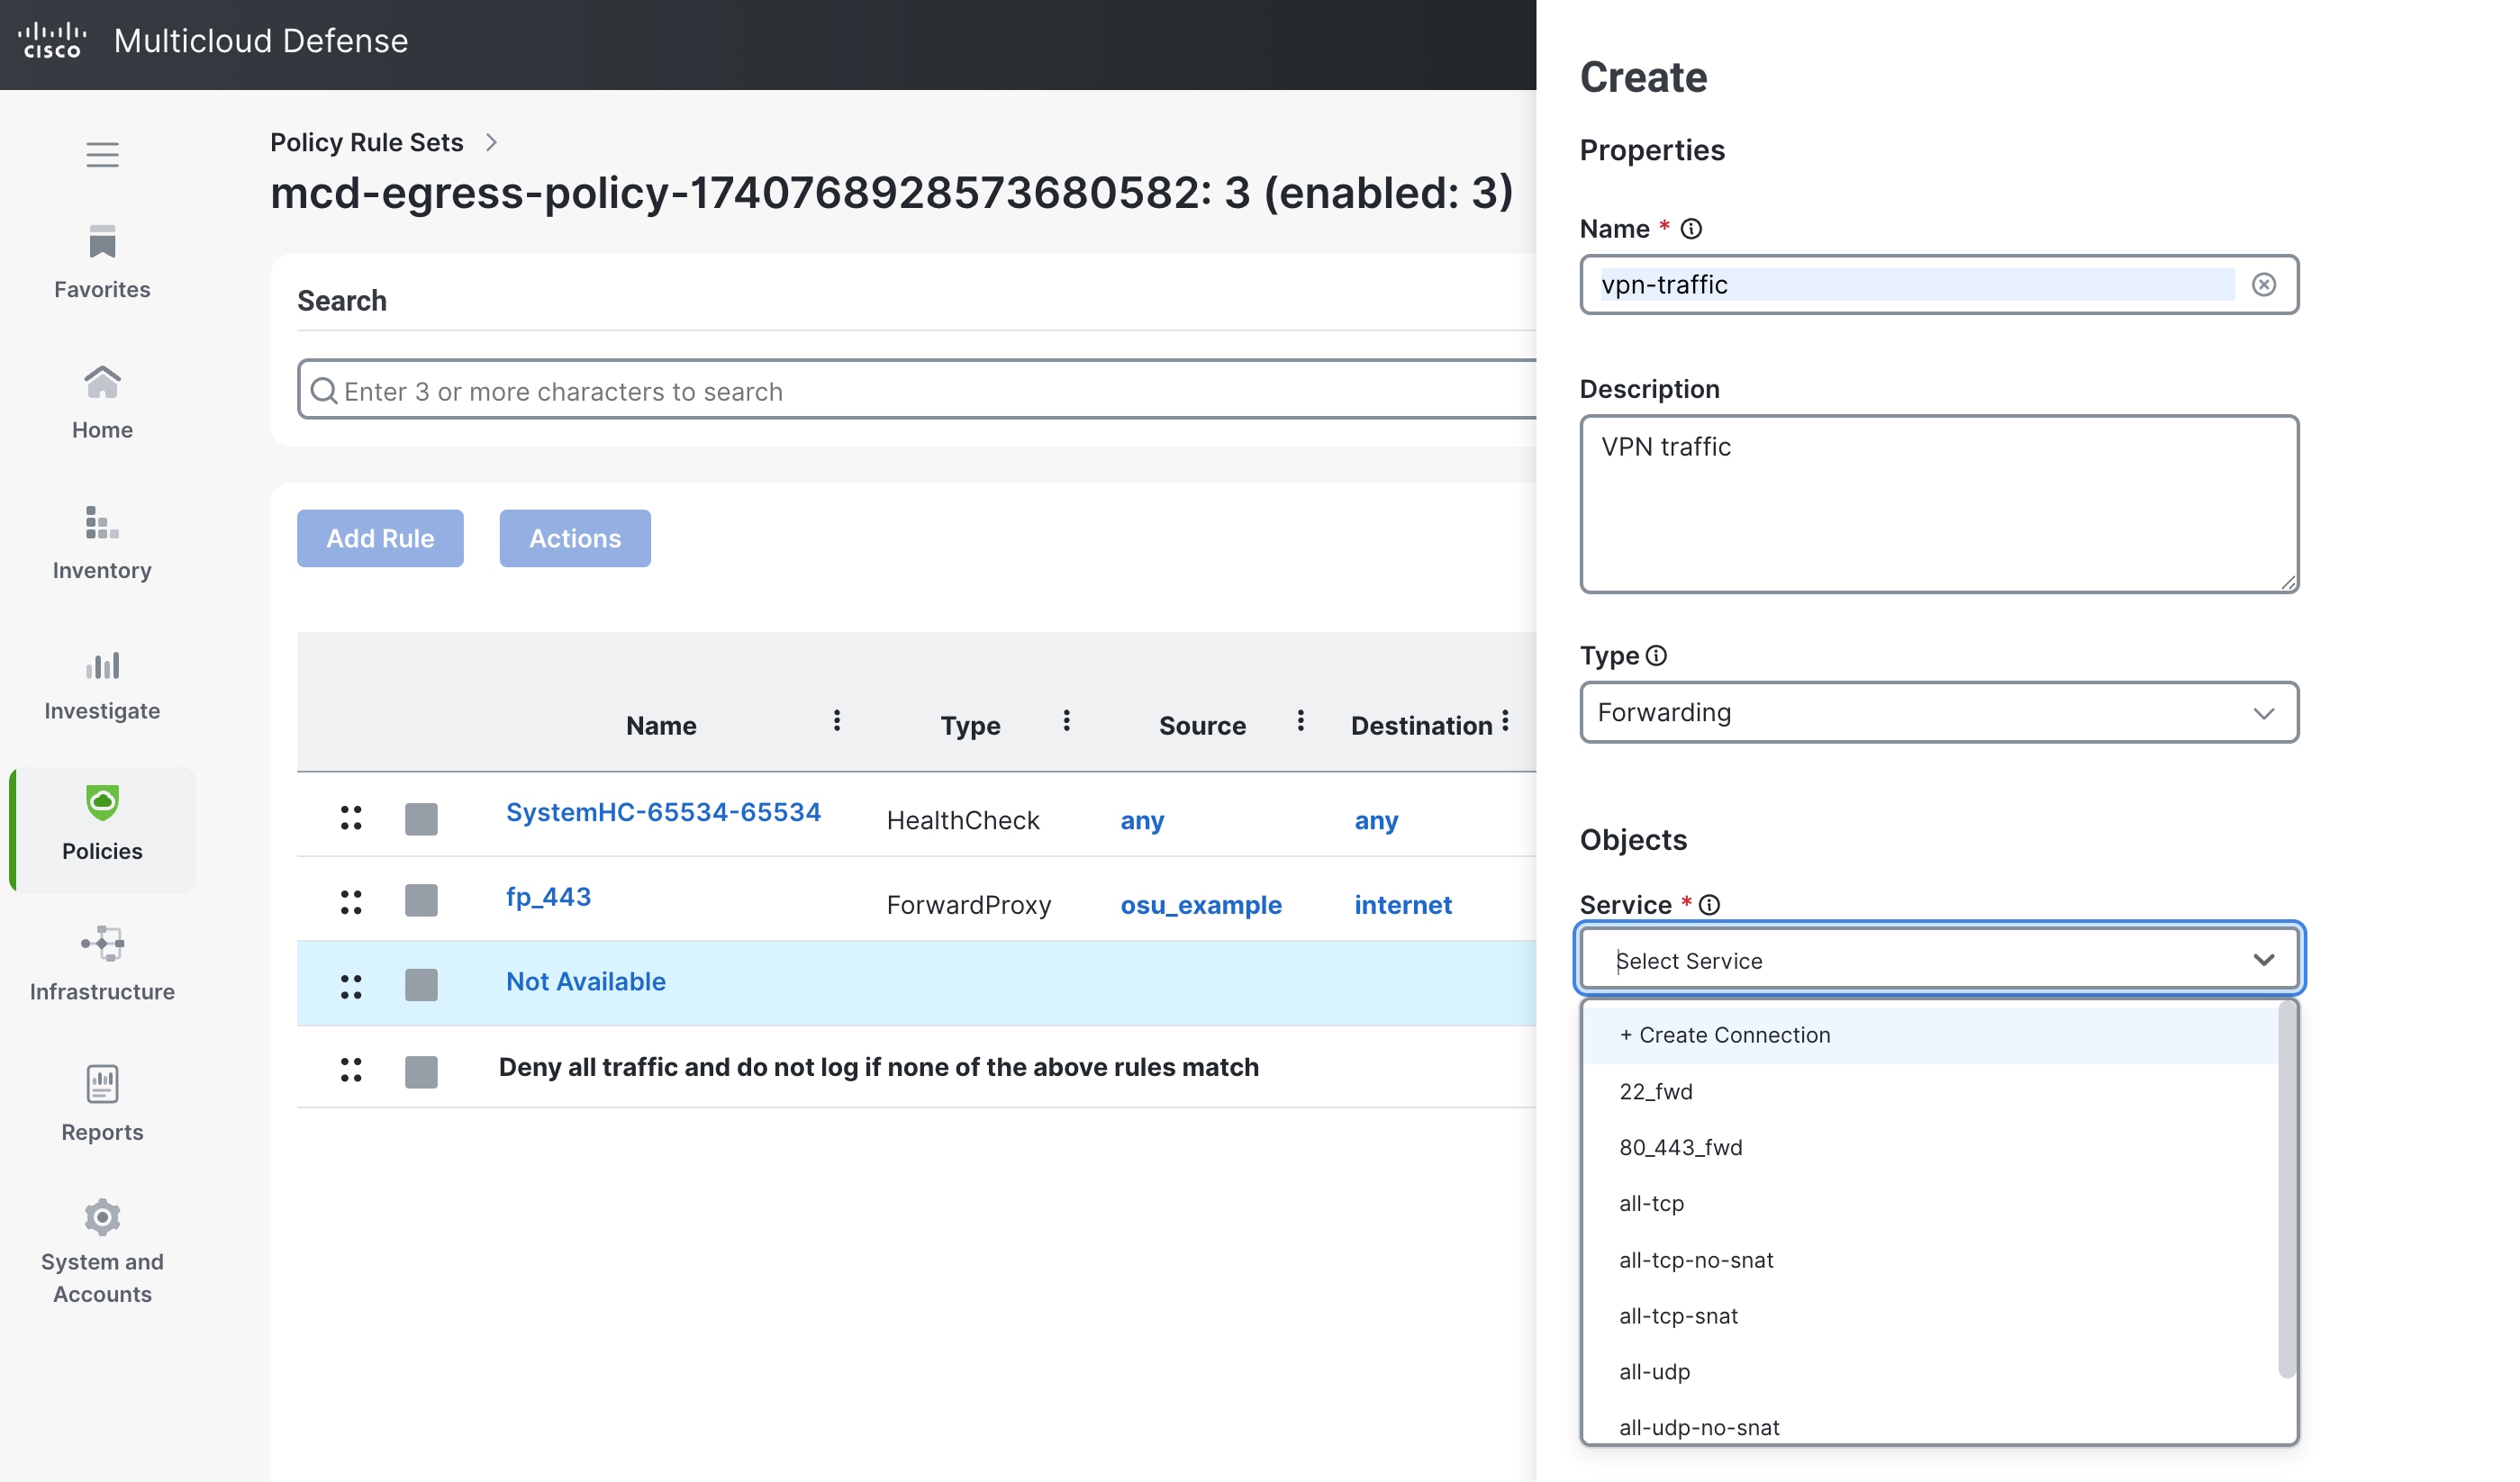
|
|
Step 7 |
Provide a Service Name and Description. |
|
Step 8 |
Enable Source NAT. In AWS gateways, source NAT is required for the gateway to work. |
|
Step 9 |
In Dst port, add the required ports for the forwarding rule, for example, 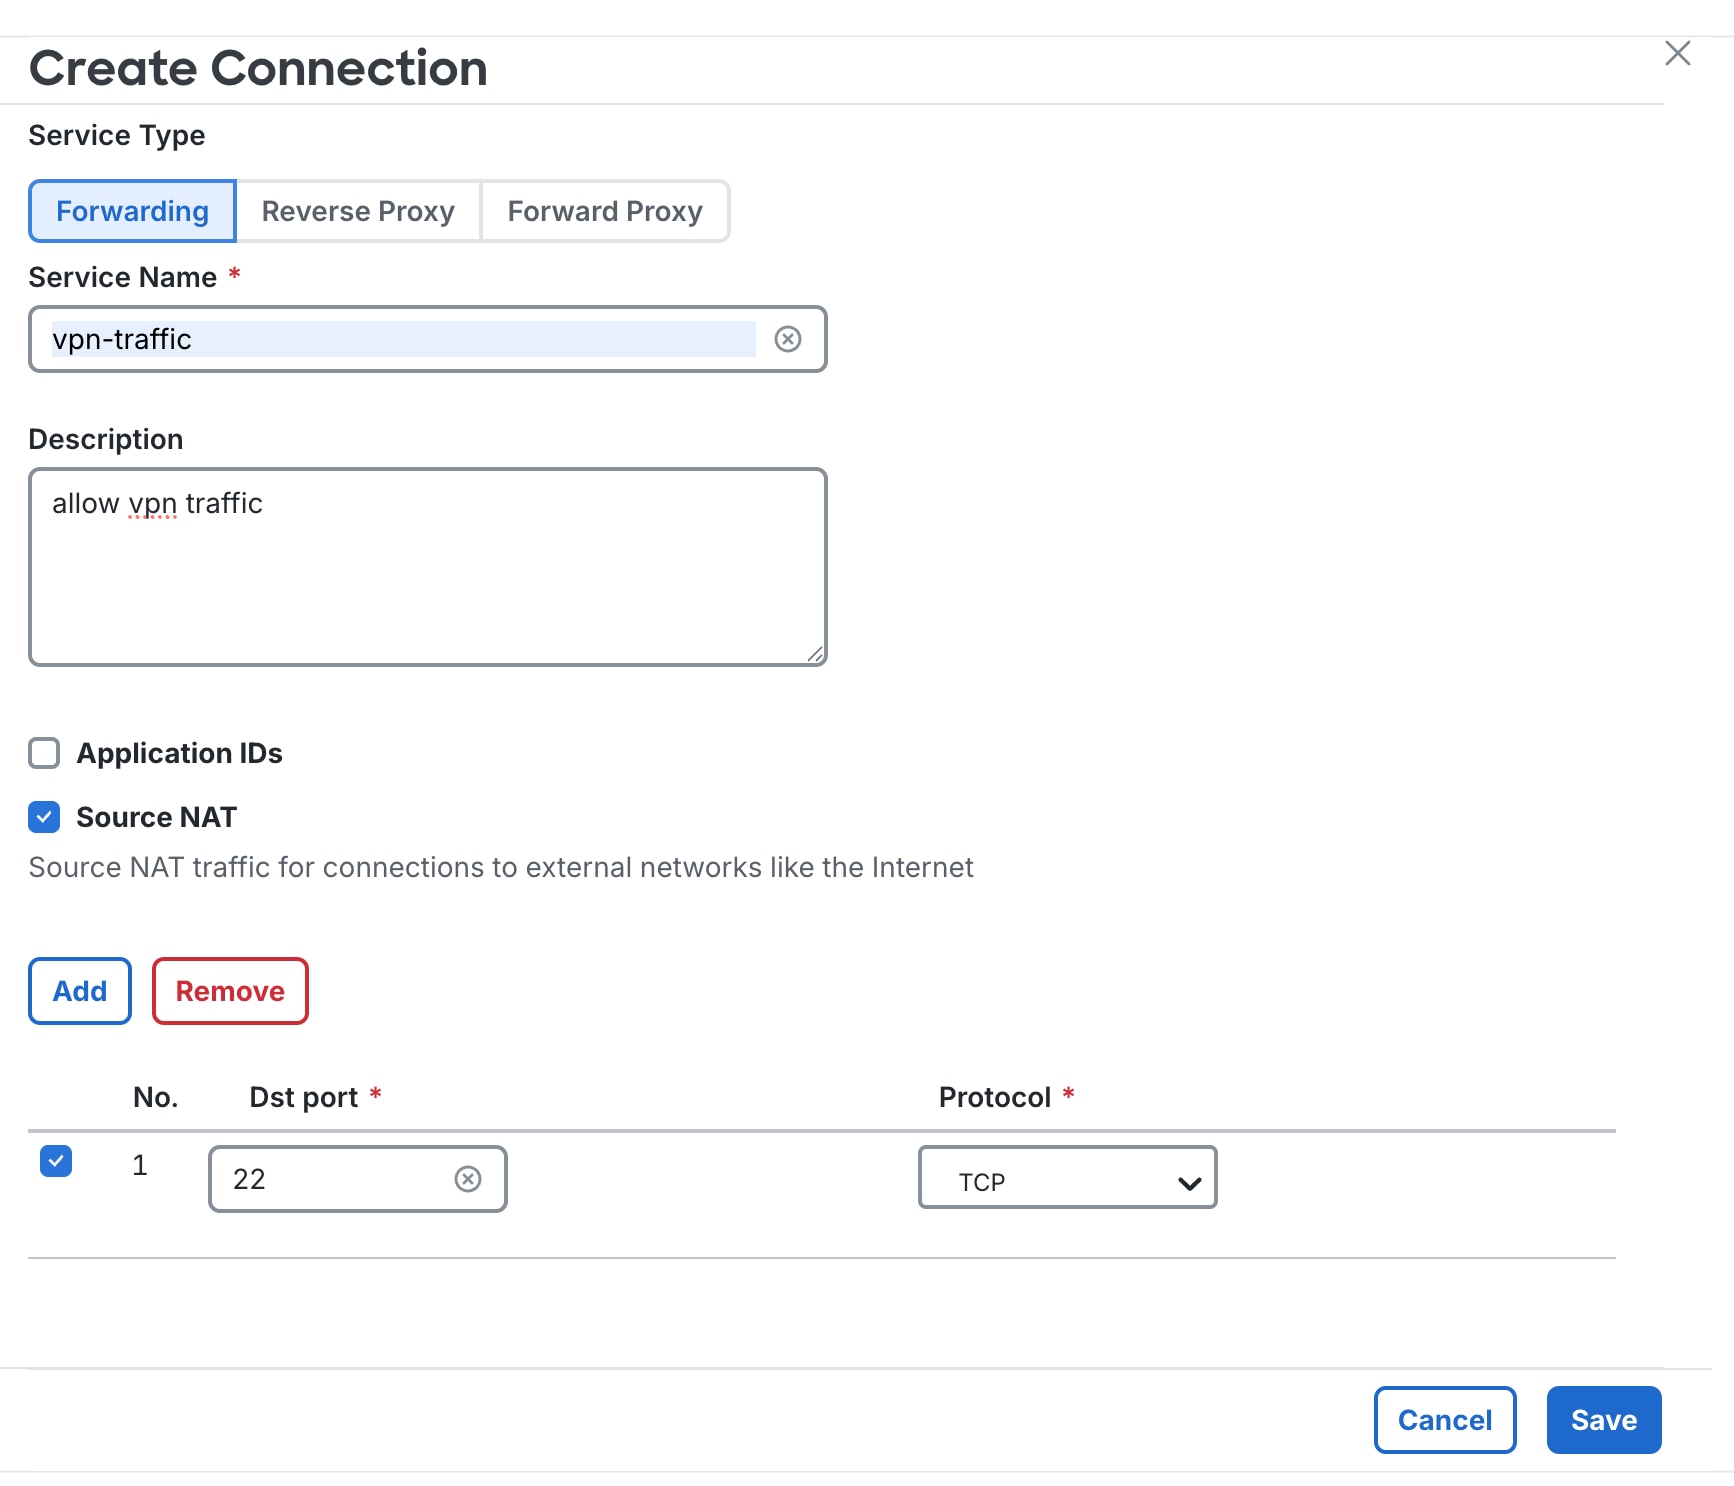
Now, create a source and destination object. Ensure that these are not static objects. For example, create two objects, a
Type Subnet ID for |
|
Step 10 |
From the Source drop-down list, choose Create Address. The Create – Src/Dest window is displayed. |
|
Step 11 |
Enter a Name, for example, |
|
Step 12 |
(Optional) Provide a Description. |
|
Step 13 |
From the Type drop-down list, choose Subnet ID. |
|
Step 14 |
From the CSP Account, Region, VPC/VNet ID, and Subnet ID drop-down lists, choose a value. 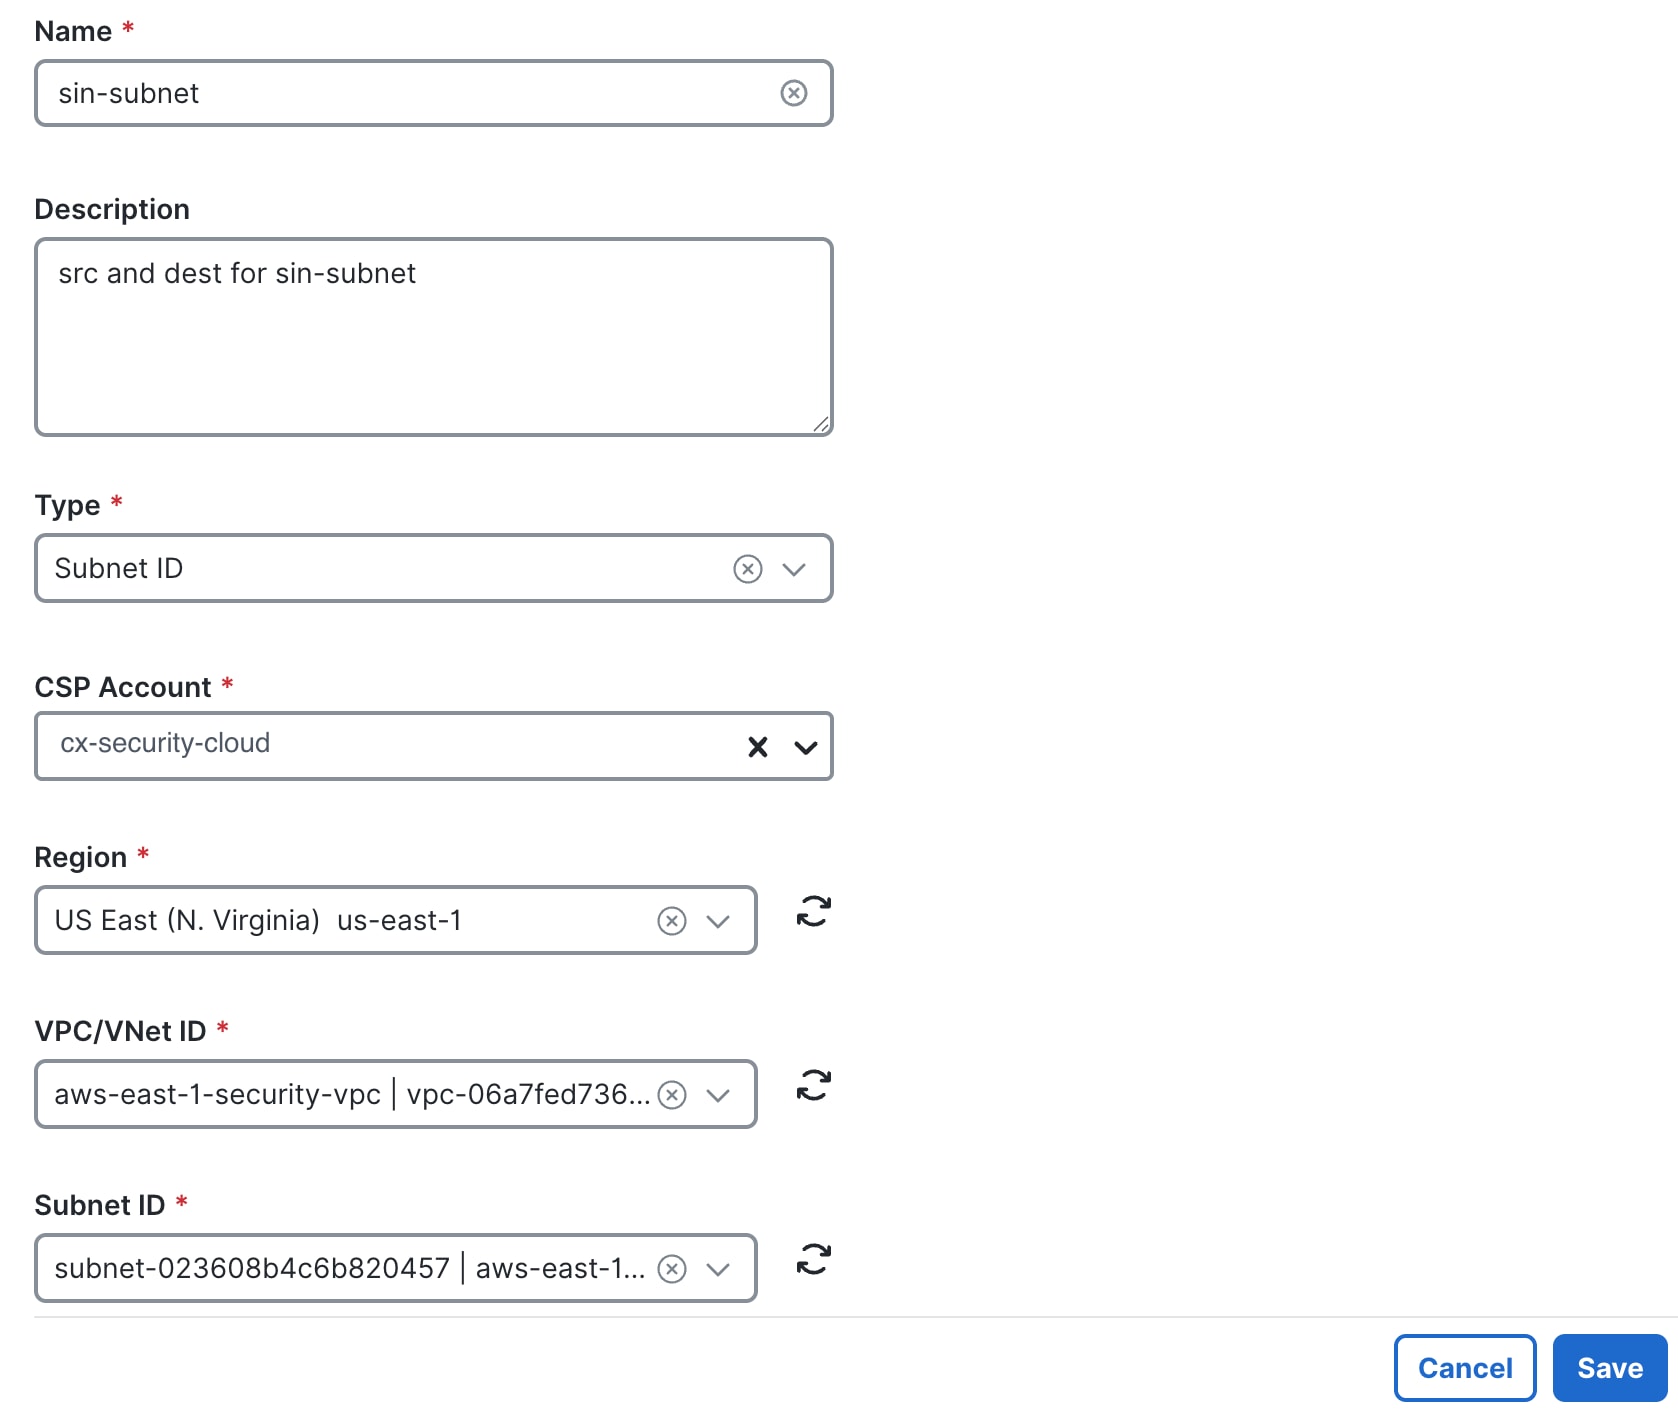
|
|
Step 15 |
Similarly, create a source and destination object for 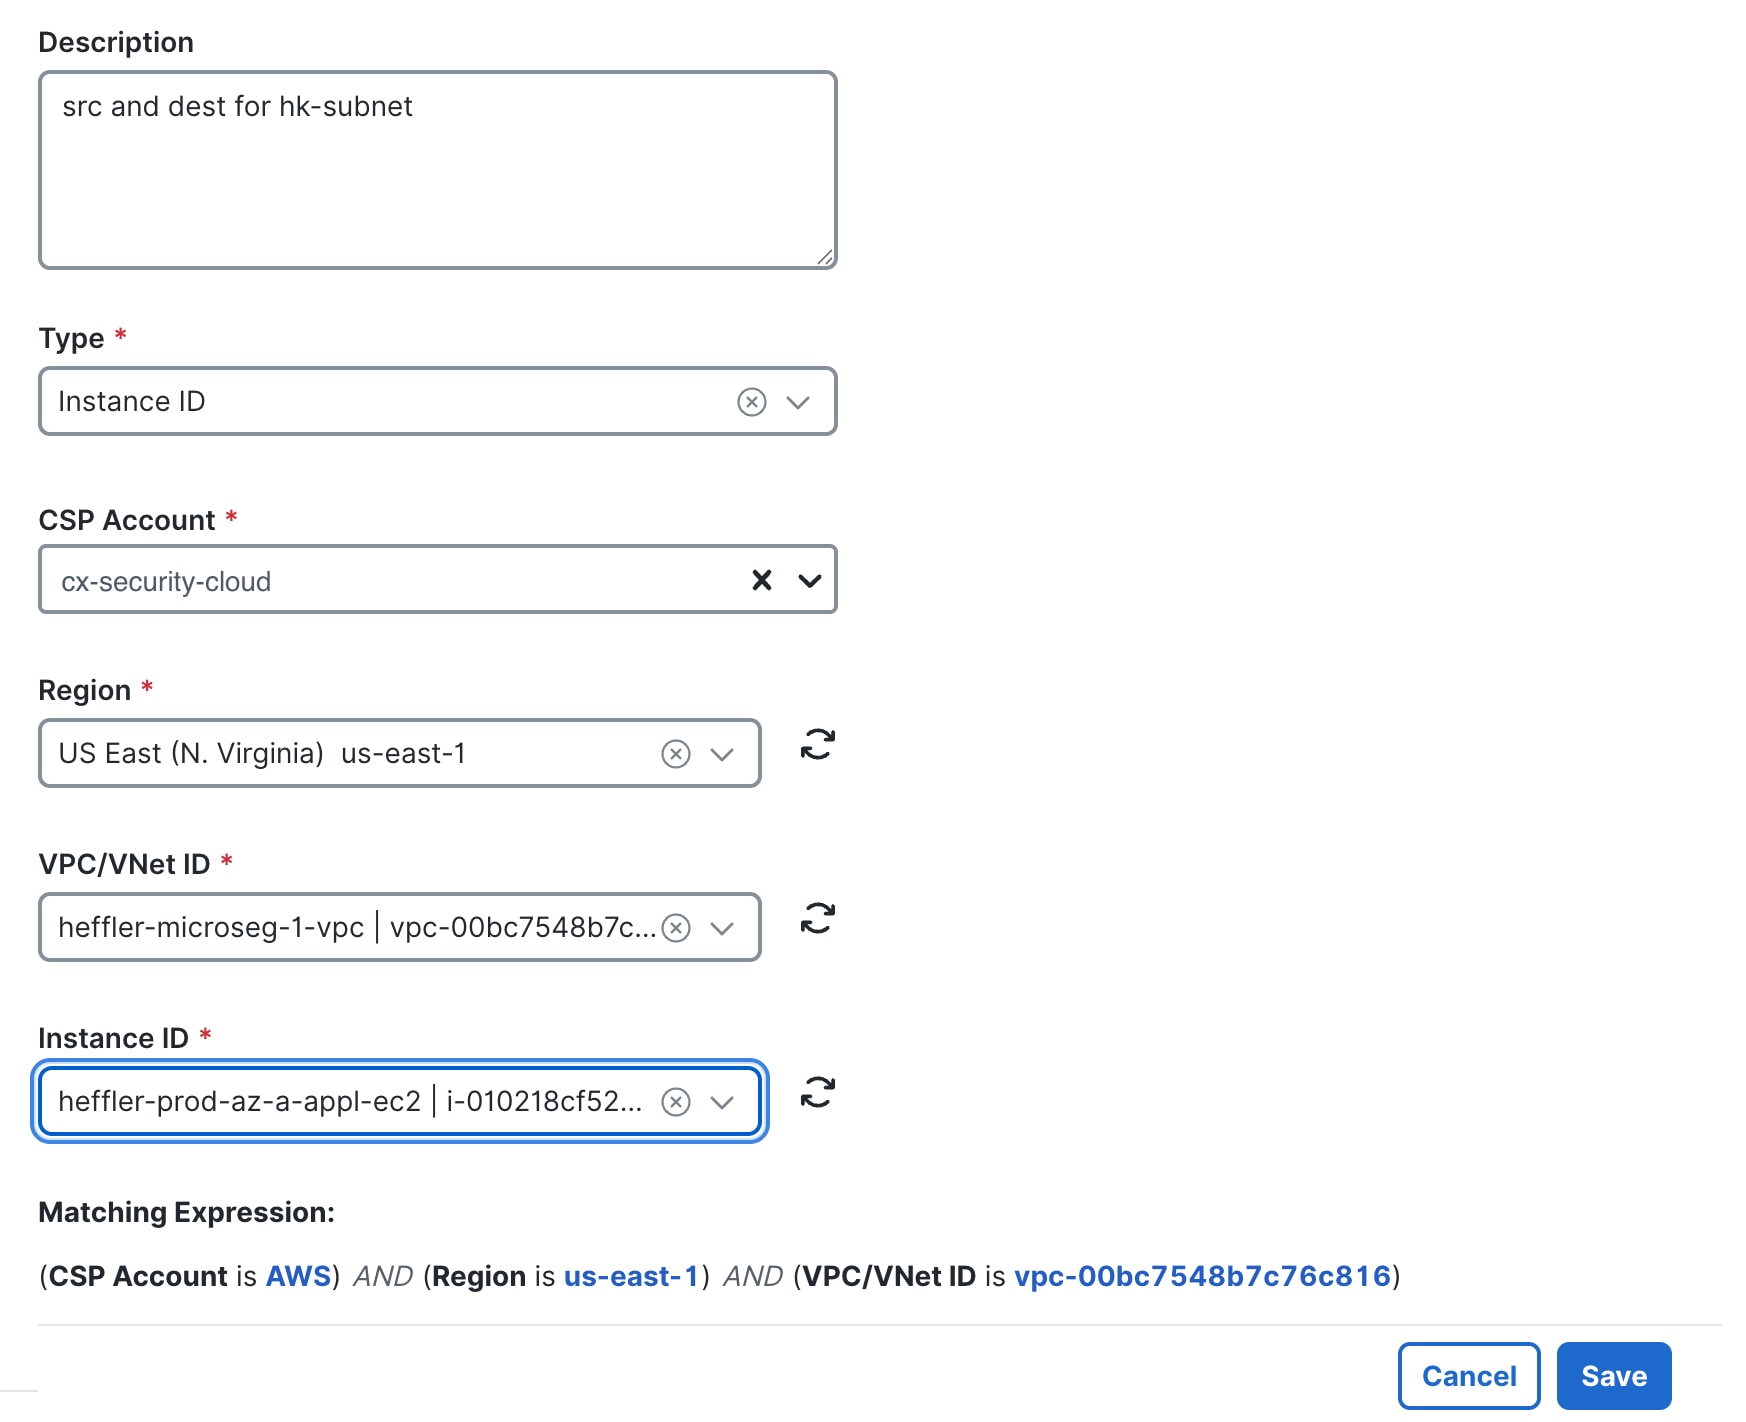
|
|
Step 16 |
Click Save. The address is successfully saved. |
|
Step 17 |
In the Create rule window, from the Action drop-down list, choose Allow Log. |
|
Step 18 |
Click Save. The rule should now allow traffic between the specified sites. |
Validate Site-to-Site VPN Traffic Between AWS-Hosted Multicloud Defense Gateways
You will now be able to see the traffic flow from site A to site B. Similarly, if you have configured the rules in reverse order, you can view the traffic flow from site B to site A in Multicloud Defense.
Troubleshooting Site-to-Site VPN Traffic Between AWS-Hosted Multicloud Defense Gateways
VPN status logs can be seen under . This helps you to determine when the VPN disconnects and reconnects again. VPN-specific logs are available in the diagnostics file.
If you face issues with connectivity between the site-to-site VPN, you can retry the configurations and tasks as outlined in this use case document or view the additional resources listed in the next section. For further assistance, contact Cisco Technical Assistance Center.
Additional Resources for Site-to-Site VPN
Know more about AWS or site-to-site VPN in Multicloud Defense using these additional resources.
 Feedback