
Manage Security Policies for SD-Routing Devices from Security Cloud Control, Release 17.18.x
Cisco SD-WAN Manager and Security Cloud Control
Cisco Security Cloud Control is a security platform that allows you to manage your security products and achieve security outcomes from a single integrated interface.
Security Cloud Control helps you optimize your security policies by identifying inconsistencies with them and by giving you tools to fix them. Security Cloud Control also gives you ways to share objects and policies, as well as make configuration templates, to promote policy consistency across devices.
Within Security Cloud Control, user and group management occurs at the platform level. Roles are assigned to these users and groups to define their privileges for administering Security Cloud Control and the integrated products.
Integration between Cisco SD-WAN Manager and Security Cloud Control
The integration of Security Cloud Control with Cisco SD-WAN Manager enables centralized management of Cisco SD-WAN environments, thereby allowing organizations to efficiently configure, monitor, and enforce security policies across networks. This integration also facilitates advanced troubleshooting, rule optimization, and change management on the Cisco SD-WAN Manager.
This integration allows you to:
- Manage objects and policies: You can create and manage security objects and NGFW policies that can be shared across devices and policies.
- Search objects: You can search security objects across devices using the global search functionality.
- Identify existing configurations: You can identify existing security configurations and policies through the onboarded Cisco SD-WAN Manager.
- View logs and analytics: You can view all the logs and analytics data pertaining to your security objects and policies from the Security Cloud Control interface.
When the Cisco SD-WAN Manager is integrated with Security Cloud Control, it connects to Cisco SD-WAN manager and automatically imports all the objects, such as existing New Gen Firewall (NGFW) policies, security objects, and security policies that are already configured in Cisco SD-WAN Manager.
Once the integration is successful, Security Cloud Control normalizes and stores these policy objects locally. SD-WAN relinquishes the ownership of these objects to Security Cloud Control. All the policy objects will be locked in Cisco SD-WAN Manager. You can only create and update shared policy objects on the SD-WAN Manager. You cannot manage the security policies and objects from the Cisco SD-WAN Manager.
You can modify these NGFW parameters or create new ones directly from Security Cloud Control. All changes made in Security Cloud Control are synchronized and saved in Cisco SD-WAN Manager.
Managing NGFW policies and objects using Security Cloud Control
Managing NGFW capabilities of Catalyst SD-WAN through Security Cloud Control helps streamline and centralize security management across Cisco's security products.
The topology diagram illustrates the integration of Catalyst SD-WAN with Security Cloud Control and other cloud services. It shows the flow of information and interactions between various components.
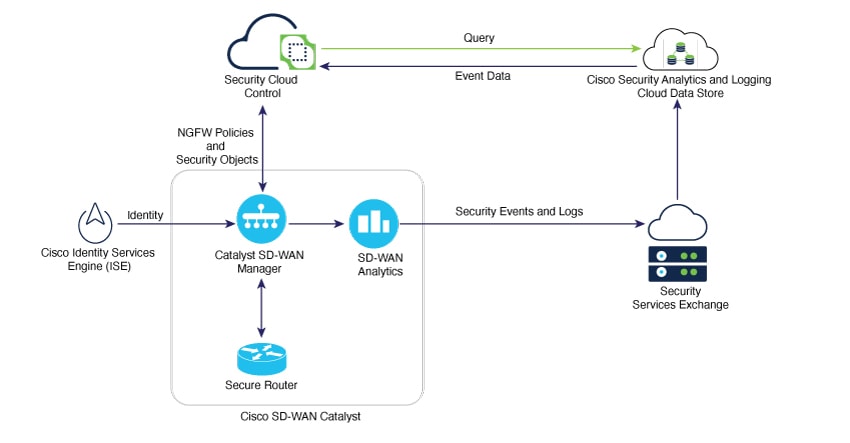
- Cisco Identity Services Engine (ISE): Provides identity information to the Security Cloud Control.
- Security Cloud Control: A central point for security policy enforcement and event correlation. This component receives the identity information from ISE, reads NGFW policies and security objects from the onboarded Catalyst SD-WAN Manager, and empowers you to modify your NGFW configurations. Security Cloud Control also sends queries to Cisco Security Analytics and Logging cloud data store for events.
-
Cisco SD-WAN Catalyst: This component consists of:
- Catalyst SD-WAN Manager: Manages the SD-WAN fabric and shows NGFW policies and security objects on the Security Cloud Control when onboarded to it. The Catalyst SD-WAN Manager sends the event data received from the Secure Router to SD-WAN Analytics.
- SD-WAN Analytics: Provides analytics data to the Security Services Exchange.
- Secure Router: The SD-Routing edge device.
Summary
The integration of Security Cloud Control with Cisco SD-WAN Manager involves onboarding, managing, and deploying security policies to secure router devices. See this illustration which shows the end-to-end workflow to manage the firewall capabilities of Catalyst SD-WAN Manager using Security Cloud Control.
Workflow
This section describes the stages of Security Cloud Control integration with Cisco SD--WAN Manager and other components.
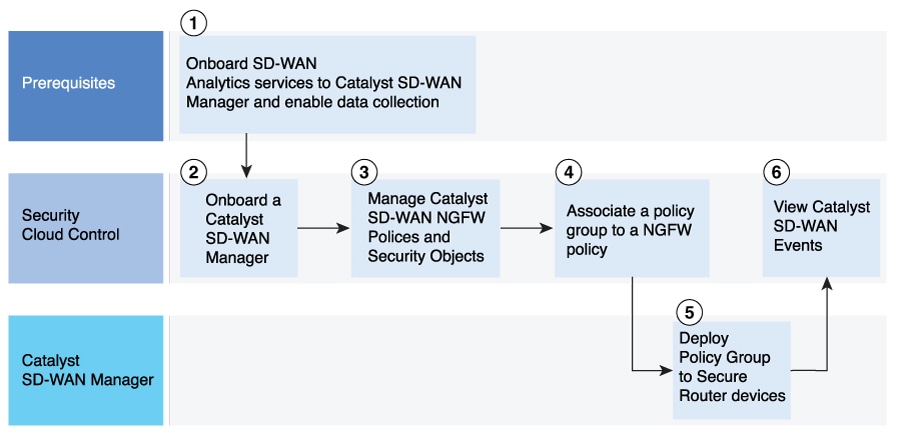
- Onboard the SD-WAN Analytics services to the Cisco SD-WAN Manager and enable data collection.
- In Security Cloud Control, onboard Cisco SD-WAN Manager that also imports all the associated Secure Router devices.
- In Security Cloud Control, create security objects such as policies, objects, and security profiles. From this dashboard, you can also edit and delete the security objects that you created.
- In Security Cloud Control, associate the NGFW policy to a Policy Group.
- From Cisco SD-WAN Manager, deploy Policy Group to your device.
-
In Security Cloud Control, view the security events received from Cisco SD-WAN Manager by using Security Analytics and Logging for monitoring and threat detection.
 Note
NoteAfter Cisco SD-WAN Manager is onboarded to Security Cloud Control, the management of policies, objects, and profile can no longer be performed through the Cisco SD-WAN Manager. Instead, these management tasks must be carried out exclusively from Security Cloud Control.
Policies are created using Security Cloud Control but stored only in Cisco SD-WAN Manager.
Prerequisites
Before you perform the integration between Cisco SD-WAN Manager and Security Cloud Control, ensure you have completed the items listed in the table.
|
Before you begin |
More information |
|---|---|
|
Ensure you have Cisco SD-Routing running on Cisco IOS XE 17.18.1a at a minimum. |
Go to the software download page to download the Cisco IOS XE 17.18.1a image. |
|
Enable cloud services in Cisco SD-WAN Manager. |
|
|
Onboard Cisco SD-WAN Analytics services to Cisco SD-WAN Manager and enable data collection. |
See Onboard a Cisco SD-WAN Manager on Security Cloud Control. |
|
Have either an Admin or Super Admin role on Security Cloud Control. |
To learn how to assign roles to users, see Managing Roles. |
|
Register Security Cloud Control to Cisco SD-WAN Manager in offline mode. |
Cisco Catalyst SD-WAN Self-Service Portal (SSP) assigns a client ID and a client secret for Security Cloud Control. The portal URL is https://ssp.sdwan.cisco.com/. The client ID and client secret is delivered by SSP to Security Cloud Control. |
|
Know the Organization Name of your SD-WAN Manager. |
The Organization Name is a unique identifier and is used to establish secure control connections within the SD-Routing environment. To view the Organization Name, log in to the Cisco SD-WAN Manager and navigate to . |
|
Generate the tenant ID and tenant name. |
Go to https://us.manage.security.cisco.com/provision, choose the region where you want to provision your Security Cloud Control, and select Sign Up. For more information, see Sign in to Security Cloud Control. Your SSP account must have the same Security Cloud Control tenant and Cisco Catalyst SD-WAN tenant. |
|
Have an active smart account. |
The organization to be onboarded in Security Cloud Control must be accessible through your Smart Account and Virtual Account. |
|
Have a valid Security Analytics and Logging subscription plan. |
See Security Analytics and Logging license and Data Storage Plans. |
Restrictions
Refer to this list to know all the restrictions that are applicable when you manage Cisco SD-WAN Manager security objects from Security Cloud Control.
- Cisco SD-WAN Manager can be deployed either on-premises or hosted in the Cisco cloud. To function properly, it must have cloud connectivity. If Cisco SD-WAN Manager is placed behind a NAT device, it is supported, but with restrictions. Specifically, only port 443 (HTTPS) needs to be open to enable cloud connectivity.
- To make changes in the NGFW policies, objects, and profiles from the Cisco SD-WAN Manager, you must deboard it from Security Cloud Control.
- Security profiles do not support IPS policies (Signature set objects) that are editable or customized.
- Live logs cannot be viewed on Security Cloud Control using Cisco Security Analytics and Logging (SAL). You can only view historical events.
- Exercise caution when changing user role privileges on Cisco SD-WAN Manager for users who are part of Security Cloud Control. Modifying privileges for Security Cloud Control-associated users can result in configuration failures.
- On-premises multitenant deployments of Cisco SD-WAN Manager 20.18.1 are not supported in Security Cloud Control. Only single-tenant SD-WAN Manager deployments are compatible with Security Cloud Control.
- It is recommended not to enable Dark mode in Security Cloud Control when Cisco SD-WAN Manager is integrated.
Onboard a Cisco SD-WAN Manager to Security Cloud Control
Perform these steps to onboard Cisco SD-WAN Manager to Security Cloud Control.
Step 1 | Log in to Security Cloud Control tenant with your SSP account credentials. |
Step 2 | In the left pane, choose . |
Step 3 | On the top right corner of the page, click the Plus icon or the Onboard Services icon. |
Step 4 | In the Select an integration page, choose Catalyst SD-WAN Manager. |
Step 5 | From the Select Organization drop-down list, choose an organization. The organizations displayed in the list are based on the region where the Security Cloud Control is deployed. |
Step 6 | In the Create label field, enter your desired label and click Connect. NoteLabels are applied to the device after it is onboarded to Security Cloud Control. Labels allow you to group devices and filter them in the Security Devices page. |
Step 7 | Click Close after verifying the details of the Cisco SD-WAN Manager you are onboarding. In the Services page, the Catalyst SD-WAN tab displays the onboarded manager. |
After a successful onboarding, you can view all the security objects, security profiles, and NGFW policies in the Security Cloud Control screen. These imported policies are available in .
You can also view a "Managed by Security Cloud Control (SCC)" banner on the Cisco SD-WAN Manager that is onboarded to Security Cloud Control.
What to do next
In the Management pane on the right, click Devices to see the onboarded devices.
You can now create new Catalyst SD-WAN security objects and security profiles from Security Cloud Control.
Manage Cisco SD-WAN security objects and policies
Create an object
Perform the steps in this task to create a new security object in Security Cloud Control.
Step 1 | Log in to the Security Cloud Control platform. |
Step 2 | From the left navigation, choose . |
Step 3 | Click Catalyst SD-WAN. |
Step 4 | Click the + sign on the right corner to create an object. |
Step 5 | Choose the object type from the Object drop-down list. Choose one of the object types from this list. Choose from:
|
Step 6 | In the Add Object pop-up window, configure the object details and settings, and click Save. |
Filter objects
Perform these steps to filter security objects in Security Cloud Control. You can filter the objects by object type, you can filter shared objects by their values, and filter objects based on usage and duplicate status.
Step 1 | In the Security Cloud Control left pane, go to In the Objects page, you can view the dashboard with all the objects listed. |
Step 2 | Click the filter icon. |
Step 3 | From the drop-down list, click the filter icon to filter the objects by object type or filter type. You can use filters to search for the desired objects and further refine the results by typing the object name, IP address, or port number to narrow down the search within the results. |
Create a new policy
NGFW security policies in Cisco SD-WAN Manager are a set of rules and configurations designed to protect systems, networks, and data from unauthorized access, misuse, or threats. Cisco SD-WAN Manager provides a comprehensive framework for implementing and managing NGFW security policies.
Perform these steps to create a new security policy for Cisco SD-WAN Manager from Security Cloud Control.
Step 1 | In the Security Cloud Control platform, choose . | ||||||||
Step 2 | In the left pane, click . | ||||||||
Step 3 | On the Catalyst SD-WAN NGFW Policies page, click Add NGFW Policy. | ||||||||
Step 4 | On the Security Policy Name tab, enter the details for these fields:
| ||||||||
Step 5 | Click Next. | ||||||||
Step 6 | On the Select the optional Configuration Group to associate with the security policy page, choose the configuration group to associate with the NGFW policy and click Next. | ||||||||
Step 7 | Click Save. |
The system displays the options to create a sub-policy. Proceed with the next task in this document if you want to create a sub-policy.
Create a sub policy
Perform these steps to create a sub-policy for your security policy, from Security Cloud Control platform.
Step 1 | In the Security Cloud Control platform, choose . | ||||||||||||||||||||||||||||||
Step 2 | In the left pane, choose . | ||||||||||||||||||||||||||||||
Step 3 | Click the policy for which you want to create the sub-policy. | ||||||||||||||||||||||||||||||
Step 4 | On the Create Sub-Policy window, click Add Sub Policy. | ||||||||||||||||||||||||||||||
Step 5 | In the Source Zone field, choose the zone that is the source of the data packets. | ||||||||||||||||||||||||||||||
Step 6 | In the Destination Zone field, choose the zone that is the destination of the data packets. | ||||||||||||||||||||||||||||||
Step 7 | On the Add Rule pop-up window that is displayed, configure the rules for your sub policy. This table specifies the fields under each section.
| ||||||||||||||||||||||||||||||
Step 8 | Click Additional Settings and if you want to configure any of these fields:
| ||||||||||||||||||||||||||||||
Step 9 | Click Save. The rule is saved. To modify an existing rule, click the pencil icon next to the rule to Edit, Disable, or Delete the rule. | ||||||||||||||||||||||||||||||
Review and create the policy
Perform this task after you add a Sub-Policy to your firewall policy.
Step 1 | On the Summary window, review all the configuration settings for your firewall policy. |
Step 2 | Click Create NGFW Policy to create the policy. |
Associate a Policy Group with the security policy
Perform these steps to associate a Policy Group with the security policy.
Step 1 | On the SD-WAN Manager main menu, go to Configurations > Policy Groups. |
Step 2 | Select the Policy Group to which you want to associate the security policy. |
Step 3 | From the NGFW drop-down field, select the policy you created. |
Step 4 | Click Save to create an association between the policy and the Policy Group. This association ensures that the NGFW Policy is applied to the Policy Group. |
Step 5 | Select the SD Routing devices on which you want to provision this policy, and click Next. |
Step 6 | Review the workflow and complete the wizard by clicking Deploy, to deploy the Policy Group to the device. Your device is now ready to use the security policy. |
Verifying Security Cloud Control Integration
A "Managed by Security Cloud Control (SCC)" banner displays on the Cisco SD-WAN Manager that is onboarded to Security Cloud Control, indicating a successful integration. This message can be viewed in the Cisco SD-WAN Manager by navigating to the relevant sections:
- For Security Objects and Profiles page, navigate to .
- For NGFW policies, navigate to .
After onboarding a Cisco SD-WAN Manager to Security Cloud Control, you can only view the NGFW policies in that Cisco SD-WAN Manager.
View Cisco SD-WAN Manager events in Security Cloud Control
Cisco SD-WAN Manager shares data about security events and logs with SSX which then shares the data with SAL. Security Cloud Control sends queries to Cisco Security Analytics and Logging (SAL) for event data. Data about connection events are stored in SAL. It sends the events data to Security Cloud Control.
Perform these steps to view Cisco SD-WAN Manager event logs in Security Cloud Control.
Before you begin
- A Security Cloud Control tenant with a valid Security Analytics and Logging subscription plan.
- Onboard the Cisco SD-WAN Manager to the Security Cloud Control tenant where you want to view the security events.
- Onboard the Cisco SD-WAN Analytics services to your Cisco SD-WAN Manager and enable data collection. For more information, see Cisco Security Analytics and Loggin. For more information about the prerequisites, see How Catalyst SD-WAN Router Share Events with Security Cloud Control..
Step 1 | In the Security Cloud Control navigation pane, choose . |
Step 2 | Click the filter icon. |
Step 3 | Scroll to the Catalyst SD-WAN Events section and select the Connection check box. |
What to do next
You can review and analyze connection events and take appropriate actions, such as for events with inspect action.
View audit logs in Cisco SD-WAN Manager
Security Cloud Control records user-related and system-level actions related to objects and policies in Audit Logs. The same changes are captured in the Audit Logs of Cisco SD-WAN Manager.
Using audit logs, you can monitor unauthorized activities such as multiple failed login attempts and excessive logins. You can also configure notifications for unauthorized activity.
In Security Cloud Control, you can monitor change logs, workflows, and jobs. For more information, see Monitor and Report Change Logs, Workflows, and Jobs.
Use this procedure to view audit logs in Cisco SD-WAN Manager.
Step 1 | To view the logs in Cisco SD-WAN Manager, go to . |
Step 2 | Review the Action, Details, Date/Time, and User columns. |
Remove a Cisco SD-WAN Manager from Security Cloud Control
Use this procedure to deboard a Cisco SD-WAN Manager from Security Cloud Control.
Step 1 | In the left pane of Security Cloud Control, choose . |
Step 2 | Choose the Cisco SD-WAN Manager instance you want to delete, and then click Remove SD-WAN Devices. |
Step 3 | Click OK to confirm the action. |