Generating and Installing Certificates

This section describes how to generate and install certificates, and includes the following topics:

Information About Certificates

The following topics provide information on certificates:

Types of Certificates

IoT FND uses the following three types of certificates:

  1. Device Certificate

  2. Web Certificate

  3. CSMP Certificate

Role of Certificates

All communications between the CGR1000, IR800s, IR1800s, C800s, ESR C5921s, IR1100, IR8100, IC3000, IXM, and the Cisco Connected IoT Field Network Director (IoT FND) must be authenticated in both directions through mutual authentication. Before mutual authentication occurs, the Cisco IoT FND and the device must each have a certificate that is signed by the same Certificate Authority (CA). You can employ either a root CA or subordinate CA (sub-CA).

For more information on generating certificates for CGRs, refer to Certificate Enrollment Guide for the Cisco 1000 Series Connected Grid Routers.

Generating certificates for IoT FND also involves generating and loading certificates on the IoT FND TPS Proxy (tpsproxy). After generating the certificates, import them into the storage location on the TPS proxy and IoT FND known as the Keystore.

Keystore

The keystore provides details for a specific system such as IoT FND server or TPS proxy. IoT FND server and TPS server use Java keystore to store their own device certificate and the corresponding private keys that are referenced using an alias.

The following table lists the certificate types used by IoT FND and the keystore location of the certificates:

IoT FND Certificate Type

Keystore Location

Device Certificate

cgms_keystore

Web Certificate

jbossas.keystore

CSMP Certificate

HSM or SSM


Note


By default, the cgms_keystore file does not exist, the file must be created.


The keystore must contain the following information:

  • Cisco SUDI or the device manufacturing certificate.

  • The root CA certificate of the issuing root CA or sub-CA server.

  • The certificate that is generated for FND server or TPS server for TPS (private key for the system).


Note


The IoT FND key and the certificates are stored in cgms_keystore file in the IoT FND server located in /opt/cgms/server/cgms/conf directory.


Generating and Exporting Certificates


Note


The IoT FND certificate encrypts data in the database. Do not lose this certificate! Loss of this certificate results in some database data that will not be able to be decrypted.


Complete the following procedures to generate and export certificates:

Configuring a Certificate Template for IoT FND and IoT FND TPS Proxy Using Microsoft CA

On the CA (or subCA) you must create certificate templates to generate certificates for the IoT FND and TPS proxy.

To create a certificate template:

Procedure


Step 1

Open the Certificate Authority application on a Microsoft CA system operating with the Enterprise edition.

The Certificate Authority application is standard on the above noted Windows Server version.

Step 2

Expand the menu to view the Certificate Templates folder.

Step 3

Right-click Certificate Templates and choose Manage from the context menu.

Step 4

In the right-pane, right-click Computer, choose Duplicate Template from the context menu, and enter NMS.

Step 5

In the Duplicate Template pane, select Microsoft CA Enterprise.

Step 6

Click OK.

Step 7

Click the NMS Properties > General tab, and do the following:

  1. Enter NMS in the Template display name and Template name fields.

  2. Enter an appropriate Validity period, which defines the lifetime of the certificate.

  3. Check the Publish certificate in Active Directory check box.

  4. Click OK.

Step 8

Click the NMS Properties > Extensions tab, and do the following:

  1. Select Application Policies in the Extensions pane.

  2. In the Application Policies pane, verify that Client Authentication and Server Authentication appear in the bottom pane.

  3. Select Key Usage in the Extensions top pane and click Edit.

  4. In the Edit Key Usage Extension pane, clear the Make this extension critical check box.

  5. Click OK.

Step 9

Click the NMS Properties > Request Handling tab, and do the following:

  1. Choose Signature and encryption from the Purpose drop-down menu.

  2. Check the Allow private key to be exported check box.

  3. Click OK.

Step 10

Click the NMS Properties > Security tab, and do the following:

  1. Select Administrator within the Group or user names pane.

  2. For each group or user names item listed (such as authenticated users, administrator, domain administrators, enterprise administrators) check the Allow check box for all permissions (full control, read, write, enroll, autoenroll).

  3. Click OK.

Step 11

Click the NMS Properties > Cryptography tab, and retain the following default settings:

  • Algorithm name: RSA

  • Minimum key site: 2048

  • Cryptographic provider: Requests can use any provider available on the subject computer

  • Request hash: SHA256

Step 12

Click OK.

Step 13

Click the NMS Properties > Subject Name tab, and retain the following default settings:

  • Radio button for Supply in the request radio button selected

  • Check box checked for Use subject information from existing certificates for autoenrollment renewal requests

Step 14

Click OK.

Note


Retain the default settings for the remaining tabs: Superseded Templates, Server, and Issuance Requirements.


Enabling a Certificate Template

To enable the certificate template:

Before you begin

Before you can create a certificate, you must enable the certificate template.

Procedure


Step 1

Configure a certificate template (see Configuring a Certificate Template for IoT FND and IoT FND TPS Proxy Using Microsoft CA).

Step 2

Open the Certificate Authority application on the Windows Server.

Step 3

Expand the menu to view the Certificate Templates folder.

Step 4

Right-click Certificate Templates and choose New > Certificate Template to Issue from the context menu.

Step 5

In the Enable Certificate Templates window, highlight the new NMS template.

Step 6

Click OK.


Generating Certificates for IoT FND and the IoT FND TPS Proxy

Follow the same steps for generating a certificate for IoT FND and for the TPS proxy by using the configuration template that you previously created.


Note


Go through the steps in this section twice: once to generate the IoT FND certificate, and once to generate the TPS proxy certificate.


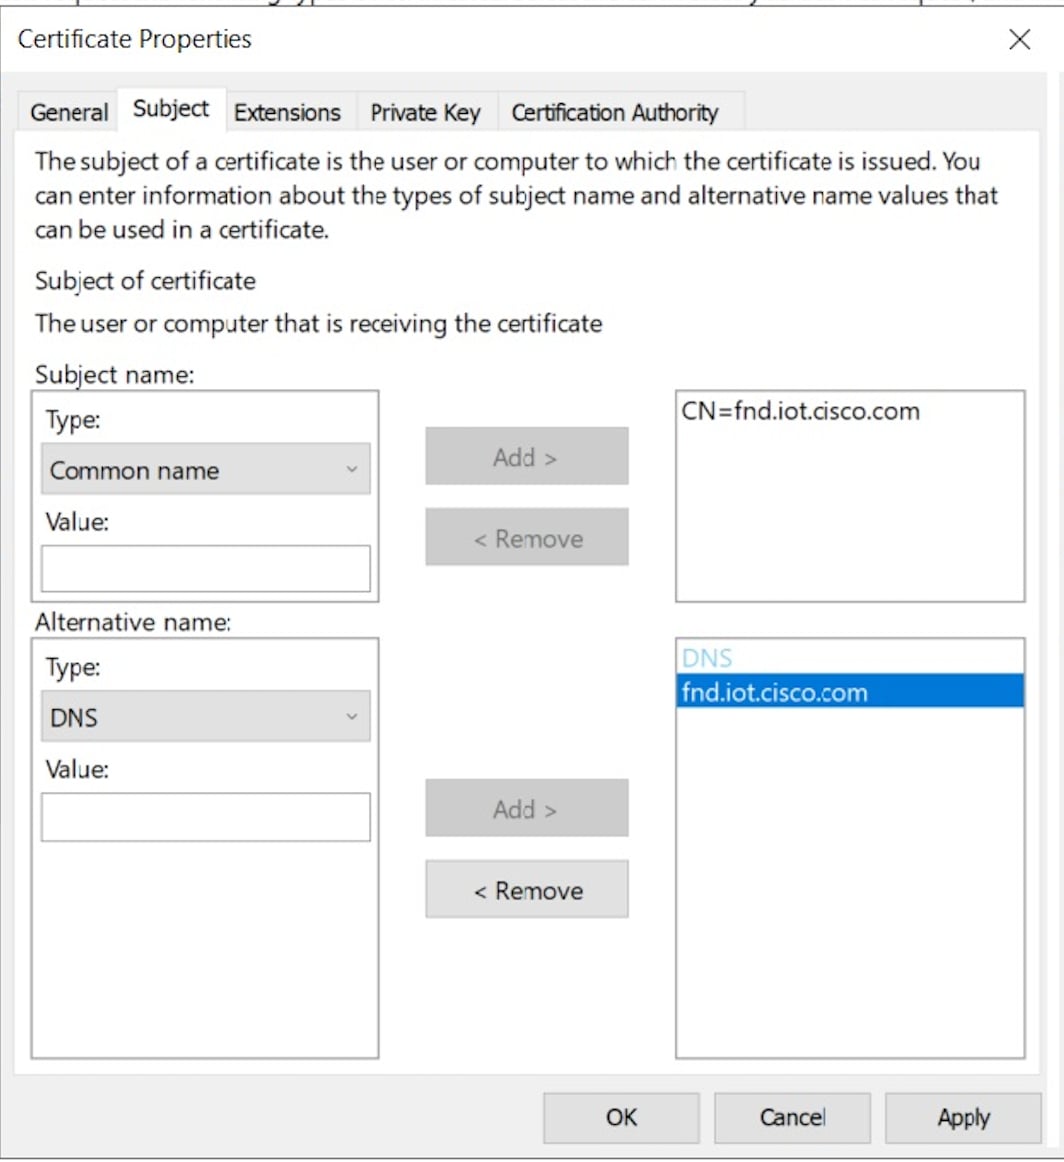
In the Certificate Properties window, click the Subject tab, and do the following:

  • In the Value field, add the fully-qualified domain name (FQDN): the value you enter depends on whether you are creating a certificate for the IoT FND or the TPS proxy.

After creating these two certificates, securely transfer the IoT FND certificate to the IoT FND application server, and securely copy the TPS proxy certificate to the TPS proxy server.

To generate a certificate:

Procedure


Step 1

Configure a certificate template (see Configuring a Certificate Template for IoT FND and IoT FND TPS Proxy Using Microsoft CA).

Step 2

Enable the certificate template (see Enabling a Certificate Template).

Step 3

From a server running Windows Server 2008, choose Start > Run and enter mmc to open the MMC console.

Step 4

In the Console 1 window, expand the Certificates > Personal folders.

Step 5

Right-click Certificates and choose All Tasks > Request New Certificate from the context menu.

Step 6

In the Before You Begin window, click Next.

Step 7

In the Select Certificate Enrollment Policy window, choose Active Directory Enrollment Policy. Click Next.

Step 8

In the Request Certificates window, do the following:

  1. Check the NMS check box.

  2. Click the More information... link.

Step 9

In the Certificate Properties window, click the Subject tab, and do the following:

  1. From the Subject name Type drop-down menu, choose Common name (CN).

  2. In the Value field, add the fully-qualified domain name (FQDN):

    • For IoT FND certificates, enter the FQDN of the IoT FND server for your deployment, for example: CN=nms.sgbu.cisco.com.

    • For TPS proxy certificates, enter the FQDN for the TPS proxy for your deployment, for example: CN= tps.sgbu.cisco.com.

  3. Click Add and the Common Name appears in the right-pane.

  4. From the Subject name Type drop-down menu, choose Organization (O).

  5. In the Value field, add the company name or organization for the IoT FND or TPS proxy.

  6. Click Add and the organization appears in the right-pane.

  7. From the Alternative name Type drop-down menu, choose DNS.

  8. In the Value field, enter the subject alternative name that matches the Cisco IoT FND's Fully Qualified Domain Name (FQDN) used in Cisco IoT FND's URL to register the routers in the Admin > Provisioning Settings page.

  9. Click Add and the DNS value appears in the right-pane.

Step 10

Click Apply. Click OK.

Step 11

In the Certificate Enrollment window, check the NMS check box and click Enroll.

Step 12

After enrollment completes, click Finish.

Step 13

In the MMC console (Console 1), expand the Certificates folder.

Step 14

Choose Personal > Certificates.

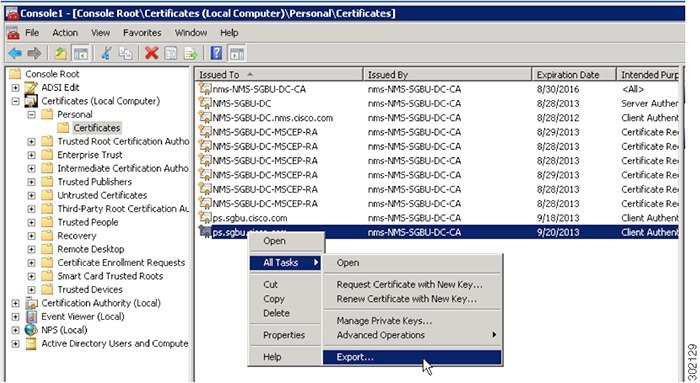
Step 15

In the Issued To pane, right-click the new certificate and choose All Tasks > Export fromthe context menu.

The Export Wizard window appears.

Step 16

Initiate the Export Wizard.

Step 17

At the Export Private Key window, select the Yes, export the private key radio button. Click Next.

Step 18

At the Export File Format window, do the following:

  1. Click the Personal Information Exchange radio button.

  2. Check the Include all certificates in the certification path if possible check box.

    This option includes the full certificate chain within the certificate.

  3. Click Next.

Step 19

In the password window, enter keystore and re-enter to confirm.

The password is the default password that the IoT FND and the TPS proxy use to read this file.

Step 20

Click Next.

Step 21

In the File to Export window, enter the file name (such as nms_cert or tps_cert) and click Next.

Step 22

In the Completing the Certificate Export Wizard, click Finish.

Files with a *.pfx extension are automatically saved to the Desktop. PFX refers to the Personal Information Exchange format, which is also known as PKCS_#12 format. PFX is an industry-standard format that allows certificates and their private keys to be transferred (exported) from one computer to another.

Step 23

Securely transfer the two certificate files (such as nms_cert.pfx and tps_cert.pfx) from the Windows Desktop to the IoT FND ( nms_cert.pfx) and TPS proxy (tps_cert.pfx), respectively.

Note


For heightened security, after a successful transfer delete the *.pfx files from the Windows Desktop and empty the Recycle bin.


Certificate Requirements for IoT FND Server HA Deployment

To generate the certificate for IoT FND server HA deployment, follow the same steps as in the Generating certificates for IoT FND and IoT FND TPS Proxy.

Ensure that IoT FND server certificate contents for HA deployment is as given below:

  • The Subject — Must have the FQDN of the VIP.

    Example: FNDSERVERVIP.TEST.COM

  • The Subject Alternative Name (SAN) — Added must include the FQDN of the VIP.

    Example: FNDSERVERVIP.TEST.COM (same as the subject)

  • The Subject Alternative Name — Must NOT have the individual server names.

    Example: It must not contain FNDSERVER1.TEST.COM, FNDSERVER2.TEST.COM

Command Authorization Support

The command authorization support was applicable to CGOS CGR1000 router until Cisco IoT FND Release 4.7.0 and is no longer supported.


Attention


  • Defining OID value in the cgms certificate for TPS and FND is required until IoT FND release 4.7 and from IoT FND release 4.8 onwards, it is not required.

  • Starting from IoT FND release 4.7, you can't onboard IOS XE routers to IoT FND if the certificates contain command authorization OIDs. Generate new certificates without these OIDs to onboard IOS XE routers. For more information, see Generating Certificates for IoT FND and the IoT FND TPS Proxy.


Exporting the CA Certificate

To export the certificate from the Certificate Authority or subordinate CA to the IoT FND:

Procedure


Step 1

Open the Certificate Authority application on a Windows Server 2008 R2 system operating with the Enterprise Edition.

Step 2

Expand the menu to view the Certificates (Local Computer) > Personal > Certificates folder.

Step 3

Locate the certificate whose fingerprint matches that in use by the Cisco CGR 1000 and Cisco ASR.

Step 4

Right-click the certificate and choose All Tasks > Export from the context menu.

Step 5

In the Certificate Export Wizard window, click Next.

Step 6

In the Export Private Key window, select the No, do not export the private key radio button. Click Next.

Step 7

In the Export File Format window, select the Base-64 encoded X.509 (.CER) radio button. Click Next.

Step 8

In the File to Export window, assign a name for the file that you want to export. Click Next.

Step 9

In the File to Export window, enter the file name (such as ca_cert or subca_cert) and click Next.

Step 10

In the Completing the Certificate Export Wizard, click Finish.

Files with a *.cer extension are automatically saved to the Desktop.

Step 11

Securely transfer the certificate file (such as ca_cert.cer) from the Windows Desktop to IoT FND.

Note


For heightened security, after a successful transfer delete the *.cer file from the Windows Desktop and empty the Recycle bin.


Installing the Certificates

You must create a cgms_keystore file on both the servers running IoT FND and IoT FND TPS Proxy.

  • IoT FND — When creating the cgms_keystore file, you import the IoT FND certificate, its private key, and the certificate chain. After creating the cgms_keystore file, you copy it into a specific directory on the server.

  • IoT FND TPS Proxy — When you create the cgms_keystore file, you import the IoT FND TPS Proxy certificate, its private key, and the certificate chain. After you create the cgms_keystore file, you copy it into a specific directory on the TPS proxy.

    To create the cgms_keystore file for the TPS proxy and IoT FND, use Keytool and complete the following procedures:

Determine the password to use for the keystore. The examples in this chapter refer to this password as keystore_password.

Using Keytool to Create the cgms_keystore File

To create the cgms_keystore file for both IoT FND and the TPS proxy:

Procedure


Step 1

As root, view the contents of the.pfx file by entering the following command on the server (IoT FND and TPS proxy):

[root@ tps_server 
~]# keytool -list -v -keystore nms_cert.pfx -srcstoretype pkcs12

Note


Viewing the.pfx provides the Alias Name required during the import.

Step 2

Enter the keystore password when prompted.

This is the same password entered when creating the.pfx file.

The information that displays (see the following Example) includes the alias_name needed for entering the following command to import the certificates into the cgms_keystore file:

Step 3

Enter the following command to import the certificates into the cgms_keystore file:

keytool -importkeystore -v -srckeystore 
filename.pfx -srcstoretype pkcs12
-destkeystore cgms_keystore -deststoretype jks -srcalias alias_name 
-destalias cgms
-destkeypass 
keystore_password

Step 4

At the prompt, enter the destination keystore password.

Step 5

Re-enter the keystore password when prompted.

Step 6

Enter the password used when creating the.pfx file (either nms_cert.pfx or tps_cert.pfx) when prompted for the source keystore password.

Note


In this example, keystore was the password when we created the .pfx file.

Example

To view the nms_cert.pfx file and access the Alias name, enter the following commands as root:

Note


This example shows the steps for the nms_cert.pfx. To view the details on the tps_cert.pfx and import the certificates to the TPS proxy, use the same commands but replace the references to nms_cert.pfx with tps_cert.pfx, and use the Alias name from the tps_cert.pfx file.

# keytool -list -v -keystore nms_cert.pfx -srcstoretype pkcs12
Enter keystore password: keystore
Keystore type: PKCS12
Keystone provider: SunJSSE
Your keystore contains 1 entry
Alias name: le-cgnms-75edd1e3-7e65-41b4-97f1-a913ebf21c8b
Creation date: March 29.2018
Entry type: PrivateKey Entry
Certificate chain length: 3
Certificate[1]:
Owner: CN=nms.sgbu.cisco.com
Issuer: CN=cisco-RSA-SUBCA-CA, DC=cisco, DC=com
...

To import the certificates to the cgms_keystore file on IoT FND, enter the following commands as root:

# keytool -importkeystore -v 
-srckeystore nms_cert.pfx -srcstoretype pkcs12
-destkeystore cgms_keystore -deststoretype jks -srcalias
le-cgnms-75edd1e3-7e65-41b4-97f1-a913ebf21c8b -destalias cgms
-destkeypass
keystore_password
 
Enter destination keystore password: keystore_password
Re-enter new password: keystore_password
Enter source keystore password: keystore
...Storing cgms_keystore

Note


The storing cgms _keystore text indicates successful completion.


Copying the cgms_keystore File to IoT FND

To copy the cgms_keystore file into the following IoT FND and TPS proxy directories:

Procedure


Step 1

For IoT FND, copy the cgms_keystore file to this directory: /opt/cgms/server/cgms/conf/

Step 2

For the TPS proxy, copy the cgms_keystore file to this directory: /opt/cgms-tpsproxy/conf/

Note


For these certificates to be active and enforceable, they must be in the correct directory.


Extracting cgms.pem and cgms.key file from *.pfx file

To extract the cgms.pem and cgms.key file:

Procedure


Step 1

Enter the following command to import the certificates into the cgms.pem file.

# openssl pkcs12 -in cgms.pfx -nokeys -out cgms.pem

Step 2

Enter the following command to import the certificates into the cgms.key file.

# openssl pkcs12 -in cgms.pfx -nocerts -out cgms.key -nodes

Note


Enter the keystore password when prompted. This is the same password entered when creating the.pfx file.


Copying the cgms.pem and cgms.key Files to IoT FND

For IoT FND, copy the cgms.pem and cgms.key file to this directory: /opt/cgms/server/cgms/conf/

Importing the CA Certificate

In addition to importing the NMS certificate, you must import the CA or (subCA) certificate to the cgms_keystore.

To import the CA certificate into the cgms_keystore:

Procedure


Step 1

On the IoT FND application server, log in as root.

Step 2

Change directory to /opt/cgms/server/cgms/conf, where you have placed the cgms_keystore file:

# cd /opt/cgms/server/cgms/conf

Step 3

Import the CA certificate:

# keytool -import -trustcacerts -alias 
root -keystore cgms_keystore -file ca_cert.cer

A script displays on the screen.

Step 4

Enter the keystore password when prompted.

Step 5

Re-enter the password.

Step 6

Enter yes when prompted to trust the certificate.

The certificate is added to the Keystore.

Example

To import the CA certificate, enter the following commands as root:

# keytool -import -trustcacerts -alias root -keystore 
cgms_keystore -file ca_cert.cer
Enter keystore password: keystore_password
Owner: CN=SGBUNMSCA-WIN-4BGS4M94L66-CA,DC=SGBUNMSCA,DC=lab,DC=co
Issuer: CN=SGBUNMSCA-WIN-4BGS4M94L66-CA,DC=SGBUNMSCA,DC=lab,DC=co
Serial number:50adbd57e6b136984f9c1512a0eb7174
Valid from: Wed Jan 11 10:58:09 PDT 2018 until: Wed Jan 11:08:59 PDT 2018
Certificate _fingerprints:
MD5: AE:5D:F4:0A:2B:E5:C8:D8:4A:F4:18:56:FD:A7:8D:7D
SHA1: 83:22:12:8C:6A:23:D3:08:2B:00:55:EF:BD:FF:BA:47:97:99:7E:41
Signature algorithm name: SHA1withRSA
Version:3
Extensions:
#1: ObjectId: 2.5.29.19 Criticality=true
BasicConstraints:[
CA:true
PathLen:2147483647
]
#2:ObjectId: 2.5.29.15 Criticality=false
KeyUsage[
DigitalSignature
Key_CertSign
Crl_Sign
]
#3:ObjectId: 2.5.29.14 Criticality=false
SubjectKeyIdentifier [
KeyIdentifier [
0000:C6 AB 38 CC EE 79 B0 51 3B 4D 13 c8 9A 56 F6 73..8..y.Q;M...V.s
0010:B9 19 FF 7B....
]
]
#4: ObjectId:1.3.6.1.4.1.311.21.1 Criticality=false
Trust this certificate [no] yes
Certificate was added to the keystore.

Importing the CA Certificate into TPS Proxy Keystore

Follow the same steps as in Importing the CA Certificate to import the CA certificate into cgms_keystore on the TPS proxy.

Importing the SUDI Certificate

To import the SUDI certificate into cgms_keystore

Procedure


Step 1

As root, change directory to /opt/cgms/server/cgms/conf, where you have placed the cgms_keystore file.

# cd /opt/cgms/server/cgms/conf

Step 2

To import the SUDI certificate, enter the following commands.

#keytool -import -trustcacerts -alias sudi -keystore cgms_keystore -file ciscosudi/cisco-sudi-ca.pem
# keytool -import -trustcacerts -alias sudi1 -keystore cgms_keystore -file ciscosudi/cisco-ca.pem

Note


It is mandatory to import both the SUDI certificates with 2029 and 2099 expiry periods.

Step 3

Enter the keystore password when prompted and enter yes. The certificate is added to the keystore.

Note


For the TPS proxy, copy the cgms_keystore file to this directory:

/opt/cgms-tpsproxy/conf/ciscosudi


Configuring a Custom CA for HSM

This section describes configuring a custom CA for the hardware security module (HSM) for signing CSMP messages sent from IoT FND to mesh devices.

To configure a custom CA for generating HSM certificates:

Before you begin
  • Ensure that you install the SafeNet client software version listed in the "System Requirements" in IoT FND Release Notes on the IoT-FND server.

  • You must have your own CA (for example, Microsoft or OpenSSL).

Procedure

Step 1

Create a new partition on the HSM and assign it to your IoT FND client (see Setting Up the HSM Client).

Step 2

Generate a key pair on the HSM and export a CSR for that key pair (see Keystore).

All commands run from the Luna client on the IoT FND server. You do not have to log in to the HSM machine.

[root@<user>-scaledb bin]# cd /usr/safenet/lunaclient/bin/
 
# Generate a Key Pair (a set of private and public keys.
You MUST provide explicit labels to the private and public keys)
[root@<user>-scaledb bin]#./cmu generatekeypair -sign=T 
-verify=T -labelpublic="nms_public_key" -labelprivate="nms_private_key"
Please enter password for token in slot 1 : ********
Enter key type - [1] RSA [2] DSA [3] ECDSA : 3 <--- Choose option 3
Enter curve type [1] NISTP 192
[2] NISTP 224
[3] NISTP 256
[4] NISTP 384
[5] NISTP 521
 
Enter curve type [1] NISTP 192
[2] NISTP 224
[3] NISTP 256 <--- Choose option 3
[4] NISTP 384
[5] NISTP 521
(1 to 5) 3
[root@<user>-scaledb bin]#
 
# Test if the keypair exists on the HSM partition
 
[root@<user>-scaledb bin]#./cmu list
Please enter password for token in slot 1 : ********
handle=2000001 label=nms_public_key
handle=2000002 label=nms_private_key
 
# Now, export a certificate signing request for this keypair. 
Note that the specific fields for DN and handle may be different for your HSM. 
Fill appropriately.
[root@<user>-scaledb bin]#./cmu requestcertificate
Please enter password for token in slot 1 : ********
Select the private key for the request :
 
Handler Label
2000002 nms_private_key
Enter handler (or 0 for exit) : 2000002
Enter Subject 2-letter Country Code (C) : US
Enter Subject State or Province Name (S) : CA
Enter Subject Locality Name (L) : San Jose
Enter Subject Organization Name (O) : Cisco Systems Inc.
Enter Subject Organization Unit Name (OU) : IOTSSG
Enter Subject Common Name (CN) : IOT-FND-HSM
Enter EMAIL Address (E) :
Enter output filename : hsm.csr
[root@<user>-scaledb bin]#
 
# Verify the file exists and has properly formatted content
 
[root@<user>-scaledb bin]# ls hsm.csr
hsm.csr
 
[root@<user>-scaledb bin]# cat hsm.csr
-----BEGIN NEW CERTIFICATE REQUEST-----
MIIBKzCB0QIBADBvMQswCQYDVQQGEwJVUzELMAkGA1UECBMCQ0ExETAPBgNVBAcT
CFNhbiBKb3NlMRowGAYDVQQKExFDaXNjbyBTeXN0ZW1zIEluYzEPMA0GA1UECxMG
SW9UU1NHMRMwEQYDVQQDEwpDRy1OTVMtSFNNMFkwEwYHKoZIzj0CAQYIKoZIzj0D
AQcDQgAESfdlrrcVtzN3Yexj9trlI5qd0w5Sdu8Vj2s17JAF/vPFUOYIw/uXwD6+
bb8vq3WHlA6tmgRbj+FU6G3Bmt/vCqAAMAsGByqGSM49BAEFAANIADBFAiEAroJO
qz3dHA2GLrGzBmUO1vYys642Nkb4B4qyEoUZIGsCIFs0iTUyGQreM1BaSDEPHArZ
RvFlrKo/Zi3c8O4gzFZW
-----END NEW CERTIFICATE REQUEST-----

Step 3

Save the generated CSR to your CA and sign the certificate.

Note


For CR-Mesh release earlier than 6.2.34 MR or 6.3.20, it is recommended to obtain a 30-year certificate.

Starting from CR-Mesh release 6.2.34 MR or 6.3.20 and later, the EST feature is supported, which automates the certificate renewal process. Therefore, it is not required to obtain a 30-year certificate. For more information on EST, see Configuring Enrollment over Secure Transport. You can use the root CA for IEEE 802.1X authentication for node admission.

Step 4

Copy the signed certificate to the IoT FND server and import it to the HSM.

[root@<user>-scaledb bin]#./cmu import
Please enter password for token in slot 1 : ********
Enter input filename : <your file name with signed certificate>
 
# Verify that the certificate was imported
 
[root@<user>-scaledb bin]#./cmu list
Please enter password for token in slot 1 : ********
handle=2000001 label=nms_public_key
handle=2000002 label=nms_private_key
handle=2000003 label=IOT-FND-HSM <--- This is my certificate with label = CN

Step 5

Run the following commands to configure IoT FND to use the new certificate:

RHEL Version

Commands

8.x

  1. systemctl stop cgms
  2. systemctl start cgms

7.x

  1. service cgms stop
  2. service cgms start
Example Output:
[root@kartven2-nms ~]# service cgms stop
[root@kartven2-nms ~]# cd /opt/cgms/server/cgms/conf/
 
# Add following properties to the cgms.properties file
 
hsm-private-key-label=nms_private_key <--- private key label you gave to your public key
hsm-public-key-label=nms_public_key <--- public key label you gave to your public key
hsm-cert-label=IOT-FND-HSM <--- label for your signed certificate
hsm-keystore-name=customca-group <--- your HA partition group
hsm-keystore-password=2bVvZsq+vsq94YxuAKdaag== <--- encrypted password for the partition
 
[root@kartven2-nms conf]# service cgms start
[root@kartven2-nms conf]#

Step 6

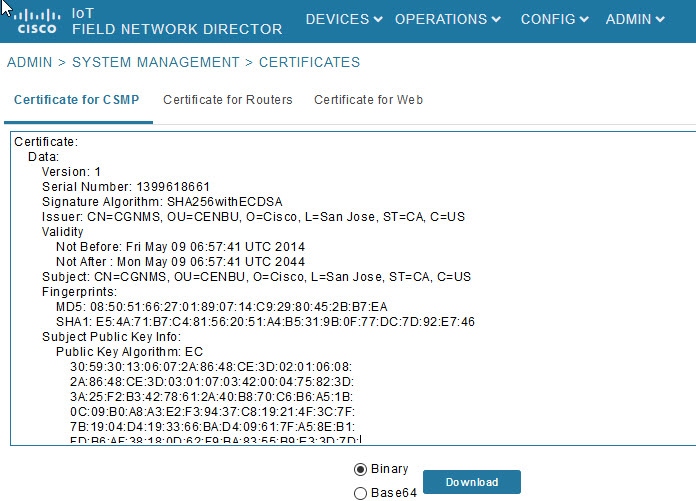
Verify that the certificate appears on the Certificates for CSMP tab (ADMIN > System Management > Certificates).

Step 7

Configure your mesh nodes to use this certificate for signatures.


Configuring a Custom CA for SSM

This section describes configuring a custom CA for the software security module (SSM) for signing CSMP messages sent from IoT FND to mesh devices.

To configure a custom CA for generating SSM certificates:

Before you begin
  • Ensure that you install the SafeNet client software version listed in the "System Requirements" in the IoT FND Release Notes on the IOT-FND server.

  • Only SSM versions 2.2.0-37 and above are supported.

  • You must have your own CA (for example, Microsoft or OpenSSL).

Procedure

Step 1

Run the following command to stop the ssm service.

RHEL Version

Command

8.x

systemctl stop ssm

7.x

service ssm stop

Step 2

Use the ssm_setup.sh script to configure a new keypair with a specific alias and generate a CSR:

[root@nms-rhel-6-6 ~]# cd /opt/cgms-ssm/bin/
[root@nms-rhel-6-6 bin]# ./ssm_setup.sh
Software Security Module Server
  1. Generate a new keyalias with self signed certificate for CSMP
  2. Generate a new keypair & certificate signing request for CSMP <--- Choose option 2
  3. Import a trusted certificate
  4. Change CSMP keystore password
  5. Print CG-NMS configuration for SSM
  6. Change SSM server port
  7. Change SSM-Web keystore password
Select available options. Press any other key to exit.
Enter your choice : 2
Warning: This action will modify ssm_csmp_keystore file. Backup the file before performing this action.
Do you want to proceed (y/n): y
 
Enter current ssm_csmp_keystore password :
Enter a new key alias name (8-16): ssmcustomca
Enter key password (8-12):
 
Enter certificate issuer details
 
Enter common name CN [Unknown]: IOT-FND-SSM
 
Enter organizational unit name OU [Unknown]: IOTSSG
 
Enter organization name O [Unknown]: Cisco Systems Inc.
 
Enter city or locality name L [Unknown]: San Jose
 
Enter state or province name ST [Unknown]: CA
 
Enter country code for this unit C [Unknown]: US
 
 
Is [CN=IOT-FND-SSM, OU=IOTSSG, O=Cisco Systems Inc., L=San Jose, ST=CA, C=US] correct (y/n)? :y
Certificate Signing Request file name: /opt/ssmcustomca.csr
Succefully generated keypair with alias ssmcustomca. You can use the CSR from /opt/ssmcustomca.csr for signature by certificate authority
[root@nms-rhel-6-6 bin]#

Step 3

Save the generated CSR to your CA and sign the certificate.

Note


For CR-Mesh release earlier than 6.2.34 MR or 6.3.20, it is recommended to obtain a 30-year certificate.

Starting from CR-Mesh release 6.2.34 MR or 6.3.20 and later, the EST feature is supported, which automates the certificate renewal process. Therefore, it is not required to obtain a 30-year certificate. For more information on EST, see Configuring Enrollment over Secure Transport. You can use the root CA for IEEE 802.1X authentication for node admission.

Step 4

Copy the signed certificate to the IoT FND server and import it to the SSM.

Step 5

Use the ssm_setup.sh script to import the two certificates to the SSM keystore:

[root@nms-rhel-6-6 bin]# ./ssm_setup.sh
Software Security Module Server
  1. Generate a new keyalias with self signed certificate for CSMP
  2. Generate a new keypair & certificate signing request for CSMP
  3. Import a trusted certificate <--- Choose option 3
  4. Change CSMP keystore password
  5. Print CG-NMS configuration for SSM
  6. Change SSM server port
  7. Change SSM-Web keystore password
Select available options. Press any other key to exit
Enter your choice : 3
 
Enter current ssm_csmp_keystore password :
Enter the alias for import: root
Certificate file name: /opt/ca.crt
Certificate reply was installed in keystore
Succefully imported certificate into alias root

Step 6

Use the ssm_setup.sh script to import the signed certificate for the alias:

[root@nms-rhel-6-6 bin]# ./ssm_setup.sh
Software Security Module Server
  1. Generate a new keyalias with self signed certificate for CSMP
  2. Generate a new keypair & certificate signing request for CSMP
  3. Import a trusted certificate <--- Choose option 3
  4. Change CSMP keystore password
  5. Print CG-NMS configuration for SSM
  6. Change SSM server port
  7. Change SSM-Web keystore password
Select available options.Press any other key to exit
Enter your choice : 3
 
Enter current ssm_csmp_keystore password :
Enter the alias for import: ssmcustomca
Certificate file name: /opt/ssmcustomca.crt
Certificate reply was installed in keystore
Succefully imported certificate into alias ssmcustomca

Step 7

Update the cgms.properties file with the following parameters to configure IoT FND to use this certificate on the SSM for signatures:

security-module=ssm
ssm-host=172.27.163.153
ssm-port=8445
ssm-keystore-alias=ssmcustomca
ssm-keystore-password=GgeQJAOk3fSIH97qJARGRA==
ssm-key-password=GgeQJAOk3fSIH97qJARGRA==

Step 8

Verify that the certificate appears on the Certificates for CSMP > ADMIN > System Management > Certificates tab.

Step 9

Configure your mesh nodes to use this certificate for signatures.


Installing Custom Browser Certificates

Default IoT FND installations use a self-signed certificate for HTTP(S) communication using either a client Web browser or the NB API client. If required, you can use certificates signed by your CA servers. This section presents installation procedures for these custom certificates.

This section covers the following topics:

BEFORE YOU BEGIN

  • Clear the client browser cache.

  • Remove existing certificates for the NMS server (by IP and DNS) on the client browser

    In Firefox for example, select Preferences > Advanced > Encryption > View Certifications. Remove the certificates in the list for the respective server.
  • Choose a common name to use in the signed certificate.

    This name requires a DNS entry that resolves to the NMS server IP address.

  • Generate the new certificates and export them to a.PFX file.

    This file must contain the private keys, public certificate, and CA server certificates.

    See Using Keytool to Create the cgms_keystore File for the procedure to generate the private and public keys for the cgms_keystore file and export them to a.PFX file.

Installing Custom Certificates in the Browser Client

These steps assume that the Java environment has been set to use the Java bundled with FND in /opt/cgms/jre.

Procedure

Step 1

On the NMS server, copy the existing jbossas.keystore, jbossas.keystore.password, vault.keystore, and VAULT.dat files from the /opt/cgms/server/cgms/conf/ directory to a safe location.

Step 2

Delete the existing jbossas.keystore, jbossas.keystore.password, vault.keystore, and VAULT.dat files from the /opt/cgms/server/cgms/conf/ directory.

Step 3

Determine the alias in the.PFX file that you plan to import into the new jbossas.keystore file:

#keytool -list -v -keystore newcert.pfx -storetype pkcs12

Enter the keystore password: keystore_password_when_pfx_file_was_created

Keystore type: PKCS12
Keystore provider: SunJSSE
Your keystore contains 1 entry
Alias name: le-nms-a88ef13a-a519-457f-a2e1-0540f5453ee0
Creation date: Feb 23, 2018
Entry type: PrivateKeyEntry
Certificate chain length: 2
Certificate[1]:
…

Step 4

Import the new custom certificate, in.pfx file format into a new jbossas.keystore file; and, at the same time change the alias name to jboss. Follow the prompts:

# keytool -importkeystore -v -srckeystore newcert.pfx -srcstoretype pkcs12
-destkeystore/opt/cgms/server/cgms/conf/jbossas.keystore -deststoretype jks
-srcalias le-nms-a88ef13a-a519-457f-a2e1-0540f5453ee0 -destalias
jboss -destkeypass your_keystore_password
Enter destination keystore password: your_keystore_password
Enter source keystore password: keystore_password_when_pfx_file_was_created
[Storing /opt/cgms/server/cgms/conf/jbossas.keystore]

Step 5

The keystore password is stored in the /opt/cgms/server/cgms/conf/VAULT.dat file.

Perform the following steps to update the keystore password to match the one entered in Step 4 (your_keystore_password).

IoT FND releases 4.9.x and earlier

  1. Create a new vault.keystore file.

    keytool -genseckey -alias vault -storetype jceks -keyalg AES -keysize 128 -storepass
    your_keystore_password -keypass your_keystore_password -keystore
    /opt/cgms/server/cgms/conf/vault.keystore
  2. Update the VAULT.dat file with the new password:

    /opt/cgms/bin/vault.sh -k /opt/cgms/server/cgms/conf/vault.keystore -p your_keystore_password 
    -e /opt/cgms/server/cgms/conf -i 50 -s 12345678 -v vault -b keystore_pass -a password -x
    your_keystore_password

    Optionally, the iteration and salt values can be modified if desired.

    Example Output:

    =====================================================================
    JBoss Vault
    JBOSS_HOME:/opt/cgms
    JAVA: java
    =====================================================================
     
    Dec 20, 2018 3:25:29 PM org.picketbox.plugins.vault.PicketBoxSecurityVault init
    INFO: PBOX000361: Default Security Vault Implementation Initialized and Ready
    Secured attribute value has been stored in vault.
    Please make note of the following:
    ********************************************
    Vault Block:keystore_pass
    Attribute Name:password
    Configuration should be done as follows:
    VAULT::keystore_pass::password::1
    ********************************************
    Vault Configuration in AS7 config file:
    ********************************************
    ...
    </extensions>
    <vault>
    <vault-option name=="KEYSTORE_URL"
    value="/opt/cgms/server/cgms/conf/vault.keystore"/>
    <vault-option name="KEYSTORE_PASSWORD" value="MASK-
    VKsAwH928fwt.3H2qUwOG"/>
    <vault-option name="KEYSTORE_ALIAS" value="vault"/>
    <vault-option name="SALT" value="12345678"/>
    <vault-option name="ITERATION_COUNT" value="50"/>
    <vault-option name="ENC_FILE_DIR" value="/opt/cgms/server/cgms/conf/"/>
    </vault><management>...
    ********************************************
    

    where vault.keystore contains the reference to VAULT.dat and VAULT.dat stores and hides the jboss keystore password. This command creates a new VAULT.dat file that contains the new jboss.keytsore password.

IoT FND releases 4.10.x and later

  1. Create a new vault.keystore file:

    /opt/cgms/jre/bin/keytool -genseckey -alias vault -storetype jceks 
    -keyalg AES -keysize 256 -storepass keystore -dname "CN=IoTFND, OU=IoT, O=Cisco Systems, 
    L=San Jose, ST=CA, C=US" -keypass keystore -validity 730 -keystore vault.keystore
  2. Update the VAULT.dat file with the new password:

    /opt/cgms/bin/vault.sh --keystore /opt/cgms/server/cgms/conf/vault.keystore
     --keystore-password keystore --alias vault --vault-block keystore_pass 
    --attribute password --sec-attr keystore --enc-dir /opt/cgms/server/cgms/conf/
     --iteration 50 --salt 12345678 -n

    Optionally, the iteration and salt values can be modified if desired.

    Expected Output:

    ============================================================
    
      JBoss Vault
    
      JBOSS_HOME: /opt/cgms
    
      JAVA: /opt/cgms/jre/bin/java
    
    =========================================================================
    
    WFLYSEC0047: Secured attribute value has been stored in Vault.
    Please make note of the following:
    ********************************************
    Vault Block:keystore_pass
    Attribute Name:password
    Configuration should be done as follows:
    VAULT::keystore_pass::password::1
    ********************************************
    WFLYSEC0048: Vault Configuration commands in WildFly for CLI:
    ********************************************
    For standalone mode:
    /core-service=vault:add(vault-options=[("KEYSTORE_URL" => 
    "/opt/cgms/server/cgms/conf/vault.keystore"),
    ("KEYSTORE_PASSWORD" => "MASK-0VKsAwH928fwt.3H2qUwOG"),("KEYSTORE_ALIAS" => "vault"),
    ("SALT" => "12345678"),("ITERATION_COUNT" => "50"),("ENC_FILE_DIR" => 
    "/opt/cgms/server/cgms/conf/")])
    ********************************************
    For domain mode:
    /host=the_host/core-service=vault:add(vault-options=[("KEYSTORE_URL" =>
    "/opt/cgms/server/cgms/conf/vault.keystore"),
    ("KEYSTORE_PASSWORD" => "MASK-0VKsAwH928fwt.3H2qUwOG"),("KEYSTORE_ALIAS" => "vault"),
    ("SALT" => "12345678"),("ITERATION_COUNT" => "50"),("ENC_FILE_DIR" =>
     "/opt/cgms/server/cgms/conf/")])
    ********************************************
    

    where vault.keystore contains the reference to VAULT.dat and VAULT.dat stores and hides the jboss keystore password. This command creates a new VAULT.dat file that contains the new jboss.keytsore password.

Step 6

Copy /opt/cgms/standalone/configuration/standalone.xml and standalone-cluster.xml to a safe location.

Step 7

Update the /opt/cgms/standalone/configuration/standalone.xml or standalone-cluster.xml file.

Depending on whether the FND server is standalone or clustered, update the respective file accordingly.

  1. Replace the keystore password with the output in step 5.

    <vault>
    <vault-option name="KEYSTORE_URL"
    value="/opt/cgms/server/cgms/conf/vault.keystore"/>
    <vault-option name="KEYSTORE_PASSWORD" value="MASK-VKsAwH928fwt.3H2qUwOG"/>
    <vault-option name="KEYSTORE_ALIAS" value="vault"/>
    <vault-option name="SALT" value="12345678"/>
    <vault-option name="ITERATION_COUNT" value="50"/>
    <vault-option name="ENC_FILE_DIR" value="/opt/cgms/server/cgms/conf/"/>
    </vault>
  2. Edit the standalone.xml or standalone-cluster.xml and replace the existing <vault> section with the above. Save and exit.

Step 8

Restart IoT FND by running the following command:

RHEL Version

Command

8.x

systemctl restart cgms

7.x

service cgms restart

Step 9

Use your browser to connect to the NMS server.

Step 10

Accept and add the new certificates.

Step 11

Use your browser to log in to IoT FND.


Importing Custom Certificates with the North Bound API Client (Windows)

For an NB API client running on a Windows Server, import the CA public certificate to the Certificate Store on your local computer. Matching CA public certificates ensures that the client machine communicates with IoT FND using the NB API client.

Importing Custom Certificates with Windows IE

To import custom certificates with windows IE:

Procedure

Step 1

In IE, enter the https URL address of the NMS server.

The URL name must match the Common Name on the NMS Server certificate.

Step 2

In the Security Alert window, click OK.

Step 3

In the security certificate warning window, click the Continue to this Website (Not Recommended) link.

Step 4

In the Security Alert window, click OK.

Step 5

Click the Certificate error section of the address bar.

Step 6

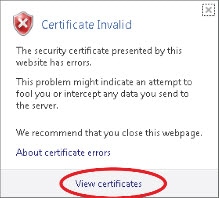
In the Certificate Invalid window, click View certificates.

The Certificate window lists the device certificate issued to the NMS server and signed by the issuing CA (or sub CA) server.

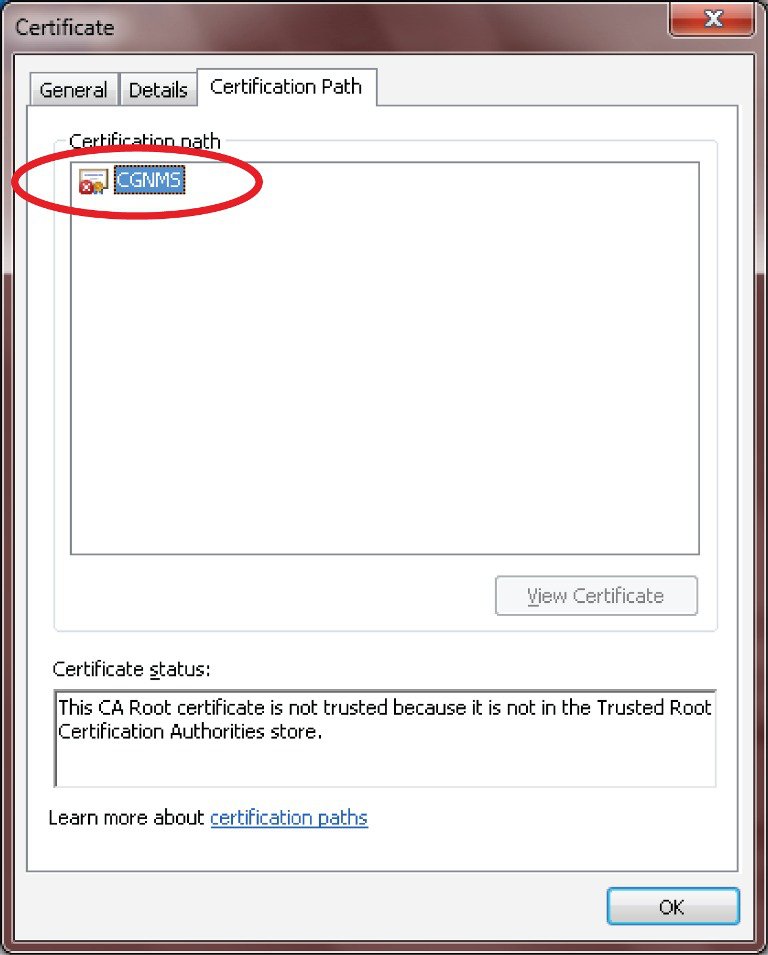
Step 7

Select the Certification Path tab, and look for the invalid certificate (that is, the one with a red cross).

Step 8

Select the invalid certificate, and select the General tab.

Step 9

Click Install Certificate.

Step 10

In the Certificate Install Wizard window, click Next.

Step 11

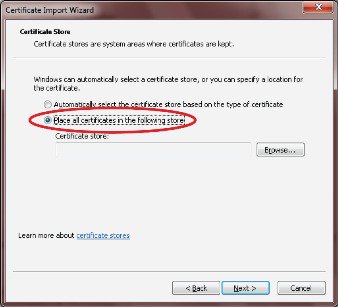
Select the Place all certificates in the Following Store option, and then click Browse.

Step 12

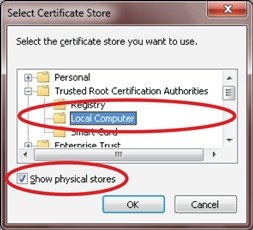
In the Certificate Store window, check the Show physical stores check box, open the Trusted Root Certification Authorities folder, select Local Computer, and then click OK.

Step 13

Click Next.

Step 14

Click Finish.

Step 15

Click OK.

Step 16

In the Certificate window, click Install Certificate.

Step 17

Select the Place all certificates in the Following Store option, and then click Browse.

Step 18

In the Certificate Store window, check the Show physical stores check box, open the Trusted Root Certification Authorities folder, select Local Computer, and then click OK.

Step 19

Click Next.

Step 20

Click Finish.

Step 21

Click OK.

Step 22

In the Certificate window, click OK.

Step 23

Repeat the previous steps if the Certificate error section of the address bar still appears.

  • Ensure that the device certificate issued to the NMS server and signed by the issuing CA (or sub CA) displays server in the Certificate window.

  • Select the Certification Path tab and verify that all certificates in the path are valid (that is, there are no red crosses on the certificates).

Step 24

Close and restart the browser.

Step 25

Enter the IoT FND server secure URL in the address bar.

The IoT FND login page displays without the security screen.


Managing Custom Certificates

Procedure


Step 1

Back up the following files that are overwritten when you upgrade or perform a fresh installation of IoT FND:

  1. In the /opt/cgms/server/cgms/conf/ directory:

    • jbossas.keystore.password

    • jbossas.keystore

  2. In the /opt/cgms/server/cgms/deploy/ directory:

  3. In the /opt/cgms/server/cgms/conf directory:

    • VAULT.dat

    • vault.keystore

Step 2

Perform the IoT FND upgrade or new installation. Refer to the appropriate installation chapter within this guide:

Installing Cisco IoT FND-RPM for the First Time - Oracle Deployment

Step 3

Copy the above files to their respective folders, and restart IoT FND.


Managing North Bound API Events

The North Bound (NB) API client can send events using HTTPS. NB API clients must subscribe to IoT FND by providing a valid HTTPS URL over which IoT FND sends events.

The NB API HTTPS communication uses either self-signed certificates or custom CA certificate.

Self-Signed Certificate

By default, a new self-signed FND Web certificate is generated in jbossas.kesytore everytime when FND is upgraded or installed.

If you are using self-signed certificates, then navigate to ADMIN > SYSTEM MANAGEMENT > CERTIFICATES and check the Allow self-signed certificate for Northbound Event Receivers check box.

Custom CA Certificate

NB API HTTPS communication with FND can also be done using custom CA certificates. In this case, the custom CA certificate for FND Web installed in jbossas.keystore is used.

The jbossas.keystore must contain the following entries:

  • Issuing CA Certificate:

    • If the FND Web certificate is issued by the sub CA server, then the certificate of the sub CA server is installed in the keystore.

    • If the certificate is issued by the root CA server, then the certificate of the root CA server is installed in the keystore.

  • The root CA certificate of the sub-CA server.

  • The certificate that is generated for FND Web server by issuing sub CA server or root CA server.


Note


Starting from IoT FND 4.4.0 release, the issuer CA certificate also needs to be installed in the jbossas.keystore in addition to the Web certificate installed for FND from custom CA.


Configuring IoT FND to Access the Keystore

After you create cgms_keystore and import the NMS and CA certificates to it, configure IoT FND to access the cgms_keystore file.

To set the keystore password:

Procedure


Step 1

Stop IoT FND.

Step 2

Run the setupCgms.sh script:

pwd
/opt/cgms/bin ./setupCgms.sh

06-12-2018 10:21:39 PDT: INFO: ========== CG-NMS Setup Started - 2018-06-12-10-21-39 =====
06-12-2018 10:21:39 PDT: INFO: Log file: /opt/cgms/bin/../server/cgms/log/cgms_setup.log
Are you sure you want to setup CG-NMS (y/n)? y
06-12-2018 10:21:39 PDT: INFO: User response: y
...
Do you want to change the keystore password (y/n)? y
06-12-2018 10:21:52 PDT: INFO: User response: y
Enter keystore password: keystore_password
Re-enter keystore password: keystore_password
06-12-2018 10:21:59 PDT: INFO: Configuring keystore password. This may take a while.
Please wait...
06-12-2018 10:22:00 PDT: INFO: Keystore password configured.
...

This script saves the password set in the cgms.properties file.

Step 3

Start IoT FND.

Tip

 
To protect the cgms_keystore and cgms.properties files, set their permissions to root read only.

Caution


Protect your system! Ensure that only root has access to the IoT FND server. Your firewall should only allow SSH access from internal hosts.


Configuring the TPS Proxy to Access the Keystore

To configure the TPS proxy to access the keystore:

Procedure


Step 1

Change to the tpsproxy bin directory:

cd /opt/cgms-tpsproxy/bin

Step 2

Convert your chosen password into encrypted form:

[root@fndnms bin]#./encryption_util.sh
Usage: EncryptionUtil <encrypt|decrypt> <data>
[root@fndnms bin]#./encryption_util.sh encrypt test
Kq+bA+oLBlo=

Step 3

Copy the encrypted password into the tpsproxy.properties file:

  1. Open the file for editing.

    cd /opt/cgms-tpsproxy/conf
    emacs tpsproxy.properties
  2. Add this line to the file:

    cgms-keystore-password-hidden=keystore_password

    In this example, the encrypted keystore_password is “7jlXPniVpMvat+TrDWqh1w==”

Step 4

Restart the TPS proxy by running the following command:

RHEL Version

Command

8.x

systemctl restart tpsproxy

7.x

service tpsproxy restart

Setting Up the HSM Client

Complete the following procedures to set up the HSM client:


Note


If your installation uses SSM for CSMP-based messaging, see chapter, "Installing Cisco IoT FND-RPM for the First Time - Oracle Deployment".

Installing the HSM Client on the IoT FND Server

The Hardware Security Module (HSM) works as a security server listening at port 1792. For IoT FND to communicate with HSM:

  1. Install the HSM client on the IoT FND server.

  2. Configure the HSM client to have the certificate for HSM.

  3. Upload the certificate to HSM.

This section describes how to install and configure the HSM client, assuming that HSM is at 172.16.0.1 and the client at 172.31.255.254.

To install and set up an HSM client:

Procedure


Step 1

Get the HSM client package, unpack it, and run the installation script:

sh install.sh

Step 2

Create the client certificate:

cd /usr/safenet/lunaclient/bin/

Step 3

Create the client certificate:

./vtl createCert -n  ip_address_of_hsm_client

Step 4

Download the HSM certificate from the HSM server:

scp admin@ip_address_of_hsm_server
:server.pem.

Step 5

Upload the client certificate to the HSM server:

scp../cert/client/ip_address_of_hsm_client.pem 
admin@ip_address_of_hsm_server:.

Step 6

Load the HSM certificate:

vtl addServer -n 
ip_address_of_hsm_server -c server.pem.

Step 7

Ensure that the HSM server is added:

vtl listServer

Step 8

From the HSM client, use SSH to log in to the HSM server:

ssh admin@ip_address_of_hsm_server
Last login: Mon Aug 15 15:36:43 2018 from 10.27.164.171
Luna SA 5.0.1-2 Command Line Shell - Copyright (c) 2001-2010 SafeNet, Inc. All rights reserved.
[TestLunaSA1] lunash:>

Step 9

Use SSH to perform these steps on the HSM server:

  1. Add the client to the HSM server:

    [TestLunaSA1] lunash:>client register -c hsm_client_name -i ip_address_of_hsm_client
    'client register' successful. Command Result : 0 (Success)
  2. List the clients that are defined on the server and ensure that the client was added:

    [TestLunaSA1] lunash:>client list
    registered client 1: cg-nms
    registered client 2: hsm_client_name
    Command Result : 0 (Success)
  3. Assign the client to a partition:

    [TestLunaSA1] lunash:>client assignPartition -c hsm_client_name 
    -p partition_name
    'client assignPartition' successful.
    Command Result : 0 (Success)
  4. Log out of HSM.

Step 10

On the server running the HSM client, verify the HSM client installation:

vtl verify
The following Luna SA Slots/Partitions were found:
Slot Serial # Label
==== ======== =====
1 151285008 TestPart1

For a fresh install of IoT FND and HSM integration, the CSMP certificate appears in the IoT FND UI only when an endpoint/meter is added to IoT FND, irrespective of whether the meter/endpoint is registered to IoT FND or not.

Note


You can also add a dummy entry for meter/endpoint, if there is no real endpoint or meter to add at the point of testing CSMP certificate display.

Apart from the CSMP certificate displayed in the GUI, you can also use the following methods to verify if IoT FND can access and retrieve the CSMP certificate from HSM:

  • Method 1

    Run the following command:

    cat /opt/cgms/server/cgms/log/server.log | grep -i HSM

    If you get the below message, then IoT FND and HSM communication is successful, and IoT FND can retrieve the public key.

    %IOTFND-6-UNSPECIFIED: %[ch=HSMKeyStore][sev=INFO]
    [tid=MSC service thread 1-3]: 
    Retrieved public key: 3059301306072a8648ce3d020106082a8648ce3d03010703
    420004d914167514ec0a110
    f3170eef742a000572cea6f0285a3074db87e43da398ab016e40ca4be5b888c26c4
    fe91106cbf685a04b0f61d599826bdbcff25cf065d24
  • Method 2

    Run the following command. The cmu list command checks if IoT FND can see two objects stored in HSM partition, namely private keys and CSMP certificate.

    [root@iot-fnd ~]# cd /usr/safenet/lunaclient/bin
    [root@iot-fnd bin]# ./cmu list
    Certificate Management Utility (64-bit) v7.3.0-165. 
    Copyright (c) 2018 SafeNet. All rights reserved.
    
    Please enter password for token in slot 0 : *******
    
    handle=2000001 label=NMS_SOUTHBOUND_KEY
    handle=2000002 label=NMS_SOUTHBOUND_KEY--cert0
    You have new mail in /var/spool/mail/root 
    

Step 11

After the HSM client installation completes, run the test suite ckdemo.

ckdemo
Ckdemo is the property of SafeNet Inc and is provided to our customers for
diagnostic and development purposes only. It is not intended for use in
production installations. Any re-distribution of this program in whole or
in part is a violation of the license agreement.
 
CrystokiConnect() (modified on Oct 18 2018 at 20:57:53)
 
*** CHRYSTOKI DEMO - SIMULATION LAB ***
 
 
Status: Doing great, no errors (CKR_OK)
 
TOKEN FUNCTIONS
( 1) Open Session ( 2) Close Session ( 3) Login
( 4) Logout ( 5) Change PIN ( 6) Init Token
( 7) Init Pin ( 8) Mechanism List ( 9) Mechanism Info
(10) Get Info (11) Slot Info (12) Token Info
(13) Session Info (14) Get Slot List (15) Wait for Slot Event
(18) Factory Reset (19) CloneMofN
OBJECT MANAGEMENT FUNCTIONS
(20) Create object (21) Copy object (22) Destroy object
(23) Object size (24) Get attribute (25) Set attribute
(26) Find object (27) Display Object
SECURITY FUNCTIONS
(40) Encrypt file (41) Decrypt file (42) Sign
(43) Verify (44) Hash file (45) Simple Generate Key
(46) Digest Key
HIGH AVAILABILITY RECOVERY FUNCTIONS
(50) HA Init (51) HA Login
KEY FUNCTIONS
(60) Wrap key (61) Unwrap key (62) Generate random number
(63) Derive Key (64) PBE Key Gen (65) Create known keys
(66) Seed RNG (67) EC User Defined Curves
CA FUNCTIONS
(70) Set Domain (71) Clone Key (72) Set MofN
(73) Generate MofN (74) Activate MofN (75) Generate Token Keys
(76) Get Token Cert(77) Sign Token Cert(78) Generate CertCo Cert
(79) Modify MofN (86) Dup. MofN Keys (87) Deactivate MofN
(88) Get Token Certificates (112) Set Legacy Cloning Domain
OTHERS
(90) Self Test
(94) Open Access (95) Close Access
(97) Set App ID (98) Options (100) LKM Commands
OFFBOARD KEY STORAGE:
(101) Extract Masked Object (102) Insert Masked Object
(103) Multisign With Value (104) Clone Object
(105) SIMExtract (106) SIMInsert
(107) SimMultiSign (118) Extract Object
(119) Insert Object
SCRIPT EXECUTION:
(108) Execute Script (109) Execute Asynchronous Script
(110) Execute Single Part Script
CLUSTER EXECUTION:
(111) Get Cluster State
SRK FUNCTIONS:
(200) SRK Get State (201) SRK Restore (202) SRK Resplit
(203) SRK Zeroize (204) SRK Enable/Disable
 
( 0) Quit demo
 
Enter your choice : 1
 
Slots available:
slot#1 - LunaNet Slot
slot#2 - Luna UHD Slot
slot#3 - Luna UHD Slot
slot#4 - Luna UHD Slot
Select a slot: 1
 
SO[0] or normal user[1]?
 
You must enter a number between 0 and 1: 1
 
Status: Doing great, no errors (CKR_OK)
 
TOKEN FUNCTIONS
( 1) Open Session ( 2) Close Session ( 3) Login
( 4) Logout ( 5) Change PIN ( 6) Init Token
( 7) Init Pin ( 8) Mechanism List ( 9) Mechanism Info
(10) Get Info (11) Slot Info (12) Token Info
(13) Session Info (14) Get Slot List (15) Wait for Slot Event
(18) Factory Reset (19) CloneMofN
OBJECT MANAGEMENT FUNCTIONS
(20) Create object (21) Copy object (22) Destroy object
(23) Object size (24) Get attribute (25) Set attribute
(26) Find object (27) Display Object
SECURITY FUNCTIONS
(40) Encrypt file (41) Decrypt file (42) Sign
(43) Verify (44) Hash file (45) Simple Generate Key
(46) Digest Key
HIGH AVAILABILITY RECOVERY FUNCTIONS
(50) HA Init (51) HA Login
KEY FUNCTIONS
(60) Wrap key (61) Unwrap key (62) Generate random number
(63) Derive Key (64) PBE Key Gen (65) Create known keys
(66) Seed RNG (67) EC User Defined Curves
CA FUNCTIONS
(70) Set Domain (71) Clone Key (72) Set MofN
(73) Generate MofN (74) Activate MofN (75) Generate Token Keys
(76) Get Token Cert(77) Sign Token Cert(78) Generate CertCo Cert
(79) Modify MofN (86) Dup. MofN Keys (87) Deactivate MofN
(88) Get Token Certificates (112) Set Legacy Cloning Domain
OTHERS
(90) Self Test
(94) Open Access (95) Close Access
(97) Set App ID (98) Options (100) LKM Commands
OFFBOARD KEY STORAGE:
(101) Extract Masked Object (102) Insert Masked Object
(103) Multisign With Value (104) Clone Object
(105) SIMExtract (106) SIMInsert
(107) SimMultiSign (118) Extract Object
(119) Insert Object
SCRIPT EXECUTION:
(108) Execute Script (109) Execute Asynchronous Script
(110) Execute Single Part Script
CLUSTER EXECUTION:
(111) Get Cluster State
SRK FUNCTIONS:
(200) SRK Get State (201) SRK Restore (202) SRK Resplit
(203) SRK Zeroize (204) SRK Enable/Disable
 
( 0) Quit demo
 
Enter your choice : 3
Security Officer[0]
Crypto-Officer [1]
Crypto-User [2]: 1
Enter PIN : 9JT5-WMYG-E5FE-TExs
 
Status: Doing great, no errors (CKR_OK)
 
TOKEN FUNCTIONS
( 1) Open Session ( 2) Close Session ( 3) Login
( 4) Logout ( 5) Change PIN ( 6) Init Token
( 7) Init Pin ( 8) Mechanism List ( 9) Mechanism Info
(10) Get Info (11) Slot Info (12) Token Info
(13) Session Info (14) Get Slot List (15) Wait for Slot Event
(18) Factory Reset (19) CloneMofN
OBJECT MANAGEMENT FUNCTIONS
(20) Create object (21) Copy object (22) Destroy object
(23) Object size (24) Get attribute (25) Set attribute
(26) Find object (27) Display Object
SECURITY FUNCTIONS
(40) Encrypt file (41) Decrypt file (42) Sign
(43) Verify (44) Hash file (45) Simple Generate Key
(46) Digest Key
HIGH AVAILABILITY RECOVERY FUNCTIONS
(50) HA Init (51) HA Login
KEY FUNCTIONS
(60) Wrap key (61) Unwrap key (62) Generate random number
(63) Derive Key (64) PBE Key Gen (65) Create known keys
(66) Seed RNG (67) EC User Defined Curves
CA FUNCTIONS
(70) Set Domain (71) Clone Key (72) Set MofN
(73) Generate MofN (74) Activate MofN (75) Generate Token Keys
(76) Get Token Cert(77) Sign Token Cert(78) Generate CertCo Cert
(79) Modify MofN (86) Dup. MofN Keys (87) Deactivate MofN
(88) Get Token Certificates (112) Set Legacy Cloning Domain
OTHERS
(90) Self Test
(94) Open Access (95) Close Access
(97) Set App ID (98) Options (100) LKM Commands
OFFBOARD KEY STORAGE:
(101) Extract Masked Object (102) Insert Masked Object
(103) Multisign With Value (104) Clone Object
(105) SIMExtract (106) SIMInsert
(107) SimMultiSign (118) Extract Object
(119) Insert Object
SCRIPT EXECUTION:
(108) Execute Script (109) Execute Asynchronous Script
(110) Execute Single Part Script
CLUSTER EXECUTION:
(111) Get Cluster State
SRK FUNCTIONS:
(200) SRK Get State (201) SRK Restore (202) SRK Resplit
(203) SRK Zeroize (204) SRK Enable/Disable
 
( 0) Quit demo
 
Enter your choice : 27
 
Enter handle of object to display (-1 to list available objects) :
 
You must enter a number between -1 and 10000000: -1
 
No objects found
 
Enter handle of object to display (-1 to list available objects) :
 
You must enter a number between -1 and 10000000:
 
You must enter a number between -1 and 10000000:
 
You must enter a number between -1 and 10000000: 0
ERROR: Can not find object with handle 0
 
Status: C_GetObjectSize returned error. (CKR_OBJECT_HANDLE_INVALID)
 
TOKEN FUNCTIONS
( 1) Open Session ( 2) Close Session ( 3) Login
( 4) Logout ( 5) Change PIN ( 6) Init Token
( 7) Init Pin ( 8) Mechanism List ( 9) Mechanism Info
(10) Get Info (11) Slot Info (12) Token Info
(13) Session Info (14) Get Slot List (15) Wait for Slot Event
(18) Factory Reset (19) CloneMofN
OBJECT MANAGEMENT FUNCTIONS
(20) Create object (21) Copy object (22) Destroy object
(23) Object size (24) Get attribute (25) Set attribute
(26) Find object (27) Display Object
SECURITY FUNCTIONS
(40) Encrypt file (41) Decrypt file (42) Sign
(43) Verify (44) Hash file (45) Simple Generate Key
(46) Digest Key
HIGH AVAILABILITY RECOVERY FUNCTIONS
(50) HA Init (51) HA Login
KEY FUNCTIONS
(60) Wrap key (61) Unwrap key (62) Generate random number
(63) Derive Key (64) PBE Key Gen (65) Create known keys
(66) Seed RNG (67) EC User Defined Curves
CA FUNCTIONS
(70) Set Domain (71) Clone Key (72) Set MofN
(73) Generate MofN (74) Activate MofN (75) Generate Token Keys
(76) Get Token Cert(77) Sign Token Cert(78) Generate CertCo Cert
(79) Modify MofN (86) Dup. MofN Keys (87) Deactivate MofN
(88) Get Token Certificates (112) Set Legacy Cloning Domain
OTHERS
(90) Self Test
(94) Open Access (95) Close Access
(97) Set App ID (98) Options (100) LKM Commands
OFFBOARD KEY STORAGE:
(101) Extract Masked Object (102) Insert Masked Object
(103) Multisign With Value (104) Clone Object
(105) SIMExtract (106) SIMInsert
(107) SimMultiSign (118) Extract Object
(119) Insert Object
SCRIPT EXECUTION:
(108) Execute Script (109) Execute Asynchronous Script
(110) Execute Single Part Script
CLUSTER EXECUTION:
(111) Get Cluster State
SRK FUNCTIONS:
(200) SRK Get State (201) SRK Restore (202) SRK Resplit
(203) SRK Zeroize (204) SRK Enable/Disable
 
( 0) Quit demo
 
Enter your choice : 0
 
Exiting GESC SIMULATION LAB

Configuring the HSM HA Client


Note


You must perform the steps in this section even if you only have one HSM server. You must also create a group that contains the HSM server.


To configure the HSM HA client:

Procedure


Step 1

Configure the HSM client so that it connects with both HSM servers, as described in Installing the HSM Client on the IoT FND Server.

Step 2

Change to the /usr/safenet/lunaclient/bin/ directory:

/usr/safenet/lunaclient/bin/

Step 3

Create a group that contains only the partition of the first HSM server by running this command and providing the serial number ( serial_num) of the HSM server obtained by running the ./vtl verify command (Installing the HSM Client on the IoT FND Server), the name of the group ( group_name), and the password ( prtn_password) for accessing the partition:

./vtl haAdmin newGroup -serialNum serial_num 
-label group_name -password prtn_password

For example:

./vtl haAdmin newGroup -serialNum 151285008 
-label testGroup1 -password TestPart1
Warning: There are 2 objects currently on the new member.
Do you wish to propagate these objects within the HA
group, or remove them?
Type 'copy' to keep and propagate the existing
objects, 'remove' to remove them before continuing,
or 'quit' to stop adding this new group member.
> copy
New group with label "testGroup1" created at group number 1151285008.
Group configuration is:
HA Group Label: testGroup1
HA Group Number: 1151285008
Synchronization: enabled
Group Members: 151285008
Needs sync: no

Step 4

Add the partition of the second HSM to the group.

For example:

./vtl haAdmin addMember -group testGroup1 
-serialNum 151268008 -password TestPart1
Member 151268008 successfully added to group testGroup1. New group
configuration is:
HA Group Label: testGroup1
HA Group Number: 1151285008
Synchronization: enabled
Group Members: 151285008, 151268008
Needs sync: yes
Please use the command 'vtl haAdmin -synchronize' when
you are ready to replicate data between all members of the
HA group. (If you have additional members to add, you may
wish to wait until you have added them before synchronizing
to save time by avoiding multiple synchronizations.)

Step 5

Verify that both partitions can be listed:

./vtl haAdmin -listGroups
If you would like to see synchronization data for group testGroup1,
please enter the password for the group members. (Press enter to
skip the synchronization check):
> *********
HA Group Label: testGroup1
HA Group Number: 1151285008
Synchronization: enabled
Group Members: 151285008, 151268008
Needs sync: yes
HA auto recovery: disabled
HA logging: disabled

Step 6

Enable HA auto recovery:

[root@localhost bin]#./vtl haAdmin -autoRecovery
vtl haAdmin -autoRecovery [ -retry 
<count> | -interval <seconds> ] -retry 
<retry count>-interval <seconds>
  • Set the retry value between -1 and 500 where, -1 is an infinite number of retries and 0 disables auto recovery.

  • Specify the auto recovery poll interval in seconds.

Step 7

Enable HA.

./vtl haAdmin -HAOnly -enable

Configuring the HSM Group Name and Password

The HSM Group name and password is provided by Cisco at manufacture.

To allow the HSM Group name and password to be configured by the user:

Procedure


Step 1

Edit the cgms.properties file to add the following properties:

  1. hsm-keystore-name <name>

  2. hsm-keystore-password <encrypted password>

Tip


You can use the same HSM server for multiple IoT FND installations by creating multiple partitions on the HSM server, configuring the HSM client, and specifying the partition name and partition password in the cgms.properties file.

Step 2

Save the cgms.properties file.

Step 3

To apply these changes, start the cgms service:

RHEL Version

Command

8.x

systemctl start cgms

7.x

service cgms start