Installing the Cisco VG400 Voice Gateway

The following chapter describes how to install and connect a Cisco VG400 Voice Gateway. The following sections provide the installation procedures in detail:


Warning


This warning symbol means danger. You are in a situation that could cause bodily injury. Before you work on any equipment, be aware of the hazards involved with electrical circuitry and be familiar with standard practices for preventing accidents. Use the statement number provided at the end of each warning to locate its translation in the translated safety warnings that accompanied this device. Statement 1071


Warning


Only trained and qualified personnel should be allowed to install, replace, or service this equipment. Statement 1030


Warning


Read the installation instructions before using, installing or connecting the system to the power source. Statement 1004


Warning


Ultimate disposal of this product should be handled according to all national laws and regulations. Statement 1040


Safety Recommendations

Before you begin the installation, read the following safety warnings and recommendations. The following information is included to alert you to safety recommendations and best practices when working with this equipment.

Maintaining Safety with Electricity

Follow these guidelines when working on equipment powered by electricity.


Warning


Installation of the equipment must comply with local and national electrical codes. Statement 1074


Warning


Avoid using or servicing any equipment that has outdoor connections during an electrical storm. There may be a risk of electric shock from lightning. Statement 1088.


Warning


This equipment contains a ring signal generator (ringer), which is a source of hazardous voltage. Do not touch the RJ-11 (phone) port wires (conductors), the conductors of a cable connected to the RJ-11 port, or the associated circuit-board when the ringer is active. The ringer is activated by an incoming call. Statement 1042


General Safety Practices

Follow these guidelines to ensure personal safety and to protect the equipment:

  • Keep the chassis area clear and dust-free during and after installation.
  • Put the removed chassis cover in a safe place.
  • Keep tools away from walk areas where you and others could fall over them.
  • Do not wear loose clothing that could get caught in the chassis.
  • Wear safety glasses if you are working under any conditions that might be hazardous to your eyes.

Safety Tips

Use these tips as safety guidelines when installing or working around this equipment:

  • Locate the emergency Power-off switch for the room in which you are working. Then, if an electrical accident occurs, you can act quickly to turn off the power.
  • Disconnect all power before installing or removing a chassis.
  • Do not work alone if potentially hazardous conditions exist.
  • Never assume that power is disconnected from a circuit. Always check.
  • Look carefully for possible hazards in your work area, such as moist floors, ungrounded power extension cables, and missing safety grounds.
  • If an electrical accident occurs, proceed as follows:
    • Use caution; do not become a victim yourself.
    • Turn off power to the system.
    • If possible, send another person to get medical aid. Otherwise, assess the condition of the victim and then call for help.
    • Determine if the person needs rescue breathing or external cardiac compressions; then take appropriate action.

Preventing Electrostatic Discharge Damage

Electrostatic discharge (ESD) can damage equipment and impair electrical circuitry. ESD occurs when electronic components are improperly handled; it can result in complete or intermittent failures.

Always follow ESD-prevention procedures when removing and replacing components.

  • Ensure that the chassis is electrically connected to earth ground.
  • Wear an ESD-preventive wrist strap, ensuring that it makes good skin contact.
  • Connect the clip to the ESD-strap connection jack (to the left of the power switch on the rear of the chassis) or to an unpainted chassis frame surface.

Caution


For safety, periodically check the resistance value of the antistatic strap, which should be between 1 and 10 megohm (Mohm).


Unpacking and Inspection

Do not unpack the Cisco VG400 until you are ready to install it. If the installation site is not ready, keep the chassis in its shipping container to prevent accidental damage.

The Cisco VG400, cables, printed publications, and any optional equipment you ordered might be shipped in more than one container. When you unpack each shipping container, check the packing list to ensure that you received all the following items:

  • Cisco VG400 Voice Gateway
  • Power cord (Auto expland via PDT)
  • RJ-45-to-DB-25 adapter cable (labeled Console) - choose an option for this cable, or by default, the auto expand option is delivered
  • RJ-45-to-DB-9 adapter cable (labeled Auxiliary) - choose an option for this cable, or by default, the auto expand option is delivered
  • Rack-mounting - place an order through the ordering tool

Inspect all the items for shipping damage. If anything appears damaged, or if you encounter problems when installing or configuring your system, contaca customer service representative.

Install the Cisco VG400 Voice Gateway

You can install the Cisco VG400 Voice Gateway in one of the following ways:

Setting the Chassis on a Desktop

You can place the router on a desktop, bench top, or shelf.


Note


Do not set the chassis in an area where the high acoustic noise can be an issue.

Caution


Do not place anything on top of the hardware that weighs more than 5 lbs. or applies a point load of greater than 1 lbs. Excessive weight damages the chassis. Additionally, do not stack other electronic equipment on top of the hardware so as not to impede or interfere with the cooling mechanisms.


Warning


To prevent airflow restriction, allow clearance around the ventilation openings to be at least 1 inch (2.54cms). Statement 1076.


After you install the voice gateway, you must connect the chassis to a reliable earth ground. For the chassis ground connection procedures, see the Chassis Grounding section.

Attach Cisco VG400 Voice Gateway Chassis to Wall

Procedure


Step 1

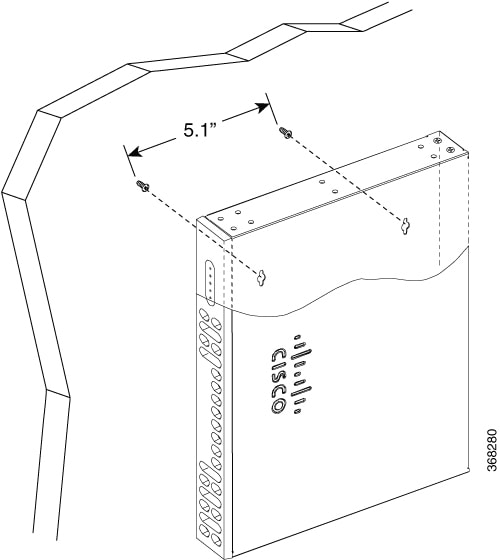
Attach the voice gateway chassis to the wall by using the fasteners.

Note


The fasteners that you use must support the weight of the VG400 Voice Gateway.

The head diameter of the fasteners should be sized to fit in the key slot on the chassis bottom. The maximum diameter of the fastener head should not exceed .250” and the maximum shank diameter should not exceed .130”.

You must adjust the fastener to allow for the head of the fastener insert into the key slot.

Caution


Your chassis installation must allow unrestricted airflow for chassis cooling.

Step 2

Attach the voice gateway to as shown in the following image.

Note


If you prefer, you can also install the voice gateway diagonally using the other two sides.

VG400 Voice Gateway - Wall Mount

After you install the voice gateway, you must connect the chassis to a reliable earth ground. For the chassis ground connection procedure, see the Chassis Grounding section.


Mount Cisco VG400 Voice Gateway Chassis in Rack


Warning


To prevent bodily injury when mounting or servicing this unit in a rack, you must take special precautions to ensure that the system remains stable. The following guidelines are provided to ensure your safety:

  • This unit should be mounted at the bottom of the rack if it is the only unit in the rack.

  • When mounting this unit in a partially filled rack, load the rack from the bottom to the top with the heaviest component at the bottom of the rack.

  • If the rack is provided with stabilizing devices, install the stabilizers before mounting or servicing the unit in the rack. Statement 1006.


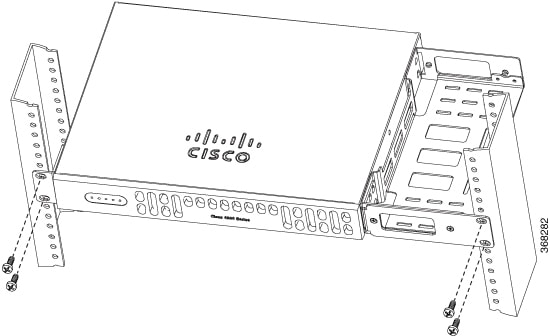
Cisco VG400 Voice Gateway can be installed in 19-inch (48.26-cm) EIA racks. Use the standard brackets shipped with the hardware for mounting the chassis in a 19-inch EIA rack.

You can mount the voice gateway in the following ways:

  • Center-front mounting: Brackets attached in the center front of the chassis with only the front panel facing forward.

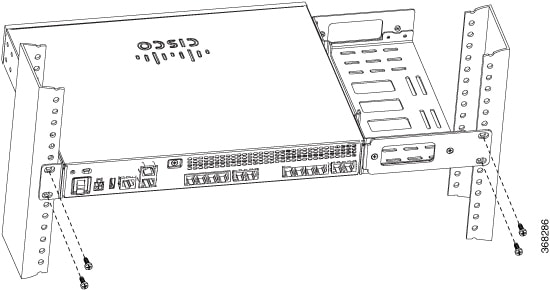
  • Center-back mounting: Brackets attached in the center back of the chassis with only the back panel facing forward.

  • Front mounting: Brackets attached at the front of the chassis with the front panel facing forward.

  • Back mounting: Brackets attached at the back of the chassis with the back panel facing forward.

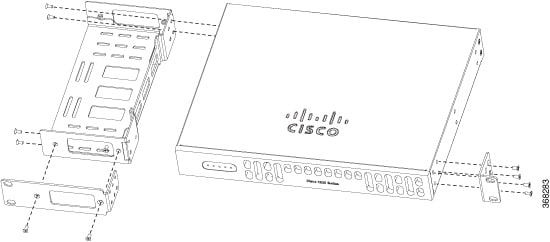
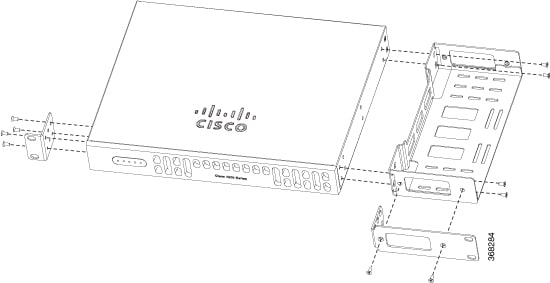
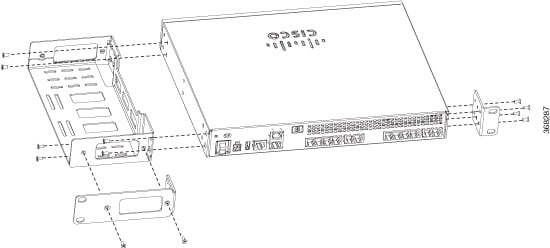
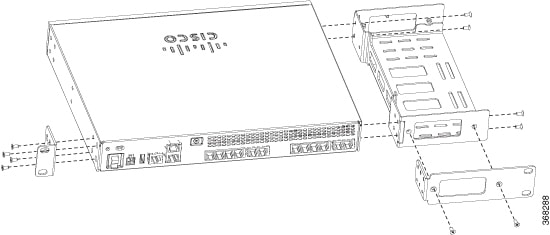
  1. Attach the mounting brackets to the chassis as shown in the following images, using the screws provided.


    Caution


    Do not over-torque the screws. The recommended torque is 15 to 18 inch-lb (1.7 to 2.0 N-m).


  2. Attach the second bracket to the opposite side of the chassis. Use a number-2 Phillips screwdriver to install the number-8 bracket screws.


    Caution


    Your chassis installation must allow unrestricted airflow for chassis cooling.


    Figure 1. Bracket Installation for Front Mounting
    Figure 2. Bracket Installation for Back Mounting

    3

    Screws

    4

    19-inch EIA brackets

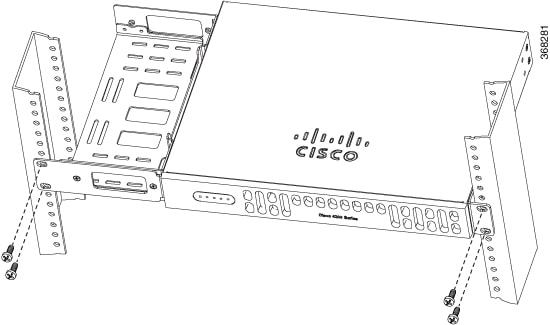
  3. Use the screws provided with the rack to install the chassis in the rack. For the 19-inch EIA bracket, start the lower pair of screws first, and rest the brackets on the lower screws while you insert the upper pair of screws.


    Tip


    The screw slots in the brackets are spaced to line up with every second pair of screw holes in the rack. When the correct screw holes are used, the small, threaded holes in the brackets line up with unused screw holes in the rack. If the small holes do not line up with the rack holes, you must raise or lower the brackets to the next rack hole.


    1

    Mounting Screws (4)

After you install the voice gateway, you must connect the chassis to a reliable earth ground. For the chassis ground connection procedures, see the Chassis Grounding section.

Chassis Grounding


Warning


To reduce the risk of electric shock, the chassis of this equipment needs to be connected to permanent earth ground during normal use. Statement 445


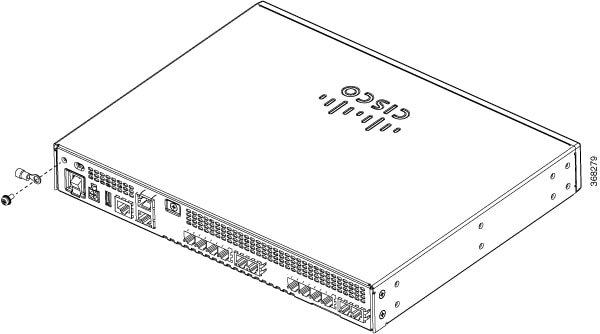
Use a size 14 AWG (2 mm2) or larger copper wire and an appropriate user-supplied ring terminal with an inner diameter of 1/4 in. (5–7 mm).

To install the ground connection for your router, perform the following steps:

Procedure


Step 1

Strip one end of the ground wire to the length required for the ring terminal.

Step 2

Crimp the ground wire to the ring terminal, using a crimp tool of the appropriate size.

Step 3

Attach the ground lug or ring terminal to the chassis as shown in the following image. Use one of the screws provided. Tighten the screws to a torque of 8 to 10 in-lb (0.9 to 1.1 N-m).

Figure 3. Chassis Ground Connection on the Voice Gateway
Chassis Grounding - VG400 Voice Gateway

Step 4

Connect the other end of the ground wire to a known reliable earth ground point at your site.


Connect to Power Supply

This section explains how to connect AC power to the voice gateway.


Warning


Read the installation instructions before using, installing or connecting the system to the power source. Statement 1004


Warning


This product relies on the building’s installation for short-circuit (overcurrent) protection. Ensure that the protective device is rated not greater than: 20A Statement 1005


To connect the Cisco Voice Gateway to an AC power outlet, perform the following steps:

  1. Connect the AC adapter to an AC power outlet.

  2. Plug the adapter cord into the router.

Power-On Procedure

Perform this procedure to power on your Cisco VG400 Voice Gateway, and verify that it goes through its initialization and self-test. When this is finished, the Cisco VG400 Voice Gateway is ready to configure.

To power on the Cisco VG400 Voice Gateway, perform the following:

Before you begin

Before you power on the Cisco VG400 Voice Gateway, ensure that:

  • The chassis is securely mounted

  • Power cable is connected

  • Interface cables are connected

SUMMARY STEPS

  1. Power on your terminal or PC, and configure it for 9600 bps, 8 data bits, 1 stop bit, and no parity.
  2. Move the Cisco VG400 Voice Gateway power switch to the ON position.
  3. Enter no to proceed with manual configuration using the CLI:
  4. Press Return to terminate autoinstall and continue with manual configuration.
  5. Press Return to bring up the Router> prompt:
  6. Enter privileged EXEC mode:
  7. Continue with the Troubleshooting section.

DETAILED STEPS


Step 1

Power on your terminal or PC, and configure it for 9600 bps, 8 data bits, 1 stop bit, and no parity.

Step 2

Move the Cisco VG400 Voice Gateway power switch to the ON position.

The green LED next to the auxiliary port comes on and the fan starts to operate. If this does not happen, see the Troubleshooting section.

The following message is displayed at the end of the boot-up messages:

Example:


--- System Configuration Dialog ---
Would you like to enter the initial configuration dialog? [yes/no]:

Step 3

Enter no to proceed with manual configuration using the CLI:

Example:


Would you like to enter the initial configuration dialog? [yes/no]: no
Would you like to terminate autoinstall? [yes]

Step 4

Press Return to terminate autoinstall and continue with manual configuration.

Several messages are displayed, ending with a line similar to the following:

Example:


...
Copyright (c) 1986-2018 by cisco Systems, Inc.
Compiled <date
> <time
> by <person
>

Step 5

Press Return to bring up the Router> prompt:

Example:


...
flashfs[4]: Initialization complete.
Router>

Step 6

Enter privileged EXEC mode:

Example:


Router> enable
 
Router#

Step 7

Continue with the Troubleshooting section.

Note

 
If the rommon 1> prompt appears, your system has booted in ROM monitor mode. For information on the ROM monitor, refer to the router rebooting and ROM monitor information in the Cisco IOS Configuration Fundamentals Configuration Guide for your Cisco IOS software release.