Host a Simple
Application on IOS XR
This section explains the different kinds of application hosting, and demonstrates how a simple application, such as iPerf, can be hosted natively or in a third-party container on IOS XR.
Types of Application Hosting
Application hosting on IOS XR is offered in two variants:
-
Native: You can host applications inside the container provided by IOS XR. Applications must be built with a Cisco-specified Linux distribution (Wind River Linux 7), which uses RPM as the package manager. The applications use the libraries found in the IOS XR root file system. Configuration management tools, such as Chef and Puppet, can be used to automate the installation of the application.
-
Container: You can create your own container on IOS XR, and host applications within the container. The applications can be developed using any Linux distribution. This is well suited for applications that use system libraries that are different from that provided by the IOS XR root file system.
Selecting the Type of Application Hosting
You can select an application hosting type, depending on your requirement and the following criteria.
-
Resources: If you need to manage the amount of resources consumed by the hosted applications, you must choose the container model, where constraints can be configured. In a native model, you can only deploy applications that use allotted resources, which are shared with internal IOS XR processes.
-
Choice of Environment: Applications to be hosted natively must be built with the Wind River Linux 7 distribution that is offered by IOS XR. If you decide to choose the Linux distribution that is to be used for building your applications, then you must choose the container model. When you host an application using the container model, you can pre-package it prior to deployment.
Native Application Hosting
This section describes the architecture and workflow for native application hosting.
Workflow for Native Application Hosting By Using the Shell Script
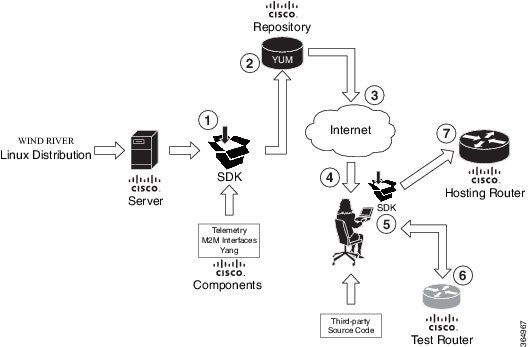
The workflow for native application hosting by using a shell script is illustrated in the following figure.
-
The SDK is built with Wind River Linux 7 (WRL7) distribution that uses a Yocto project workspace.
IOS XR uses the open embedded kernel infrastructure from the Yocto project as a base. Thus, IOS XR contains all the system libraries, and the basic tool chain to support applications. As a result, applications that are to be hosted natively on IOS XR must be rebuilt for the Wind River distribution and can later be customized with other IOS XR features, such as Telemetry and YANG data models.
-
The SDK is compiled and saved in the Cisco (YUM) repository. 
Note
The native application hosting environment is built either by using the QEMU hypervisor, or by running the SDK shell script.
Yellowdog Updated, Modified (YUM) is an open source command-line package management utility for Linux that enables creating and compiling of an embedded distribution source file into suitable formats, such as Red Hat Packet Manager (RPM). YUM allows automatic package updates. By using YUM, you can install, delete, update, and view available packages.
-
The Cisco repository is made accessible to the application developer over the Internet.
-
The developer downloads the SDK and runs the SDK shell script for installation. See Create a Cross-Build Environment Using the SDK Shell Script for more information.
-
The developer rebuilds the application to be hosted on IOS XR. See Build Native RPMs for more information.
-
The developer hosts the rebuilt application on the test router.
-
The developer hosts the rebuilt application on the hosting router running IOS XR.
For information on preparing the build environment for native application hosting, see Set Up the Build Environment.
Native Application Hosting Architecture
The architecture for native application hosting is described in the following figure.
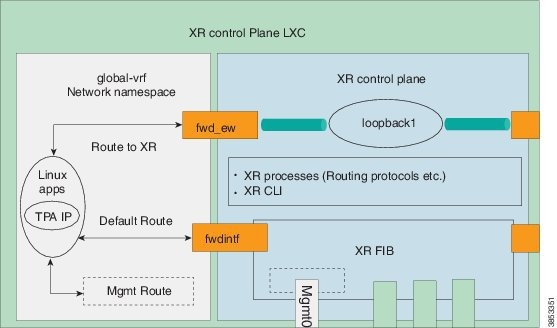
The XR control plane LXC offers the following two components:
-
global-vrf network namespace: All native applications reside in the global-vrf network namespace. The applications use TPA IP address to communicate outside XR through the fwdintf / Loopback0 interface of XR. You can access the namespace through the XR Linux shell. The namespace contains the following routes by default:
Note
global-vrf is referred to as the Third-Party Network Namespace (TPNNS) in Cisco IOS XR Versions 5.3.2 and 6.0.0
-
XR control plane: The XR control plane contains the XR routing processes and protocols and can be accessed through the XR router console (CLI). The XR FIB is programmed by the XR control plane.
Run iPerf as a Native Application
As an example of native application hosting, you can install an iPerf client natively on IOS XR and check its connectivity with an iPerf server installed natively on another router, as described in this section.
Topology
This figure illustrates the topology used in this example.
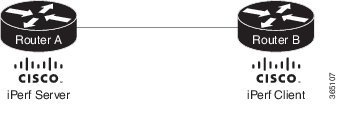
iPerf server is installed on Router A, and iPerf client is installed on Router B. Both installations are done natively on IOS XR. The iPerf client communicates with the iPerf server through the interfaces offered by IOS XR.
Prerequisites
Ensure that you have configured the two routers as shown in the topology.
Configuration Procedure
To run iPerf as a native application, follow these steps:
-
Log into Router A, and enter the XRNNS.
RP/0/RP0/CPU0:ios# run
[xr-vm_node0_RP0_CPU0:~]$
-
Install the iPerf server as an RPM on Router A.
[xr-vm_node0_RP0_CPU0:~]$yum install
https://s3.amazonaws.com/alpha-builds/iperf-2.0.5.ios_xr6.x86_64.rpm
-
Perform Steps 1 and 2 to install the iPerf client on Router B.
-
Verify the iPerf server installation on Router A.
[xr-vm_node0_RP0_CPU0:~]$ iperf -v
iperf version 2.0.5 (08 Jul 2010) pthreads
Similarly, verify the iPerf client installation on Router B.
-
Bind the Loopback0 interface on Router A to the iPerf server, and launch the iPerf server instance.
In this example, 1.1.1.1 is the assigned Loopback0 interface address of Router A, and 57730 is the port number used for communication.
[xr-vm_node0_RP0_CPU0:~]$ iperf -s -B 1.1.1.1 -p 57730
Server listening on TCP port 57730
Binding to local address 1.1.1.1
TCP window size: 85.3 KByte (default)
-
Launch the iPerf client instance on Router B, by specifying the same port number used for the iPerf server, and the management IP address of Router A.
In this example, 192.168.122.213 is the management IP address of Router A, and 57730 is the port number used to access the iPerf server.
[xr-vm_node0_RP0_CPU0:~]$ iperf -c 192.168.122.213 -p 57730
------------------------------------------------------------
Client connecting to 192.168.122.213, TCP port 57730
TCP window size: 85.0 KByte (default)
------------------------------------------------------------
[  3] local 192.168.122.1 port 46974 connected with 192.168.122.213 port 57730
[ ID] Interval       Transfer     Bandwidth
[  3]  0.0-10.0 sec   146 MBytes   122 Mbits/sec
To use UDP, instead of TCP, to communicate with the iPerf server, use the following command:
[xr-vm_node0_RP0_CPU0:~]$ iperf -c 192.168.122.213 -p 57730 -u
------------------------------------------------------------
Client connecting to 192.168.122.213, UDP port 57730
Sending 1470 byte datagrams
UDP buffer size:  208 KByte (default)
------------------------------------------------------------
[  3] local 192.168.122.1 port 41466 connected with 192.168.122.213 port 57730
[ ID] Interval       Transfer     Bandwidth
[  3]  0.0-10.0 sec  1.25 MBytes  1.05 Mbits/sec
[  3] Sent 893 datagrams
[  3] Server Report:
[  3]  0.0-10.0 sec  1.25 MBytes  1.05 Mbits/sec   0.233 ms    0/  893 (0%)
[root@hostB ~]#
-
Ping the iPerf server from the iPerf client on Router B.
[xr-vm_node0_RP0_CPU0:~]$ /bin/ping 192.164.168.10
PING 192.164.168.10 (192.164.168.10) 56(84) bytes of data.
64 bytes from 192.164.168.10: icmp_seq=1 ttl=255 time=13.0 ms
64 bytes from 192.164.168.10: icmp_seq=2 ttl=255 time=2.14 ms
64 bytes from 192.164.168.10: icmp_seq=3 ttl=255 time=2.21 ms
The iPerf client hosted on Router B accesses the iPerf server hosted on Router A.
Native application hosting for iPerf is successful.
iPerf Operations on IOS XR By Using System V Init Script
The iPerf server or client service can be started, stopped, or restarted automatically on IOS XR. To achieve this, a System V (SysV) script must be created, and added as shown in this example:
-
Create the SysV script for starting, stopping, or reloading the iPerf server or client.
In this example, the script is created for the iPerf server. To create the script for the iPerf client, instead, use the command described in Step 5 of the iPerf configuration procedure.
#!/bin/bash # # description: iPerf server # # Get function from functions library . /etc/init.d/functions # Start the service iperf start() { iperf -s -B 1.1.1.1 -p 57730 & "Starting the iPerf Server: " /path/to/iperf & ### Create the lock file ### touch /var/lock/subsys/iperf success $"iPerf server startup" echo } # Restart the service iperf stop() { iperf -s -B 1.1.1.1 -p 57730 & "Stopping the iPerf Server: " killproc iperf ### Delete the lock file ### rm -f /var/lock/subsys/iperf echo } ### main logic ### case "$1" in start) start ;; stop) stop ;; status) status iperf ;; restart|reload|condrestart) stop start ;; *) echo $"Usage: $0 {start|stop|restart|reload|status}" exit 1 esac exit 0 -
Add the script to IOS XR hosting the iPerf server or client.
bash-4.3# chkconfig --add iperf
Host a WRL7 Application Natively By Using a Vagrant Box
This section describes how you can host a Wind river Linux (WRL7) application natively by using a vagrant box.
Native Application Hosting Topology
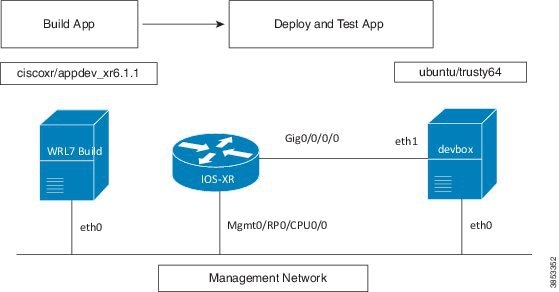
For the sake of illustration, we will use the three vagrant instance topology as shown in the following figure.
Before You Begin
Before you can start using vagrant, ensure that you have fulfilled the following requirements on your host device.
-
Latest version of Vagrant for your operating system.
-
A virtual box for your operating system.
-
Minimum of 4-5 GB of RAM with two cores.
-
(Optional) If you are using the Windows Operating System, you should download the Git bash utility for running the commands described in this section.
-
Host the two-node (rtr and devbox) application development topology as described in Deploy an Application Development Topology on Cisco IOS XR by Using a Vagrant Box.
Procedure
Use the following steps to host an application natively on IOS XR.
-
Verify if you have the IOS-XRv and the ciscoxr/appdev-xr6.1.1 vagrant boxes installed on your machine.
annseque@ANNSEQUE-WS02 MINGW64 ~
$ vagrant box list
IOS-XRv                (virtualbox, 0)
ciscoxr/appdev-xr6.1.1 (virtualbox, 1.0)
ubuntu/trusty64        (virtualbox, 20160602.0.0)
-
Clone the vagrant-xrdocs repository.
annseque@ANNSEQUE-WS02 MINGW64 ~
$ git clone https://github.com/ios-xr/vagrant-xrdocs.git
-
Navigate to the vagrant-xrdocs/native-app-topo-bootstrap directory and launch the vagrant instance.
annseque@ANNSEQUE-WS02 MINGW64 ~/vagrant-xrdocs (master) $ cd native-app-topo-bootstrap/ annseque@ANNSEQUE-WS02 MINGW64 ~/vagrant-xrdocs/native-app-topo-bootstrap (master) $ vagrant up Bringing machine 'rtr' up with 'virtualbox' provider... Bringing machine 'devbox' up with 'virtualbox' provider... Bringing machine 'wrl7_build' up with 'virtualbox' provider... ==> rtr: Clearing any previously set forwarded ports... ==> rtr: Clearing any previously set network interfaces... ==> rtr: Preparing network interfaces based on configuration... rtr: Adapter 1: nat rtr: Adapter 2: intnet ==> rtr: Forwarding ports... rtr: 57722 (guest) => 2222 (host) (adapter 1) rtr: 22 (guest) => 2223 (host) (adapter 1) ==> rtr: Running 'pre-boot' VM customizations... ==> rtr: Booting VM... ==> rtr: Waiting for machine to boot. This may take a few minutes... rtr: SSH address: 127.0.0.1:2222 rtr: SSH username: vagrant rtr: SSH auth method: private key rtr: Warning: Remote connection disconnect. Retrying... ... ==> rtr: Machine booted and ready! ==> rtr: Checking for guest additions in VM... rtr: No guest additions were detected on the base box for this VM! Guest rtr: additions are required for forwarded ports, shared folders, host only rtr: networking, and more. If SSH fails on this machine, please install rtr: the guest additions and repackage the box to continue. rtr: rtr: This is not an error message; everything may continue to work properly, rtr: in which case you may ignore this message. ==> rtr: Machine already provisioned. Run `vagrant provision` or use the `--provision` ==> rtr: flag to force provisioning. Provisioners marked to run always will still run. ==> devbox: Checking if box 'ubuntu/trusty64' is up to date... ==> devbox: A newer version of the box 'ubuntu/trusty64' is available! You currently ==> devbox: have version '20160801.0.0'. The latest is version '20160907.0.0'. Run ==> devbox: `vagrant box update` to update. ==> devbox: Clearing any previously set forwarded ports... ==> devbox: Fixed port collision for 22 => 2222. Now on port 2200. ==> devbox: Clearing any previously set network interfaces... ==> devbox: Preparing network interfaces based on configuration... devbox: Adapter 1: nat devbox: Adapter 2: intnet ==> devbox: Forwarding ports... devbox: 22 (guest) => 2200 (host) (adapter 1) ==> devbox: Booting VM... ==> devbox: Waiting for machine to boot. This may take a few minutes... devbox: SSH address: 127.0.0.1:2200 devbox: SSH username: vagrant devbox: SSH auth method: private key devbox: Warning: Remote connection disconnect. Retrying... devbox: Warning: Remote connection disconnect. Retrying... ==> devbox: Machine booted and ready! ... ==> wrl7_build: Checking if box 'ciscoxr/appdev-xr6.1.1' is up to date... ==> wrl7_build: Clearing any previously set forwarded ports... ==> wrl7_build: Fixed port collision for 22 => 2222. Now on port 2201. ==> wrl7_build: Clearing any previously set network interfaces... ==> wrl7_build: Preparing network interfaces based on configuration... wrl7_build: Adapter 1: nat ==> wrl7_build: Forwarding ports... wrl7_build: 22 (guest) => 2201 (host) (adapter 1) ==> wrl7_build: Booting VM... ==> wrl7_build: Waiting for machine to boot. This may take a few minutes... wrl7_build: SSH address: 127.0.0.1:2201 wrl7_build: SSH username: vagrant wrl7_build: SSH auth method: private key wrl7_build: Warning: Remote connection disconnect. Retrying... ... ==> wrl7_build: Welcome to the IOS XR Application Development (AppDev) VM that provides a WRL7 based native environment to build appli cations for IOS XR (Release 6.1.1) platforms. -
Verify if the WRL7 build instance has launched.
annseque@ANNSEQUE-WS02 MINGW64 ~/vagrant-xrdocs/native-app-topo-bootstrap (master)
$ vagrant status
Current machine states:

rtr                       running (virtualbox)
devbox                    running (virtualbox)
wrl7_build                running (virtualbox)
...
-
Access the WRL7 build instance through SSH, and retrieve the source code of the application you want to host natively.
In this example, we fetch the source code for the iPerf application.
annseque@ANNSEQUE-WS02 MINGW64 ~/vagrant-xrdocs/native-app-topo-bootstrap (master)
$ vagrant ssh wrl7_build

---------------------------------------------------------------------------------------------

localhost:~$ wget https://iperf.fr/download/source/iperf-2.0.9-source.tar.gz
--2016-09-13 01:54:58--  https://iperf.fr/download/source/iperf-2.0.9-source.tar.gz
Resolving iperf.fr... 194.158.119.186, 2001:860:f70a::2
Connecting to iperf.fr|194.158.119.186|:443... connected.
HTTP request sent, awaiting response... 200 OK
Length: 277702 (271K) [application/x-gzip]
Saving to: 'iperf-2.0.9-source.tar.gz'

100%[=================================================================>] 277,702      153KB/s   in 1.8s

2016-09-13 01:55:01 (153 KB/s) - 'iperf-2.0.9-source.tar.gz' saved [277702/277702]

-----------------------------------------------------------------------------------------

localhost:~$ ls
iperf-2.0.9-source.tar.gz
localhost:~$
-
Copy the source code tar ball to the /usr/src/rpm/SOURCES/ build location.
localhost:~$ sudo cp /home/vagrant/iperf-2.0.9-source.tar.gz /usr/src/rpm/SOURCES/
-
Retrieve the XML spec file (iperf.spec) for building the RPM.
localhost:~$ wget http://10.30.110.214/iperf.spec
--2016-09-13 01:58:44--  http://10.30.110.214/iperf.spec
Connecting to 10.30.110.214:80... connected.
HTTP request sent, awaiting response... 200 OK
Length: 609
Saving to: 'iperf.spec'

100%[===========================================================>] 609         --.-K/s   in 0s

2016-09-13 01:58:45 (38.2 MB/s) - 'iperf.spec' saved [609/609]

------------------------------------------------------------------------------------------------
localhost:~$ ls
iperf-2.0.9-source.tar.gz  iperf.spec
-
Build the RPM by using the retrieved spec file.
localhost:~$ sudo rpmbuild -ba iperf.spec
Executing(%prep): /bin/sh -e /var/tmp/rpm-tmp.59743
+ umask 022
+ cd /usr/lib64/rpm/../../src/rpm/BUILD
+ cd /usr/src/rpm/BUILD
+ rm -rf iperf-2.0.9
+ /bin/tar -xf -
...
Requires: libc.so.6()(64bit) libc.so.6(GLIBC_2.14)(64bit) libc.so.6(GLIBC_2.2.5)(64bit)
 libc.so.6(GLIBC_2.3)(64bit) libc.so.6(GLIBC_2.7)(64bit)
 libgcc_s.so.1()(64bit) libgcc_s.so.1(GCC_3.0)(64bit) libm.so.6()
(64bit) libm.so.6(GLIBC_2.2.5)(64bit) libpthread.so.0()(64bit)
libpthread.so.0(GLIBC_2.2.5)(64bit) libpthread.so.0(GLIBC_2.3.2)(64bit)
librt.so.1()(64bit) librt.so.1(GLIBC_2.2.5)(64bit) libstdc++.so.6()(64bit)
libstdc++.so.6(CXXABI_1.3)(64bit) libstdc++.so.6(GLIBCXX_3.4)(64bit) rtld(GNU_HASH)
Checking for unpackaged file(s): /usr/lib64/rpm/check-files /usr/lib64/rpm/../../../var/tmp/iperf-root
Wrote: /usr/src/rpm/SRPMS/iperf-2.0.9-XR_6.1.1.src.rpm
Wrote: /usr/src/rpm/RPMS/x86_64/iperf-2.0.9-XR_6.1.1.x86_64.rpm
...

localhost:~$ ls -l /usr/src/rpm/RPMS/x86_64/
total 48
-rw-r--r-- 1 root root 48118 Sep 13 02:03 iperf-2.0.9-XR_6.1.1.x86_64.rpm
-
Transfer the RPM file to XR.
-
Note down the port number on XR for transferring the RPM file.
localhost:~$ exit logout Connection to 127.0.0.1 closed. annseque@ANNSEQUE-WS02 MINGW64 ~/vagrant-xrdocs/native-app-topo-bootstrap (master) $ vagrant port rtr The forwarded ports for the machine are listed below. Please note that these values may differ from values configured in the Vagrantfile if the provider supports automatic port collision detection and resolution. 22 (guest) => 2223 (host) 57722 (guest) => 2222 (host) -
Access the WRL7 build instance, and copy the RPM file by using the SCP command with the port number of XR.
annseque@ANNSEQUE-WS02 MINGW64 ~/vagrant-xrdocs/native-app-topo-bootstrap (master)
$ vagrant ssh wrl7_build
Last login: Tue Sep 13 01:49:37 2016 from 10.0.2.2

localhost:~$ scp -P 2222 /usr/src/rpm/RPMS/x86_64/iperf-2.0.9-XR_6.1.1.x86_64.rpm
vagrant@10.0.2.2:/home/vagrant/
vagrant@10.0.2.2's password:
iperf-2.0.9-XR_6.1.1.x86_64.rpm
-
-
Install the application (iPerf) on XR.
-
Access XR through SSH.
annseque@ANNSEQUE-WS02 MINGW64 ~/vagrant-xrdocs/native-app-topo-bootstrap (master)
$ vagrant ssh rtr
Last login: Fri Sep  9 19:20:56 2016 from 10.0.2.2
xr-vm_node0_RP0_CPU0:~$
-
Verify the presence of the RPM file on XR.
xr-vm_node0_RP0_CPU0:~$ ls -l iperf-2.0.9-XR_6.1.1.x86_64.rpm
-rw-r--r-- 1 vagrant vagrant 48118 Sep 13 06:33 iperf-2.0.9-XR_6.1.1.x86_64.rpm
-
Install iPerf by using yum.
xr-vm_node0_RP0_CPU0:~$ sudo yum install -y  iperf-2.0.9-XR_6.1.1.x86_64.rpm
Loaded plugins: downloadonly, protect-packages, rpm-persistence
Setting up Install Process
Examining iperf-2.0.9-XR_6.1.1.x86_64.rpm: iperf-2.0.9-XR_6.1.1.x86_64
Marking iperf-2.0.9-XR_6.1.1.x86_64.rpm to be installed
Resolving Dependencies
--> Running transaction check
---> Package iperf.x86_64 0:2.0.9-XR_6.1.1 will be installed
--> Finished Dependency Resolution

...

Total size: 103 k
Installed size: 103 k
Downloading Packages:
Running Transaction Check
Running Transaction Test
Transaction Test Succeeded
Running Transaction
  Installing : iperf-2.0.9-XR_6.1.1.x86_64

Installed:
  iperf.x86_64 0:2.0.9-XR_6.1.1

Complete!
xr-vm_node0_RP0_CPU0:~$
-
Verify iPerf installation.
xr-vm_node0_RP0_CPU0:~$ iperf -v
iperf version 2.0.9 (1 June 2016) pthreads
-
-
Test the natively installed application (iPerf) on XR.
-
Access the XR router console and configure the Third-party Application (TPA) access for outside networks.
annseque@ANNSEQUE-WS02 MINGW64 ~/vagrant-xrdocs/native-app-topo-bootstrap (master)
$ ssh -p 2223 vagrant@localhost
vagrant@localhost's password:

RP/0/RP0/CPU0:ios# config
Tue Sep 13 06:46:56.368 UTC
RP/0/RP0/CPU0:ios(config)# tpa address-family ipv4 update-source loopback 0
RP/0/RP0/CPU0:ios(config)# commit
Tue Sep 13 06:47:04.642 UTC
RP/0/RP0/CPU0:ios(config)# end
RP/0/RP0/CPU0:ios# bash -c ip route
Tue Sep 13 06:47:43.792 UTC
default dev fwdintf  scope link  src 1.1.1.1
10.0.2.0/24 dev Mg0_RP0_CPU0_0  proto kernel  scope link  src 10.0.2.15
-
Exit the XR router console, and launch the iPerf server on XR.
RP/0/RP0/CPU0:ios# exit
Connection to localhost closed.

annseque@ANNSEQUE-WS02 MINGW64 ~/vagrant-xrdocs/native-app-topo-bootstrap (master)
$ vagrant ssh rtr
Last login: Tue Sep 13 06:44:53 2016 from 10.0.2.2

xr-vm_node0_RP0_CPU0:~$ iperf -s -u
------------------------------------------------------------
Server listening on UDP port 5001
Receiving 1470 byte datagrams
UDP buffer size: 64.0 MByte (default)
------------------------------------------------------------
-
-
Install the iPerf (client) on devbox.
xr-vm_node0_RP0_CPU0:~$ exit
logout
Connection to 127.0.0.1 closed.

annseque@ANNSEQUE-WS02 MINGW64 ~/vagrant-xrdocs/native-app-topo-bootstrap (master)
$ vagrant ssh devbox
Welcome to Ubuntu 14.04.5 LTS (GNU/Linux 3.13.0-92-generic x86_64)
...
-
Install iPerf application.
vagrant@vagrant-ubuntu-trusty-64:~$ sudo apt-get -y install iperf
Reading package lists... Done
Building dependency tree
Reading state information... Done
The following NEW packages will be installed:
  iperf
...
-
Test the iPerf application on devbox.
-
Configure TPA route to XR from devbox.
vagrant@vagrant-ubuntu-trusty-64:~$ sudo ip route add 1.1.1.1/32 via 11.1.1.10
vagrant@vagrant-ubuntu-trusty-64:~$ ping 1.1.1.1
PING 1.1.1.1 (1.1.1.1) 56(84) bytes of data.
64 bytes from 1.1.1.1: icmp_seq=1 ttl=255 time=15.1 ms
64 bytes from 1.1.1.1: icmp_seq=2 ttl=255 time=3.81 ms
^C
--- 1.1.1.1 ping statistics ---
2 packets transmitted, 2 received, 0% packet loss, time 1002ms
rtt min/avg/max/mdev = 3.817/9.480/15.143/5.663 ms
-
Test if the iPerf client on devbox can communicate with the iPerf server on XR.
vagrant@vagrant-ubuntu-trusty-64:~$ iperf -c 1.1.1.1 -u
------------------------------------------------------------
Client connecting to 1.1.1.1, UDP port 5001
Sending 1470 byte datagrams
UDP buffer size:  208 KByte (default)
------------------------------------------------------------
[  3] local 11.1.1.20 port 34348 connected with 1.1.1.1 port 5001
[ ID] Interval       Transfer     Bandwidth
[  3]  0.0-10.0 sec  1.25 MBytes  1.05 Mbits/sec
[  3] Sent 893 datagrams
[  3] Server Report:
[  3]  0.0-10.0 sec  1.25 MBytes  1.05 Mbits/sec   0.256 ms    0/  893 (0%)
-
You have successfully built an application RPM on XR and hosted it natively by using a vagrant box.
Container Application Hosting
This section introduces the concept of container application hosting and describes its workflow.
Container application hosting makes it possible for applications to be hosted in their own environment and process space (namespace) within a Linux container on Cisco IOS XR. The application developer has complete control over the application development environment, and can use a Linux distribution of choice. The applications are isolated from the IOS XR control plane processes; yet, they can connect to networks outside XR through the XR GigE interfaces. The applications can also easily access local file systems on IOS XR.
This figure illustrates the workflow for creating a Linux container for application hosting. For the complete configuration procedure, see Run iPerf as a Container Application.
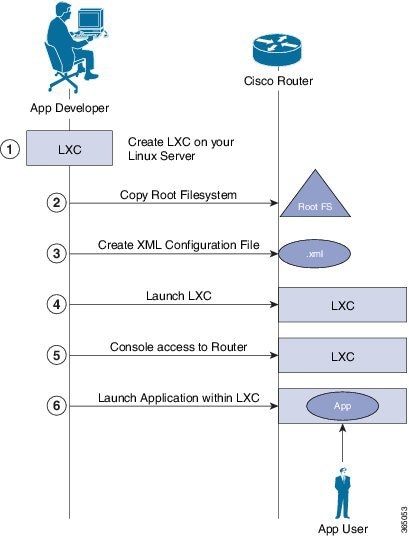
There are two components in container application hosting:
-
Linux server: This is the server you use to develop your application, to bring up the Linux Container (LXC), and to prepare the container environment.
-
Router: This is the router running the 64-bit IOS XR that is used to host your container with the application you want to run.
- On the Linux server, bring up the LXC, and do the following:
-
Connect to the router running IOS XR, and copy the root file system.
-
Create the configuration file for the container in .xml format. This file specifies the attributes for the container, such as name of the container, default namespace, and so on.
Note
If you specify a network namespace (third-party), then by default, the LXC is launched in that namespace.
-
Launch the LXC on the router.
-
Log into the LXC on the router through IOS XR console access.
-
Manually start the application, or configure the application to start automatically when the LXC is launched.
You can use a container, like a Linux box, to install and host applications for users.
- Run iPerf as a Container Application
- Deploy an Application Development Topology on Cisco IOS XR by Using a Vagrant Box
- Host an Application within an LXC Container by Using a Vagrant Box
Run iPerf as a Container Application
As an example of container application hosting, you can install an iPerf client within a LXC on IOS XR, and check its connectivity with an iPerf server installed within an LXC on another router, as described in this section.
Topology
The following illustration describes the topology used in this example.
iPerf server is installed on Router A, and iPerf client is installed on Router B. Both installations are done within containers on the 64-bit IOS XR. The iPerf client communicates with the iPerf server through the interfaces offered by IOS XR.
Prerequisites
Ensure that you have configured the two routers as shown in the topology.
Configuration Procedure
To run iPerf as a container application, follow these steps:
-
Log into Router A, and enter the XRNNS.
RP/0/RP0/CPU0:ios# run
[xr-vm_node0_RP0_CPU0:~]$
-
Launch the LXC.
[xr-vm_node0_RP0_CPU0:~]$virsh -c lxc+tcp://10.11.12.15:16509/ -e ^Q console demo1
-
Log into the LXC when prompted.
Connected to domain demo
Escape character is ^Q
Kernel 3.14.23-WR7.0.0.2_standard on an x86_64

host login: Password:
-
Install the iPerf server within the LXC on Router A.
[root@host ~]#apt-get install iperf
-
Perform Steps 1 to 4 to install the iPerf client on Router B.
-
Verify the iPerf server installation on Router A.
[root@host ~]#iperf -v
iperf version 2.0.5 (08 Jul 2010) pthreads
Similarly, verify the iPerf client installation on Router B.
-
Bind the Loopback0 interface on Router A to the iPerf server, and launch the iPerf server instance.
In this example, 1.1.1.1 is the assigned Loopback0 interface address of Router A, and 57730 is the port number used for communication.
[root@host ~]#iperf -s -B 1.1.1.1 -p 57730
Server listening on TCP port 57730
Binding to local address 1.1.1.1
TCP window size: 85.3 KByte (default)
-
Launch the iPerf client instance on Router B, by specifying the same port number used for the iPerf server, and the management IP address of Router A.
In this example, 192.168.122.213 is the management IP address of Router A, and 57730 is the port number used to access the iPerf server.
[root@host ~]#iperf -c 192.168.122.213 -p 57730
------------------------------------------------------------
Client connecting to 192.168.122.213, TCP port 57730
TCP window size: 85.0 KByte (default)
------------------------------------------------------------
[  3] local 192.168.122.1 port 46974 connected with 192.168.122.213 port 57730
[ ID] Interval       Transfer     Bandwidth
[  3]  0.0-10.0 sec   146 MBytes   122 Mbits/sec
To use UDP, instead of TCP, to communicate with the iPerf server, use the following command.
[root@host ~]#iperf -c 192.168.122.213 -p 57730 -u
------------------------------------------------------------
Client connecting to 192.168.122.213, UDP port 57730
Sending 1470 byte datagrams
UDP buffer size:  208 KByte (default)
------------------------------------------------------------
[  3] local 192.168.122.1 port 41466 connected with 192.168.122.213 port 57730
[ ID] Interval       Transfer     Bandwidth
[  3]  0.0-10.0 sec  1.25 MBytes  1.05 Mbits/sec
[  3] Sent 893 datagrams
[  3] Server Report:
[  3]  0.0-10.0 sec  1.25 MBytes  1.05 Mbits/sec   0.233 ms    0/  893 (0%)
[root@hostB ~]#
-
Ping the iPerf server from the iPerf client on Router B.
[root@host ~]#/bin/ping 192.164.168.10
PING 192.164.168.10 (192.164.168.10) 56(84) bytes of data.
64 bytes from 192.164.168.10: icmp_seq=1 ttl=255 time=13.0 ms
64 bytes from 192.164.168.10: icmp_seq=2 ttl=255 time=2.14 ms
64 bytes from 192.164.168.10: icmp_seq=3 ttl=255 time=2.21 ms
The iPerf client hosted on Router B can access the iPerf server hosted on Router A.
Container application hosting for iPerf is successful. For information on a use case of container application hosting, see Run a Telemetry Receiver Within a Container on Cisco IOS XR.
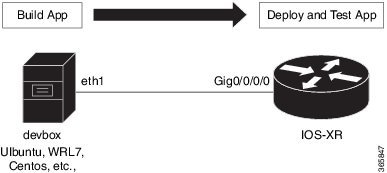
Deploy an Application Development Topology on Cisco IOS XR by Using a Vagrant Box
This section describes how you can create an application development topology on Cisco IOS XR for creating and hosting your applications, by using a vagrant box.
For the sake of illustration, we will use a simple two-node topology, where an instance of Cisco IOS XR behaves as one node (rtr), and an instance of Ubuntu (hypervisor) behaves as the other (devbox). We will use the devbox to develop the app topology and deploy it on the rtr.
Before You Begin
Before you can start using vagrant, ensure that you have fulfilled the following requirements on your host device.
-
Latest version of Vagrant for your operating system.
-
A virtual box for your operating system.
-
Minimum of 4-5 GB of RAM with two cores.
-
(Optional) If you are using the Windows Operating System, you should download the Git bash utility for running the commands described in this section.
Procedure
To create and host an application development topology on XR, follow these steps.
-
Generate an API key and a CCO ID by using the steps described in https://xrdocs.github.io/getting-started/steps-download-iosxr-vagrant.
-
Download the latest stable version of the IOS XR vagrant box.
$ curl <cco-id>:<API-KEY>

$ BOXURL --output ~/iosxrv-fullk9-x64.box

$ vagrant box add --name IOS-XRv ~/iosxrv-fullk9-x64.box
-
Verify if the vagrant box has been successfully installed.
annseque@ANNSEQUE-WS02 MINGW64 ~ vagrant box list
IOS-XRv (virtualbox, 0)
-
Create a working directory.
annseque@ANNSEQUE-WS02 MINGW64 ~ mkdir ~/iosxrv
annseque@ANNSEQUE-WS02 MINGW64 ~ cd ~/iosxrv
-
Initialize the vagrant file with the new vagrant box.
ANNSEQUE-WS02 MINGW64:iosxrv annseque$ vagrant init IOS-XRv
A `Vagrantfile` has been placed in this directory. You are now
ready to `vagrant up` your first virtual environment! Please read
the comments in the Vagrantfile as well as documentation on
`vagrantup.com` for more information on using Vagrant.
-
Clone the vagrant-xrdocs repository.
annseque@ANNSEQUE-WS02 MINGW64 ~
$ git clone https://github.com/ios-xr/vagrant-xrdocs.git
-
Navigate to the vagrant-xrdocs repository and locate the lxc-app-topo-bootstrap directory.
annseque@ANNSEQUE-WS02 MINGW64 ~
$ cd vagrant-xrdocs/

annseque@ANNSEQUE-WS02 MINGW64 ~/vagrant-xrdocs (master)
$ ls
ansible-tutorials/       native-app-topo-bootstrap/  simple-mixed-topo/
lxc-app-topo-bootstrap/  README.md                   single_node_bootstrap/

annseque@ANNSEQUE-WS02 MINGW64 ~/vagrant-xrdocs (master)
$ ls lxc-app-topo-bootstrap/
configs/  scripts/  Vagrantfile
-
(Optional) View the contents of the vagrant file in the lxc-app-topo-bootstrap directory.
The vagrant file (Vagrantfile) contains the two node topology for application development. You can modify this by using a vi editor, if required.
annseque@ANNSEQUE-WS02 MINGW64 ~/vagrant-xrdocs (master) $ cd lxc-app-topo-bootstrap/ annseque@ANNSEQUE-WS02 MINGW64 ~/vagrant-xrdocs/lxc-app-topo-bootstrap (master) $ cat Vagrantfile # -*- mode: ruby -*- # vi: set ft=ruby : # All Vagrant configuration is done below. The "2" in Vagrant.configure # configures the configuration version (we support older styles for # backwards compatibility). Please don't change it unless you know what # you're doing. Vagrant.configure(2) do |config| config.vm.define "rtr" do |node| node.vm.box = "IOS-XRv" # gig0/0/0 connected to "link1" # auto_config is not supported for XR, set to false node.vm.network :private_network, virtualbox__intnet: "link1", auto_config : false #Source a config file and apply it to XR node.vm.provision "file", source: "configs/rtr_config", destination: "/hom e/vagrant/rtr_config" node.vm.provision "shell" do |s| s.path = "scripts/apply_config.sh" s.args = ["/home/vagrant/rtr_config"] end end config.vm.define "devbox" do |node| node.vm.box = "ubuntu/trusty64" # eth1 connected to link1 # auto_config is supported for an ubuntu instance node.vm.network :private_network, virtualbox__intnet: "link1", ip: "11.1.1 .20" end end -
Ensure you are in the lxc-app-topo-bootstrap directory, and launch the vagrant instance.
annseque@ANNSEQUE-WS02 MINGW64 ~/vagrant-xrdocs/lxc-app-topo-bootstrap (master)
$ vagrant up

Bringing machine 'rtr' up with 'virtualbox' provider...
Bringing machine 'devbox' up with 'virtualbox' provider...
==> rtr: Clearing any previously set forwarded ports...
==> rtr: Clearing any previously set network interfaces...
==> rtr: Preparing network interfaces based on configuration...
    rtr: Adapter 1: nat
    rtr: Adapter 2: intnet
==> rtr: Forwarding ports...
    rtr: 57722 (guest) => 2222 (host) (adapter 1)
    rtr: 22 (guest) => 2223 (host) (adapter 1)
==> rtr: Running 'pre-boot' VM customizations...
==> rtr: Booting VM...
==> rtr: Waiting for machine to boot. This may take a few minutes...
    rtr: SSH address: 127.0.0.1:2222
    rtr: SSH username: vagrant
    rtr: SSH auth method: private key
    rtr: Warning: Remote connection disconnect. Retrying...
    ...
==> rtr: Machine booted and ready!
==> rtr: Checking for guest additions in VM...
    rtr: No guest additions were detected on the base box for this VM! Guest
    rtr: additions are required for forwarded ports, shared folders, host only
    rtr: networking, and more. If SSH fails on this machine, please install
    rtr: the guest additions and repackage the box to continue.
    rtr:
    rtr: This is not an error message; everything may continue to work properly,
    rtr: in which case you may ignore this message.
==> rtr: Machine already provisioned. Run `vagrant provision` or use the `--provision`
==> rtr: flag to force provisioning. Provisioners marked to run always will still run.
==> devbox: Checking if box 'ubuntu/trusty64' is up to date...
==> devbox: A newer version of the box 'ubuntu/trusty64' is available! You currently
==> devbox: have version '20160801.0.0'. The latest is version '20160826.0.1'. Run
==> devbox: `vagrant box update` to update.
==> devbox: Clearing any previously set forwarded ports...
==> devbox: Fixed port collision for 22 => 2222. Now on port 2200.
==> devbox: Clearing any previously set network interfaces...
==> devbox: Preparing network interfaces based on configuration...
    devbox: Adapter 1: nat
    devbox: Adapter 2: intnet
==> devbox: Forwarding ports...
    devbox: 22 (guest) => 2200 (host) (adapter 1)
==> devbox: Booting VM...
==> devbox: Waiting for machine to boot. This may take a few minutes...
    devbox: SSH address: 127.0.0.1:2200
    devbox: SSH username: vagrant
    devbox: SSH auth method: private key
    devbox: Warning: Remote connection disconnect. Retrying...
    devbox: Warning: Remote connection disconnect. Retrying...
==> devbox: Machine booted and ready!
==> devbox: Checking for guest additions in VM...
    devbox: The guest additions on this VM do not match the installed version of
    devbox: VirtualBox! In most cases this is fine, but in rare cases it can
    devbox: prevent things such as shared folders from working properly. If you see
    devbox: shared folder errors, please make sure the guest additions within the
    devbox: virtual machine match the version of VirtualBox you have installed on
    devbox: your host and reload your VM.
    devbox:
    devbox: Guest Additions Version: 4.3.36
    devbox: VirtualBox Version: 5.0
==> devbox: Configuring and enabling network interfaces...
==> devbox: Mounting shared folders...
    devbox: /vagrant => C:/Users/annseque/vagrant-xrdocs/lxc-app-topo-bootstrap
==> devbox: Machine already provisioned. Run `vagrant provision` or use the `--provision`
==> devbox: flag to force provisioning. Provisioners marked to run always will still run.

==> rtr: Machine 'rtr' has a post `vagrant up` message. This is a message
==> rtr: from the creator of the Vagrantfile, and not from Vagrant itself:
==> rtr:
==> rtr:
==> rtr:     Welcome to the IOS XRv (64-bit) Virtualbox.
==> rtr:     To connect to the XR Linux shell, use: 'vagrant ssh'.
==> rtr:     To ssh to the XR Console, use: 'vagrant port' (vagrant version > 1.8)
==> rtr:     to determine the port that maps to guestport 22,
==> rtr:     then: 'ssh vagrant@localhost -p <forwarded port>'
==> rtr:
==> rtr:     IMPORTANT:  READ CAREFULLY
==> rtr:     The Software is subject to and governed by the terms and conditions
==> rtr:     of the End User License Agreement and the Supplemental End User
==> rtr:     License Agreement accompanying the product, made available at the
==> rtr:     time of your order, or posted on the Cisco website at
==> rtr:     www.cisco.com/go/terms (collectively, the 'Agreement').
==> rtr:     As set forth more fully in the Agreement, use of the Software is
==> rtr:     strictly limited to internal use in a non-production environment
==> rtr:     solely for demonstration and evaluation purposes. Downloading,
==> rtr:     installing, or using the Software constitutes acceptance of the
==> rtr:     Agreement, and you are binding yourself and the business entity
==> rtr:     that you represent to the Agreement. If you do not agree to all
==> rtr:     of the terms of the Agreement, then Cisco is unwilling to license
==> rtr:     the Software to you and (a) you may not download, install or use the
==> rtr:     Software, and (b) you may return the Software as more fully set forth
==> rtr:     in the Agreement.
You have successfully deployed the two nodes, rtr and devbox on your host machine.
-
To access the XR router console, check the port number that maps to the guest port number 22.
annseque@ANNSEQUE-WS02 MINGW64 ~/vagrant-xrdocs/lxc-app-topo-bootstrap (master)
$ vagrant port rtr
The forwarded ports for the machine are listed below. Please note that
these values may differ from values configured in the Vagrantfile if the
provider supports automatic port collision detection and resolution.

    22 (guest) => 2223 (host)
 57722 (guest) => 2222 (host)
You need to use port number 2223 to SSH to the rtr node (XR). -
Access the XR router console (rtr console) through SSH.
The password for vagrant@localhost is vagrant.
annseque@ANNSEQUE-WS02 MINGW64 ~/vagrant-xrdocs/lxc-app-topo-bootstrap (master)
$ ssh -p 2223 vagrant@localhost
vagrant@localhost's password:


RP/0/RP0/CPU0:ios#
You are at the XR router console, or the console of the rtr node in this example. -
Check the GigE interface IP address of the rtr.
You will need the GigE interface IP address to access the rtr console from the devbox console at a later stage.
RP/0/RP0/CPU0:ios# show ipv4 interface gigabitEthernet 0/0/0/0 brief
Wed Aug 31 04:00:48.006 UTC

Interface                      IP-Address      Status                Protocol
GigabitEthernet0/0/0/0         11.1.1.10       Up                    Up
Note
To access the XR Linux shell from the rtr console, use the run command.
RP/0/RP0/CPU0:ios# run
Wed Aug 31 04:01:45.119 UTC

[xr-vm_node0_RP0_CPU0:~]$
-
Exit the rtr console, and access the devbox console through SSH.
RP/0/RP0/CPU0:ios# exit Connection to localhost closed. annseque@ANNSEQUE-WS02 MINGW64 ~/vagrant-xrdocs/lxc-app-topo-bootstrap (master) $ vagrant ssh devbox Welcome to Ubuntu 14.04.4 LTS (GNU/Linux 3.13.0-87-generic x86_64) * Documentation: https://help.ubuntu.com/ System information disabled due to load higher than 1.0 Get cloud support with Ubuntu Advantage Cloud Guest: http://www.ubuntu.com/business/services/cloud 25 packages can be updated. 12 updates are security updates. vagrant@vagrant-ubuntu-trusty-64:~$ -
Verify if you can access the rtr console from the devbox console, by pinging the GigE interface of the rtr.
Use the GigE interface IP address you retrieved in Step 12.
vagrant@vagrant-ubuntu-trusty-64:~$ ping 11.1.1.10 -c 2
PING 11.1.1.10 (11.1.1.10) 56(84) bytes of data.
64 bytes from 11.1.1.10: icmp_seq=1 ttl=255 time=40.2 ms
64 bytes from 11.1.1.10: icmp_seq=2 ttl=255 time=6.67 ms

--- 11.1.1.10 ping statistics ---
2 packets transmitted, 2 received, 0% packet loss, time 1002ms
rtt min/avg/max/mdev = 6.670/23.457/40.245/16.788 ms
vagrant@vagrant-ubuntu-trusty-64:~$
Note
To access the XR Linux console, exit the devbox console and run the vagrant ssh rtr command from the lxc-app-topo-bootstrap directory. vagrant@vagrant-ubuntu-trusty-64:~$ exit logout Connection to 127.0.0.1 closed. annseque@ANNSEQUE-WS02 MINGW64 ~/vagrant-xrdocs/lxc-app-topo-bootstrap (master) $ vagrant ssh rtr Last login: Thu Jul 21 05:51:28 2016 from 10.0.2.2 xr-vm_node0_RP0_CPU0:~$
You have successfully deployed an application development topology on your host machine.
Host an Application within an LXC Container by Using a Vagrant Box
This section describes how you can host an application within your own container (LXC) by using a vagrant box.
Before You Begin
Before you can start using vagrant, ensure that you have fulfilled the following requirements on your host device.
-
Latest version of Vagrant for your operating system.
-
A virtual box for your operating system.
-
Minimum of 4-5 GB of RAM with two cores.
-
(Optional) If you are using the Windows Operating System, you should download the Git bash utility for running the commands described in this section.
-
Host the two-node (rtr and devbox) application development topology as described in Deploy an Application Development Topology on Cisco IOS XR by Using a Vagrant Box.
Workflow for Deploying Your LXC Container
The workflow for launching your container on IOS XR is described in this section and illustrated in the following topology.

Procedure
To host your application within your own container, use the following steps.
-
Navigate to the lxc-app-topo-bootstrap directory and ensure the vagrant instance is running. If not, launch the vagrant instance.
annseque@ANNSEQUE-WS02 MINGW64 ~/vagrant-xrdocs/lxc-app-topo-bootstrap (master) $ vagrant status Current machine states: rtr aborted (virtualbox) devbox aborted (virtualbox) This environment represents multiple VMs. The VMs are all listed above with their current state. For more information about a specific VM, run `vagrant status NAME`. annseque@ANNSEQUE-WS02 MINGW64 ~/vagrant-xrdocs/lxc-app-topo-bootstrap (master) $ vagrant up Bringing machine 'rtr' up with 'virtualbox' provider... Bringing machine 'devbox' up with 'virtualbox' provider... ==> rtr: Clearing any previously set forwarded ports... ==> rtr: Clearing any previously set network interfaces... ==> rtr: Preparing network interfaces based on configuration... rtr: Adapter 1: nat rtr: Adapter 2: intnet ==> rtr: Forwarding ports... rtr: 57722 (guest) => 2222 (host) (adapter 1) rtr: 22 (guest) => 2223 (host) (adapter 1) ==> rtr: Running 'pre-boot' VM customizations... ==> rtr: Booting VM... ==> rtr: Waiting for machine to boot. This may take a few minutes... rtr: SSH address: 127.0.0.1:2222 rtr: SSH username: vagrant rtr: SSH auth method: private key rtr: Warning: Remote connection disconnect. Retrying... ... ==> rtr: Machine booted and ready! ... ==> rtr: Machine already provisioned. Run `vagrant provision` or use the `--provision` ==> rtr: flag to force provisioning. Provisioners marked to run always will still run. ==> devbox: Checking if box 'ubuntu/trusty64' is up to date... ==> devbox: A newer version of the box 'ubuntu/trusty64' is available! You currently ==> devbox: have version '20160801.0.0'. The latest is version '20160826.0.1'. Run ==> devbox: `vagrant box update` to update. ==> devbox: Clearing any previously set forwarded ports... ==> devbox: Fixed port collision for 22 => 2222. Now on port 2200. ==> devbox: Clearing any previously set network interfaces... ==> devbox: Preparing network interfaces based on configuration... devbox: Adapter 1: nat devbox: Adapter 2: intnet ==> devbox: Forwarding ports... devbox: 22 (guest) => 2200 (host) (adapter 1) ==> devbox: Booting VM... ==> devbox: Waiting for machine to boot. This may take a few minutes... devbox: SSH address: 127.0.0.1:2200 devbox: SSH username: vagrant devbox: SSH auth method: private key devbox: Warning: Remote connection disconnect. Retrying... devbox: Warning: Remote connection disconnect. Retrying... ==> devbox: Machine booted and ready! ... devbox: Guest Additions Version: 4.3.36 devbox: VirtualBox Version: 5.0 ==> devbox: Configuring and enabling network interfaces... ==> devbox: Mounting shared folders... devbox: /vagrant => C:/Users/annseque/vagrant-xrdocs/lxc-app-topo-bootstrap ==> devbox: Machine already provisioned. Run `vagrant provision` or use the `--provision` ==> devbox: flag to force provisioning. Provisioners marked to run always will still run. ==> rtr: Machine 'rtr' has a post `vagrant up` message. This is a message ==> rtr: from the creator of the Vagrantfile, and not from Vagrant itself: ==> rtr: ==> rtr: ==> rtr: Welcome to the IOS XRv (64-bit) Virtualbox. ==> rtr: To connect to the XR Linux shell, use: 'vagrant ssh'. ==> rtr: To ssh to the XR Console, use: 'vagrant port' (vagrant version > 1.8) ==> rtr: to determine the port that maps to guestport 22, ==> rtr: then: 'ssh vagrant@localhost -p <forwarded port>' ... annseque@ANNSEQUE-WS02 MINGW64 ~/vagrant-xrdocs/lxc-app-topo-bootstrap (master) $ vagrant status Current machine states: rtr running (virtualbox) devbox running (virtualbox) This environment represents multiple VMs. The VMs are all listed above with their current state. For more information about a specific VM, run `vagrant status NAME`. -
Access the devbox through SSH and install LXC tools.
To launch an LXC container, you need the following, which can be obtained by installing LXC tools:
annseque@ANNSEQUE-WS02 MINGW64 ~/vagrant-xrdocs/lxc-app-topo-bootstrap (master) $ vagrant ssh devbox Welcome to Ubuntu 14.04.4 LTS (GNU/Linux 3.13.0-87-generic x86_64) * Documentation: https://help.ubuntu.com/ System information as of Thu Sep 1 03:55:29 UTC 2016 System load: 0.99 Processes: 94 Usage of /: 3.9% of 39.34GB Users logged in: 0 Memory usage: 14% IP address for eth0: 10.0.2.15 Swap usage: 0% IP address for eth1: 11.1.1.20 Graph this data and manage this system at: https://landscape.canonical.com/ Get cloud support with Ubuntu Advantage Cloud Guest: http://www.ubuntu.com/business/services/cloud 25 packages can be updated. 12 updates are security updates. New release '16.04.1 LTS' available. Run 'do-release-upgrade' to upgrade to it. ------------------------------------------------------------------------------------------------ Last login: Wed Aug 31 04:02:20 2016 from 10.0.2.2 vagrant@vagrant-ubuntu-trusty-64:~$ sudo apt-get update Ign http://archive.ubuntu.com trusty InRelease Get:1 http://security.ubuntu.com trusty-security InRelease [65.9 kB] ... Get:33 http://archive.ubuntu.com trusty-backports/universe Translation-en [36.8 kB] Hit http://archive.ubuntu.com trusty Release ... Hit http://archive.ubuntu.com trusty/universe Translation-en Ign http://archive.ubuntu.com trusty/main Translation-en_US Ign http://archive.ubuntu.com trusty/multiverse Translation-en_US Ign http://archive.ubuntu.com trusty/restricted Translation-en_US Ign http://archive.ubuntu.com trusty/universe Translation-en_US Fetched 4,022 kB in 16s (246 kB/s) Reading package lists... Done ---------------------------------------------------------------------------------------------- vagrant@vagrant-ubuntu-trusty-64:~$ sudo apt-get -y install lxc Reading package lists... Done Building dependency tree Reading state information... Done The following extra packages will be installed: bridge-utils cgmanager cloud-image-utils debootstrap dnsmasq-base euca2ools genisoimage libaio1 libboost-system1.54.0 libboost-thread1.54.0 liblxc1 libmnl0 libnetfilter-conntrack3 libnspr4 libnss3 libnss3-nssdb librados2 librbd1 libseccomp2 libxslt1.1 lxc-templates python-distro-info python-lxml python-requestbuilder python-setuptools python3-lxc qemu-utils sharutils uidmap Suggested packages: cgmanager-utils wodim cdrkit-doc btrfs-tools lvm2 lxctl qemu-user-static python-lxml-dbg bsd-mailx mailx The following NEW packages will be installed: bridge-utils cgmanager cloud-image-utils debootstrap dnsmasq-base euca2ools genisoimage libaio1 libboost-system1.54.0 libboost-thread1.54.0 liblxc1 libmnl0 libnetfilter-conntrack3 libnspr4 libnss3 libnss3-nssdb librados2 librbd1 libseccomp2 libxslt1.1 lxc lxc-templates python-distro-info python-lxml python-requestbuilder python-setuptools python3-lxc qemu-utils sharutils uidmap 0 upgraded, 30 newly installed, 0 to remove and 52 not upgraded. Need to get 6,469 kB of archives. After this operation, 25.5 MB of additional disk space will be used. Get:1 http://archive.ubuntu.com/ubuntu/ trusty/main libaio1 amd64 0.3.109-4 [6,364 B] ... Get:30 http://archive.ubuntu.com/ubuntu/ trusty-updates/main debootstrap all 1.0.59ubuntu0.5 [29.6 kB] Fetched 6,469 kB in 22s (289 kB/s) Selecting previously unselected package libaio1:amd64. (Reading database ... 62989 files and directories currently installed.) Preparing to unpack .../libaio1_0.3.109-4_amd64.deb ... ... Setting up lxc (1.0.8-0ubuntu0.3) ... lxc start/running Setting up lxc dnsmasq configuration. Processing triggers for ureadahead (0.100.0-16) ... Setting up lxc-templates (1.0.8-0ubuntu0.3) ... Setting up libnss3-nssdb (2:3.23-0ubuntu0.14.04.1) ... Setting up libnss3:amd64 (2:3.23-0ubuntu0.14.04.1) ... Setting up librados2 (0.80.11-0ubuntu1.14.04.1) ... Setting up librbd1 (0.80.11-0ubuntu1.14.04.1) ... Setting up qemu-utils (2.0.0+dfsg-2ubuntu1.27) ... Setting up cloud-image-utils (0.27-0ubuntu9.2) ... Processing triggers for libc-bin (2.19-0ubuntu6.9) ... -
Verify that the LXC was properly installed.
vagrant@vagrant-ubuntu-trusty-64:~$ sudo lxc-start --version
1.0.8
-
Create the LXC container with a standard Ubuntu base template and launch it in devbox.
vagrant@vagrant-ubuntu-trusty-64:~$ sudo lxc-create -t ubuntu --name xr-lxc-app
Checking cache download in /var/cache/lxc/trusty/rootfs-amd64 ...
Installing packages in template: ssh,vim,language-pack-en
Downloading ubuntu trusty minimal ...
I: Retrieving Release
I: Retrieving Release.gpg
...
Generation complete.
Setting up perl-modules (5.18.2-2ubuntu1.1) ...
Setting up perl (5.18.2-2ubuntu1.1) ...
Processing triggers for libc-bin (2.19-0ubuntu6.9) ...
Processing triggers for initramfs-tools (0.103ubuntu4.4) ...
Download complete
Copy /var/cache/lxc/trusty/rootfs-amd64 to /var/lib/lxc/xr-lxc-app/rootfs ...
Copying rootfs to /var/lib/lxc/xr-lxc-app/rootfs ...
Generating locales...
  en_US.UTF-8... up-to-date
Generation complete.
Creating SSH2 RSA key; this may take some time ...
Creating SSH2 DSA key; this may take some time ...
Creating SSH2 ECDSA key; this may take some time ...
Creating SSH2 ED25519 key; this may take some time ...
update-rc.d: warning: default stop runlevel arguments (0 1 6) do not match ssh Default-Stop values (none)
invoke-rc.d: policy-rc.d denied execution of start.

Current default time zone: 'Etc/UTC'
Local time is now:      Thu Sep  1 04:46:22 UTC 2016.
Universal Time is now:  Thu Sep  1 04:46:22 UTC 2016.


##
# The default user is 'ubuntu' with password 'ubuntu'!
# Use the 'sudo' command to run tasks as root in the container.
##
-
Verify if the LXC container has been successfully created.
vagrant@vagrant-ubuntu-trusty-64:~$ sudo lxc-ls --fancy
NAME        STATE    IPV4  IPV6  AUTOSTART
------------------------------------------
xr-lxc-app  STOPPED  -     -     NO
-
Start the LXC container.
You will be prompted to log into the LXC container. The login credentials are ubuntu/ubuntu.
vagrant@vagrant-ubuntu-trusty-64:~$ sudo lxc-start --name xr-lxc-app
<4>init: plymouth-upstart-bridge main process (5) terminated with status 1
...

xr-lxc-app login: ubuntu
Password:
Welcome to Ubuntu 14.04.5 LTS (GNU/Linux 3.13.0-87-generic x86_64)

 * Documentation:  https://help.ubuntu.com/

The programs included with the Ubuntu system are free software;
the exact distribution terms for each program are described in the
individual files in /usr/share/doc/*/copyright.

Ubuntu comes with ABSOLUTELY NO WARRANTY, to the extent permitted by
applicable law.

ubuntu@xr-lxc-app:~$
-
Install your application within the LXC container.
For the sake of illustration, in this example we will install the iPerf application.
ubuntu@xr-lxc-app:~$ sudo apt-get -y install iperf
[sudo] password for ubuntu:
Reading package lists... Done
Building dependency tree
Reading state information... Done
The following NEW packages will be installed:
  iperf
0 upgraded, 1 newly installed, 0 to remove and 0 not upgraded.
Need to get 56.3 kB of archives.
After this operation, 174 kB of additional disk space will be used.
Get:1 http://archive.ubuntu.com/ubuntu/ trusty/universe iperf amd64 2.0.5-3 [56.3 kB]
Fetched 56.3 kB in 16s (3,460 B/s)
Selecting previously unselected package iperf.
(Reading database ... 14648 files and directories currently installed.)
Preparing to unpack .../iperf_2.0.5-3_amd64.deb ...
Unpacking iperf (2.0.5-3) ...
Setting up iperf (2.0.5-3) ...
ubuntu@xr-lxc-app:~$
-
Change the SSH port inside the container and verify that it has been correctly assigned.
When you deploy your container to IOS XR, it shares the network namespace with XR. Since IOS XR already uses Ports 22 and 57722 for other purposes, you must pick some other port number for your container.
ubuntu@xr-lxc-app:~$ sudo sed -i s/Port\ 22/Port\ 58822/ /etc/ssh/sshd_config
[sudo] password for ubuntu:

ubuntu@xr-lxc-app:~$ cat /etc/ssh/sshd_config | grep Port
Port 58822
ubuntu@xr-lxc-app:~$
-
Shut the container down.
ubuntu@xr-lxc-app:~$ sudo shutdown -h now ubuntu@xr-lxc-app:~$ Broadcast message from ubuntu@xr-lxc-app (/dev/lxc/console) at 5:17 ... The system is going down for halt NOW! <4>init: tty4 main process (369) killed by TERM signal ... wait-for-state stop/waiting * Asking all remaining processes to terminate... ...done. * All processes ended within 1 seconds... ...done. * Deactivating swap... ...done. mount: cannot mount block device /dev/sda1 read-only * Will now halt -
Assume the root user role.
vagrant@vagrant-ubuntu-trusty-64:~$ sudo -s
root@vagrant-ubuntu-trusty-64:~# whoami
root
-
Navigate to the /var/lib/lxc/xr-lxc-app/ directory and package the rootfs into a tar ball.
root@vagrant-ubuntu-trusty-64:~# cd /var/lib/lxc/xr-lxc-app/
root@vagrant-ubuntu-trusty-64:/var/lib/lxc/xr-lxc-app# ls
config  fstab  rootfs
root@vagrant-ubuntu-trusty-64:/var/lib/lxc/xr-lxc-app# cd rootfs
root@vagrant-ubuntu-trusty-64:/var/lib/lxc/xr-lxc-app/rootfs# tar -czvf xr-lxc-app-rootfs.tar.gz *
tar: dev/log: socket ignored
root@vagrant-ubuntu-trusty-64:/var/lib/lxc/xr-lxc-app/rootfs#
-
Transfer the rootfs tar ball to the home directory (~/ or /home/vagrant) and verify if the transfer is successful.
root@vagrant-ubuntu-trusty-64:/var/lib/lxc/xr-lxc-app/rootfs# mv *.tar.gz /home/vagrant
root@vagrant-ubuntu-trusty-64:/var/lib/lxc/xr-lxc-app/rootfs# ls -l /home/vagrant
total 120516
-rw-r--r-- 1 root root 123404860 Sep  1 05:22 xr-lxc-app-rootfs.tar.gz
root@vagrant-ubuntu-trusty-64:/var/lib/lxc/xr-lxc-app/rootfs#
-
Create an LXC spec XML file for specifying attributes required to launch the LXC container with the application.
You must navigate to the /home/vagrant directory on devbox and use a vi editor to create the XML file. Save the file as xr-lxc-app.xml.
A sample LXC spec file to launch the application within the container is as shown.
root@vagrant-ubuntu-trusty-64:/var/lib/lxc/xr-lxc-app/rootfs# exit
exit
vagrant@vagrant-ubuntu-trusty-64:~$ pwd
/home/vagrant
vagrant@vagrant-ubuntu-trusty-64:~$ vi xr-lxc-app.xml

-------------------------------------------------------------------------------------
<domain type='lxc' xmlns:lxc='http://libvirt.org/schemas/domain/lxc/1.0' >
<name>xr-lxc-app</name>
<memory>327680</memory>
<os>
<type>exe</type>
<init>/sbin/init</init>
</os>
<lxc:namespace>
<sharenet type='netns' value='global-vrf'/>
</lxc:namespace>
<vcpu>1</vcpu>
<clock offset='utc'/>
<on_poweroff>destroy</on_poweroff>
<on_reboot>restart</on_reboot>
<on_crash>destroy</on_crash>
<devices>
<emulator>/usr/lib64/libvirt/libvirt_lxc</emulator>
<filesystem type='mount'>
<source dir='/misc/app_host/xr-lxc-app/'/>
<target dir='/'/>
</filesystem>
<console type='pty'/>
</devices>
</domain>
In IOS-XR the global-vrf network namespace contains all the XR GigE or management interfaces. The sharenet configuration in the XML file ensures that the container on being launched has native access to all XR interfaces.
/misc/app_host/ on IOS XR is a special mount volume that is designed to provide nearly 3.9GB of disk space. This mount volume can be used to host custom container rootfs and other large files without occupying disk space on XR. In this example, we expect to untar the rootfs to the /misc/app_host/xr-lxc-app/ directory.
-
Verify if the rootfs tar ball and the LXC XML spec file are present in the home directory.
root@vagrant-ubuntu-trusty-64:~# pwd
/home/vagrant
root@vagrant-ubuntu-trusty-64:~# ls -l
total 119988
-rw-r--r-- 1 root root 122863332 Jun 16 19:41 xr-lxc-app-rootfs.tar.gz
-rw-r--r-- 1 root root       590 Jun 16 23:29 xr-lxc-app.xml
root@vagrant-ubuntu-trusty-64:~#
-
Transfer the rootfs tar ball and XML spec file to XR.
There are two ways of transferring the files: Through the GigE interface (a little slower) or the management interface. You can use the method that works best for you.
-
Transfer Through the Management Interface of XR:
-
Check the port number that maps to the management port on XR.
Vagrant forwards the port number 57722 to a host port for XR over the management port. In a virtual box, the IP address of the host (your laptop) is always 10.0.2.2 for the port that was translated (NAT).
vagrant@vagrant-ubuntu-trusty-64:~$ exit
logout
Connection to 127.0.0.1 closed.

annseque@ANNSEQUE-WS02 MINGW64 ~/vagrant-xrdocs/lxc-app-topo-bootstrap (master)
$ vagrant port rtr
The forwarded ports for the machine are listed below. Please note that
these values may differ from values configured in the Vagrantfile if the
provider supports automatic port collision detection and resolution.

    22 (guest) => 2223 (host)
 57722 (guest) => 2222 (host)
The output shows that port number 2222 maps to port number 57722.
-
Access devbox and use the port number 2222 to transfer the rootfs tar ball and XML spec file to XR.
annseque@ANNSEQUE-WS02 MINGW64 ~/vagrant-xrdocs/lxc-app-topo-bootstrap (master)
$ vagrant ssh devbox
Welcome to Ubuntu 14.04.4 LTS (GNU/Linux 3.13.0-87-generic x86_64)

 * Documentation:  https://help.ubuntu.com/

  System information as of Fri Sep  2 05:38:20 UTC 2016

  System load:  0.49              Users logged in:       0
  Usage of /:   6.4% of 39.34GB   IP address for eth0:   10.0.2.15
  Memory usage: 25%               IP address for eth1:   11.1.1.20
  Swap usage:   0%                IP address for lxcbr0: 10.0.3.1
  Processes:    80

  Graph this data and manage this system at:
    https://landscape.canonical.com/

  Get cloud support with Ubuntu Advantage Cloud Guest:
    http://www.ubuntu.com/business/services/cloud

New release '16.04.1 LTS' available.
Run 'do-release-upgrade' to upgrade to it.


Last login: Fri Sep  2 05:38:20 2016 from 10.0.2.2
vagrant@vagrant-ubuntu-trusty-64:~$ scp -P 2222 /home/vagrant/*.* vagrant@10.0.2.2:/misc/app_host/scratch
The authenticity of host '[10.0.2.2]:2222 ([10.0.2.2]:2222)' can't be established.
ECDSA key fingerprint is db:25:e2:27:49:2a:7b:27:e1:76:a6:7a:e4:70:f5:f7.
Are you sure you want to continue connecting (yes/no)? yes
Warning: Permanently added '[10.0.2.2]:2222' (ECDSA) to the list of known hosts.
vagrant@10.0.2.2's password:
xr-lxc-app-rootfs.tar.gz                                                                                                                                    100%  234MB  18.0MB/s   00:13
xr-lxc-app.xml                                                                                                                                              100%  591     0.6KB/s   00:00
vagrant@vagrant-ubuntu-trusty-64:~$
-
-
Transfer Through the GigE Interface of XR:
-
Determine the GigE interface IP address on XR.
vagrant@vagrant-ubuntu-trusty-64:~$ exit
logout
Connection to 127.0.0.1 closed.

annseque@ANNSEQUE-WS02 MINGW64 ~/vagrant-xrdocs/lxc-app-topo-bootstrap (master)
$ vagrant ssh rtr
Last login: Wed Aug 31 07:09:51 2016 from 10.0.2.2
xr-vm_node0_RP0_CPU0:~$ ifconfig
Gi0_0_0_0 Link encap:Ethernet  HWaddr 08:00:27:5a:29:77
          inet addr:11.1.1.10  Mask:255.255.255.0
          inet6 addr: fe80::a00:27ff:fe5a:2977/64 Scope:Link
          UP RUNNING NOARP MULTICAST  MTU:1514  Metric:1
          RX packets:0 errors:0 dropped:0 overruns:0 frame:0
          TX packets:1 errors:0 dropped:3 overruns:0 carrier:1
          collisions:0 txqueuelen:1000
          RX bytes:0 (0.0 B)  TX bytes:42 (42.0 B)

Mg0_RP0_CPU0_0 Link encap:Ethernet  HWaddr 08:00:27:13:ad:eb
          inet addr:10.0.2.15  Mask:255.255.255.0
          inet6 addr: fe80::a00:27ff:fe13:adeb/64 Scope:Link
          UP RUNNING NOARP MULTICAST  MTU:1514  Metric:1
          RX packets:94 errors:0 dropped:0 overruns:0 frame:0
          TX packets:66 errors:0 dropped:0 overruns:0 carrier:1
          collisions:0 txqueuelen:1000
          RX bytes:13325 (13.0 KiB)  TX bytes:11041 (10.7 KiB)

fwd_ew    Link encap:Ethernet  HWaddr 00:00:00:00:00:0b
          inet6 addr: fe80::200:ff:fe00:b/64 Scope:Link
          UP RUNNING NOARP MULTICAST  MTU:1500  Metric:1
          RX packets:0 errors:0 dropped:0 overruns:0 frame:0
          TX packets:2 errors:0 dropped:1 overruns:0 carrier:0
          collisions:0 txqueuelen:1000
          RX bytes:0 (0.0 B)  TX bytes:140 (140.0 B)

fwdintf   Link encap:Ethernet  HWaddr 00:00:00:00:00:0a
          inet6 addr: fe80::200:ff:fe00:a/64 Scope:Link
          UP RUNNING NOARP MULTICAST  MTU:1496  Metric:1
          RX packets:0 errors:0 dropped:0 overruns:0 frame:0
          TX packets:4 errors:0 dropped:1 overruns:0 carrier:0
          collisions:0 txqueuelen:1000
          RX bytes:0 (0.0 B)  TX bytes:302 (302.0 B)

lo        Link encap:Local Loopback
          inet addr:127.0.0.1  Mask:255.0.0.0
          inet6 addr: ::1/128 Scope:Host
          UP LOOPBACK RUNNING  MTU:65536  Metric:1
          RX packets:0 errors:0 dropped:0 overruns:0 frame:0
          TX packets:0 errors:0 dropped:0 overruns:0 carrier:0
          collisions:0 txqueuelen:0
          RX bytes:0 (0.0 B)  TX bytes:0 (0.0 B)
In this example, the IP address of the GigE interface is 11.1.1.10.
-
Copy the rootfs tar ball to XR by using the GigE interface address.
vagrant@vagrant-ubuntu-trusty-64:~$ scp -P 57722 /home/vagrant/xr-lxc-app-rootfs.tar.gz
vagrant@11.1.1.10:/misc/app_host/scratch/
The authenticity of host '[11.1.1.10]:57722 ([11.1.1.10]:57722)' can't be established.
ECDSA key fingerprint is db:25:e2:27:49:2a:7b:27:e1:76:a6:7a:e4:70:f5:f7.
Are you sure you want to continue connecting (yes/no)? yes
Warning: Permanently added '[11.1.1.10]:57722' (ECDSA) to the list of known hosts.
vagrant@11.1.1.10's password:
xr-lxc-app-rootfs.tar.gz
-
Copy the XML spec file to XR by using the GigE interface address.
vagrant@vagrant-ubuntu-trusty-64:~$ scp -P 57722 /home/vagrant/xr-lxc-app.xml
vagrant@11.1.1.10:/misc/app_host/scratch/
vagrant@11.1.1.10's password:
xr-lxc-app.xml
-
-
-
Create a directory (/misc/app_host/xr-lxc-app/)on XR (rtr) to untar the rootfs tar ball.
vagrant@vagrant-ubuntu-trusty-64:~$ exit
logout
Connection to 127.0.0.1 closed.

annseque@ANNSEQUE-WS02 MINGW64 ~/vagrant-xrdocs/lxc-app-topo-bootstrap (master)
$ vagrant ssh rtr
Last login: Fri Sep  2 05:49:01 2016 from 10.0.2.2

xr-vm_node0_RP0_CPU0:~$ sudo mkdir /misc/app_host/xr-lxc-app/
-
Navigate to the /misc/app_host/xr-lxc-app/ directory and untar the tar ball.
xr-vm_node0_RP0_CPU0:~$ cd /misc/app_host/xr-lxc-app/
xr-vm_node0_RP0_CPU0:/misc/app_host/xr-lxc-app$ sudo tar -zxf ../scratch/xr-lxc-app-rootfs.tar.gz
tar: dev/audio3: Cannot mknod: Operation not permitted
...
-
Use the XML spec file to launch the container and verify its existence on XR.
xr-vm_node0_RP0_CPU0:/misc/app_host/xr-lxc-app$ virsh create /misc/app_host/scratch/xr-lxc-app.xml
Domain xr-lxc-app created from /misc/app_host/scratch/xr-lxc-app.xml

xr-vm_node0_RP0_CPU0:/misc/app_host/xr-lxc-app$ virsh list
 Id    Name                           State
----------------------------------------------------
 2095  xr-lxc-app                     running
 4932  sysadmin                       running
 12086 default-sdr--1                 running
-
Log into the container. The default login credentials are ubuntu/ubuntu.
There are two ways of logging into the container. You can use the method that works best for you:
-
Logging into the container by using virsh command:
xr-vm_node0_RP0_CPU0:/misc/app_host/xr-lxc-app$ virsh console xr-lxc-app
Connected to domain xr-lxc-app
Escape character is ^]
init: Unable to create device: /dev/kmsg
* Stopping Send an event to indicate plymouth is up                     [ OK ]
* Starting Mount filesystems on boot                                    [ OK ]
* Starting Signal sysvinit that the rootfs is mounted                   [ OK ]
* Starting Fix-up sensitive /proc filesystem entries                    [ OK ]

xr-lxc-app login:  * Starting OpenSSH server                             [ OK ]


Ubuntu 14.04.5 LTS xr-lxc-app tty1
xr-lxc-app login: ubuntu
Password:
Last login: Fri Sep  2 05:40:11 UTC 2016 on lxc/console
Welcome to Ubuntu 14.04.5 LTS (GNU/Linux 3.14.23-WR7.0.0.2_standard x86_64)

 * Documentation:  https://help.ubuntu.com/
ubuntu@xr-lxc-app:~$
-
Logging into the container by using SSH:
Use the SSH port number you configured, 58822, and any of XR interface IP addresses to log in.
xr-vm_node0_RP0_CPU0:/misc/app_host/xr-lxc-app$ ssh -p 58822 ubuntu@11.1.1.10
Warning: Permanently added '[11.1.1.10]:58822' (ECDSA) to the list of known hosts.
ubuntu@11.1.1.10's password:
Welcome to Ubuntu 14.04.5 LTS (GNU/Linux 3.14.23-WR7.0.0.2_standard x86_64)

 * Documentation:  https://help.ubuntu.com/
Last login: Fri Sep  2 07:42:37 2016
ubuntu@xr-lxc-app:~$
-
-
Verify if the interfaces on XR are available inside the LXC container.
The LXC container operates as your own Linux server on XR. Because the network namespace is shared between the LXC and XR, all of XR interfaces (GigE, management, and so on) are available to bind to and run your applications.
ubuntu@xr-lxc-app:~$ ifconfig Gi0_0_0_0 Link encap:Ethernet HWaddr 08:00:27:5a:29:77 inet addr:11.1.1.10 Mask:255.255.255.0 inet6 addr: fe80::a00:27ff:fe5a:2977/64 Scope:Link UP RUNNING NOARP MULTICAST MTU:1514 Metric:1 RX packets:186070 errors:0 dropped:0 overruns:0 frame:0 TX packets:155519 errors:0 dropped:3 overruns:0 carrier:1 collisions:0 txqueuelen:1000 RX bytes:301968784 (301.9 MB) TX bytes:10762900 (10.7 MB) Mg0_RP0_CPU0_0 Link encap:Ethernet HWaddr 08:00:27:13:ad:eb inet addr:10.0.2.15 Mask:255.255.255.0 inet6 addr: fe80::a00:27ff:fe13:adeb/64 Scope:Link UP RUNNING NOARP MULTICAST MTU:1514 Metric:1 RX packets:170562 errors:0 dropped:0 overruns:0 frame:0 TX packets:70309 errors:0 dropped:0 overruns:0 carrier:1 collisions:0 txqueuelen:1000 RX bytes:254586763 (254.5 MB) TX bytes:3886846 (3.8 MB) fwd_ew Link encap:Ethernet HWaddr 00:00:00:00:00:0b inet6 addr: fe80::200:ff:fe00:b/64 Scope:Link UP RUNNING NOARP MULTICAST MTU:1500 Metric:1 RX packets:0 errors:0 dropped:0 overruns:0 frame:0 TX packets:2 errors:0 dropped:1 overruns:0 carrier:0 collisions:0 txqueuelen:1000 RX bytes:0 (0.0 B) TX bytes:140 (140.0 B) fwdintf Link encap:Ethernet HWaddr 00:00:00:00:00:0a inet6 addr: fe80::200:ff:fe00:a/64 Scope:Link UP RUNNING NOARP MULTICAST MTU:1496 Metric:1 RX packets:0 errors:0 dropped:0 overruns:0 frame:0 TX packets:155549 errors:0 dropped:1 overruns:0 carrier:0 collisions:0 txqueuelen:1000 RX bytes:0 (0.0 B) TX bytes:10765764 (10.7 MB) lo Link encap:Local Loopback inet addr:127.0.0.1 Mask:255.0.0.0 inet6 addr: ::1/128 Scope:Host UP LOOPBACK RUNNING MTU:65536 Metric:1 RX packets:64 errors:0 dropped:0 overruns:0 frame:0 TX packets:64 errors:0 dropped:0 overruns:0 carrier:0 collisions:0 txqueuelen:0 RX bytes:9400 (9.4 KB) TX bytes:9400 (9.4 KB) -
Configure the container to communicate outside XR with other nodes in the network.
By default, your XR Vagrant box is set up to talk to the internet using a default route through your management port. If you want the router to use the routing table on XR to talk to other nodes in the network, then you must configure tpa-address on XR. This becomes the src-hint for all Linux application traffic.
In this example, we use Loopback 0 for tpa-address to ensure that the IP address for any originating traffic for applications on the XR is a reachable IP address across your topology.
ubuntu@xr-lxc-app:~$ exit
logout
Connection to 11.1.1.10 closed.
xr-vm_node0_RP0_CPU0:/misc/app_host/xr-lxc-app$ exit
logout
Connection to 127.0.0.1 closed.

annseque@ANNSEQUE-WS02 MINGW64 ~/vagrant-xrdocs/lxc-app-topo-bootstrap (master)
$  vagrant port rtr | grep 22
    22 (guest) => 2223 (host)
 57722 (guest) => 2222 (host)

annseque@ANNSEQUE-WS02 MINGW64 ~/vagrant-xrdocs/lxc-app-topo-bootstrap (master)
$ ssh -p 2223 vagrant@localhost
vagrant@localhost's password:


RP/0/RP0/CPU0:ios# configure
Fri Sep  2 08:03:05.094 UTC
RP/0/RP0/CPU0:ios(config)# interface loopback 0
RP/0/RP0/CPU0:ios(config-if)# ip address 1.1.1.1/32
RP/0/RP0/CPU0:ios(config-if)# exit
RP/0/RP0/CPU0:ios(config)# tpa address-family ipv4 update-source loopback 0
RP/0/RP0/CPU0:ios(config)# commit
Fri Sep  2 08:03:39.602 UTC
RP/0/RP0/CPU0:ios(config)# exit
RP/0/RP0/CPU0:ios# bash
Fri Sep  2 08:03:58.232 UTC

[xr-vm_node0_RP0_CPU0:~]$ ip route
default dev fwdintf  scope link  src 1.1.1.1
10.0.2.0/24 dev Mg0_RP0_CPU0_0  proto kernel  scope link  src 10.0.2.15
You can see the configured Loopback 0 IP address (1.1.1.1).
-
Test your application within the launched container.
We installed iPerf in our container. We will run the iPerf server within the container, and the iPerf client on the devbox and see if they can communicate. Basically, the hosted application within a container on rtr should be able to talk to a client application on devbox.
-
Check if the iPerf server is running within the LXC container on XR.
[xr-vm_node0_RP0_CPU0:~]$ssh -p 58822 ubuntu@11.1.1.10
Warning: Permanently added '[11.1.1.10]:58822' (ECDSA) to the list of known hosts.
ubuntu@11.1.1.10's password:
Welcome to Ubuntu 14.04.5 LTS (GNU/Linux 3.14.23-WR7.0.0.2_standard x86_64)

 * Documentation:  https://help.ubuntu.com/
Last login: Fri Sep  2 07:47:28 2016 from 11.1.1.10

ubuntu@xr-lxc-app:~$ iperf -s -u
------------------------------------------------------------
Server listening on UDP port 5001
Receiving 1470 byte datagrams
UDP buffer size: 64.0 MByte (default)
------------------------------------------------------------
-
Check if XR Loopback interface is accessible on devbox. (Open a new Git bash window for this step.)
annseque@ANNSEQUE-WS02 MINGW64 ~ $ cd vagrant-xrdocs annseque@ANNSEQUE-WS02 MINGW64 ~/vagrant-xrdocs (master) $ cd lxc-app-topo-bootstrap/ annseque@ANNSEQUE-WS02 MINGW64 ~/vagrant-xrdocs/lxc-app-topo-bootstrap (master) $ vagrant ssh devbox Welcome to Ubuntu 14.04.4 LTS (GNU/Linux 3.13.0-87-generic x86_64) * Documentation: https://help.ubuntu.com/ System information as of Fri Sep 2 05:51:19 UTC 2016 System load: 0.08 Users logged in: 0 Usage of /: 6.4% of 39.34GB IP address for eth0: 10.0.2.15 Memory usage: 28% IP address for eth1: 11.1.1.20 Swap usage: 0% IP address for lxcbr0: 10.0.3.1 Processes: 77 Graph this data and manage this system at: https://landscape.canonical.com/ Get cloud support with Ubuntu Advantage Cloud Guest: http://www.ubuntu.com/business/services/cloud 53 packages can be updated. 26 updates are security updates. New release '16.04.1 LTS' available. Run 'do-release-upgrade' to upgrade to it. Last login: Fri Sep 2 05:51:21 2016 from 10.0.2.2 vagrant@vagrant-ubuntu-trusty-64:~$ sudo ip route add 1.1.1.1/32 via 11.1.1.10 vagrant@vagrant-ubuntu-trusty-64:~$ ping 1.1.1.1 PING 1.1.1.1 (1.1.1.1) 56(84) bytes of data. 64 bytes from 1.1.1.1: icmp_seq=1 ttl=255 time=1.87 ms 64 bytes from 1.1.1.1: icmp_seq=2 ttl=255 time=10.5 ms 64 bytes from 1.1.1.1: icmp_seq=3 ttl=255 time=4.13 ms ^C --- 1.1.1.1 ping statistics --- 3 packets transmitted, 3 received, 0% packet loss, time 2007ms rtt min/avg/max/mdev = 1.876/5.510/10.520/3.661 ms -
Install the iPerf client on devbox.
vagrant@vagrant-ubuntu-trusty-64:~$ sudo apt-get install iperf
Reading package lists... Done
Building dependency tree
Reading state information... Done
The following NEW packages will be installed:
  iperf
0 upgraded, 1 newly installed, 0 to remove and 52 not upgraded.
Need to get 56.3 kB of archives.
After this operation, 174 kB of additional disk space will be used.
Get:1 http://archive.ubuntu.com/ubuntu/ trusty/universe iperf amd64 2.0.5-3 [56.3 kB]
Fetched 56.3 kB in 10s (5,520 B/s)
Selecting previously unselected package iperf.
(Reading database ... 64313 files and directories currently installed.)
Preparing to unpack .../iperf_2.0.5-3_amd64.deb ...
Unpacking iperf (2.0.5-3) ...
Processing triggers for man-db (2.6.7.1-1ubuntu1) ...
Setting up iperf (2.0.5-3) ...
-
Launch the iPerf client on devbox and verify if it is communicating with the iPerf server within the LXC on XR.
vagrant@vagrant-ubuntu-trusty-64:~$ iperf -u -c 1.1.1.1
------------------------------------------------------------
Client connecting to 1.1.1.1, UDP port 5001
Sending 1470 byte datagrams
UDP buffer size:  208 KByte (default)
------------------------------------------------------------
[  3] local 11.1.1.20 port 37800 connected with 1.1.1.1 port 5001
[ ID] Interval       Transfer     Bandwidth
[  3]  0.0-10.0 sec  1.25 MBytes  1.05 Mbits/sec
[  3] Sent 893 datagrams
[  3] Server Report:
[  3]  0.0-10.0 sec  1.25 MBytes  1.05 Mbits/sec   1.791 ms    0/  893 (0%)
You have successfully hosted an application within an LXC container on XR by using a vagrant box.
-
 Feedback