How High Availability Works
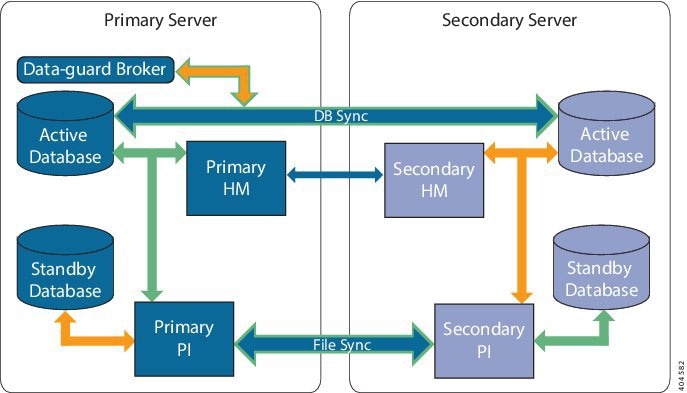
An HA deployment consists of two Prime Infrastructure servers: a primary and a secondary. Each of these servers has an active database and a standby backup copy of the active database. Under normal circumstances, the primary server is active: It is connected to its active database while it manages the network. The secondary server is passive, connected only to its standby database, but in constant communication with the primary server.
The Health Monitor processes running on both servers monitor the status of its opposite server. Oracle Recovery Manager (RMAN) running on both servers creates the active and standby databases and synchronizes the databases when there are changes, with the help of Oracle Data Guard Broker running on the primary server.
When the primary server fails, the secondary takes over, connecting to its active database, which is in sync with the active primary database. You can trigger this switch, called a “failover”, either manually, which is recommended, or have it triggered automatically, You then use the secondary server to manage the network while working to restore access to the primary server. When the primary is available again, you can initiate a switch (called a “failback”) back to the primary server and resume network management using the primary.
If you choose to deploy the primary and secondary servers on the same IP subnet, you can configure your devices to send a notifications to Prime Infrastructure at a single virtual IP address. If you choose to disperse the two servers geographically, such as to facilitate disaster recovery, you will need to configure your devices to send notifications to both servers.
About the Primary and Secondary Servers
In any Prime Infrastructure HA implementation, for a given instance of a primary server, there must be one and only one dedicated secondary server.
Typically, each HA server has its own IP address or host name. If you place the servers on the same subnet, they can share the same IP using virtual IP addressing, which simplifies device configuration. The primary and secondary servers of Prime Infrastructure must be enabled on a network interface ethernet0 (eth0) during HA implementation.
Once HA is set up, you should avoid changing the IP addresses or host names of the HA servers, as this will break the HA setup (see “Reset the Server IP Address or Host Name” in Related Topics).
Sources of Failure
Prime Infrastructure servers can fail due to issues in one or more of the following areas:
- Application Processes: Failure of one or more of the Prime Infrastructure server processes, including NMS Server, MATLAB, TFTP, FTP, and so on. You can view the operational status of each of these application processes by running the ncs status command through the admin console.
- Database Server: One or more database-related processes could be down. The Database Server runs as a service in Prime Infrastructure.
- Network: Problems with network access or reachability issues.
- System: Problems related to the server's physical hardware or operating system.
- Virtual Machine
(VM): Problems with the VM environment on which the primary and secondary
servers were installed (if HA is running in a VM environment).
For more information, see How High Availability Works
File and Database Synchronization
Whenever the HA configuration determines that there is a change on the primary server, it synchronizes this change with the secondary server. These changes are of two types:
- Database: These include database updates related to configuration, performance and monitoring data.
- File: These include changes to configuration files.
Oracle Recovery Manager (RMAN) running on both servers creates the active and standby databases and synchronizes the databases when there are changes, with the help of Oracle Data Guard Broker running on the primary server.
File changes are synchronized using the HTTPS protocol. File synchronization is done either in:
- Batch: This category includes files that are not updated frequently (such as license files). These files are synchronized once every 500 seconds.
- Near Real-Time: Files that are updated frequently fall under this category. These files are synchronized once every 11 seconds.
By default, the HA framework is configured to copy all the required configuration data, including:
- Report configurations
- Configuration Templates
- TFTP-root
- Administration settings
- Licensing files
HA Server Communications
The primary and secondary HA servers exchange the following messages in order to maintain the health of the HA system:
- Database Sync: Includes all the information necessary to ensure that the databases on the primary and secondary servers are running and synchronized.
- File Sync: Includes frequently updated configuration files. These are synchronized every 11 seconds, while other infrequently updated configuration files are synchronized every 500 seconds.
- Process Sync: Ensures that application- and database-related processes are running. These messages fall under the Heartbeat category.
- Health Monitor
Sync: These messages check for the following failure conditions:
- Network failures
- System failures (in the server hardware and operating system)
- Health Monitor failures
Health Monitor Process
Health Monitor (HM) is the main component managing HA operations. Separate instances of HM run as an application process on both the primary and the secondary server. HM performs the following functions:
- Synchronizes database and configuration data related to HA (this excludes databases that sync separately using Oracle Data Guard).
- Exchanges heartbeat messages between the primary and secondary servers every five seconds, to ensure communications are maintained between the servers.
- Checks the available disk space on both servers at regular intervals, and generates events when storage space runs low.
- Manages, controls and monitors the overall health of the linked HA servers. If there is a failure on the primary server then it is the Health Monitor’s job to activate the secondary server.
Health Monitor Web Page
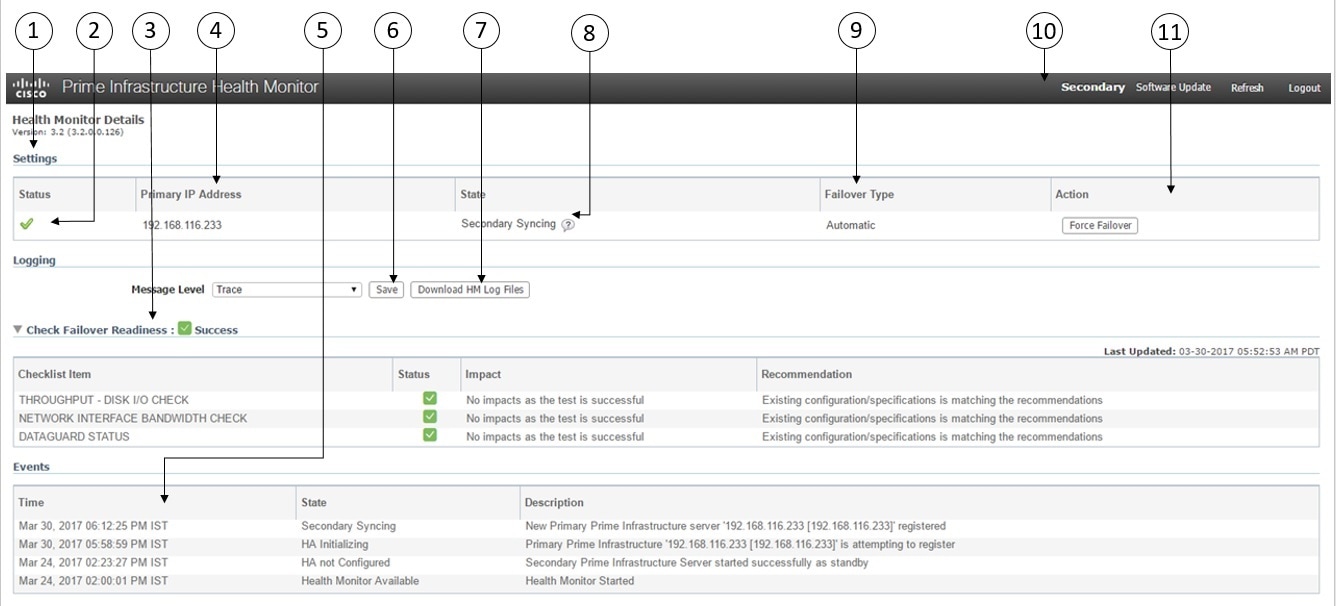
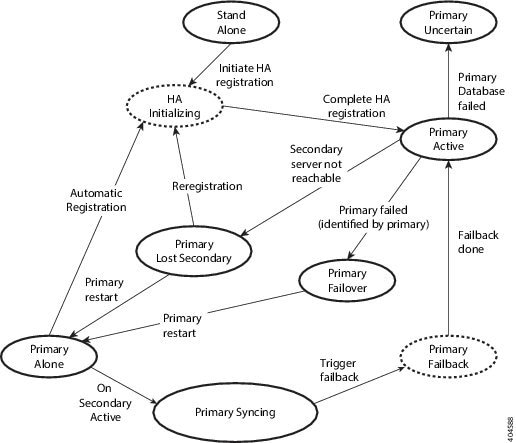
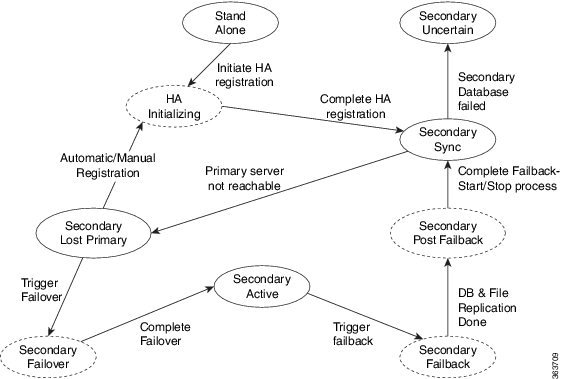
You control HA behavior using the Health Monitor web page. Each Health Monitor instance running on the primary server or secondary server has its own web page. The following figure shows an example of the Health Monitor web page for a secondary server in the “Primary Active” and "Secondary Syncing" state.
|
1 |
Settings area displays Health Monitor state and configuration detail in five separate sections. |
|
2 |
Status indicates current functional status of the HA setup (green check mark indicates that HA is on and working). |
|
3 |
Check Failover Readiness field displays the values of system failback and system failover details of the checklist items. For more details, see "Check Failover Readiness" given below the table. |
|
4 |
Primary IP Address identifies the IP of the peer server for this secondary server (on the primary server, this field is labeled “Secondary IP Address”). |
|
5 |
Events table displays all current HA-related events, in chronological order, with most recent event at the top. |
|
6 |
Message Level field lets you change the logging level (your choice of Error, Informational, or Trace). You must press Save to change the logging level. |
|
7 |
Logging Download area lets you download Health Monitor log files. |
|
8 |
State shows current HA state of the server on which this instance of Health Monitor is running. |
|
9 |
Failover Type shows whether you have Manual or Automatic failover configured. |
|
10 |
Identifies the HA server whose Health Monitor web page you are viewing. |
|
11 |
Action shows actions you can perform, such as failover or failback. Action buttons are enabled only when Health Monitor detects HA state changes needing action. |
|
Checklist Name |
Description |
||
|---|---|---|---|
|
SYSTEM - CHECK DISK IOPS |
This validates the disk iops in both primary and secondary server. The minimum expected disk iops is 200 MBps. |
||
|
NETWORK - CHECK NETWORK INTERFACE BANDWIDTH |
This checks if the eth0 interface speed matches the recommended speed of 100 Mbps in both primary and secondary sever. This test will not measure network bandwidth by transmitting data between primary and secondary server. |
||
|
NETWORK - CHECK NETWORK BANDWIDTH SPEED |
This checks if the network bandwidth speed matches the recommended speed of 100 Mbps in both primary and secondary sever. This test will measure network bandwidth by transmitting data between primary and secondary server.
|
||
|
DATABASE - SYNC STATUS |
This ensures the oracle data guard broker configuration which syncs the primary and secondary database. |
Trend Graph for Check Failover Readiness :
-
Click Click here link in the Trend Graph to check the trend graphs for all the check failover readiness test. The trend graphs shows the historical summary of the test and status on the stability of the System/Network.
-
Click Select Date Range to modify date and time, Click Apply. By default, trend graphs displays the latest 6 hours value.
Using Virtual IP Addressing With HA
Under normal circumstances, you configure the devices that you manage using Prime Infrastructure to send their syslogs, SNMP traps and other notifications to the Prime Infrastructure server’s IP address. When HA is implemented, you will have two separate Prime Infrastructure servers, with two different IP addresses. If we fail to reconfigure devices to send their notifications to the secondary server as well as the primary server, then when the secondary Prime Infrastructure server goes into Active mode, none of these notifications will be received by the secondary server.
Setting all of your managed devices to send notifications to two separate servers demands extra device configuration work. To avoid this additional overhead, HA supports use of a virtual IP that both servers can share as the Management Address. The two servers will switch IPs as needed during failover and failback processes. At any given time, the virtual IP Address will always point to the correct Prime Infrastructure server.
Note that you cannot use virtual IP addressing unless the addresses for both of the HA servers and the virtual IP are all in the same subnet. This can have an impact on how you choose to deploy your HA servers (see “Planning HA Deployments” and “Using the Local Model” in Related Topics).
Also note that a virtual IP address is in no way intended as a substitute for the two server IP addresses. The virtual IP is intended as a destination for syslogs and traps, and for other device management messages being sent to the Prime Infrastructure servers. Polling of devices is always conducted from one of the two Prime Infrastructure server IP addresses. Given these facts, if you are using virtual IP addressing, you must open your firewall to incoming and outgoing TCP/IP communication on all three addresses: the virtual IP address as well as the two actual server IPs.
You can also use virtual IP addressing if you plan to use HA with Operations Center. You can assign a virtual IP as SSO to the Prime Infrastructure instance on which Operations Center is enabled. No virtual IP is needed for any of the instances managed using Operations Center (see “Enable HA for Operations Center”).
You can enable virtual IP addressing during HA registration on the primary server, by specifying that you want to use this feature and then supplying the virtual IPv4 (and, optionally, IPv6) address you want the primary and secondary servers to share (see “How to Register HA on the Primary Server”).
To remove Virtual IP addressing after it is enabled, you must remove HA completely (see “Remove HA Via the GUI”).
How to Use SSL Certificates in an HA Environment?
If you decide to use SSL certification to secure communications between Prime Infrastructure server and users, and also plan to implement HA, you will need to generate separate certificates for both the primary and secondary HA servers.
These certificates must be generated using the FQDN (Fully Qualified Domain Name) for each server. To clarify: You must use the primary server’s FQDN to generate the certificate you plan to use for the primary server, and the secondary server’s FQDN to generate the certificate you plan to use for the secondary server,
Once you have generated the certificates, import the signed certificates to the respective servers.
Do not generate SSL certificates using a virtual IP address. The virtual IP address feature is used to enable communications between Prime Infrastructure and your network devices.
To set up HTTPS access for Cisco Prime Infrastructure, see Set Up HTTPS Access to Prime Infrastructure
Import Client Certificates Into Web Browsers
Users accessing Prime Infrastructure servers with certificate authentication must import client certificates into their browsers in order to authenticate. Although the process is similar across browsers, the actual details vary with the browser. The following procedure assumes that your users are using a Prime Infrastructure compatible version of Firefox.
You must ensure that the user importing the client certificates has:
- Downloaded a copy of the certificate files to a local storage resource on the client machine
- If the certificate file is encrypted: The password with which the certificate files were encrypted.
Procedure
|
Step 1 |
Launch Firefox and enter the following URL in the location bar: about:preferences#advanced. Firefox displays its Options > Advanced tab. |
|
Step 2 |
Select Certificates > View Certificates > Your Certificates, then click Import.... |
|
Step 3 |
Navigate to the downloaded certificate files, select them, then click OK or Open. |
|
Step 4 |
If the certificate files are encrypted: You will be prompted for the password used to encrypt the certificate file. Enter it and click OK. The certificate is now installed in the browser. |
|
Step 5 |
Press Ctrl+Shift+Del to clear the browser cache. |
|
Step 6 |
Point the browser to the Prime Infrastructure server using certificate authentication. You will be prompted to select the certificate with which to respond to the server authentication requested. Select the appropriate certificate and click OK. |
Hot Standby Behavior
When the primary server is active, the secondary server is in constant synchronization with the primary server and runs all Prime Infrastructure processes for fast switch over. When the primary server fails, the secondary server immediately takes over the active role within two to three minutes after the failover.
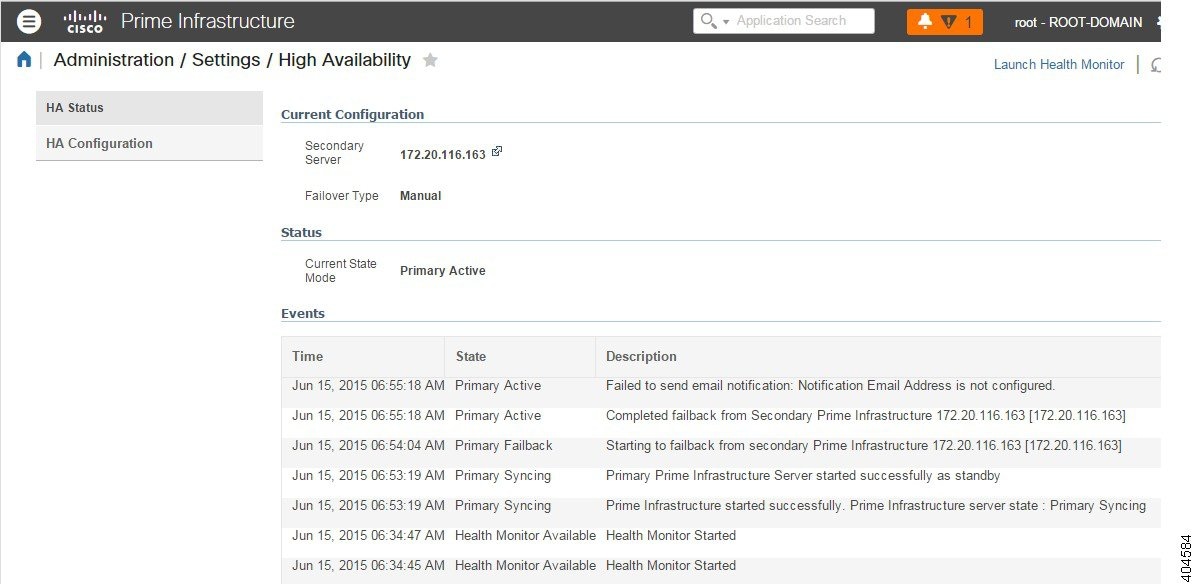
Once issues in the primary server are resolved and it is returned to a running state, the primary server assumes a standby role. When the primary server is in the standby role, the Health Monitor GUI shows “Primary Syncing” state during which the database and files on the primary start to sync with the active secondary.
When the primary server is available again and a failback is triggered, the primary server again takes over the active role. This role switching between the primary and secondary servers happens within two to three minutes.

 Feedback