Cisco Prime Collaboration Assurance Guide - Standard, 11.x
Bias-Free Language
The documentation set for this product strives to use bias-free language. For the purposes of this documentation set, bias-free is defined as language that does not imply discrimination based on age, disability, gender, racial identity, ethnic identity, sexual orientation, socioeconomic status, and intersectionality. Exceptions may be present in the documentation due to language that is hardcoded in the user interfaces of the product software, language used based on RFP documentation, or language that is used by a referenced third-party product. Learn more about how Cisco is using Inclusive Language.
- Updated:
- January 16, 2017
Chapter: Manage Devices
Manage Devices
You need to get the devices in Managed state in Inventory for Cisco Prime Collaboration to display monitoring information about the devices. Before you can manage devices using Cisco Prime Collaboration, you need to discover devices in your network. After you add the device credentials, you can discover and manage the devices.
You must run the RIS Collector Service in Cisco Unified Communications Manager for Cisco Unified Communications Manager to be in managed state. For more information on how to run RIS Collector Service in Cisco Prime Collaboration 11.0, see Setting Up Devices for Prime Collaboration Assurance wiki page, in Cisco Prime Collaboration 11.5, see Configure Devices for Prime Collaboration Assurance and in Cisco Prime Collaboration 11.6, see Configure Devices for Prime Collaboration Assurance
To view the pre-canned dashboards and create custom dashboards, and to view the alarms associated with Unified CM and Unity Connection, you need to only add the Unified CM or Unity Connection cluster using the Add Device option in Inventory. To manage Cisco TMS applications, you need to first discover the devices using the auto discovery option.
You need to configure device credentials for the Cisco TMS and associated devices that are managed using Cisco Prime Collaboration. Device credentials are required for discovering these devices and updating inventory. If the credentials vary for different devices, create separate credentials profiles. That is, if you want to manage two Cisco TMS with different credentials in Cisco Prime Collaboration, you must create two separate credentials profiles.
Review Setting up Devices for Prime Collaboration Assurance in Cisco Prime Collaboration 11.0, Configure Devices for Prime Collaboration Assurance in Cisco Prime Collaboration 11.5 and Configure Devices for Prime Collaboration Assurance in Cisco Prime Collaboration 11.6 to see whether you have completed the necessary configuration.
 Note | If the RIS Collector Service is not running on Cisco Unified Communications Manager, it will not get managed. |
- Add Cisco Unified CM and Cisco Unity Connection
- Add Cisco TMS and Associated Devices
- Add a Device Credentials Profile
- Credential Profiles Field Descriptions
- Edit Device Credentials
- Verify Device Credentials
- Discovery Lifecycle of a Cisco TMS
- Current Inventory
- Device Status Summary
Add Cisco Unified CM and Cisco Unity Connection
You can add single or multiple devices to Cisco Prime Collaboration manually by using the Add Device option on the Device Inventory page.
To add a new Cisco Unified CM or Cisco Unity Connection device:
Add Cisco TMS and Associated Devices
You must add and configure device credentials before discovering these devices. See Add a Device Credentials Profile for details.
To add Cisco TMS and associated devices:
Add a Device Credentials Profile
| Step 1 |
For Cisco Prime Collaboration Release 11.5 and later Choose from the Toggle Navigation pane. The Inventory Management page is displayed. |
| Step 2 | In the Inventory Management page, choose TMS and Associated devices(Autodiscover) from Add drop-down menu. The Manage Credentials page is displayed. |
| Step 3 | In the Inventory Management page, click Manage Credentials. |
| Step 4 | In the Credentials Profile page, click Add and enter the necessary information described in the Credential Profiles Field Descriptions table. |
| Step 5 | Click Save. In your network, you may have configured the same SNMP credentials for all devices, but different CLI credentials. In such cases, first create a new profile and later clone the existing profile. To clone, in the Credentials Profile page, select an existing profile and click Clone and after the required updates click Add/Update. |
Credential Profiles Field Descriptions
After the devices are discovered, you can check the current Inventory table to verify that the credentials have been updated in the Cisco Prime Collaboration database.
The following table describes the fields on the Credential Profiles page.
For Cisco Prime Collaboration Release 11.5 and later
-
CISCO INTERACTION MANAGER is renamed as WEB/EMAIL INTERACTION MANAGER
-
CUIC is renamed as INTELLIGENCE CENTER
-
CTS is renamed as CTS/IX ENDPOINT
-
CISCO UNIFIED COMMUNICATIONS MANAGER is renamed as COMMUNICATIONS MANAGER
-
C_SERIES CODEC is renamed as TC/CE ENDPOINT
-
E20 is renamed as E20 ENDPOINT
-
ISDN is renamed as ISDN GATEWAY
-
MCU is renamed as MULTIPOINT CONTROLLER
-
MXP is renamed as MXP ENDPOINT
-
ROUTER is renamed as ROUTER/VOICEGATEWAY
-
TPS is renamed as TELEPRESENCE SERVER
-
TELEPRESENCE CONDUCTOR is renamed as TELEPRESENCE CONDUCTOR
Note | You do not need to add credentials for Cisco Device, Polycom, Cisco Unified Communications Manager Express (Cisco Unified CME), and UC500 Series devices in Credential Profiles page. |
Edit Device Credentials
If you have modified credentials for the devices that you are currently managing in the Cisco Prime Collaboration application, you must modify the relevant credential profiles in the Cisco Prime Collaboration database.
If the credentials are incorrect, a major event, Device is not accessible from Cisco Prime Collaboration, is triggered (Monitor> Alarms & Events> Events).
| Step 1 | Choose
.
For Cisco Prime Collaboration Release 11.5 and later Choose . |
| Step 2 | From the Inventory Management page, select a device and click . |
| Step 3 | Update the credentials and
click
Save.
Cisco Prime Collaboration takes a few minutes to update its database with the modified credentials. After the credentials are updated, an informational event, "Device is accessible from Collaboration Manager", is triggered. Cisco Prime Collaboration uses the updated credentials in the next polling job. |
Verify Device Credentials
For Cisco Prime Collaboration Release 11.5 and later
If device discovery fails because of incorrect credentials, you can test the credentials for the failed devices and rediscover those devices. Choose for a list of devices that were not discovered.
Note | Do not run this task when a discovery job is in progress. |
| Step 1 |
For Cisco Prime Collaboration Release 11.5 and later Choose . The Inventory Management page is displayed. | ||
| Step 2 | In the Inventory Management page, choose TMS and Associated devices (Auto Discover) from Add drop-down menu. The Manage Credential page is displayed. | ||
| Step 3 | From the Credential Profiles page, select the profile name to use for testing the credentials, and click Verify. | ||
| Step 4 | Enter a valid device IP address to test the credentials. You can verify only one device at a time, and you cannot enter expressions such as *.*.*.*, 192.2.*.*, and so on. | ||
| Step 5 | Click
Test. You can see
an inprogress moving icon next to the test button till the task completes. The
test results are displayed under the Test Credential Result pane.
If the verification fails, see the possible reasons listed in .
|
Credential Verification Error Messages
The credential verification error messages are tabulated below.
|
Either the device response time is slow or the device is unreachable. |
||||
|
Either the device response time is slow or the device is unreachable. |
Increase the SNMP Timeout and Retries values in the credential profile. |
|||
|
The configured SNMPv3 security level is not supported on the device. |
Device does not support the configured SNMPv3 security level. |
Change the SNMPv3 security level to the supported security level in the credential profile. |
||
|
The SNMPv3 response was not received within the stipulated time. |
Either the device response time is slow or the device is unreachable. |
|||
|
Enter the correct SNMPv3 engine ID in the credential profile. |
||||
|
Verify that the correct SNMPv3 authentication algorithm is entered in the credential profile. |
||||
|
The configured SNMPv3 context in the credential profile does not exist on the device. |
Verify that the configured SNMPv3 context is correct in the credential profile. |
|||
|
Either the SNMPv3 username is incorrect in the credential profile or the SNMPv3 username is not configured on the device. |
Verify that the correct SNMPv3 username is set in the credential profile and on the device. |
|||
|
Verify and reenter the device CLI credentials in the credential profile. |
||||
|
Either SSH or Telnet service may not be running on the device. |
||||
|
Either the HTTP service is not running or the URL is invalid. |
||||
|
Verify whether the HTTP or HTTPS service is running on the device. |
||||
|
Incorrect HTTP credentials entered in the credential profile. |
Verify and reenter the device HTTP credentials in the credential profile. |
|||
|
Incorrect JTAPI credentials entered in the credential profile. |
Verify and reenter the device JTAPI credentials in the credential profile.
|
|||
|
For Cisco Prime Collaboration Release 11.1 and earlier |
||||
|
Incorrect MSI credentials entered in the credential profile. |
Verify and reenter the device MSI credentials in the credential profile. |
|||
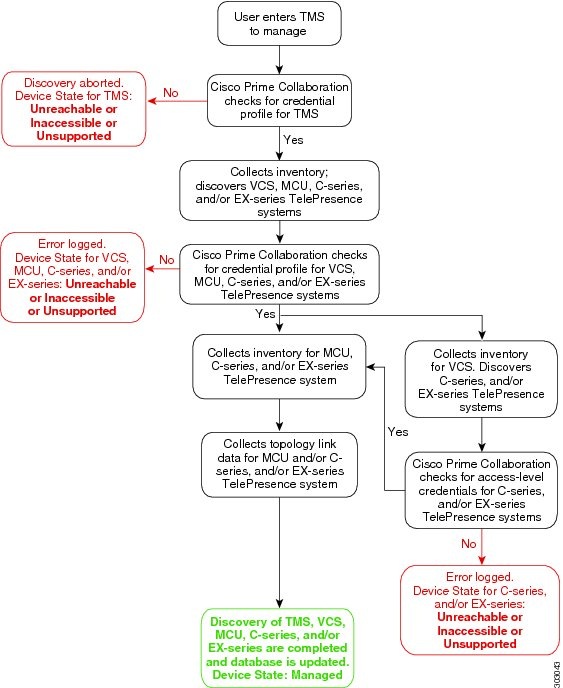
Discovery Lifecycle of a Cisco TMS
The following figure shows the discovery lifecycle of a Cisco TMS.
Current Inventory
For Cisco Prime Collaboration Release 11.5 and later
Choose .
You can use the show drop-down list on the inventory table to filter devices based on the device type and state. There are options such as Quick Filters and Advanced Filters to filter devices based on the device criteria.
Not all columns of the inventory table appear by default. To see all the columns, click the Settings option on the top right corner. You can export the inventory table as a CSV or a PDF file by clicking the Export icon at the upper right corner of the inventory table.
| Field | Description |
| Host Name |
Name assigned to the device for ease of identification |
| Device Type | The most applicable role or service of the device. |
| Model | Device model |
| IP Address | IP address used for managing the device. Click on the IP address
to log into the device.
For routers and switches, you must associate a terminal client application, such as Putty, to log into the device |
| Software Version |
Software version running on the device. |
| State |
Status of the device. |
| Status Reason |
Reason for the device status. |
| Last Discovered |
Date and time when the device was last discovered. The time will be according to the time zone set in the Cisco Prime Collaboration server. |
Device Status Summary
For Cisco Prime Collaboration Release 11.5 and later
The Device Status Summary lists the count of devices based on the device state. The counts does not include Phones & Unknown devices. The device count is available as a cross-launch to the Inventory table in Inventory Management. When you click on any count, you will be directed to the Inventory table, where you can see all the devices in that particular state. You can filter count based on Customer/Assurance Domain. The Device Status Summary data is refreshed every 30 seconds.
The Device Status Summary is available under . The Devices column displays the total number of devices in a particular state. The Status column displays the status of the devices. When you click on Discovery Jobs, you will be directed to Job Management page and where you can see the status of the discovery job.
You can view the following device status. For more information on status, see "Discovery Life Cycle" section in Cisco Prime Collaboration Assurance Guide- Advanced.
When you hover your mouse over Partially Managed, Inaccessible, or Undiscoverable states, you can view a tool tip with an explanation.
You can view Unmanaged device count in the global summary bar, adjacent to Inventory Summary. When you click on the count, you will be directed to Device Status Summary page.
| Displays the device discovery status. | |
|
Devices Discovery In-Progress <count> |
Displays the number of devices for which discovery is in progress. Devices Discovery In-Progress <count> is not displayed, if there are no discovery is in progress. |
 Feedback