Next Steps

This chapter describes the tasks that you perform after installing Prime Cable Provisioning.

Licensing Prime Cable Provisioning

To access this release, you must procure a new license of Prime Cable Provisioning 7.4.


Note


You need to get the permanent or evaluation license of 7.4 to upgrade from 5.x/6.x to 7.4.

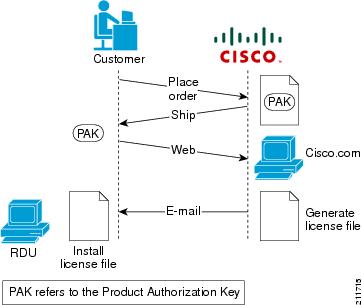
Prime Cable Provisioning software must be registered via Cisco.com in order to obtain a license file (*.lic). The license file will be sent to you by e-mail. For any licensing issues, please contact your Cisco account representative or mailto:ask-cableprovisioning@cisco.com.

Prime Cable Provisioning licenses are available either as a permanent or an evaluation license.

  • Permanent -A permanent license is purchased for use in your network environment and activates the specific features for which it is intended.
  • Evaluation -An evaluation license enables functionality for a specific length of time.

Prime Cable Provisioning evaluation licenses become invalid on a predetermined date. As such, evaluation licenses must be created when needed. To create your evaluation license, contact your Cisco representative, who will generate the necessary license file online and forward it to you via e-mail.

Prime Cable Provisioning enables you to install permanent and evaluation licenses at the same time. In addition, it also allows you to install more than one evaluation license. This enables you to increase your device limit when you are in short of licenses till you purchase a permanent license. While you can install more than one evaluation license, an expired license can be deleted and a new evaluation license (with a later expiry date), or a permanent license can be added. While deleting the expired license, ensure that the device limit of the new license at least equals the number of devices that is currently stored in the database.

Prime Cable Provisioning enables licensing using a Service License file. Each license translates to a DOCSIS IP device. The license file that you receive will contain the number of DOCSIS IP devices that are licensed.

Prior to Prime Cable Provisioning 5.x, every device type instance such as, DOCSIS, Computer, PacketCable, CableHome, etc. consumed a separate license. In addition, with dual-stack Computers, this approach created two IPDevice records, one each for IPv4 and IPv6, resulting in two licenses being consumed instead of one. In Prime Cable Provisioning 5.x, 6.x, the licensing scheme counts only the DOCSIS IP devices irrespective of whether the device is a stand-alone CM or an embedded eCM, each DOCSIS IP device consumes one license. Apart from the DOCSIS IP device, all other device types consume no license. In other words, Prime Cable Provisioning consumes only one license:

  • if a subscriber has a CM to which a Computer and a PacketCable devices are connected.
  • if a subscriber has a CM to which a dual-stack Computer and a PacketCable devices are connected.
  • if a subscriber has an e-MTA or e-STB.

To know how the license mechanism for Prime Cable Provisioning 5.x is different from BAC 4.x, see the BAC 4.x and Prime Cable Provisioning 5.x Licensing Model document.

The Prime Cable Provisioning Admin UI shows the available and used licenses. You can also see the available and used licenses count through the API client.


Caution


Do not edit your license file. Changing the data in any way invalidates the license file.


You still require separate licenses for the following Prime Cable Provisioning components:
  • The DPE

  • The KDC, if you configure your network to support voice technology

While you must install the DPE license from the Admin UI, the KDC license continues to be proprietary as in previous releases, and is licensed during Prime Cable Provisioning installation.

The DPE license is either included in a single license file along with the Service License or it is a separate license file by itself. The DPE is licensed only when you install this license file from the Admin UI.

For detailed information on how to add and delete licenses, see the Cisco Prime Cable Provisioning 7.4 User Guide.

Obtaining a Permanent License

The following figure describes the procedure to request a permanent license.
Figure 1. License Claim Process

Note


With FlexLM licensing, you receive a Product Authorization Key (PAK) for each software CD package that you purchase. The PAK is affixed as a sticky label on the Software License Claim Certificate card that is included in your CD-ROM package.


To obtain a permanent license:

Procedure


Step 1

Keep your PAK handy and access http://www.cisco.com/go/license. You must have a valid Cisco.com account to log into this site.

The Product License Registration website appears.

Step 2

Complete the steps detailed at the Product License Registration page.

Note


During license registration, submit each PAK that you have received. For each PAK that you submit, a license file is generated and sent to you via e-mail.

Step 3

Once you receive your license file, install it using the procedure described in Installing Your License File.


Obtaining an Evaluation License

For an evaluation license, contact your Cisco representative, who will generate the necessary key from the Cisco licensing website and e-mail it to you. Once you receive your license file, install it using the procedure described in Installing Your License File.

Installing Your License File

Before installing your license file, ensure that you back up your licenses in case you have to reinstall the Prime Cable Provisioning software.

To install your permanent or evaluation license:

Procedure


Step 1

Once you receive your license file, save each file to the local system on which you intend to launch your web browser.

Step 2

Launch your web browser on that system.

Step 3

Enter the administrator’s location using this syntax:

http://machine_name:port_number/

where,
  • machine_name—Identifies the computer on which the RDU is running.

    Note


    To access the Admin UI via HTTP over SSL, also known as HTTPS, enter https://machine_name:port_number/

    .
  • port_number—Identifies the computer port on which the server side of the administrator application runs. The default port number is:

    • 8100 for HTTP

    • 8443 for HTTPS

The main login page appears.

Step 4

Enter the username and password.

Note


If you are logging in for the first time, the Change Password screen appears. Enter a new password and confirm it.

Step 5

Click Login.

The Main Menu page appears.

Step 6

Click the license link at the top of the Main Menu page, or choose Configuration > License Keys.

The Manage License Keys page appears.

Step 7

In the License File field, enter the complete path to the location of the license file on your local system. Remember to include the name of the license file while specifying the pathname.

Or, click Browse and navigate to the license file.

Step 8

Click Add. The details regarding the number of services, the DPEs that you are licensed to use, and the type of license (Permanent or Evaluation) appear.


Installing Your KDC License

Obtain a KDC license from your Cisco representative and then install it in the correct directory.

To install the KDC license file (bacckdc.license):

Procedure


Step 1

Obtain your license file from your Cisco representative.

Step 2

Log into the Prime Cable Provisioning host as root or non-root.

Step 3

Change to the <BPR_HOME>/kdc directory.

Step 4

Copy the license file to this <BPR_HOME>/kdc directory.

Caution

 
  • Be careful not to copy the license file as an ASCII file. The file contains binary data susceptible to unwanted modification during an ASCII transfer.

  • Do not copy KDC license files between operating systems because the transfer process may damage the file.

Step 5

To restart the KDC server and make the changes take effect, run the bprAgent restart kdc command from the /etc/init.d directory.


Cisco Prime Network Registrar Configurations

After installing Prime Cable Provisioning, you must set up the Prime Network Registrar DNS server and Prime Network Registrar Extension Points.

Enabling a Cisco Prime Network Registrar Spoofing DNS Server

A spoofing DNS server redirects all DNS requests to the same IP address. You can enable spoofing to enforce a self-provisioning flow for a new subscriber.

For example, assume that a DNS host is dns.example.com, and has an IP address of 10.10.10.5. Assume also that the web server with the self-provisioning flow is 10.10.10.6.

On the DNS server, set the following parameters in Prime Network Registrar:

nrcmd> zone . delete

nrcmd> zone . create primary dns.example.com postmaster.dns.example.com

nrcmd> zone . addrr * a 10.10.10.6

nrcmd> save

nrcmd> dns reload

When DNS reloads, the changes take effect.

On the DHCP server, set the following parameters in Prime Network Registrar:

nrcmd> policy unprovisioned setoption domain-name-servers 10.10.10.5

nrcmd> policy unprovisioned setoption domain-name example.com

nrcmd> save

nrcmd> dhcp reload

Syslog is now ready to receive alerts from Prime Cable Provisioning.

This appendix describes the sample configuration file included with this installation of Prime Cable Provisioning. This file is typical of the files you use during the Prime Cable Provisioning installation.

You can copy and use the sample configuration scripts to work with your Prime Cable Provisioning implementation. One script exists for DOCSIS modems and computers, while another script is available for DOCSIS modems and PacketCable MTAs.

Cisco Prime Network Registrar Extension Point Configuration

This section describes the sample configuration file included with this installation of Prime Cable Provisioning. This file is typical of the files you use during the Prime Cable Provisioning installation.

You can copy and use the sample configuration scripts to work with your Prime Cable Provisioning implementation. One script exists for DOCSIS modems and computers, while another script is available for DOCSIS modems and PacketCable MTAs.

Sample Script for DOCSIS Modems and Computers

The sample configuration nrcmd script (bpr_cnr_hsd_sample_config.nrcmd) is used for a high-speed data deployment of DOCSIS modems and computers in a multiple-host configuration with failover protection. It is installed in the <BPR_HOME>/cnr_ep/samples directory.

To create this script, assume that the:
  • DHCP primary server IP address is: 192.168.0.32

  • DNS primary server IP address is: 192.168.0.32


Note


Ensure that these IP addresses cannot be pinged from outside.
This sample script defines:
  • Scope selection tag objects for provisioned client classes.

  • Client-class objects for provisioned DOCSIS modems and computers.

  • Policy objects for unprovisioned and provisioned devices. (The only difference is that DNS servers are not given to unprovisioned devices.)

  • Scope and scope policy objects for unprovisioned and provisioned DOCSIS modems and computers.

  • Disabled TFTP server.

To run this script, in the Prime Network Registrar nrcmd program, enter:

# NR_HOME/local/usrbin/nrcmd -N username -P password -b < bpr_cnr_hsd_sample_config.nrcmd
  • username—Identifies the username.

  • password—Identifies the password.

Sample Script for DOCSIS Modems and PacketCable eMTA/eDVA

This sample configuration nrcmd script (bpr_cnr_pktcbl_sample_config.nrcmd) is used for a high-speed data deployment of DOCSIS modems and PacketCable eMTA's/eDVA's. A multiple-host configuration with failover protection is also used, and the script is installed in the <BPR_HOME>/cnr_ep/samples directory.

To create this script, assume that the:
  • DHCP primary server IP address is: 192.168.0.32

  • DNS primary server IP address is: 192.168.0.32


Note


Ensure that these IP addresses cannot be pinged from outside.

This sample script defines objects similar to those described in Sample Script for DOCSIS Modems and Computers

To run this script, in the Prime Network Registrar nrcmd program, enter:

# NR_HOME/local/usrbin/nrcmd -N username -P password -b < bpr_cnr_pktcbl_sample_config.nrcmd
  • username—Identifies the username.

  • password—Identifies the password.

Setting Up a Device Provisioning Engine

This section describes how you set up the DPE component of Prime Cable Provisioning.

The DPE caches provisioning information and handles all configuration requests, including downloading configuration files to devices. It is integrated with the Prime Network Registrar DHCP server to control the assignment of IP addresses. Multiple DPEs can communicate with a single DHCP server.

To configure the DPE from the CLI, you must have a valid license. If you run the commands described in this chapter on an unlicensed DPE, the following message appears:
This DPE is not licensed. Your request cannot be serviced. Please check with your system administrator for DPE licenses.

For details on DPE licensing and how to install your license, see Licensing Prime Cable Provisioning.

Accessing the DPE CLI

The Prime Cable Provisioning CLI is an IOS-like command-line interface that you use to configure and view the status of the DPE by using Telnet or SSH. The CLI supports built-in command help and command autocompletion.

You can enable authentication of the CLI through a locally configured login and privileged passwords, or through a remote username and password for a TACACS+ service.

To access the DPE CLI, open a Telnet session to port 2323 from a local or remote host.

Accessing DPE CLI from a Local Host

To access the CLI from a local host, use:

# telnet localhost 2323

or,
# telnet 0 2323

Accessing DPE CLI from a Remote Host

To access the CLI from a remote host, enter:

# telnet remote-hostname 2323

Note


If you cannot establish a Telnet connection to the CLI, the CLI server is probably not running. You may need to start the server. To start the server, enter:

# <BPR_HOME>/cli/bin/startCLI.sh


After you access the CLI, you must enter the DPE credentials to continue.

See the Cisco Prime Cable Provisioning DPE CLI Reference Guide for specific information on the CLI commands that a DPE supports.

Logging In

To log into the DPE:

Procedure


Step 1

At the username and password prompt, enter the appropriate username and password.

For security reasons, we recommend that you change the original password.

Step 2

Change your login and privileged mode passwords.

  1. To change the login password:

    1. Access the DPE in the privileged mode.

    2. At the prompt, enter the password command.

      For example:

      bac_dpe# password

    3. At the password prompt, enter the new password, then re-enter it.

      For example:

      New password: <password1>

      Retype new password: <password1>

      Password changed successfully.

  2. To change the privileged mode password:

    1. Access the DPE in the privileged mode. You must have the PRIV_DPE_UPDATE privilege to run this command.

    2. At the password prompt, enter the new password, then re-enter it.

      For example:

      New enable password: <password2>

      Retype new enable password: <password2>

      Password changed successfully.


Configuring a DPE for Data

To configure a DPE, you must know the:
  • IP address or fully qualified domain name (FQDN) of the RDU for the DPE.

  • Provisioning group or groups to which the DPE belongs.


Tip


You can use the show run command to view the running configuration. A complete list of commands is available through the use of the show commands command. For additional information, see the Cisco Prime Cable Provisioning DPE CLI Reference.


To configure a DPE:

Procedure


Step 1

Configure the DPE interface to handle provisioning requests, by specifying the IP address of the interface in the IPv4 or the IPv6 addressing formats.

For example:

Using IPv4 format:

bac_dpe# interface ip 10.10.10.133 provisioning

% OK (Requires DPE restart "> dpe reload")

Using IPv6 format:

bac_dpe# interface ip 2001:0DB8:0:0:203:baff:fe12:d5ea provisioning

% OK (Requires DPE restart "> dpe reload")

Note


The values provided here are sample values only. Use values appropriate for your network.

Step 2

Configure the IPv4 ONLY address for communication with Prime Network Registrar.

For example:

bac_dpe# interface ip 10.10.10.133 pg-communication

% OK (Requires DPE restart "> dpe reload")

Step 3

Enter the IP address for the RDU or its domain name if you are implementing DNS. Also, identify the port on which the RDU is listening. The default listening port is 49187. Identify whether to enable secure mode of communication with the RDU. The value can either be true or false, where true indicates secure mode.

For example:

Using IPv4 format:

bac_dpe# dpe rdu-server 10.10.10.1 49187 false

% OK (Requires DPE and DPE CLI restart)

Step 4

Specify the provisioning group or groups of the DPE. Where appropriate, specify the secondary provisioning group to which the DPE belongs to.

For example:

bac_dpe# dpe provisioning-group primary group1

% OK (Requires appliance restart "> reload")

bac_dpe# dpe provisioning-group secondary group2

% OK (Requires appliance restart "> reload")

Step 5

Set the shared secret password to be the same as that on the RDU.

Note


You must have the PRIV_DPE_SECURITY privilege to run this command.

For example:

bac_dpe# dpe shared-secret secret

% OK (Requires DPE and DPE CLI restart)

Step 6

Enable the TFTP service running on the DPE.

For example:

Using IPv4 format:

bac_dpe# service tftp 1 ipv4 enabled true

% OK (Requires DPE restart "> dpe reload")

Using IPv6 format:

bac_dpe# service tftp 1 ipv6 enabled true

% OK (Requires DPE restart "> dpe reload")

Step 7

Enable the Time of Day (ToD) service running on the DPE.

For example:

Using IPv4 format:

bac_dpe# service tod 1 ipv4 enabled true

% OK (Requires DPE restart "> dpe reload")

Using IPv6 format:

bac_dpe# service tod 1 ipv6 enabled true

% OK (Requires DPE restart "> dpe reload)

Step 8

For the configuration to take effect, you must reload the DPE and restart the DPE CLI.

For example:

bac_dpe# dpe reload
Process [dpe] has been restarted
bac_dpe# BPR_HOME/agent/bin/bprAgent restart cli
Process [cli] has been restarted.

After you reload the DPE, you can establish a Telnet session to the DPE using its IP address. Remember to use the new login and enable password that you created in Logging In.

After the successful configuration of the DPE, the configured DPE must appear under the Servers page in the Admin UI.


Configuring a DPE for Voice Technology

This section describes the configuration tasks that you must perform to set up a DPE to support voice technology.

For using the tips provided in this section, see the dpe.properties file, located in the <BPR_HOME>/dpe/conf directory. You change the properties specified, as indicated in the tips, to enable the described feature. If you edit the properties, you must restart the DPE.


Caution


In the dpe.properties file, there should be only one instance of each property described in these tips.


Setting Up Voice Technology

To set up voice technology on your DPE:

Procedure

Step 1

To set the FQDN for each enabled DPE interface in the IPv4 or IPv6 format, enter:

interface ip ip_address provisioning fqdn fqdn

Tip


dpe.properties: /server/provFQDNs=FQDN[IP address]:port. This could translate, for example, into c3po.pcnet.cisco.com[10.10.10.5]:49186.

The FQDN is sent as the SNMPEntity in DHCP option 177 suboption 3.

For example:

Using the IPv4 format:

bac_dpe# interface ip 10.10.1.2 provisioning fqdn dpe.example.com

% OK (Requires DPE restart "> dpe reload")

Using the IPv6 format:

bac_dpe# interface ip 2001:0DB8:0:0:203:baff:fe12:d5ea provisioning fqdn dpe.example.com

% OK (Requires DPE restart "> dpe reload")

Step 2

Configure the IPv4 ONLY address for communication with Prime Network Registrar.

For example:

bac_dpe# interface ip 10.10.10.133 pg-communication

% OK (Requires DPE restart "> dpe reload")

Step 3

To configure voice technology at DPE, enter:

service packetcable 1 registration kdc-service-key password

Note


The DPE password that you enter by using this CLI command must match the corresponding password used in the KeyGen utility when generating service keys for the KDC.

Tip


dpe.properties: /pktcbl/regsvr/KDCServiceKey=(xx: ... xx)

where (xx: ... xx) represents a 24-byte randomly selected, colon-separated, hexadecimal value; for example: 31:32:33:34:35:36:37:38:39:30:31:32:33:34:3 5:36:37:38:39:30:31:32:33:34.

For example:

bac_dpe# service packetcable 1 registration kdc-service-key password3

% OK (Requires DPE restart "> dpe reload")

Step 4

To control the choice of encryption algorithm for use during SNMPv3, enter:

bac_dpe# service packetcable 1 registration policy-privacy value

If you enter a value of zero (which is the default value) for this policy privacy, the MTA will choose a privacy option for SNMPv3. Entering any nonzero value means the Provisioning Server will set its privacy option in SNMPv3 to a specific protocol. Although, currently, DES is the only privacy option supported by voice technology.

Tip


dpe.properties: /pktcbl/regsvr/policyPrivacy=1 (enables DES privacy)

For example:

bac_dpe# service packetcable 1 registration policy-privacy 1

% OK (Requires DPE restart “> dpe reload”>

Step 5

Enter this command to set the SNMP service key used for SNMPv3 cloning to the RDU.

bac_dpe# service packetcable 1 snmp key-material password

The default value for this command is null. Enter this default to disable SNMPv3 cloning on this DPE.

Caution


To enable SNMP cloning, set this property to the identical 46 hexadecimal bytes that are used at the RDU (rdu.properties file, which resides in the /<BPR_HOME>/rdu/conf directory).

Tip


dpe.properties: to turn SNMPv3 cloning off, use /pktcbl/snmp/keyMaterial= ; to turn it on, use /pktcbl/snmp/keyMaterial=key. For example, /pktcbl/snmp/keyMaterial=31:32:33:34: 35:36:37:38:39:30:31:32:33:34:35:36:37:38:39:30:31:32:33:34:35:36:37:38:39:30:31:32:33:34:35:36:37:38:39:30:31:32:33:34:35:36

For example:

bac_dpe# service packetcable 1 snmp key-material password4

% OK (Requires DPE restart "> dpe reload")

Step 6

Enter this command to enable the PacketCable voice technology.

bac_dpe# service packetcable 1 enable true

You can disable voice technology by entering service packetcable 1 enable false.

Tip


dpe.properties: /pktcbl/enable=enabled

For example:

bac_dpe# service packetcable 1 enable true

% OK (Requires DPE restart "> dpe reload")

Step 7

Run the dpe reload command.

For example:

bac_dpe# dpe reload

Process [dpe] has been restarted.


Controls Available

The commands described in this section provide additional configuration settings.
  • service packetcable 1 registration encryption enable—This command optionally enables encryption of the MTA configuration file.


    Tip


    dpe.properties: /pktcbl/regsvr/configEncrypt=1


  • no service packetcable 1 registration encryption enable—This command optionally disables encryption of the MTA configuration file.


    Tip


    dpe.properties: /pktcbl/regsvr/configEncrypt=0


  • service packetcable 1 snmp timeout timeout—This command dynamically sets the number of seconds that the DPE waits for a response to an SNMPv3 SET operation. The timeout is expressed in seconds and the default value is 10 seconds.


    Tip


    dpe.properties: /pktcbl/snmp/timeout=1 and /pktcbl/snmp/timeout=10


Updating keypassword Post-Installation

The keystore-password (keypassword) is configured during the installation of Prime Cable Provisioning. If you want to change the keypassword post-installation, follow the steps mentioned below:

  1. Update the keypassword using the following command:

    $BPR_HOME/jre/bin/keytool -storetype JCEKS -keypasswd -keystore $KEYSTORE_LOCATION -alias sharedsecretKeyAlias -keypass $OLD_KEY_PASS -new $KEY_PASS -storepass $OLD_KEY_PASS

    Example:

    /opt/CSCObac/jre/bin/keytool -storetype JCEKS -keypasswd -keystore /opt/CSCObac/lib/security/.keystore -alias sharedsecretKeyAlias -keypass test1234 -new secret123 -storepass test1234
  2. Update the storepasswd for .keystore using the following command:

    /changeSSLProperties.sh -ckp