Installation Overview

This chapter describes how you can access the software image and also describes the high-level installation steps.

This chapter contains the following sections:

Downloading the Prime Cable Provisioning Software Image

You can download the Prime Cable Provisioning software image from the Download Software page for Prime Cable Provisioning.

  1. Download the following software image:

    BAC_74_LinuxK9.gtar.gz
Verify signature of Image

It is expected that verification script on your premises can reach Cisco to download root and subCA certs. Also, you have python(3) installed.

  1. Download the image_verification.tar.gz image and extract files:

    # tar -zxvf image_verification.tar.gz
  2. Extract the public key from the public cert:

    $ openssl x509 -pubkey -noout -in PCP_RELEASE_7X-CCO_RELEASE.pem > PCP_RELEASE_7X-CCO_RELEASE.pubkey
  3. Verify the verify script using the public key and signature files

    $ openssl dgst -sha512 -verify PCP_RELEASE_7X-CCO_RELEASE.pubkey -signature cisco_x509_verify_release.py3.signature cisco_x509_verify_release.py3
    Verified OK
  4. Verify the product image.

    $ python3 cisco_x509_verify_release.py3 -e PCP_RELEASE_7X-CCO_RELEASE.pem -s BAC_74_LinuxK9.gtar.gz.signature -i BAC_74_LinuxK9.gtar.gz -v dgst -sha512

High-level Installation Flow and Startup

This section provides the general flow to complete the Prime Cable Provisioning 7.4 installation. For details about the complete installation, see Installing Prime Cable Provisioning.

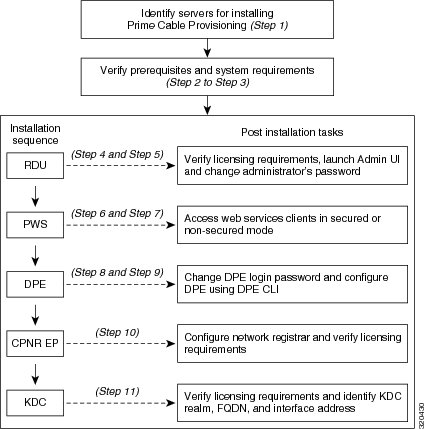
The following figure provides a high level flow for installing Prime Cable Provisioning 7.4:

Figure 1. High-level Installation Flow and Startup

To set up Prime Cable Provisioning 7.4 in your network infrastructure:

Procedure


Step 1

Determine the servers on which you are installing the Prime Cable Provisioning components. The components can be installed on the same host server or on different host servers, though the recommendation is to have separate servers for each component.

Note


In Linux, if RDU and Prime Network Registrar are installed on the same host server, then the lease query will not work.

Step 2

Verify the file-system block size of the directory in which you intend to install the Prime Cable Provisioning database and the database transaction log files. See File-System Block Size.

Step 3

Review the Installation Checklist.

Step 4

Install the RDU. Ensure that you know the location for the Home directory, Data directory, and Database logs directory.

Step 5

After installing the RDU, ensure that you:

  1. Obtain a valid Prime Cable Provisioning license to provision devices. For details on obtaining and installing your license file, see Obtaining a Permanent License.

    You still require separate licenses for the following Prime Cable Provisioning components:

    • The DPE

    • The KDC, if you configure your network to support secure PacketCable voice technology

  2. Verify whether the RDU is running by:

    • Checking RDU logs from the location BPR_DATA/rdu/logs.

    • Checking the status of the bprAgent using the command systemctl status bpragent

  3. Launch the Admin UI.

    //server_name:port_number/

    where,

    • server_name—Identifies the server on which the RDU is running.

    • port_number—Identifies the server port on which the server side of the RDU is running. By default, this port number is:

      • 8100 for HTTP

      • 8443 for HTTPS

    The main login screen appears.

  4. Login to PCP using the login credentials

    1. Enter the username and password.

    2. Click Login

    3. To change the password:

      • Enter a new password; ensure that this password has at least 8 alphanumeric characters, without any special characters.

      • Click Login.

Step 6

Install the REST PWS. Ensure that you know:

  • The RDU server information; hostname, port, username, and password.

    Note


    You can also configure the RDU server(s) after the REST PWS installation using the ws-cli.sh tool. The ws-cli.sh tool is used to change key REST PWS configuration properties like adding or deleting the RDU accounts and changing the log severity level. For information about the ws-cli.sh tool, see the Cisco Prime Cable Provisioning 7.4 User Guide.

  • The secured port and nonsecured port for web services or API clients.

Step 7

After installing the REST PWS, ensure that you can access the web services or API clients in secured mode using HTTPS or nonsecured mode using HTTP. You can use the default port 9790 (secured mode), and 9101 (non-secured mode) for REST PWS.

Note

 
If you have configured multiple RDU servers on the same REST PWS, ensure that the REST PWS can communicate with all the RDU servers.

Step 8

Install DPE.

Step 9

After installing the DPE, ensure that you:

  1. Change the DPE login password and the privileged password from the command-line interface (CLI).

    • To change the login password, access the CLI in the privileged mode, and enter:

      bac_dpe# password password

      where, password identifies the new DPE password.

    • To change the DPE privileged password, enter:

      bac_dpe# enable password password

      where, password identifies the local configured password currently in effect or, optionally, provides a new password. If this parameter is omitted, you are prompted for the password. Note: The enable password is disabled by default.

      For more information, see the Cisco Prime Cable Provisioning 7.4 DPE CLI Reference Guide.

  2. Configure the DPE from the CLI as required. For configuration instructions, see the Cisco Prime Cable Provisioning 7.4 DPE CLI Reference Guide.

Step 10

Install and configure Prime Network Registrar, if it is not already installed on your system. We recommend that you use Prime Network Registrar 11.x or later. For more information on installing Prime Network Registrar, see the Cisco Prime Network Registrar Installation Guide.

Note


In Linux, if RDU and Prime Network Registrar are installed on the same server, then the lease query will not work.

  • When you install the Prime Network Registrar Local Cluster (LCCM), ensure that you:

    1. Install Prime Cable Provisioning extensions on all Prime Network Registrar local cluster servers. See Installing Prime Cable Provisioning.

    2. Configure Prime Network Registrar, including its extensions. Specifically, you need to configure scopes, policies, client classes, and selection tags. See Configuring Extensions. Also see the Cisco Prime Network Registrar User Guide.

    3. Configure the Prime Network Registrar syslog for alerts and debugging information. For information on configuring syslog file for alerts, see the Cisco Prime Cable Provisioning 7.4 User Guide.

    4. Validate the installation by connecting to the Prime Network Registrar web UI and viewing it.

  • When you install Prime Network Registrar Regional Cluster (RCCM), ensure that you:

    1. Identify the master server for Prime Network Registrar Regional Installation, which administers all the configured Prime Network Registrar local clusters. This server can be Solaris, Windows, or Linux.

    2. Obtain a valid central-cluster license file for the Prime Network Registrar Regional Server.

    3. After you install the Prime Cable Provisioning extensions on all Prime Network Registrar local servers, replicate the local data into regional and pull the replica address space. For more information, see the Cisco Prime Network Registrar User Guide.

      Alternatively, you can also create subnets, client classes, policies, and so on at RCCM and push them to the required LCCM DHCP server. For more information, see the Cisco Prime Network Registrar User Guide.

After you complete Prime Network Registrar installation, install Prime Network Registrar Extention Points. For more information see, Installing Prime Network Registrar Extension Points in Interactive Mode.

Step 11

Install and configure the KDC. When you install the KDC, ensure that you:

  • Obtain a valid Prime Cable Provisioning license. The KDC license is proprietary and is licensed during Prime Cable Provisioning installation. For information on installing the KDC license, see Licensing Prime Cable Provisioning.

  • Have the following information at hand:

    • KDC realm—Identified by a unique name, the KDC realm consists of a KDC and the clients and servers registered to that KDC.

      Note


      The realm must match the certificate chain at the KDC.

    • KDC FQDN—Identifies the fully qualified domain name on which the KDC server is located.

    • KDC interface address—Identifies the interface (generally the IP address of the KDC server) on which the KDC listens for requests.

Step 12

Optionally, configure the syslog file for alerts. You can set up the syslog file on any Prime Cable Provisioning component server. For information on configuring syslog file for alerts, see the Cisco Prime Cable Provisioning 7.4 User Guide