User Guide for Cisco Network Registrar 7.2
Bias-Free Language
The documentation set for this product strives to use bias-free language. For the purposes of this documentation set, bias-free is defined as language that does not imply discrimination based on age, disability, gender, racial identity, ethnic identity, sexual orientation, socioeconomic status, and intersectionality. Exceptions may be present in the documentation due to language that is hardcoded in the user interfaces of the product software, language used based on RFP documentation, or language that is used by a referenced third-party product. Learn more about how Cisco is using Inclusive Language.
- Updated:
- March 20, 2015
Chapter: Address Space Management
- Address Block Administrator Role
- Viewing Address Space
- Pulling Replica Address Space from Local Clusters
- Address Blocks and Subnets
- Viewing Address Blocks, Subnets, and Address Types
- Knowing When to Add Address Blocks
- Adding Address Blocks
- Delegating Address Blocks
- Pushing Subnets to Local DHCP Servers and Routers
- Creating Reverse Zones from Subnets
- Reclaiming Subnets
- Adding Children to Address Blocks
- Adding Address Ranges to Subnets
- Viewing Address Utilization for Address Blocks, Subnets, and Scopes
- Generating Subnet Utilization History Reports
Managing Address Space
Address blocks provide an organizational structure for addresses used across the network. Address blocks can consist of static addresses or dynamic addresses allocated to DHCP servers for lease assignment. An address block can have any number of child address blocks and can culminate in one or more child subnets. The address block administrator is responsible for these objects. This administrator can create parent and child address blocks or subnets, which are always the leaf nodes of the address space. Static subnets can be further subdivided into one or more IP address ranges. However, dynamically added subnets create their own subnets that the administrator cannot modify or delete.

Note ![]() For IPv6 address management, see also the "Viewing IPv6 Address Space" section on page 26-11.
For IPv6 address management, see also the "Viewing IPv6 Address Space" section on page 26-11.
See Also
Address Block Administrator Role
Viewing Address Space
Pulling Replica Address Space from Local Clusters
Address Blocks and Subnets
Generating Subnet Utilization History Reports
Address Block Administrator Role
The address block administrator role manages address space at a higher level than that of specific subnet or static address allocations. This is actually a middle manager role, because there is likely to be a higher authority handing out address blocks to the system.
See Also
Required Permissions
Role Functions
Required Permissions
To exercise the functions available to the address administrator, you must have at the:
•![]() Regional cluster—The regional-addr-admin role assigned. This role should probably be unencumbered by further subnet-utilization, lease-history, ric-management, and dhcp-management subrole restrictions.
Regional cluster—The regional-addr-admin role assigned. This role should probably be unencumbered by further subnet-utilization, lease-history, ric-management, and dhcp-management subrole restrictions.
•![]() Local cluster—The addrblock-admin role assigned.
Local cluster—The addrblock-admin role assigned.
Role Functions
These functions are available to the address block administrator at the:
•![]() Regional cluster:
Regional cluster:
–![]() Address aggregation. For example, if the 10.0.0.0/16 address block exists at the regional cluster and a local cluster administrator creates the 10.1.1.0/24 address block, the local address block (through replication) is rolled up under its parent at the regional cluster. This allows a unified view of the address space at the regional cluster without affecting the local cluster configuration.
Address aggregation. For example, if the 10.0.0.0/16 address block exists at the regional cluster and a local cluster administrator creates the 10.1.1.0/24 address block, the local address block (through replication) is rolled up under its parent at the regional cluster. This allows a unified view of the address space at the regional cluster without affecting the local cluster configuration.
–![]() Address delegation. Administrators can delegate address space to the local cluster, thereby giving up authority of the delegated object.
Address delegation. Administrators can delegate address space to the local cluster, thereby giving up authority of the delegated object.
–![]() Subnet utilization reports. The regional cluster supports subnet utilization reporting across regions, protocol servers, and sets of network hardware. The central configuration administrator can poll the local clusters for subnet utilization by virtual private network (VPN), if defined, time range, and criteria that contain the following choices: owner, region, address type, address block, subnet, or all. For details on querying subnet utilization, see the "Generating Subnet Utilization History Reports" section.
Subnet utilization reports. The regional cluster supports subnet utilization reporting across regions, protocol servers, and sets of network hardware. The central configuration administrator can poll the local clusters for subnet utilization by virtual private network (VPN), if defined, time range, and criteria that contain the following choices: owner, region, address type, address block, subnet, or all. For details on querying subnet utilization, see the "Generating Subnet Utilization History Reports" section.
–![]() Lease history reports. This provides a single vantage point on the lease history of multiple DHCP servers. The administrator can query the history data at the local cluster to constrain the scope of the history report. Lease histories can be queried by VPN (if defined), time range and criteria that contain the following choices: IP address, MAC address, IP address range, or all. This is an important feature to meet government and other agency mandates concerning address traceability. For details on querying lease history, see the "Querying Leases" section on page 22-31.
Lease history reports. This provides a single vantage point on the lease history of multiple DHCP servers. The administrator can query the history data at the local cluster to constrain the scope of the history report. Lease histories can be queried by VPN (if defined), time range and criteria that contain the following choices: IP address, MAC address, IP address range, or all. This is an important feature to meet government and other agency mandates concerning address traceability. For details on querying lease history, see the "Querying Leases" section on page 22-31.
–![]() Polling configurations. The administrator can control the intervals and periods of local cluster polling for replication, IP histories, and subnet utilization. You can also set the lease history and subnet utilization trimming ages and compacting intervals at the CCM server level. (See Chapter 6, "Managing the Central Configuration.")
Polling configurations. The administrator can control the intervals and periods of local cluster polling for replication, IP histories, and subnet utilization. You can also set the lease history and subnet utilization trimming ages and compacting intervals at the CCM server level. (See Chapter 6, "Managing the Central Configuration.")
–![]() Check the DHCP and address data consistency.
Check the DHCP and address data consistency.
•![]() Local cluster:
Local cluster:
–![]() Manage address blocks, subnets, and address types.
Manage address blocks, subnets, and address types.
–![]() Check the DHCP and address data consistency.
Check the DHCP and address data consistency.
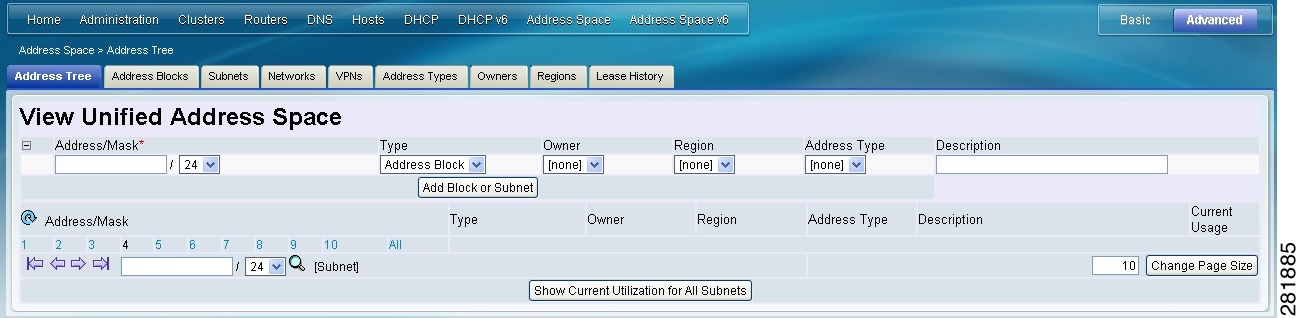
Viewing Address Space
The address space is a hierarchical tree of address blocks and subnets in IPv4 and prefixes in IPv6, sorted in IP address order. You can choose the level of depth at which to display the tree. You can also expand and contract nodes, which recursively expands or contracts all child nodes. If you pick a new level, this overrides the previous expansion or contraction.
Local Advanced and Regional Web UI
From the Address Space menu, choose Address Tree to open the View Unified Address Space page (see Figure 9-1 for the IPv4 version of the page). Note that you can choose a VPN (if configured).
Choose Address Tree from the Address Space v6 to open the View Unified v6 Address Space page.
Figure 9-1 View IPv4 Address Space Page (Local Advanced)
Pulling Replica Address Space from Local Clusters
You may choose to pull address space from the replica data of the local clusters instead of explicitly creating it.
Note ![]() Pulling replica address space from a local cluster where IPv4 subnets were removed does not clear the server name on the subnet. Although the subnet is no longer used, it is still considered allocated to the server. Hence, the delete operation does not appear for the subnet, so that you cannot delete the subnet from the regional cluster. To push or reallocate the subnet to a different cluster, or remove it from the regional cluster, you must first reclaim the subnet (see the "Reclaiming Subnets" section). This clears the reference to the local server.
Pulling replica address space from a local cluster where IPv4 subnets were removed does not clear the server name on the subnet. Although the subnet is no longer used, it is still considered allocated to the server. Hence, the delete operation does not appear for the subnet, so that you cannot delete the subnet from the regional cluster. To push or reallocate the subnet to a different cluster, or remove it from the regional cluster, you must first reclaim the subnet (see the "Reclaiming Subnets" section). This clears the reference to the local server.
Regional Web UI
Step 1 ![]() On the View Unified Address Space (or View Unified v6 Address Space) page, click Pull Data. (To omit reservations in the pull, check the Omit Reservations? check box.)
On the View Unified Address Space (or View Unified v6 Address Space) page, click Pull Data. (To omit reservations in the pull, check the Omit Reservations? check box.)
Step 2 ![]() Choose the data synchronization mode on the Select Pull Replica Address Space (or Select Pull Replica IPv6 Address Space) page.
Choose the data synchronization mode on the Select Pull Replica Address Space (or Select Pull Replica IPv6 Address Space) page.
Step 3 ![]() Click Report at the bottom of the page.
Click Report at the bottom of the page.
Step 4 ![]() Click OK on the Report Pull Replica Address Space (or Report Pull Replica IPv6 Address Space) page.
Click OK on the Report Pull Replica Address Space (or Report Pull Replica IPv6 Address Space) page.
Address Blocks and Subnets
An address block is an aggregate of IP addresses based on a power-of-two address space that can be delegated to an authority. For example, the 192.168.0.0/16 address block (part of the RFC 1918 private address space) includes 216 (or 65536) addresses. Address blocks can be further divided into child address blocks and subnets. For example, you might want to delegate the 192.168.0.0/16 address block further into four child address blocks—192.168.0.0/18, 192.168.64.0/18, 192.168.128.0/18, and 192.168.192.0/18.
Note ![]() The DHCP server also uses address blocks to manage subnet allocation for on-demand address pools (see the "Configuring Virtual Private Networks and Subnet Allocation" section on page 23-17). Address blocks used for dynamic address pools must be created using the dhcp-address-block command in the CLI. The unified address view in the web UI also displays these dynamic address blocks, but does not provide an edit link to them, because they have been delegated in their entirety to the DHCP server. They should not be further subdivided for subnet allocation. The DHCP server automatically handles these address blocks as it receives subnet requests. These address pools are indicated by a D (for "Delegated").
The DHCP server also uses address blocks to manage subnet allocation for on-demand address pools (see the "Configuring Virtual Private Networks and Subnet Allocation" section on page 23-17). Address blocks used for dynamic address pools must be created using the dhcp-address-block command in the CLI. The unified address view in the web UI also displays these dynamic address blocks, but does not provide an edit link to them, because they have been delegated in their entirety to the DHCP server. They should not be further subdivided for subnet allocation. The DHCP server automatically handles these address blocks as it receives subnet requests. These address pools are indicated by a D (for "Delegated").
A subnet is the leaf node of the address space and cannot be further subdivided. If you create the 192.168.50.0/24 subnet, you can subsequently create an address block by that same name, and the subnet will become a child of the address block. However, you cannot further subdivide or delegate the 192.168.50.0/24 subnet.
Subnets can have one or more defined address ranges. Address blocks cannot have address ranges. When you create an address range for a subnet by using the web UI, it becomes a static range, meaning that it cannot be allocated dynamically using DHCP. However, the web UI shows any dynamic ranges defined by DHCP scopes for the subnet. Displaying the ranges as such indicates where overlaps may occur between assigning static addresses for the address space and dynamic addresses for scopes.
The address space view shows the hierarchy of address block and subnets and their parent-child relationships. The hierarchy does not go down to the level of address ranges for each subnet. These are displayed when you access the subnet.
See Also
Viewing Address Blocks, Subnets, and Address Types
Knowing When to Add Address Blocks
Adding Address Blocks
Delegating Address Blocks
Pushing Subnets to Local DHCP Servers and Routers
Creating Reverse Zones from Subnets
Reclaiming Subnets
Adding Children to Address Blocks
Adding Address Ranges to Subnets
Viewing Address Utilization for Address Blocks, Subnets, and Scopes
Viewing Address Blocks, Subnets, and Address Types
You can view the address blocks and subnets created for a network.
Local Advanced and Regional Web UI
From the Address Space menu, choose Address Tree. This opens the View Unified Address Space page.
To choose a level of depth for the address space, click one of the numbers across the top, or click All to get all levels. The address space appears below the row of numbers. The Address Type column identifies the type of object displayed, an address block or a subnet. The Owner column identifies the owner of the address space, and the Region column identifies the assigned region for the address space.
Address spaces that were assigned dynamically are indicated by a D (for "Delegated") in the Address Type column. You cannot delete this delegated address space.
To refresh the view, click the Refresh icon ( ).
).
You can add, modify, and delete address types. From Address Space menu, choose Address Types to open the List/Add Address Types page. Click Add Address Type to open the Add Address Type page, and modify settings on the Edit Address Type page. You can also pull replica address types and push address types to the local clusters on the List/Add Address Types page.
Knowing When to Add Address Blocks
This use case describes the set of user actions associated with adding a new address block to the network in a shared management network. These preconditions are assumed:
1. ![]() From summary IP address utilization reports (see the "Enabling Subnet Utilization Collection" section on page 6-13), an address block administrator notes that the top level address block of the company is nearing the 90% utilization mark.
From summary IP address utilization reports (see the "Enabling Subnet Utilization Collection" section on page 6-13), an address block administrator notes that the top level address block of the company is nearing the 90% utilization mark.
2. ![]() The address block administrator submits a request for more address space from ARIN (or some other numbering authority) and the request is granted.
The address block administrator submits a request for more address space from ARIN (or some other numbering authority) and the request is granted.
Once the address space is made available, the regional address administrator:
1. ![]() Adds the new blocks to the central address block map, and based on a review of the utilization reports, creates and delegates address blocks to be used by the local clusters. The action of delegating the address blocks causes them to be pushed to the local clusters.
Adds the new blocks to the central address block map, and based on a review of the utilization reports, creates and delegates address blocks to be used by the local clusters. The action of delegating the address blocks causes them to be pushed to the local clusters.
2. ![]() Allocates the new address space to network elements as needed, using router and failover synchronization features to simplify the configuration tasks:
Allocates the new address space to network elements as needed, using router and failover synchronization features to simplify the configuration tasks:
•![]() Allocates subnets to a failover pair (gets a scope template for the subnet, either from the subnet or the failover pair).
Allocates subnets to a failover pair (gets a scope template for the subnet, either from the subnet or the failover pair).
•![]() Allocates subnets to a router interface configuration (RIC) server interface and failover pair.
Allocates subnets to a router interface configuration (RIC) server interface and failover pair.
•![]() Finds a free subnet (finds the address block of the right type).
Finds a free subnet (finds the address block of the right type).
•![]() Allocates the free subnet to an address destination (DHCP server or other destination).
Allocates the free subnet to an address destination (DHCP server or other destination).
Adding Address Blocks
Once you configure your network, you can add DHCPv4 address blocks.
Local Advanced and Regional Web UI
To view CCM address blocks, click the Address Blocks submenu from the Address Space v4 drop-down list to open the List/Add Address Blocks page.
To add an address block, enter its network address in the Address/Mask field, then choose the address mask from the drop-down list. For example, enter 192.168.50.0 in the Address Mask field, then choose 24 in the drop-down list to create the 192.168.50.0/24 address block, which is all the addresses in the range 192.168.50.0 through 192.168.50.255.
For a review of the number of available addresses for each subnet mask, see Table 9-1. These available hosts exclude the two network and broadcast addresses in each range.
Delegating Address Blocks
Address block delegation is the coordinated actions of marking the delegated address block at the regional cluster as being delegated to a local cluster and creating the delegated address block in the local cluster. To delegate an address block to a local cluster, the address block cannot have child address blocks or subnets. The delegated address block created at the local server must have the same address size as the one at the regional cluster.
You can delegate only one address block to one local cluster at a time; you cannot delegate it to multiple local clusters. You can also delegate an address block to an owner.
To delegate an address block, you must:
1. ![]() Have the central configuration administrator create a local cluster to which to delegate the address block (see the "Configuring Server Clusters" section on page 6-2).
Have the central configuration administrator create a local cluster to which to delegate the address block (see the "Configuring Server Clusters" section on page 6-2).
2. ![]() Have the central configuration administrator synchronize the regional cluster with the local cluster (see the "Synchronizing with Local Clusters" section on page 6-9). The local cluster will have address source references to the regional cluster through the synchronization process.
Have the central configuration administrator synchronize the regional cluster with the local cluster (see the "Synchronizing with Local Clusters" section on page 6-9). The local cluster will have address source references to the regional cluster through the synchronization process.
3. ![]() Delegate the address block to the cluster or an owner.
Delegate the address block to the cluster or an owner.
Regional Web UI
For example:
Step 1 ![]() Have the central configuration administrator create a local cluster, ServProv-One:
Have the central configuration administrator create a local cluster, ServProv-One:
a. ![]() Log in to the regional cluster as the central configuration administrator.
Log in to the regional cluster as the central configuration administrator.
b. ![]() From the Clusters menu, choose Cluster List.
From the Clusters menu, choose Cluster List.
c. ![]() Click Add Cluster on the List/Add Remote Clusters page to open the Add Remote Cluster page.
Click Add Cluster on the List/Add Remote Clusters page to open the Add Remote Cluster page.
d. ![]() Enter the cluster name ServProv-One and the connection data, then click Add Cluster.
Enter the cluster name ServProv-One and the connection data, then click Add Cluster.
e. ![]() On the List/Add Remote Clusters page, click the Resynchronize icon (
On the List/Add Remote Clusters page, click the Resynchronize icon ( ) next to ServProv-One.
Step 2 ![]() As regional address administrator, create an address block:
As regional address administrator, create an address block:
a. ![]() Log in to the regional cluster as the regional address administrator.
Log in to the regional cluster as the regional address administrator.
b. ![]() Click Address Space, then Address Blocks to open the List/Add Address Blocks page.
Click Address Space, then Address Blocks to open the List/Add Address Blocks page.
c. ![]() Enter 192.168.50.0 in the Address/Mask field, then choose 24 in the mask drop-down list.
Enter 192.168.50.0 in the Address/Mask field, then choose 24 in the mask drop-down list.
d. ![]() Click Add Address Block.
Click Add Address Block.
Step 3 ![]() Delegate the address block to a cluster or owner:
Delegate the address block to a cluster or owner:
a. ![]() Click the name of the address block to open the Edit Address Block page.
Click the name of the address block to open the Edit Address Block page.
b. ![]() In the Address Block Delegation section of the page, choose either a local cluster or an owner to which to delegate the address block.
In the Address Block Delegation section of the page, choose either a local cluster or an owner to which to delegate the address block.
c. ![]() Click Delegate Block. The Edit Address Block page now indicates that the address block is delegated.
Click Delegate Block. The Edit Address Block page now indicates that the address block is delegated.
d. ![]() If there are further modifications to the address block, click Modify Address Block, otherwise click Cancel.
If there are further modifications to the address block, click Modify Address Block, otherwise click Cancel.
e. ![]() The List/Add Address Blocks page now identifies the address block as being delegated (D). To undelegate it, edit the address block again, then click Reclaim Address Block.
The List/Add Address Blocks page now identifies the address block as being delegated (D). To undelegate it, edit the address block again, then click Reclaim Address Block.
Pushing Subnets to Local DHCP Servers and Routers
You can push subnets to local DHCP servers and routers.
Local Advanced and Regional Web UI
Step 1 ![]() Have the central configuration administrator create a local cluster and resynchronize it with the local cluster.
Have the central configuration administrator create a local cluster and resynchronize it with the local cluster.
Step 2 ![]() Create a subnet at the regional cluster:
Create a subnet at the regional cluster:
a. ![]() From the Address Space menu, choose Subnets. This opens the List/Add Subnets page.
From the Address Space menu, choose Subnets. This opens the List/Add Subnets page.
b. ![]() Enter at least the network address and choose the mask of the subnet, then click Add Subnet.
Enter at least the network address and choose the mask of the subnet, then click Add Subnet.
Step 3 ![]() Have the central configuration administrator create a scope template so that it can create a scope to contain a subnet:
Have the central configuration administrator create a scope template so that it can create a scope to contain a subnet:
a. ![]() Log in to the regional cluster as the central configuration administrator.
Log in to the regional cluster as the central configuration administrator.
b. ![]() From the DHCP menu, choose Scope Templates to open the List DHCP Scope Templates page.
From the DHCP menu, choose Scope Templates to open the List DHCP Scope Templates page.
c. ![]() Click Add Scope Template to open the Add DHCP Scope Template page.
Click Add Scope Template to open the Add DHCP Scope Template page.
d. ![]() Among other entries on this page, enter the create-range expression in the Range Expression field to create a scope with that subnet. (If you choose a policy for the scope template, be sure that the policy exists at the local cluster, or you must push the policy to the local cluster. See the "Pushing Policies to Local Clusters" section on page 6-17.) Click Add Scope Template.
Among other entries on this page, enter the create-range expression in the Range Expression field to create a scope with that subnet. (If you choose a policy for the scope template, be sure that the policy exists at the local cluster, or you must push the policy to the local cluster. See the "Pushing Policies to Local Clusters" section on page 6-17.) Click Add Scope Template.
Step 4 ![]() As regional address administrator, add the subnet to the local cluster DHCP server:
As regional address administrator, add the subnet to the local cluster DHCP server:
a. ![]() Log in to the regional cluster as the regional address administrator.
Log in to the regional cluster as the regional address administrator.
b. ![]() From the Address Space menu, choose Subnets to open the List/Add Subnets page.
From the Address Space menu, choose Subnets to open the List/Add Subnets page.
c. ![]() Click the name of the subnet to open the Edit Subnet page
Click the name of the subnet to open the Edit Subnet page
d. ![]() Click Push Subnet. This opens the Push Subnet page
Click Push Subnet. This opens the Push Subnet page
e. ![]() Choose the scope template from the drop-down list.
Choose the scope template from the drop-down list.
f. ![]() Choose the router and the router interface from the drop-down lists.
Choose the router and the router interface from the drop-down lists.
g. ![]() Choose the DHCP Server radio button, then choose the cluster from the drop-down list.
Choose the DHCP Server radio button, then choose the cluster from the drop-down list.
h. ![]() Click Push Subnet.
Click Push Subnet.
Creating Reverse Zones from Subnets
You can create reverse zones from subnets directly on the List/Add Subnets page instead of having to do so manually (see the "Adding Reverse Zones from Subnets" section on page 15-14). Click the Create icon ( ) in the Reverse Zone column of the List/Add Subnets page to open the Create Reverse Zone(s) for Subnet page. On that page, choose a configured zone template from the drop-down list, then click Report to return to the List/Add Subnets page.
See Also
Reclaiming Subnets
Adding Address Ranges to Subnets
Viewing Address Utilization for Address Blocks, Subnets, and Scopes
Pushing Subnets to Local DHCP Servers and Routers
Reclaiming Subnets
Once you delegate a subnet to the DHCP or RIC server, you can reclaim it if necessary.
Local Advanced and Regional Web UI
Step 1 ![]() From the Address Space menu, choose Subnets to open the List/Add Subnets page.
From the Address Space menu, choose Subnets to open the List/Add Subnets page.
Step 2 ![]() Click the name of the subnet to open the Edit Subnet page.
Click the name of the subnet to open the Edit Subnet page.
Step 3 ![]() Click Reclaim Subnet to open the Reclaim Subnet page.
Click Reclaim Subnet to open the Reclaim Subnet page.
Step 4 ![]() If you want to force deleting the subnet, check the Force Delete check box.
If you want to force deleting the subnet, check the Force Delete check box.
Step 5 ![]() Click Reclaim Subnet.
Click Reclaim Subnet.
Note ![]() When you push or reclaim subnets for a managed or virtual router, this sets the primary and secondary relationships that are set for the router for all the related subnets and scopes as well. For details on routers, see the "Pushing and Reclaiming Subnets for Routers" section on page 11-4.
When you push or reclaim subnets for a managed or virtual router, this sets the primary and secondary relationships that are set for the router for all the related subnets and scopes as well. For details on routers, see the "Pushing and Reclaiming Subnets for Routers" section on page 11-4.
Adding Children to Address Blocks
You might want to subdivide undelegated address blocks into child address blocks or subnets.
Local Advanced and Regional Web UI
Step 1 ![]() From the Address Space name, choose Address Blocks to open the List/Add Address Blocks page.
From the Address Space name, choose Address Blocks to open the List/Add Address Blocks page.
Step 2 ![]() Click the name of an address block that is not marked as delegated (D). This opens the Edit Address Block page.
Click the name of an address block that is not marked as delegated (D). This opens the Edit Address Block page.
Step 3 ![]() To add a child address block, add an address that is part of the address block network address in the Address/Mask field of the Child Address Blocks section of the Edit Address Block page. Choose a higher mask value than the parent address block, then click Add.
To add a child address block, add an address that is part of the address block network address in the Address/Mask field of the Child Address Blocks section of the Edit Address Block page. Choose a higher mask value than the parent address block, then click Add.
An error message appears if you try to set the same network address for a child address block as for a child subnet.
Omitting a value when you click Add automatically adds the subdivisions of the parent address space with the appropriate mask value. For example, if the parent space is 192.168.50.0/24, you omit any child subnet value, and click Add, the web UI adds the children in this order:
192.168.50.0/26
192.168.50.64/26
192.168.50.128/26
192.168.50.192/26
Step 4 ![]() To add a child subnet, add an address in the Address/Mask field of the Child Subnets section of the page that is part of the address block network address, but choose a higher mask value than the parent address block. Then click Add.
To add a child subnet, add an address in the Address/Mask field of the Child Subnets section of the page that is part of the address block network address, but choose a higher mask value than the parent address block. Then click Add.
An error message appears if you try to set the same network address for a child address block as for a child subnet.
If you omit a value when you click Add, this automatically adds the subdivisions of the parent address space with the appropriate mask value. For example, if the parent space is 192.168.50.0/24, you omit any child subnet value, and click Add, the web UI adds the children in this order:
192.168.50.0/26
192.168.50.64/26
192.168.50.128/26
192.168.50.192/26
Adding Address Ranges to Subnets
You can edit the subnet data and add any number of address ranges to a subnet. These ranges must be in the designated network of the subnet.
Local Advanced and Regional Web UI
Step 1 ![]() From the Address Space menu, choose Subnets to open the List/Add Subnets page.
From the Address Space menu, choose Subnets to open the List/Add Subnets page.
Step 2 ![]() Click the name of the subnet to which you want to add address ranges. This opens the Edit Subnet page.
Click the name of the subnet to which you want to add address ranges. This opens the Edit Subnet page.
Step 3 ![]() Enter the starting address of the range in the Start field in the IP Ranges area of the page, then add the ending address in the End field. If you add just the host numbers in these fields, the relative address in the range determined by the address mask is used.
Enter the starting address of the range in the Start field in the IP Ranges area of the page, then add the ending address in the End field. If you add just the host numbers in these fields, the relative address in the range determined by the address mask is used.
Step 4 ![]() Click Add IP Range.
Click Add IP Range.
Viewing Address Utilization for Address Blocks, Subnets, and Scopes
You can view the current address utilization for address blocks, subnets, and scopes.

Tip ![]() For address utilization for IPv6 prefixes, see the "Viewing Address Utilization for Prefixes" section on page 26-27.
For address utilization for IPv6 prefixes, see the "Viewing Address Utilization for Prefixes" section on page 26-27.
Local Advanced and Regional Web UI
The function is available on the View Unified Address Space page, List/Add Address Blocks page, and List/Add Subnets page. When you click the View icon ( ) in the Current Usage column, or the Show Current Utilization for All Subnets button, the View Current Utilization Report page appears.
Note ![]() To ensure the proper subnet-to-server mapping on this page, you must update the regional address space view so that it is consistent with the relevant local cluster. Do this by pulling the replica address space, or reclaiming the subnet to push to the DHCP server (see the "Reclaiming Subnets" section). Also ensure that the particular DHCP server is running.
To ensure the proper subnet-to-server mapping on this page, you must update the regional address space view so that it is consistent with the relevant local cluster. Do this by pulling the replica address space, or reclaiming the subnet to push to the DHCP server (see the "Reclaiming Subnets" section). Also ensure that the particular DHCP server is running.
The other columns on the View Current Utilization Report page identify:
•![]() Type—Whether the address space is an address block, subnet, or scope.
Type—Whether the address space is an address block, subnet, or scope.
•![]() Active Dynamic—Addresses that are part of a dynamic range managed by DHCP and that are currently leased, but not reserved.
Active Dynamic—Addresses that are part of a dynamic range managed by DHCP and that are currently leased, but not reserved.
•![]() Free Dynamic—Addresses that are not currently leased.
Free Dynamic—Addresses that are not currently leased.
•![]() Active Reserved—Addresses that are part of a dynamic range and are reserved.
Active Reserved—Addresses that are part of a dynamic range and are reserved.
•![]() View Utilization History—Appears at the regional cluster only. Clicking the Report icon (
View Utilization History—Appears at the regional cluster only. Clicking the Report icon ( ) opens the List Subnet Utilization Records page, where you can refine the subnet utilization history query.
The Utilization Detail column items are expandable on the View Current Utilization Report page so that you can view the scope data for an address block or subnet. If you click the address block, subnet, or scope name in this column, this opens the View Utilization Detail page.
The View Utilization Detail page is a read-only page that shows detailed address utilization attributes for the address block, subnet, or scope. The address utilization attributes are described in Table 9-2.
Generating Subnet Utilization History Reports
You can extract subnet utilization history data so that you can determine how many addresses in the subnet were allocated and what the free address space is. You can use additional administrative functions to trim and compact the subnet utilization database of records, to manage the size of the database.
See Also
Enabling Subnet Utilization History Collection at the Local Cluster
Querying Subnet Utilization History Data
Trimming and Compacting Subnet Utilization History Data
Viewing Subnet Utilization History Data
Enabling Subnet Utilization History Collection at the Local Cluster
You must explicitly enable subnet utilization collection for the local cluster DHCP server.
Local Basic or Advanced Web UI
Step 1 ![]() From the DHCP menu, choose DHCP Server.
From the DHCP menu, choose DHCP Server.
Step 2 ![]() On the Manage DHCP Server page, click the Local DHCP Server link.
On the Manage DHCP Server page, click the Local DHCP Server link.
Step 3 ![]() On the Edit DHCP Server page, look for the Subnet Utilization Settings attributes, which determine how frequently snapshots of the data occur and over which period of time the data should be maintained:
On the Edit DHCP Server page, look for the Subnet Utilization Settings attributes, which determine how frequently snapshots of the data occur and over which period of time the data should be maintained:
•![]() collect-addr-util-duration—Maximum period, in hours, the DHCP server maintains address utilization data. The preset value is 0. To disable DHCP server from collecting any address utilization data, unset this parameter or set it to 0.
collect-addr-util-duration—Maximum period, in hours, the DHCP server maintains address utilization data. The preset value is 0. To disable DHCP server from collecting any address utilization data, unset this parameter or set it to 0.
•![]() collect-addr-util-interval—Frequency, in minutes or hours, that the DHCP server should maintain address utilization data snapshots, assuming that the collect-addr-util-duration attribute is not unset or set to 0. The preset value is 15 minutes.
collect-addr-util-interval—Frequency, in minutes or hours, that the DHCP server should maintain address utilization data snapshots, assuming that the collect-addr-util-duration attribute is not unset or set to 0. The preset value is 15 minutes.
Note that both of these parameters can impact DHCP server memory. Each snapshot of data collected for every interval is 68 bytes. For example, if there are 10 scopes, the collection duration is set to 24 hours, and the collection interval is set to one hour, memory used by the DHCP server to maintain address utilization data is 24 times 68 bytes for each scope, or 16 K.
Step 4 ![]() Click Modify Server at the bottom of the page.
Click Modify Server at the bottom of the page.
Step 5 ![]() Reload the DHCP server.
Reload the DHCP server.
Querying Subnet Utilization History Data
You collect subnet utilization by first having subnets and setting up the scopes, address ranges, and collection criteria at the local cluster. You then set up the local cluster containing the DHCP server as part of the regional cluster, and enable polling the subnet utilization data from the regional cluster.
Regional Web UI
Step 1 ![]() From the Clusters menu, choose Cluster List to open the List/Add Remote Clusters page.
From the Clusters menu, choose Cluster List to open the List/Add Remote Clusters page.
Step 2 ![]() Click the name of the local cluster to open the Edit Remote Cluster page.
Click the name of the local cluster to open the Edit Remote Cluster page.
Step 3 ![]() Look for the Subnet Utilization Settings attributes:
Look for the Subnet Utilization Settings attributes:
•![]() poll-subnet-util-interval—Polling interval; be sure that this is set to a reasonable time interval greater than 0.
poll-subnet-util-interval—Polling interval; be sure that this is set to a reasonable time interval greater than 0.
•![]() poll-subnet-util-retry—Retry count in case of a polling failure; preset to one retry.
poll-subnet-util-retry—Retry count in case of a polling failure; preset to one retry.
•![]() poll-subnet-util-offset—Fixed time when polling occurs. For example, setting the offset to 13h (1 P.M.) with the polling interval set to 2h means that polling occurs every two hours, but it must occur at 1 P.M. each day.
poll-subnet-util-offset—Fixed time when polling occurs. For example, setting the offset to 13h (1 P.M.) with the polling interval set to 2h means that polling occurs every two hours, but it must occur at 1 P.M. each day.
Step 4 ![]() You must also set the selection criteria for querying the subnet utilization data—In the Advanced mode, click Address Space, then Subnet Utilization to open the Query Subnet Utilization page.
You must also set the selection criteria for querying the subnet utilization data—In the Advanced mode, click Address Space, then Subnet Utilization to open the Query Subnet Utilization page.
Step 5 ![]() You can query subnet utilization history based on the following criteria:
You can query subnet utilization history based on the following criteria:
a. ![]() Time range—Choose from one of the following time ranges for the lease history data:
Time range—Choose from one of the following time ranges for the lease history data:
–![]() last 10 days
last 10 days
–![]() last 30 days
last 30 days
–![]() last 60 days
last 60 days
–![]() last 90 days
last 90 days
–![]() from/to (limited to 90 days)
from/to (limited to 90 days)
If you choose this value, also choose the Start Date and End Date month, day, and year from the drop-down lists. The result depends on the value of the poll-subnet-util-interval attribute.
b. ![]() Criteria—Choose the criteria on which you want to base the query:
Criteria—Choose the criteria on which you want to base the query:
–![]() By Owner—Choose the owner from the adjacent drop-down list.
By Owner—Choose the owner from the adjacent drop-down list.
–![]() By Region—Choose the region from the adjacent drop-down list.
By Region—Choose the region from the adjacent drop-down list.
–![]() By Address Type—Choose the address type from the adjacent drop-down list.
By Address Type—Choose the address type from the adjacent drop-down list.
–![]() By Address Block—Choose the address block from the adjacent drop-down list.
By Address Block—Choose the address block from the adjacent drop-down list.
–![]() By Subnet—Choose the subnet from the adjacent drop-down list.
By Subnet—Choose the subnet from the adjacent drop-down list.
–![]() All—Choose by all owners, regions, address types, address blocks, and subnets.
All—Choose by all owners, regions, address types, address blocks, and subnets.
Step 6 ![]() Click Query Subnet Utilization to open the List Subnet Utilization Records page (see the "Viewing Subnet Utilization History Data" section).
Click Query Subnet Utilization to open the List Subnet Utilization Records page (see the "Viewing Subnet Utilization History Data" section).
Trimming and Compacting Subnet Utilization History Data
If you enable subnet utilization, its database is trimmed automatically based on the expiration time of each record. You can also compact the data so that you can view subsets of the records older than a certain age. The CCM server performs background trimming at the regional cluster, which trims off the subnet utilization data older than a certain age at regular intervals. The trimming interval is preset to 24 hours, and the age (how far back to go in time before trimming) to 24 weeks.
Regional Web UI
You must be a central configuration administrator assigned the database subrole to adjust the values of and perform subnet utilization database trimming and compacting.
Step 1 ![]() From the Servers menu, choose Manage Servers to open the Manage Servers page.
From the Servers menu, choose Manage Servers to open the Manage Servers page.
Step 2 ![]() Click the Local CCM Server link to open the Edit CCM Server page.
Click the Local CCM Server link to open the Edit CCM Server page.
Step 3 ![]() Under the Subnet Utilization Settings, set the following attributes:
Under the Subnet Utilization Settings, set the following attributes:
a. ![]() poll-subnet-util-interval—How often to collect subnet utilization from all the DHCP servers. If it is set to 0, the polling is disabled.
poll-subnet-util-interval—How often to collect subnet utilization from all the DHCP servers. If it is set to 0, the polling is disabled.
b. ![]() poll-subnet-util-retry—The number of retries for a given polling interval, if polling fails.
poll-subnet-util-retry—The number of retries for a given polling interval, if polling fails.
c. ![]() poll-subnet-util-offset—Provides a fixed time of day for subnet utilization polling. This time is interpreted as a time of day offset, with 0 being 12 midnight, provided the polling interval is less than 24 hours, and the offset value is less than the polling interval. If the offset value is greater than the polling interval, or the interval is greater than 24 hours, the offset will be ignored.
poll-subnet-util-offset—Provides a fixed time of day for subnet utilization polling. This time is interpreted as a time of day offset, with 0 being 12 midnight, provided the polling interval is less than 24 hours, and the offset value is less than the polling interval. If the offset value is greater than the polling interval, or the interval is greater than 24 hours, the offset will be ignored.
The scheduler for polling will ensure that the first polling event occurs at the offset time. For example, if you set the interval to 4 hours and the offset to 2 A.M., the polling would occur at 2 A.M., 6 A.M., 10 A.M., 2 P.M., 6 A.M., and 10 P.M.
a. ![]() trim-subnet-util-interval—How often to trim the old subnet utilization data automatically, the default being not to trim the data. You must set this to a value to trigger any background trimming. The bounded values are 0 to one year, and you can use units in seconds (s), minutes (m), hours (h), days (d), weeks (w), months (m), and years (y).
trim-subnet-util-interval—How often to trim the old subnet utilization data automatically, the default being not to trim the data. You must set this to a value to trigger any background trimming. The bounded values are 0 to one year, and you can use units in seconds (s), minutes (m), hours (h), days (d), weeks (w), months (m), and years (y).
b. ![]() trim-subnet-util-age—How far back in time to trim the old subnet utilization data automatically, the preset value being 24 weeks. (However, the trim-subnet-util-interval value must be set to other than 0 for trimming to be in effect at all.) The bounded values are 24 hours to one year, and you can use units in seconds (s), minutes (m), hours (h), days (d), weeks (w), months (m), and years (y).
trim-subnet-util-age—How far back in time to trim the old subnet utilization data automatically, the preset value being 24 weeks. (However, the trim-subnet-util-interval value must be set to other than 0 for trimming to be in effect at all.) The bounded values are 24 hours to one year, and you can use units in seconds (s), minutes (m), hours (h), days (d), weeks (w), months (m), and years (y).
Step 4 ![]() You can also force immediate trimming and compacting. Find the Trim/Compact Inputs section:
You can also force immediate trimming and compacting. Find the Trim/Compact Inputs section:
a. ![]() Trim/Compact age—How far in time to go back to trim the data. There are no bounds to this value. However, if you set a very small value (such as 1m), it trims or compacts very recent data, which can be undesirable. In fact, if you set it to zero, you lose all of the collected data. Setting the value too high (such as 10y) may end up not trimming or compacting any data.
Trim/Compact age—How far in time to go back to trim the data. There are no bounds to this value. However, if you set a very small value (such as 1m), it trims or compacts very recent data, which can be undesirable. In fact, if you set it to zero, you lose all of the collected data. Setting the value too high (such as 10y) may end up not trimming or compacting any data.
b. ![]() Compact interval— Time interval at which to compact the subnet utilization records older than the Trim/Compact age. This interval can be some multiple of the polling interval. For example, if the compact interval is set to twice the polling interval, it eliminates every other record.
Compact interval— Time interval at which to compact the subnet utilization records older than the Trim/Compact age. This interval can be some multiple of the polling interval. For example, if the compact interval is set to twice the polling interval, it eliminates every other record.
Step 5 ![]() If you are trimming immediately, click Trim All Subnet Utilization among the controls at the bottom of the page. If you are compacting the data, click Compact All Subnet Utilization.
If you are trimming immediately, click Trim All Subnet Utilization among the controls at the bottom of the page. If you are compacting the data, click Compact All Subnet Utilization.
Viewing Subnet Utilization History Data
The DHCP server gathers subnet utilization data into three broad categories:
•![]() Active Reserved
Active Reserved
•![]() Active Unreserved
Active Unreserved
•![]() Free Reserved
Free Reserved
Each of these categories has a current value for a given collection interval, and low and high values over the life of the DHCP server.
To illustrate the three subnet utilization categories, consider this DHCP scope configuration:
Scope 10.10.10.0/24
Range 10.10.10.1 10.10.10.10
Range 10.10.10.20 10.10.10.30
Reservation 10.10.10.1 MAC-1
Reservation 10.10.10.2 MAC-2
Reservation 10.10.10.41 MAC-3
Reservation 10.10.10.42 MAC-4
Of the 254 potential leases, only 31 are configured, and two reservations are outside the address range.
Immediately after configuring the scope, adding the ranges and reservations, and reloading the DHCP server, these counters appear for subnet utilization:
Active Reserved 0
Active Unreserved 0
Free Unreserved 20
As soon as clients MAC-1 and MAC-2 get their reserved leases, subnet utilization then shows as:
Active Reserved 2
Active Unreserved 0
Free Unreserved 20
When the client MAC-5 gets lease 10.10.10.3, subnet utilization then shows as:
Active Reserved 2
Active Unreserved 1
Free Unreserved 19
Regional Web UI
From the Address Space menu, choose Subnet Utilization. Query subnet utilization to open the List Subnet Utilization Records page.
Tip ![]() At the top left corner of the List Subnet Utilization Records page is either the Log icon (
At the top left corner of the List Subnet Utilization Records page is either the Log icon ( ) for the Netscape browsers that you can click to view a text version of the report, or the Save icon (
 ) for the Internet Explorer browser so that you can save the report to a file (preset to .txt).
Click one of the records to open the View Subnet Utilization Record page for that record.
 Feedback