User Guide for Cisco Network Registrar 7.2
Bias-Free Language
The documentation set for this product strives to use bias-free language. For the purposes of this documentation set, bias-free is defined as language that does not imply discrimination based on age, disability, gender, racial identity, ethnic identity, sexual orientation, socioeconomic status, and intersectionality. Exceptions may be present in the documentation due to language that is hardcoded in the user interfaces of the product software, language used based on RFP documentation, or language that is used by a referenced third-party product. Learn more about how Cisco is using Inclusive Language.
- Updated:
- March 20, 2015
Chapter: Managing Zones
- Staged and Synchronous Modes
- Creating and Applying Zone Templates
- Managing Primary DNS Servers
- Managing Secondary Servers
- Adding Subzones
- Enabling DNS Updates
- Managing Zone Distributions
Managing Zones
The Domain Name System (DNS) is a distributed database for objects in a computer network. By using a nameserver approach, the network consists of a hierarchy of autonomous domains and zones. The namespace is organized as a tree that often resembles the organizations that are responsible for the administration boundaries. For an introduction to the protocol, see Chapter 14, "Introduction to the Domain Name System."
The basic function of DNS nameservers is to provide data about network objects by answering queries. You can configure the Cisco Network Registrar DNS server and zones by accepting the system defaults or changing them.
This chapter describes the basics of configuring the Cisco Network Registrar DNS servers, and their primary and secondary zones. Chapter 16, "Managing Resource Records," describes how to manage DNS resource records (RRs) and hosts, and Chapter 17, "Managing DNS Server Properties," describes how to set some of the more advanced zone and DNS server properties.
See Also
Staged and Synchronous Modes
Creating and Applying Zone Templates
Managing Primary DNS Servers
Managing Secondary Servers
Adding Subzones
Enabling DNS Updates
Managing Zone Distributions
Staged and Synchronous Modes
You can perform additions or edits to DNS zones, RRs, and hosts in one of two modes—staged or synchronous:
•![]() Staged (or CCM)—Changes to zones (and their hosts and protected server RRs) are written to the CCM database, but not immediately propagated to the DNS server until a synchronization is requested. This mode is reflected on the List/Add CCM Server Protected RRs for Zone page.
Staged (or CCM)—Changes to zones (and their hosts and protected server RRs) are written to the CCM database, but not immediately propagated to the DNS server until a synchronization is requested. This mode is reflected on the List/Add CCM Server Protected RRs for Zone page.
•![]() Synchronous (or DNS)—After committing changes to CCM, hosts and protected RRs are immediately propagated to the DNS server. If propagation cannot occur because of an unreachable server, RRs are propagated at the next synchronization. This mode is reflected on the List/Add DNS Server RRs for Zone page.
Synchronous (or DNS)—After committing changes to CCM, hosts and protected RRs are immediately propagated to the DNS server. If propagation cannot occur because of an unreachable server, RRs are propagated at the next synchronization. This mode is reflected on the List/Add DNS Server RRs for Zone page.

Note ![]() Synchronous dns edit mode is the default value for the local cluster. Because of this, the procedures in this User Guide do not include a specific step to reload the DNS server. If Staged mode is in effect, assume an implicit server reload as part of most procedures.
Synchronous dns edit mode is the default value for the local cluster. Because of this, the procedures in this User Guide do not include a specific step to reload the DNS server. If Staged mode is in effect, assume an implicit server reload as part of most procedures.
Synchronizations can occur on a zone basis or by creating a zone distribution. In synchronous mode, changes are written to the DNS server right away, even though a server reload is necessary for the zone to be published on the network.
Note ![]() In Cisco Network Registrar versions earlier than 7.1, the dns edit mode was called zone edit mode.
In Cisco Network Registrar versions earlier than 7.1, the dns edit mode was called zone edit mode.
Local Basic or Advanced and Regional Web UI
Staged or synchronous zone modes are preset based on the Set dns edit mode setting in Session Settings on the Main Menu page:
•![]() The regional web UI is preset to staged.
The regional web UI is preset to staged.
•![]() The local web UI is preset to synchronous.
The local web UI is preset to synchronous.
CLI Commands
Set the session dns-edit-mode attribute to staged or synchronous. For example:
nrcmd> session set dns-edit-mode=sync
Creating and Applying Zone Templates
A zone template is a convenient way to create a boilerplate for primary zones that share many of the same attributes. You can apply a zone template to any zone, and override the zone attributes with those of the template. You can create zone templates in the local and regional cluster web UIs and in the CLI.

Local Basic or Advanced and Regional Web UI
Step 1 ![]() From the DNS menu, choose Zone Templates.
From the DNS menu, choose Zone Templates.
Step 2 ![]() You can add a zone template at the local and regional clusters, and you can also pull and push zone templates at the regional cluster in the web UI:
You can add a zone template at the local and regional clusters, and you can also pull and push zone templates at the regional cluster in the web UI:
•![]() To add a zone template at the local cluster or explicitly add one at the regional cluster, click Add Zone Template. This opens the Add Zone Template page, which is almost identical to the Add Zone page for the local cluster.
To add a zone template at the local cluster or explicitly add one at the regional cluster, click Add Zone Template. This opens the Add Zone Template page, which is almost identical to the Add Zone page for the local cluster.
To make the zone template meaningful, you would enter, in addition to its name, at least the suggested serial number, nameserver, contact e-mail address, and list of nameservers, because they are required for the zone itself. You might also want to specify any zone owners or zone distributions. You do not necessarily need to add these values for the zone template, because you can do so for the zone once it is created from the template. However, the template name and zone default TTL are required. (For a description of the minimally required zone attributes, see the "Creating Primary Zones" section.)
After you enter these value, click Add Zone Template at the bottom of the page.
•![]() At the regional cluster, to pull a zone template from one or more local clusters, click Pull Replica Zone Templates on the List Zone Templates page. This opens the Select Replica DNS Zone Template Data to Pull page.
At the regional cluster, to pull a zone template from one or more local clusters, click Pull Replica Zone Templates on the List Zone Templates page. This opens the Select Replica DNS Zone Template Data to Pull page.
This page shows a tree view of the regional server replica data for the local clusters' zone templates. The tree has two levels, one for the local clusters and one for the templates in each cluster. You can pull individual templates from the clusters, or you can pull all of their templates:
–![]() To pull individual zone templates, expand the tree for the cluster, choose a pull criterion next to its name, then click Pull Zone Template.
To pull individual zone templates, expand the tree for the cluster, choose a pull criterion next to its name, then click Pull Zone Template.
–![]() To pull all the templates from a cluster, choose a pull criterion, then click Pull All Zone Templates from Cluster.
To pull all the templates from a cluster, choose a pull criterion, then click Pull All Zone Templates from Cluster.
–![]() To update all the replica data for a cluster, click the Replica icon (
To update all the replica data for a cluster, click the Replica icon ( ) next to its name.
The pull selection criteria are:
–![]() Ensure—Pulls each template, except if an existing template by that name already exists at the regional cluster, in which case it does not overwrite the regional cluster data.
Ensure—Pulls each template, except if an existing template by that name already exists at the regional cluster, in which case it does not overwrite the regional cluster data.
–![]() Replace—Pulls each template and overwrites the data for it if it already exists at the regional cluster, without affecting any additional templates at the regional cluster. This is the default and recommended setting.
Replace—Pulls each template and overwrites the data for it if it already exists at the regional cluster, without affecting any additional templates at the regional cluster. This is the default and recommended setting.
–![]() Exact—Pulls each template, overwrites the data for it if it already exists at the regional cluster, and removes any additional templates at the regional cluster.
Exact—Pulls each template, overwrites the data for it if it already exists at the regional cluster, and removes any additional templates at the regional cluster.
•![]() At the regional cluster, to push a zone template to one or more local clusters:
At the regional cluster, to push a zone template to one or more local clusters:
–![]() To push all the zone templates on the page List Zone Templates page—Click Push All Zone Templates.
To push all the zone templates on the page List Zone Templates page—Click Push All Zone Templates.
–![]() To push individual zone templates on the page List Zone Templates page—Click Push Zone Template next to the template name.
To push individual zone templates on the page List Zone Templates page—Click Push Zone Template next to the template name.
Both of these actions open a version of the Push Zone Template Data to Local Clusters page (see Figure 15-1).
Figure 15-1 Push Zone Template Data to Local Clusters Page (Regional)

This page provides a choice of the synchronization mode and the destination clusters. Move the desired cluster or clusters from the Available field to the Selected field, then click one of the data synchronization mode radio buttons:
–![]() Ensure—Pushes each template, except if an existing template by that name already exists at the local cluster, in which case it does not overwrite the local cluster data. This is the default and recommended setting.
Ensure—Pushes each template, except if an existing template by that name already exists at the local cluster, in which case it does not overwrite the local cluster data. This is the default and recommended setting.
–![]() Replace—Pushes each template and overwrites the data for it if it already exists at the local cluster, without affecting any additional templates at the local cluster.
Replace—Pushes each template and overwrites the data for it if it already exists at the local cluster, without affecting any additional templates at the local cluster.
–![]() Exact—Available for "push all" operations only, it pushes each template, overwrites the data for it if it already exists at the local cluster, and removes any additional templates at the local cluster.
Exact—Available for "push all" operations only, it pushes each template, overwrites the data for it if it already exists at the local cluster, and removes any additional templates at the local cluster.
After making these choices, click Push Data to Clusters. This opens the View Push Zone Template Data Report page, where you can view the intended results of the push operation. Click OK to implement the push operation.
Step 3 ![]() You can apply the template to a new or existing zone:
You can apply the template to a new or existing zone:
a. ![]() New zone—Select the template from the Template drop-down list when you create the zone, as described in the "Configuring Primary Forward Zones" section.
New zone—Select the template from the Template drop-down list when you create the zone, as described in the "Configuring Primary Forward Zones" section.
b. ![]() Existing zone—After you create a zone (see the "Configuring Primary Forward Zones" section), you can apply the template when you edit the zone on the Edit Zone page. Click the template name in the Template drop-down list, then click Apply Template.
Existing zone—After you create a zone (see the "Configuring Primary Forward Zones" section), you can apply the template when you edit the zone on the Edit Zone page. Click the template name in the Template drop-down list, then click Apply Template.
CLI Commands
Use zone-template name create to create the zone template. (See the "Configuring Primary Forward Zones" section for how to apply the template to a zone.) For example:
nrcmd> zone-template zone-template-1 create serial=1
To apply a template to a zone, use zone-template name apply-to zone. Note that the syntax permits one or more comma-separated zones and also the all keyword for all zones. You can also clone a template from an existing template by using zone-template clone-name create clone=template, and then make adjustments to the clone. For example:
nrcmd> zone-template zone-template-1 apply-to example.com,boston.example.com
nrcmd> zone-template cloned-template create clone=zone-template-1 owner=owner-1
Managing Primary DNS Servers
Adding a zone involves creating a domain name. You can also define an owner and use a zone template. If you do not use a template, you must also define the Start of Authority (SOA) and Name Server (NS) properties for the zone.
You do not need to create a loopback zone for the local host, because Cisco Network Registrar automatically creates one. A loopback zone is a reverse zone that a host uses to resolve its loopback address, 127.0.0.1, to localhost so that it can direct network traffic to itself. The loopback zone is 127.in-addr.arpa, which appears on the list of reverse zones.
See Also
Configuring Primary Forward Zones
Zone Lists and Zone Trees
Adding Primary Reverse Zones
Getting Zone Counts on the Server
Configuring Primary Forward Zones
This section explains how to configure a primary nameserver with a primary forward zone. When you are done with this procedure, follow the procedure in the "Adding Primary Reverse Zones" section to configure a reverse zone for each network that you use.

Tip ![]() For an example of adding a forward zone, see the "Create the Zone Infrastructure" section on page 5-33.
For an example of adding a forward zone, see the "Create the Zone Infrastructure" section on page 5-33.
See Also
Creating Primary Zones
Editing Primary Zones
Confirming Zone Nameservers
Synchronizing Zones and Zone Commands
Importing and Exporting Zone Data
Creating Primary Zones
Creating a primary zone requires, at a minimum, adding certain key Start of Authority (SOA) attributes and nameservers for the zone. The advantage of Basic mode in the web UI is that many of these settings are already done for you.
Local Basic Web UI
Step 1 ![]() From the DNS menu, choose Forward Zones to open the List/Add Zones page.
From the DNS menu, choose Forward Zones to open the List/Add Zones page.
Step 2 ![]() Enter the zone name (in domain name format).
Enter the zone name (in domain name format).
Step 3 ![]() Enter the name of the nameserver host, such as ns1.
Enter the name of the nameserver host, such as ns1.
Step 4 ![]() Enter the contact e-mail name, such as hostmaster.
Enter the contact e-mail name, such as hostmaster.
Step 5 ![]() Click Add Zone. Basic mode creates the zone with preset values:
Click Add Zone. Basic mode creates the zone with preset values:
•![]() Zone default TTL—24h
Zone default TTL—24h
•![]() Start of Authority (SOA) serial number—1
Start of Authority (SOA) serial number—1
•![]() SOA secondary refresh time—3h
SOA secondary refresh time—3h
•![]() SOA secondary retry time—60m
SOA secondary retry time—60m
•![]() SOA secondary expiration time—1w
SOA secondary expiration time—1w
•![]() SOA minimum TTL—10m
SOA minimum TTL—10m
Local Advanced and Regional Web UI
Step 1 ![]() From the DNS menu, choose Forward Zones to open the List/Add Zones page. (At the regional cluster, these actions open the List Forward Zones page.)
From the DNS menu, choose Forward Zones to open the List/Add Zones page. (At the regional cluster, these actions open the List Forward Zones page.)
Step 2 ![]() Enter the zone name (in domain name format).
Enter the zone name (in domain name format).
Step 3 ![]() Choose an owner or region, if necessary, from the drop-down list.
Choose an owner or region, if necessary, from the drop-down list.
Step 4 ![]() Apply an existing zone template, if necessary (see the "Creating and Applying Zone Templates" section). Click the name of the configured template in the drop-down list.
Apply an existing zone template, if necessary (see the "Creating and Applying Zone Templates" section). Click the name of the configured template in the drop-down list.
Caution
Step 5 ![]() Click Add Zone to open the Add Zone page.
Click Add Zone to open the Add Zone page.
Step 6 ![]() Modify the top attributes, if necessary:
Modify the top attributes, if necessary:
a. ![]() Owner and region
Owner and region
b. ![]() Preconfigured zone distribution (see the "Managing Zone Distributions" section)
Preconfigured zone distribution (see the "Managing Zone Distributions" section)
c. ![]() Zone default TTL
Zone default TTL
Step 7 ![]() In the SOA attributes, enter a:
In the SOA attributes, enter a:
a. ![]() Serial number, such as 1.
Serial number, such as 1.
A primary DNS server uses a serial number to indicate when its database changes and uses any incrementing of this number to trigger a zone transfer to a secondary server. The serial number you can enter here is the suggested one only, and the DNS server does not always accept it. If you edit the serial number to be less than the actual serial number that the server maintains, the server logs a warning message and ignores the suggested serial number. The actual serial number always equals or is higher than the suggested one. You can get the actual serial number by using zone name get serial (if the DNS server is running; if the server is not running, or listing or showing the zone attributes, it always returns the suggested serial number), or by refreshing the DNS Server Value for the zone Serial Number attribute. You must explicitly enter this suggested serial number when creating a zone.
b. ![]() Nameserver host, such as ns1.
Nameserver host, such as ns1.
Enter either just the hostname or its fully qualified name (such as ns1.example.com., but you must end it with a trailing dot). Use the fully qualified name if the primary nameserver is in a different zone. The primary DNS server becomes the ns value in the zone SOA record. You must also specify one or more authoritative nameservers for the zone—these become the Name Server (NS) records for the zone. In the CLI, the primary DNS server automatically becomes the first NS record and also appears as the first entry in the nameservers attribute list.
c. ![]() Contact e-mail name, such as hostmaster.
Contact e-mail name, such as hostmaster.
The fully qualified contact e-mail name becomes a slightly altered version of the e-mail address in that dots (.) are substituted for the at symbol (@). If using the fully qualified value, end the address with a trailing dot (for example, enter hostmaster@example.com as hostmaster.example.com.). Precede any dot before the @ in the original address with a backslash (\) (for example, enter hostmaster.marketing@example.com as hostmaster\.marketing.example.com.).
Step 8 ![]() Enter an authoritative nameserver name under Nameservers further down the page, then click Add Nameserver.
Enter an authoritative nameserver name under Nameservers further down the page, then click Add Nameserver.
Authoritative nameservers validate the data in their zones. Both primary and secondary servers can be authoritative. The crucial difference is where they get their zone data. A primary server obtains its data from an administrator, as stored in the server configuration database, and from DNS updates, typically from a DHCP server. A secondary server obtains the zone data from its designated master servers by way of a zone transfer.
You must add at least one nameserver for a zone—Cisco Network Registrar does not consider the zone data complete unless you do so. The nameservers you list should be those that you want people outside your domain to query when trying to resolve names in your zone. You must add the authoritative nameservers in addition to the primary server for the zone. If the primary DNS server for the zone is in the zone, you must create a host address for it.
For every DNS internal-to-zone nameserver, you must create an Address (A) resource record (RR) to associate the server domain name with an IP address:
a. ![]() Click Host to open the List Zones page.
Click Host to open the List Zones page.
b. ![]() Click the zone name to open the List/Add Hosts for Zone page.
Click the zone name to open the List/Add Hosts for Zone page.
c. ![]() Enter the hostname of the authoritative server.
Enter the hostname of the authoritative server.
d. ![]() Enter its IP address.
Enter its IP address.
e. ![]() Click Add Host. The server hostname and address appear in the list.
Click Add Host. The server hostname and address appear in the list.
f. ![]() To edit the host, click its name to open the Edit Host page. Click Modify Host to implement the changes.
To edit the host, click its name to open the Edit Host page. Click Modify Host to implement the changes.
Step 9 ![]() Configure additional attributes as needed.
Configure additional attributes as needed.
Step 10 ![]() Click Add Zone.
Click Add Zone.
CLI Commands
To create a primary zone, use zone name create primary nameserver contact. You must specify a primary DNS server; this server becomes the first authoritative DNS nameserver. For example:
nrcmd> zone example.com create primary ns1 hostmaster
The serial number defaults to 1. You can get the actual serial number by using zone name get serial (if the DNS server is running; if the server is not running, or listing or showing the zone attributes, it always returns the suggested serial number).
To add additional authoritative nameservers for the zone, enter a comma-separated list of fully qualified domain names using zone name set nameservers=list. Note that only the first server entered is confirmed by the command. Use zone name show to show all the server names.
Use zone name addRR hostname A address to add the authoritative server hostname and address. To list the host, use zone name listHosts. To remove the host, use zone name removeRR hostname A.
If you want to apply an existing template while creating a zone, use the template attribute. For example:
nrcmd> zone example.com create primary ns1 hostmaster template=zone-template-1
Note ![]() In this example, even though you need to specify the nameserver and contact as part of the syntax, the template definition (if any) overwrites them.
In this example, even though you need to specify the nameserver and contact as part of the syntax, the template definition (if any) overwrites them.
To apply a template after creating the zone, use zone name applyTemplate template. For example:
nrcmd> zone example.com applyTemplate zone-template-1
Editing Primary Zones
You can edit a primary zone to modify its properties, apply a template to it, or use the zone definition to create a template from it.
Local Advanced and Regional Web UI
Step 1 ![]() From the DNS server, choose Forward Zones to open the List/Add Zones page (or List Forward Zones page in the regional web UI).
From the DNS server, choose Forward Zones to open the List/Add Zones page (or List Forward Zones page in the regional web UI).
Step 2 ![]() Click the name of the zone to edit to open the Edit Zone page.
Click the name of the zone to edit to open the Edit Zone page.
Step 3 ![]() Make attribute changes as necessary.
Make attribute changes as necessary.
Step 4 ![]() To apply a template to the zone, choose a template name from the drop-down list at the bottom of the page, then click Apply Template.
To apply a template to the zone, choose a template name from the drop-down list at the bottom of the page, then click Apply Template.
Caution
Step 5 ![]() To use the zone definitions to create a template from them while modifying the zone, click Modify Zone and Save Template. On the Save New Zone Template page, give the template a name in the Value field, then click Save Zone Template. You return to the List/Add Zones page.
To use the zone definitions to create a template from them while modifying the zone, click Modify Zone and Save Template. On the Save New Zone Template page, give the template a name in the Value field, then click Save Zone Template. You return to the List/Add Zones page.
Confirming Zone Nameservers
Confirm your zone NS RR configuration by looking at the RRs that you created.
Local Advanced and Regional Web UI
Click the View icon ( ) in the RRs column of the zone name on the List/Add Zones page (List Forward Zones page in the regional web UI) to open the List/Add CCM Server Protected Server RRs for Zone page (in the regional web UI) or List/Add DNS Server RRs for Zone page (in the local web UI). There should be an A record for each nameserver host in the zone. Edit these records or add more on this page.
See the "Adding Resource Records" section on page 16-2.
CLI Commands
Use zone name listRR to check the RRs you added.
Synchronizing Zones and Zone Commands
If a zone needs to be synchronized, the List/Add Zones page shows an icon in the Sync? column. Click this icon to open a Synchronize Zone page. Expert mode includes an additional Sync CCM Hosts from RR Data button. The CLI provides a zone name syncToDns command.
The List/Add Zones page also includes a Run icon ( ) in the Commands column. When clicked, this opens the Zone Commands page. These commands serve specific purposes:
•![]() Checkpoint zone—See the "Changesets and Checkpointing" section on page 17-10.
Checkpoint zone—See the "Changesets and Checkpointing" section on page 17-10.
•![]() Scavenge zone—See the "Scavenging Dynamic Records" section on page 28-16.
Scavenge zone—See the "Scavenging Dynamic Records" section on page 28-16.
•![]() Get scavenge start time—See the "Scavenging Dynamic Records" section on page 28-16.
Get scavenge start time—See the "Scavenging Dynamic Records" section on page 28-16.
Importing and Exporting Zone Data
The easiest and quickest way to create a primary zone is to import an existing BIND format zone file, defined in RFC 1035. You can also export these same kinds of files to another server. BIND 4.x.x uses a boot file, called named.boot, to point the server to its database files. You can import your entire BIND 4.x.x configuration using the import command in the CLI. BIND 8 and BIND 9 use a configuration file, called named.config, with a different syntax.
You can import and export zone data only by using the CLI.
When a BIND file contains an $INCLUDE directive, BIND searches for the include file relative to the directory that the directory directive in the named.boot file specifies. In contrast, the nrcmd program searches for the include file relative to the directory containing the zone file being processed.
To avoid this problem, ensure that the BIND configuration uses absolute paths whenever specifying an include file in a zone file. If your zone files contain relative paths when specifying include files, and the directory containing the zone file is not the same as the directory that the directory directive in the named.boot file specifies, your configuration cannot load properly. You need to convert the relative paths in your zone files to absolute paths so that you can import your BIND configuration into Cisco Network Registrar. Here is an example of a configuration and how to fix paths in directory hierarchy, configuration files, and zone files:
•![]() Directory hierarchy:
Directory hierarchy:
/etc/named.conf
/etc/named.boot
/usr/local/domain/primary/db.example
/usr/local/domain/primary/db.include
/usr/local/domain/secondary
•![]() Configuration file (/etc/named.conf):
Configuration file (/etc/named.conf):
#BIND searches for zone files and include files relative to /usr/local/domain
option directory /usr/local/domain
#BIND finds zone file in /usr/local/domain/primary
zone example.com {
type master ;
file primary/db.example ;
#end of /etc/named.conf
•![]() Configuration file (/etc/named.boot):
Configuration file (/etc/named.boot):
#BIND searches for zone files and include files relative to /usr/local/domain
directory /usr/local/domain
#BIND finds zone file in /usr/local/domain/primary
primary example.com primary/db.example
#end of /etc/named.boot
•![]() Incorrect zone file (/usr/local/domain/primary/db.example):
Incorrect zone file (/usr/local/domain/primary/db.example):
#BIND searches for include file relative to /usr/local/domain
$INCLUDE primary/db.include
#end of /usr/local/domain/primary/db.example
To make the configuration loadable, change the relative path ($INCLUDE primary/db.include) in the file db.example to an absolute path ($INCLUDE /usr/local/domain/primary/db.include).
Table 15-1 describes the named.boot and named.conf file directives that BIND 4 and BIND 9 support, and the corresponding Cisco Network Registrar user interface location or syntax, if any.
|
|
|
|
|---|---|---|
— |
acl name { |
Web UI: List/Add Access Control Lists page fields (see the "Scavenging Dynamic Records" section on page 28-16). |
forwarders addrlist |
options { |
Web UI: Edit DNS Server page, set Forwarders: IP Address field. |
— |
key id { |
Web UI: List/Add Encryption Keys page fields. |
limit transfers-in num |
options { |
Web UI: Edit DNS Server page, set xfer-client- concurrent-limit. |
— |
options { |
Web UI: Edit DNS Server page, enable restrict-query-acl |
options allow-recursion addr-match-list |
options { |
Web UI: Edit DNS Server page, enable restrict-recursion-acl. |
options forward-only |
options { |
Web UI: Edit DNS Server page, enable Slave mode. |
options listen-on port |
options { |
Web UI: Edit DNS Server page, set Listening port. |
options max-cache-ttl num |
options { |
Web UI: Edit DNS Server, set Max. RR caching TTL. |
options no-fetch-glue |
options { |
Web UI: Edit DNS Server page, enable Don't fetch missing glue records. |
options no-recursion |
options { |
Web UI: Edit DNS Server page, enable Recursive queries. |
options notify yes |
options { |
Web UI: Edit DNS Server page, enable Send zone change notification (NOTIFY). |
options rrset-order order order ... |
options { |
Web UI: Edit DNS Server page, enable Enable round-robin. |
options support-ixfr yes |
options { |
Web UI: Edit DNS Server page, enable Request incremental transfers (IXFR). |
options transfer-format many-answers |
options { |
Web UI: Edit DNS Server page, enable Use multirec format for zone transfers. |
primary zonename file |
zone "name" |
Web UI: Add Zone page fields. |
secondary zonename |
zone "name" |
Web UI: Add Secondary Zone page fields. |
slave |
zone "name" |
Web UI: Edit DNS Server page, enable Slave mode. |
— |
zone "name" |
Web UI: Edit Zone page, set restrict-query-acl. |
tcplist addrlist |
zone "name" |
Web UI: Edit Zone page, enable restrict-xfer and set restrict-xfer-acl. |
Zone Lists and Zone Trees
You can display forward and reverse zones as lists or as trees. The List/Add Zones page has a button with which you can toggle between these two views: Show Forward Zone List and Show Forward Zone Tree. The List/Add Reverse Zones page has similar toggle buttons: Show Reverse Zone List and Show Reverse Zone Tree.
Adding Primary Reverse Zones
For a correct DNS configuration, you must create a reverse zone for each network that you use. A reverse zone is a primary zone that DNS clients use to convert IP addresses back to hostnames, and resides in a special in-addr.arpa domain. You can create a reverse zone manually or import it from BIND. You can also create reverse zones from subnets (see the "Adding Reverse Zones from Subnets" section).
See Also
Adding Reverse Zones as Zones
Adding Reverse Zones from Subnets
Adding Reverse Zones as Zones
You can manually add a reverse zone as a zone.
Local Basic or Advanced and Regional Web UI
From the DNS menu, choose Reverse Zones to open the List/Add Reverse Zones page (or List Reverse Zones page in the regional web UI). This page is almost identical to the List/Add Zones page. Then, add a reverse zone the same way you would add a forward zone, as described in the "Configuring Primary Forward Zones" section, except use the reverse of the forward zone network number added to the special in-addr.arpa domain as the zone name. Use the same template or SOA and nameserver values as you used for the related forward zone.
You can enter a DHCPv4 subnet or DHCPv6 prefix value in the Name field, which converts the subnet or prefix into an appropriate reverse zone name.
To create a reverse zone by using an IPv4 subnet or an IPv6 prefix, do the following:
Step 1 ![]() From the DNS menu, choose Reverse Zones.
From the DNS menu, choose Reverse Zones.
Step 2 ![]() In the List/Add Reverse Zones page, enter values in the Name field, for example:
In the List/Add Reverse Zones page, enter values in the Name field, for example:
•![]() 209.165.201.1/24—Creates a reverse zone by using an IPv4 subnet.
209.165.201.1/24—Creates a reverse zone by using an IPv4 subnet.
•![]() 2001:db8:ff80:ff80::/64—Creates a reverse zone by using an IPv6 prefix.
2001:db8:ff80:ff80::/64—Creates a reverse zone by using an IPv6 prefix.
Step 3 ![]() Click Add Zone
Click Add Zone
The Add Reverse Zone page appears.
Step 4 ![]() Enter the required fields to create the reverse zone:
Enter the required fields to create the reverse zone:
•![]() Serial Number —Enter 1.
Serial Number —Enter 1.
•![]() Nameserver—Enter ns1.example.com. (include the trailing dot).
Nameserver—Enter ns1.example.com. (include the trailing dot).
•![]() Contact E-Mail—Enter hostmaster.example.com. (include the trailing dot).
Contact E-Mail—Enter hostmaster.example.com. (include the trailing dot).
•![]() Click Add Nameserver.
Click Add Nameserver.
Step 5 ![]() Click Add Zone to add the zone
Click Add Zone to add the zone
The List/Add Reverse Zones page appears.
To create a reverse zone by using the name of an IPv6 prefix, do the following:
Step 1 ![]() From the DHCPv6 menu, choose Prefixes.
From the DHCPv6 menu, choose Prefixes.
Step 2 ![]() Enter a prefix name (for example, prefix-1) and address (for example, 2001:db8:ff80:ff80::).
Enter a prefix name (for example, prefix-1) and address (for example, 2001:db8:ff80:ff80::).
Step 3 ![]() Choose a prefix length from the drop-down list (for example, 64).
Choose a prefix length from the drop-down list (for example, 64).
Step 4 ![]() Click Add Prefix.
Click Add Prefix.
The prefix is added to the list.
To create a reverse zone from the prefix,
a. ![]() Click the Create icon (
Click the Create icon ( ) in the Reverse Zone column.
The Create Reverse Zone(s) for Prefix page appears.
b. ![]() Select a zone template
Select a zone template
c. ![]() Click Report, and Run.
Click Report, and Run.
Step 5 ![]() Click Return to return to the List/Add DHCPv6 Prefixes page.
Click Return to return to the List/Add DHCPv6 Prefixes page.
The icon in the Reverse Zone column changes to the View icon (). You can click this icon to open the List/Add Reverse Zones page.
CLI Commands
Use zone name create primary and zone name addRR PTR to add the primary reverse zone and pointer records for the server. You can also apply a zone template.
To create a reverse zone by using:
•![]() An IPv4 subnet
An IPv4 subnet
For example, you can enter:
nrcmd> zone 209.165.201.1/24 create primary ns1.example.com. hostmaster.example.com.
•![]() An IPv6 prefix
An IPv6 prefix
For example, you can enter:
nrcmd> zone 2001:db8::/64 create primary ns1.example.com. hostmaster.example.com.
•![]() The name of an IPv6 prefix
The name of an IPv6 prefix
For example, you can enter:
nrcmd> prefix prefix-1 create 2001:db8:ff80:ff80::/64
nrcmd> zone prefix-1 create primary ns1.example.com. hostmaster.example.com.
Adding Reverse Zones from Subnets
An alternative to creating reverse zones manually is to create them from existing subnets. You can do this in the web UI only.
Local Advanced and Regional Web UI
Step 1 ![]() From the Address Space menu, choose Subnets to open the List/Add Subnets page.
From the Address Space menu, choose Subnets to open the List/Add Subnets page.
Step 2 ![]() Create a subnet for the reverse zone, or use one of the existing subnets. If the subnet already has a reverse zone created from it, the Reverse Zone column shows the View icon (), which opens the List/Add Reverse Zones page. If the subnet has the Create icon () in the Reverse Zone column, click the icon to open the Create Reverse Zone(s) for Subnet page.
Create a subnet for the reverse zone, or use one of the existing subnets. If the subnet already has a reverse zone created from it, the Reverse Zone column shows the View icon (), which opens the List/Add Reverse Zones page. If the subnet has the Create icon () in the Reverse Zone column, click the icon to open the Create Reverse Zone(s) for Subnet page.
Step 3 ![]() On the Create Reverse Zone(s) for Subnet page, you must choose an existing zone template.
On the Create Reverse Zone(s) for Subnet page, you must choose an existing zone template.
Step 4 ![]() Click Report to show the changesets for the creation.
Click Report to show the changesets for the creation.
Step 5 ![]() Click Run to run the creation.
Click Run to run the creation.
Step 6 ![]() Click Return to return to the List/Add Subnets page.
Click Return to return to the List/Add Subnets page.
Step 7 ![]() Confirm the creation by clicking DNS, then Reverse Zones to see the newly created zone on the List/Add Reverse Zones page.
Confirm the creation by clicking DNS, then Reverse Zones to see the newly created zone on the List/Add Reverse Zones page.
Getting Zone Counts on the Server
You can view the created zones associated with the DNS server, hence obtain a count, in the web UI.
Using the CLI, you can get an exact count of the total zones for the DNS server by using dns getZoneCount [forward | reverse | primary | secondary | published | unpublished | all]. With no options specified, the command returns the total number of published zones only.
Managing Secondary Servers
When you configure a zone, choose at least one secondary server. If you have only one nameserver and it becomes unavailable, there is nothing that can look up names. A secondary server splits the load with the primary or handles the whole load if the primary is unavailable. When a secondary server starts up, it contacts the primary and pulls the zone data over. This is known as a zone transfer.
Tip ![]() If the authoritative server for your secondary zones is also running Cisco Network Registrar 6.0 or later, see the "Managing Zone Distributions" section for how to avoid entering these zones manually. If you have only one secondary server, remove it geographically from the primary. They should not be on the same network segment, switch, or router, but on a different cluster entirely.
If the authoritative server for your secondary zones is also running Cisco Network Registrar 6.0 or later, see the "Managing Zone Distributions" section for how to avoid entering these zones manually. If you have only one secondary server, remove it geographically from the primary. They should not be on the same network segment, switch, or router, but on a different cluster entirely.
You can configure a secondary DNS server to be responsible for a secondary zone, which makes the server a secondary for that zone. You also need to give the address of the master server from which to perform zone transfers. Cisco Network Registrar must know about this master server.
See Also
Adding Secondary Forward Zones
Adding Secondary Reverse Zones
Enabling Zone Transfers
Adding Secondary Forward Zones
You can add a secondary forward zone at the local cluster.
Local Basic or Advanced Web UI
From the DNS, choose Secondary Zones to open the List/Add Secondary Zones page. Then click Add Secondary Zone to open the Add Secondary Zone page.
A secondary zone requires a name and a list of one or more master servers. You can also enable restricting zone transfers to a set of hosts, then enter the access control list (ACL) of the restricted hosts in the restrict-xfer-acl field. Enter other attribute values as necessary, then click Add Secondary Zone.
Clicking the name of the secondary zone on the List/Add Secondary Zones page opens the Edit Secondary Zone page where you can edit the secondary zone. Click Modify Secondary Zone on this page.
CLI Commands
Use zone name create secondary. The IP address you include is that of the nameserver from which data is expected, typically a primary nameserver. You cannot apply a template to a secondary zone.
Adding Secondary Reverse Zones
You should add a secondary reverse zone, just as you added a secondary forward zone.
Local Basic or Advanced Web UI
Step 1 ![]() Add the secondary reverse zone the same way you do a secondary forward zone, except that the address must be a reverse zone address. (See the "Adding Secondary Forward Zones" section.)
Add the secondary reverse zone the same way you do a secondary forward zone, except that the address must be a reverse zone address. (See the "Adding Secondary Forward Zones" section.)
Step 2 ![]() Make the secondary zone domain name an in-addr.arpa reverse domain.
Make the secondary zone domain name an in-addr.arpa reverse domain.
Step 3 ![]() Add the nameserver address for the secondary forward zone and set any zone transfer address restrictions, as in the "Adding Secondary Forward Zones" section.
Add the nameserver address for the secondary forward zone and set any zone transfer address restrictions, as in the "Adding Secondary Forward Zones" section.
Enabling Zone Transfers
A secondary server periodically contacts its master server for changes, called a zone transfer. The interval is defined in the server SOA record as the secondary refresh time. You can restrict zone transfers by setting the restrict-xfer attribute to true (the preset value is false) on the master server.
Note ![]() If you restrict zone transfers, the nslookup utility ls command may fail because it tries to do a full zone transfer, unless you include the IP address that ls runs from in the zone restrict-xfer-acl list.
If you restrict zone transfers, the nslookup utility ls command may fail because it tries to do a full zone transfer, unless you include the IP address that ls runs from in the zone restrict-xfer-acl list.
Local Advanced and Regional Web UI
Step 1 ![]() On the List/Add Zones page (or the List Forward Zones page in the regional web UI), click the name of the primary zone to open the Edit Zone page.
On the List/Add Zones page (or the List Forward Zones page in the regional web UI), click the name of the primary zone to open the Edit Zone page.
Step 2 ![]() In the zone attributes area, you can set the restrict-xfer attribute to false (the preset value). If you set the attribute to true, you can also specify a list of servers to which to restrict the zone transfers by using the restrict-xfer-acl attribute, separating the IP addresses with commas.
In the zone attributes area, you can set the restrict-xfer attribute to false (the preset value). If you set the attribute to true, you can also specify a list of servers to which to restrict the zone transfers by using the restrict-xfer-acl attribute, separating the IP addresses with commas.
Secondary zones can also restrict zone transfers from other secondary zones, so that the restrict-xfer and restrict-xfer-acl attributes are also available for secondary zone configurations.
Step 3 ![]() Click Modify Zone.
Click Modify Zone.
Step 4 ![]() You can force zone transfers for the DNS server in two ways:
You can force zone transfers for the DNS server in two ways:
•![]() On the List Secondary Zones page, click the Run icon () in the Force Zone Transfer column.
On the List Secondary Zones page, click the Run icon () in the Force Zone Transfer column.
•![]() To force all zone transfers from the primary server, on the DNS Server Commands page (see Figure 7-1 on page 7-2), click the Run icon () next to Force all zone transfers.
To force all zone transfers from the primary server, on the DNS Server Commands page (see Figure 7-1 on page 7-2), click the Run icon () next to Force all zone transfers.
CLI Commands
In the CLI, zone transfers are enabled by default, unless you restrict them using zone name enable restrict-xfer. If you want to force a zone transfer, use zone name forceXfer secondary.
Adding Subzones
As the zone grows, you might want to divide it into smaller pieces called subzones. You can delegate administrative authority for these subzones, and have them managed there or served by separate servers. This partitioning is called subzone delegation. Establish subzone delegation by performing these tasks:
1. ![]() Choose a subzone name.
Choose a subzone name.
2. ![]() Specify a nameserver name.
Specify a nameserver name.
3. ![]() Specify a nameserver address.
Specify a nameserver address.
See Also
Choosing Subzone Names and Servers
Creating and Delegating Subzones
Undelegating Subzones
Editing Subzone Delegation
Choosing Subzone Names and Servers
After you decide to divide the zone into subzones, you must create names for them. Involve the people responsible for the subzones in deciding their names, and try to maintain a consistent naming scheme.
These suggestions can help you avoid subzone naming problems:
•![]() Consider not naming a subzone by its organizational name. In a changing business environment, organizations merge and are renamed. Naming a subzone after an organization could result in a name that is no longer meaningful over time.
Consider not naming a subzone by its organizational name. In a changing business environment, organizations merge and are renamed. Naming a subzone after an organization could result in a name that is no longer meaningful over time.
•![]() Consider not using geographical names that indicate the subzone location. Geographical names are meaningless to people outside your organization.
Consider not using geographical names that indicate the subzone location. Geographical names are meaningless to people outside your organization.
•![]() Do not use cryptic names; make them obvious.
Do not use cryptic names; make them obvious.
•![]() Do not use existing or reserved top-level domain names as subzones. Using existing names can result in routing problems.
Do not use existing or reserved top-level domain names as subzones. Using existing names can result in routing problems.
After you choose a subzone name, specify its nameservers, the ones the parent domain nameservers use when queried about the subzone. To ensure that the subzone is always reachable, you should specify two nameservers. They must be authoritative for this zone as either primary or secondary, or lame delegation will result (see the "Reporting Lame Delegation" section on page 17-14).
Whenever a subzone nameserver changes its name or address, the subzone administrator must inform its parent zone so that the parent zone administrator can change the subzone nameserver and glue records. A glue record is an A record with the address of a subzone authoritative nameserver. If the subzone administrator fails to inform its parent, the glue records are invalid. The common symptom is that a host cannot reach a host in another domain by its name, only by its address.
Note ![]() Cisco Network Registrar detects lame delegation by reporting missing subzone NS records in the parent zone, if NS record addresses do not match, and if glue A records are required.
Cisco Network Registrar detects lame delegation by reporting missing subzone NS records in the parent zone, if NS record addresses do not match, and if glue A records are required.
Creating and Delegating Subzones
You delegate a subzone by creating it in the parent zone. There should be one NS record for each nameserver to which the subzone is delegated. Each NS record requires a corresponding A record describing the address of the nameserver, unless the nameserver is outside the parent zone or subzone. This A record is called a glue record.
See also the "Choosing Subzone Names and Servers" section.
Local Basic or Advanced Web UI
Step 1 ![]() Create a zone as a subdomain of the parent domain on the List/Add Zones (or List Forward Zones) page:
Create a zone as a subdomain of the parent domain on the List/Add Zones (or List Forward Zones) page:
•![]() If applying a zone template, go to Step 2.
If applying a zone template, go to Step 2.
•![]() If not applying a zone template, on the Add Zone page, add the SOA records and the nameserver with its address, then click Add Zone.
If not applying a zone template, on the Add Zone page, add the SOA records and the nameserver with its address, then click Add Zone.
Step 2 ![]() If Cisco Network Registrar detects a parent zone based on the subzone name, the Create Subzone in Parent Zone page appears. Click Create as Subzone (or Create as Unparented Zone if you do not want it to be a subzone) on this page.
If Cisco Network Registrar detects a parent zone based on the subzone name, the Create Subzone in Parent Zone page appears. Click Create as Subzone (or Create as Unparented Zone if you do not want it to be a subzone) on this page.
Step 3 ![]() If you configured a nameserver in the subzone, you need to create a glue Address (A) record for it. In the field provided, enter the IP address of the nameserver, then click Specify Glue Records. (If there are multiple subzone nameservers, there are multiple fields for the glue records.)
If you configured a nameserver in the subzone, you need to create a glue Address (A) record for it. In the field provided, enter the IP address of the nameserver, then click Specify Glue Records. (If there are multiple subzone nameservers, there are multiple fields for the glue records.)
Step 4 ![]() Click Report to show the intended changesets for the added records, then click Run.
Click Report to show the intended changesets for the added records, then click Run.
Step 5 ![]() Click Return after viewing the actual changesets implemented.
Click Return after viewing the actual changesets implemented.
Step 6 ![]() To confirm the added records for the subzone, click the View icon () in the RRs column for the subzone. The glue A record or records for the subzone nameserver should appear. Click Return to Zone List.
To confirm the added records for the subzone, click the View icon () in the RRs column for the subzone. The glue A record or records for the subzone nameserver should appear. Click Return to Zone List.
Step 7 ![]() To confirm the added records for the parent zone, click the View icon () in the RRs column for the parent zone. The subzone nameserver (NS) record or records plus the glue A record or records for them should appear. Click Return to Zone List.
To confirm the added records for the parent zone, click the View icon () in the RRs column for the parent zone. The subzone nameserver (NS) record or records plus the glue A record or records for them should appear. Click Return to Zone List.
CLI Commands
On the subzone primary nameserver machine, create the subdomain:
nrcmd> zone boston.example.com. create primary bostonDNSserv1 hostmaster
On the parent zone nameserver machine, add an NS record for the subzone nameserver, then Create a glue A record for the subzone nameserver:
nrcmd> zone example.com. addRR boston NS bostonDNSserv1.boston.example.com.
nrcmd> zone example.com. addRR bostonDNSserv1.boston.example.com. A 192.168.40.1
Undelegating Subzones
If you undelegate a subzone, you need to remove any associated NS and glue A records from the parent zone.
Note ![]() If you delete the subzone, Cisco Network Registrar cleans up the delegation records automatically.
If you delete the subzone, Cisco Network Registrar cleans up the delegation records automatically.
Local Basic or Advanced and Regional Web UI
On the regional List/Add CCM Server Protected RRs for Zone page or local List/Add DNS Server RRs for Zone page, delete the NS record for the subzone, then delete the glue A record for the subzone server host.
CLI Commands
Use zone name removeRR NS and zone name removeRR A to remove the subzone NS and glue A records.
Editing Subzone Delegation
You can edit the subzone RRs.
Local Basic or Advanced and Regional Web UI
Step 1 ![]() On the regional List/Add CCM Server Protected RRs for Zone page or local List/Add DNS Server RRs for Zone page, edit the NS RR for the subzone by clicking the Edit icon (
On the regional List/Add CCM Server Protected RRs for Zone page or local List/Add DNS Server RRs for Zone page, edit the NS RR for the subzone by clicking the Edit icon ( ) next to the record to open the Edit RR in Zone page.
Step 2 ![]() Edit the NS record data.
Edit the NS record data.
Step 3 ![]() Click Modify Resource Record.
Click Modify Resource Record.
Step 4 ![]() Edit the glue A RR for the subzone server in the same way as in the previous steps.
Edit the glue A RR for the subzone server in the same way as in the previous steps.
CLI Commands
Use zone name removeRR to delete the NS and glue A records, then use zone name addRR to replace them.
Enabling DNS Updates
DNS Update (RFC 2136) integrates DNS and DHCP so that they can work together. DNS update automatically records the association between the hosts and their DHCP-assigned addresses. Using DHCP and DNS update, you can configure a host automatically for network access whenever it attaches to the network. You can locate and access the host using its unique DNS hostname.
DNS update is described more fully in Chapter 28, "Configuring DNS Update." The chapter includes sections on the following:
•![]() Update policy (the Update Policies tab)—Determines what kind of RRs you want updated when name-to-address associations change through DHCP.
Update policy (the Update Policies tab)—Determines what kind of RRs you want updated when name-to-address associations change through DHCP.
•![]() Update map (the Update Maps tab)—Defines an update relationship between a DNS server or HA DNS pair and a DHCP failover pair, DHCP policies, client-class, or access control list. (See the "Creating DNS Update Maps" section on page 28-7.)
Update map (the Update Maps tab)—Defines an update relationship between a DNS server or HA DNS pair and a DHCP failover pair, DHCP policies, client-class, or access control list. (See the "Creating DNS Update Maps" section on page 28-7.)
Managing Zone Distributions
Creating a zone distribution simplifies creating multiple zones that share the same secondary zone attributes. The zone distribution requires adding one or more predefined secondary servers. Running a zone distribution synchronization adds secondary zones managed by secondary (slave) servers for each primary zone managed by a primary server. You can also use zone distributions to synchronize zone data from the CCM database to the local DNS server and regional and local cluster zone data.
The distribution must be in a star topology, that is, one primary server and multiple secondary servers. The authoritative (master) server can only be the local primary server where the zone distribution default is defined. Starting with Cisco Network Registrar 6.2, you can manage one zone distribution at the local cluster and multiple distributions at the regional clusters.
See Also
Preparing the Zone Distribution Map
Creating a Zone Distribution
Pulling Zone Distributions from Replica Data
Preparing the Zone Distribution Map
To prepare for creating a zone distribution, draw a zone distribution map diagram on paper.
Step 1 ![]() Start by identifying the HA DNS pair that is primary (or the primary server if HA is not involved) for all the zones that you include in the map:
Start by identifying the HA DNS pair that is primary (or the primary server if HA is not involved) for all the zones that you include in the map:
a. ![]() Create a box for each server in the HA DNS pair. For example, the server pair for the Chicago-cluster consists of the servers at 192.168.50.1 and 192.168.60.1.
Create a box for each server in the HA DNS pair. For example, the server pair for the Chicago-cluster consists of the servers at 192.168.50.1 and 192.168.60.1.
b. ![]() Write the IP addresses of each server in each box.
Write the IP addresses of each server in each box.
c. ![]() Write a P (for Primary) inside each box (see Figure 15-2).
Write a P (for Primary) inside each box (see Figure 15-2).
Figure 15-2 Diagramming a Zone Distribution Map
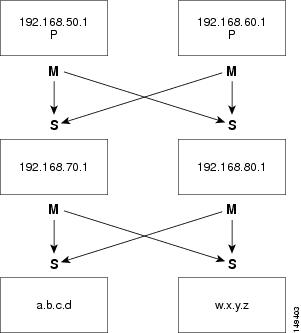
Step 2 ![]() Identify the role as master for each server by writing an M below the box. In the example, both primary servers are, by definition, also masters that will send copies of their zones to other servers over zone transfers. Even so, write the M below the box to make later steps easier.
Identify the role as master for each server by writing an M below the box. In the example, both primary servers are, by definition, also masters that will send copies of their zones to other servers over zone transfers. Even so, write the M below the box to make later steps easier.
Step 3 ![]() Identify all slave servers that will receive zone transfers directly from these masters. Below the master server boxes on the page, add a box for each slave, and write its IP address inside the box. For example, the slave servers at 192.168.70.1 and 192.168.80.1 get zone transfers from the Chicago-cluster masters.
Identify all slave servers that will receive zone transfers directly from these masters. Below the master server boxes on the page, add a box for each slave, and write its IP address inside the box. For example, the slave servers at 192.168.70.1 and 192.168.80.1 get zone transfers from the Chicago-cluster masters.
Step 4 ![]() Write an S above each slave server box.
Write an S above each slave server box.
Step 5 ![]() Draw arrows from the M to each S representing the zone transfer flow (see the diagram). In this HA DNS example, the arrows go from each master to both slaves.
Draw arrows from the M to each S representing the zone transfer flow (see the diagram). In this HA DNS example, the arrows go from each master to both slaves.
Step 6 ![]() As you can see from the diagram, you can extend the boxes further so that the original slaves can become masters to another set of servers (a.b.c.d and w.x.y.z).
As you can see from the diagram, you can extend the boxes further so that the original slaves can become masters to another set of servers (a.b.c.d and w.x.y.z).
Step 7 ![]() Enter the IP address in each box with an M below it in the Master Servers list when creating the zone distribution.
Enter the IP address in each box with an M below it in the Master Servers list when creating the zone distribution.
In the CLI, set the master-servers attribute to the list of IP addresses; for example:
nrcmd> zone-dist dist-1 create Chicago-cluster master-servers=192.168.50.1,192.168.60.1
Step 8 ![]() From the Secondary Servers drop-down list on the Add or Edit Zone Distribution Secondary Server page, choose the cluster associated with the slave server IP addresses in the boxes that have an S above them.
From the Secondary Servers drop-down list on the Add or Edit Zone Distribution Secondary Server page, choose the cluster associated with the slave server IP addresses in the boxes that have an S above them.
In the CLI, use zone-dist name addSecondary cluster; for example:
nrcmd> zone-dist dist-1 addSecondary Boston-cluster
Creating a Zone Distribution
Note ![]() If you move a zone from one zone distribution to another, synchronize the first zone distribution, move the zone, then synchronize the second zone distribution.
If you move a zone from one zone distribution to another, synchronize the first zone distribution, move the zone, then synchronize the second zone distribution.
Local Basic or Advanced and Regional Web UI
Step 1 ![]() From the DNS menu, choose Zone Distributions (for the regional cluster) or Zone Distribution (for the local cluster). This opens the regional List/Add Zone Distributions page or the local List Zone Distributions page. Note that the default zone distribution is predefined at both clusters; however, the default cluster is the only one available at the local cluster.
From the DNS menu, choose Zone Distributions (for the regional cluster) or Zone Distribution (for the local cluster). This opens the regional List/Add Zone Distributions page or the local List Zone Distributions page. Note that the default zone distribution is predefined at both clusters; however, the default cluster is the only one available at the local cluster.
Step 2 ![]() To add a new zone distribution, click Add Zone Distribution to open the Add Zone Distribution page. To edit an existing zone distribution, click its name to open the Edit Zone Distribution page. The Add Zone Distribution page and Edit Zone Distribution page are functionally equivalent.
To add a new zone distribution, click Add Zone Distribution to open the Add Zone Distribution page. To edit an existing zone distribution, click its name to open the Edit Zone Distribution page. The Add Zone Distribution page and Edit Zone Distribution page are functionally equivalent.
Step 3 ![]() In the Primary Server field, enter the cluster (or configured HA DNS pair) that has the primary server. This primary server is authoritative for the zones that you will determine further down the page. This selection is subtractive: the next zone distribution you create will no longer have the cluster that you set here as one of the choices.
In the Primary Server field, enter the cluster (or configured HA DNS pair) that has the primary server. This primary server is authoritative for the zones that you will determine further down the page. This selection is subtractive: the next zone distribution you create will no longer have the cluster that you set here as one of the choices.
Step 4 ![]() In the Master Servers list, add the IP address (and optional key) for each master server. The master server is generally the primary server. However, you might want to set up a hierarchy of primaries and secondaries where you need to define the master servers for each of the secondary relationships. You might also want to determine the HA DNS server pairs from the master server list. You can also add an optional TSIG key (see the "Transaction Security" section on page 28-9) to the master server address by hyphenating the entry in the format address-key. For each entry, click Add IP Key.
In the Master Servers list, add the IP address (and optional key) for each master server. The master server is generally the primary server. However, you might want to set up a hierarchy of primaries and secondaries where you need to define the master servers for each of the secondary relationships. You might also want to determine the HA DNS server pairs from the master server list. You can also add an optional TSIG key (see the "Transaction Security" section on page 28-9) to the master server address by hyphenating the entry in the format address-key. For each entry, click Add IP Key.
Step 5 ![]() For a zone distribution, you need to add at least one secondary server. Click Add Server on the Edit Zone Distribution page to open the Add Zone Distribution Secondary Server page. Here, choose the cluster of the secondary server. Optionally, if the master servers are other than the primary servers indicated for the zone distribution, add the master server addresses, separating multiple addresses with commas. After clicking Add Secondary Server returns you to the Add or Edit page, you can connect to the secondary server cluster, delete it, or edit it to change the master servers.
For a zone distribution, you need to add at least one secondary server. Click Add Server on the Edit Zone Distribution page to open the Add Zone Distribution Secondary Server page. Here, choose the cluster of the secondary server. Optionally, if the master servers are other than the primary servers indicated for the zone distribution, add the master server addresses, separating multiple addresses with commas. After clicking Add Secondary Server returns you to the Add or Edit page, you can connect to the secondary server cluster, delete it, or edit it to change the master servers.
To manage the secondary servers in the zone distribution, click the View icon () in the Manage Servers column to open the List Secondary Servers page. You can also edit the secondary server on an Edit Zone Distribution Secondary Server page.
Step 6 ![]() Choose the forward and reverse zones for the zone distribution. The default zone distribution includes all the created forward and reverse zones. For all other created zone distributions, you must move the zone or zones into the Selected column.
Choose the forward and reverse zones for the zone distribution. The default zone distribution includes all the created forward and reverse zones. For all other created zone distributions, you must move the zone or zones into the Selected column.
Step 7 ![]() Click Add Zone Distribution or Modify Zone Distribution.
Click Add Zone Distribution or Modify Zone Distribution.
Step 8 ![]() Synchronize the zone distribution with the local cluster DNS servers. A synchronization:
Synchronize the zone distribution with the local cluster DNS servers. A synchronization:
•![]() Pushes staged zone, RR, or host edits to the primary server cluster or HA DNS pair for the regional cluster in Ensure, Replace, or Exact modes, or from the local cluster in Exact mode.
Pushes staged zone, RR, or host edits to the primary server cluster or HA DNS pair for the regional cluster in Ensure, Replace, or Exact modes, or from the local cluster in Exact mode.
•![]() Creates secondary zones for secondary servers, in Exact mode.
Creates secondary zones for secondary servers, in Exact mode.
Step 9 ![]() Choose a synchronization mode:
Choose a synchronization mode:
•![]() Update—Adds new zones, RR sets, and hosts; replaces existing hosts if there are conflicts; and creates new secondary zones.
Update—Adds new zones, RR sets, and hosts; replaces existing hosts if there are conflicts; and creates new secondary zones.
•![]() Complete—Like Ensure mode, except that it always replaces existing RR sets and hosts, and modifies the master server list on existing secondary zones.
Complete—Like Ensure mode, except that it always replaces existing RR sets and hosts, and modifies the master server list on existing secondary zones.
•![]() Exact—Like Complete mode, except that it deletes extra zones, RR sets, hosts, and secondary zones no longer on the primary.
Exact—Like Complete mode, except that it deletes extra zones, RR sets, hosts, and secondary zones no longer on the primary.
Step 10 ![]() Click the Report icon (
Click the Report icon ( ) in the Synchronize column (or the same icon in the Synchronize All Zone Distributions area of the page at the regional cluster). This opens the Sync Zone Distribution page that shows a preview of the data synchronized. Click Run.
CLI Commands
To create the zone distribution, use zone-dist name create primary-cluster. (The primary cluster can also be the HA DNS pair.) For example:
nrcmd> zone-dist dist-2 create Chicago-cluster
To set the master server or servers, use zone-dist name set master-servers=addressses, separating the addresses with commas. For example:
nrcmd> zone-dist zone-dist-2 set master-servers=192.168.50.1,192.168.60.1
To add the secondary server, use zone-dist name addSecondary secondary-cluster. For example:
nrcmd> zone-dist zone-dist-2 AddSecondary Boston-cluster
You must associate the zone distribution directly with the zone or zone template. Use zone name set dist-map=zone-dist-list or zone-template name set dist-map=zone-dist-list, separating the zone distribution entries with commas. For example:
nrcmd> zone example.com set dist-map=zone-dist-2
nrcmd> zone-template zone-template-1 set dist-map=zone-dist-2
To synchronize the zone distributions, use zone-dist name sync. You can do a synchronization in update, complete, or exact mode, and you can exclude RRs and secondary zones:
•![]() At the local cluster, this synchronizes staged edits to the DNS server and primary zones to secondaries. Regardless of the synchronization mode, this always synchronizes the exact list of authoritative zones.
At the local cluster, this synchronizes staged edits to the DNS server and primary zones to secondaries. Regardless of the synchronization mode, this always synchronizes the exact list of authoritative zones.
•![]() At the regional cluster, this synchronizes primary zones with the local clusters, and primaries to secondaries. This replaces primary zones at the local cluster in Update and Complete modes, and deletes extra primary zones at the local cluster in Exact mode.
At the regional cluster, this synchronizes primary zones with the local clusters, and primaries to secondaries. This replaces primary zones at the local cluster in Update and Complete modes, and deletes extra primary zones at the local cluster in Exact mode.
•![]() For secondary zones, the same synchronization logic occurs at the local and regional clusters. In Update mode, this ensures that corresponding secondary zones exist on the server. In Complete mode, existing zones are updated to use the master server list specified by the zone distribution map. In Exact mode, any zones not matching the distribution map are deleted.
For secondary zones, the same synchronization logic occurs at the local and regional clusters. In Update mode, this ensures that corresponding secondary zones exist on the server. In Complete mode, existing zones are updated to use the master server list specified by the zone distribution map. In Exact mode, any zones not matching the distribution map are deleted.
For example:
nrcmd> zone-dist zone-dist-1 sync exact no-rrs no-secondaries
Pulling Zone Distributions from Replica Data
You can pull zone distributions from the local replica data instead of explicitly creating them.
Tip ![]() For an example of pulling local zone data to create a zone distribution, see the "Pull Zone Data and Create a Zone Distribution" section on page 5-43.
For an example of pulling local zone data to create a zone distribution, see the "Pull Zone Data and Create a Zone Distribution" section on page 5-43.
Regional Web UI
Step 1 ![]() On the List/Add Zone Distributions page, click Pull Replica Zone Data.
On the List/Add Zone Distributions page, click Pull Replica Zone Data.
Step 2 ![]() Choose the data synchronization mode (Update, Complete, or Exact) on the Select Pull Replica Zone Data page. These modes are described in the table on that page.
Choose the data synchronization mode (Update, Complete, or Exact) on the Select Pull Replica Zone Data page. These modes are described in the table on that page.
Step 3 ![]() Click Report at the bottom of the page.
Click Report at the bottom of the page.
Step 4 ![]() Click Run on the Report Pull Replica Zone Data page.
Click Run on the Report Pull Replica Zone Data page.
Step 5 ![]() Click OK on the Run Pull Replica Zone Data page.
Click OK on the Run Pull Replica Zone Data page.
 Feedback