User Guide for Cisco Network Registrar 7.2
Bias-Free Language
The documentation set for this product strives to use bias-free language. For the purposes of this documentation set, bias-free is defined as language that does not imply discrimination based on age, disability, gender, racial identity, ethnic identity, sexual orientation, socioeconomic status, and intersectionality. Exceptions may be present in the documentation due to language that is hardcoded in the user interfaces of the product software, language used based on RFP documentation, or language that is used by a referenced third-party product. Learn more about how Cisco is using Inclusive Language.
- Updated:
- March 20, 2015
Chapter: Managing DHCP Server Properties
Advanced DHCP Server Properties
This chapter describes how to set up some of the more advanced DHCP server properties. Before clients can use DHCP for address assignment, you must add at least one scope to the server. This is described in Chapter 20, "Configuring Scopes and Networks." The additional properties are:
•![]() Defining Advanced Server Attributes
Defining Advanced Server Attributes
•![]() Integrating Windows System Management Servers
Integrating Windows System Management Servers
•![]() Using Extensions to Affect DHCP Server Behavior
Using Extensions to Affect DHCP Server Behavior
•![]() Configuring Virtual Private Networks and Subnet Allocation
Configuring Virtual Private Networks and Subnet Allocation
Configuring BOOTP
BOOTP (the BOOTstrap Protocol) was originally created for loading diskless computers. It was later used to allow a host to obtain all the required TCP/IP information to use the Internet. Using BOOTP, a host can broadcast a request on the network and get information required from a BOOTP server. The BOOTP server is a computer that listens for incoming BOOTP requests and generates responses from a configuration database for the BOOTP clients on that network. BOOTP differs from DHCP in that it has no concept of lease or lease expiration. All IP addresses that a BOOTP server allocates are permanent.
You can configure Cisco Network Registrar to act like a BOOTP server. In addition, although BOOTP normally requires static address assignments, you can choose to either reserve IP addresses (and, therefore, use static assignments) or have IP addresses dynamically allocated for BOOTP clients.
See Also
About BOOTP
Enabling BOOTP for Scopes
Moving or Decommissioning BOOTP Clients
Using Dynamic BOOTP
BOOTP Relay
About BOOTP
When you configure the DHCP server to return a BOOTP packet, be aware that BOOTP requires information in the DHCP packet in fields other than the option space. BOOTP devices often need information in the boot file (file), server IP address (siaddr), and server hostname (sname) fields of the DHCP packet (see RFC 2131).
Every Cisco Network Registrar DHCP policy has attributes with which you can configure the information you want returned directly in the file, siaddr, or sname fields. The Cisco Network Registrar DHCP server also supports a configuration parameter with which you can configure the policy options and determine which of the file, sname, or siaddr values you want returned to the BOOTP device.
Cisco Network Registrar supports an analogous configuration parameter with which you can configure the options and file, sname, or siaddr values you want returned to the DHCP client. This is in addition to any options requested by the DHCP clients in the dhcp-parameter-request option in the DHCP request. Thus, you can configure both the BOOTP and DHCP response packets appropriately for your devices.
Step 1 ![]() Decide which values you want for the BOOTP attributes:
Decide which values you want for the BOOTP attributes:
•![]() file—Name of the boot file
file—Name of the boot file
•![]() siaddr—Server IP address
siaddr—Server IP address
•![]() sname—Optional server hostname
sname—Optional server hostname
Step 2 ![]() Decide the list of options and their values that you want returned to the BOOTP client.
Decide the list of options and their values that you want returned to the BOOTP client.
Step 3 ![]() Set these values in the policy you want associated with the BOOTP request:
Set these values in the policy you want associated with the BOOTP request:
•![]() Attributes (packet-siaddr, packet-file-name, packet-server-name) to send to the BOOTP client.
Attributes (packet-siaddr, packet-file-name, packet-server-name) to send to the BOOTP client.
•![]() Option values, such as the server addresses and domain name to return to the BOOTP client.
Option values, such as the server addresses and domain name to return to the BOOTP client.
•![]() List of fields and options you want returned to the BOOTP client.
List of fields and options you want returned to the BOOTP client.
Step 4 ![]() Enable the associated scope or scopes for BOOTP processing.
Enable the associated scope or scopes for BOOTP processing.
Step 5 ![]() Enable dynamic BOOTP processing if you want to have this scope provide an address for any BOOTP client that requests one. If you do not enable dynamic BOOTP, you must make reservations for each BOOTP client for which you want this scope to provide an address.
Enable dynamic BOOTP processing if you want to have this scope provide an address for any BOOTP client that requests one. If you do not enable dynamic BOOTP, you must make reservations for each BOOTP client for which you want this scope to provide an address.
Enabling BOOTP for Scopes
You can enable BOOTP processing for a scope. Set certain attributes and BOOTP reply options for a created policy in the local cluster web UI, or use policy name create and policy name set in the CLI, to configure BOOTP. Set the policy attributes and options as a comma-separated list. The attributes are entities to use in a client boot process:
•![]() packet-siaddr—IP address of the next server
packet-siaddr—IP address of the next server
•![]() packet-file-name—Name of the boot file
packet-file-name—Name of the boot file
•![]() packet-server-name—Hostname of the server
packet-server-name—Hostname of the server
The server looks through the policy hierarchy for the first instances of these attribute values.
In the CLI, policy name setOption requires spaces (not equal signs) before values.
Also, enable BOOTP and dynamic BOOTP, if desired, and ensure that the DHCP server updates the DNS server with BOOTP requests. The options are:
•![]() Set the option dhcp-lease-time.
Set the option dhcp-lease-time.
•![]() Enable the dynamic-bootp attribute.
Enable the dynamic-bootp attribute.
•![]() Enable the update-dns-for-bootp attribute.
Enable the update-dns-for-bootp attribute.
•![]() Enable the update-dns-for-bootp attribute.
Enable the update-dns-for-bootp attribute.
Moving or Decommissioning BOOTP Clients
When you move or decommission a BOOTP client, you can reuse its lease. To decommission a BOOTP client, you must remove its lease reservation from the scope and force its lease to be available.
Force the lease to be available in the local cluster web UI, or set scope name removeReservation and lease ipaddr force-available in the CLI.
Using Dynamic BOOTP
When you use dynamic BOOTP, there are additional restrictions placed on the address usage in scopes, because BOOTP clients are allocated IP addresses permanently and receive leases that never expire.
If you are using DHCP failover, when a server whose scope does not have the dynamic-bootp option enabled goes into PARTNER-DOWN state, it can allocate any available IP address from that scope, no matter whether it was initially available to the main or backup server. However, when the dynamic-bootp option is enabled, the main server and backup servers can only allocate their own addresses. Consequently scopes that enable the dynamic-bootp option require more addresses to support failover.
When using dynamic BOOTP:
1. ![]() Segregate dynamic BOOTP clients to a single scope. Disable DHCP clients from using that scope. In the local cluster web UI, under the BOOTP attributes for the scope, disable the dhcp attribute. In the CLI, use scope name disable dhcp.
Segregate dynamic BOOTP clients to a single scope. Disable DHCP clients from using that scope. In the local cluster web UI, under the BOOTP attributes for the scope, disable the dhcp attribute. In the CLI, use scope name disable dhcp.
2. ![]() If you are using DHCP failover, set the failover-dynamic-bootp-backup-percentage attribute for the DHCP server to allocate a greater percentage of addresses to the backup server for this scope. This percentage can be as much as 50 percent higher than a regular backup percentage.
If you are using DHCP failover, set the failover-dynamic-bootp-backup-percentage attribute for the DHCP server to allocate a greater percentage of addresses to the backup server for this scope. This percentage can be as much as 50 percent higher than a regular backup percentage.
BOOTP Relay
Any router that supports BOOTP relay usually has an address that points to the DHCP server. For example, if you are using a Cisco router, it uses the term IP helper-address, which contains an address for a specific machine. In this case, use this address to forward all BOOTP (and therefore DHCP) broadcast packets. Be sure that you configure this address on the router closest to your host.

Tip ![]() If your DHCP clients are not receiving addresses from the DHCP server, check the network configuration, particularly the router or relay agent configuration, to verify that your network devices are set up to point to your Cisco Network Registrar DHCP server address.
If your DHCP clients are not receiving addresses from the DHCP server, check the network configuration, particularly the router or relay agent configuration, to verify that your network devices are set up to point to your Cisco Network Registrar DHCP server address.
Defining Advanced Server Attributes
You can set advanced DHCP server attributes, including custom DHCP options.
See Also
Setting Advanced DHCP Server Attributes
Enabling BOOTP for Scopes
Moving or Decommissioning BOOTP Clients
Using Dynamic BOOTP
BOOTP Relay
Setting Advanced DHCP Server Attributes
Table 23-1 describes the advanced DHCP server attributes that you can set in the local cluster web UI and CLI.
|
|
|
|
|---|---|---|
max-dhcp-requests |
set/ |
Controls the number of buffers that the DHCP server allocates for receiving packets from DHCP clients and failover partners. If this setting is too large, a burst of DHCP activity can clog the server with requests that become stale before being processed. This results in an increasing processing load that can severely degrade performance as clients try to obtain a new lease, and affects the ability to handle bursts. A low buffer setting throttles requests and could affect server throughput. If the server runs out of buffers, packets are dropped. A good rule or thumb is to increase the buffers if you expect a high load (in a steady state or when experiencing frequent stress times) or you have a fast multiprocessor system. In a nonfailover deployment, the default setting (500) is sufficient. In a failover deployment, you can increase it to 1000 if the DHCP logs indicate a consistently high number of request buffers. You should then also modify the number of DHCP responses (see the max-dhcp-responses parameter) to four times the request buffers. When using LDAP client lookups, buffers should not exceed the LDAP lookup queue size defined by the total number of LDAP connections and the maximum number of requests allowed for each connection. Set the LDAP queue size to match the capacity of the LDAP server to service client lookups. If the following logs messages occur frequently and are not related to short term traffic spikes (such as after a power recovery), you may want to consider increasing the value of the attribute: 4493 DHCP ERROR "DHCP has used xx of its yy request buffers: the server is dropping a request." 4494 DHCP WARNING "DHCP has used xx of yy request packets. Requests will be ignored if no packet buffers are available." 5270 DHCP WARNING "DHCP has used xx of its yy request buffers: the server is congested -- will not keep the client last-transaction-time to within value but will keep it to within value seconds." Required. The default is 500. |
max-dhcp-responses |
set/ |
Controls the number of response buffers that the DHCP server allocates for responding to DHCP clients and performing failover communication between DHCP partners. In a non-failover deployment, the default setting of twice the number of request buffers is sufficient. In a failover deployment, you can increase this so that it is four times the number of request buffers. In general, increasing the number of response buffers is not harmful, while reducing it to below the previously recommended ratios might be harmful to server responsiveness. If the following logs messages occur frequently and are not related to short term traffic spikes (such as after a power recovery), you may want to consider increasing the value of the attribute: 4721 DHCP ERROR "DHCP has used all xx response packets. A request was dropped and they will continue to be dropped if no responses are available." 5289 DHCP WARNING "DHCP has used xx of yy response packets. Requests will be dropped if no responses are available." Required. The default is 1000. |
max-ping-packets |
set/ |
Controls the number of buffers that the server has available to initiate Ping requests to clients. If you enable the Ping address before offering it option at the scope level, packet buffers are used to send and receive ICMP messages. If you enable pinging, you should have enough ping packets allocated to handle the peak load of possible ping requests. The default is 500 ping packets. |
hardware-unicast |
enable/ |
Controls whether the DHCP server sends unicast rather than broadcast responses when a client indicates that it can accept a unicast. This feature is only available on Windows and Solaris platforms; other operating systems broadcast instead. The default is enabled. |
defer-lease-extensions |
enable/ |
Controls whether the DHCP server extends leases that are less than half expired. This is a performance tuning attribute that helps minimize the number of disk writes to the lease state database. The default is checked or true. This means that a client renewing a lease less than halfway through can get the remaining part of it only and not be extended. See the "Deferring Lease Extensions" section. |
last-transaction-time- |
set/ |
The default value of the last-transaction-time-granularity attribute has changed from 60 seconds to one week. This new default means that the client-last-transaction-time may not accurately reflect the last time the client communicated with the server. If your deployment depended on this attribute being updated whenever the client communicated with the server, you need to explicitly set the last-transaction-time-granularity attribute to a value appropriate for the deployment. The last-transaction-time-granularity attribute is effectively not used when you have disabled defer-lease-extensions. Therefore, if you have disabled defer-lease-extensions, this change in the default value does not impact you. When the server is heavily loaded and has run low on request or response buffers, the server temporarily sets the last-transaction-time-granularity value to one year to reduce its load. |
discover-queue-limit |
set/ |
Specifies the percentage limit of the request buffers that may be used for DHCPDISCOVER and SOLICIT client requests at any time. Once the configured percentage of the request buffers is exceeded, additional DHCPDISCOVER and SOLICIT client requests are discarded. By restricting the requests buffers that can be used by DHCPDISCOVER/SOLICIT requests, the server assures it has request buffers available to process DHCPREQUEST/REQUEST requests and this can greatly reduce the time needed to get clients online during spikes in activity, such as after a power recovery or CMTS reboot. If activity summary logging is enabled, the number of DHCPDISCOVER (DHCPv4) and SOLICIT (DHCPv6) packets dropped because of rate limiting is reported as DRL:number. The DHCPv4 statistics includes a new queue-limited-discovers-dropped counter and the DHCPv6 statistics includes a new queue-limited-solicits-dropped counter. These counters are used to monitor the packets that are dropped. |
Local Basic or Advanced Web UI
Step 1 ![]() From the DHCP menu, choose DHCP Server to open the Manage DHCP Server page.
From the DHCP menu, choose DHCP Server to open the Manage DHCP Server page.
Step 2 ![]() Click the name of the server.
Click the name of the server.
Step 3 ![]() Add or modify attributes on the Edit DHCP Server page.
Add or modify attributes on the Edit DHCP Server page.
Step 4 ![]() Click Modify Server to make the changes.
Click Modify Server to make the changes.
CLI Commands
Use dhcp show and dhcp get to show the current server parameters, then use dhcp set, dhcp unset, dhcp enable, and dhcp disable to change them (see Table 23-1).
Deferring Lease Extensions
Enabling the defer-lease-extensions attribute (which is its preset value) allows the DHCP server to optimize response to a sudden flood of DHCP traffic. An example of a network event that could result in such a traffic spike is a power failure at a cable internet service provider (ISP) data center that results in all of its cable modem termination systems (CMTS) rebooting at once. If this happens, the devices attached to the CMTSs produce a flood of DHCP traffic as they quickly come back online.
With the defer-lease-extensions attribute enabled, the DHCP server might defer extending the lease expiration time for a client's renewal request, which typically occurs before T1 (usually before halfway through the lease). Instead of giving the client the full configured lease time, the server grants the remaining time on the existing lease. Because the absolute lease expiration time does not change, the server can avoid database updates that result in a significantly higher server throughput. Another benefit is avoiding having to update the failover partner with an extended lease expiration time.
If a client is at or beyond T1 (typically halfway to its expiration), enabling or disabling this attribute has no effect, and the server always tries to extend the lease expiration time. However, failover and other protocol restrictions can prevent the server from extending the lease for the full configured time.

Note ![]() Deferring lease extensions significantly increases the server performance while remaining in compliance with the DHCP RFC, which stipulates that client binding information is committed to persistent storage when the lease changes.
Deferring lease extensions significantly increases the server performance while remaining in compliance with the DHCP RFC, which stipulates that client binding information is committed to persistent storage when the lease changes.
When deferring lease extensions, it is advisable to leave the policy attribute allow-lease-time-override to its default of disabled, or to change it to disabled if it is enabled.
These three specific situations are described from the server point of view:
•![]() Client retries—When the server gets behind, it is possible for a client to retransmit requests. The DHCP server does not maintain enough information to recognize these as retransmissions, and processes each to completion, granting a full lease duration again and updating the database. When the server is already behind, doing extra work worsens the situation. To prevent this, the DHCP server does not extend leases that are less than 30 seconds old, regardless of the state of the defer-lease-extensions attribute.
Client retries—When the server gets behind, it is possible for a client to retransmit requests. The DHCP server does not maintain enough information to recognize these as retransmissions, and processes each to completion, granting a full lease duration again and updating the database. When the server is already behind, doing extra work worsens the situation. To prevent this, the DHCP server does not extend leases that are less than 30 seconds old, regardless of the state of the defer-lease-extensions attribute.
•![]() Client reboots—The effective renew time for a client lease is really the minimum of the configured renew time and the time between client reboots. In many installations this may mean that clients get fresh leases one (in a typical enterprise) or two (in a typical cable network) times per day, even if the renew time is set for many days. Setting the defer-lease-extensions attribute can prevent these early renews from causing database traffic.
Client reboots—The effective renew time for a client lease is really the minimum of the configured renew time and the time between client reboots. In many installations this may mean that clients get fresh leases one (in a typical enterprise) or two (in a typical cable network) times per day, even if the renew time is set for many days. Setting the defer-lease-extensions attribute can prevent these early renews from causing database traffic.
•![]() Artificially short renewal times—Because there is no way for a DHCP server to proactively contact a DHCP client with regard to a lease, you might configure short lease times on the DHCP server to provide a means of doing network renumbering, address reallocation, or network reconfiguration (for example, a change in DNS server address) in a timely fashion. The goal is to allow you to do this without incurring unacceptable database update overhead.
Artificially short renewal times—Because there is no way for a DHCP server to proactively contact a DHCP client with regard to a lease, you might configure short lease times on the DHCP server to provide a means of doing network renumbering, address reallocation, or network reconfiguration (for example, a change in DNS server address) in a timely fashion. The goal is to allow you to do this without incurring unacceptable database update overhead.
As a complication, the server also keeps track of the time when it last heard from the client. Known as the last transaction time, sites sometimes use this information as a debugging aid. Maintaining this time robustly requires a write to the database on every client interaction. The last-transaction-time-granularity attribute is the one to set. (See the attribute description in Table 23-1.) Because it is primarily a debugging aid, the value need not be entirely accurate. Furthermore, because the in-memory copy is always accurate, you can use export leases -server to display the current information, even if the data is not up to date in the database.
Integrating Windows System Management Servers
You can have the DHCP server interact with the Microsoft System Management Server (SMS) so that SMS is current with DHCP changes. Normally, SMS pulls updated data through a DHCPDISCOVER request from the server about any new clients that joined the network. Cisco Network Registrar, however, pushes these updates to SMS when you use dhcp updateSms. Before you do, verify that:
•![]() SMS client installation and initialization step is complete.
SMS client installation and initialization step is complete.
•![]() Cisco Network Registrar Server Agent is set to run under a login account with sufficient privileges.
Cisco Network Registrar Server Agent is set to run under a login account with sufficient privileges.
•![]() SMS site ID is correct and matches that of the SMS server.
SMS site ID is correct and matches that of the SMS server.
These steps describe how to integrate Windows SMS into Cisco Network Registrar.
Step 1 ![]() Install the Microsoft BackOffice 4.5 Resource Kit on the same machine as the Cisco Network Registrar DHCP server. Follow the installation instructions and choose the default settings.
Install the Microsoft BackOffice 4.5 Resource Kit on the same machine as the Cisco Network Registrar DHCP server. Follow the installation instructions and choose the default settings.
Step 2 ![]() After the installation, modify the User Variable search path on the Environment tab of the System control panel to:
After the installation, modify the User Variable search path on the Environment tab of the System control panel to:
\program files\ResourceKit\SMS\diagnose
Step 3 ![]() If the DHCP and SMS servers are on different machines, install the SMS client on the same machine as the DHCP server. The SMS library has the necessary API calls to communicate with the SMS server. You must assign the correct site code from the DHCP server machine. In your Network Neighborhood, go to the path \\SMS-servername\SMSLOGON\x86.bin\00000409\smsman.exe.
If the DHCP and SMS servers are on different machines, install the SMS client on the same machine as the DHCP server. The SMS library has the necessary API calls to communicate with the SMS server. You must assign the correct site code from the DHCP server machine. In your Network Neighborhood, go to the path \\SMS-servername\SMSLOGON\x86.bin\00000409\smsman.exe.
Run the program and follow the instructions, using the default settings. The program creates two icons that you can use later from the control panel, marked SMS and Remote Control.
Step 4 ![]() Stop and then restart the Cisco Network Registrar server agent under a trusted domain account with sufficient privileges. Both the DHCP and SMS servers must be aware of this account. Use this short procedure:
Stop and then restart the Cisco Network Registrar server agent under a trusted domain account with sufficient privileges. Both the DHCP and SMS servers must be aware of this account. Use this short procedure:
a. ![]() Stop the local cluster server agent process.
Stop the local cluster server agent process.
b. ![]() Configure the account under which the Cisco Network Registrar services run. Create an account name that is a member of both the trusted SMS site server group and a member of the DHCP server administrator group, with the corresponding password.
Configure the account under which the Cisco Network Registrar services run. Create an account name that is a member of both the trusted SMS site server group and a member of the DHCP server administrator group, with the corresponding password.
c. ![]() Restart the local cluster server agent process.
Restart the local cluster server agent process.
Step 5 ![]() Use dhcp set sms-library-path (or the sms-library-path attribute under the Microsoft Systems Management Server category on the Edit DHCP Server page) to configure the DHCP server to push lease information to SMS. Include the full path to the SMSRsGen.dll. If you omit a value, the path defaults to the internal server default location of this file. For example:
Use dhcp set sms-library-path (or the sms-library-path attribute under the Microsoft Systems Management Server category on the Edit DHCP Server page) to configure the DHCP server to push lease information to SMS. Include the full path to the SMSRsGen.dll. If you omit a value, the path defaults to the internal server default location of this file. For example:
nrcmd> dhcp set sms-library-path /conf/dll
When you install the Microsoft BackOffice Resource Kit, the system path is not updated to reflect the location of the SMS data link library (DLL). Use one of these methods to configure this attribute:
a. ![]() Set the sms-library-path attribute to a relative path:
Set the sms-library-path attribute to a relative path:
•![]() First, modify the system PATH variable to append the path of the directory where the DLL is installed:
First, modify the system PATH variable to append the path of the directory where the DLL is installed:
sms-install-directory\diagnose
•![]() Then, set sms-library-path to the name of the DLL, such as smsrsgen.dll. You can also accept the system default by unsetting the attribute.
Then, set sms-library-path to the name of the DLL, such as smsrsgen.dll. You can also accept the system default by unsetting the attribute.
b. ![]() Set sms-library-path to an absolute path. If you do not want to change the system path, set this attribute to the absolute path of the DLL location:
Set sms-library-path to an absolute path. If you do not want to change the system path, set this attribute to the absolute path of the DLL location:
"\\Program Files\\Resource Kit\\sms\\diagnose\\smsrsgen.dll"
Step 6 ![]() Set the sms-network-discovery DNS attribute to 1 to turn SMS network discovery on.
Set the sms-network-discovery DNS attribute to 1 to turn SMS network discovery on.
If you use the default of 0, you disable SMS network discovery.
Step 7 ![]() Set the sms-site-code DHCP server attribute by entering the SMS site code from Step 3.
Set the sms-site-code DHCP server attribute by entering the SMS site code from Step 3.
The default string is empty, but for data discovery to be successful, you must provide the site code.
Step 8 ![]() Set the sms-lease-interval attribute to the SMS lease interval.
Set the sms-lease-interval attribute to the SMS lease interval.
The lease interval is the time between sending addresses to SMS, or how long, in milliseconds, the DHCP server should wait before pushing the next lease to the SMS server when you run server dhcp updateSms. Early versions of the SMSRsGen.dll file (SMS Version 2.0) did not allow SMS to reliably receive multiple updates within a one-second window (1000 ms); the default value, therefore, was set to 1.1 second (1100 ms). If you install a future version of the Microsoft BackOffice Resource Kit, which might contain an enhanced version of the SMSRsGen.dll file, then reduce this interval or set it to 0 to increase performance.
Step 9 ![]() Reload the DHCP server and check the dhcp_startup_log and/or name_dhcp_1_log file.
Reload the DHCP server and check the dhcp_startup_log and/or name_dhcp_1_log file.
Step 10 ![]() In the CLI, use server dhcp updateSms to initiate SMS processing. (This command can take an optional all keyword to send all leased addresses from the DHCP server to SMS. If you omit this keyword, the DHCP server sends only new leases activated since the last time the command ran.) Then, verify that both the DHCP and SMS logs indicate successful completion. Note that a server reload during SMS updating interrupts the process, but the process resumes (or restarts) after the server is back up.
In the CLI, use server dhcp updateSms to initiate SMS processing. (This command can take an optional all keyword to send all leased addresses from the DHCP server to SMS. If you omit this keyword, the DHCP server sends only new leases activated since the last time the command ran.) Then, verify that both the DHCP and SMS logs indicate successful completion. Note that a server reload during SMS updating interrupts the process, but the process resumes (or restarts) after the server is back up.
Using Extensions to Affect DHCP Server Behavior
Cisco Network Registrar provides the ability to alter and customize the operation of the DHCP server through extensions, programs that you can write in TCL or C/C++. Extensions interact with the server in two ways: by modifying request or response packets, and through environment variables stored in the environment dictionary (see Chapter 29, "Using Extension Points" for details).
For example, you might have an unusual routing hub that uses BOOTP configuration. This device issues a BOOTP request with an Ethernet hardware type (1) and MAC address in the chaddr field. It then sends out another BOOTP request with the same MAC address, but with a hardware type of Token Ring (6). The DHCP server normally distinguishes between a MAC address with hardware type 1 and one with type 6, and considers them to be different devices. In this case, you might want to write an extension that prevents the DHCP server from handing out two different addresses to the same device.
You can solve the problem of the two IP addresses by writing either of these extensions:
•![]() One that causes the DHCP server to drop the Token Ring (6) hardware type packet.
One that causes the DHCP server to drop the Token Ring (6) hardware type packet.
•![]() One that changes the Token Ring packet to an Internet packet and then switches it back again on exit. Although this extension would be more complex, the DHCP client could thereby use either return from the DHCP server.
One that changes the Token Ring packet to an Internet packet and then switches it back again on exit. Although this extension would be more complex, the DHCP client could thereby use either return from the DHCP server.
See Also
Writing Extensions
Preventing Chatty Clients by Using an Extension
Writing Extensions
You can write extensions in TCL or C/C++:
•![]() TCL—Makes it a bit easier and quicker to write an extension. If the extension is short, the interpreted nature of TCL does not have a serious effect on performance. When you write an extension in TCL, you are less likely to introduce a bug that can crash the server.
TCL—Makes it a bit easier and quicker to write an extension. If the extension is short, the interpreted nature of TCL does not have a serious effect on performance. When you write an extension in TCL, you are less likely to introduce a bug that can crash the server.
•![]() C/C++—Provides the maximum possible performance and flexibility, including communicating with external processes. However, the complexity of the C/C++ API is greater and the possibility of a bug in the extension crashing the server is more likely than with TCL.
C/C++—Provides the maximum possible performance and flexibility, including communicating with external processes. However, the complexity of the C/C++ API is greater and the possibility of a bug in the extension crashing the server is more likely than with TCL.
You create extensions at specific extension points. Extension points include three types of dictionaries—request, response, and environment. One or more of these dictionaries are available for each of the following extension points:
1. ![]() init-entry—Extension point that the DHCP server calls when it configures or unconfigures the extension. This occurs when starting, stopping, or reloading the server. This entry point has the same signature as the others for the extension. It is required for DHCPv6 processing. Dictionary: environment only.
init-entry—Extension point that the DHCP server calls when it configures or unconfigures the extension. This occurs when starting, stopping, or reloading the server. This entry point has the same signature as the others for the extension. It is required for DHCPv6 processing. Dictionary: environment only.
2. ![]() pre-packet-decode—First extension point that the DHCP server encounters when a request arrives, and calls it before decoding the packet. Dictionaries: request and environment.
pre-packet-decode—First extension point that the DHCP server encounters when a request arrives, and calls it before decoding the packet. Dictionaries: request and environment.
3. ![]() post-packet-decode—Rewrites the input packet. Dictionaries: request and environment.
post-packet-decode—Rewrites the input packet. Dictionaries: request and environment.
4. ![]() post-class-lookup—Evaluates the result of a client-class-lookup-id operation on the client-class. Dictionaries: request and environment.
post-class-lookup—Evaluates the result of a client-class-lookup-id operation on the client-class. Dictionaries: request and environment.
5. ![]() pre-client-lookup—Affects the client being looked up, possibly by preventing the lookup or supplying data that overrides the existing data. Dictionaries: request and environment.
pre-client-lookup—Affects the client being looked up, possibly by preventing the lookup or supplying data that overrides the existing data. Dictionaries: request and environment.
6. ![]() post-client-lookup—Reviews the operation of the client-class lookup process, such as examining the internal server data structures filled in from the client-class processing. You can also use it to change any data before the DHCP server does additional processing. Dictionaries: request and environment.
post-client-lookup—Reviews the operation of the client-class lookup process, such as examining the internal server data structures filled in from the client-class processing. You can also use it to change any data before the DHCP server does additional processing. Dictionaries: request and environment.
7. ![]() generate-lease—Generates and controls a DHCPv6 address or prefix. Dictionaries: request, response, and environment.
generate-lease—Generates and controls a DHCPv6 address or prefix. Dictionaries: request, response, and environment.
8. ![]() check-lease-acceptable—Changes the results of the lease acceptability test. Do this only with extreme care. Dictionaries: request, response, and environment.
check-lease-acceptable—Changes the results of the lease acceptability test. Do this only with extreme care. Dictionaries: request, response, and environment.
9. ![]() lease-state-change—Determines when the lease state changes this only with extreme care. Dictionaries: response and environment.
lease-state-change—Determines when the lease state changes this only with extreme care. Dictionaries: response and environment.
10. ![]() pre-packet-encode—Changes the data sent back to the DHCP client in the response, or change the address to which to send the DHCP response. Dictionaries: request, response, and environment.
pre-packet-encode—Changes the data sent back to the DHCP client in the response, or change the address to which to send the DHCP response. Dictionaries: request, response, and environment.
11. ![]() post-packet-encode—Allows the server to examine and alter the packet before it sends the packet to the client, or drops the packet. Dictionaries: request, response, and environment.
post-packet-encode—Allows the server to examine and alter the packet before it sends the packet to the client, or drops the packet. Dictionaries: request, response, and environment.
12. ![]() pre-dns-add-forward—Alters the name used for the DNS forward (A record) request. Dictionary: environment only.
pre-dns-add-forward—Alters the name used for the DNS forward (A record) request. Dictionary: environment only.
13. ![]() post-send-packet—Used after sending a packet for processing that you want to perform outside of the serious time constraints of the DHCP request-response cycle. Dictionaries: request, response, and environment.
post-send-packet—Used after sending a packet for processing that you want to perform outside of the serious time constraints of the DHCP request-response cycle. Dictionaries: request, response, and environment.
14. ![]() environment-destructor—Allows an extension to clean up any context that it might be holding. Dictionary: environment.
environment-destructor—Allows an extension to clean up any context that it might be holding. Dictionary: environment.
To extend the DHCP server, do the following:
Step 1 ![]() Write the extension in Tcl, C or C++ and install it in the server extensions directory, on:
Write the extension in Tcl, C or C++ and install it in the server extensions directory, on:
•![]() UNIX:
UNIX:
–![]() Tcl—/opt/nwreg2/extensions/DHCP/tcl
Tcl—/opt/nwreg2/extensions/DHCP/tcl
–![]() C or C++—/opt/nwreg2/extensions/DHCP/dex
C or C++—/opt/nwreg2/extensions/DHCP/dex
•![]() Windows:
Windows:
–![]() Tcl—\program files\Cisco Network Registrar\extensions\dhcp\tcl
Tcl—\program files\Cisco Network Registrar\extensions\dhcp\tcl
–![]() C or C++—\program files\Cisco Network Registrar\extensions\dhcp\dex
C or C++—\program files\Cisco Network Registrar\extensions\dhcp\dex
It is best to place these extensions in the appropriate directory for TCL or C/C++ extensions. Then, when configuring the filename, just enter the filename itself, without slash (/) or backslash (\).
If you want to place extensions in subdirectories, enter the filename with a path separator. These are different depending on the operating system on which your DHCP server is running.
Note ![]() When entering a filename that contains a backslash (\) character in Windows, you must enter it with a double-backslash (\\), because backslash (\) is an escape character in the CLI. For example, enter the filename debug\myextension.tcl as debug\\myextension.tcl.
When entering a filename that contains a backslash (\) character in Windows, you must enter it with a double-backslash (\\), because backslash (\) is an escape character in the CLI. For example, enter the filename debug\myextension.tcl as debug\\myextension.tcl.
Step 2 ![]() Use the List/Add DHCP Extensions page in the web UI (In the Advanced mode, choose Extensions from the DHCP menu to open the List/Add DHCP Extensions page) or the extension command in the CLI to configure the DHCP server to recognize this extension.
Use the List/Add DHCP Extensions page in the web UI (In the Advanced mode, choose Extensions from the DHCP menu to open the List/Add DHCP Extensions page) or the extension command in the CLI to configure the DHCP server to recognize this extension.
Step 3 ![]() Attach the configured extension to one or more DHCP extension points by using dhcp attachExtension.
Attach the configured extension to one or more DHCP extension points by using dhcp attachExtension.
Step 4 ![]() Reload the server.
Reload the server.
Preventing Chatty Clients by Using an Extension
One example of an effective use of an extension is to protect against clients flooding the server with unnecessary traffic. You can use the ChattyClientFilter extension to keep the server from having to do much of the work of processing these chatty client packets. If you have large numbers of clients in your network, you might want to consider implementing this extension.
The ChattyClientFilter extension is available in the /examples/dhcp/dex directory of the Cisco Network Registrar installation, and compiled and ready to use in /extensions/dhcp/dex/dexextension.so or /extensions/dhcp/dex/dexextension.dll. The extension monitors client requests, based on the MAC address, and disables the client if it generates more than a certain number of packets in a time interval. Disabling a client means that the server discards packets from it. However, the server does not ignore the client entirely, because it continues to monitor traffic from it. If the server detects that the client starts to generate fewer than a certain number of packets in a time interval, it reenables the client and begins to allow packets from it again.
Figure 23-1 Chatty Client Filter Flow
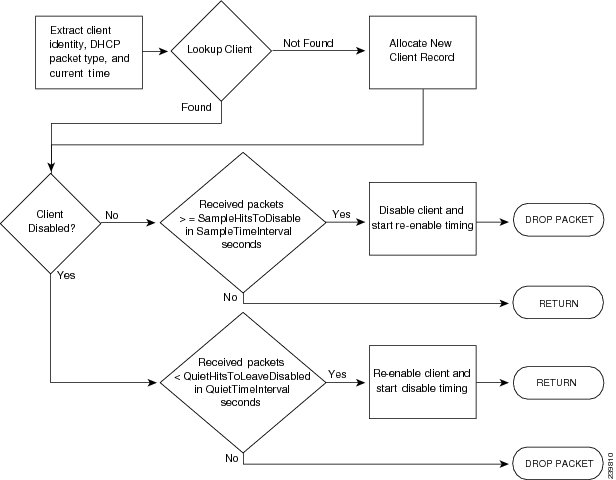
The criteria for disabling and reenabling are set through arguments to the ChattyClientFilter extension. By default, the server disables a client when it receives more than 15 packets within 30 seconds; the server reenables the client when it sends fewer than 5 packets within 10 seconds. Note that these defaults are conservative and do not protect against all situations. For example, the server does not disable a client that sends packets every three seconds. Even allowing for a few retransmissions, a client should never need to send more than a half dozen packets in a short interval.
If you suspect chatty clients, review the DHCP server logs to determine incoming rates, then set the arguments described in Table 23-2 in the ChattyClientFilter code appropriately.
Note ![]() The -h, -i, -l, and -q defaults are unlikely to be appropriate to most situations as these were designed to address a single type of misbehaving client. Using a longer interval and packet hit count for normal conditions will produce reasonable results. Values such as -i 120 -h 8 -q 120 -l 8 would allow a client 8 packets over a 120 second period. A normal DHCPDISCOVER/OFFER/REQUEST/ACK is only 2 packets from a client. That is, the proper use of the ChattyClientFilter requires tuning these values for your particular network conditions. Use of the logscan tool which is available from the Cisco Network Registrar download section on the Cisco website can help in analyzing client activity.
The -h, -i, -l, and -q defaults are unlikely to be appropriate to most situations as these were designed to address a single type of misbehaving client. Using a longer interval and packet hit count for normal conditions will produce reasonable results. Values such as -i 120 -h 8 -q 120 -l 8 would allow a client 8 packets over a 120 second period. A normal DHCPDISCOVER/OFFER/REQUEST/ACK is only 2 packets from a client. That is, the proper use of the ChattyClientFilter requires tuning these values for your particular network conditions. Use of the logscan tool which is available from the Cisco Network Registrar download section on the Cisco website can help in analyzing client activity.
Review the comments in the ChattyClientFilter.cpp file for details on setting the arguments and enabling the extension. In most cases, you would attach it to the post-packet-decode extension point (along with check-lease-acceptable if you use the -n argument).
A sample use for the ChattyClientFilter is to drop DHCPRELEASE packets sent from a DHCPv4 client to prevent the lease history database from growing out of bounds, which can be the case with certain router configurations.
This scenario uses the -d argument. The setup on a Solaris or Linux system might be:
nrcmd> extension dexChattyClientFilter create dex libdexextension.so
dexChattyClientFilter
init-entry=dexChattyClientFilterInitEntry
init-args="-d 2 120"
nrcmd> dhcp attachextension post-packet-decode dexChattyClientFilter
For Windows, replace libdexextension.so with dexextension.dll.
This setup results in the server dropping DHCPRELEASE packets if it receives more than two of these packets from the same client in a 120-second interval, and resuming DHCPRELEASEs processing when the client does not send a DHCPRELEASE for at least 120 seconds.
Tuning the DHCP Server
Other helpful hints in tuning your DHCP performance include:
•![]() Set the request (max-dhcp-requests) and response (max-dhcp-responses) buffers for optimal throughput. See Table 23-1 for details.
Set the request (max-dhcp-requests) and response (max-dhcp-responses) buffers for optimal throughput. See Table 23-1 for details.
•![]() Keep the defer-lease-extensions attribute enabled. This reduces writes to the database.
Keep the defer-lease-extensions attribute enabled. This reduces writes to the database.
•![]() Set the last-transaction-time-granularity attribute to at least 60 seconds, optimally a value greater than half your lease interval.
Set the last-transaction-time-granularity attribute to at least 60 seconds, optimally a value greater than half your lease interval.
•![]() Disable the allow-lease-time-override attribute for policies offering production leases.
Disable the allow-lease-time-override attribute for policies offering production leases.
•![]() Minimize your logging and debugging settings. If you require logging, use the log-settings attribute for the DHCP server with a controlled number of attributes, as described in Table 23-3.
Minimize your logging and debugging settings. If you require logging, use the log-settings attribute for the DHCP server with a controlled number of attributes, as described in Table 23-3.
•![]() Consider setting client caching (see the "Setting Client Caching Parameters" section on page 24-14).
Consider setting client caching (see the "Setting Client Caching Parameters" section on page 24-14).
•![]() Check the server statistics to aid in monitoring server performance (see the "Displaying Statistics" section on page 7-12).
Check the server statistics to aid in monitoring server performance (see the "Displaying Statistics" section on page 7-12).
•![]() Consider setting the scope allocation priority (see the "Configuring Multiple Scopes Using Allocation Priority" section on page 20-12).
Consider setting the scope allocation priority (see the "Configuring Multiple Scopes Using Allocation Priority" section on page 20-12).
•![]() If pinging hosts before offering addresses, consider adjusting the ping timeout period (see the "Pinging Hosts Before Offering Addresses" section on page 22-7).
If pinging hosts before offering addresses, consider adjusting the ping timeout period (see the "Pinging Hosts Before Offering Addresses" section on page 22-7).
•![]() To boost performance, consider limiting the number of selection tags.
To boost performance, consider limiting the number of selection tags.
•![]() If using Lightweight Directory Access Protocol (LDAP) servers, consider the performance issues described in the "Configuring Cisco Network Registrar to Use LDAP" section on page 24-19.
If using Lightweight Directory Access Protocol (LDAP) servers, consider the performance issues described in the "Configuring Cisco Network Registrar to Use LDAP" section on page 24-19.
•![]() If using DHCP failover, consider using the load balancing feature (see the "Setting Load Balancing" section on page 27-21).
If using DHCP failover, consider using the load balancing feature (see the "Setting Load Balancing" section on page 27-21).
Tip ![]() Be sure to follow any DHCP server attribute changes with a server reload.
Be sure to follow any DHCP server attribute changes with a server reload.
Configuring Virtual Private Networks and Subnet Allocation
This section describes how to configure the Cisco Network Registrar DHCP server to support virtual private networks (VPNs) and subnet allocation for on-demand address pools.
Configuring VPNs involves an adjustment to the usual DHCP host IP address designation. VPNs use private address spaces that might not be unique across the Internet. Because of this, Cisco Network Registrar supports IP addresses that are distinguished by a VPN identifier. Relay agents on routers must support this capability as well. The VPN identifier selects the VPN to which the client belongs. VPN for DHCP is currently only supported by Cisco IOS software, the newest versions of which can include VPN IDs in the relayed DHCP messages.
Subnet allocation is a way of leasing subnets to clients (usually routers or edge devices) so that they can, in turn, provide DHCP services. This can occur along with or instead of managing individual client addresses. Subnet allocation can vastly improve IP address provisioning, aggregation, characterization, and distribution by relying on the DHCP infrastructure to dynamically manage subnets. Subnet allocation through DHCP is currently only supported by Cisco IOS software, the newest versions of which incorporate the on-demand address pools feature.
See Also
Configuring Virtual Private Networks Using DHCP
Configuring DHCP Subnet Allocation
VPN and Subnet Allocation Tuning Parameters
Configuring Virtual Private Networks Using DHCP
VPNs that you create provide a filtering mechanism for:
•![]() Viewing the unified address space (see the "Viewing Address Space" section on page 9-3).
Viewing the unified address space (see the "Viewing Address Space" section on page 9-3).
•![]() Listing address blocks (see the "Adding Address Blocks" section on page 9-6).
Listing address blocks (see the "Adding Address Blocks" section on page 9-6).
•![]() Listing subnets (see the "Address Blocks and Subnets" section on page 9-4).
Listing subnets (see the "Address Blocks and Subnets" section on page 9-4).
•![]() Querying subnet utilization (see the "Generating Subnet Utilization History Reports" section on page 9-13).
Querying subnet utilization (see the "Generating Subnet Utilization History Reports" section on page 9-13).
•![]() Querying lease history (see the "Running IP Lease Histories" section on page 22-23).
Querying lease history (see the "Running IP Lease Histories" section on page 22-23).
If you do not configure a VPN, Cisco Network Registrar uses the global VPN of 0 on each scope.
To configure a VPN whereby a client can request IP addresses from a DHCP server using a relay agent, you must define the VPN and associate a scope with it. Specifically:
1. ![]() Ensure that the relay agents that handle DHCP VPN traffic are configured with a version of Cisco IOS software that supports the vpn-id suboption of the relay-agent-info option (82) in DHCP.
Ensure that the relay agents that handle DHCP VPN traffic are configured with a version of Cisco IOS software that supports the vpn-id suboption of the relay-agent-info option (82) in DHCP.
2. ![]() Coordinate with the Cisco IOS relay agent administrator that the VPN is identified either by a VPN ID or a VPN Routing and Forwarding instance (VRF) name.
Coordinate with the Cisco IOS relay agent administrator that the VPN is identified either by a VPN ID or a VPN Routing and Forwarding instance (VRF) name.
3. ![]() Create a scope for the VPN.
Create a scope for the VPN.
See Also
Typical Virtual Private Networks
Creating and Editing Virtual Private Networks
VPN Usage
Typical Virtual Private Networks
Figure 19-4 on page 19-5 shows a typical VPN scenario with DHCP client 1 as part of VPN blue and DHCP client 2 in VPN red. For example, both DHCP client 1 in VPN blue and client 2 in VPN red have the same private network address: 192.168.1.0/24. The DHCP relay agent has gateway addresses that are in the two VPNs as well as a global one (172.27.180.232). There are two failover DHCP servers, both of which know the relay agent through its external gateway address.
Here is the processing that takes place for the server to issue a VPN-supported address to a client:
1. ![]() DHCP client 1 broadcasts a DHCPDISCOVER packet, including its MAC address, hostname, and any requested DHCP options.
DHCP client 1 broadcasts a DHCPDISCOVER packet, including its MAC address, hostname, and any requested DHCP options.
2. ![]() DHCP relay agent at address 192.168.1.1 picks up the broadcast packet. It adds a relay-agent-info option (82) to the packet and includes the subnet-selection suboption that identifies 192.168.1.0 as the subnet. The packet also includes the vpn-id suboption that identifies the VPN as blue. Because the DHCP server cannot communicate directly with the requesting client, the server-id-override suboption contains the address of the relay agent as known by the client (192.168.1.1). The relay agent also includes in the packet its external gateway address (giaddr), 172.27.180.232.
DHCP relay agent at address 192.168.1.1 picks up the broadcast packet. It adds a relay-agent-info option (82) to the packet and includes the subnet-selection suboption that identifies 192.168.1.0 as the subnet. The packet also includes the vpn-id suboption that identifies the VPN as blue. Because the DHCP server cannot communicate directly with the requesting client, the server-id-override suboption contains the address of the relay agent as known by the client (192.168.1.1). The relay agent also includes in the packet its external gateway address (giaddr), 172.27.180.232.
3. ![]() The relay agent unicasts the DHCPDISCOVER packet to the configured DHCP server on its subnet.
The relay agent unicasts the DHCPDISCOVER packet to the configured DHCP server on its subnet.
4. ![]() DHCP server 1 receives the packet and uses the vpn-id and subnet-selection suboptions to allocate an IP address from the proper VPN address space. It finds the available address 192.168.1.37 in the subnet and VPN, and places it in the yiaddr field of the packet (the address offered to the client).
DHCP server 1 receives the packet and uses the vpn-id and subnet-selection suboptions to allocate an IP address from the proper VPN address space. It finds the available address 192.168.1.37 in the subnet and VPN, and places it in the yiaddr field of the packet (the address offered to the client).
5. ![]() The server unicasts a DHCPOFFER packet to the relay agent that is identified by the giaddr value.
The server unicasts a DHCPOFFER packet to the relay agent that is identified by the giaddr value.
6. ![]() The relay agent removes the relay-agent-info option and sends the packet to DHCP client 1.
The relay agent removes the relay-agent-info option and sends the packet to DHCP client 1.
7. ![]() DHCP client 1 broadcasts a DHCPREQUEST message requesting the same IP address that it was offered. The relay agent receives this broadcast message.
DHCP client 1 broadcasts a DHCPREQUEST message requesting the same IP address that it was offered. The relay agent receives this broadcast message.
8. ![]() The relay agent forwards the DHCPREQUEST packet to DHCP server 1, which replies with a unicast DHCPACK packet to the client.
The relay agent forwards the DHCPREQUEST packet to DHCP server 1, which replies with a unicast DHCPACK packet to the client.
9. ![]() For a lease renewal, the client unicasts a DHCPRENEW packet to the IP address found in the dhcp-server-identifier option of the DHCPACK message. This is 192.168.1.1, the address of the relay agent. The relay agent unicasts the packet to the DHCP server. The server does its normal renewal processing, without necessarily knowing whether it was the server that gave out the original address in the first place. The server replies in a unicast DHCPACK packet. The relay agent then forwards the DHCPACK packet to the client IP address identified by the ciaddr field value.
For a lease renewal, the client unicasts a DHCPRENEW packet to the IP address found in the dhcp-server-identifier option of the DHCPACK message. This is 192.168.1.1, the address of the relay agent. The relay agent unicasts the packet to the DHCP server. The server does its normal renewal processing, without necessarily knowing whether it was the server that gave out the original address in the first place. The server replies in a unicast DHCPACK packet. The relay agent then forwards the DHCPACK packet to the client IP address identified by the ciaddr field value.
If the server-id-override suboption of the relay-agent-info option (82) exists, the DHCP server uses its value to compare to that of the dhcp-server-identifier option in the reply packet. Any packet that the DHCP client unicasts then goes directly to the relay agent and not to the server (which may, in fact, be inaccessible from the client). Both partners in a failover environment can renew a lease if the packet includes the server-id-override suboption.
Creating and Editing Virtual Private Networks
To set up the VPN and its index:
Step 1 ![]() Coordinate with the Cisco IOS relay agent administrator that the VPNs are configured either by VPN ID or VRF name on the relay agent. This will determine how to identify the VPN in Cisco Network Registrar.
Coordinate with the Cisco IOS relay agent administrator that the VPNs are configured either by VPN ID or VRF name on the relay agent. This will determine how to identify the VPN in Cisco Network Registrar.
Step 2 ![]() Create a VPN to allow provisioning DHCP clients onto the VPN that is configured in the IOS switch or router.
Create a VPN to allow provisioning DHCP clients onto the VPN that is configured in the IOS switch or router.
Enter a VPN index, which can be any unique text string except the reserved words all or global. Its associated ID must also be unique. To add an index at the:
•![]() Local cluster (Advanced)—From the DHCP menu, choose VPNs to open the List/Add VPNs page. Give the VPN a numerical key identifier and a unique name in the cluster.
Local cluster (Advanced)—From the DHCP menu, choose VPNs to open the List/Add VPNs page. Give the VPN a numerical key identifier and a unique name in the cluster.
•![]() Regional cluster—Add the local cluster containing the VPN (click Clusters, then Cluster List). Then choose VPNs from the DHCP menu. This opens the List/Add VPNs page. You can create the VPN on this page or pull the VPN from the local clusters:
Regional cluster—Add the local cluster containing the VPN (click Clusters, then Cluster List). Then choose VPNs from the DHCP menu. This opens the List/Add VPNs page. You can create the VPN on this page or pull the VPN from the local clusters:
–![]() If creating the VPN, give it a numerical key identifier and a unique name.
If creating the VPN, give it a numerical key identifier and a unique name.
–![]() If pulling the VPN from the local clusters, click Pull Replica VPNs on the List/Add VPNs page, then pull a specific VPN or all the VPNs from the selected cluster.
If pulling the VPN from the local clusters, click Pull Replica VPNs on the List/Add VPNs page, then pull a specific VPN or all the VPNs from the selected cluster.
You can also push VPNs to the clusters by clicking Push VPN or Push All VPNs on the List/Add VPNs page. Then choose the synchronization mode and the clusters to which to push the VPNs on the Push VPN Data to Local Clusters page.
•![]() In the CLI—Use vpn name create key. For example:
In the CLI—Use vpn name create key. For example:
nrcmd> vpn blue create 99
Step 3 ![]() Specify the appropriate VPN identifier, either by VPN ID or VRF name. It is rarely both.
Specify the appropriate VPN identifier, either by VPN ID or VRF name. It is rarely both.
•![]() If you use a VPN ID, set the vpn-id attribute value for the VPN. The value is usually in hexadecimal, in the form oui:index, per IETF RFC 2685. It consists of a three-octet VPN Organizationally Unique Identifier (OUI) that corresponds to the VPN owner or ISP, followed by a colon. It is then followed by a four-octet index number of the VPN itself. Add the VPN ID value to the List/Add VPNs page. In the CLI, set the vpn-id attribute. For example:
If you use a VPN ID, set the vpn-id attribute value for the VPN. The value is usually in hexadecimal, in the form oui:index, per IETF RFC 2685. It consists of a three-octet VPN Organizationally Unique Identifier (OUI) that corresponds to the VPN owner or ISP, followed by a colon. It is then followed by a four-octet index number of the VPN itself. Add the VPN ID value to the List/Add VPNs page. In the CLI, set the vpn-id attribute. For example:
nrcmd> vpn blue set vpn-id=a1:3f6c
•![]() If you use a VPN Routing and Forwarding (VRF) instance name, set the vrf-name attribute value for the VPN. Cisco routers frequently use VRF names. Add the VRF Name value to the List/Add VPNs page. In the CLI, set the vrf-name attribute. For example:
If you use a VPN Routing and Forwarding (VRF) instance name, set the vrf-name attribute value for the VPN. Cisco routers frequently use VRF names. Add the VRF Name value to the List/Add VPNs page. In the CLI, set the vrf-name attribute. For example:
nrcmd> vpn blue set vrf-name=framus
Step 4 ![]() Add a description for the VPN (optional).
Add a description for the VPN (optional).
Step 5 ![]() Click Add VPN. You can edit the VPN to change the values on the Edit VPN page.
Click Add VPN. You can edit the VPN to change the values on the Edit VPN page.
Step 6 ![]() Create a scope for the VPN.
Create a scope for the VPN.
You must keep the VPN name and scope name as similar as possible for identification purposes.
a. ![]() In the web UI, click DHCP, then Scopes to open the List/Add DHCP Scopes page.
In the web UI, click DHCP, then Scopes to open the List/Add DHCP Scopes page.
b. ![]() Choose the VPN name from the Select VPN drop-down list and create a scope. You cannot change the VPN once you set it at the time of creation of the scope.
Choose the VPN name from the Select VPN drop-down list and create a scope. You cannot change the VPN once you set it at the time of creation of the scope.
In the CLI, identify to which VPN the scope belongs in one of three ways:
•![]() Its VPN name, through the vpn attribute (which applies the VPN ID to the scope).
Its VPN name, through the vpn attribute (which applies the VPN ID to the scope).
•![]() The VPN ID itself, through the vpn-id attribute.
The VPN ID itself, through the vpn-id attribute.
•![]() The current session VPN name, by omitting the VPN or its ID on the command line.
The current session VPN name, by omitting the VPN or its ID on the command line.
You set the default VPN for the current session using session set current-vpn. You can then set the usual address range and necessary option properties for the scope. For example:
nrcmd> scope blue-1921681 create 192.168.1.0 255.255.255.0 vpn=blue
Or:
nrcmd> scope blue-1921681 create 192.168.1.0 255.255.255.0 vpn-id=99
Or:
nrcmd> session set current-vpn=blue
nrcmd> scope blue-1921681 create 192.168.1.0 255.255.255.0
Then:
nrcmd> scope blue-1921681 addRange 192.168.1.101 192.168.1.200
nrcmd> scope-policy blue-1921681 setOption routers 192.168.1.1
If you are in the staged dhcp edit mode, reload the DHCP server after you create all the VPNs and scopes.
VPN Usage
The VPN name is used to qualify many DHCP objects in Cisco Network Registrar, such as IP addresses (leases), scopes, and subnets. For example, lease names can have this syntax:
vpn/ipaddress
For example, red/192.168.40.0
A VPN can be any unique text string except the reserved words global and all. You can use global and all when you lease data. The global VPN maps to the [none] VPN; the all VPN maps to both the specific VPN and the [none] VPN.
In the CLI, if you omit the VPN or its ID in defining an object, the VPN defaults to the value set by session set current-vpn. In the web UI, if the current VPN is not defined, it defaults to the [none] VPN, which includes all addresses outside of any defined VPNs.
These objects have associated VPN properties:
•![]() Address blocks—Define the VPN for an address block. Click Address Space, then Address Blocks. On the List/Add Address Blocks page, choose the VPN from the Select VPN drop-down list. In the CLI, use the dhcp-address-block creation and attribute setting commands. For example:
Address blocks—Define the VPN for an address block. Click Address Space, then Address Blocks. On the List/Add Address Blocks page, choose the VPN from the Select VPN drop-down list. In the CLI, use the dhcp-address-block creation and attribute setting commands. For example:
nrcmd> dhcp-address-block red create 192.168.50.0/24
nrcmd> dhcp-address-block red set vpn=blue
nrcmd> dhcp-address-block red set vpn-id=99
•![]() Clients and client-classes—In some cases it is best to provision a VPN inside of Cisco Network Registrar instead of externally, where it might have to be configured for every Cisco IOS device. To support this capability, you can specify a VPN for a client or client-class. Two attributes are provided:
Clients and client-classes—In some cases it is best to provision a VPN inside of Cisco Network Registrar instead of externally, where it might have to be configured for every Cisco IOS device. To support this capability, you can specify a VPN for a client or client-class. Two attributes are provided:
–![]() default-vpn—VPN that the packet gets if it does not already have a vpn-id or vrf-name value in the incoming packet. You can use the attribute with clients and client-classes.
default-vpn—VPN that the packet gets if it does not already have a vpn-id or vrf-name value in the incoming packet. You can use the attribute with clients and client-classes.
–![]() override-vpn—VPN the packet gets no matter what is provided for a vpn-id or vrf-name value in the incoming packet. You can use the attribute with clients and client-classes. Note that if you specify an override VPN on the client-class, and a default VPN for the client, the override VPN on the client-class takes precedence over the default VPN on the client.
override-vpn—VPN the packet gets no matter what is provided for a vpn-id or vrf-name value in the incoming packet. You can use the attribute with clients and client-classes. Note that if you specify an override VPN on the client-class, and a default VPN for the client, the override VPN on the client-class takes precedence over the default VPN on the client.
At the local cluster—Click DHCP, then Client-Classes. Create or edit a client-class and enter the default-vpn and override-vpn attribute values.
At the regional cluster—Click DHCP Configuration, then Client-Classes. Create or pull, and then edit a client-class to enter the default-vpn and override-vpn attribute values.
In the CLI—Use the client-class creation and attribute setting commands. For example:
nrcmd> client 1,6,00:d0:ba:d3:bd:3b set default-vpn=blue
nrcmd> client-class CableModem set override-vpn=blue
In a cable modem deployment, for example, you can use the override-vpn attribute to provision the cable modems. The client-class would determine the scope for the cable modem, and the scope would determine the VPN for the uBR. User traffic through the cable modem would then have the vpn-id suboption set and use the specific VPN. The override-vpn value also overrides any default-vpn set for the client.
•![]() Leases—List leases, show a lease, or get lease attributes.
Leases—List leases, show a lease, or get lease attributes.
In the CLI—To import leases, use import leases filename. Each lease entry in the file can include the VPN at the end of the line. If it is missing, Cisco Network Registrar assigns the [none] VPN. (See also the "Importing and Exporting Lease Data" section on page 22-5.)
nrcmd> import leases leaseimport.txt
To export the address or lease data to include the VPN, use export addresses with the vpn attribute, or export leases with the -vpn option. The VPN value can be the reserved word global or all:
–![]() Global—Any addresses outside the defined VPNs (the [none] VPN).
Global—Any addresses outside the defined VPNs (the [none] VPN).
–![]() All—All VPNs, including the [none] VPN.
All—All VPNs, including the [none] VPN.
If you omit the VPN, the export uses the current VPN as set by session set current-vpn. If the current VPN is not set, the server uses the [none] VPN.
nrcmd> export addresses file=addrexport.txt vpn=red
nrcmd> export leases -server -vpn red leaseexport.txt
•![]() Scopes—Scopes can include the VPN name or its ID, as described in the "Creating and Editing Virtual Private Networks" section.
Scopes—Scopes can include the VPN name or its ID, as described in the "Creating and Editing Virtual Private Networks" section.
Note ![]() You cannot change the VPN once you set it at the time of creation of the scope.
You cannot change the VPN once you set it at the time of creation of the scope.
•![]() Subnets—Listing subnets, showing a subnet, or getting the vpn or vpn-id attribute for a subnet shows the VPN. See the "Configuring DHCP Subnet Allocation" section.
Subnets—Listing subnets, showing a subnet, or getting the vpn or vpn-id attribute for a subnet shows the VPN. See the "Configuring DHCP Subnet Allocation" section.
•![]() DHCP server—If the vpn-communication attribute is enabled (which it is by default), the DHCP server can communicate with DHCP clients that are on a different VPN from that of the DHCP server by using an enhanced DHCP relay agent capability. This capability is indicated by the server-id-override suboption in the relay agent information option (82).
DHCP server—If the vpn-communication attribute is enabled (which it is by default), the DHCP server can communicate with DHCP clients that are on a different VPN from that of the DHCP server by using an enhanced DHCP relay agent capability. This capability is indicated by the server-id-override suboption in the relay agent information option (82).
Configuring DHCP Subnet Allocation
The following section provides an example of setting up subnet allocation using the DHCP server. Figure 19-5 on page 19-6 shows a sample subnet allocation configuration with subnets assigned to provisioning devices, along with the conventional DHCP client/server configuration.
Before allocating subnets, the DHCP server first determines what VPN the client is on, in the following order:
1. ![]() The server looks for incoming VPN options and uses the value for the VPN.
The server looks for incoming VPN options and uses the value for the VPN.
2. ![]() If no VPN options are found, the server uses the relay agent suboption value, then combines the VPN with the subnet address to form the unique identifier.
If no VPN options are found, the server uses the relay agent suboption value, then combines the VPN with the subnet address to form the unique identifier.
3. ![]() If no relay agent suboption is found, the server looks for client-class information (selection tags).
If no relay agent suboption is found, the server looks for client-class information (selection tags).
To configure DHCP subnet allocation:
Step 1 ![]() Create a DHCP address block for a subnet, set the initial subnet mask and its increment, and set other subnet allocation request attributes. Also, associate a policy or define an embedded policy.
Create a DHCP address block for a subnet, set the initial subnet mask and its increment, and set other subnet allocation request attributes. Also, associate a policy or define an embedded policy.
•![]() If you use VPNs, you can specify a vpn or vpn-id attribute (see the "Configuring Virtual Private Networks Using DHCP" section).
If you use VPNs, you can specify a vpn or vpn-id attribute (see the "Configuring Virtual Private Networks Using DHCP" section).
Note ![]() Unsetting the VPN ID in the CLI reverts the value to the current session VPN.
Unsetting the VPN ID in the CLI reverts the value to the current session VPN.
•![]() The server uses the presence of the subnet-alloc DHCP option (220) in the request packet to determine that the packet is a subnet allocation request. You can configure the server to use the subnet-name suboption (3) as a selection tag if you set the addr-blocks-use-selection-tags attribute for the server or VPN.
The server uses the presence of the subnet-alloc DHCP option (220) in the request packet to determine that the packet is a subnet allocation request. You can configure the server to use the subnet-name suboption (3) as a selection tag if you set the addr-blocks-use-selection-tags attribute for the server or VPN.
•![]() You can optionally set a default selection tag by setting the addr-blocks-default-selection-tags attribute for the DHCP server or VPN object. This identifies one or more subnets from which to allocate the addresses. If the relay agent sends a VPN string (via a VPN option or relay agent suboption), associated with a subnet, any address block with that string as one of its addr-blocks-default-selection-tags values uses that subnet.
You can optionally set a default selection tag by setting the addr-blocks-default-selection-tags attribute for the DHCP server or VPN object. This identifies one or more subnets from which to allocate the addresses. If the relay agent sends a VPN string (via a VPN option or relay agent suboption), associated with a subnet, any address block with that string as one of its addr-blocks-default-selection-tags values uses that subnet.
•![]() The default behavior on the server and for VPNs is that the DHCP server tries to allocate subnets to clients using address blocks that the clients already used. Disabling the addr-blocks-use-client-affinity attribute causes the server to supply subnets from any suitable address block, based on other selection data in the clients' messages.
The default behavior on the server and for VPNs is that the DHCP server tries to allocate subnets to clients using address blocks that the clients already used. Disabling the addr-blocks-use-client-affinity attribute causes the server to supply subnets from any suitable address block, based on other selection data in the clients' messages.
•![]() If you want to support configurations of multiple address blocks on a single LAN segment (analogous to using primary and secondary scopes), add a segment-name attribute string value to the DHCP address block. When the relay agent sends a single subnet selection address, it selects address blocks tagged with that segment-name string value. However, you must also explicitly enable the LAN segment capability (addr-blocks-use-lan-segments) at the server or VPN level.
If you want to support configurations of multiple address blocks on a single LAN segment (analogous to using primary and secondary scopes), add a segment-name attribute string value to the DHCP address block. When the relay agent sends a single subnet selection address, it selects address blocks tagged with that segment-name string value. However, you must also explicitly enable the LAN segment capability (addr-blocks-use-lan-segments) at the server or VPN level.
•![]() Instead of associating a policy, you can set properties for the address block embedded policy. As in embedded policies for clients, client-classes, and scopes, you can enable, disable, set, unset, get, and show attributes for an address block policy. You can also set, unset, get, and list any DHCP options for it, as well as set, unset, and list vendor options. Note that deleting an address block embedded policy unsets all the embedded policy properties.
Instead of associating a policy, you can set properties for the address block embedded policy. As in embedded policies for clients, client-classes, and scopes, you can enable, disable, set, unset, get, and show attributes for an address block policy. You can also set, unset, get, and list any DHCP options for it, as well as set, unset, and list vendor options. Note that deleting an address block embedded policy unsets all the embedded policy properties.
Step 2 ![]() Note that the server allocates subnets based on the relay agent request. If not requested, the default subnet size is a 28-bit address mask. You can change this default, if necessary, by setting the default-subnet-size attribute for the DHCP address block.
Note that the server allocates subnets based on the relay agent request. If not requested, the default subnet size is a 28-bit address mask. You can change this default, if necessary, by setting the default-subnet-size attribute for the DHCP address block.
For example:
nrcmd> dhcp-address-block red set default-subnet-size=25
Step 3 ![]() You can control any of the subnets the DHCP server creates from the address blocks. Identify the subnet in the form vpn-name/netipaddress/mask, with the vpn-name optional. Subnet control includes activating and deactivating the subnet as you would a lease. Likewise, you can force a subnet to be available, with the condition that before you do so, that you check that the clients assigned the subnet are no longer using it. First, show any subnets created.
You can control any of the subnets the DHCP server creates from the address blocks. Identify the subnet in the form vpn-name/netipaddress/mask, with the vpn-name optional. Subnet control includes activating and deactivating the subnet as you would a lease. Likewise, you can force a subnet to be available, with the condition that before you do so, that you check that the clients assigned the subnet are no longer using it. First, show any subnets created.
Step 4 ![]() Reload the DHCP server.
Reload the DHCP server.
VPN and Subnet Allocation Tuning Parameters
Consider these tuning parameters for VPNs and on-demand address pools.
•![]() Keep orphaned leases that have nonexistent VPNs—Cisco Network Registrar usually maintains leases that do not have an associated VPN in the Cisco Network Registrar state database. You can change this by enabling the DHCP attribute delete-orphaned-leases. The server maintains a lease state database that associates clients with leases. If a scope modification renders the existing leases invalid, the lease database then has orphaned lease entries. These are typically not removed even after the lease expires, because the server tries to use this data in the future to reassociate a client with a lease. One downside to this is that the lease database may consume excessive disk space. When you enable the delete-orphaned-leases attribute, such lease database entries are removed during the next server reload. However, be cautious when enabling this attribute, because rendering leases invalid can result in clients using leases that the server believes to be free. This can compromise network stability.
Keep orphaned leases that have nonexistent VPNs—Cisco Network Registrar usually maintains leases that do not have an associated VPN in the Cisco Network Registrar state database. You can change this by enabling the DHCP attribute delete-orphaned-leases. The server maintains a lease state database that associates clients with leases. If a scope modification renders the existing leases invalid, the lease database then has orphaned lease entries. These are typically not removed even after the lease expires, because the server tries to use this data in the future to reassociate a client with a lease. One downside to this is that the lease database may consume excessive disk space. When you enable the delete-orphaned-leases attribute, such lease database entries are removed during the next server reload. However, be cautious when enabling this attribute, because rendering leases invalid can result in clients using leases that the server believes to be free. This can compromise network stability.
•![]() Keep orphaned subnets that have nonexistent VPNs or address blocks—This is the default behavior, although you can change it by enabling the DHCP attribute dhcp enable delete-orphaned-subnets. As the DHCP server starts up, it reads its database of subnets and tries to locate the parent VPN and address block of each subnet. With the attribute enabled, if a subnet refers to a VPN that is no longer configured in the server, or if the server cannot locate a parent address block that contains the subnet, the server permanently deletes the subnet from the state database.
Keep orphaned subnets that have nonexistent VPNs or address blocks—This is the default behavior, although you can change it by enabling the DHCP attribute dhcp enable delete-orphaned-subnets. As the DHCP server starts up, it reads its database of subnets and tries to locate the parent VPN and address block of each subnet. With the attribute enabled, if a subnet refers to a VPN that is no longer configured in the server, or if the server cannot locate a parent address block that contains the subnet, the server permanently deletes the subnet from the state database.
•![]() Keep the VPN communication open—This is the default behavior, although you can change it by disabling the DHCP attribute vpn-communication. The server can communicate with clients that reside on a different VPN from that of the server by using an enhanced DHCP relay agent capability. This is signaled by the appearance of the vpn-id suboption of the relay-agent-info option (82). You can disable the vpn-communication attribute if the server is not expected to communicate with clients on a different VPN than the server. The motivation is typically to enhance network security by preventing unauthorized DHCP client access.
Keep the VPN communication open—This is the default behavior, although you can change it by disabling the DHCP attribute vpn-communication. The server can communicate with clients that reside on a different VPN from that of the server by using an enhanced DHCP relay agent capability. This is signaled by the appearance of the vpn-id suboption of the relay-agent-info option (82). You can disable the vpn-communication attribute if the server is not expected to communicate with clients on a different VPN than the server. The motivation is typically to enhance network security by preventing unauthorized DHCP client access.
Setting DHCP Forwarding
The Cisco Network Registrar DHCP server supports forwarding DHCP packets to another DHCP server on a per-client basis. For example, you might want to redirect address requests from certain clients, with specific MAC address prefixes, to another DHCP server. This can be useful and important in situations where the server being forwarded to is not one that you manage. This occurs in environments where multiple service providers supply DHCP services for clients on the same virtual LAN.
Enabling DHCP forwarding requires implementing an extension script. The DHCP server intercepts the specified clients and calls its forwarding code, which checks the specified list of forwarded server addresses. It then forwards the requests rather than processing them itself. You attach and detach extensions to and from the DHCP server by using dhcp attachExtension and dhcp detachExtension.
The DHCP forwarding feature works like this:
1. ![]() When DHCP is initialized, the server opens a UDP socket, which it uses to send forwarded packets. To support servers with multiple IP addresses, the socket address pair consists of INADDR_ANY and any port number. This enables clients to use any one of the server IP addresses.
When DHCP is initialized, the server opens a UDP socket, which it uses to send forwarded packets. To support servers with multiple IP addresses, the socket address pair consists of INADDR_ANY and any port number. This enables clients to use any one of the server IP addresses.
2. ![]() When the DHCP server receives a request from a client, it processes these extension point scripts:
When the DHCP server receives a request from a client, it processes these extension point scripts:
–![]() post-packet-decode
post-packet-decode
–![]() pre-client-lookup
pre-client-lookup
–![]() post-client-lookup
post-client-lookup
As the DHCP server processes these scripts, it checks the environment dictionary for this string:
cnr-forward-dhcp-request
3. ![]() When it finds that string and it has the value true (enabled), the server calls its forwarding code.
When it finds that string and it has the value true (enabled), the server calls its forwarding code.
4. ![]() The forwarding code checks the environment dictionary for a string with this key:
The forwarding code checks the environment dictionary for a string with this key:
cnr-request-forward-address-list
It expects a list of comma-separated IP addresses with an optional colon-delimited port number, as in this example:
192.168.168.15:1025,192.168.169.20:1027
By default, the server forwards to server-port for DHCPv4 and v6-server-port for DHCPv6. It sends a copy of the entire client request to each IP address and port in turn. If any element in the list is invalid, the server stops trying to parse the list.
5. ![]() After the forwarding code returns, the server stops processing the request. In the post-client-lookup extension point script, however, this action might create an optional log message with client-entry details.
After the forwarding code returns, the server stops processing the request. In the post-client-lookup extension point script, however, this action might create an optional log message with client-entry details.
The following example of a portion of a TCL extension script tells the DHCP server to forward a request to another server based on the information in the request. You can use such a script if there are multiple device provisioning systems in the same environment. In this case, you would run the extension script on the DHCP server to which routers forward broadcast requests. The script would determine which (if any) other server or servers should handle the request, and tell the original server to forward the request.
The sample script uses a static mapping of MAC address prefix to send modems from a specific vendor to a specific system:
proc postPktDecode {req resp env} {
set mac [$req get chaddr]
set addrs ""
;# Very simple, static classifier that forwards all requests from devices
;# with a vendor-id of 01:0c:10 to the DHCP servers at 10.1.2.3 and 10.2.2.3:
switch -glob -- $mac {
01:0c:10* {
set addrs "10.1.2.3,10.2.2.3"
}
}
;# If we decide to forward the packet, the $addrs var will have the IP addresses
;# where to forward the packet:
if {$addrs != ""} {
;# Tell the DHCP server to forward the packet...
$env put cnr-forward-dhcp-request true
;# ...and where to forward it:
$env put cnr-request-forward-address-list $addrs
;# No more processing is required.
return
}
}
A more flexible script could use a per-client configuration object, such as the Cisco Network Registrar client entry, to indicate which DHCP server should get the request.
 Feedback