Using the Highly Available CVIM Monitor

This chapter contains the following topics:

Overview of Highly Available Cisco VIM Monitor

From Cisco VIM 3.4.1, you can monitor CVIM pods either:

  • Individually using the local CVIM Monitor (CVIM-MON)

    Or

  • Centrally using the new HA CVIM Monitor (HA CVIM-MON)

The local CVIM-MON (introduced in CVIM 3.0) provides pod-level monitoring based on a Prometheus stack that is hosted on the pod management node. This local solution supports the largest supported CVIM pod size (128 nodes).

Local CVIM-MON has the following limitations:

  • Not highly available as a downtime of the management node stops all metric collection in the pod.

  • Multi-site monitoring of large deployments with a large number of sites (dozens or hundreds of sites) is difficult as the pod-level time series database (TSDB) is isolated.

  • Very small sites with severely limited HW resources (edge cloud) cannot afford the resources to run a dedicated Prometheus stack per site. There is also operational complexity to manage a very large number of Prometheus stacks.

HA CVIM-MON addresses the above issues and has the following features:

  • Integrated and highly available monitoring of multiple CVIM pods.

  • Centralized TSDB, alarm and web-based GUI dashboards.

  • Scales to several hundred pods and thousands of nodes.

  • Provides a longer retention time for collected metrics (months instead of 15 days for the local CVIM-MON)

  • Preserves a low sampling interval (1 minute for largest deployments).

  • Monitor pods of any size including very small pods (edge deployments) and individual bare metal servers. Monitored pods or servers are hierarchically grouped into metros and metros in regions.

A single HA CVIM-MON stack or two independent CVIM-MON stacks (for disaster recovery) can monitor the same set of monitored pods, or metros, or regions that form a monitoring domain.

HA CVIM-MON supports and requires a limited set of hardware configurations. You can install HA CVIM-MON on bare metal using a fully automated installer and by updating the setup_data.yaml configuration file.

Hardware Requirements for HA CVIM MON

HA CVIM-MON is available for Cisco UCS C series servers or Quanta servers with:

  • One server used as a management node

  • Three or more servers to form a cluster managed by Kubernetes

To achieve the required network throughput, you need one of the following:

  • Each UCS server requires two Intel X710 cards

  • Each Quanta server requires one Intel XXV 710 card

Networking Layout for HA CVIM-MON

Public Network

The public network (br_api) interfaces with:

  • External applications using HA CVIM-MON such as an OSS/BSS system querying the TSDB or browsers connecting to the HA CVIM-MON GUI

  • Managed Cisco VIM pods (for metrics collection)

  • Managed servers

  • HA CVIM-MON administrators (ssh)

This public network is implemented by the br_api interface and provides external access to the following services:

  • Kubernetes infrastructure administrator services

  • Kubernetes cluster nodes (ssh)

  • Grafana, Prometheus and Alertmanager HTTP services

The public network segment needs one VLAN and at least five IPv4 or IPv6 addresses in an externally accessible subnet:

  • One IP address for the management node

  • One IP address for each of the cluster nodes

  • One IP address for external_lb_vip for accessing the HA CVIM-MON services

Management and Provisioning Segment

The management segment (br_mgmt) needs one separate VLAN and one subnet with an address pool large enough to accommodate all the current and future servers planned for the cluster for initial provisioning (PXE boot Linux) and for all Kubernetes internal communication. This VLAN and subnet can be local to CVIM-MON for UCS C-Series and Quanta deployments. All cluster nodes need an IP address from this subnet. The BMC or CIMC network must be accessible through the public network.

Network Topologies for HA CVIM-MON

UCS C-Series Network Topology

UCS-C based servers use Intel X710 NIC (4x10G, two NICs for each cluster node, one NIC for the management node). Teaming is used for the br_api and br_mgmt links with dual N9K TORs.

The management node saves one Intel X710 NIC by using X710 for both br_mgmt links and LOM ports for the br_api links.

Quanta Network Topology

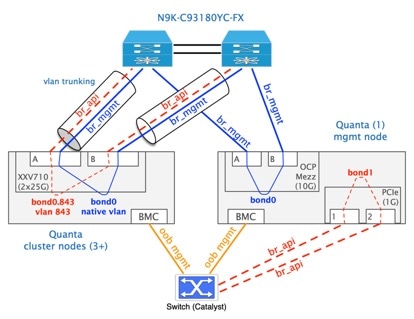
The cluster nodes connect to the ToR switches from the Intel XXV710 card ports as shown below. The br_api and br_mgmt interfaces are mapped on two different VLANs sharing the same physical links that are connected to the dual N9K TORs using VLAN trunking.

The management node uses the OCP Mezz NIC for br_mgmt (2x10G on vlan 843) and the PCIe NIC for br_api (2x1G on native vlan). The two br-api links of the management node are wired to the OOB switch.

Overview of HA CVIM-MON Architecture

The purpose of the cluster nodes is to run the functions of Kubernetes master and worker nodes.

The minimum configuration runs with only three master nodes. In this configuration, the three master nodes host the Kubernetes control plane components and the application containers that form the HA CVIM-MON function. You can extend this configuration with one or more worker nodes based on computational and storage requirements. Worker nodes host only application containers.

PortWorx storage and data management platform forms the persistent and highly available storage, and takes care of replicating the storage blocks across all cluster nodes and is transparent to the applications.

For information about stacks, see Overview of HA CVIM-MON Stacks.

For information about monitoring external servers using HA CVIM-MON, see Prerequisites for Monitoring External Servers Using HA CVIM MON.

Overview of HA CVIM-MON Stacks

An HA CVIM-MON stack is a set of containers running in the same Kubernetes namespace that is in charge of a monitoring domain.

A monitoring domain includes one or more regions. Each region includes one or more metros. Each metro includes one or more Cisco VIM pods.

Although most HA CVIM-MON deployments require only one stack per cluster, you can create more than one stack on the same cluster. For example, you can create one stack for production and another for experimentation purposes. Different stacks have different configurations and do not share any common storage.

Each stack has a name. A valid stack name must be unique and can have only lower-case alphanumeric characters and ‘-’ is the only special character allowed.

The stack storage size depends on the following factors:

  • Retention time

  • Scraping interval

  • Number of time series to store

The number of time series to store is a function of the following parameters:

  • Number of Cisco VIM pod servers to monitor.

  • Type of hardware used.

    For example, CPUs with more cores generate more time series.

  • Number of virtual resources used in these pods.

    For example, the number of VMs, virtual interfaces and so on.

Typical bare metal servers generate around 1000 time series per server (CPUs, memory, hardware sensors, and so on). Typical OpenStack deployments generate an additional 1000 to 4000 time series per server depending on how many VMs and virtual interfaces are running. We recommend that you use between 2000 and 5000 time series per server depending on the type of deployments.

The formula for calculating the stack storage size is:

needed_disk_space = retention_time_seconds * ingested_samples_per_second *bytes_per_sample * replication_factor

The typical space used per sample is 1 to 2 bytes because of the way Prometheus compresses samples in the TSDB.

The required raw disk capacity takes into account the replication factor which is 3 in this implementation.

The example shows how to calculate the required disk space:

  • Number of servers=1000

  • Time series per server=3000=3M time series

  • One minute sampling interval = 3M/60 = 50K samples/sec

  • 3 months retention time = 7,776,000 seconds

Hence, required disk space in GB = 7,776,000 * 50,000 * 2 * 3 / 10**9 = ~2300 GB

Installation Modes for HA CVIM-MON

You can install HA CVIM-MON using three installation modes.

Connected Mode of Install

You can perform this mode of installation when the Cisco VIM management node has internet connectivity. All the artifacts and docker images needed for installation are directly fetched from the internet and utilized by the installer. This is the default mode of HA CVIM-MON install. You must provide the following information in the setup_data.yaml file to fetch artifacts from cvim-registry.com:

REGISTRY_USERNAME: <username>
	REGISTRY_PASSWORD: <password>
	REGISTRY_EMAIL: <email>

Air Gapped Install using USB

The following procedure describes how to download the Cisco NFVI installation files onto a USB drive of the staging server with Internet access. You can use the USB to load the Cisco NFVI installation files onto the management node without Internet access.


Note

We recommend that you use Virtual Network Computing (VNC), a terminal multiplexer, or similar screen sessions to complete these steps.


  1. Fetching artifacts to staging server.

    Before you begin you must have a CentOS 7 staging server (VM, laptop, or UCS server) with a 64 GB USB 2.0 drive. You can use USB 3.0 64GB if the management node is of type Cisco UCS M5. The staging server must have a wired Internet connection to download the Cisco VIM installation files onto the USB drive. Once downloaded, you can copy the installation files onto the management node from a USB drive.

    1. On the staging server, use yum to install the following packages:

      • PyYAML

      • Python-requests

      • Centos-release-scl

      • Python 3.6

        Check if python 3.6 binary is located at /opt/rh/rh-python36/root/bin/, if not copy the python 3.6 binary to /opt/rh/rh-python36/root/bin/.

    2. Log into Cisco VIM software download site and download the getartifacts.py script from external registry:

      # download the new getartifacts.py file (see example below) 
      curl -o getartifacts.py https://username:password@cvim-registry.com/mercury-releases/cvim34-rhel7-osp13/releases/3.4.1/getartifacts.py
      
      # Change the permission of getartificats.py
      chmod +x getartifacts.py
      
    3. Run getartifacts.py.

      The script formats the USB2.0 drive (or USB3.0 drive for M5/Quanta based management node) and downloads the installation files. You must provide the registry username and password, tag ID, and USB partition on the staging server.
      # ./getartifacts.py -t <tag_id > -u <username> -p <password> -d <device_path> --mgmtk8s [--proxy] <proxy>
    4. Use the following command to verify the downloaded artifacts and container images:

      # create a directory
      sudo mkdir -p /mnt/Cisco
      
      # You need to mount the partition with the steps given below:
      sudo mount <device_path> /mnt/Cisco
      cd /mnt/Cisco
      
      # execute the verification script
      ./test-usb
      
    5. If the test-usb script reports any failures, you can unmount the USB and run the getartifacts command again with the --retry option.

      sudo ./getartifacts.py -t <tag_id> -u <username> -p <password> -d <device_path> --retry
    6. Mount the USB and then run the test-usb command to validate if all the files are downloaded:

      # create a directory
      sudo mkdir -p /mnt/Cisco
      
      # You need to mount the partition with the steps given below:
      sudo mount <device_path> /mnt/Cisco
      cd /mnt/Cisco
      
      # execute the verification script
      ./test-usb
      
    7. When the USB integrity test is done, unmount the USB drive by using the following command:

      # Unmount USB device
      sudo umount /mnt/Cisco
      
  2. Importing artifacts from the USB on to the management node.

    On the CVIM MON HA management node use the prepared USB stick and complete the following steps:

    • Insert the USB stick into the management node drive after you install the buildnode.iso in it.

    • Use import_artifacts.sh script to copy all the artifacts onto the management node. After successful completion, the installation artifacts are copied to /var/cisco/artifacts on the management node. After the artifacts are available in the management node, steps to install HA CVIM MON pod remain the same.

      # Run import artifacts script
      cd ~/installer-<tag_id>/tools
      ./import_artifacts.sh
      
  3. Configuration of setup data file.

    HA CVIM MON setup_data.yaml file has a configuration to set the install mode. Set the install mode as disconnected to avoid management node to try and fetch artifacts from the internet. For example,

    	INSTALL_MODE: disconnected

Air Gapped Install using Software Delivery Server

The Software Delivery Server (SDS) is also called the Cisco VIM Software Hub.

Cisco VIM Software Hub alleviates the need for Cisco VIM management nodes to have internet connectivity and helps to remove the logistics of shipping USBs to multiple pods across the enterprise for software installation or update of the cloud. You can install and download the HA CVIM MON artifacts on the SDS server.

For more information on the hardware requirements of the SDS server and steps to install artifacts, see Installing Cisco VIM Software Hub in Air-Gapped Mode.

Configuration of setup data file:

After you pre-install the artifacts on the Cisco VIM Software Hub, you can start the HA CVIM MON installation using SDS.


Note

Ensure that the br_api ip address can reach the br_private ip address of the SDS server.


  • Install the management node with buildnode ISO

  • Add the following fields in HA CVIM MON setup_data.yaml file.

    REGISTRY_NAME: '<registry_name>' # Mandatory Parameter.

HA CVIM MON setup_data.yaml requires the REGISTRY_USERNAME and REGISTRY_PASSWORD to connect to the docker registry and fetch docker images. To fetch the docker images from Cisco VIM Software Hub node, provide the user credentials available in the SDS_READ_ONLY_USERS section of sds_setup_data.yaml. The details of an admin user with read or write access to docker registry are provided in SDS_REGISTRY_USERNAME and SDS_REGISTRY_PASSWORD field. Hence, we recommend that you have a read-only user on the Cisco VIM pod.

Configuring the Setup File for HA CVIM-MON

The setup_data.yaml configuration file describes all the parameters of the HA CVIM-MON cluster and is required for the installation of the HA CVIM-MON cluster after the management node is up and running.

The configuration file is available at: /root/openstack-configs/setup_data.yaml.HA CVIM-MON.EXAMPLE.You must configure the following parameters in this configuration file:

Before you begin

Install the management node ISO on the management node. You must select the management node install option during the ISO install process.

Procedure


Step 1

Configure general parameters of the HA CVIM-MON cluster such as:

  • IP address for the internal load balancer for the br_mgmt network (this is an internal IP address)

  • IP address for the external load balancer for the br_api network (external IP address)

  • NTP servers

  • Domain suffix to use for all external URLs to HA CVIM-MON services

  • Virtual router ID (for VRRP)

The IP addresses to provide are either IPv4 or IPv6 based on selected IP version (set in the Argus bare metal section).

The final domain suffix is of the following format:

.cvimmon-<stack_name>.<domain_suffix>
Step 2

Configure stack properties such as:

Stack property

Description

Metric retention time

Metrics retention time in the Prometheus TSDB.

Stack size

Storage size of the stack that you can derive from the following formula:

needed_disk_space = retention_time_seconds * ingested_samples_per_second * bytes_per_sample * replication_factor

For more information on stacks and calculating the stack size, see Overview of HA CVIM-MON Stacks

Metric scraping interval

Frequency with which monitored CVIM pods are scraped for their metrics.

Regions, Metros, Pods

The list of regions, metros, and pods that the stack monitors.

Static credentials of the Grafana server

  • Admin user name

  • Admin password

Step 3

Configure regions, metros, and pods of the monitoring domain.

The region, metro, and pod names must be unique within the monitoring domain. They can be any ascii string. These names are only used as a metric label value.

You must configure each region with the following parameters:

  • A region name

  • A list of metros

You must configure each metro with the following parameters:

  • A metro name

  • A list of Cisco VIM pods

You must configure each Cisco VIM pod with the following parameters:

  • A pod name

  • Pod IP address ( IPv4 or IPv6)

  • Pod HA proxy certificate

  • User name and password to access the pod

Step 4

Configure log rotation.

You must configure the following parameters for the infrastructure logs:

  • Frequency of log rotation

  • Maximum size of each log.

    When the size of the log exceeds this value, a rotation occurs.

  • Number of compressed archive log files to keep for each log file.

    The old archive log files are deleted.

Step 5

Configure SNMP.

You must configure SNMP for each stack only if SNMP traps are enabled. When SNMP traps are enabled, all HA CVIM-MON alerts in the stack are forwarded to the configured SNMP managers using the selected SNMP version.

You must configure the following parameters for SNMP:

  • IPv4 or IPv6 address and port to send traps to.

  • SNMP version: v2c (default) or v3.

  • SNMP credentials:

    • v2c: Community string

    • v3: Engine ID, credentials and encryption settings

Step 6

Configure LDAP support for Grafana.

Grafana has two default users with dynamically assigned passwords and different roles:

  • Viewer: Cannot navigate dashboards or modify them.

  • Admin: Can navigate and modify dashboards.

You can map LDAP user groups with these roles by configuring access to one LDAP server with the following information:

  • Bind DN

  • Domain name

  • Password

  • LDAP server URI

  • Search-based DNS

  • Search filter

  • Group mapping for the two roles

Note 

You can connect to only one LDAP server in Cisco VIM 3.4.1.

Step 7

Configure external servers.

The servers must meet few prerequisites. For more information, see Prerequisites for Monitoring External Servers Using HA CVIM MON.

You must configure the following parameters for external servers:

  • Server name

  • Server IP address followed by port 9273

For more information on monitoring the external servers, see Monitoring External Servers Using CVIM MON.

Step 8

Configure Argus bare metal.

You must configure the following parameters for the Argus bare metal:

  • HA CVIM-MON release deployment image

  • IPv4 or IPv6 selection for the cluster deployment

  • br_api network addressing

  • br_mgmt network addressing

  • Bare metal access credentials (CIMC or BMC)

  • Linux root credentials

  • DNS and NTP settings

  • Time zone selection


What to do next

Run the HA CVIM-MON installer. For more information, see Using HA CVIM-MON Installer.

Prerequisites for Monitoring External Servers Using HA CVIM MON

You can monitor external servers such as standalone Linux servers, which are not managed by any Cisco VIM pod, by an HA CVIM-MON stack.

You must provide the server name and its IP address followed by port 9273 in the setup_data.yaml file.

The servers must meet the following prerequisites:

  • Servers must be reachable from the Prometheus server in the HA CVIM-MON stack.

  • Servers must run on hardware that is similar to the CVIM Management Node BOM.

  • Servers must run the CVIM Management node ISO or CentOS 7.7.

  • Servers must have the Telegraf agent provided by the HA CVIM-MON stack installer.

  • Servers must run in the same site as the HA CVIM-MON cluster.

Prometheus collects the server metrics over unauthenticated and unencrypted HTTP connections on port 9273.

Cisco VIM distinguishes the metrics collected from external servers from the Cisco VIM pod metrics by a node_type label value of external. By default, Cisco VIM associates metrics for all CPUs with the label tag set to host. You can customize this with additional steps during installation.

Default built-in alerting rules and custom alerting rules equally apply to external nodes unless restricted to certain node types in the rule.

For more information on how HA CVIM-MON stack monitors external servers, see Monitoring External Servers Using CVIM MON.

Using HA CVIM-MON Installer

You must perform the installation operations from the installer directory under /root/installer-<build>. The build number is specific for each HA CVIM-MON release.

The installer script is ./bootstrap/k8s-infra/k8s_runner.py.

The installation process is as follows:

Before you begin

You must refer the following sections before using the HA CVIM-MON installer:

Procedure


Step 1

Validation

Verifies the hardware and software configuration.

Step 2

Bootstrap Infra

Prepares the management node for CVIM MON HA installation for setting up local docker registry, installing repos, host packages on management node, and so on.

Step 3

Setup Argus

Prepares bare metal installation.

Step 4

Argus bare metal

Installs and configures the operating system.

Step 5

CVIM-MON Infra

Prepares Cisco VIM MON nodes for Kubernetes and application install.

Step 6

Kubernetes Provisioner

Installs the Kubernetes infrastructure.

Step 7

Helm Infra

Installs the HA CVIM-MON stacks.


You can list all steps using the -l argument and you can execute the steps individually:
# ./bootstrap/k8s-infra/k8s_runner.py -l

     !!  CVIM MON HA ORCHESTRATOR  !!
=========================================
+------------------------+--------------+
| Operations             | Operation ID |
+------------------------+--------------+
| VALIDATION             |      1       |
| BOOTSTRAP_INFRA        |      2       |
| SETUP_ARGUS            |      3       |
| ARGUS_BAREMETAL        |      4       |
| COMMON_CVIM_MON_INFRA  |      5       |
| KUBERNETES_PROVISIONER |      6       |
| HELM_INFRA             |      7       |
+------------------------+--------------+
For a complete installation, run the script without passing any argument:
# ./bootstrap/k8s-infra/k8s_runner.py

                        ############################
                         CVIM MON HA ORCHESTRATOR
                        ############################


[1/5][VALIDATION: INIT]                                                       [   -   ]    0min 12secs

 Input File Validations!
+-------------------------------------+--------+-------+
| Rule                                | Status | Error |
+-------------------------------------+--------+-------+
| Schema Validation of Input File     |  PASS  | None  |
| Check for Valid Keys                |  PASS  | None  |
| Valid Operation Check               |  PASS  | None  |
| Check for duplicate keys            |  PASS  | None  |
| Check Cvim-Mon Target Nomenclature  |  PASS  | None  |
| Check duplicate Cvim-Mon target     |  PASS  | None  |
| Information                         |        |       |
| Check Argus api network information |  PASS  | None  |
| Check Argus management network      |  PASS  | None  |
| information                         |        |       |
| Check Argus api network information |  PASS  | None  |
| Check Argus management network      |  PASS  | None  |
| information                         |        |       |
| Pod operations for CVIM-MON-HA      |  PASS  | None  |
+-------------------------------------+--------+-------+
[1/5][VALIDATION: INIT]                                                       [   \   ]    0min 50secs

What to do next

You can manage your HA CVIM-MON clusters using various commands. For more information, see Resources for Managing the HA CVIM-MON Cluster.

Resources for Managing the HA CVIM-MON Cluster

You can manage your HA CVIM-MON cluster using various commands.

Configuration File and Secrets

The configuration file is available at:
~/openstack-configs/setup_data.yaml
The secrets are saved under:
~/openstack-configs/secrets.yaml 

The secrets.yaml file is readable only from root. This file contains the user name and password for accessing Grafana, Prometheus, and Alertmanager for each stack.

An example of secrets.yaml file is given below:

Prometheus-Password-cvimmon-monitor(Username:admin):YyZM5f3DdyCKxklw1vIN4i0l0M2EoRbkjb+UKm0Sa5Y=
Grafana-Password-cvimmon-monitor(Username:admin):59QRzzo+PEedz8MDfdX26+DoaMJ/OgVgoqGWdUhDS78=
Grafana-Password-stack1(Username:admin):h72DhjEnVS/Rr4nFCZmmxKRmuK/t7qjyZJJrFbTyCtM=
Prometheus-Password-stack1(Username:admin):1Ph5AI8JUhiHgX0vjHB3W0Wzgjy2jWfiC5egAQJuuIs=
Grafana-Password-stacktsdb(Username:admin):N/ABGdX0ym5VhJ7Q/k8TO1oeqRXuzvbOmU9JeunA1As=
Prometheus-Password-stacktsdb(Username:admin):F8SPq+1qUSKM08EvlL+bTbL6RU8BI8Qcz/Yjzi0s7gw=

Stack Services URLs

To get information about Stack Services URLs, use the following command:

# ./bootstrap/k8s-infra/k8s_runner.py  --get-endpoint [<stack-name> | ”all”]
Listing Endpoints for : stack2
+--------------------------------------------------------------------------+
| Endpoint FQDN                                                                       |
+--------------------------------------------------------------------------+
|  <IP Address> cvimmon-grafana-stack2.cisco.com                           |
|  <IP Address> cvimmon-alertmanager-stack2.cisco.com                      |
|  <IP Address> cvimmon-prometheus-stack2.cisco.com                        |
+--------------------------------------------------------------------------+

If you use all as a parameter to --get-endpoint, the table lists all URLs of all stacks in the cluster.


Note

For a given stack, all URLs are assigned the same IP address. The HTTP server at this IP address reroutes the traffic to the appropriate service container based on the requested URL.


Kubernetes Resources

To list Kubernetes nodes, use the following command:

[root@queensland installer]# kubectl get nodes
NAME      STATUS   ROLES    AGE   VERSION
cvmonq1   Ready    master   56m   v1.15.2
cvmonq2   Ready    master   56m   v1.15.2
cvmonq3   Ready    master   61m   v1.15.2
cvmonq4   Ready    <none>   54m   v1.15.2

In the above example, the Kubernetes cluster has three master nodes and one worker node

To get the status of the cluster, use the following command:

[root@Antarctica ~]# kubectl cluster-info
Kubernetes master is running at https://[2001:420:293:241f:172:29:75:115]:6443
KubeDNS is running at https://[2001:420:293:241f:172:29:75:115]:6443/api/v1/namespaces/kube-system/services/kube-dns:dns/proxy

To debug and diagnose cluster problems, use the kubectl cluster-info dump command.

Cisco VIM implements each HA CVIM-MON stack as a separate Kubernetes namespace that contains several pods. A pod is a wrapper for a Kubernetes container.

To list all namespaces including HA CVIM-MON stacks, use the following command:

[root@Antarctica ~]# kubectl get pods --all-namespaces | grep grafana
cvimmon-monitor   grafana-cvimmon-monitor-65656cd4cb-qtzfp                         1/1     Running            0          17d
stack1            grafana-stack1-549d4f7997-6p5fb                                  1/1     Running            6          17d
stacktsdb         grafana-stacktsdb-56c6cd4875-hp97p                               1/1     Running            5          16d
stacktsdb2        grafana-stacktsdb2-7fb6c7dc5c-m9dq5                              1/1     Running            3          16d
stackv6           grafana-stackv6-6d656b868-znz5f                                  1/1     Running            1          3d20h

To list all the pods of a given stack, use the following command:

[root@Antarctica ~]# kubectl get pods -n stackv6
NAME                                              READY   STATUS    RESTARTS   AGE
grafana-stackv6-6d656b868-znz5f                   1/1     Running   1          3d20h
prometheus-stackv6-alertmanager-9f557fdb5-96h4z   2/2     Running   0          3d20h
prometheus-stackv6-server-5cffbb5b49-wh4p7        2/2     Running   0          3d20h

To display the node on which each pod of a stack is running, use the following command:

[root@Antarctica ~]# kubectl get pod -o=custom-columns=NODE:.spec.nodeName,NAME:.metadata.name -n stackv6
NODE          NAME
antarctica2   grafana-stackv6-6d656b868-znz5f
antarctica1   prometheus-stackv6-alertmanager-9f557fdb5-96h4z
antarctica1   prometheus-stackv6-server-5cffbb5b49-wh4p7

To display the persistent volume chain (PVC) attached to each pod, use the following command:

[root@Antarctica ~]# kubectl get pvc -n stackv6
NAME                              STATUS   VOLUME                                     CAPACITY   ACCESS MODES   STORAGECLASS   AGE
grafana-stackv6                   Bound    pvc-61af7b58-6b7a-48a5-8562-2e3fcb662f65   10Gi       RWX            portworx-sc    14d
prometheus-stackv6-alertmanager   Bound    pvc-5b9dedc8-2540-4edf-aa5e-4296ff03b5a9   50Gi       RWX            portworx-sc    14d
prometheus-stackv6-server         Bound    pvc-1a9ded1d-70c5-43ea-af83-c62ceee241d1   2000Gi     RWO            portworx-sc    14d

Supported POD Operations

HA CVIM-MON supports the following pod operations:

Replacing a Master Node

You must replace a master node if there are any hardware issues, power failure, disk failure, and so on. HA CVIM-MON provides an option to replace the master node to help in the recovery of the master node. A master node can be online or offline during the master replace operation.

The conditions for replacing the master node are given below:

  • You must not change the setup data especially the node details for the replace node option.

  • The replaced node and the defective node must have the same CIMC or BMC version.

  • You can replace only one master node at a time. You cannot use the replaced node if more than one master node is defective.

When you replace a node, the master node is removed from the Kubernetes cluster and replaced with a new master node with the same name and the hardware details.

The following example shows how to replace a master node:

cd /root/installer-<build_number
# ./bootstrap/k8s-infra/k8s_runner.py --replace-master <node_name>

[root@queensland installer-22898]# ./bootstrap/k8s-infra/k8s_runner.py --replace-master  cvmonq1
The logs for this run are available at /var/log/cvimmonha/2019-10-22_145736_574029

                        ############################
                         CVIM MON HA ORCHESTRATOR
                        ############################

[1/4][CLEANUP: INIT]                                                          [ DONE! ]    0min 2secs
[1/4][CLEANUP: check-kubernetes-node-Check if the node is present]            [ DONE! ]    0min 2secs
<SNIP>
[1/4][CLEANUP: delete-etcd-member-Get ClusterConfiguration config map fo...   [ DONE! ]    3mins 30secs
[1/4][CLEANUP: delete-etcd-member-Remove the node from the clusterstatus...   [ DONE! ]    3mins 40secs

Ended Installation [CLEANUP] [Success]

[2/4][ARGUS_BAREMETAL: INIT]                                                  [ DONE! ]    0min 0sec
[2/4][ARGUS_BAREMETAL: Validating Argus Configs..]                            [ DONE! ]    0min 2secs
<SNIP>
[2/4][ARGUS_BAREMETAL: Servers are pxe-booting..Takes Time!!]                 [ DONE! ]    16mins 56secs
[2/4][ARGUS_BAREMETAL: Server(s) deploy operation finished: Success]          [ DONE! ]    17mins 3secs

Ended Installation [ARGUS_BAREMETAL] [Success]

[3/4][COMMON_CVIM_MON_INFRA: INIT]                                            [ DONE! ]    0min 1sec
[3/4][COMMON_CVIM_MON_INFRA: update-known-hosts-Set backup_name fact for...   [ DONE! ]    0min 1sec
<SNIP>
 [3/4][COMMON_CVIM_MON_INFRA: ntp-Restore old selinux label]                   [ DONE! ]    6mins 51secs
[3/4][COMMON_CVIM_MON_INFRA: ntp-Enable ntpd service]                         [ DONE! ]    6mins 52secs

Ended Installation [COMMON_CVIM_MON_INFRA] [Success]

[4/4][KUBERNETES_PROVISIONER: delete-etcd-member-Remove the node from th...   [ DONE! ]    0min 3secs
[4/4][KUBERNETES_PROVISIONER: kube-apiserver-podpreset-Add node-monitor-...   [ DONE! ]    10mins 23secs
[4/4][KUBERNETES_PROVISIONER: kube-apiserver-podpreset-Add pod-eviction-...   [ DONE! ]    10mins 33secs

Ended Installation [KUBERNETES_PROVISIONER] [Success]

Executing autobackup for CVIM MON
Executing autobackup at :/var/cisco/cvimmonha_autobackup/cvimmonha_autobackup_3.3.20_2019-10-22_15:35:56

Adding a Worker Node

You can add a worker node to the HA CVIM-MON cluster in the following two ways:

  • Pre-define in the setup_data file and the worker node is installed when you install the HA CVIM-MON cluster.

  • Add post-deployment using the --add-worker option.

Following are the conditions for adding the worker node to the HA CVIM-MON cluster:

  • You must add the hardware details of the worker node in the setup data (Argus bare metal section).

  • You can add only one worker at a time to the HA CVIM-MON cluster.

  • The worker node hardware and the network hardware must conform to the same BOM defined by the HA CVIM-MON master nodes.

  • You must apply the same networking schema of the HA CVIM-MON masters for all worker nodes.

Configuring the Setup data File for Worker Node

You must use the following schema for defining a worker node in the setup_data.yaml file. The same schema is used for the master nodes except the role field. You must explicitly define the role field as a worker for the worker node.

- name: Worker1
            oob_ip: 10.10.10.10
            role: worker
            ip_address:
              management_1_v4: 10.10.11.10/24
              management_1_gateway_v4: 10.10.11.1
              api_1_v4: 10.10.12.10/24
              api_1_gateway_v4: 10.10.12.1

Add worker Command

To add the worker to the HA CVIM-MON cluster, use the following command:

cd /root/installer-<build_number
# ./bootstrap/k8s-infra/k8s_runner.py --add-worker <node_name>

[root@queensland installer-22898]# ./bootstrap/k8s-infra/k8s_runner.py --add-worker cvmonq4
The logs for this run are available at /var/log/cvimmonha/2019-10-22_140832_817059

                        ############################
                         CVIM MON HA ORCHESTRATOR
                        ############################

[1/5][VALIDATION: INIT]                                                       [   -   ]    0min 3secs

 Input File Validations!
+-------------------------------------+--------+-------+
| Rule                                | Status | Error |
+-------------------------------------+--------+-------+
| Schema Validation of Input File     |  PASS  | None  |
| Check for Valid Keys                |  PASS  | None  |
| Valid Operation Check               |  PASS  | None  |
| Check for duplicate keys            |  PASS  | None  |
| Check Cvim-Mon Target Nomenclature  |  PASS  | None  |
| Check duplicate Cvim-Mon target     |  PASS  | None  |
| Information                         |        |       |
| Check Argus api network information |  PASS  | None  |
| Check Argus management network      |  PASS  | None  |
| information                         |        |       |
| Check Argus api network information |  PASS  | None  |
| Check Argus management network      |  PASS  | None  |
| information                         |        |       |
| Pod operations for CVIM-MON-HA      |  PASS  | None  |
+-------------------------------------+--------+-------+
[1/5][VALIDATION: INIT]                                                       [   \   ]    3mins 1sec

  UCS Hardware Validations
+-----------------------------+--------+----------------+
| UseCase                     | Status | Failure Reason |
+-----------------------------+--------+----------------+
| CIMC Firmware Version Check |  PASS  | None           |
| Argus NIC Adapter Check     |  PASS  | None           |
| Argus Num Disks Check       |  PASS  | None           |
+-----------------------------+--------+----------------+
[1/5][VALIDATION: INIT]                                                       [ DONE! ]    3mins 2secs

Ended Installation [VALIDATION] [Success]

[2/5][GENERATE_INVENTORY: INIT]                                               [ DONE! ]    0min 0sec
[2/5][GENERATE_INVENTORY: Get Artifacts Phase...Takes Time !!]                [ DONE! ]    0min 2secs
[2/5][GENERATE_INVENTORY: generate-inventory-Check if Argus Site File is...   [ DONE! ]    0min 2secs
[2/5][GENERATE_INVENTORY: generate-inventory-Copy Rendered Inventory Fil...   [ DONE! ]    0min 3secs

Ended Installation [GENERATE_INVENTORY] [Success]

[3/5][ARGUS_BAREMETAL: INIT]                                                  [ DONE! ]    0min 0sec
[3/5][ARGUS_BAREMETAL: Validating Argus Configs..]                            [ DONE! ]    0min 2secs
[3/5][ARGUS_BAREMETAL: Initiating Argus Baremetal node operation..]           [ DONE! ]    0min 2secs
[3/5][ARGUS_BAREMETAL: Initiating Node deploy: cvmonq4..]                     [ DONE! ]    0min 3secs
[3/5][ARGUS_BAREMETAL: Servers are pxe-booting..Takes Time!!]                 [ DONE! ]    15mins 56secs
[3/5][ARGUS_BAREMETAL: Server(s) deploy operation finished: Success]          [ DONE! ]    16mins 3secs

Ended Installation [ARGUS_BAREMETAL] [Success]

[4/5][COMMON_CVIM_MON_INFRA: generate-inventory-Copy Rendered Inventory ...   [ DONE! ]    0min 1sec
[4/5][COMMON_CVIM_MON_INFRA: update-known-hosts-Set backup_name fact for...   [ DONE! ]    0min 2secs
[4/5][COMMON_CVIM_MON_INFRA: ntp-Restore old selinux label]                   [ DONE! ]    7mins 47secs
[4/5][COMMON_CVIM_MON_INFRA: ntp-Enable ntpd service]                         [ DONE! ]    7mins 48secs

Ended Installation [COMMON_CVIM_MON_INFRA] [Success]

[5/5][KUBERNETES_PROVISIONER: INIT]                                           [ DONE! ]    0min 3secs
[5/5][KUBERNETES_PROVISIONER: kubeadm-Remove swapfile from /etc/fstab]        [ DONE! ]    0min 5secs
[5/5][KUBERNETES_PROVISIONER: kubeadm-Turn swap off]                          [ DONE! ]    0min 7secs
<SNIP>

[5/5][KUBERNETES_PROVISIONER: reconfig-kubelet-Restart Kubelet if Change...   [ DONE! ]    6mins 20secs

Ended Installation [KUBERNETES_PROVISIONER] [Success]

Executing autobackup for CVIM MON
Executing autobackup at :/var/cisco/cvimmonha_autobackup/cvimmonha_autobackup_3.3.20_2019-10-22_14:42:00
[DONE] autobackup of CVIM MON HA Node successfully.

Removing a Worker Node

You can remove a worker node from the cluster if required. An HA CVIM-MON cluster can operate without any worker nodes. You can also remove all the worker nodes. After this operation, the node is deleted from the HA CVIM-MON Kubernetes cluster. All the running pods are automatically migrated to the other workers or masters.

The conditions for removing a worker node are given below:

  • You can remove only one worker node at a time.

  • You must delete the node details of the worker node from the setup_data file before executing the remove worker operation.

To remove the worker node, use the following command:

cd /root/installer-<build_number>
# ./bootstrap/k8s-infra/k8s_runner.py --remove-worker <node_name>

[root@queensland installer-22898]# ./bootstrap/k8s-infra/k8s_runner.py --remove-worker cvmonq4
The logs for this run are available at /var/log/cvimmonha/2019-10-22_134955_053095

                        ############################
                         CVIM MON HA ORCHESTRATOR
                        ###########################

[1/4][VALIDATION: INIT]                                                       [   /   ]    0min 2secs

 Input File Validations!
+-------------------------------------+--------+-------+
| Rule                                | Status | Error |
+-------------------------------------+--------+-------+
| Schema Validation of Input File     |  PASS  | None  |
| Check for Valid Keys                |  PASS  | None  |
| Valid Operation Check               |  PASS  | None  |
| Check for duplicate keys            |  PASS  | None  |
| Check Cvim-Mon Target Nomenclature  |  PASS  | None  |
| Check duplicate Cvim-Mon target     |  PASS  | None  |
| Information                         |        |       |
| Check Argus api network information |  PASS  | None  |
| Check Argus management network      |  PASS  | None  |
| information                         |        |       |
| Check Argus api network information |  PASS  | None  |
| Check Argus management network      |  PASS  | None  |
| information                         |        |       |
| Pod operations for CVIM-MON-HA      |  PASS  | None  |
+-------------------------------------+--------+-------+
[1/4][VALIDATION: INIT]                                                       [   /   ]    2mins 43secs

  UCS Hardware Validations
+-----------------------------+--------+----------------+
| UseCase                     | Status | Failure Reason |
+-----------------------------+--------+----------------+
| CIMC Firmware Version Check |  PASS  | None           |
| Argus NIC Adapter Check     |  PASS  | None           |
| Argus Num Disks Check       |  PASS  | None           |
+-----------------------------+--------+----------------+
[1/4][VALIDATION: INIT]                                                       [ DONE! ]    2mins 44secs

Ended Installation [VALIDATION] [Success]

[2/4][CLEANUP: INIT]                                                          [ DONE! ]    0min 2secs
[2/4][CLEANUP: check-kubernetes-node-Check if the node is present]            [ DONE! ]    0min 2secs
[2/4][CLEANUP: portworx-Get the node status for the replace node]             [ DONE! ]    1min 59secs
[2/4][CLEANUP: portworx-Get the node status for the replace node]             [ DONE! ]    1min 59secs
[2/4][CLEANUP: portworx-Remove the node from the cluster]                     [ DONE! ]    2mins 50secs

Ended Installation [CLEANUP] [Success]

[3/4][ARGUS_BAREMETAL: INIT]                                                  [ DONE! ]    0min 0sec
[3/4][ARGUS_BAREMETAL: Validating Argus Configs..]                            [ DONE! ]    0min 2secs
[3/4][ARGUS_BAREMETAL: Initiating Argus Baremetal node operation..]           [ DONE! ]    0min 2secs
[3/4][ARGUS_BAREMETAL: Initiating Node delete: cvmonq4..]                     [ DONE! ]    0min 54secs
[3/4][ARGUS_BAREMETAL: Server(s) delete operation finished: Success]          [ DONE! ]    1min 1sec

Ended Installation [ARGUS_BAREMETAL] [Success]

[4/4][GENERATE_INVENTORY: INIT]                                               [ DONE! ]    0min 1sec
[4/4][GENERATE_INVENTORY: generate-inventory-Check if Argus Site File is...   [ DONE! ]    0min 1sec
[4/4][GENERATE_INVENTORY: generate-inventory-Copy Rendered Inventory Fil...   [ DONE! ]    0min 2secs

Ended Installation [GENERATE_INVENTORY] [Success]

Executing autobackup for CVIM MON
Executing autobackup at :/var/cisco/cvimmonha_autobackup/cvimmonha_autobackup_3.3.20_2019-10-22_13:56:36
[DONE] autobackup of CVIM MON HA Node successfully.
The logs for this run are available at /var/log/cvimmonha/2019-10-22_134955_053095

Regenerating Certificates

You can regenerate Kubernetes, ETCD, and application certificates using HA CVIM-MON.

Kubernetes Certificates

To regenerate Kubernetes certificates, use the following command:

 ./bootstrap/k8s-infra/k8s_runner.py --renew-k8s-certs

[root@queensland installer-22898]# ./bootstrap/k8s-infra/k8s_runner.py --renew-k8s-certs
The logs for this run are available at /var/log/cvimmonha/2019-10-22_112657_292383

                        ############################
                         CVIM MON HA ORCHESTRATOR
                        ############################

[1/2][VALIDATION: INIT]                                                       [   /   ]    0min 3secs

 Input File Validations!
+------------------------------------+--------+-------+
| Rule                               | Status | Error |
+------------------------------------+--------+-------+
| Schema Validation of Input File    |  PASS  | None  |
| Check for Valid Keys               |  PASS  | None  |
| Valid Operation Check              |  PASS  | None  |
| Pod operations for CVIM-MON-HA     |  PASS  | None  |
| Check for duplicate keys           |  PASS  | None  |
| Check Cvim-Mon Target Nomenclature |  PASS  | None  |
| Check duplicate Cvim-Mon target    |  PASS  | None  |
| Information                        |        |       |
+------------------------------------+--------+-------+
[1/2][VALIDATION: INIT]                                                       [ DONE! ]    0min 4secs

Ended Installation [VALIDATION] [Success]

[2/2][KUBERNETES_PROVISIONER: INIT]                                           [ DONE! ]    0min 4secs
[2/2][KUBERNETES_PROVISIONER: kubernetes-renew-certs-Check Cluster State]     [ DONE! ]    0min 7secs
[2/2][KUBERNETES_PROVISIONER: kubernetes-renew-certs-Fail if any of the ...   [ DONE! ]    2mins 53secs
[2/2][KUBERNETES_PROVISIONER: kubernetes-renew-certs-Check if all Pods i...   [ DONE! ]    2mins 55secs

Ended Installation [KUBERNETES_PROVISIONER] [Success]

The logs for this run are available at /var/log/cvimmonha/2019-10-22_112657_292383

ETCD Certificates

To regenerate ETCD certificates, use the following command:

./bootstrap/k8s-infra/k8s_runner.py --renew-etcd-certs

[root@queensland installer-22898]# ./bootstrap/k8s-infra/k8s_runner.py --renew-etcd-certs
The logs for this run are available at /var/log/cvimmonha/2019-10-22_113204_415606

                        ############################
                         CVIM MON HA ORCHESTRATOR
                        ############################

[1/2][VALIDATION: INIT]                                                       [   -   ]    0min 3secs

 Input File Validations!
+------------------------------------+--------+-------+
| Rule                               | Status | Error |
+------------------------------------+--------+-------+
| Schema Validation of Input File    |  PASS  | None  |
| Check for Valid Keys               |  PASS  | None  |
| Valid Operation Check              |  PASS  | None  |
| Pod operations for CVIM-MON-HA     |  PASS  | None  |
| Check for duplicate keys           |  PASS  | None  |
| Check Cvim-Mon Target Nomenclature |  PASS  | None  |
| Check duplicate Cvim-Mon target    |  PASS  | None  |
| Information                        |        |       |
+------------------------------------+--------+-------+
[1/2][VALIDATION: INIT]                                                       [ DONE! ]    0min 4secs

Ended Installation [VALIDATION] [Success]

[2/2][KUBERNETES_PROVISIONER: INIT]                                           [ DONE! ]    0min 4secs
[2/2][KUBERNETES_PROVISIONER: etcd_upgrade-Configure | Check if etcd clu...   [ DONE! ]    0min 4secs
[2/2][KUBERNETES_PROVISIONER: etcd_upgrade-Fail if any of the ceritficat...   [ DONE! ]    0min 32secs
[2/2][KUBERNETES_PROVISIONER: etcd_upgrade-Configure | Check if etcd clu...   [ DONE! ]    0min 34secs

Ended Installation [KUBERNETES_PROVISIONER] [Success]

The logs for this run are available at /var/log/cvimmonha/2019-10-22_113204_415606

Application Certificates

To regenerate application (NGINX) certificates, use the following command:

./bootstrap/k8s-infra/k8s_runner.py --regenerate-certs

[root@queensland installer-22898]# ./bootstrap/k8s-infra/k8s_runner.py --regenerate-certs
The logs for this run are available at /var/log/cvimmonha/2019-10-22_120629_288207

                        ############################
                         CVIM MON HA ORCHESTRATOR
                        ############################

[1/2][VALIDATION: INIT]                                                       [   -   ]    0min 2secs

 Input File Validations!
+------------------------------------+--------+-------+
| Rule                               | Status | Error |
+------------------------------------+--------+-------+
| Schema Validation of Input File    |  PASS  | None  |
| Check for Valid Keys               |  PASS  | None  |
| Valid Operation Check              |  PASS  | None  |
| Pod operations for CVIM-MON-HA     |  PASS  | None  |
| Check for duplicate keys           |  PASS  | None  |
| Check Cvim-Mon Target Nomenclature |  PASS  | None  |
| Check duplicate Cvim-Mon target    |  PASS  | None  |
| Information                        |        |       |
+------------------------------------+--------+-------+
[1/2][VALIDATION: INIT]                                                       [ DONE! ]    0min 3secs

Ended Installation [VALIDATION] [Success]

[2/2][HELM_INFRA: INIT]                                                       [ DONE! ]    0min 2secs
[2/2][HELM_INFRA: nginx-ingress-controller-Check whether helm binary exi...   [ DONE! ]    0min 3secs
[2/2][HELM_INFRA: prometheus-stack1->Check Rollout Status of Prometheus-...   [ DONE! ]    1min 8secs
[2/2][HELM_INFRA: prometheus-stack1->Check the status of Prometheus-stac...   [ DONE! ]    1min 8secs
[2/2][HELM_INFRA: prometheus-stack1->Ensure Prometheus-stack1 Deployment...   [ DONE! ]    1min 8secs
[2/2][HELM_INFRA: prometheus-stack1->Clear the old-version file]              [ DONE! ]    1min 8secs
[2/2][HELM_INFRA: prometheus-stack1->Faile the update if rollback was du...   [ DONE! ]    1min 12secs

Ended Installation [HELM_INFRA] [Success]

Executing autobackup for CVIM MON
Executing autobackup at :/var/cisco/cvimmonha_autobackup/cvimmonha_autobackup_3.3.20_2019-10-22_12:07:46
[DONE] autobackup of CVIM MON HA Node successfully.
The logs for this run are available at /var/log/cvimmonha/2019-10-22_120629_288207

Updating the Software of HA CVIM MON Nodes

You can update the software of HA CVIM-MON nodes using the following three actions:

  • Update-Gets the new software version and updates the HA CVIM-MON software in the nodes.

  • Rollback-Rolls back to the previous version of the software if there are problems after the software update.

  • Commit-Commits the software update. You cannot roll back to an older version after you commit the software.

Update

An update is the initial phase used to update the software on the HA CVIM-MON nodes. The update action performs the following operations:

  • Downloads the new software version and the container images.

  • Updates the software and containers in the management nodes.

  • Updates the software in the HA CVIM-MON master and worker nodes.

  • Updates the HA CVIM-MON stacks running on the nodes.

Following are the steps to update the software of HA CVIM-MON nodes:

  1. Get the new installer tar.

  2. Extract the tar to the root directory by using the following command:

    # tar –xvzf mercury-installer.tar.gz
    
  3. Change to the new workspace and update the HA CVIM-MON software by using the following command:

    # cd /root/<new_ws>
    # ./bootstrap/k8s-infra/k8s_runner.py –update
  4. After the update finishes, you can verify the update by checking the root/openstack-configs directory. It shows the new workspace.

    # ls -rtl /root/openstack-configs
    lrwxrwxrwx. 1 root root 46 Oct  3 11:46 /root/openstack-configs -> /root/<new_ws>
    

Rollback

A rollback rolls back to the previous software version if there are problems after the software update.

The rollback action performs the following operations:

  • The containers in the management node are rollbacked to the previous software version. The repo containers are not rollbacked.

  • The HA CVIM-MON stacks are rollbacked to the previous software version.

Following are the steps to rollback the software of HA CVIM-MON nodes:

  1. Move to the previous workspace where the software version was running by using the following command:

    # cd /root/old_ws
    
  2. Use the rollback command to rollback the HA CVIM-MON software to the older version:

    # ./bootstrap/k8s-infra/k8s_runner.py --rollback
  3. After the rollback finishes, you can verify the rollback by checking the root/openstack-configs directory. It shows the old workspace.

    # ls -rtl /root/openstack-configs
    lrwxrwxrwx. 1 root root 46 Oct  3 11:46 /root/openstack-configs -> /root/<old_ws>
    

Commit

This action commits the software update of the HA CVIM-MON nodes. You cannot roll back to an older version after you commit the software.

The commit action performs the following operations:

  • The old version of the software running in the containers of the management node are removed.

  • The software version of the HA CVIM-MON stacks are committed to the new running version.

  • All intermediate files and temporary files are removed

Following are the steps to commit the software of HA CVIM-MON nodes:

  1. Move to the new workspace from where HA CVIM-MON is running by using the following command:

    # cd /root/new_ws
    
  2. Use the commit command to commit the HA CVIM-MON software to the newer version:

    # ./bootstrap/k8s-infra/k8s_runner.py –commit

Adding and Removing HA CVIM-MON Stacks

HA CVIM-MON allows you to manage Prometheus or Grafana stacks.

Adding HA CVIM-MON Stacks

You can execute the add-stack operation after adding new stacks to the cvim-mon-stacks list in the setup_data file. The new stacks must have different names from the current stacks in the setup_data file. The stacks must also follow the same target hierarchy or layout as the other working stacks. Any changes to the setup_data besides adding new stacks to cvim-mon-stacks list result in a validation failure.

After updating the setup_data file, run the add-stack operation from the current working installer directory using the following command:

# ./bootstrap/k8s-infra/k8s_runner.py --add-stack

[root@queensland installer-22898]# ./bootstrap/k8s-infra/k8s_runner.py --add-stack
The logs for this run are available at /var/log/cvimmonha/2019-10-22_121443_260335

                        ############################
                         CVIM MON HA ORCHESTRATOR
                        ############################

[1/2][VALIDATION: INIT]                                                       [   \   ]    0min 3secs

 Input File Validations!
+------------------------------------+--------+-------+
| Rule                               | Status | Error |
+------------------------------------+--------+-------+
| Schema Validation of Input File    |  PASS  | None  |
| Check for Valid Keys               |  PASS  | None  |
| Valid Operation Check              |  PASS  | None  |
| Pod operations for CVIM-MON-HA     |  PASS  | None  |
| Check for duplicate keys           |  PASS  | None  |
| Check Cvim-Mon Target Nomenclature |  PASS  | None  |
| Check duplicate Cvim-Mon target    |  PASS  | None  |
| Information                        |        |       |
+------------------------------------+--------+-------+
[1/2][VALIDATION: INIT]                                                       [ DONE! ]    0min 4secs

Ended Installation [VALIDATION] [Success]

[2/2][HELM_INFRA: INIT]                                                       [ DONE! ]    0min 2secs
[2/2][HELM_INFRA: nginx-ingress-controller-Check whether helm binary exi...   [ DONE! ]    0min 3secs
[2/2][HELM_INFRA: nginx-ingress-controller-List installed Helm charts.]       [ DONE! ]    0min 4secs
[2/2][HELM_INFRA: prometheus-stack2->Clear the old-version file]              [ DONE! ]    9mins 1sec
[2/2][HELM_INFRA: prometheus-stack2->Faile the update if rollback was du...   [ DONE! ]    9mins 5secs

Ended Installation [HELM_INFRA] [Success]

Executing autobackup for CVIM MON
Executing autobackup at :/var/cisco/cvimmonha_autobackup/cvimmonha_autobackup_3.3.20_2019-10-22_12:23:55
[DONE] autobackup of CVIM MON HA Node successfully.
The logs for this run are available at /var/log/cvimmonha/2019-10-22_121443_260335

Deleting HA CVIM-MON Stacks

You can execute the delete-stack operation after deleting the existing stacks from the setup_data file. Any changes to the setup_data besides deleting stacks from the cvim-mon-stacks list result in a validation failure.

After making the setup_data changes, run the delete-stack operation from the current working installer directory using the following command:

# ./bootstrap/k8s-infra/k8s_runner.py --delete-stack

[root@queensland installer-22898]# ./bootstrap/k8s-infra/k8s_runner.py --delete-stack
The logs for this run are available at /var/log/cvimmonha/2019-10-22_123804_113281

                        ############################
                         CVIM MON HA ORCHESTRATOR
                        ############################

[1/2][VALIDATION: INIT]                                                       [   -   ]    0min 2secs

 Input File Validations!
+------------------------------------+--------+-------+
| Rule                               | Status | Error |
+------------------------------------+--------+-------+
| Schema Validation of Input File    |  PASS  | None  |
| Check for Valid Keys               |  PASS  | None  |
| Valid Operation Check              |  PASS  | None  |
| Pod operations for CVIM-MON-HA     |  PASS  | None  |
| Check for duplicate keys           |  PASS  | None  |
| Check Cvim-Mon Target Nomenclature |  PASS  | None  |
| Check duplicate Cvim-Mon target    |  PASS  | None  |
| Information                        |        |       |
+------------------------------------+--------+-------+
[1/2][VALIDATION: INIT]                                                       [ DONE! ]    0min 3secs

Ended Installation [VALIDATION] [Success]

[2/2][HELM_INFRA: INIT]                                                       [ DONE! ]    0min 2secs
[2/2][HELM_INFRA: nginx-ingress-controller-Check whether helm binary exi...   [ DONE! ]    0min 3secs
[2/2][HELM_INFRA: prometheus-stack2->Ensure Prometheus-stack2 Deployment...   [ DONE! ]    1min 30secs
[2/2][HELM_INFRA: prometheus-stack2->Clear the old-version file]              [ DONE! ]    1min 30secs
[2/2][HELM_INFRA: prometheus-stack2->Faile the update if rollback was du...   [ DONE! ]    1min 34secs

Ended Installation [HELM_INFRA] [Success]

Executing autobackup for CVIM MON
Executing autobackup at :/var/cisco/cvimmonha_autobackup/cvimmonha_autobackup_3.3.20_2019-10-22_12:39:43
[DONE] autobackup of CVIM MON HA Node successfully.
The logs for this run are available at /var/log/cvimmonha/2019-10-22_123804_113281

Reconfiguring HA CVIM-MON Stacks

You can reconfigure HA CVIM-MON stacks in the following ways:

Reconfiguration Options

Related Section

Update global options that are applicable to all HA CVIM-MON stacks.

Reconfiguring Global Options of HA CVIM-MON Stacks

Update parameters for each HA CVIM-MON stack.

Reconfiguring Individual HA CVIM-MON Stacks

Update the HA proxy certificate and HA CVIM-MON proxy password of each pod.

Reconfiguring a Cisco VIM OpenStack Pod

Reconfiguring Global Options of HA CVIM-MON Stacks

You can use the reconfigure option to modify global parameters that apply to all HA CVIM-MON stacks. You can reconfigure the following global stack parameters:

  • log_rotation_frequency: Frequency of log rotation

  • log_rotation_size: Maximum size of each log. When the size of the log exceeds this value, a rotation occurs.

  • log_rotation_del_older: Number of compressed archive log files to keep for each log file. The old archive log files are deleted.

To reconfigure the above parameters, you must update them in the setup_data.yaml file and run the k8s_runner.py command with the reconfigure option.

The following example shows how to use the reconfigure option.

# ./bootstrap/k8s-infra/k8s_runner.py --reconfigure

Reconfiguring Individual HA CVIM-MON Stacks

You can use the reconfigure-stack option to change the SNMP parameters under each stack section in the setupdata.yaml file. You can modify the following fields using reconfigure-stack:

  • Enable SNMP feature

  • Add or remove SNMP manager

  • Change the IP address of the SNMP manager

  • Change version of SNMP manager

Following options are not reconfigurable:

  • Scrape interval

  • LDAP configuration

The following example shows how to use the reconfigure-stack option.

# ./bootstrap/k8s-infra/k8s_runner.py --reconfigure-stack

Reconfiguring a Cisco VIM OpenStack Pod

You can use the reconfigure-cvim-pod option to update the HA proxy certificate (cert) and HA CVIM-MON proxy password (cvim_mon_proxy_password) of each pod.You can execute the reconfigure-cvim-pod operation after changing the certificate or the proxy password keys of the existing OpenStack targets from the existing stacks in the setup_data.yaml file. Any changes to the setup_data.yaml file besides these keys in the existing cvim-mon-stacks list result in a validation failure.

After updating the setup_data.yaml, execute the reconfigure-cvim-pod operation from the current working installer directory using the following command:

# ./bootstrap/k8s-infra/k8s_runner.py --reconfigure-cvim-pod

Modifying Monitoring Targets in a Stack

The Prometheus server in each stack is configured to pull metrics from the list of configured target CVIM pods at a given interval. This interval is usually 1ms for large deployments. These pull requests are scheduled concurrently to spread equally within the interval window. This action enables a better distribution of the bandwidth within each scrape interval.

Adding a Target Cisco VIM OpenStack Pod

You can execute the add-cvim-pod operation after adding new Cisco VIM OpenStack targets to the existing stacks of the cvim-mon-stacks list in the setup_data.yaml file. The new targets must have different names and a different target IP from the other targets in the stack. Any changes to the setup_data.yaml file besides adding new targets to existing stacks result in a validation failure.

After updating setup_data.yaml, execute the add-cvim-pod option from the current working installer directory using the following command:

# ./bootstrap/k8s-infra/k8s_runner.py --add-cvim-pod

Deleting a Target Cisco VIM OpenStack Pod

You can execute the delete-cvim-pod operation after deleting the existing OpenStack targets from the existing stacks in the setup_data.yaml file. Any changes to the setup_data.yaml file besides deleting targets from the existing cvim-mon-stacks list result in a validation failure.

After updating setup_data.yaml, execute the delete-cvim-pod operation from the current working installer directory using the following command:

# ./bootstrap/k8s-infra/k8s_runner.py --delete-cvim-pod

You can also reconfigure a Cisco VIM OpenStack pod using the reconfigure-cvim-pod option. For more information, see Reconfiguring a Cisco VIM OpenStack Pod.

Customizing Custom Grafana Dashboards for HA CVIM MON

HA CVIM-MON allows the creation and persistence of custom dashboards. In order to persist the dashboards, you must follow the steps below. After you create new dashboards or makes changes in Grafana, you can save the work and persist the new or updated dashboards in the custom dashboard repository located in the management node.

You cannot modify or persist built-in dashboards, we recommend that you duplicate the built-in dashboards and edit the copies as custom dashboards.

Following options are supported:

# ./bootstrap/k8s-infra/k8s_runner.py -h

--cvimmon-custom-dashboards
                        Local CVIM MON custom dashboard
  --save-dashboard      Persist Custom Dashboards
  --list-dashboard      List Custom Dashboards
  --upload-dashboard    Upload Custom Dashboards
  --forceop             Force option to delete custom dashboards with upload or save op.
  --preserve            Only works with upload option. If passed all existing dashboards will be preserved with new dashboards.
  --dir-path DIR_PATH   Dir path from where custom dashboards will be uploaded to grafana
  --dry-run             To view what changes will be made on grafana. No actual changes will be made.
  --stack-name STACK_NAME
                        Stack name for which info for dashboards is required.

--cvimmon-custom-dashboards is required if you want to execute any operation related to custom dashboards.

--stack name is required to specify which stack is targeted for the custom dashboard operation.

Listing Custom Dashboards

To list the custom dashboard per stack, use the following command:

# ./bootstrap/k8s-infra/k8s_runner.py --cvimmon-custom-dashboards --list-dashboard --stack-name stack3 

The above command lists out all the custom dashboards on the stack3 namespace.

Saving Custom Dashboards from Grafana to the Management Node

The save dashboard operation synchronizes all custom dashboards from the Grafana server to the management node repository.

To save custom dashboards from Grafana to the management node, use the following command:

# ./bootstrap/k8s-infra/k8s_runner.py --cvimmon-custom-dashboards --save-dashboard --stack-name stack3

During the sync operation if there is a dashboard present on the management node repository and not on the Grafana server (for example, if the dashboard has been deleted from Grafana):

  • The command fails if –forceop or –preserve options does not pass.

  • The command succeeds and deletes the stale dashboard in the management node repository if –forceop passes.

  • The command succeeds and keeps the stale dashboard in the management node repository if –preserve passes.

You can copy all custom dashboards to any user-provided and user-managed empty directory on the management node if –dir-path is provided. This option is useful if you want to version and save all the custom dashboards in a version control system (for example, Git).

This operation succeeds only if the Grafana server and management node repository are in sync. Hence, a sync operation is required before copying the custom dashboards to a user directory.

Following is an example of the –dir-path option:

# ./bootstrap/k8s-infra/k8s_runner.py --cvimmon-custom-dashboards --save-dashboard 
--stack-name stack3 --dir-path /root/sync_dash/

Note

If you pass the --dry-run option to any of these options, you can see relevant logs but no actual sync operation between the Grafana server and the management node repository.


Note

Grafana dashboard folders are not persisted in this version.


Uploading Custom Dashboards from the Management Node to Grafana Server

The upload dashboard operation synchronizes the management node repository with the Grafana server.

Either --forceop or --preserve option is required if only one or more dashboards are present in Grafana.

If you pass the --forceop option, all existing custom dashboards in Grafana server are deleted and all dashboards in the management node repository are uploaded to the Grafana server. Only dashboards present in the Grafana server are deleted.

If you pass the--preserve option, all existing dashboards are preserved and if a dashboard with the same name is encountered then the saved dashboard from the management node repository overwrites the one on Grafana server. Only dashboards present in Grafana side are preserved.

To upload custom dashboards from a user-managed directory to the management node repository and the Grafana server, use the –dir-path option. This functionality works only when the Grafana server and the management node repository are in sync.

Following is an example of the --forceop option:

# ./bootstrap/k8s-infra/k8s_runner.py --cvimmon-custom-dashboards --upload-dashboard 
--dir-path /root/sync_dash/ --stack-name stack3  --force

Following is an example of the --preserve option:

# ./bootstrap/k8s-infra/k8s_runner.py --cvimmon-custom-dashboards --upload-dashboard 
--dir-path /root/sync_dash/ --stack-name stack3  --preserve

The above options are useful if you want to upload a new set of custom dashboards from a git repository onto a newly deployed HA CVIM-MON stack.


Note

If you pass the --dry-run option to run the operations without actual sync, you can see relevant logs for operations between the Grafana server and the management node repo.


Customizing Alerting Rules

Alerting rules define how alerts must be triggered based on conditional expressions on any available metric. For example, it is possible to trigger an alert when any performance metric such as CPU usage, network throughput, or disk usage reaches a certain threshold.

HA CVIM-MON is deployed with a set of default built-in alerting rules that cover the most important error conditions that can occur in the pod.

You can customize alerting rules by using the following steps:

  • Create a custom alerting rules configuration file to add new rules, modify or delete built-in rules.

  • Verify that the custom alerting rules file is valid using a verification tool.

  • Update alerting rules by applying the custom alerting rules file.

Update Alerting Rules

The alerting rules update operation always merges the following two files:

  • Default alerting rules file (built-in file)

  • Custom alerting rules file

Applying a second custom alerting rules file does not preserve alerting rules from the previously applied custom alerting rules file. The update operation does not include previously applied custom alerting rules.

To update alerting rules, run the k8s_runner.py command with --alerting_rules_config option and a path to the custom_alerting_rules.yml file.

For example:

# ./bootstrap/k8s-infra/k8s_runner.py --alerting_rules_config /root/custom_alerting_rules.yaml

The merge tool output file consists of:

  • All rules from custom_alerting_rules.yml that do not belong to group change-rules or delete-rules.

  • Rules from default_alerting_rules.yml that:

    • Do not duplicate rules from custom file.

    • Must not be deleted.

    • Are modified according to change-rules input.

Format of Custom Alerting Rules File

The format of the custom_alerting_rules.yml is identical to the one used by the Prometheus configuration file with a few additional semantic extensions to support deletion and modification of pre-built existing rules.

The groups entry contains a list of groups identified by group_name, where each group can include one or more rules. The labels are used for determining the severity and other SNMP trap attributes.

The limitations when setting labels are given below:

  • You must set the values of severity, snmp_fault_code, and snmp_fault_severity to the values specified in the example below.

  • You must set the value of snmp_fault_source to indicate the metric used in the alert expression.

  • You must not change the the value of snmp_node.

  • You must set the value of snmp_podid as the pod name specified in setup_data.yaml.

groups:
- name: {group_name}
  rules:
  - alert: {alert_name}
    annotations:
      description: {alert_description}
      summary: {alert_summary}
    expr: {alert_expression}
    for: {pending_time}
    labels:
      severity: {informational/warning/critical}
      snmp_fault_code: {other/resourceUsage/resourceThreshold/serviceFailure/hardwareFailure/networkConnectivity}
      snmp_fault_severity: {emergency/critical/major/alert/informational}
      snmp_fault_source: {fault_source}
      snmp_node: '{{ $labels.instance }}'
      snmp_podid: {pod_id}

Adding Alert Rules

Any alert rule specified under a group that is not named change-rules or delete-rules is populated to the merged output file. Custom rules are prioritized over the preexisting rules. If there are two alerts with the same name in both files, only the one from the custom file is retained as a result of the merge.

Modifying Alert Rules

You can modify any preexisting rule using the following syntax:

groups:
- name: change-rules
  rules:
  - alert: {alert_name}
    expr: {new_alert_expression}
    annotations:
      summary: {new_alert_summary}

The merge script looks only for a group named change-rules and changes the expression or summary of the updated alert.

If the alert to be changed does not exist, it is not created and changes are not made.

Deleting Alert Rules

You can delete any built-in rule by using the following construct:

custom_alerting_rules.yml

groups:
- name: delete-rules
  rules:
  - alert: {alert_name/regular_expression}

The merge script looks only for a group named delete-rules and deletes pre-existing rules that match the provided names or regular expressions.

If the alert to be deleted does not exist, changes are not made.

The following custom configuration file includes examples of a new alerting rule, a modified alerting rule and a deleted alerting rule:

groups:
- name: cpu
  rules:
  - alert: cpu_idle
    annotations:
      description: CPU idle usage is too high - resources underutilized
      summary: CPU idle too high
    expr: cpu_usage_idle > 80
    for: 5m
    labels:
      severity: informational
      snmp_fault_code: resourceUsage
      snmp_fault_severity: informational
      snmp_fault_source: cpu_usage_idle
      snmp_node: '{{ $labels.instance }}'
      snmp_podid: pod7
  - alert: cpu_iowait
    annotations:
      description: CPU iowait usage is too high
      summary: CPU iowait too high
    expr: cpu_usage_iowait > 10
    for: 3m
    labels:
      severity: warning
      snmp_fault_code: resourceUsage
      snmp_fault_severity: alert
      snmp_fault_source: cpu_usage_iowait
      snmp_node: '{{ $labels.instance }}'
      snmp_podid: pod7
- name: change-rules
  rules:
  - alert: disk_used_percent
    expr: disk_used_percent > 99
    annotations:
      summary: Disk used > 99%
  - alert: reboot
    annotations:
      summary: Server rebooted
  - alert: system_n_users
    expr: system_n_users > 10
- name: delete-rules
  rules:
  - alert: disk_filling_up_in_4h
  - alert: mem.*

Validation Script for Custom Alerting Rules

You must validate any custom alerting rules file before an updation using the following CLI command:

/opt/cisco/check_promtool.py -v <custom_alerts_file>

The validation script uses the Prometheus promtool script but skips some of its checks to allow updation and deletion of rules. It also checks if the SNMP severities and fault codes are supported.

The following example shows the output of the promtool script in case of a successful validation:

# /opt/cisco/check_promtool.py -v /root/alerting_custom_rules.yaml
check_promtool.py: checking /root/alerting_custom_rules.yaml
check_promtool.py: success:
check_promtool.py:  rules to be changed: 2
check_promtool.py:  rules to be added: 2

The following example shows the output of the promtool script in case of a failure:

# /opt/cisco/check_promtool.py -v /root/alerting_custom_rules.yaml
check_promtool.py: checking /root/alerting_custom_rules.yaml
check_promtool.py: failure:
check_promtool.py:    line 22: field for already set in type rulefmt.Rule
check_promtool.py:    line 23: field labels already set in type rulefmt.Rule

Customizing Alert Manager and Receivers

The Alert Manager component in CVIM-MON is in charge of the routing, grouping, and inhibiting alerts that are sent by the Prometheus alert rule engine to the appropriate receivers.

By default, CVIM-MON forwards every alert to the SNMP agent to be sent to the SNMP managers as SNMP traps, if enabled in the configuration file.

After deployment, you can add custom alert routes, alert grouping, alert inhibitions and receivers by following the below steps:

1.Create a proper custom alerting rules configuration file:

  • Create a custom alert manager rule configuration file named alertmanager_custom_config.yml.

  • Edit the content using your favorite editor (see format below).

  • Verify that the custom alerting rule file is valid using the provided tool.

2.Once the file is validated, you can execute the following command:

# ./bootstrap/k8s-infra/k8s_runner.py --alerting_rules_config <alertmanager_config_file>

Supported Receivers

The Alert Manager supports the following list of receivers:

  • webhook

  • pagerduty

  • e-mail

  • pushover

  • wechat

  • opsgenie

  • victorops

Alert Manager Custom Configuration File Format

General Format

The following listing shows the general format of the alert manager configuration file. Most custom configuration files must include only a small subset of the available options.

global:
# ResolveTimeout is the time after which an alert is declared resolved # if it has not been updated.
[ resolve_timeout: <duration> | default = 5m ]

# The default SMTP From header field. [ smtp_from: <tmpl_string> ]
# The default SMTP smarthost used for sending emails, including port number.
# Port number usually is 25, or 587 for SMTP over TLS (sometimes referred to as STARTTLS).

# Example: smtp.example.org:587 [ smtp_smarthost: <string> ]
# The default hostname to identify to the SMTP server. [ smtp_hello: <string> | default = "localhost" ]
[ smtp_auth_username: <string> ]
# SMTP Auth using LOGIN and PLAIN. [ smtp_auth_password: <secret> ]
# SMTP Auth using PLAIN.
[ smtp_auth_identity: <string> ] # SMTP Auth using CRAM-MD5.
[ smtp_auth_secret: <secret> ]
# The default SMTP TLS requirement.
[ smtp_require_tls: <bool> | default = true ]

# The API URL to use for Slack notifications. [ slack_api_url: <secret> ]
[ victorops_api_key: <secret> ]
[ victorops_api_url: <string> | default = "https://alert.victorops.com/integrations/generic/20131114/alert/" ]
[ pagerduty_url: <string> | default = "https://events.pagerduty.com/v2/enqueue" ] [ opsgenie_api_key: <secret> ]
[ opsgenie_api_url: <string> | default = "https://api.opsgenie.com/" ] [ hipchat_api_url: <string> | default = "https://api.hipchat.com/" ]  [ hipchat_auth_token: <secret> ]
[ wechat_api_url: <string> | default = "https://qyapi.weixin.qq.com/cgi-bin/" ] [ wechat_api_secret: <secret> ]
[ wechat_api_corp_id: <string> ]

# The default HTTP client configuration [ http_config: <http_config> ]
# Files from which custom notification template definitions are read.
# The last component may use a wildcard matcher, e.g. 'templates/*.tmpl'. templates:
[ - <filepath> ... ]

# The root node of the routing tree. route: <route>

# A list of notification receivers. receivers:
- <receiver> ...

# A list of inhibition rules. inhibit_rules:
[ - <inhibit_rule> ... ]

The custom configuration must be a full working configuration file with the following template. It must contain three main keys such as global, route, and receiver.

The global configuration must have at least one attribute, for example, resolve_timeout = 5m. Ensure that all new receivers must be part of the route, so the alerts are routed to the proper receivers. The receiver name cannot be snmp.

You can find the configuration details for creating route/receiver in the Prometheus Alert Manager documentation (publicly available online).

global: resolve_timeout: 5m

route: <route>

receivers:
- <receiver> ...

The following is a custom config to add a webhook receiver. 

global:
  resolve_timeout: 5m

route:
  group_by: ['alertname', 'cluster', 'service']
  group_wait: 30s
  group_interval: 5m
  repeat_interval: 8737h
  receiver: receiver-webhook

receivers:
- name: ‘receiver-webhook’
  webhook_configs: 
  - send_resolved: true
    url: 'http://webhook-example:####/xxxx/xxx'

Default Built-in Configuration File

Two different default configuration files are available to define the following in order:

  1. Generic route for all alerts to the SNMP agent running on the management node.

  2. Route to a generic receiver that can be customized to add a channel of notification (webhook, slack and others).

Default configuration file with SNMP enabled

:
global:
  resolve_timeout: 5m

route:
  group_by: ['alertname', 'cluster', 'service']
  group_wait: 30s
  group_interval: 5m
  repeat_interval: 8737h

  # A default receiver
  receiver: snmp

receivers:
- name: 'snmp'
  webhook_configs:
  - send_resolved: true
    url: 'http://localhost:1161/alarms'

Default configuration file with SNMP disabled

route:
  receiver: recv
  group_by:
  - alertname
  - cluster
  - service
  group_wait: 30s
  group_interval: 5m
  repeat_interval: 8737h
receivers:
- name: recv

SNMP Trap Receivers

You can send the SNMP traps to SNMP managers enabled in the Cisco VIM configuration file setup_data.yaml.

Example: inhibit (mute) alerts matching a set of labels

Inhibit alerts is a tool that prevents certain alerts to be triggered if other alert/alerts is/are trigged. If one alert having the target attribute matches with the another alert having source attribute, this tool inhibits the alert with target attribute.

This is the general format for inhibit alerts. You can set a regex to match both the source and target alerts and to filter the alerts per label name.

# Matchers that have to be fulfilled in the alerts to be muted.
target_match:
  [ <labelname>: <labelvalue>, ... ]
target_match_re:
  [ <labelname>: <regex>, ... ]

# Matchers for which one or more alerts have to exist for the
# inhibition to take effect.
source_match:
  [ <labelname>: <labelvalue>, ... ]
source_match_re:
  [ <labelname>: <regex>, ... ]

# Labels that must have an equal value in the source and target
# alert for the inhibition to take effect.
[ equal: '[' <labelname>, ... ']' ]

Example: Inhibit alerts if other alerts are active

The following is an example of inhibit rule that inhibits all the warning alerts that are already critical.

inhibit_rules:
- source_match:
    severity: 'critical'
  target_match:
    severity: 'warning'
  # Apply inhibition if the alertname is the same.
  equal: ['alertname', 'cluster', 'service']

This is an example of inhibit all alerts docker_container in containers that are down (which has the alert docker_container_down on).

inhibit_rules:
  - target_match_re:
       alertname: 'docker_container.+'
    source_match:
       alertname: 'docker_container_down'
    equal: ['job', 'instance']

Validation Script

When a new configuration is set, execute amtool script and ensure that you get a SUCCESS in the output from the configuration POV.

> /opt/cisco/amtool check-config <alertmanager_config_file>
Checking '<alertmanager_config_file>'  SUCCESS
Found:
 - global config
 - route
 - 0 inhibit rules
 - 1 receivers
 - 0 templates
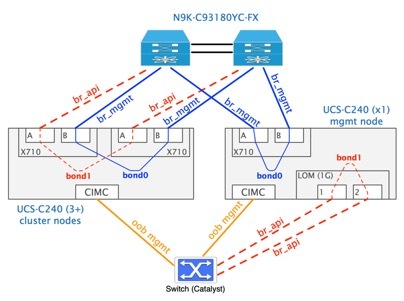
Backing Up HA CVIM-MON

You can backup the HA CVIM-MON pod in two ways:

  • Manual Backup

  • Auto Backup

Backup initiates only if the last executed operation is in the success state. Also, if the CVIM-MON pod is in the middle of an update then backup won’t be executed.

Backup executes only from the workspace from where CVIM MON was deployed.

Manual Backup

Navigate to <installer-ws>/bootstrap/k8s-infra/cvimmon_backup.

The following example shows how to perform a manual backup:
# ./cvimmon_ha_backup.py –backup

Backup dir: /var/cisco/cvimmonha_backup/<backup_dir>
Log dir: /var/log/cvimmonha_backup/<log_file name>

Information regarding backup dir and log file appear in the console after the execution of the operation.

To see details of the backup operation use --debug option along with the execution script.

Auto Backup

After any state change operation, autobackup is executed after the success.

Following options won’t execute Autobackup:

  • --renew-k8s-certs

  • --renew-etcd-certs

  • --update

Auto Backup directory:

  /var/cisco/cvimmonha_autobackup/<backup_dir>

Log directory:

/var/log/cvimmonha/<uuid>/mercury_baremetal_install.log

Note

After you execute backup successfully, move the backup directory to some remote location and proceed with the restore workflow.


Restoring HA CVIM-MON

Important Notes for Restore

Following are the important notes before you restore HA CVIM-MON:

  • Cisco VIM version must be same for management node ISO.

  • Timezone, hostname, and IP config for the management node must not change. If it does, restore will fail.

  • You must execute restore from the /var/cisco/ directory.

  • You must not modify the backup directory. If you do, restore will fail.

Restore

After the ISO installation, place the backup dir from the remote machine to the management node at /var/cisco/. Navigate to the backup directory and execute the following command:

# ./cvimmon_restore

To view detailed messages add --v parameter to the cvimmon_restore script.

After all the data on the management node is restored, the script initiates the first three steps of install:

!!  CVIM MON HA ORCHESTRATOR  !!    
=========================================
+------------------------+-------------------+
| Operations             | Operation ID |
+------------------------+-------------------+
| VALIDATION             |      1               |
| BOOTSTRAP_INFRA        |      2               |
| SETUP_ARGUS            |      3               |

After the successful completion of the restore operation, execute the kubectl get pods --all-namespaces command and see if all the pods are in the running state.

You can also verify by logging into Grafana using the old password and confirm if all the data is visible.