- Preface
- Installation Prerequisites
- Installing the Master for Windows
- Installing the Master for Unix
- Installing Client Manager
- Installing the Java Client
- Installing Fault Tolerance
- Installing the Agent
- Installing Adapters
- Basic Configuration
- Configuring SSL Messaging
- Defining Users
- Upgrading Components
- Troubleshooting TES
- Appendix A
- Appendix B
Installing the Master for Unix
You can run TES on Unix by installing the Unix versions of the master and agent software. The current Unix version of the TES master only works with an Oracle database.
There are two methods to install the Unix version of the TES master:
- Installation Program (see Installing the Unix Master.)
- Manually - From the command line as described in Installing the Master for Unix from the Command Line. Before installing the Unix master from the command line, you must manually create the Oracle schema.
The master is installed with default parameters that provide most users with optimum performance, but individual circumstances may require reconfiguring the master parameters after installation. These parameters are managed in a master.props file residing on the master machine. Refer to Configuring the Master for information on modifying the main master properties.
Installation Prerequisites
The following requirements must be met prior to installation of the Unix master:
–![]() Solaris 2.9 or 2.10 (Sparc) with Sun JVM 1.7
Solaris 2.9 or 2.10 (Sparc) with Sun JVM 1.7
–![]() Hewlett-Packard 11i(RISC) with Sun JVM 1.7 (must be using the most current patches)
Hewlett-Packard 11i(RISC) with Sun JVM 1.7 (must be using the most current patches)
Hewlett-Packard 11i v1 or v2 (Itanium) with Sun JVM 1.7 (must be using the most current patches)
–![]() AIX 5.3 TL 5,6,9,10,6.1 with IBM JVM 1.7.
AIX 5.3 TL 5,6,9,10,6.1 with IBM JVM 1.7.
–![]() Linux Redhat Enterprise Server v4,v5 Intel (x86) kernel 2.2.14+– Sun JVM 1.7
Linux Redhat Enterprise Server v4,v5 Intel (x86) kernel 2.2.14+– Sun JVM 1.7
–![]() Linux SUSE Enterprise Server v10,v11 Intel (x86) kernel 2.2.14+–Sun JVM 1.7
Linux SUSE Enterprise Server v10,v11 Intel (x86) kernel 2.2.14+–Sun JVM 1.7
- A user account created to own, control and install the Unix master files under. This user does not have to be root although whoever creates the user must be root.
- 300 MB of disk space for the product and its logs
- Installation from an X Windows terminal, either local or remote
- Master machine requires at least 2 Gig of RAM (The use of any TES adapters requires an additional 1 GB.) and dual 500 MHz processors dedicated to TES needs
- Oracle 10g or 11i database instance already installed and running
- Create a ‘tidal’ user on the unix box for use when installing the master.
- You should have your DBA available during installation to provide database configuration information.
- Apply all patches supplied in the latest hotfix for TES 6.2.

Note![]() Only one master can be installed on a machine. TES cannot operate correctly if two masters are installed on the same machine.
Only one master can be installed on a machine. TES cannot operate correctly if two masters are installed on the same machine.
Installing the Unix Master
Step 1![]() Copy install.bin to the target machine.
Copy install.bin to the target machine.
Step 2![]() Change the permissions on the copied install.bin file to make the file executable by entering:
Change the permissions on the copied install.bin file to make the file executable by entering:
Step 3![]() After copying the file to the directory, begin the installation program by entering:
After copying the file to the directory, begin the installation program by entering:
When the installation program starts, the installation splash screen displays, and the Introduction panel follows.
Step 4![]() After reading the introductory text that explains how to cancel the installation or modify a previous entry on a previous screen, click Next.
After reading the introductory text that explains how to cancel the installation or modify a previous entry on a previous screen, click Next.
Step 5![]() On the Choose Installation Folder panel, enter the directory path to the location where you wish to install the master files or click Choose to browse through the directory tree to the desired directory.
On the Choose Installation Folder panel, enter the directory path to the location where you wish to install the master files or click Choose to browse through the directory tree to the desired directory.
Step 6![]() Click Next. The Select Appropriate Master panel displays.
Click Next. The Select Appropriate Master panel displays.
Note![]() The master machines, both primary and backup, must have mirror configurations, meaning that both machines must use the same version of operating system and JVM for fault tolerance to operate correctly.
The master machines, both primary and backup, must have mirror configurations, meaning that both machines must use the same version of operating system and JVM for fault tolerance to operate correctly.
Step 7![]() Select whether you are installing a primary or backup master.
Select whether you are installing a primary or backup master.
The only instance you would select the Backup option is if you are installing fault tolerance, which requires a special license. If you are installing fault tolerance, install the primary master before you install the backup master.
Step 8![]() Click Next. The Select Admiral Database Creation Option panel displays.
Click Next. The Select Admiral Database Creation Option panel displays.
Step 9![]() Select Automatic or Manual.
Select Automatic or Manual.
TES requires its own database to store job information. The installation program will create the database automatically unless you select the Manual option. The automatic database creation process creates a schema called ‘tidal’ and three tablespaces:
If the schema name or any of the names of the tablespaces is used already, the installation will fail.
Step 10![]() Click Next. The Enter DBA UserName and Password dialog box displays.
Click Next. The Enter DBA UserName and Password dialog box displays.
TES must be able to access the Oracle database. You must provide the user name and password required to access the database. Your DBA can provide this information. The DBA user name is usually the ‘system’ user. The specified database user will create the ‘tidal’ schema and its three tablespaces.
Step 11![]() Click Next. The JDBC Driver Information panel displays.
Click Next. The JDBC Driver Information panel displays.
Step 12![]() Provide the following information so the Unix master can connect to the database:
Provide the following information so the Unix master can connect to the database:
Note![]() The master should not be installed on hosts with underscores in their names or the JMS connections will fail between components.
The master should not be installed on hosts with underscores in their names or the JMS connections will fail between components.
Note![]() The SID is case-sensitive.
The SID is case-sensitive.
Step 13![]() Click Next. The Test JDBC Connection panel displays.
Click Next. The Test JDBC Connection panel displays.
Step 14![]() Click Test JDBC Connection to verify that the information configuring the database connection is correct. The installation program must be able to connect to the database before the installation can continue.
Click Test JDBC Connection to verify that the information configuring the database connection is correct. The installation program must be able to connect to the database before the installation can continue.
Note![]() If the connection to the database cannot be established, an error message displays explaining what needs to be fixed. If the database cannot be accessed you must resolve the issue before proceeding with the installation SID is case-sensitive.
If the connection to the database cannot be established, an error message displays explaining what needs to be fixed. If the database cannot be accessed you must resolve the issue before proceeding with the installation SID is case-sensitive.
When the program accesses the database, a “Connection Successful” message displays.
Step 15![]() Click Next. The Admiral Tablespace Installation panel displays.
Click Next. The Admiral Tablespace Installation panel displays.
Step 16![]() Specify the location for the Oracle tablespace directories to be created.
Specify the location for the Oracle tablespace directories to be created.
- To use any location other than the default location, enter the directory paths to the ADMIRAL_DATA, ADMIRAL_INDEX and ADMIRAL_TEMP tablespaces. Do not change the actual datafile names. Change only the directory paths.
- If your database is on a Windows platform, be sure to use Windows pathname syntax (for example, C:\Program Files\Microsoft SQL Server\MSSQL\Data).
- If your database is on the Unix platform, use the proper Unix directory syntax (for example, /opt/oracle/oradata/Admiral/ADMIRAL_DATA).
Step 17![]() Click Next. The Master Host Name panel displays.
Click Next. The Master Host Name panel displays.
Step 18![]() Enter the hostname (or machine name) of the machine that you are installing the Unix master on. Do not use the domain name.
Enter the hostname (or machine name) of the machine that you are installing the Unix master on. Do not use the domain name.
Step 19![]() Click Next. The SNMP Information panel displays.
Click Next. The SNMP Information panel displays.
Step 20![]() Enter the name of the SNMP server machine.
Enter the name of the SNMP server machine.
If you want to use SNMP to send traps in TES, you must tell the Unix master how to connect to the SNMP server.
Step 21![]() Enter the port number of the SNMP server machine. The default port number is 162. This information can be changed later if necessary.
Enter the port number of the SNMP server machine. The default port number is 162. This information can be changed later if necessary.
Step 22![]() Click Next to continue the installation or to skip this step if you are not using SNMP traps. The TES SuperUser panel displays.
Click Next to continue the installation or to skip this step if you are not using SNMP traps. The TES SuperUser panel displays.
Figure 3-1 TES SUPERUSER panel
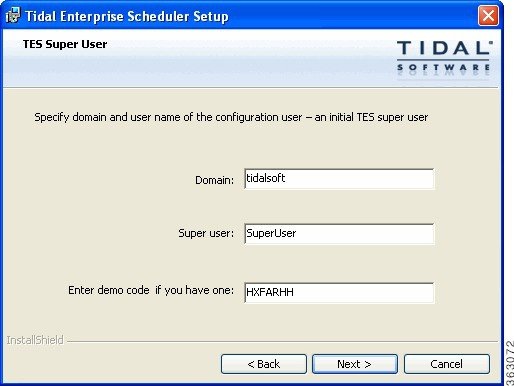
Step 23![]() Enter the domain name of the initial TES configuration Super User.
Enter the domain name of the initial TES configuration Super User.
Step 24![]() Enter the name of the initial TES configuration Super User.
Enter the name of the initial TES configuration Super User.
Step 25![]() If you have a Demo license, enter the license number, then click Next. The Pre-Installation Summary panel displays.
If you have a Demo license, enter the license number, then click Next. The Pre-Installation Summary panel displays.
This screen summarizes the information entered during the installation procedure.
Step 26![]() Review the information to ensure it is correct.
Review the information to ensure it is correct.
Step 27![]() If any information is incorrect, retrace your steps and correct the information by clicking Previous until you reach the desired screen.
If any information is incorrect, retrace your steps and correct the information by clicking Previous until you reach the desired screen.
If the information is correct, click Install to start the installation of the Unix master files.
After the installation process completes, a screen provides a database status report. This report lists the various steps during the creation of the database and if the step was successful.
Step 28![]() Review the database report for any error notices.
Review the database report for any error notices.
Step 29![]() If the database was created without any errors, click Next.
If the database was created without any errors, click Next.
If the report displays any errors during database creation, note the errors. You can correct the errors later by manually creating the database. Click Next.
Once installation is complete, the Installation Complete panel displays.
Step 30![]() Click Done to exit the installer.
Click Done to exit the installer.
Verifying Successful Installation
You should verify that the installation program installed all of the required files.
Verify that all of master files were installed by going to the directory location that you designated during installation and listing the directory contents with the following command:
The seven main file directories (not counting the UninstallerData directory) are listed at the top with the contents of the bin, lib and config directories also displayed.
Installing the Master for Unix from the Command Line
The Unix master can be installed using the installer program or by installing it from the command line.
To install from the command line:
Step 1![]() Copy install.bin to the target machine.
Copy install.bin to the target machine.
Step 2![]() Change the permissions on the install.bin file in the directory to make the file executable:
Change the permissions on the install.bin file in the directory to make the file executable:
Step 3![]() Open a command prompt window and enter:
Open a command prompt window and enter:
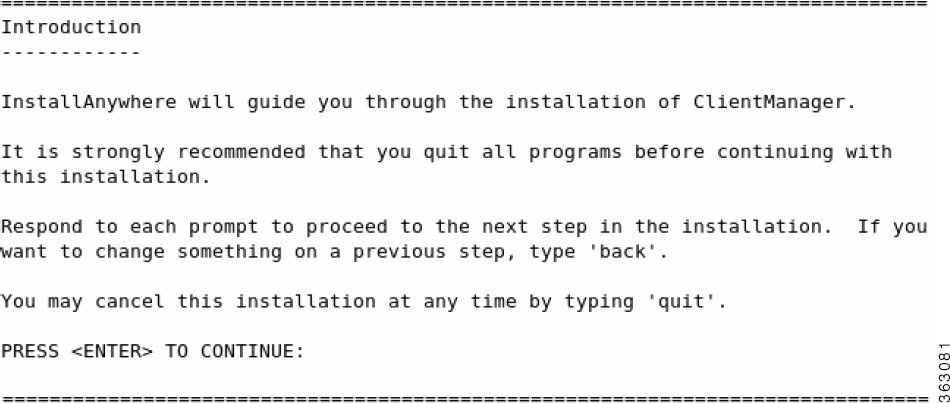
Step 4![]() Press Enter. The following screen displays as the installation program begins.
Press Enter. The following screen displays as the installation program begins.
Figure 3-2 Launching Installer Screen

The initial installation screen is followed with the Introduction screen that provides instruction for proceeding with the installation program.
Figure 3-3 Introduction Screen
Step 5![]() Press Enter. The Choose Install Folder screen displays.
Press Enter. The Choose Install Folder screen displays.
Step 6![]() Enter the directory path where the master files should be installed. It is recommended that you use the default directory path when installing.
Enter the directory path where the master files should be installed. It is recommended that you use the default directory path when installing.
Step 7![]() Press Enter. The Select Master Type screen displays.
Press Enter. The Select Master Type screen displays.
Figure 3-4 Select Master Type Screen

Step 8![]() Select whether you are installing a primary or backup master.
Select whether you are installing a primary or backup master.
Select the Primary option by entering 1 at the prompt.
Select the Backup option by entering 2 at the prompt if you are installing fault tolerance, which requires a special license. (If you are using fault tolerance, be sure to install the primary master before you install the backup master. Refer to the Cisco Tidal Enterprise Scheduler Installation Guide for more information on installing fault tolerance.)
Step 9![]() Press Enter. The JDBC Driver screen displays.
Press Enter. The JDBC Driver screen displays.
Step 10![]() Supply the following information so the Unix master can connect to the database:
Supply the following information so the Unix master can connect to the database:
Step 11![]() Press Enter. The Master Hostname screen displays.
Press Enter. The Master Hostname screen displays.
Figure 3-5 Master Hostname Screen

Step 12![]() Type the name of the machine where you are installing the master.
Type the name of the machine where you are installing the master.
Note![]() Do not include the domain name. If you are installing fault tolerance, this screen does not display when installing the backup master.
Do not include the domain name. If you are installing fault tolerance, this screen does not display when installing the backup master.
Step 13![]() Press Enter. The SNMP Information screen displays.
Press Enter. The SNMP Information screen displays.
Figure 3-6 SNMP Information Screen

If you want to use the email function in TES, you must tell the Unix master how to connect to the SNMP server. (The default SNMP port number is 162.) This information can be changed later in the master.props file, if necessary.
Note![]() To bypass this screen, press Enter.
To bypass this screen, press Enter.
Step 14![]() Enter the following information:
Enter the following information:
Step 15![]() Press Enter. The TES SuperUser screen displays.
Press Enter. The TES SuperUser screen displays.
Figure 3-7 TES SuperUser Screen

Step 16![]() Enter the domain name of the initial TES configuration Super User, then press Enter.
Enter the domain name of the initial TES configuration Super User, then press Enter.
Step 17![]() Enter the name of the initial TES configuration Super User, then press Enter. The Pre-Installation Summary screen displays.
Enter the name of the initial TES configuration Super User, then press Enter. The Pre-Installation Summary screen displays.
Step 18![]() Review the accuracy of the information.
Review the accuracy of the information.
Step 19![]() Press Enter to begin the installation.
Press Enter to begin the installation.
If any of the information is incorrect, you can type QUIT to cancel the installation or you can continue with the installation and make corrections in the master.props configuration file.
The Installing screen displays.
Once installation is complete, the Installation Complete screen displays.
Step 20![]() Press Enter to exit the installer.
Press Enter to exit the installer.
Step 21![]() Verify successful installation of the master files by following the procedure described in Verifying Successful Installation.
Verify successful installation of the master files by following the procedure described in Verifying Successful Installation.
Note![]() If you are installing the Unix master from the command line, you must also manually install the database as a separate procedure. This procedure is described in the following section.
If you are installing the Unix master from the command line, you must also manually install the database as a separate procedure. This procedure is described in the following section.
Updating Oracle Schema Manually
Although it is recommended that the installation process create the master database for Oracle, users can create the Oracle schema manually. If you are installing the Unix master from the command-line then you must first create the Oracle schema manually. Have your Oracle DBA perform the following procedures.
To update the Oracle schema manually:
Step 1![]() Locate the connectdb.sql script within the sql directory.
Locate the connectdb.sql script within the sql directory.
Step 2![]() Edit the following parameters in this script:.
Edit the following parameters in this script:.
Note![]() For debugging purposes, you can run a spool file as you run the installation script.
For debugging purposes, you can run a spool file as you run the installation script.
- create tablespace admiral_data datafile 'ADMIRAL_DATA' size 200m reuse autoextend on;
- create tablespace admiral_index datafile 'ADMIRAL_INDEX' size 100m reuse autoextend on;
- create temporary tablespace admiral_temp datafile 'ADMIRAL_TEMP' size 200M reuse;
- create user tidal identified by <call Technical Services for password> default tablespace admiral_data quota unlimited on admiral_data quota unlimited on admiral_index temporary tablespace admiral_temp ;
(Contact Technical Services for the password to enter in the brackets < >.)
(Contact Technical Services for the password to enter in the brackets < >. Replace the string “tnsname” at the end of the CONNECT statement with the real TNSName that is used to connect to the Oracle database.)
Note![]() If you wish to install the datafiles in a specific directory, the Oracle DBA can change the CREATE TABLESPACE statements to specify a different directory location for the datafiles. The datafile growth options may also be modified if desired. Do not lower the default SIZE values.
If you wish to install the datafiles in a specific directory, the Oracle DBA can change the CREATE TABLESPACE statements to specify a different directory location for the datafiles. The datafile growth options may also be modified if desired. Do not lower the default SIZE values.
Step 3![]() Enter the information you received from Technical Services in the appropriate brackets in the connectdb.sql script.
Enter the information you received from Technical Services in the appropriate brackets in the connectdb.sql script.
Step 5![]() Locate the orapopulate.sql script within the sql directory.
Locate the orapopulate.sql script within the sql directory.
Step 6![]() Find the following statement and change DOMAINNAME and SUPERUSERNAME to be the domain and user name of the initial super user account:
Find the following statement and change DOMAINNAME and SUPERUSERNAME to be the domain and user name of the initial super user account:
insert into usrmst (usrmst_id, usrmst_domain, usrmst_name, usrmst_fullname, usrmst_desc, usrmst_phoneno, usrmst_pagerno, usrmst_email, usrmst_emailtype, secmst_id, lngmst_id, usrmst_password, usrmst_suser) values (1, DOMAINNAME, 'SUPERUSERNAME', 'SUPERUSERNAME', null, null, null, null, null, 6, 1, null, 'Y');
Note![]() DOMAINNAME can be null. If it is not null, be sure to add single quotes around the domain name in the sql statement. Your Oracle TES database should now be installed.
DOMAINNAME can be null. If it is not null, be sure to add single quotes around the domain name in the sql statement. Your Oracle TES database should now be installed.
Step 8![]() Login as the SYSTEM user (or equivalent).
Login as the SYSTEM user (or equivalent).
Step 9![]() Run the connectdb.sql script to create a user called tidal and to create the database tablespaces. Run the following scripts as the tidal user you just created.
Run the connectdb.sql script to create a user called tidal and to create the database tablespaces. Run the following scripts as the tidal user you just created.
a.![]() Run the adoracle.sql script and if there are no errors issue a commit ; statement.
Run the adoracle.sql script and if there are no errors issue a commit ; statement.
b.![]() Run the orapopulate.sql script and if there are no errors issue a commit ; statement.
Run the orapopulate.sql script and if there are no errors issue a commit ; statement.
c.![]() Run the nodmst.sql script and if there are no errors issue a commit ; statement.
Run the nodmst.sql script and if there are no errors issue a commit ; statement.
Your Oracle TES database should now be installed. If any errors occurred when running those scripts, do not continue. Collect as much information on the errors as possible and contact either the consultant assisting your installation or Technical Services at Cisco.
Controlling the Unix Master
Control the Unix master from the command line using tesm command as described in the following table:
Note![]() ./ may not be required on some systems. Consult your system administrator to determine how the commands should be used.
./ may not be required on some systems. Consult your system administrator to determine how the commands should be used.
Using the Command Line
You can use the command line to directly access the Unix master but you can only access it from the machine that the Unix master is installed on. (You do not need to provide the name of the machine in the command.) You can use single or multiple-command mode when entering commands.
Uninstalling the Unix Master
There are two ways to uninstall the master. The first is done using the contents of the Uninstaller folder. The second is done through the command line. Use the method you are most comfortable with.
Uninstalling From the Uninstaller Folder
The uninstallation procedure will not be successful if attempted while the master is running. You must stop the Unix master before you can remove it.
To uninstall from the Uninstaller folder:
Step 1![]() Check the status of the master to see if it is running, by entering:
Check the status of the master to see if it is running, by entering:
Step 2![]() If the status check shows the master is not running, proceed to the next step. If the status check shows the master is running, stop the master by entering:
If the status check shows the master is not running, proceed to the next step. If the status check shows the master is running, stop the master by entering:
Step 3![]() Once the master is stopped, use the Unix file manager to locate the uninstaller folder called UninstallerData.
Once the master is stopped, use the Unix file manager to locate the uninstaller folder called UninstallerData.
Step 4![]() From the UninstallerData folder, run Uninstall_UnixMaster. The Uninstall Master panel displays.
From the UninstallerData folder, run Uninstall_UnixMaster. The Uninstall Master panel displays.
Step 5![]() Click Uninstall. A status panel is displayed to illustrate the progress of the uninstallation program.Once the uninstall is complete, the Uninstall Complete panel displays.
Click Uninstall. A status panel is displayed to illustrate the progress of the uninstallation program.Once the uninstall is complete, the Uninstall Complete panel displays.
The Unix master is now uninstalled. Any files that were created after the master is installed are not removed. Files that were not removed must be manually removed.
Note![]() The uninstallation program only removes the Client Manager files installed at the time of installation. If you created other files in the master directory after installation, these files are not removed. You must manually delete these additional files.
The uninstallation program only removes the Client Manager files installed at the time of installation. If you created other files in the master directory after installation, these files are not removed. You must manually delete these additional files.
Uninstalling Using the Command Line
The uninstallation procedure will not be successful if the master is running. Stop the master before beginning uninstallation.
To uninstall using the command line:
Step 1![]() Check the status of the master to verify that it is not running by entering:
Check the status of the master to verify that it is not running by entering:
Step 2![]() If the status check shows the master is not running, proceed to the next step. If the status check shows the master is running, stop the master by entering:
If the status check shows the master is not running, proceed to the next step. If the status check shows the master is running, stop the master by entering:
Step 3![]() Once the master is stopped, return to the master directory.
Once the master is stopped, return to the master directory.
Have your Unix administrator remove the master directory and its contents.
 Feedback