- Preface
- Installation Prerequisites
- Installing the Master for Windows
- Installing the Master for Unix
- Installing Client Manager
- Installing the Java Client
- Installing Fault Tolerance
- Installing the Agent
- Installing Adapters
- Basic Configuration
- Configuring SSL Messaging
- Defining Users
- Upgrading Components
- Troubleshooting TES
- Appendix A
- Appendix B
Cisco Tidal Enterprise Scheduler 6.2 Installation Guide
Bias-Free Language
The documentation set for this product strives to use bias-free language. For the purposes of this documentation set, bias-free is defined as language that does not imply discrimination based on age, disability, gender, racial identity, ethnic identity, sexual orientation, socioeconomic status, and intersectionality. Exceptions may be present in the documentation due to language that is hardcoded in the user interfaces of the product software, language used based on RFP documentation, or language that is used by a referenced third-party product. Learn more about how Cisco is using Inclusive Language.
- Updated:
- July 1, 2016
Chapter: Installing the Master for Windows
Installing the Master for Windows
TES can be configured on a network in many different ways. The master is installed with default parameters that provide most users with optimum performance but individual circumstances may require reconfiguring the master parameters after installation. These parameters are managed in a master.props file residing on the master machine. Refer to Configuring the Master for information on modifying the main master properties.
Installation Prerequisites
The following requirements must be met for successful installation of the TES master:
- User with local Administrator privileges
- One of the Windows operating systems listed in Minimum System Requirements.
- The master machine must be able to ping the database server’s host name and to establish a normal database client connection to the database service (and the backup master and fault monitor server host names, if in a fault tolerant configuration)
- Database software already installed single or multiple instance (See Supported Databases for further information.)
- Apply all patches supplied in the latest hotfix for TES 6.2.
- Set the system properties to provide the complete path to the bin directory.
To set system properties to provide the complete Java path:
Step 1![]() Right click My Computer, and choose Properties.
Right click My Computer, and choose Properties.
Step 2![]() Click the Advanced system settings link in the left pane.
Click the Advanced system settings link in the left pane.
The System Properties dialog box displays.
Step 3![]() Click Environment Variables, and select the path to edit in the Environment Variables dialog box.
Click Environment Variables, and select the path to edit in the Environment Variables dialog box.
Step 4![]() Click Edit and provide the complete Java path, down to the bin directory.
Click Edit and provide the complete Java path, down to the bin directory.
Installing the Windows Master

Note![]() This installation procedure for installting the Windows master differs depending upon whether the database being used is Microsoft SQL Server or Oracle.
This installation procedure for installting the Windows master differs depending upon whether the database being used is Microsoft SQL Server or Oracle.
Using a Microsoft SQL Database
To install the master component using a Microsoft SQL database:
Step 2![]() On the Internet Explorer-Security Warning dialog box, click Run.
On the Internet Explorer-Security Warning dialog box, click Run.
Step 3![]() On the Welcome panel, click Next.
On the Welcome panel, click Next.
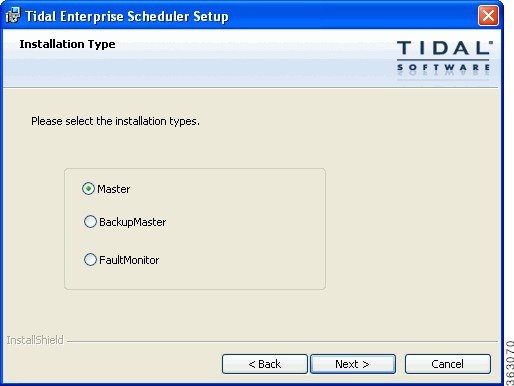
Step 4![]() On the Installation Type panel, select Master, then click Next.
On the Installation Type panel, select Master, then click Next.
Figure 2-1 Installation Type Panel
Step 5![]() On the TES Super User panel, enter the following, then click Next.
On the TES Super User panel, enter the following, then click Next.
Step 6![]() On the Destination Folder panel, select the directory where the Scheduler files will reside, then click Next.
On the Destination Folder panel, select the directory where the Scheduler files will reside, then click Next.
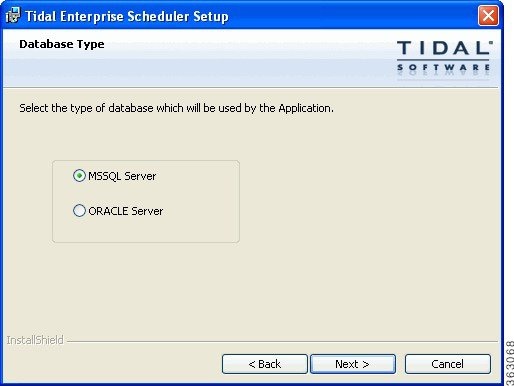
Step 7![]() On the Database Type panel, select MSSQL Server, then click Next.
On the Database Type panel, select MSSQL Server, then click Next.
Figure 2-2 Database Type Panel
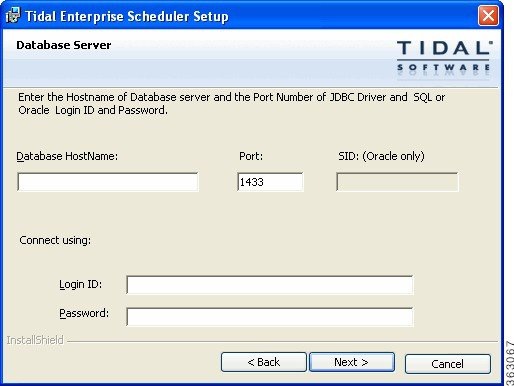
Step 8![]() On the Database Server panel, identify the Microsoft SQL database and logon you are using, then click Next.
On the Database Server panel, identify the Microsoft SQL database and logon you are using, then click Next.
Note![]() The master should not be installed on hosts with underscores in their names or the JMS connections will fail between components.
The master should not be installed on hosts with underscores in their names or the JMS connections will fail between components.
Note![]() The Oracle SID and Service Name should be the same on the database. However, if they are different, provide the Oracle Service Name as the SID in this field.
The Oracle SID and Service Name should be the same on the database. However, if they are different, provide the Oracle Service Name as the SID in this field.
–![]() Login ID — Enter the login credentials for the database administrator.
Login ID — Enter the login credentials for the database administrator.
–![]() Password — Enter the password for the database administrator.
Password — Enter the password for the database administrator.
Figure 2-3 Database Server Panel
Step 9![]() On the Admiral Database and Transaction Log File Path panel, click Next to accept the default paths.
On the Admiral Database and Transaction Log File Path panel, click Next to accept the default paths.
Step 10![]() On the Database Size panel, enter database and log file sizes, then click Next.
On the Database Size panel, enter database and log file sizes, then click Next.
The Active Directory/LDAP Authentication panel displays.
Step 11![]() Select an option, then click Next.
Select an option, then click Next.
If configuring the Client Manager to use the Active Directory option, the Active Directory Authentication panel displays.
If configuring the Client Manager to use the LDAP option, the LDAP Authentication panel displays.
Step 12![]() For Active Directory, enter the following information:
For Active Directory, enter the following information:
For LDAP, enter the following information:
- Hostname— Enter the hostname or IP address for the LDAP server.
- Port— Enter the port number for the LDAP server.
- BindDN— Enter the user account to query the LDAP server.
- UserObjectClass— Specify a valid object class for the BindDB user. Only users who posses one or more of these objectClasses will be permitted to authenticate.
- UserBindDN— Enter the user account to query the LDAP server.
- User-role based access for Oracle/Sun Directory Server— Select this option if your TES 6.2 Web Client user authentication is defined to use Oracle/Sun Directory Server with role-based access.
- GroupBindDN— Enter the group account to query the LDAP server.
Step 13![]() On the Ready to Install the Program panel, click Install to start the installation process.The Installing Tidal TES - Master panel displays.
On the Ready to Install the Program panel, click Install to start the installation process.The Installing Tidal TES - Master panel displays.
The progress of your master installation is displayed in the form of a progress bar.

Warning![]() Do not click Cancel once the installation process begins copying files in the Setup Status panel. Cancelling the installation at this point corrupts the installation program.
Do not click Cancel once the installation process begins copying files in the Setup Status panel. Cancelling the installation at this point corrupts the installation program.
You will not be able to install the component without the help of Support. If you decide you do not want to install the component, you must complete the installation and then uninstall.
Step 14![]() On the Setup Completed panel, click Finish.
On the Setup Completed panel, click Finish.
Using an Oracle Database
Note![]() The procedure for installing a master running an Oracle database is very similar to the procedure used when running a Microsoft SQL database. The differences are described in the following procedure.
The procedure for installing a master running an Oracle database is very similar to the procedure used when running a Microsoft SQL database. The differences are described in the following procedure.
To install the master component using an Oracle database:
Step 2![]() On the File Download-Security Warning panel, click Run.
On the File Download-Security Warning panel, click Run.
Step 3![]() On the Internet Explorer-Security Warning panel, click Run.
On the Internet Explorer-Security Warning panel, click Run.
Step 4![]() On the Welcome panel, click Next.
On the Welcome panel, click Next.
Step 5![]() On the Installation Type panel, select Master, then click Next.
On the Installation Type panel, select Master, then click Next.
Step 6![]() On the TES Super User panel, enter the following, then click Next.
On the TES Super User panel, enter the following, then click Next.
Step 7![]() On the Destination Folder panel, select the directory where the Scheduler files will reside, then click Next.
On the Destination Folder panel, select the directory where the Scheduler files will reside, then click Next.
Step 8![]() On the Database Type panel, select Oracle Server, then click Next.
On the Database Type panel, select Oracle Server, then click Next.
Step 9![]() On the Database Server panel, identify the Oracle database and logon you are using, then click Next.
On the Database Server panel, identify the Oracle database and logon you are using, then click Next.
- Database HostName – Enter the hostname of the database server.
- Port – Enter the port number of the JDBC driver. The default port is 1521.
- SID – Enter the Oracle System ID.
- Login ID – Enter the login credentials for the database administrator.
- Password – Enter the password for the database administrator.
Note![]() This information is available from the Oracle Database Administrator.
This information is available from the Oracle Database Administrator.
Step 10![]() On the Oracle Tablespace Datafiles panel, specify the name and location of the Data, Index and Temp tablespaces so Scheduler can access the files, then click Next. By default, Scheduler calls the datafiles, ADMIRAL_DATA, ADMIRAL_INDEX and ADMIRAL_TEMP. You can retain the default name or replace the default values with different names but you must type the directory path to each datafile location.
On the Oracle Tablespace Datafiles panel, specify the name and location of the Data, Index and Temp tablespaces so Scheduler can access the files, then click Next. By default, Scheduler calls the datafiles, ADMIRAL_DATA, ADMIRAL_INDEX and ADMIRAL_TEMP. You can retain the default name or replace the default values with different names but you must type the directory path to each datafile location.
Step 11![]() On the Ready to Install the Program panel, click Install to start the installation process.
On the Ready to Install the Program panel, click Install to start the installation process.
The Installing Tidal TES - Master panel displays.
The progress of your master installation is displayed in the form of a progress bar.
Warning![]() Do not click Cancel once the installation process begins copying files in the Setup Status screen. Cancelling the installation at this point corrupts the installation program.
Do not click Cancel once the installation process begins copying files in the Setup Status screen. Cancelling the installation at this point corrupts the installation program.
You will not be able to install the component without the help of Support. If you decide you do not want to install the component, you must complete the installation and then uninstall.
Step 12![]() On the Setup Completed panel, click Finish.
On the Setup Completed panel, click Finish.
Verifying Master Connection
Use the Service Control Manager to verify that the master is running.
Step 1![]() From the Windows Start menu on the master machine, select Programs > TIDAL Software > Scheduler > Master > Service Control Manager to display the Tidal Service Manager.
From the Windows Start menu on the master machine, select Programs > TIDAL Software > Scheduler > Master > Service Control Manager to display the Tidal Service Manager.
Step 2![]() From the Service list, select Scheduler Master. The master status displays at the bottom of the dialog box.
From the Service list, select Scheduler Master. The master status displays at the bottom of the dialog box.
Step 3![]() Click Start to start the master if it is not running.
Click Start to start the master if it is not running.
Configuring the Master
Most of the master parameter configurations are completed from the master.props file in the config directory. Parameter values are added or modified from this file. If you used the default locations during installation the master.props file is located at:
C:/Program Files/TIDAL/Scheduler/Master/Config/master.props
Configuring the Master for SNMP
If you want to use Simple Network Management Protocol (SNMP) to send traps in TES, you must tell the master how to connect to the SNMP server. You can configure the master to use SNMP from the master.props file.
To configure the master for SNMP:
Step 1![]() Stop the master using the Tidal Service Manager.
Stop the master using the Tidal Service Manager.
a.![]() From the Start menu on the master machine, choose Programs > TIDAL Software > TIDAL Service Manager to display the Tidal Service Manager.
From the Start menu on the master machine, choose Programs > TIDAL Software > TIDAL Service Manager to display the Tidal Service Manager.
b.![]() From the Service list, select Scheduler Master. The master status displays at the bottom of the dialog box.
From the Service list, select Scheduler Master. The master status displays at the bottom of the dialog box.
c.![]() Click Stop to stop the master. (The bottom of the dialog box displays “Scheduler Master: Stopped”.)
Click Stop to stop the master. (The bottom of the dialog box displays “Scheduler Master: Stopped”.)
Step 2![]() Open the master.props file in a text editor such as Notepad.
Open the master.props file in a text editor such as Notepad.
The master.props file is located in the config directory. If you used the default locations during installation, the master.props file is located at:
C:/Program Files/TIDAL/Scheduler/master/config/master.props
Step 3![]() On separate lines, enter the following SNMP information:
On separate lines, enter the following SNMP information:
snmphost=<hostname of the SNMP server>
snmpport=<port number used by the SNMP server>
Step 4![]() Replace the text enclosed in brackets with the hostname and port number for the SNMP server.
Replace the text enclosed in brackets with the hostname and port number for the SNMP server.
Step 5![]() Save and close the master.props file.
Save and close the master.props file.
Step 6![]() Restart the master from the Tidal Service Manager.
Restart the master from the Tidal Service Manager.
Configuring the Nice Value for the Master Service
Usually the Scheduler master service would have the highest priority for CPU resources on the machine where it resides but there may be occasions where you want other services to have a greater priority to CPU resources. You can reconfigure the Scheduler master service to a lower priority by assigning it a Unix nice value as used in the ps command for the Solaris, HPUX and AIX operating systems.
Scheduler uses a different nice value scale than that used in Unix systems but the following formula can be used to convert the Scheduler nice value to a Unix nice value:
20 - (Scheduler nice value -1) = Unix nice value
For example, a Scheduler nice value of 40 for the master service would convert to a -19 Unix nice value, 20 - (40-1) = -19.
Changing the Master Database Password
To change the Master database password:
Step 1![]() Log on the master machine.
Log on the master machine.
Step 2![]() Navigate to the master installation directory inside cmd.exe.
Navigate to the master installation directory inside cmd.exe.
Step 3![]() Run the following command:
Run the following command:
Note![]() In the command above, tidal97 is an example of the current password and tidal98 is an example the new password. When you execute the command, provide your own current and new passwords.
In the command above, tidal97 is an example of the current password and tidal98 is an example the new password. When you execute the command, provide your own current and new passwords.
The master.props will have a line added to it similar to the following:
Installing an Oracle Database
See Using an Oracle Database for Oracle database installation requirements.
Adding an Oracle Service as a Master Dependency
If you are installing the TES master on the same Windows machine that will be your Oracle database server, manually add the Oracle service as a dependency to the TES master service before it can start automatically when the system is rebooted.
To add the Oracle service as a TES master dependency:
Step 1![]() Log in as an Administrator.
Log in as an Administrator.
Step 2![]() From the Windows Start menu, choose Programs > TIDAL Software > Scheduler > Master>Service Manager > Scheduler Master.
From the Windows Start menu, choose Programs > TIDAL Software > Scheduler > Master>Service Manager > Scheduler Master.
Step 3![]() Stop the master by clicking Stop.
Stop the master by clicking Stop.
Step 4![]() Click Configure, then click Dependencies.
Click Configure, then click Dependencies.
Step 5![]() Select the service OracleService <service name> from the Available Services list and drag it to the Depends On tab.
Select the service OracleService <service name> from the Available Services list and drag it to the Depends On tab.
Step 6![]() Click OK, then click OK again.
Click OK, then click OK again.
The next time you reboot, the TES master service will start automatically after the Oracle server service has started.
Installing an Oracle Database Manually
Although it is recommended that the installation process create the Admiral database for Oracle, users can create the database manually. If the Create database manually after installation option is selected while installing the master, your DBA must perform the procedures below after the TES installation completes.
The Oracle SQL scripts needed to create the database can be found in the Oracle directory within the master directory where you installed the Scheduler program files. If you did not select the default location, the files are in the directory location you specified.
Inside the oracle directory is a connectdb.sql script. Certain parameters in this script must be edited before manual installation of the database.
Note![]() If you wish to install the datafiles in a specific directory, the Oracle DBA can change the CREATE TABLESPACE statements to specify a different directory location for the datafiles. The datafile growth options may also be modified if desired. Do not lower the default SIZE values.
If you wish to install the datafiles in a specific directory, the Oracle DBA can change the CREATE TABLESPACE statements to specify a different directory location for the datafiles. The datafile growth options may also be modified if desired. Do not lower the default SIZE values.
The CREATE USER, GRANT and ALTER USER statements contain critical security information values in the brackets < >. Contact Support for assistance with the appropriate values.
Once you have entered the information you received from Support in the appropriate places in the connectdb.sql script, save and close the script.
Step 1![]() Open the Oracle SQL*Plus program.
Open the Oracle SQL*Plus program.
Step 2![]() Login as the SYSTEM user (or equivalent) and connect to the ADMIRAL TNS Name.
Login as the SYSTEM user (or equivalent) and connect to the ADMIRAL TNS Name.
Step 3![]() Run the following installation script:
Run the following installation script:
@C:\progra~1\TIDAL\Scheduler\master\oracle\instnew.sql
Note![]() For debugging purposes, you may wish to run a spool file as you run the installation script.
For debugging purposes, you may wish to run a spool file as you run the installation script.
Step 4![]() Edit orapopulate.sql so it will create a valid initial super user account.
Edit orapopulate.sql so it will create a valid initial super user account.
Find the following statement and change DOMAINNAME and SUPERUSERNAME to be the domain and user name of the initial super user account:
insert into usrmst (usrmst_id, usrmst_domain, usrmst_name, usrmst_fullname, usrmst_desc, usrmst_phoneno, usrmst_pagerno, usrmst_email, usrmst_emailtype, secmst_id, lngmst_id, usrmst_password, usrmst_suser) values (1, DOMAINNAME, 'SUPERUSERNAME', 'SUPERUSERNAME', null, null, null, null, null, 6, 1, null, 'Y');
Note![]() DOMAINNAME can be null. If it is not null, be sure to add single quotes around the domain name in the sql statement. Your Oracle TES database should now be installed.
DOMAINNAME can be null. If it is not null, be sure to add single quotes around the domain name in the sql statement. Your Oracle TES database should now be installed.
Uninstalling the Windows Master
A temp directory must be present on the root of your hard drive in order for uninstallation to work properly.
Uninstallation Prerequisites
Before uninstalling the master:
Step 1![]() Stop all TES components.
Stop all TES components.
Step 2![]() Exit all Tidal Web clients by choosing File > Exit from the menu for each Tidal Web client that is running.
Exit all Tidal Web clients by choosing File > Exit from the menu for each Tidal Web client that is running.
a.![]() From the Windows Start menu, choose Programs > TIDAL Software > TIDAL Service Manager.
From the Windows Start menu, choose Programs > TIDAL Software > TIDAL Service Manager.
b.![]() From the Service list, choose Scheduler Master.
From the Service list, choose Scheduler Master.
c.![]() Click Stop; the light turns green when the master has stopped.
Click Stop; the light turns green when the master has stopped.
Once TES components have been stopped, you can begin the uninstallation process.
Uninstallation Procedure
The TES master is uninstalled from the Windows Control Panel.
Step 1![]() From the Windows Start menu, choose Control Panel, then double-click Add or Remove Programs.
From the Windows Start menu, choose Control Panel, then double-click Add or Remove Programs.
Step 2![]() Scroll down the list of programs installed on the machine to the Tidal Scheduler program.
Scroll down the list of programs installed on the machine to the Tidal Scheduler program.
Step 3![]() Click the Tidal Scheduler program to highlight it.
Click the Tidal Scheduler program to highlight it.
Step 4![]() Click Remove to start the uninstallation process. A confirmation message displays.
Click Remove to start the uninstallation process. A confirmation message displays.
Note![]() SNMP services are momentarily stopped when uninstalling the SNMP extension agent. They are restarted when uninstallation is complete.
SNMP services are momentarily stopped when uninstalling the SNMP extension agent. They are restarted when uninstallation is complete.
Step 5![]() Click OK to uninstall. The Preparing Setup panel displays showing a progress bar. When the progress bar reaches 100%, a Scheduler confirmation dialog box displays.
Click OK to uninstall. The Preparing Setup panel displays showing a progress bar. When the progress bar reaches 100%, a Scheduler confirmation dialog box displays.
Note![]() On occasion, the master service may not be fully stopped even though the Service Manager says the master has stopped. Uninstalling the master before the master service completely stops displays an error message “Unable to stop service completely.” This message displays when the machine is unable to stop the master service quickly due to the volume of processes. Click OK to close the error message dialog box and wait while the machine catches up to complete the uninstallation process. When the uninstallation process finally completes, verify that all files were deleted from the location where the master files resided.
On occasion, the master service may not be fully stopped even though the Service Manager says the master has stopped. Uninstalling the master before the master service completely stops displays an error message “Unable to stop service completely.” This message displays when the machine is unable to stop the master service quickly due to the volume of processes. Click OK to close the error message dialog box and wait while the machine catches up to complete the uninstallation process. When the uninstallation process finally completes, verify that all files were deleted from the location where the master files resided.
Warning![]() Do not cancel the uninstallation process once it begins or the uninstallation program will not be able to find its files the next time you attempt to uninstall. If you do cancel the uninstall, you will need to contact Technical Services.
Do not cancel the uninstallation process once it begins or the uninstallation program will not be able to find its files the next time you attempt to uninstall. If you do cancel the uninstall, you will need to contact Technical Services.
Note![]() During uninstallation, a dialog box may display indicating that some files are locked because they are shared by other applications. Ignore the locked files and continue with the uninstallation.
During uninstallation, a dialog box may display indicating that some files are locked because they are shared by other applications. Ignore the locked files and continue with the uninstallation.
Step 7![]() Repeat to remove other components.
Repeat to remove other components.
Note![]() If a Client Manager resides on the same machine as the master, the Client Manager must be uninstalled if the master is uninstalled.
If a Client Manager resides on the same machine as the master, the Client Manager must be uninstalled if the master is uninstalled.
Step 8![]() Once you complete uninstalling components, reboot the machine to clear the registry.
Once you complete uninstalling components, reboot the machine to clear the registry.
Note![]() If you do not reboot after uninstallation(s), any subsequent installation may fail.
If you do not reboot after uninstallation(s), any subsequent installation may fail.
Some files or folders under the TES folder that were created after the installation might not be removed. You may want to manually delete these files and folders. The log file and the database created during installation remain and must be removed in separate procedures
Configuring the JVM Manually
To configure the JVM manually:
Step 1![]() Stop the master using the Tidal Service Manager.
Stop the master using the Tidal Service Manager.
a.![]() From the Windows Start menu on the master machine, choose Programs > TIDAL Software > TIDAL Service Manager to display the Tidal Service Manager.
From the Windows Start menu on the master machine, choose Programs > TIDAL Software > TIDAL Service Manager to display the Tidal Service Manager.
b.![]() From the Service list, select Scheduler Master. The master status displays at the bottom of the dialog box.
From the Service list, select Scheduler Master. The master status displays at the bottom of the dialog box.
c.![]() Click Stop to stop the master. (The bottom of the dialog box displays “Scheduler Master: Stopped”.)
Click Stop to stop the master. (The bottom of the dialog box displays “Scheduler Master: Stopped”.)
Step 2![]() Open the Windows Registry Editor.
Open the Windows Registry Editor.
Step 3![]() Locate the HKEY_LOCAL_MACHINE Software > TIDAL Software > Scheduler key in the Registry.
Locate the HKEY_LOCAL_MACHINE Software > TIDAL Software > Scheduler key in the Registry.
Step 4![]() Locate the JvmVersion value. The value should be 1.7. If there is no value, double-click the value to display its String Editor dialog box.
Locate the JvmVersion value. The value should be 1.7. If there is no value, double-click the value to display its String Editor dialog box.
Note![]() Run “path/to/java -version” to check the right version.
Run “path/to/java -version” to check the right version.
Step 5![]() Enter 1.7, then click OK to close the dialog box and Registry.
Enter 1.7, then click OK to close the dialog box and Registry.
Step 6![]() From the Tidal Service Manager, restart the master.
From the Tidal Service Manager, restart the master.
a.![]() From the Windows Start menu on the master machine, choose Programs > TIDAL Software > Scheduler > Master > Service Control Manager to display the Tidal Service Manager.
From the Windows Start menu on the master machine, choose Programs > TIDAL Software > Scheduler > Master > Service Control Manager to display the Tidal Service Manager.
b.![]() From the Service scroll-down menu, choose Scheduler Master. The master status displays at the bottom of the dialog box.
From the Service scroll-down menu, choose Scheduler Master. The master status displays at the bottom of the dialog box.
 Feedback