- Preface
- Installation Prerequisites
- Installing the Master for Windows
- Installing the Master for Unix
- Installing Client Manager
- Installing the Java Client
- Installing Fault Tolerance
- Installing the Agent
- Installing Adapters
- Basic Configuration
- Configuring SSL Messaging
- Defining Users
- Upgrading Components
- Troubleshooting TES
- Appendix A
- Appendix B
Cisco Tidal Enterprise Scheduler 6.2 Installation Guide
Bias-Free Language
The documentation set for this product strives to use bias-free language. For the purposes of this documentation set, bias-free is defined as language that does not imply discrimination based on age, disability, gender, racial identity, ethnic identity, sexual orientation, socioeconomic status, and intersectionality. Exceptions may be present in the documentation due to language that is hardcoded in the user interfaces of the product software, language used based on RFP documentation, or language that is used by a referenced third-party product. Learn more about how Cisco is using Inclusive Language.
- Updated:
- July 1, 2016
Chapter: Installing the Java Client
Installing the Java Client
Cisco TES 6.2 offers a desktop-like client experience with the introduction of a light-weight Java client which can be installed as a standalone application or can be launched through a URL from the TES Master.
Installation Prerequisites
The following requirements must be met prior to installation of the Java Client:
–![]() CPU (64-bit): 2.2+ GHz Quad Core
CPU (64-bit): 2.2+ GHz Quad Core
–![]() Only JavaFx2 certified systems are supported. See:
Only JavaFx2 certified systems are supported. See:
http://www.oracle.com/technetwork/java/javafx/downloads/supportedconfigurations-1506746.html
–![]() Install Desktop Experience (Windows Server Only). See: http://technet.microsoft.com/en-us/library/cc754314.aspx
Install Desktop Experience (Windows Server Only). See: http://technet.microsoft.com/en-us/library/cc754314.aspx
–![]() The software installs and runs only in X-Windows desktop mode (for example, GNOME, KDE) of all UNIX based operating systems.
The software installs and runs only in X-Windows desktop mode (for example, GNOME, KDE) of all UNIX based operating systems.
Installing the Java Client for Windows
To install the Java client for Windows:
Step 1![]() Run the install.exe file. The installation wizard displays.
Run the install.exe file. The installation wizard displays.
Step 2![]() At the Introduction screen, click Next.
At the Introduction screen, click Next.
Step 3![]() At the Important Information screen, read the information and click Next.
At the Important Information screen, read the information and click Next.
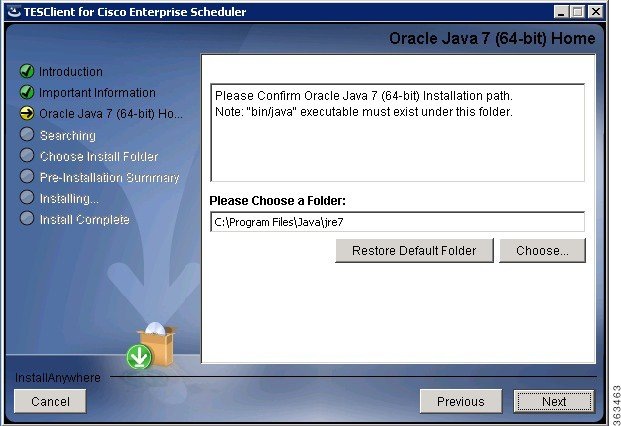
Step 4![]() At the Oracle Java 7 (64-bit) Home screen, choose the path to the Java 7 folder.
At the Oracle Java 7 (64-bit) Home screen, choose the path to the Java 7 folder.

Note![]() You may have installed multiple Java virtual machines. Ensure that you choose version 7 specifically.
You may have installed multiple Java virtual machines. Ensure that you choose version 7 specifically.
Figure 5-1 Oracle Java 7 (64-bit) Home Screen
Step 5![]() At the Choose Install Folder screen, select the location where you want the Java client to be installed.
At the Choose Install Folder screen, select the location where you want the Java client to be installed.
Step 6![]() The Pre-Installation Summary screen shows the items that will be installed. Click Install. The installation progress is shown in the next screen.
The Pre-Installation Summary screen shows the items that will be installed. Click Install. The installation progress is shown in the next screen.
Step 7![]() The Install Complete screen summarizes the results of the installation. Click Done.
The Install Complete screen summarizes the results of the installation. Click Done.
Confirm that a new TES client shortcut is created.
Installing the Java Client for Unix
To install the Java client for Unix:
Step 1![]() Run the install.bin file. The installation wizard displays.
Run the install.bin file. The installation wizard displays.
Step 2![]() At the Introduction screen, click Next.
At the Introduction screen, click Next.
Step 3![]() At the Important Information screen, read the information and click Next.
At the Important Information screen, read the information and click Next.
Step 4![]() At the Oracle Java 7 (64-bit) Home screen, choose the path to the Java 7 folder.
At the Oracle Java 7 (64-bit) Home screen, choose the path to the Java 7 folder.
Note![]() You may have installed multiple Java virtual machines. Ensure that you choose version 7 specifically.
You may have installed multiple Java virtual machines. Ensure that you choose version 7 specifically.
Step 5![]() At the Choose Install Folder screen, select the location where you want the Java client to be installed.
At the Choose Install Folder screen, select the location where you want the Java client to be installed.
Step 6![]() The Pre-Installation Summary screen shows the items that will be installed. Click Install. The installation progress is shown in the next screen.
The Pre-Installation Summary screen shows the items that will be installed. Click Install. The installation progress is shown in the next screen.
Step 7![]() The Install Complete screen summarizes the results of the installation. Click Done.
The Install Complete screen summarizes the results of the installation. Click Done.
Step 8![]() You can now launch the software by executing the tesclient.sh command.
You can now launch the software by executing the tesclient.sh command.
Running the TES Java Client
You can run the Cisco TES 6.2 Java client as an application on your system, as well as via a web browser.
Running the Java Client as a System Application
Prerequisites
The following prerequisites must be met to run the Java client as a system application:
- Java client Host machine must be in DNS/NIS+ domain.
- Java client Host machine must be allowed to connect to port 6215 of Scheduler's host.
- Scheduler's master.props must have valid LDAP/AD configuration.
To run the Java client as an application on your system:
Step 1![]() Launch the Java client that you have installed. The Login screen displays.
Launch the Java client that you have installed. The Login screen displays.
Step 2![]() Enter the following details:
Enter the following details:
The Java client application window displays.
Note![]() The logs and help folders are created in your temp folder. You can view them by clicking View > Client Logs.
The logs and help folders are created in your temp folder. You can view them by clicking View > Client Logs.
Note![]() Startup scripts of the Java client can be optionally modified to add jvm arguments for optimal performance.
Startup scripts of the Java client can be optionally modified to add jvm arguments for optimal performance.
Running the Java Client Via a Web Browser
Prerequisites
The following prerequisites must be met to run the Java client via a web browser:
- By default, scheduler will run a webserver at port 8080. The Java client host must be allowed to access a configured port on scheduler's host machine.
- On Windows, only Internet Explorer 64-bit (c:\Program Files\Internet Explorer\iexplorer.exe) is capable of running 64-bit Java7. Only 64-bit Java7 will support 8GB memory requirements.
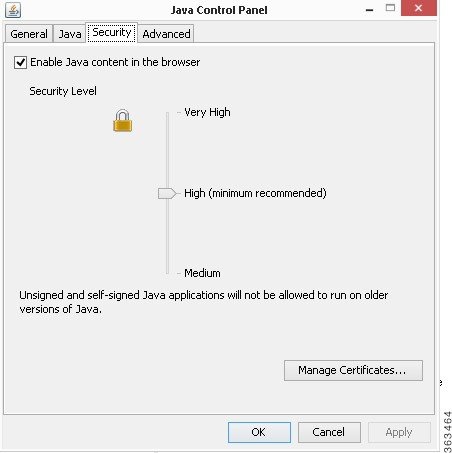
- For all operating systems and browsers, you must enable Java content in the Java Control Panel.
Note![]() Confirm that browser's security settings allow running Java applets.
Confirm that browser's security settings allow running Java applets.
To run the Java client via a web browser:
Step 1![]() Open a TES-supported web browser and enter the following URL:
Open a TES-supported web browser and enter the following URL:
http://master's hostname:8080/tesclient
where master's hostname is the hostname of TES.
Step 2![]() Click Launch Enterprise Scheduler.
Click Launch Enterprise Scheduler.
Step 3![]() Click Run to allow execution of the Java client.
Click Run to allow execution of the Java client.
If the version of Java client does not match what has been installed on the master, remove all temporary Java files using options available in the General tab of the Java Control Panel.
Uninstalling the TES Java Client
The Java client applications that are installed on Windows systems can be uninstalled from the Control Panel.
For UNIX systems, use install.bin -r to uninstall the Java client.
Note![]() If you face issues removing the software, inspect and cleanup the.com.zerog.registry.xml file, located under the user’s home directory (for Unix), or at c:\Program Files\Zero G Registry (for Windows).
If you face issues removing the software, inspect and cleanup the.com.zerog.registry.xml file, located under the user’s home directory (for Unix), or at c:\Program Files\Zero G Registry (for Windows).
 Feedback