Prepare for Installation

Before you install the Cisco NCS 540 large density routers, you must prepare your site for installation.


Note


The illustrations are for reference only and may vary based on your Cisco NCS 540 router variant. Any differences between the routers are called out.


Preparing your site involves these tasks:

General Precautions

Observe the following general precautions when using and working with your router:

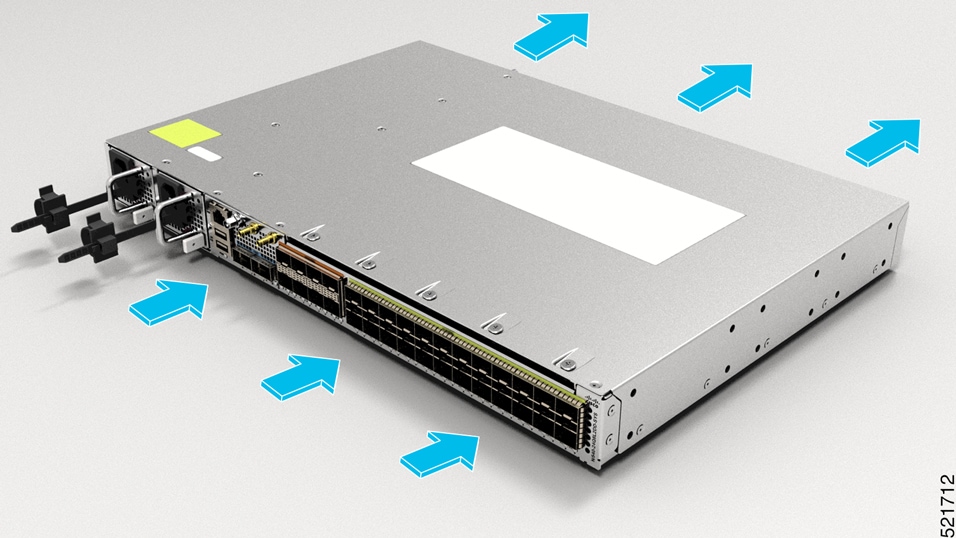
  • Keep your system components away from radiators and heat sources, and do not block cooling vents.

  • Do not spill food or liquids on your system components, and never operate the product in a wet environment.

  • Do not push any objects into the openings of your system components. Doing so can cause fire or electric shock by shorting out interior components.

  • Position system cables and power supply cable carefully. Route system cables, the power supply cable, and plug so that they are not stepped on or tripped over. Be sure that nothing else rests on your system component cables or power cable.

  • Do not modify power cables or plugs. Consult a licensed electrician or your power company for site modifications. Always follow your local and national wiring rules.

  • If you turn off your system, wait at least 30 seconds before turning it on again to avoid damage to the system components.

Site Planning Checklist

Use the following checklist to perform and account for all the site planning tasks described in this chapter:

  • The site meets the environmental requirements.
  • The site’s air conditioning system can compensate for the heat dissipation of the router.
  • The floor space that the router occupies can support the weight of the system.
  • Electrical service to the site complies with the requirements.
  • The electrical circuit servicing the router complies with the requirements.
  • Consideration has been given to the console port wiring and limitations of the cabling involved, according to TIA/EIA-232F.
  • The router Ethernet cabling distances are within the prescribed limitations.
  • The equipment rack in which you plan to install the router complies with prescribed requirements.
  • The following factors have been carefully considered when selecting the location of the rack: safety, ease of maintenance, and proper airflow.

Environmental Requirements

For outside plant installation (cell site cabinet, hut, and so on), you must protect the router against airborne contaminants, dust, moisture, insects, pests, corrosive gases, polluted air, or other reactive elements. Sealed equipment chamber with air-conditioning or a heat exchanger is recommended for OSP deployments. The equipment chamber must comply with the temperature and clearance requirements. Sealed equipment chamber with air-conditioning or a heat exchanger is recommended for OSP deployments. Examples of such cabinets include IP66 cabinets with heat exchanger complying with Telcordia GR487. Temperature must be maintained within –40ºC to 65ºC.

The equipment shall be placed inside an enclosure (that is protected from direct outside weather and environmental stresses by the enclosure), and where the operating climate, as defined by Class 2 of GR-3108-CORE, is between:

  • –40 to 158°F (–40 to 65°C)

  • 5% and 85% RH

For more information on environmental properties and regulatory standards, see the Cisco Network Convergence System 540 Large Density Routers Data sheet.

Temperature

Temperature extremes may cause a system to operate at reduced efficiency and cause various problems, including premature aging and failure of chips, and failure of mechanical devices. Extreme temperature fluctuations may also cause chips to become loose in their sockets.

Observe the following guidelines:

  • Ensure that the chassis has adequate ventilation.

  • Don’t place the chassis within a closed-in wall unit or on top of cloth, which can act as thermal insulation.

  • Don’t place the chassis where it receives direct sunlight, particularly in the afternoon.

  • Don’t place the chassis next to a heat source of any kind, including heating vents.

  • Adequate ventilation is important at high altitudes. Make sure that all the slots and openings on the system remain unobstructed, especially the fan vent on the chassis.

  • Clean the installation site at regular intervals to avoid the buildup of dust and debris, which may cause a system to overheat.

Failure to observe these guidelines may damage the chassis' internal components.

Dust and Particles

Fans cool power supplies and system components by drawing in room-temperature air and exhausting heated air out through various openings in the chassis. However, fans also ingest dust and other particles, causing contaminant buildup in the system and increased internal chassis temperature. A clean operating environment can greatly reduce the negative effects of dust and other particles, which act as insulators and interfere with the mechanical components in the system.

PM2.5 and PM10 are some of the commonly available air quality parameters to indicate dust concentration levels. Periodically check dust concentration levels and provide required protection to improve air quality around the equipment.

Air Quality

Dust is everywhere and often invisible to the naked eye. It consists of fine particles in the air that originate from various sources, such as soil dust lifted by weather, from volcanic eruptions, or pollution. Dust at an installation site may contain small amounts of textile, paper fibers, or minerals from outdoor soil. It may also contain natural contaminants, such as chlorine from the marine environment and industrial contaminants such as sulfur. Ionized dust and debris are dangerous and get attracted to electronic equipment.

The accumulation of dust and debris on electronic equipment has the following adverse effects:

  • It increases the operating temperature of the equipment. According to the Arrhenius effect, an increase in the operating temperature leads to a decrease in reliability and life of the equipment.

  • The moisture and corrosive elements that are present in the dust can corrode the electronic or mechanical components and cause premature board failure.

These adverse effects are further accelerated by the presence of fans in the data networking equipment that ingest dust and other particles into the equipment. Higher the volume of air that is generated by the fans for cooling, the higher the quantity of dust and particulates that get deposited and trapped inside the equipment.

Corrosion

Corrosion is a chemical reaction that occurs between electronic components, gases, and humidity, which results in metal deterioration. Corrosion attacks edge connectors, pin connectors, IC plug-in sockets, wire wraps, and all other metal components. Depending on the type and concentration level of the corrosive gases, performance degradation of the components occurs either rapidly or over a period of time. It also leads to blocked currents, brittle connection points, and overheated electrical systems. Corrosion by-products from insulating layers on circuits and causes electronic failure, short circuits, pitting, and metal loss.

A type of corrosion known as creep corrosion, that primarily affects PCBA (Printed Circuit Board Assembly) occurs when the PCBA is subjected to a harsh, and sulfur-rich (hydrogen sulfide) end-use environment over a prolonged period of time. The corrosion begins on certain exposed metals, such as copper and silver, and then creeps along the remaining metal surface either causing electrical short circuits or creating holes. Creep corrosion also occurs on electronic components such as resistors and PCBs.


Note


To prevent corrosion, remove or minimize the presence of dust and particulates at the installation site by following the guidelines mentioned in ANSI 71-04-2013 regulations.


Figure 1. PCB with Corrosion on its Metal Contacts

Airflow Guidelines

Cool air is circulated through the router by fans that are located along the rear side of the router. The internal fans maintain acceptable operating temperatures for the internal components by drawing in cool air through the vents, and circulating the air through the router.

To ensure adequate airflow, we recommended that you always maintain this minimum clearance distance:

  • Front clearance—5 inches (12.7 centimeters)

  • Rear clearance—2 inches (5.08 centimeters)

Figure 2. Airflow Side View for N540-24Q8L2DD-SYS

Note the following points:

  • When installing the router in a back-to-back position with another device, ensure that there is a minimum of 3.9 inches (10 centimeters) airflow clearance between the two devices.

  • If airflow through the equipment rack and the routers that occupy it is blocked or restricted, or if the ambient air being drawn into the rack is too warm, an overtemperature condition may occur within the rack and the routers that occupy it.

  • The site must be as dust-free as possible. Dust tends to clog the router fans, reducing the flow of cooling air through the equipment rack and the routers that occupy it, thereby increasing the risk of an overtemperature condition.

  • Enclosed racks must have adequate ventilation. Ensure that the rack is not congested because each router generates heat. An enclosed rack must have louvered sides and a fan to provide cooling air. The equipment generates heat near the bottom of the rack, which can be drawn upward into the intake ports of the equipment above.

  • When mounting a router in an open rack, ensure that the rack frame does not block the exhaust fans.

  • When rack-installed equipment fails, especially equipment in an enclosed rack, try operating the equipment by itself, if possible. Power off all the other equipment in the rack (and in adjacent racks) to give the router maximum cooling air and clean power.

  • Avoid installing the router in a location in which the router air intake vents may draw in the exhaust air from adjacent equipment. Consider how the air flows through the router; the airflow direction is front to back, with ambient air drawn in from the vents located on the sides of the router.

Recommended Airflow

The movement of air around the router should not be more than 1 m/s from 5 inches front clearance.

Site Power Guidelines

The chassis has specific power and electrical wiring requirements. Adhering to these requirements ensures the reliable operation of the system. Follow these precautions and recommendations when planning your site power for the chassis:

  • The redundant power option provides a second, identical power supply to ensure uninterrupted power supply.

  • Connect each power supply to a separate input power source. Otherwise, it results in a total power failure to the system due to a fault in the external wiring or a tripped circuit breaker.

  • To prevent loss of input power, ensure that the maximum load on each circuit is within the current ratings of the wiring and the breakers.

  • Check the power at your site before installation, and periodically after installation, to ensure that you are receiving clean power. If necessary, install a power conditioner.

  • Provide proper grounding to avoid personal injury and damage to the equipment due to power surges or lightning striking power lines. The chassis ground must be attached to a central office or other interior ground system.


Caution


This product requires external surge protection device for both AC and DC power feeds to the equipment. For DC power feed, the surge protective device (SPD) must handle common mode and differential mode surge as per the local standards.


Note


The chassis installation must comply with all the applicable codes, and is approved for use with only copper conductors. The ground bond-fastening hardware must be compatible and preclude loosening, deterioration, and electrochemical corrosion of hardware and joined material. Attachment of the chassis ground to a central office or other interior ground system must be made with a 6-AWG gauge wire copper ground conductor.

Note


The AC PSU requires external surge protection devices for installations where electrical surges higher than 2KV common mode and 2KV differential mode are expected. Failure to do so can result in permanent damage to the product.

The DC PSU requires external surge protection devices for installations where electrical surges higher than 2KV common mode and 1KV differential mode are expected. Failure to do so can result in permanent damage to the product.


Electrical Circuit Requirements

Each router requires a dedicated electrical circuit. If you equip the router with dual-power feeds, provide a separate circuit for each power supply to avoid compromising the power redundancy feature.

The routers can be powered by a DC source. Ensure that equipment grounding is present and observe the power-strip ratings. Make sure that the total ampere rating of all the products plugged into the power strip does not exceed 80% of the rating.

Site Cabling Guidelines

This section contains guidelines for wiring and cabling at your site. When preparing your site for network connections to the router, consider the type of cable required for each component, and the cable limitations. Consider the distance limitations for signaling, ElectroMagnetic Interference (EMI), and connector compatibility. Possible cable types are fiber, thick or thin coaxial, foil twisted-pair, or unshielded twisted-pair cabling.

Also consider any additional interface equipment you need, such as transceivers, hubs, switches, modems, Channel Service Units (CSU), or Data Service Units (DSU).

Before you install the router, have all the additional external equipment and cables on hand. For information about ordering, contact a Cisco customer service representative.

The extent of your network and the distances between the network interface connections depend, in part, on the following factors:

  • Signal type

  • Signal speed

  • Transmission medium

The distance and rate limits referenced in the following sections are the IEEE-recommended maximum speeds and distances for signaling purposes. Use this information as a guideline when planning your network connections prior to installing the router.

If wires exceed the recommended distances, or if wires pass between buildings, give special consideration to the effect of a lightning strike in your vicinity. The electromagnetic pulse caused by lightning or other high-energy phenomena can easily couple enough energy into unshielded conductors to destroy electronic devices. If you have had problems of this sort in the past, you may want to consult experts in electrical surge suppression and shielding.

Asynchronous Terminal Connections

The router provides a console port to connect a terminal or computer for local console access. The router supports RS-232 asynchronous data with distance recommendations specified in the IEEE RS-232 standard.

Interference Considerations

When wires are run for any significant distance, there is a risk that stray signals will be induced on the wires as interference. If interference signals are strong, they may cause data errors or damage to the equipment.

The following sections describe the sources of interference and how to minimize their effects on the router system.

Electromagnetic Interference

All the equipment powered by AC current can propagate electrical energy that can cause EMI and possibly affect the operation of other equipment. The typical sources of EMI are equipment power cords and power service cables from electric utility companies.

Strong EMI can destroy the signal drivers and receivers in the router and even create an electrical hazard by causing power surges through the power lines into installed equipment. These problems are rare, but could be catastrophic.

To resolve these problems, you need specialized knowledge and equipment that could consume substantial time and money. However, you can ensure that you have a properly grounded and shielded electrical environment, paying special attention to the need for electrical surge suppression.

Radio Frequency Interference

When electromagnetic fields act over a long distance, Radio Frequency Interference (RFI) may be propagated. Building wiring can often act as an antenna, receiving the RFI signals and creating more EMI on the wiring.

If you use twisted-pair cable in your plant wiring with a good distribution of grounding conductors, the plant wiring is unlikely to emit radio interference. If you exceed the recommended distances, use a high-quality twisted-pair cable with one ground conductor for each data signal.

Lightning and AC Power Fault Interference

If signal wires exceed the recommended cabling distances, or if signal wires pass between buildings, you should consider the effect that a lightning strike in your vicinity might have on the router.

The Electromagnetic Pulse (EMP) generated by lightning or other high-energy phenomena can couple enough energy into unshielded conductors to damage or destroy electronic equipment. If you have previously experienced such problems, you should consult with RFI and EMI experts to ensure that you have adequate electrical surge suppression and shielding of signal cables in your router operating environment.

Tools and Equipment

You need the following tools and equipment to install and upgrade the router and its components:

  • ESD-preventive cord and wrist strap

  • Antistatic mat or antistatic foam

  • Number 1 and Number 2 Phillips-head screwdrivers

  • #12-24 pan-head screws to secure the router to the equipment rack

  • Cables for connecting to the network ports (depending on the configuration)

For more information about cable specifications, see the Troubleshooting section.

  • Ethernet hub, switch, or PC with a network interface card for connecting to the Ethernet ports

  • Console terminal (an ASCII terminal or a PC running terminal emulation software) that is configured for 115200 baud, 8 data bits, no parity, no flow control, and 1stop bit

  • Console cable for connecting to the console port

  • Ratcheting torque screwdriver with a Phillips head that exerts up to 30-pound force per square inch (in-lb) or 0.02-kilograms force per square millimeter (kgf/mm2) of pressure

  • Crimping tool as specified by the ground lug manufacturer

  • Wire-stripping tools for stripping both 6-AWG and 14-AWG wires

  • Tape measure and level

Prepare Your Location

This section illustrates how the building that houses the chassis must be properly grounded to the earth ground.

Figure 3. Building with Rack Room Connected to Earth Ground
Building with Rack Room Connected to Earth Ground

Prepare Yourself

This section illustrates how to prepare yourself before removing the chassis from the sealed antistatic bag. The figures show how to wear the ESD strap around the wrist and how to connect the other end of the strap to the ground. ESD wrist straps are the primary means of controlling static charge on personnel.

Note: These images are for only representation purposes. The chassis' actual appearance and size would vary.

Figure 4. Wearing the ESD Strap
Wearing the ESD Strap

Prepare Rack for Router Installation

Install the chassis into a two-post standard rack with standard horizontal mounting rails. Before you mount the chassis into the rack, we recommend that you do the following:

Procedure


Step 1

Place the rack where you plan to install the chassis. Ensure that the rack is grounded to earth.

Step 2

Secure the rack to the floor.

To bolt the rack to the floor, a floor bolt kit (also called an anchor embedment kit) is required. For information on bolting the rack to the floor, consult a company that specializes in floor mounting kits (such as Hilti; see Hilti.com for details). Make sure that floor mounting bolts are accessible, especially if an annual retorquing of bolts is required.


Cabinet Selection Guidelines

Equipment that is intended for installation in controlled environmental space has average yearly levels of contamination. Ventilated cabinets or racks can be used if pollutant levels are maintained within allowable limits.

Equipment intended for installation in outside plant (OSP) areas must have sealed cabinets with heat exchanger that meet the IP66 or IP65 protection and low average yearly levels of concentration of contaminants inside the cabinet.


Note


Ventilated cabinets and racks are not recommended for OSP applications.


Table 1. Cabinet Type for Indoor and Outdoor Installation

Cabinet Type

Suitable for Indoor Installation?

Suitable for Outdoor Installation?

Open rack with no front and rear doors

Yes

No

Ventilated cabinets with normal air filter at intake and fans

Yes

No

Sealed cabinets with heat exchanger that meet NEMA -4 or protection

Yes

Yes

Sealed cabinets with air-conditioners that meet NEMA -4 or IP65 protection

Yes

Yes

Allowable limits for Environmental Pollutants

Concentration of pollutant levels in outdoor and indoor environment must be less than pollutant levels mentioned in Table 2.3 and Table 2.4 of NEBS GR-63-CORE Issue 5 Dec 2017, respectively. High concentrations of pollutants have a negative impact on the equipment life time.

Allowable Temperature and Humidity

Maximum allowable temperature and humidity levels must be within the values that are mentioned in the data sheets. Do not install in places where condensation may occur, or where equipment is exposed to high humidity for long time, such as near the sea, rivers, and large water bodies.

Installations in Highly-corrosive Environment

Installation in highly corrosive area is not recommended. Examples of highly corrosive areas are seashore, less than 10 meters from high traffics roadway, and areas having high industrial pollutants.

Periodic Measurement of Environmental Pollutants

We recommend that you check concentration of pollutants periodically. Necessary protection should be provided to ensure the equipment is not exposed to high concentration level of pollutants.

Unpack the Cisco NCS 540 Large Density Routers

Ensure that there is sufficient room around the chassis pallet for unpacking.

  1. Remove the accessory tray and the packing material.

  2. Carefully set the packing material aside.


    Tip


    Be sure to save the packaging in case you need to return any of the components products.

    Note


    These images are for only representation purposes. The chassis' actual appearance and size would vary.
    Figure 5. Unpacking the Device

    1

    Regular Slotted Container (shipping box)

    2, 6

    Foam end caps

    3, 5

    Corrugated caps

    4

    Front end of the product

    7

    Accessory tray

    8

    Corrugated insert

    9

    Carton sealing tape

Table 2. Accessories Kit

19- inch Rack Mount Brackets

23- inch Rack Mount Brackets

ETSI Rack Mount Brackets

Wall Mount Brackets

Desktop Brackets

Cable Management Brackets

N540DD-RKM-19 N540-RKM-23-FHC N540-RKM-ETSI-FHC NA

NA

N540-CBL-BRKT-FHC


Note


The chassis Pointer Card that is shipped with your Cisco NCS 540 Series Routers contains links and information to other online documentation.

Note


If the product is not in use, store the device in the initial packaged condition or in an ESD PE sealed bag with silica gel.