- Web Filtering
- Benefits of Web Filtering
- Prerequisites for Web Filtering
- Restrictions for Web Filtering
- How to Deploy Web Filtering
- How to Install and Activate the Virtual Container Service
- Installing the UTD OVA File
- Configuring VirtualPortGroup Interfaces and Virtual Service
- Configure Domain-based Web Filtering with an External Block Server
- Configure Domain-based Web Filtering with a Local Block Server
- Configure URL-based Web Filtering with a Local Block Server
- Configure URL-based Web Filtering with an Inline Block Page
- Configuring Domain/URL based Web Filtering and Snort IPS
- Verifying the Web Filter Configuration
- Configuration Examples
- Additional References for Cisco Web Filtering
- Feature Information for Cisco Web Filtering
Web Filtering
The Web Filtering feature enables the user to provide controlled access to Internet websites or Interanet sites by configuring the domain-based or URL-based policies and filters on the device. The user can configure the web filtering profiles to manage the web access. The Web Filtering feature is implemented using the container service and it is similar to the Snort IPS solution.
Web Filtering can either allow or deny access to a specific domain or URL based on:
Whitelist and Blacklist—These are static rules, which helps the user to either allow or deny domains or URLs. If the same pattern is configured under both whitelist and blacklist, the traffic will be whitelisted.
-
Category—URLs can be classified into multiple categories such as News, Social Media, Education, Adult and so on. Based on the requirements, user has the option to block or allow one or more categories.
-
Reputation—Each URL has a reputation score associated with it. The reputation score range is from 0-100, and it is categorized as: high-risk (reputation score (0-20), suspicious (0-40), moderate-risk (0-60), low-risk (0-80), and trustworthy (0-100). Based on the reputation score of a URL and the configuration, a URL is either blocked or allowed. If the user defines a reputation threshold through the CLI, all the URLs, with a reputation score lower than the user-defined threshold will be blocked.
- Web Filtering
- Benefits of Web Filtering
- Prerequisites for Web Filtering
- Restrictions for Web Filtering
- How to Deploy Web Filtering
- Verifying the Web Filter Configuration
- Configuration Examples
- Additional References for Cisco Web Filtering
- Feature Information for Cisco Web Filtering
Web Filtering
The Web Filtering feature enables the user to provide controlled access to Internet websites by configuring the domain-based or URL-based policies and filters on the device. Domain-based Filtering enables the user to control access to websites/servers at domain level, and URL-based Filtering enables the user to control access to websites at URL level. This section includes the following topics:
Domain-based Filtering
Domain-based filtering allows the user to control access to a domain by permitting or denying access based on the domain-based policies and filters configured on the device. When the client sends a DNS request through the Cisco Cloud Services Router 1000V Series, the DNS traffic is inspected based on the domain-based policies (whitelist/blacklist). Domains that are whitelisted or blacklisted will not be subjected to URL-based filtering even if they are configured. Graylist traffic does not match both whitelist and blacklist, and it is subjected to URL-based filtering if it is configured.
Domain-based Filtering Using Whitelist Filter
To allow the complete domain (cisco.com) without subjecting to any filtering, use the whitelist option . When a user makes a request to access a website using a browser, the browser makes a DNS request to get the IP address of the website. Domain filtering applies the filter on the DNS traffic. If the website’s domain name matches to one of the whitelisted patterns, domain filtering whitelists the website’s address. The browser receives the IP address for the website and sends the HTTP(s) request to the IP address of the website. Domain filtering treats this traffic as whitelist traffic. This whitelist traffic is not further subjected to URL-based filtering even if it is configured. If the Snort IPS is configured, the traffic will be subjected to Snort IPS .
Domain-based Filtering Using Blacklist Filter
When a user want to block a complete domain (badsite.com), use the blacklist option. Domain filtering applies the filter on the DNS traffic. If the website’s domain name matches to one of the blacklisted patterns, domain filtering will send the configured block server’s IP address in the DNS response to the end user instead of the actual resolved IP address of the website. The browser receives the block server’s IP address as the IP address for the website and sends the HTTP(s) request to this IP address. This traffic is not further subjected to URL filtering or Snort IPS even if they are configured.The block server receives the HTTP(s) request and serves a block page to the end user. Also, when the DNS request matches a blacklist, all application traffic to that domain will be blocked.
Domain filtering is applied to all the DNS traffic even if the DNS requests are made in the context of non-HTTP(S) requests such as FTP, telnet, and so on. The blacklisted non-HTTP(S) traffic (FTP, telnet, and so on.) will also be forwarded to the block server. It is block server’s responsibility to serve a block page or deny the request. You can configure an internal or external block server. For configuration steps, see Configure Domain-based Web Filtering with an External Block Server and Configure Domain-based Web Filtering with a Local Block Server.
If the traffic is not whitelisted or blacklisted by domain filtering, it will be subjected to URL filtering and Snort IPS if they are configured.
A user may consider using a combination of domain filtering whitelist and blacklist pattern list to design the filters. For an example, if a user want to whitelist www\.foo\.com but also wanted to blacklist other domains such as www\.foo\.abc and www\.foo\.xyz, configure the www\.foo\.com in the whitelist pattern list and www\.foo\. in the blacklist pattern list.
URL-based Filtering
URL-based filtering allows a user to control access to Internet websites by permitting or denying access to specific websites based on the whitelist/blacklist, category, or reputation configuration. For example, when a client sends a HTTP/HTTP(s) request through the Cisco CSR 1000V Cloud Services Router, the HTTP/HTTP(s) traffic is inspected based on the URL filtering policies (Whitelist/Blacklist, Category, and Reputation). If the HTTP/HTTP(s) request matches the blacklist, the HTTP(s) request is blocked either by inline block page response or redirects the URL to a block server. If the HTTP/HTTP(s) request matches the whitelist, the traffic is allowed without further URL filtering inspection.
For HTTPS traffic, the inline block page will not be displayed. URL-based filtering will not decode any encoded URL before peforming a lookup.
When there is no whitelist/blacklist configuration on the device, based on the category and reputation of the URL, traffic is allowed or blocked either using a block page or redirect URL for HTTP. For HTTP(s), there is no block page or redirect URL, the flow will be dropped.
The URL database is downloaded from the cloud when the user configures the category/reputation-based URL filtering. The URL category/reputation database has only a few IP address based records and the category/reputation look up occurs only when the host portion of the URL has the domain name. After the full database is downloaded from the cloud, if there are any updates to the existing database, the incremental updates will be automatically downloaded in every 15 minutes. The complete database size is approximately 440 MB and the downloaded database should always synchronize with the cloud. The database will be invalid if the connection to the cloud is lost for more than 24 hours.
If the device does not get the database updates from the cloud, the fail-open option ensures that the traffic designated for URL filtering is not dropped. When you configure the fail-close option, all the traffic destined for URL filtering will be dropped when the cloud connectivity is lost.
 Note | The web filtering database is periodically updated from the cloud in every 15 minutes. |
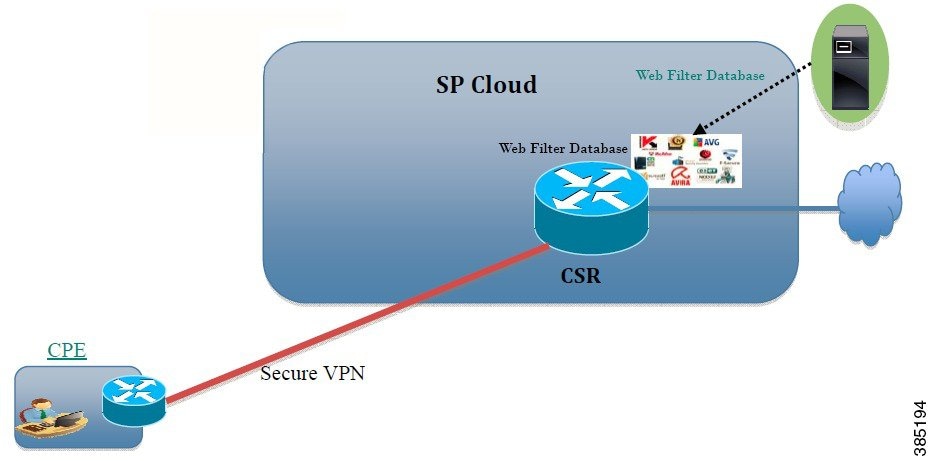
The figure illustrates the Web Filtering topology.
Benefits of Web Filtering
The web filtering feature allows a user to provide controlled access to the Internet by configuring domain and URL based policies and filters. It helps to secure the network by blocking malicious or unwanted websites.Web filtering comprises of URL-based filtering and the Domain-based filtering. Domain-based filtering helps control access to websites/servers at domain level and the URL-based filtering helps control access to websites at URLs level. A user can use web filtering to blacklist individual URL or domain names and configure whitelisting policies for the same. A user can also provision to allow or block a URL based on reputation or category.
Prerequisites for Web Filtering
Before you configure the web filtering feature on the Cisco CSR 1000V Cloud Services Router, ensure that you have the following:
The Cisco CSR 1000V Cloud Services Router runs the Cisco IOS XE Denali 16.3 software image or later.
-
The Cisco CSR 1000V Cloud Services Router requires 2 vCPU, 8GB memory, and 2GB extra disk space for deploying the container service.
-
The Cisco CSR 1000V Cloud Service Router must have a security K9 license to enable the web filtering feature.
Restrictions for Web Filtering
The following restrictions apply to the web filtering feature:
This feature is only supported on Cisco CSR 1000V Cloud Services Router and it is not supported on Cisco 4000 Series Integrated Services Routers.
-
The blacklist/whitelist pattern supports only regex pattern, and currently 64 patterns are supported for blacklist/whitelist rules. For more information on regex pattern, see the Regular Expressions chapter.
-
Domain filtering supports only the IPv4 domains resolved through DNS protocol using IPv4 UDP transport. Domain filtering alerts are sent only to IOS syslog.
-
Domain filtering with OpenDNS is not supported.
-
URL filtering with Virtual Routing and Forwarding (VRF) is not supported.
-
Domain filtering with CWS is not supported.
-
Domain filtering does not support category and reputation.
-
Local block server does not support serving HTTPS block page.When the URL filter tries to inject block page or redirect message, it does not support HTTPS traffic.
-
When there is a username and password in the URL, URL filter does not remove them from the URL before matching the whitelist/blacklist pattern. However, the category/reputation lookup does not have this limitation and removes the username and password from the URL before lookup.
-
HTTPS inspection is limited. Web filtering uses server certificate to obtain the URL/domain information. It is not possible to inspect the full URL path.
-
If the virtual-service profile urlf-low is configured after installing the virtual service, the activation will fail. You need to uninstall and install the virtual service again.
-
UTD does not inter-operate with WCCP, and NBAR under inter-VRF scenario.
-
Web filter profile names for URL, domain, block and sourcedb can have only alpha-numeric characters, dashes and underscores.
How to Deploy Web Filtering
To deploy web filtering on supported devices, perform the following tasks:
-
Provision the device: Identify the device to install the Web Filtering feature. This feature is supported on Cisco CSR 1000V Cloud Services Router.
-
Obtain the license: The web filtering functionality is available only in security packages which require a security license to enable the service. Contact Cisco Support to obtain the license.
| Step 1 | Install and activate the virtual container service—How to Install and Activate the Virtual Container Service |
| Step 2 | Configure the domain-based web filtering with an external block server—Configure Domain-based Web Filtering with an External Block Server |
| Step 3 | Configure the domain-based web filtering with local block server—Configure Domain-based Web Filtering with a Local Block Server |
| Step 4 | Configure the URL-based web filtering with a local block server—Configure URL-based Web Filtering with a Local Block Server |
| Step 5 | Configure the URL-based web filtering with an Inline block server—Configure URL-based Web Filtering with an Inline Block Page |
| Step 6 | Configure the Snort IPS/IDS—Configuring Domain/URL based Web Filtering and Snort IPS |
How to Install and Activate the Virtual Container Service
To install and activate the virtual container service, perform the following task:
| Step 1 | Install the UTD OVA file—Installing the UTD OVA File. |
| Step 2 | Configure the VirtualPortGroup interfaces and virtual-service—Configuring VirtualPortGroup Interfaces and Virtual Service. |
| Step 3 | Activate the Snort virtual container service. |
Installing the UTD OVA File
An OVA file is an Open Virtualization Archive that contains a compressed, installable version of a virtual machine. You must download this OVA file on to the router and use the virtual-service install CLI to install the service. The service OVA file is not bundled with the Cisco IOS XE Release images that are installed on the router. However, the OVA files may be preinstalled in the flash of the router.
You must use a Cisco IOS XE image with security license. During the OVA file installation, the security license is checked and an error is reported if the license is not present.
This is the sample configuration:
Device> enable
Device# virtual-service install name UTDIPS package harddisk:utd-ips-v102.ova media harddisk:
Device# show virtual-service list
Virtual Service List:
Name Status Package Name
------------------------------------------------------------------------------
snort Installed utdsnort.1_2_2_SV2982_XE_main.20160
Configuring VirtualPortGroup Interfaces and Virtual Service
You must configure two VirtualPortGroup interfaces and configure guest IP addresses for both interfaces.
Note | The VirtualPortGroup interface for data traffic must use a private or nonroutable IP address. We recommend the use of 192.0.2.0/30 IP address range for this interface. |
This is the sample configuration:
Device# configure terminal
evice(config)# interface VirtualPortGroup0
Device(config-if)# ip address 192.0.2.0 255.255.255.252
Device(config-if)# exit
Device(config)# interface VirtualPortGroup 1
Device(config-if)# ip address 192.0.2.1 255.255.255.224
Device(config-if)# exit
Device(config)# virtual-service UTDIPS

Device(config-virt-serv)# profile urlf-low (This is minimum requirement for web filtering to work.)

Device(config-virt-serv)# vnic gateway VirtualPortGroup 0 (The IP-address configured in VPG0 interface should have access to Internet over http(s).If the VPG0 interface does not have access to Internet, the web filter database will not be updated.)
Device(config-virt-serv-vnic)# guest ip address 10.0.0.2
Device(config-virt-serv-vnic)# exit
Device(config-virt-serv)# vnic gateway VirtualPortGroup 1
Device(config-virt-serv-vnic)# guest ip address 192.0.2.2
Device(config-virt-serv-vnic)# exit
Device(config-virt-serv)# activate
Device(config-virt-serv)# end

Device# show virtual-service list
Virtual Service List:

Name                    Status             Package Name
------------------------------------------------------------------------------
snort                   Activated          utdsnort.1_2_2_SV2982_XE_main.20160
Configure Domain-based Web Filtering with an External Block Server
To configure domain-based web filtering with an external block server, perform these steps:
| Step 1 | Install and activate the virtual service. For more information, see Configuring VirtualPortGroup Interfaces and Virtual Service. |
| Step 2 | Configure the
blacklist parameter-map:
parameter-map type regex domainfilter_blacklist_pmap1 pattern “www\.examplebook\.com” pattern “www\.bitter\.com” |
| Step 3 | Configure the
whitelist parameter-map:
parameter-map type regex domainfilter_whitelist_pmap1 pattern “www\.example\.com” pattern “www\.exmaplegogle\.com” |
| Step 4 | Configure the
domain profile and associate the blacklist and whitelist parameter-maps:
utd web-filter domain profile 1
 blacklist
  parameter-map regex domainfilter_blacklist_pmap1
 whitelist
  parameter-map regex domainfilter_whitelist_pmap1
|
| Step 5 | (Optional)
By default the domain filtering alerts are not enabled. Configure the alerts
for blacklist or whitelist, or both under the domain profile:
alert {all |blacklist | whitelist}
|
| Step 6 | Configure
the external redirect-server under the domain profile:
redirect-server external x.x.x.x (This is the IP address that is used for serving block page when a page is blacklisted) |
| Step 7 | Configure
the UTD engine standard with domain profile:
utd engine standard web-filter domain-profile 1 |
| Step 8 | Configure
the UTD with engine standard and enable it globally or on a specific interface:
utd
    all-interfaces
    engine standard
This example shows how to configure domain-based web filtering with an external block server: parameter-map type regex domainfilter_blacklist_pmap1 pattern “www\.examplebook\.com” parameter-map type regex domainfilter_whitelist_pmap1 pattern “www\.example\.com” utd engine standard web-filter domain-profile 1 !utd web-filter domain profile 1 alert all blacklist parameter-map regex domainfilter_blacklist_pmap1 whitelist parameter-map regex domainfilter_whitelist_pmap1 redirect-server external 2 to x ! utd all-interfaces engine standard |
Configure Domain-based Web Filtering with a Local Block Server
To configure domain-based web filtering with a local block server, perform these steps:
| Step 1 | Install and activate the virtual service. For more information, see Configuring VirtualPortGroup Interfaces and Virtual Service. |
| Step 2 | Configure a
loopback interface or use any existing interface that the client can access:
interface loopback 110 ip address 10.1.1.1 255.255.255.255 exit |
| Step 3 | Configure the
UTD web filter with the local block server profile:
utd web-filter block local-server profile 1 block-page-interface loopback 110 http-ports 80 content text "Blocked by Web-Filter" |
| Step 4 | Configure the
blacklist parameter-map:
parameter-map type regex domainfilter_blacklist_pmap1 pattern “www\.bitter\.com” |
| Step 5 | Configure the
whitelist parameter-map:
parameter-map type regex domainfilter_whitelist_pmap1 pattern “www\.exmaplegogle\.com” |
| Step 6 | Configure the
domain profile and associate the blacklist and whitelist parameter-maps:
utd web-filter domain profile1 blacklist parameter-map regex domainfilter_blacklist_pmap1 whitelist parameter-map regex domainfilter_whitelist_pmap1 |
| Step 7 | (Optional) By
default the domain filtering alerts are not enabled. Configure the alerts for
blacklist or whitelist, or both under the domain profile:
alert {all |blacklist | whitelist}
|
| Step 8 | Configure the
redirect-server as local block server under the domain profile:
redirect-server local-block-server 1 |
| Step 9 | Configure the
UTD engine standard with domain profile:
utd engine standard web-filter domain-profile 1 |
| Step 10 | Configure the
UTD with engine standard and enable it globally or on a specific interface:
utd
    all-interfaces
    engine standard
This example shows how to configure a domain-based web filtering with a local block server: interface loopback 110
ip address 10.1.1.1 255.255.255.255
exit
utd engine standard
web-filter
domain-profile 1
!
utd web-filter block local-server profile 1
block-page-interface Loopback110
content text "Blocked by Web-Filter"
http-ports 80
!
utd web-filter domain profile 1
alert all
blacklist
parameter-map regex df_blacklist_pmap1
whitelist
parameter-map regex df_whitelist_pmap1
redirect-server local-block-server 1
!utd
all-interfaces
engine standard
|
Configure URL-based Web Filtering with a Local Block Server
To configure URL-based web filtering with a local block server, perform these steps:
| Step 1 | Install and activate the virtual service. For more information, see Configuring VirtualPortGroup Interfaces and Virtual Service. |
| Step 2 | Configure a loopback interface or use any existing interface that the client can access:
interface loopback 110 ip address 10.1.1.1 255.255.255.255 exit |
| Step 3 | Configure the UTD web filter with the local block server profile:
utd web-filter block local-server profile 1 block-page-interface loopback 110 http-ports 80 content text "Blocked by Web-Filter" |
| Step 4 | Configure the blacklist parameter-map:
parameter-map type regex urlf_blacklist_pmap1 pattern www.exmplee.com/sports |
| Step 5 | Configure the whitelist parameter-map:
parameter-map type regex urlf_whitelist_pmap1 pattern www.examplehoo.com/finance |
| Step 6 | Configure the URL profile and do the following:
utd web-filter url profile 1 |
| Step 7 | Configure the UTD engine standard with URL profile:
utd engine standard web-filter url-profile 1 |
| Step 8 | Configure the UTD engine standard and enable the UTD on a global or specific interface:
utd
all-interfaces
engine standard
This example shows how to configuration a URL-based web filtering with a local block server: parameter-map type regex urlf_blacklist_pmap1
pattern www.goog.com/sprots
parameter-map type regex urlf_whitelist_pmap1
pattern www.exmaplehoo.com/finance
!interface loopback 110
ip address 10.1.1.1 255.255.255.255
exit
utd web-filter block local-server profile 1
block-page-interface loopback 110
http-ports 80
content text "Blocked by Web-Filter"
utd web-filter url profile 1
blacklist
  parameter-map regex urlf_blacklist_pmap1
whitelist
  parameter-map regex urlf_whitelist_pmap1
alert all
categories allow
  sports
reputation
  block-threshold high-risk
sourcedb fail close
log level error
block local-server 1!
utd engine standard
 web-filter
	url-profile 1
!
utd
all-interfaces
    engine standard
|
Configure URL-based Web Filtering with an Inline Block Page
To configure URL-based web filtering with an in-line block page, perform these steps:
| Step 1 | Install and activate the virtual service. For more information, see Configuring VirtualPortGroup Interfaces and Virtual Service. |
| Step 2 | Configure the blacklist parameter-map:
parameter-map type regex urlf_blacklist_pmap1 pattern www.exmaplegogle.com/sports |
| Step 3 | Configure the whitelist parameter-map:
parameter-map type regex urlf_whitelist_pmap1 pattern www.exmaplehoo.com/finance |
| Step 4 | Configure the UTD block page profile:
utd web-filter block page profile 1 text "Blocked by Web-Filter URLF" (The other options are file and redirect-url) |
| Step 5 | Configure the URL profile and do the following:
utd web-filter url profile 1 |
| Step 6 | Configure the UTD engine standard with URL profile:
utd engine standard web-filter url-profile 1 |
| Step 7 | Configure the UTD engine standard and enable the UTD on a global or specific interface:
utd
engine standard
all-interfaces
This example shows how to configuration an URL-based web filtering with an inline block server: parameter-map type regex urlf_blacklist_pmap1
pattern www.examplegogle.com/sprots
parameter-map type regex urlf_whitelist_pmap1
pattern www.examplehoo.com/finance
!
utd web-filter block page profile 1
text "Blocked by Web-Filter URLF"
!
utd web-filter url profile 1
blacklist
  parameter-map regex urlf_blacklist_pmap1
whitelist
  parameter-map regex urlf_whitelist_pmap1
alert all
categories allow
  sports
reputation
  block-threshold high-risk
sourcedb fail close
log level error
!
utd engine standard
 web-filter
	url-profile 1
!
utd
all-interfaces
engine standard
|
Configuring Domain/URL based Web Filtering and Snort IPS
To configure Domain/URL based web filtering and Snort IPS, perform these steps:
| Step 1 | Configure the domain profile:
utd web-filter domain profile 1 |
| Step 2 | Configure the URL profile:
utd web-filter url profile 1 |
| Step 3 | Configure the threat-inspection under UTD engine standard:
utd engine standard threat-inspection |
| Step 4 | Configure the web-filter under UTD engine standard with the domain and URL profiles:
utd engine standard logging syslog threat-inspection threat protection policy security signature update server cisco username xxx password QhLb]Z[ifMbFgLYgR]^KLDUZ signature update occur-at daily 0 0 logging level error web-filter domain-profile 1 url-profile 1 |
| Step 5 | Configure the UTD engine standard and enable it globally or on a specific interface:
utd
    engine standard
    all-interfaces
|
Verifying the Web Filter Configuration
You can verify the Web filtering configuration using the following commands:
Device# show utd engine standard config
IPS/IDS: Disabled


URL Filtering:
---------------
Status: Enabled

Whitelist:
==========
www.edition.cnn.com
16k.html

Blacklist:
==========
www.youtube.com

Categories(Allow):
==================
Sports

Block Profile:
Block text: "Blocked by URLF"

Reputation Threshold : High risk
Alerts : None
Debug level : Error

Device# show utd engine standard web-filter source status
Source DB Status:
        Process: Running
        Last known status: 2016-04-18 06:42:28  Current local database version 4-765
Troubleshooting Web Filtering
To collect the logs, use the virtual-service move name "CONTAINER_NAME" log to bootflash: command. You can troubleshoot issues that are related to enabling Web filtering feature using the following commands on the device:
-
debug utd engine standard all
-
debug utd engine standard climgr
-
debug utd engine standard daq
-
debug utd engine standard internal
-
debug utd engine standard onep
-
Greater robustness during configuration download to detect and act upon errors.
-
Efficient way of handling signature and configuration updates occuring together.
-
Early detect and recover from the loss of the oneP connection between IOSd and CLIMGR. For example, when CLIMGR crashes.
-
Improved visibility to the detailed results of the (current or recent) configuration download, without requiring you to enable debugs.
Configuration Examples
The following example shows how to enable domain filtering on CSR 1000V Cloud Services Router:
 Example: Configuring Parameter Map
The following example shows how to configure parameter map:
Device# enable
Device# configure terminal
Device(config)# parameter-map type regex wlist1
Device(config-profile)# pattern www.google.com
Device(config-profile)# pattern www.cisco.com
!
Device(config)# parameter-map type regex blist1
Device(config-profile)# pattern www.exmaplehoo.com
Device(config-profile)# pattern www.bing.com
exit
!
Device(config)# utd web-filter block local-server profile 1
Device(config--utd-webf-blk-srvr)# content file bootflash:test.utd.file
Device(config--utd-webf-blk-srvr)# exit


For the local block server to work, HTTP server should be running. Use the ip http server command to configure the block server. The show ip http server status  command displays the server status as enabled.

Device(config)# show ip http server status
HTTP server status: Enabled
HTTP server port: 80
- Example: Configuring Web Filter Domain Profile
- Configuring Web Filter URL Profile
- Configuring UTD Snort IPS/IDS Whitelist Signatures
- Example: Configuring Web Filter Profile
- Example: Alert Messages for Web Filtering Events
Example: Configuring Web Filter Domain Profile
The following example shows how to configure web filter domain profile:
Device(config)# utd web-filter domain profile 1
Device(config-utd-webfltr-domain)# blacklist
Device(config-utd-webf-dmn-bl)# parameter-map regex blist1
Device(config-utd-webf-dmn-bl)# whitelist
Device(config-utd-webf-dmn-wl)# parameter-map regex wlist1
Device(config-utd-webf-dmn-wl)# exit
Device(config-utd-webfltr-domain)# alert all
Device(config-utd-webfltr-domain)# redirect-server external 1.2.3.4
Device(config-utd-webfltr-domain)# exit
Configuring Web Filter URL Profile
The following example shows how to configure web filter URL profile:
Device(config)# utd web-filter url profile 1
Device(config-utd-webfltr-url)# blacklist
Device(config-utd-webf-url-bl)# parameter-map regex blist1
Device(config-utd-webf-url-bl)# whitelist
Device(config-utd-webf-url-wl)# parameter-map regex wlist1
Device(config-utd-webf-url-wl)# exit
Device(config-utd-webfltr-url)# categories allow
Device(config-utd-webf-url-cat)# news-and-media
Device(config-utd-webf-url-cat)# search-engines
Device(config-utd-webf-url-cat)# computer-and-internet-info
Device(config-utd-webf-url-cat)# computer-and-internet-security
Device(config-utd-webf-url-cat)# financial-services
Device(config-utd-webf-url-cat)# image-and-video-search
Device(config-utd-webf-url-cat)# job-search
Device(config-utd-webf-url-cat)#exit
Device(config-utd-webfltr-url)# alert all
Device(config-utd-webfltr-url)# reputation
Device(config-utd-webf-url-rep)# block-threshold suspicious
Device(config-utd-webf-url-rep)# exit
Device(config-utd-webfltr-url)# block local-server 1
Device(config-utd-webfltr-url)# exit
Configuring UTD Snort IPS/IDS Whitelist Signatures
The following example shows how to configure signature whitelist:
Device(config)# utd threat-inspection whitelist
Device(config-utd-whitelist)# signature id 1
Device(config-utd-whitelist)# signature id 2
evice(config-utd-whitelist)# exit
!
Example: Configuring Web Filter Profile
The following example shows how to configure web filter profile:
Device(config)# utd engine standard
Device(config-utd-eng-std)# logging server 1.2.3.4
Device(config-utd-eng-std)# threat-inspection
Device(config-utd-engstd-insp)#threat protection
Device(config-utd-engstd-insp)# policy security
Device(config-utd-engstd-insp)# logging level emerg
Device(config-utd-engstd-insp)# whitelist
Device(config-utd-engstd-insp)# web-filter
Device(config-utd-engstd-webf)# domain-profile 1
Device(config-utd-engstd-webf)# url-profile 1
Device(config-utd-engstd-webf)# exit
Example: Alert Messages for Web Filtering Events
The following example shows alert messages for web filtering events:
016/06/02-14:44:41.061501 IST [**] [Instance_ID: 1] [**] Drop [**] UTD WebFilter Blacklist [**] [URL: www.edition.cnn.com/2016/03/31/asia/kolkata-bridge-collapse/index.html] [Initiator_VRF: 0] {TCP} 1.0.0.9:56608 -> 2.0.0.29:80

2016/06/02-14:48:06.636270 IST [**] [Instance_ID: 1] [**] Pass [**] UTD WebFilter Whitelist [**] [URL: www.ndtv.com/index.html] [Initiator_VRF: 0] {TCP} 1.0.0.9:56611 -> 2.0.0.23:80

Jun 2 14:37:57.856 IST: %IOSXE-6-PLATFORM: F0: cpp_cp: QFP:0.0 Thread:000 TS:00000618422205723793 %UTD-6-UTD_DF_BLACKLIST_MATCH: UTD WebFilter Domain Blacklist [**] [Domain: www.cricinfo.com] [Matched Pattern: www.cricinfo.com] {UDP} 2.0.0.10:53 -> 1.0.0.9:55184

Jun 2 14:39:22.653 IST: %IOSXE-6-PLATFORM: F0: cpp_cp: QFP:0.0 Thread:000 TS:00000618507002407540 %UTD-6-UTD_DF_WHITELIST_MATCH: UTD WebFilter Domain Whitelist [**] [Domain: www.cricinfo.com] [Matched Pattern: www.cricinfo.com] {UDP} 2.0.0.10:53 -> 1.0.0.9:55286
Additional References for Cisco Web Filtering
Related Documents
| Related Topic | Document Title |
|---|---|
|
IOS commands |
|
|
Security commands |
|
|
UCS E-Series Servers |
Technical Assistance
| Description | Link |
|---|---|
|
The Cisco Support website provides extensive online resources, including documentation and tools for troubleshooting and resolving technical issues with Cisco products and technologies. To receive security and technical information about your products, you can subscribe to various services, such as the Product Alert Tool (accessed from Field Notices), the Cisco Technical Services Newsletter, and Really Simple Syndication (RSS) Feeds. Access to most tools on the Cisco Support website requires a Cisco.com user ID and password. |
Feature Information for Cisco Web Filtering
The following table provides release information about the feature or features described in this module. This table lists only the software release that introduced support for a given feature in a given software release train. Unless noted otherwise, subsequent releases of that software release train also support that feature.
Use Cisco Feature Navigator to find information about platform support and Cisco software image support. To access Cisco Feature Navigator, go to www.cisco.com/go/cfn. An account on Cisco.com is not required.|
Feature Name |
Releases |
Feature Information |
|---|---|---|
|
Cisco Web Filtering |
Cisco IOS XE Denali Release 16.3.1 |
The Web Filtering feature enables the user to provide controlled access to Internet websites by configuring the domain-based or URL-based policies and filters on the device. The user can configure the web filtering profiles to manage the web access.Web Filtering feature is implemented using the container service and it is similar to the Snort IPS solution. |
|
UTD feature parity on ISRv UTD Serviceability Enhancements |
Cisco IOS XE Fuji Release 16.8.1 |
Domain and URL filtering in both single-tenant and multi-tenant mode are supported for CSR. For ISRv, only single-tenant is supported. This feature is available on all models of the ENCS platforms. Error recovery feature in UTD is enhanced to allow the container to recover from internal error by initiating a bulk configuration download from IOS. The command utd web-filter profile name is modifed. |
 Feedback