Configure and Run Tests

Run a Raw Test

To test the storage performance in HxBench, select the Bench Tests tab and click the Create Test button. The Create page appears. This is the first of three pages that guide you through creating a bench test.

Procedure


Step 1

On the Test Profile page, complete the following fields:

Field Name

Description

Test Name field

Type a unique name into the field. The test name is used to associate test parameters and test results into user-defined reports.

Test Type list

Select Raw Disk from the list.

  1. Select the desired Profile Type for the named test from the following options:

    Profile Type

    Description

    Select Existing

    Use an existing profile from the list of available Test Profiles.

    Create New

    Create a new test. Complete the Vdbench test parameter values to define a new custom test:

    Test Parameters

    • Read Mix (%): Valid range is 1-100%. The default is 60%.

    • IO Type list: Valid values are Random and Sequential. The default is Random.

    • IO Block Size (KB): Valid range is 0-99. The default is 8.

    • Threads per VM: Value must be greater than 1. The default is 32.

    Data Set

    • Deduplication (%): Valid range is 0-99%. The default is 50%.

    • Compression (%): Valid range is 0-99%. The default is 50%.

    • Dataset per VM (GB): Value must be greater than 1. The default is 100.

    • Working Set (% of Dataset): Valid range is 0-100%. The default is 100%.

    Loadpoint and Run Time

    • Select the Loadpoint: Fixed Load (only 100% loadpoint) or Stepwise Load (Initial calibration, 10%, 50%, 75% 90%, 100% load point)

    • Run Time (min): Length of time of the test: Value must be greater than 1.

    Upload File

    Click the Browse button to navigate to upload Vdbench test parameters from a file.

  2. Click Next to continue to the VM Group.

Step 2

On the VM Group page, provide the infrastructure details of the virtual machines you want to test.

  1. Select the infrastructure to run the tests.

    Infrastructure Type

    Description

    Use Existing VM Group

    To use the existing infrastructure to run the tests, select the VM from the Select VM Group list.

    Create New VMs

    To create a new infrastructure, select Create New VMs and complete the following fields:

    • VM Name Prefix: Name of the VM.

    • vCenter: Pre-populated values. You cannot edit or change the values.

    • Datastore list: List of datastores in the vCenter that are queried at runtime.

    • Number of VMs: Valid value range is 1 to 4 VMs. The default is 4.

    • Stretched Cluster: Enable Stretched Cluster; If you are benchmarking a Stretched Cluster complete the additional fields:

      • HX Connect IP: HX Connect IP address

      • HX Connect Username: HX Connect Username

      • HX Connect Password: HX Connect Password.

      • Fetch Data Store: After entering HX Connect details click on this button to fetch Datastore details.

  2. Click Next.

  3. Upon successful selection of Define Test and Define Infra, click Start Test to start the test.

    As the test progresses, it will automatically transition through the following work flow progress pages.

    Work flow Page

    Description

    Create Infra

    View the Test VMs created with the given specifications. Use the Log Details tab to view the progress.

    Validate Infra

    VM infrastructure is validated for its availability and reachability.

    Create Data Set

    Data disk priming is carried out to run the test. The VM infrastructure is ready upon the completion of data disk priming. Now, the Vdbench tool is triggered to run the storage performance test using the provided test inputs on the VM infrastructure.

    Run Tests

    Performance metrics are captured and updated as the test progresses.

    Completed

    When the test is successfully Completed, the status turns green. The fields under Aggregate Test Results are updated.


Testing iSCSI Storage for HyperFlex

Testing iSCSI Storage: HyperFlex Cluster

To test HyperFlex storage performance in HxBench, perform the following steps:

Procedure


Step 1

On the Bench Tests tab, click Create Test. The Test Profile page appears. This is the first of three pages that guide you through creating a bench test.

Step 2

On the Test Profile page, complete the following fields:

Field Name

Description

Test Name field

Type a unique name into the field. The test name is used to associate test parameters and test results into user-defined reports.

Test Type list

Select iSCSI Block Storage Workload – HX from the list.

  1. Select the desired Profile Type for the named test from the following options:

    Profile Type

    Description

    Select Existing

    Use an existing profile from the list of available Test Profiles.

    Create New

    Create a new test. Complete the Vdbench test parameter values to define a new custom test:

    Test Parameters

    • Read Mix (%): Valid range is 1-100%. The default is 60%.

    • IO Type list: Valid values are Random and Sequential. The default is Random.

    • IO Block Size (KB): Valid range is 0-99. The default is 8.

    • Threads per VM: Value must be greater than 1. The default is 32.

    Data Set

    • Deduplication (%): Valid range is 0-99%. The default is 50%.

    • Compression (%): Valid range is 0-99%. The default is 50%.

    • Dataset per VM (GB): Value must be greater than 1. The default is 100.

    • Working Set (% of Dataset): Valid range is 0-100%. The default is 100%.

    Loadpoint and Run Time

    • Select the Loadpoint: Fixed Load (only 100% loadpoint) or Stepwise Load (Initial calibration, 10%, 50%, 75% 90%, 100% load point)

    • Run Time (min): Length of time of the test: Value must be greater than 1.

    Upload File

    Click the Browse button to navigate to upload Vdbench test parameters from a file.

  2. Click Next to continue to the VM Group.

Step 3

On the VM Group page, provide the infrastructure details of the virtual machines you want to test.

  1. Select the infrastructure to run the tests.

    Infrastructure Type

    Description

    Use Existing VM Group

    To use the existing infrastructure to run the tests, select the VM from the Select VM Group list.

    Create New VMs

    To create a new infrastructure, select Create New VMs and complete the following fields:

    • VM Name: Name of the VM.

    • Node: Name of the node.

    • Data Store list: List of data stores in the vCenter that are queried at runtime.

    • Total VMs across All Nodes: Total count of VMs across all nodes. Value needs to be greater than 1.

    • MTU Size: (Optional) MTU size for the test VMs and controller.

    • HX Connect IP: HX Connect IP address.

    • HX Connect Username: HX Connect Username.

    • HX Connect Password: HX Connect Password.

    Target Server Details

    Enable CHAP: Select either Yes or No. If yes is selected, the CHAP Username and Password fields is visible and mutual authentication between target and user is configured. Complete the required fields.

    • IP Address: CHAP IP address

    • CHAP Username: CHAP username

    • CHAP Password: CHAP password

    Network Configuration Details

    • Static/DHCP: Select Static or DHCP for IPs to assign to the test VMs.

    • IP Range Start: Starting IP address for test VMs. Successive unused IPs after this IP are used for test VMs. This option is only available if you select Static.

    • Netmask: NetmaskIP of the network used for test VMs. This option is only available if you select Static.

    • Gateway: GatewayIP of the network used for test VMs. This option is only available if you select Static.

    Data Priming

    Priming involves performing an initial write to the entire VM. This is required for all new VMs to ensure performance results are valid. Existing VMs should be re-primed when using a storage efficiency ration other than the one used for initial creation.

    Use the radio buttons to include or skip priming and specify when to run the priming test in the field provided.

  2. Click Next.

  3. Upon successful selection of Define Test and Define Infra, click Start Test to start the test.

    As the test progresses, it will automatically transition through the following work flow progress pages.

    Work flow Page

    Description

    Create Infra

    View the Test VMs created with the given specifications. Use the Log Details tab to view the progress.

    Validate Infra

    VM infrastructure is validated for its availability and reachability.

    Create Data Set

    Data disk priming is carried out to run the test. The VM infrastructure is ready upon the completion of data disk priming. Now, the Vdbench tool is triggered to run the storage performance test using the provided test inputs on the VM infrastructure.

    Run Tests

    Performance metrics are captured and updated as the test progresses.

    Completed

    When the test is successfully Completed, the status turns green. The fields under Aggregate Test Results are updated.

When the test is successfully Completed, the status turns green and the fields under Loadpoint Averages and VM Average Comparison are updated.
  • You can view the Test VMs created with the given specifications. You can view the progress in the Status column.

    View the progress in the Status column. View the Test VMs created with the given specifications.

  • Data disk priming is carried out to run the test.

  • The VM infrastructure is ready upon the completion of data disk priming. The vdbench tool is now triggered to run the storage performance test using the provided test inputs on the VM infrastructure.

  • Performance metrics are updated as the test progresses on theRun Tests page.

  • When the test is in progress the Create VM Group button is disabled. The button is enabled after test completes, fails or terminates.


Testing iSCSI Storage: Non-HyperFlex Clusters

To test storage performance (non-HyperFlex platform) in HxBench, proceed as follows:

Procedure


Step 1

On the Bench Tests tab, click Create Test. The Create page appears. This is the first of three pages that guide you through creating a bench test.

Step 2

On the Test Profile page, complete the following fields:

Field Name

Description

Test Name field

Type a unique name into the field. The test name is used to associate test parameters and test results into user-defined reports.

Test Type list

Select iSCSI Block Storage Workload – Non-HX from the list.

  1. Select the desired Profile Type for the named test from the following options:

    Profile Type

    Description

    Select Existing

    Use an existing profile from the list of available Test Profiles.

    Create New

    Create a new test. Complete the Vdbench test parameter values to define a new custom test:

    Test Parameters

    • Read Mix (%): Valid range is 1-100%. The default is 60%.

    • IO Type list: Valid values are Random and Sequential. The default is Random.

    • IO Block Size (KB): Valid range is 0-99. The default is 8.

    • Threads per VM: Value must be greater than 1. The default is 32.

    Data Set

    • Deduplication (%): Valid range is 0-99%. The default is 50%.

    • Compression (%): Valid range is 0-99%. The default is 50%.

    • Dataset per VM (GB): Value must be greater than 1. The default is 100.

    • Working Set (% of Dataset): Valid range is 0-100%. The default is 100%.

    Loadpoint and Run Time

    • Select the Loadpoint: Fixed Load (only 100% loadpoint) or Stepwise Load (Initial calibration, 10%, 50%, 75% 90%, 100% load point)

    • Run Time (min): Length of time of the test: Value must be greater than 1.

    Upload File

    Click the Browse button to navigate to upload Vdbench test parameters from a file.

  2. Click Next to continue to the VM Group.

Step 3

On the VM Group page, configure details of the infrastructure where you want to deploy the test virtual machines to run the test. You must use an existing infrastructure.

  1. Select Use Existing VM Group to run the tests.

  2. Click Next.

  3. Click Start Test to start the test.

When the test is successfully Completed, the status turns green and the fields under Loadpoint Averages and VM Average Comparison are updated.
  • You can view the Test VMs created with the given specifications. You can view the progress in the Status column.

    View the progress in the Status column. View the Test VMs created with the given specifications.

  • Data disk priming is carried out to run the test.

  • The VM infrastructure is ready upon the completion of data disk priming. The vdbench tool is now triggered to run the storage performance test using the provided test inputs on the VM infrastructure.

  • Performance metrics are updated as the test progresses on theRun Tests page.

  • When the test is in progress the Create VM Group button is disabled. The button is enabled after test completes, fails or terminates.


Terminate a Test

You can terminate a running test using the Terminate option in the Run test wizard. The test will be marked as Terminated by user.

Test Details

The various operations you can perform on completed tests, test profiles, and VM infrastructure are listed in this section.

Bench Tests

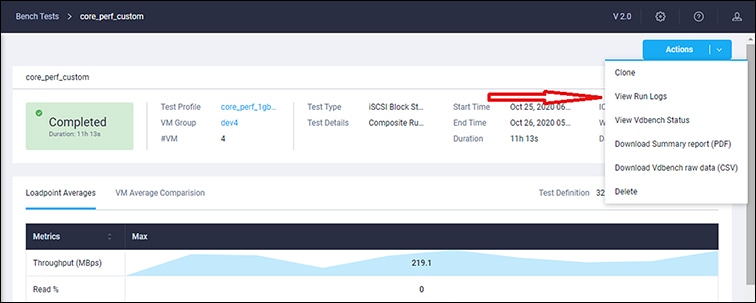
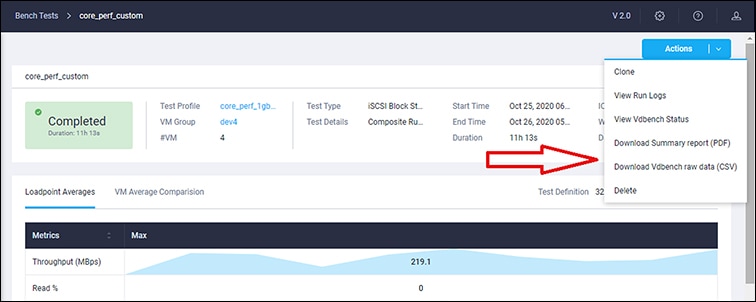
You can view the list of tests run on the controller under the BENCH TESTS tab. You can select any test from this list and visualize the test summary, performance metrics and compare across multiple tests. If there is a test running, the Test History view lists it as In-Progress Test and updates the view details periodically. You can delete a test and associated data from HxBench.

Comparisons

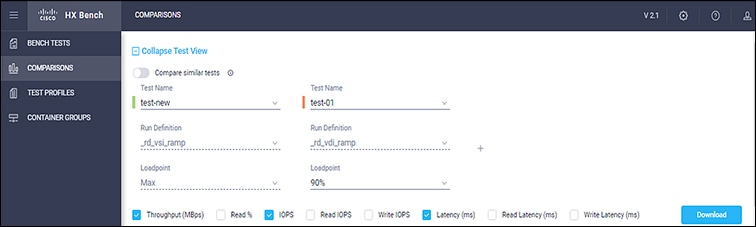
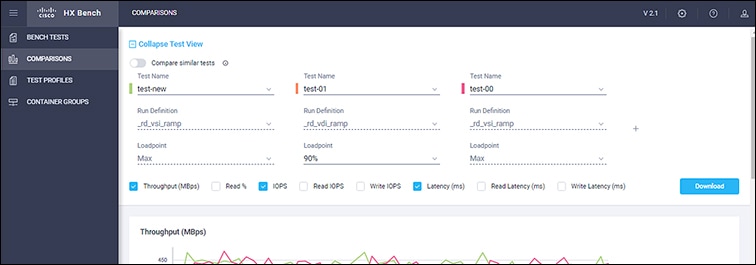
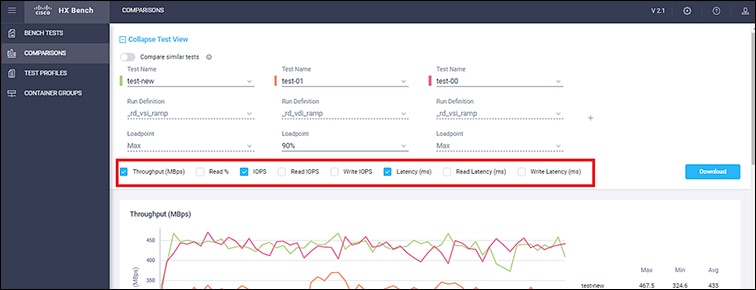
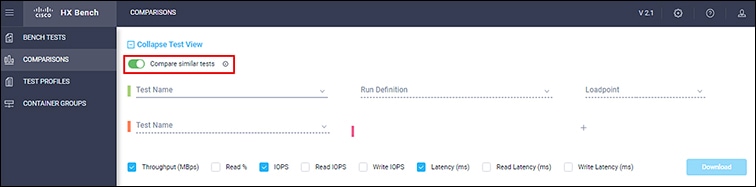
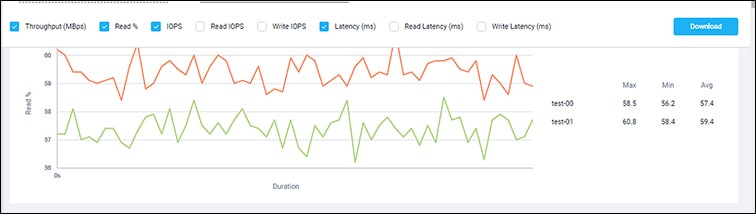
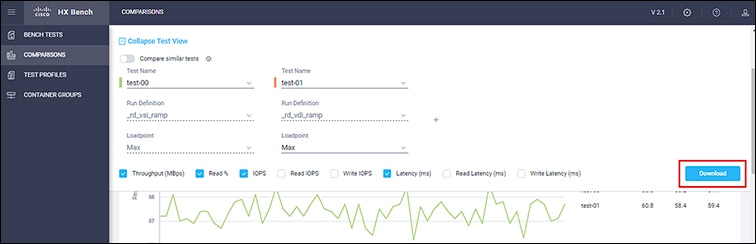
You can select and compare test results on the COMPARISONS tab. You can select any test from this list, the Run Definition and Loadpoint and compare across multiple tests.

  • Use the toggle to auto select similar tests.

  • Use the check boxes to select specific metrics.

  • Click the + to add additional tests.

Test Profiles

You can view the list of available profiles in the controller under the TEST PROFILES tab. You can select a profile and view the details. You can download a profile from here. You can also upload a profile and use it for testing. However, when a profile file is uploaded, the content must be in the correct format as defined by Vdbench. If there is any wrong format or unrecognized keys, the test will fail. You can delete a profile from HxBench.

VM Groups

You can view the available VM infrastructure and its status from the VM GROUPS page. If an infrastructure is not required for any further testing, you can delete it.

You can create a VM infrastructure to run a test using the Run Test wizard.

Application Logs

Application logs are stored in the following location:

/home/appadmin/hxbench/hxbench/hxbench.log

The following screenshot shows how to download the application logs.

Test Results

Test Results Logs

  • Click on Test Details > View Logs > View Run Logs.

    You can view the complete test logs.

  • Click on Test Details > View Logs > View Vdbench Status.

    You can view the parsable information about the current status of Vdbench.

Download Test Results Report

  • To download the detailed results in PDF, click on Download icon under Test Details and select PDF.

  • To download the detailed results in CSV, click on Download icon under Test Details and select CSV.

Comparing Test Results

You can perform various comparisons on completed tests by selecting the required test from the list. You can select a minimum of two and a maximum of five tests at a time. To compare completed test proceed as follows:

Procedure


Step 1

Click on the Comparisons tab.

Step 2

Select the tests to be compared from the completed Test Name list. You can select a minimum of two and a maximum of five tests.

Step 3

Use the check boxes to select the test parameters that you want to compare.

Step 4

Turn on the Compare similar tests switch to compare tests with the same test profile. The first test selected is considered the base test, all of the other tests to be compared will have the same run definition and loadpoint as the first test.


The comparison results appear with an illustrative graph.

What to do next

To download the detailed test comparisons result in PDF, click on the Download button under the Comparisons tab.