Cisco ACI Hardening
Available Languages
Bias-Free Language
The documentation set for this product strives to use bias-free language. For the purposes of this documentation set, bias-free is defined as language that does not imply discrimination based on age, disability, gender, racial identity, ethnic identity, sexual orientation, socioeconomic status, and intersectionality. Exceptions may be present in the documentation due to language that is hardcoded in the user interfaces of the product software, language used based on RFP documentation, or language that is used by a referenced third-party product. Learn more about how Cisco is using Inclusive Language.
- US/Canada 800-553-2447
- Worldwide Support Phone Numbers
- All Tools
 Feedback
 Feedback
Principles of Secure Operations
Monitor Cisco Security Advisories and Responses
Cisco Nexus Dashboard Insights
Use Authentication, Authorization and Accounting
Implement the Principle of Least Privilege
Use Centralized Log Collection and Monitoring
Perform Configuration Management
Cisco ACI Configuration Backups
Use Strong Passwords and Multi-Factor Authentication (MFA)
Authentication, Authorization, and Accounting (AAA)
User Authentication Using Remote Authentication Providers
Access to Fabric Using Fallback
User Authentication Using Local Users
Dual-Factor Authentication (2FA)
User Authorization Using Remote Authentication Providers
Browse audit logs using Cisco APIC GUI
Browse Audit Logs Using the Cisco APIC CLI
Browse Audit Logs Using the Cisco APIC REST API
Export Audit Logs Using Callhome/Syslog/TACACS
Securing Simple Network Management Protocol (SNMP)
Disable unused Services and Protocols
Disable Insecure Protocols and Ciphers
Restricting Management Access Using Contracts
How to Apply Management Contracts
Recommended Management Contract Configuration
Management Contracts Under-the-hood
Authentication Using the REST API
Authentication with the Username and Password
Authentication with Signature-based Transactions
REST API Denial-of-Service Protections
HTTP/HTTPS Throttling for AAA Login
FIPS Mode in Cisco Integrated Management Controller (CIMC)
Control-Plane Protocols Authentication
Authentication in Council of Oracle Protocol (COOP)
Fabric Internode Authentication Security Level
Protecting from Loops Using the Mis-Cabling Protocol (MCP)
Cisco ACI Security Policies (a.k.a. Contracts)
Factory Hardening and System Integrity
Device Authentication and Intra-Fabric Messaging Encryption
Exposed Ports on Cisco ACI Devices
In recent years, cyber-attacks have become an increasingly common threat to organizations of all sizes and industries. Hackers are constantly devising new tactics and techniques to exploit vulnerabilities in systems and networks, making it essential for organizations to prioritize security measures such as infrastructure hardening.
Infrastructure hardening involves implementing a range of security measures to reduce the attack surface and strengthen the underlying components of an organization's digital infrastructure. This may include implementing strong passwords and multi-factor authentication, restricting access to sensitive information, installing firewalls and intrusion detection systems, and keeping software and hardware versions current with the latest patches and updates.
By implementing infrastructure hardening measures, organizations can significantly reduce their risk exposure to cyber-attacks. By strengthening the security of their systems and networks, they can make it much more difficult for hackers to gain access to sensitive information, steal data, or cause damage to their operations. In addition, effective infrastructure hardening can help organizations meet regulatory compliance requirements and protect their reputation by demonstrating their commitment to security.
At Cisco, we prioritize security in all aspects of our product development process. We understand that every environment is unique and requires specific security features and mechanisms to ensure optimal protection against cyber-attacks.
Specifically talking about Cisco Application Centric Infrastructure (ACI), our flagship data center software defined network solution has been built to be compliant with industry standards and certifications. Cisco ACI holds the following security certifications:
· DoD UC APL (Cisco ACI Certification Letter)
· Common Criteria (Cisco ACI Certification Report)
· FIPS 140-2 (Cisco ACI Compliance Letter)
Additionally, the Cisco ACI solution has been proven to meet PCI compliance requirements within a customer cardholder data environment, as attested by Verizon.
While Cisco ACI has been designed with the utmost security in mind, some configuration and tuning may be necessary to enable and customize the available features to properly harden the fabric based on the specifics of each environment.
| Date |
Description |
| October 3, 2024 |
Updated the Fabric Internode Authentication Security Level section due to changes in the default values in Cisco ACI release 6.1(1). |
| November 6, 2023 |
This document was created. |
This white paper provides recommendations and guidance in configuring Cisco ACI to ensure that it meets the highest security standards and is resilient against attacks.
There are three major areas on which administrators need to focus to properly harden network infrastructure: the management plane, the control plane, and the data plane. All three areas are equally important because they can all be compromised if not correctly hardened, which enables attacks to any of those areas to cause critical damage that, while different in nature, can have comparable impact.
This white paper addresses typical questions raised about hardening these three areas, the recommended configuration that customers need to perform to harden Cisco ACI, and the features that can and should be used in the given scenarios.
Additionally, this white paper discusses some of the most relevant principles of secure operations, as well as some architectural choices made in Cisco ACI and Cisco Nexus 9000 from the engineering and manufacturing perspective to secure the system.
Principles of Secure Operations
Although most of this document is devoted to the secure configuration of a Cisco ACI fabric, configurations alone do not completely secure a network. The operating procedures in use on the network contribute as much to security as the configuration of the underlying devices.
This section contains some operational recommendations that you are advised to implement, as they will contribute to maintain your network securely and minimize your attack surface and exposure. This section focuses on critical areas of network operations and may not be comprehensive.
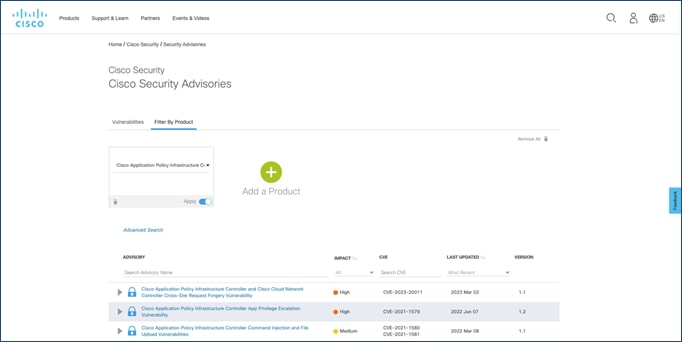
Monitor Cisco Security Advisories and Responses
The Cisco Product Security Incident Response Team (PSIRT) creates and maintains publications, commonly referred to as Cisco PSIRT Security Advisories, for security-related concerns in Cisco products.
Cisco security vulnerability publications are available at http://www.cisco.com/go/psirt .
Cisco releases bundles of Cisco Security Advisories at 16:00 Greenwich Mean Time (GMT) on a regular schedule twice each year. The specific release dates and schedule are different per Cisco product. Specifically, for Cisco ACI and NX-OS, bundles are released every fourth Wednesday of February and August at 16:00 GMT.
Cisco reserves the right to publish individual Security Advisories outside the above schedule.
To maintain a secure network, you must be aware of the Cisco security advisories and responses that have been released. To ease this, Cisco provides several ways to stay connected and receive the latest security vulnerability information from Cisco:
The Cisco Security portal on Cisco.com provides Cisco security vulnerability documents and Cisco security information, including relevant security products and services.
Cisco Security Advisories provide information about Critical-, High-, and Medium-severity security vulnerabilities. They are clear-signed with the Cisco PSIRT PGP public key and distributed to the external cust-security-announce@cisco.com mailing list you can subscribe to.
To subscribe to the cust-security-announce mailing list, email cust-security-announce-join@cisco.com (the content of the message does not matter). You will receive confirmation, instructions, and a list policy statement.
Cisco security vulnerability information is also available through RSS feeds from Cisco.com. For information on how to subscribe to the RSS feeds, visit the Cisco Security RSS Feeds page.
The Cisco PSIRT openVuln application programming interface (API) is a RESTful API that allows customers to obtain Cisco security vulnerability information in different machine-consumable formats. To learn about accessing and using the API, visit the PSIRT page on the Cisco DevNet website.
The My Notifications website allows registered Cisco.com users to subscribe to and receive important Cisco product and technology information, including Cisco Security Advisories.
To learn about Cisco security vulnerability disclosure policies and publications, see the Security Vulnerability Policy.
Cisco Nexus Dashboard Insights
Cisco Nexus Dashboard Insights is the Day-2 operations solution from Cisco that helps you manage, operate, and troubleshoot your data center networks by providing you insights, visibility, and analytics.
Among the variety of use cases and features that Nexus Dashboard Insights provides, there is the capability to be proactively notified about Security Advisories and Field Notices impacting your data center fabric.
In contrast with the options listed above, Nexus Dashboard Insights will only inform you about the Security Advisories that are impacting the environment based on the software release, hardware models, and features being used. For Security Advisories impacting the system, a detailed description of recommended actions to be taken are described. Hence, Nexus Dashboard Insights makes monitoring Security Advisories and acting on them easier.

Use Authentication, Authorization and Accounting
Authentication, Authorization, and Accounting (AAA) is a well-known security framework used to control access to resources and services in systems and networks.
Authentication refers to the process of verifying the identity of a user or device attempting to access a resource. This is typically done through a username and password or through more advanced methods such as multi-factor authentication (MFA) or biometrics.
Authorization refers to the process of determining whether a user or device has the necessary permissions to access a specific resource or perform a particular action within the network.
Accounting refers to the process of logging the activities of users and devices within the network, including the resources they access and the actions they perform. This information can be used for auditing or other purposes.
These three components together form a comprehensive security framework that helps ensure that only authorized users and devices can access network resources, and that their activities can be tracked for security and accountability purposes.
Cisco ACI supports the AAA framework for both local users and remote users.
For more information, see the Cisco APIC Security Configuration Guide.
Implement the Principle of Least Privilege
The principle of least privilege is a security concept that suggests that a subject should be granted the minimum level of access necessary to perform their job or function. This means that a subject should only be given the permissions and privileges required to complete their specific tasks, and no more. In this context, a subject can be either a user, an automation engine (such as Terraform or Ansible), a process, or another system or product.
The principle of least privilege is important because it helps reduce the risk of unauthorized access or accidental misuse of sensitive data or resources. By limiting access to only what is necessary, the attack surface is reduced and the potential damage that can be caused by a security breach or vulnerability is minimized.
Cisco ACI offers a very strong Role-Based Access Control (RBAC) feature set to help administrators effectively implement this Principle of Least Privilege. For more information, see the Access, Authentication, and Accounting section in the Cisco APIC Security Configuration Guide.
Use Centralized Log Collection and Monitoring
Indication removal techniques (IRT) are used to remove traces or indications of a security incident or intrusion to prevent detection or impede further investigation. IRTs can include actions such as deleting or modifying log files, altering system settings or configurations, or manipulating network traffic.
From a security perspective, we strongly recommend that you save logs remotely, as they are a critical source of evidence in detecting and investigating security incidents. Logs can provide valuable information such as the date and time of an event, the source and destination of network traffic, and the actions taken by users or processes on a system.
By saving logs remotely, organizations can ensure that they are protected from IRTs and other attempts to modify or delete logs on local systems. Remote logging also allows logs to be stored securely in a centralized location where they can be monitored, analyzed, and correlated more easily.
Cisco ACI provides different mechanisms to export events and logs to remote locations. These mechanisms include:
Syslog is a standard protocol used for logging system messages and events on network devices and servers. Cisco ACI supports exporting events, faults, and audit logs using Syslog over UDP, TCL, or SSL.
Cisco APIC provides a powerful REST API interface that enables users to perform CRUD (Create, Read, Update, and Delete) operations on Cisco ACI managed objects (MO) in a programmatic way.
When an API query is performed on Cisco APIC, there is the option to create a subscription to any future changes in the results of that query that occur during the active API session. When any MO is created, changed, or deleted because of a user- or system-initiated action, an event is generated. If that event changes the results of an active subscribed query, the APIC generates a push notification to the API client that created the subscription.
This mechanism can be used to be notified about events and changes without the need to periodically pull the information from the APIC. For more information, see the Cisco APIC REST API Configuration Guide.
Simple Network Management Protocol (SNMP) is a standard protocol used for network management and monitoring of devices, such as routers, switches, and servers.
SNMP can be used for log collection by allowing network administrators to retrieve logs and other management information from SNMP-enabled devices such as routers, switches, and servers, and send them to a centralized log management system for further analysis and monitoring. SNMP-enabled devices can also send notification messages, called SNMP traps, to the centralized monitoring system when specific events or conditions occur.
Cisco ACI supports both SNMPv2c and SNMPv3. We strongly recommend that you use SNMPv3 from a security perspective as it offers both authentication and encryption. Only GET and TRAP operations are supported in Cisco ACI.
For more information, see the Cisco APIC Faults, Events, and System Messages Management Guide.
Many of the protocols used for management access and operations purposes carry sensitive network management data that must be properly protected. Therefore, secure protocols should be used for those connections whenever possible. Table 1 lists examples of secure protocols and their insecure counterparts.
Table 1. Secure Protocols and Insecure Protocols
| Secure Protocol |
Insecure Protocol |
| HTTPS |
HTTP |
| SCP / SFTP |
FTP |
| SNMPv3 |
SNMPv2 |
| SSH |
Telnet |
These secure protocols, as well as other management and control-plane protocols that offer integrity, confidentiality, and authenticity, rely on ciphers and crypto algorithms. Besides using protocols that offer those security capabilities, it is also important to use crypto algorithms and ciphers that are considered secure and that have no known weaknesses.
Therefore, those algorithms that are no longer considered secure should be avoided as long as there is a better alternative available. Examples of those insecure algorithms and ciphers are MD5, SHA1, and TLSv1.0/1.1.
Cisco ACI has disabled insecure protocols by default. Additionally, the list of crypto algorithms and ciphers being supported or enabled by default is reviewed every time a new version is released. For example, TLSv1.0 and v1.1 are no longer supported beginning with Cisco APIC release 6.0, with TLSv1.2 as the default option (TLSv1.3 is also supported). For more information, see the HTTPS Access section in the Cisco APIC Security Configuration Guide.
Perform Configuration Management
Configuration management is the process of managing and controlling the changes made to a system or software throughout its development and operational life cycle. It determines how changes are proposed, reviewed, approved, and deployed.
Within the context of security and hardening, the most relevant part of the Configuration Management is to ensure that configuration backups are periodically collected and archived safely in case they are required to restore the system. Engineers and administrators can use configuration archives to roll back changes that have been made to network devices, as well as restore the system after a disaster or an incident.
In the context of security, configuration archives can also be used to determine what security changes were made, and when these changes occurred. In conjunction with audit log data, this information can assist in the security auditing of network devices.
Cisco ACI Configuration Backups
Cisco ACI allows administrators to perform on-demand and periodic snapshots. Those snapshots can be saved either locally or in a remote location.
We recommend that you perform periodic remote backups, frequently enough to ensure minimal loss of configuration changes in case of a disaster. Considering Cisco ACI configuration backups are JSON files that rarely are more than a few KB in size, doing several backups per day is generally acceptable for most organizations. Backups can also be scheduled to run automatically at regular intervals.
Cisco ACI configuration contains many sensitive details, including passwords and secrets. Therefore, backup configuration must be properly secured and stored in a secure remote location, ensuring that sensitive information on the configuration files is not disclosed.
Cisco APIC provides the option to encrypt sensitive properties (listed here) contained in configuration backup files using AES using a user-provided AES passphrase. We strongly recommend that you use this option, not only from a security perspective, but also for a business continuity perspective.
When AES encryption is not enabled, Cisco APIC will remove all sensitive information from the configuration file before exporting the file. Therefore, the configuration backup will not include passwords, keys, tokens, or other sensitive attributes. In such a scenario, restoring the backup will result in some functionality not working correctly. For example, local users will not be able to log in because their passwords are not set, BGP neighbors will not come up if authentication is being used, or connection to a VM manager will fail because the credentials are not configured.
Therefore, we recommend that you set the AES passphrase immediately after fabric bring-up, and store the passphrase in a safe location external to the APIC. This passphrase must be provided by the administrator to unencrypt the configuration backup needed to restore the fabric should a disaster happen.
Use Strong Passwords and Multi-Factor Authentication (MFA)
Strong passwords and multi-factor authentication (MFA) are critical security measures for protecting networks and systems against unauthorized access to sensitive data and systems, and cyber-attacks. Using strong passwords that include a combination of upper- and lower-case letters, numbers, and special characters makes it much harder for malicious actors to brute-force the password, even if they are using sophisticated tools. MFA adds an extra layer of security by requiring users to provide an additional form of time-limited authentication, such as a fingerprint or a security token, in addition to their password. This significantly reduces the likelihood of a hacker gaining access to the network or system even if they obtain the user's password through phishing or other means.
Additionally, strong passwords and MFA increase accountability by making it more difficult for individuals to deny that they accessed a system or network device, given that both their password and their MFA token or device must have been used to do so. Cisco ACI allows administrators to enforce, for local users, the use of strong passwords, as well as activate multi-factor authentication on a per-user basis.
Securing the management plane is one of the main areas where administrators need to focus when hardening a network infrastructure. If bad actors manage to compromise the management plane of a fabric, they will eventually get some level of elevated management privileges in our infrastructure, with the potential capability of impacting its availability, confidentiality, or integrity.
This section focuses on the available features to harden the management plane of Cisco ACI, and the recommendations in this area.
Authentication, Authorization, and Accounting (AAA)
When it comes to management plane hardening, one of the fundamental aspects to take care of is ensuring that only authorized subjects (users) are able to access the system. Additionally, when these subjects access the system, they should only be able to access the resources and perform the operations that they need, and not more, following the Principle of Least Privilege. Finally, any action performed by any user should be logged, so that administrators can refer to this for any forensic analysis.
These aspects are part of the AAA Framework, which includes three areas: Authentication, Authorization, and Accounting.
User Authentication Using Remote Authentication Providers
Cisco ACI supports user authentication using both local users and remote authentication providers. We recommend as a best practice that you use a centralized identity platform for user authentication. Cisco ACI can authenticate users against that centralized identity platform using remote authentication providers.
As of Cisco APIC release 6.0, the following remote authentication providers are supported:
· RADIUS
· TACACS+
· LDAP
· RSA SecurID
· SAML (from Cisco APIC release 3.0)
o Using either ADFS, Okta SSO or PingFederate
· Duo (from Cisco APIC release 5.0(1))
o Using Duo Proxy RADIUS server or Duo Proxy LDAP Server
· OAuth2.0 (from Cisco APIC release 5.2(3))
o Using Authorization Code grant type
A remote authentication provider should be the preferred and only method of authentication under normal operations. However, administrators must ensure that if the remote authentication provider becomes unavailable or unreachable, access to the system is still possible.
To allow access to Cisco ACI when the remote authentication provider becomes unreachable, you should configure AAA fallback, and configure fallback to be available only when the remote authentication provider becomes unreachable. Cisco APIC release 6.0 supports fallback with RADIUS, TACACS+, RSA, LDAP, and Duo.
Note: Remote authentication providers where AAA fallback is not supported, such as OAuth2 and SAML, will always be reported as unavailable. Hence, fallback will always be possible.
Fallback uses local authentication by default, and we recommend that you do not change this, given it is extremely important to ensure that the fallback mechanism is available in all circumstances (even under severe connectivity issues).
Verifying whether the remote authentication provider is available or not can be performed in two different ways:
| ICMP ping check |
By default, an ICMP echo is used to verify the availability of the remote authentication provider. In case of responses not being received to ICMP echo messages, the fallback mechanism will be activated. However, this monitoring mechanism has a caveat: if a remote authentication provider is reachable from a network perspective, but the authentication service is not available, ICMP echo probes will be successful, but still login will not be possible. |
| Server monitoring |
To overcome the previous caveat, the AAA server monitoring feature was introduced in Cisco APIC release 3.1(1). Server monitoring uses an administrator-defined user to perform periodic authentication checks against the remote authentication provider. If authentication is successful, the remote authentication provider is considered healthy. We recommend this mechanism, as it not only verifies network reachability, but also verifies the availability of the entire stack and hence is more accurate. As of APIC release 6.0, leaf and spine switches do not support server monitoring. This limitation has different consequences depending on what is the version running in the fabric:
● Before Cisco APIC release 5.2(3e), if you use server monitoring, access to the switches using fallback mechanism is never possible, as the remote authentication provider is always considered available. In this scenario, we strongly recommend that you have console access to the switches as a backup mechanism.
● Starting with Cisco APIC release 5.2(3e), you can use the ICMP ping check together with Server Monitoring for switch fallback support. Therefore, the APIC will use Server Monitoring, while switches will rely on the ICMP ping check. Even in this scenario, we recommend that you have console access to the switches as a backup mechanism.
Note: There are some enhancements being tracked to include server monitoring support in leaf and spines switches: CSCvx74300 and CSCvy25958. |
Access to Fabric Using Fallback
When a remote authentication provider is not available, fallback is not automatically enabled; users must manually choose to use fallback. However, fallback is not an available option in the Login Domain drop-down GUI landing page.
To log into the Cisco APIC using fallback, you must use the following syntax:
· Using the GUI: apic:fallback\\<local_username>
· Using the CLI or REST API: apic#fallback\\<local_username>
Note: You must use the same syntax when using a login domain that is different than the default when accessing the system through the CLI or REST API. For example, apic#myldap\\<local_username>.
User Authentication Using Local Users
Cisco ACI supports the AAA framework with local users as well. However, local authentication should be limited to a number of reduced use cases, such as fallback access or console access. Therefore, we recommend that you adhere to the following guidelines when using local users:
· Configure a reduced number of personal local accounts for those specific use cases. Avoid using generic accounts, as this makes accounting and account revoking more challenging.
· Configure Fallback Check to ensure local accounts are only used when remote authentication providers are not available.
· Harden these local accounts properly, using the recommendations explained in the following sections: Password Strength Check, Password Expiration, and Dual-Factor Authentication.
Some organization's hardening best practices suggest that admin accounts should be deleted. However, in Cisco APIC, you cannot delete the admin account. This should not come as a surprise, as there are plenty of systems where admin or root accounts cannot be removed.
Note that the admin account in Cisco APIC is not equivalent to the root account. While the admin account has complete permissions to manage the Cisco ACI fabric configuration, it does not have access to the underlying software components and file system that Cisco ACI devices use to run.
There is still a root account with full privileges, although access to the root account is extremely restricted. In certain situations, and only when absolutely necessary, Cisco Technical Support can generate a locally specific and time-limited passcode for root access, so that Cisco Technical Support can assist with troubleshooting. This one-time time-limited passcode can only be generated by Cisco Technical Support using a token coming from the APIC that needs to be accessed. In other words, users are not able to log in as root under any circumstances.
Best practices dictate that the admin account should not be used for regular operations; it should only be used for last-resort access and specific operations that cannot be done by other users (these situations are very limited).
To prevent the usage of the admin account, there are different strategies organizations can use, which fall outside of the scope of this document. These strategies are oriented to ensure that not a single user knows the admin password, while ensuring that the admin password can be retrieved in a short time if it is required.
There might be other local or remote users with almost same level of permissions the admin account has. Even if that is the case, having individual accounts ensures proper accounting can be done, and facilitates revoking access whenever needed.
As mentioned earlier in this document, ensuring passwords are strong is a recommended best practice. Cisco ACI allows administrators to enforce certain conditions for configured user passwords to make sure they are strong and secure.
Password Strength Check is enabled by default in Cisco ACI. During the initial bring-up of the system, you can disable this check. We recommend that you keep the Password Strength Check enabled.
When enabled, Cisco ACI ensures local user passwords meet the following criteria:
· Must contain between 8 and 80 characters.
· Must contain at least three of the following:
o Lower case letters
o Upper case letters
o Digits
o Special characters
· Must not contain characters repeated more than three consecutive times.
· Must pass a password dictionary check (English dictionary).
· Must not be identical to the username or reversed username.
· Must not be blank.
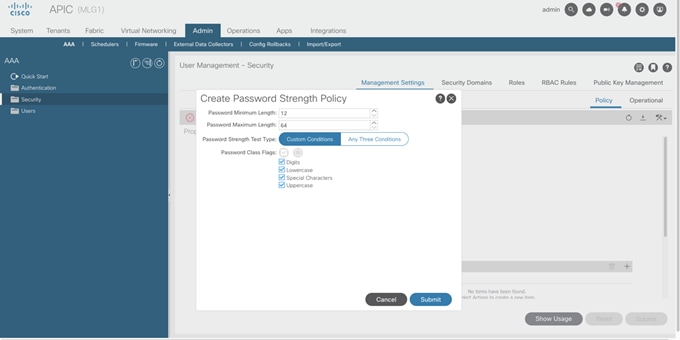
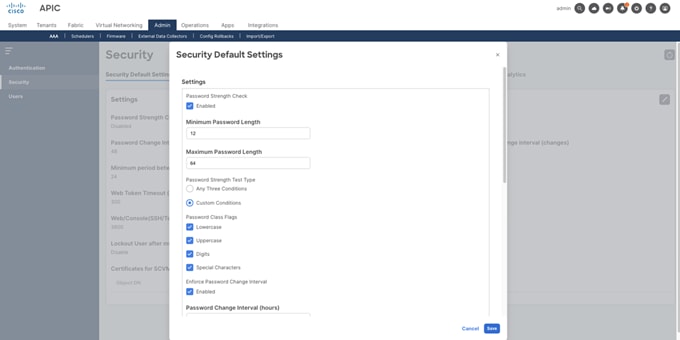
Password length and character types required can be customized using a password strength profile. For example, if an organization requires passwords with at least 12 characters and all 4 types of characters, this can be enforced by customizing the password strength profile as shown in the images below.
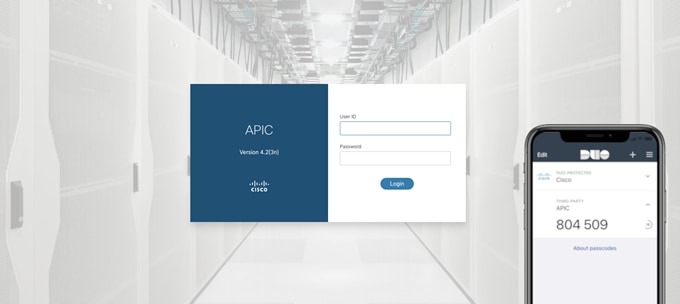
Dual-Factor Authentication (2FA)
Cisco APIC release 3.0(1) added support for Dual-Factor Authentication using a One-Time Password (OTP). Dual-Factor Authentication can be enabled on a per-user level. After being enabled, the first time the user logs into the APIC, a screen will be shown that requests the user to configure user's selected device with the OTP key details.
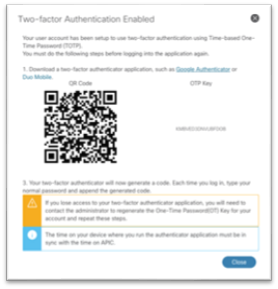
For consecutive logins, user must append the OTP code to their password.
The one-time password (OTP) changes every 30 seconds and requires the user device to be in time sync with the APIC.
We recommend that you enable Dual-Factor Authentication for all local users. However, we recommend that you do not enable Dual-Factor Authentication for the admin user to ensure that the Cisco ACI Fabric can be access with last resort credentials in case any other method fails.
Starting with Cisco APIC release 4.2(4), an administrator can block a user from being able to log in after a given number of failed login attempts. Administrators can specify how many failed login attempts in a given period are needed to lockout the user, as well as the lockout duration.
User Lockout feature is supported for both local users and remote users. For remote users, the following considerations apply:
· When a remote user is locked out, it is locked out for any remote authentication provider.
· Login failures due to remote authentication provider being unreachable or down are not considered.
· Login failures due to bad SSH keys or invalid certificate are not considered.
When a user is in a locked-out state, the lockout is enforced in all nodes that are part of the fabric, including controllers and switches. We recommend that you enable the User Lockout feature.
User authorization allows administrators to grant to each user the level of privileges required to perform the actions they need for their job, hence implementing the principle of least privilege.
Cisco ACI uses a role-based access control (RBAC) model based on three main elements:
· Security domains
· Roles
· Privileges
Each object class in the Cisco ACI object model has a list of privileges that enables permissions to read or write objects from that given class. These privileges are listed in the object model configuration. The following figure shows an example for the class fvBD (bridge domain):
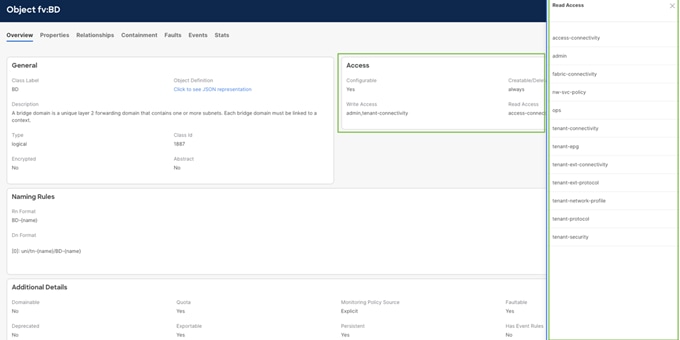
One or more privileges can be grouped together into a role, which can be then associated to a user to allow that user to manage a certain set of classes. To provide multi-tenant capabilities and more granular RBAC control, Cisco ACI introduced the concept of the security domain. A security domain represents a section of the Management Information Tree (MIT), such as a tenant or a set of switches.
To provide a user access to a certain set of objects, the user must be associated to one or more security domains. For each of the security domains a user is associated with, administrators can define the role of that user within that security domain.
For example, a user can have the role tenant-admin in security domain Tenant-A, and at the same time have the role read-all in the security domain common, which contains the tenant common.
Combining these concepts of security domain, roles, and privileges, administrators can configure granular permissions and effectively implement the principle of least privilege.
Cisco ACI provides out-of-the-box a set of privileges and roles. However, administrators can also define custom privileges and custom roles in case the existing ones does not match their needs. For more information, see the Cisco APIC Security Configuration Guide.
User Authorization Using Remote Authentication Providers
When using remote authentication, administrators have two methods to configure the required permissions of each user.
Administrators can use Cisco AV pairs to specify to Cisco APIC the configured RBAC roles and privileges for the user. Using Cisco AV Pairs is optional for LDAP, SAML, and OAuth2.0, but it is the only option available for RSA SecurID, RADIUS, and TACACS+.
To configure a Cisco AV Pair on an external authentication server, an administrator adds a Cisco AV pair to the existing user record. The Cisco AV pair format is the same regardless the provider being used:
shell:domains =
domainA/writeRole1|writeRole2|writeRole3/readRole1|readRole2,
domainB/writeRole1|writeRole2|writeRole3/readRole1|readRole2(16003)
As shown above, for each domain the customer has permissions for, the AV pair specifies what are the write roles and the read-only roles.
The numerical value within the parentheses in the attribute/value (AV) pair string is used as the UNIX user ID of the user in the APIC bash shell. User IDs on the APIC for the Linux shell are generated within the APIC for local users. For remote users, the user ID for the Linux shell can be specified in the Cisco AV pair (16003 in the example above). The valid range is 16000 to 23999 (not included). Trying to associate a user ID outside of this range will result in an error being raised during user authorization.
If the UNIX user ID is not specified in the Cisco AV Pair, APIC will allocate a unique UNIX user ID internally. There are no best practices regarding whether the user ID should be provided or not. When manually specified, ensure that user IDs are uniquely assigned to users and avoid overlapping.
Linux user IDs are used during bash sessions, allowing standard Linux permissions enforcement. Also, all managed objects created by a user are marked as created-by that user's Linux user ID.
Continuing the previous example, if a user has role tenant-admin in security domain Tenant-A, and at the same time has the role read-all in the security domain common, the corresponding Cisco AV pair for that user would be:
shell:domains = Tenant-A/tenant-admin/,common//read-all
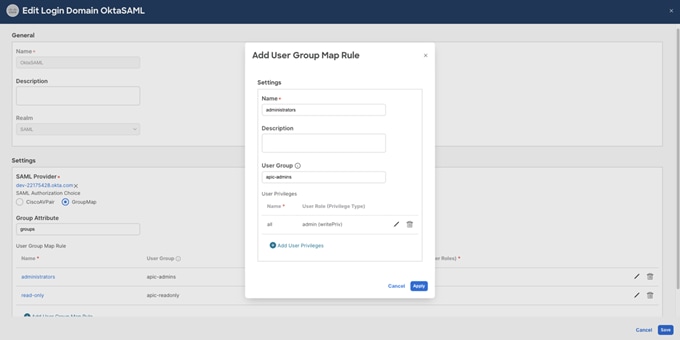
Besides Cisco AV pairs, LDAP, SAML, and OAuth2.0 providers also support group mapping for assigning user privileges. Using group mapping, user privileges are assigned based on the group to which the users belong, which is received from the remote authentication provider encoded in a given attribute, such as LDAP memberOf. You can customize the attribute to be used in SAML and OAuth2.0. For LDAP, the attribute used is memberOf.
For every group that can be received from the remote authentication provider, administrators can configure the corresponding user privileges to be given, using user group map rules.
The following figure displays the configuration for group mapping in a SAML login domain using the Okta authentication provider.
Depending on the remote authentication provider being used, either one or both mechanisms might be available. The table below summarizes the supported combinations as of Cisco APIC release 6.0.
Table 2. Supported mechanisms to receive user privileges from remote authentication provider
| Provider |
Cisco AV Pairs |
Group Mapping |
| RADIUS |
Supported |
Not Supported |
| TACACS+ |
Supported |
Not Supported |
| LDAP |
Supported |
Supported |
| SAML |
Supported |
Supported |
| RSA SecurID |
Supported |
Not Supported |
| OAuth 2.0 |
Supported |
Supported |
Cisco ACI records all changes that are done to objects that are configurable in the Cisco APIC, including information about when the change was made, what action was performed (create, update, or delete), the user that did the action, and the source IP address from which the session was established. This information is stored in the APIC and can be accessed and exported for audit purposes using multiple mechanisms.
Browse audit logs using Cisco APIC GUI
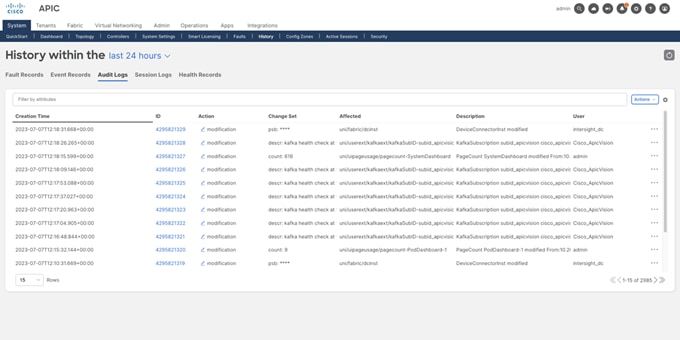
You can browse audit logs from the Cisco APIC graphical user interface by navigating to the History > Audit Logs tab, which is available under almost every section in the GUI. When navigating to the audit logs under a particular section, such as a tenant, the audit logs for that particular object, as well as all children under it, will be displayed.
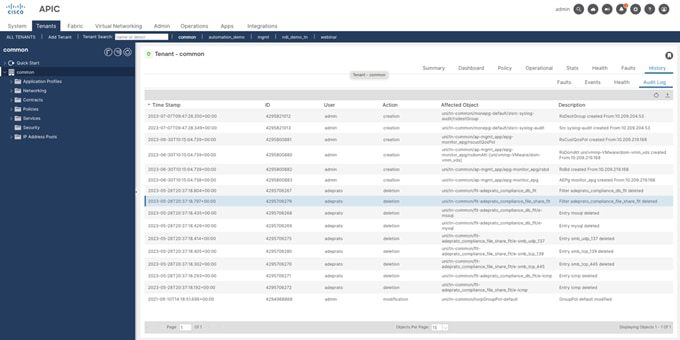
A global view of all audit logs and session logs for the entire fabric can be found under System > History.
Browse Audit Logs Using the Cisco APIC CLI
You can also browse the audit logs from the Cisco APIC command-line interface (CLI) using the command "show audits". This command allows administrators to filter the audit logs based on several parameters, such as the user, the time, or the action.
apic1-mdr1# show audits ?
<CR>
action Object action indicator
detail Detailed audit-log information
end-time Logs created in time interval
id Log ID
last-days Logs created in time interval
last-hours Logs created in time interval
last-minutes Logs created in time interval
start-time Logs created in time interval
tenant Show Tenants Information
user Name of user
A sample output of the previous command is shown below:
apic1-mdr1# show audits user admin last-minutes 30
Creation Time : 2023-07-07T09:47:40.568+00:00
ID : 4295821016
User : admin
Action : deletion
Affected Object : uni/tn-test-audit/rsTenantMonPol
Description : RsTenantMonPol deleted From:10.209.204.53
Creation Time : 2023-07-07T09:47:40.568+00:00
ID : 4295821017
User : admin
Action : deletion
Affected Object : uni/tn-test-audit/eptags
Description : EpTags deleted From:10.209.204.53
Creation Time : 2023-07-07T09:47:40.568+00:00
ID : 4295821015
User : admin
Action : deletion
Affected Object : uni/tn-test-audit/svcCont
Description : SvcCont deleted From:10.209.204.53
Creation Time : 2023-07-07T09:47:40.567+00:00
ID : 4295821018
User : admin
Action : deletion
Affected Object : uni/tn-test-audit
Description : Tenant test-audit deleted From:10.209.204.53
--More--
Browse Audit Logs Using the Cisco APIC REST API
Cisco ACI handles accounting using two managed objects that are processed by the same mechanism as faults and events: aaaSessionLR and aaaModLR. The aaaSessionLR managed object tracks user account login and logout sessions on the Cisco APIC and switches, as well as token refresh. The aaaModLR managed object tracks the changes users make to objects and when the changes occurred. Both the aaaSessionLR and aaaModLR event logs are stored in Cisco APIC database. After the data exceeds the pre-set storage allocation size, it overwrites records using a FIFO mechanism.
Audit logs are not replicated across the cluster. In case an APIC is lost or its hard drives are damaged, some audit logs may be lost forever. That is one of the reasons (although not the only nor the most important one) why we recommend exporting audit logs to an external location.
The aaaModLR and aaaSessionLR managed objects can be queried using the REST API either by class (most common) or by distinguished name (DN). Using REST API filters, administrators can retrieve a subset of audit logs for reporting, auditing, or troubleshooting purposes.
Export Audit Logs Using Callhome/Syslog/TACACS
Cisco ACI provides the option to stream monitoring information using different protocols and mechanisms. Specifically for audit logs and session logs, Cisco ACI supports the following mechanisms:
· Callhome (and Smart Callhome)
· Syslog (over UDP, TCP or SSL)
· TACACS+
Note: TACACS+ External Logging support was introduced in Cisco ACI release 6.0(2). More information can be found here.
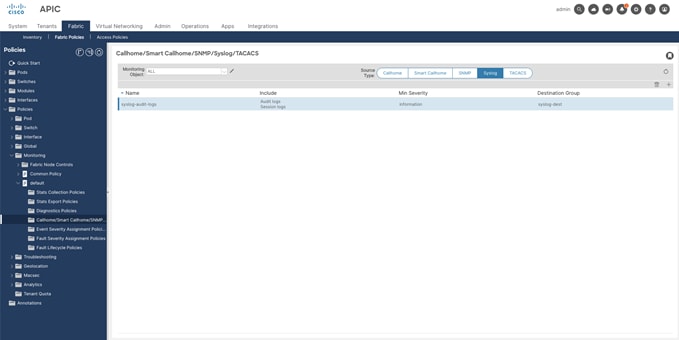
The configuration for audit logs and session logs export using these mechanisms follow the standard monitoring configuration for Cisco ACI, that is, using monitoring policies.
Monitoring policies are used to customize how the different components of the ACI fabric are monitored, including but not limited to fault lifecycle for specific objects, severity that triggers a syslog message for each facility, and remote destinations for syslog and SNMP traps being generated.
Monitoring policies can be attached to several objects, but not to all of them. If a monitoring policy can be explicitly configured on an object, but it is not configured, it will inherit the monitoring policy of its parent. On the other hand, objects that do not have the possibility of having an associated monitoring policy always inherit it from the parent.
Administrators can either create specific policies and apply them to given objects (such as a tenant) or can customize the default policies available in the APIC by default. Regardless of which method is preferred, it is important to note that monitoring policies have three different scopes:
· Access scope
o Applies to access policies, access ports, or VM controllers, for example.
o Can be found under Fabric > Access Policies > Policies > Monitoring
· Fabric scope
o Applies to fabric policies, fabric ports, cards, chassis, fans, and other infrastructure elements.
o Can be found under Fabric > Fabric Policies > Policies > Monitoring
· Tenant scope
o Applies to tenant policies and elements associated to tenants
o Can be found under Tenants > Tenant XYZ > Policies > Monitoring
Monitoring policies must be created under the right scope depending on which objects would like to be monitored.
Similarly, there are different default monitoring policies available under each of these scopes. Configuring audit logs export under any of these policies will only apply to objects under the given scope.
· Fabric Common Policy
o Applies by default to all objects under access and fabric scopes
o Can be found under Fabric > Fabric Policies > Policies > Monitoring
· Fabric Default Policy
o Applies by default to all objects under fabric scope
o Can be found under Fabric > Fabric Policies > Policies > Monitoring
· Access Default Policy
o Applies by default to all objects under access scope
o Can be found under Fabric > Access Policies > Policies > Monitoring
· Tenant Default Policy
o Applies by default to all objects under any tenant scope
o Can be found under Tenants > Tenant Common > Policies > Monitoring
Note: Cisco ACI does not export any audit logs or session logs via these mechanisms by default. Therefore, administrators need to, as a minimum, modify these default monitoring policies to start exporting audit and session logs.
Console ports provide a last-resort access to devices for local and remote operations. If any issue prevents devices from booting or enabling management access, the console port is the only alternative to connect to the device and perform troubleshooting. Given that the console is a last-resort access, we recommend that you configure this interface to use local authentication by default. This ensures that login using the console is always possible even when remote authentication servers are not reachable.
Local accounts used for console access must be properly hardened by using strong passwords and dual-factor authentication. Additionally, if console servers are used to provide remote access to the console interface, then those console servers must be hardened as well, according to vendor best practices.
Securing Simple Network Management Protocol (SNMP)
Simple Network Management Protocol (SNMP) has been extensively used by organizations around the globe to monitor their network devices. It is still widely used even though the trend is moving toward monitoring using REST API, gRPC NMI, and other methods. Therefore, Cisco ACI supports both SNMPv2c and SNMPv3 for both polling (GET) and notifications (TRAP). Note that pushing changes using SNMP using SET operations is not supported in Cisco ACI, which significantly reduces the attack surface when enabling SNMP. Both SNMPv2c and SNMPv3 are disabled by default; they must be explicitly configured before they can be used.
Regarding which version to use, SNMPv2c presents important security limitations that make the protocol less desirable. For example, communities are sent in clear text, and hence can be intercepted and exposed. SNMPv3 supports both authentication and encryption, and therefore it is a much secure alternative. Because of this, we strongly recommend that you use SNMPv3 whenever possible.
Use SNMPv2c only to overcome compatibility limitations. If you need to use SNMPv2c because of external restrictions, there are some recommendations to follow to limit exposure and reduce the attack surface as much as possible:
· Use strong community strings and follow strong password recommendations
· Rotate community strings at regular intervals
· Use SNMP client group policies to restrict SNMP access to a specific set of IP addresses
· Use management contracts to limit who can access Cisco ACI management interfaces using the SNMP protocol
Disable unused Services and Protocols
Disabling unused and insecure protocols is a common best practice for hardening any IT infrastructure. Traditionally and for ease of initial setup, there are a set of protocols that are often enabled in some networking platforms, which are not only insecure but also typically not used. Hence, administrators disable these protocols as one of the first actions to harden those devices.
With Cisco ACI, that is no longer the case. By default, Cisco ACI only exposes two ports:
· HTTPS (TCP 443) for GUI access and REST API access, on both the APIC and switches
· SSH (TCP 22) for CLI access, on both the APIC and switches
No other ports are accessible from the outside.
When it comes to protocols being used by default (externally), the list is also small. The protocols Cisco ACI uses by default, excluding the ones used exclusively inside the fabric, are:
· LLDP (Link Layer Discovery Protocol) is used to support zero-touch fabric provisioning, and hence it is enabled by default.
We recommend that you keep LLDP enabled on trusted interfaces, as LLDP is also used for loop prevention. It may also be used for other functionality, such as VMM integration. We recommend disabling LLDP on interfaces towards untrusted networks.
Cisco ACI is designed not to run non-required services by default, as well as to limit remote management services or protocols that are active by default. Hence, there is no action required from an administrator standpoint to disable them. If any other protocol is required, such as SNMP, administrators must explicitly configure it.
Disable Insecure Protocols and Ciphers
As mentioned previously, one of the principles of secure operations is to disable insecure protocols, using the secure alternative protocol (if it exists) instead. From the Cisco ACI perspective, this recommendation means:
· Use HTTPS only and keep HTTP disabled.
Cisco ACI has HTTP disabled by default. Administrators can enable HTTP, but we do not recommend enabling this.
· Use SSH only and keep Telnet disabled.
Cisco ACI has Telnet disabled by default. Starting from APIC release 6.0(2), Telnet is no longer supported. In previous releases, administrators can enable Telnet, but, once again, we do not recommend enabling this.
· Use SCP, SFTP, or HTTPS for file transfers and exports.
Avoid using insecure protocols such as FTP for file transfers, including software image downloads, configuration backups, tech support exports, and alike. Always use a secure alternative instead.
Additionally, administrators should pay attention not only to the protocol being used, but also to the cipher suite that is being used. This includes:
· Disable obsolete or non-recommended TLS versions, such as TLS1.0 or TLS1.1, and use only the strongest TLS version available in your release.
· Disable any cipher or encryption algorithm that your organization considers insecure. For example, although CBC ciphers are generally considered secure, they are known to be vulnerable to padding oracle and BEAST attacks, and therefore some organizations may prefer to disable them and use only GCM ciphers. Cisco ACI allows administrators to configure the ciphers and algorithms to be used, in Fabric > Fabric Policies > Pod Policies > Management Access.
Protocols, ciphers, and algorithms active by default may differ depending on the APIC release in use. In every release, Cisco reviews if there are modifications required in this area based on the current state of the art. For instance, in APIC release 6.0, TLS1.1 compatibility was removed and TLS1.3 support was introduced.
Restricting Management Access Using Contracts
Contracts are a well-known feature of Cisco ACI for implementing segmentation in the data plane. However, contracts can (and should) also be used to protect management access to Cisco ACI devices, both APIC and switches.
Cisco ACI contracts can be configured under the dedicated management tenant to restrict which traffic flows are allowed to reach the management interfaces of Cisco ACI, including both out-of-band and in-band. The out-of-band management port is a dedicated, physical interface on the back of the node itself. The in-band management interface uses the fabric links interconnecting the ACI nodes, plus the front panel interfaces connecting to the APIC cluster members. The console port cannot be protected using contracts.
We strongly recommend that administrators use granular management contracts to restrict not only the ports being used, but also the sources that are allowed to reach the fabric on those ports.
Contracts are configured exactly in the same way as in regular tenants, with a few differences in where they are applied and how they are implemented under the hood. This section covers recommendations about how to configure and apply these contracts.
How to Apply Management Contracts
After the management contracts are ready, contracts need to be applied on the fabric by setting the consumer and provider.
Out-of-band management contracts are provided by the node management EPG known as the Out-of-Band EPG. This EPG represents the out-of-band management interfaces of all fabric nodes, including APIC and switches.
Out-of-band management contracts are consumed by an object called External Management Network Instance Profiles, which represents the external entities, defined as subnets, that are allowed to communicate to the fabric.
Note: Out-of-band contracts can be applied only in one direction. This means that only inbound traffic can be restricted.
In-band management contracts can be either provided or consumed by the node management EPG known as the In-Band EPG. This EPG represents the in-band management interfaces of all fabric nodes, including APIC and switches.
In-band management contracts are then consumed or provided by an EPG or external EPG within the management tenant, depending on the configuration. The most common configuration is to have a L3Out configured under the mgmt tenant, using the inb VRF instance. This L3Out provides external connectivity to/from the organization's management network. In this case, the in-band management contract will be consumed or provided by an external EPG configured under this L3Out.
Alternatively, the administrator may decide to have management stations directly connected to the fabric under the mgmt tenant. If that is the case, the contract can also be consumer or provided by an application EPG under the mgmt tenant.
Note: Management stations connected directly to the fabric may become impacted by potential issues in the fabric. Hence, we do not recommend that you connect systems or services that may be required to troubleshoot the fabric should an incident occurs.
Recommended Management Contract Configuration
Cisco recommends administrators to configure granular management contracts, in a way that only the protocols that are needed are allowed, and only from the sources where these connections are expected to come from.
The figure below represents an example of what a good management contract configuration may look like.
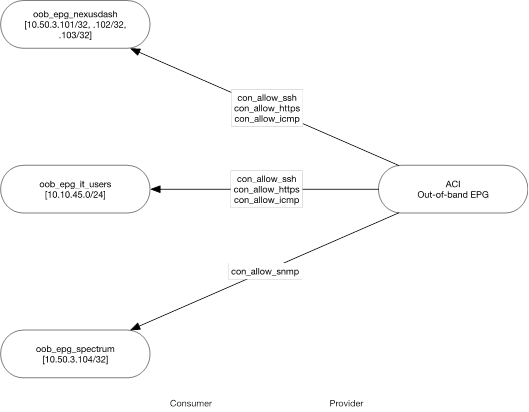
In the example above, three external management network instance profiles have been created, representing the different sources that need to reach the fabric out-of-band management interfaces for management purposes.
For each of these origins, the required contracts have been associated. The example uses separated contracts per protocol, but this is optional and is only a design choice. The important point is that only the required protocols or ports for each origin have been allowed.
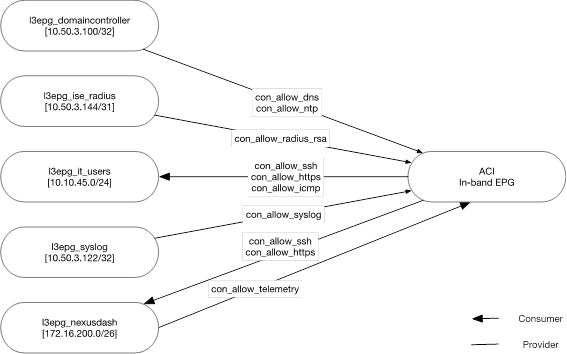
Similar configuration will be required for in-band. However, there is an important difference: out-of-band contracts are implemented only in the inbound direction, and are stateful, because they are implemented under the hood using iptables. In contrast, in-band management contracts are implemented using ACI zoning-rules (same as regular contracts) and that means that are applied in both directions and they are stateless. Therefore, outbound traffic must also be explicitly permitted, or it will be otherwise dropped.
Management Contracts Under-the-hood
While the configuration for management contracts is not very different from what administrators are used to doing for regular Cisco ACI contracts, the implementation of these management contracts is very different, especially for out-of-band contracts.
Out-of-band contracts both in APIC and in the switches, are implemented using iptables. When out-of-band contracts are rendered, they are translated into iptables rules and configured on the fabric nodes. While the specific configuration is slightly different if we look at switches or APIC, the general idea is the same.
Note: Checking iptables on APIC can be done using a regular admin user. However, checking iptables on a switch does require root access.
Therefore, as an example, let's take a look at iptables on APIC. Note that the output has been cleaned-up for the sake of clarity.

At the top of the iptables output, the default iptables chains can be found: INPUT, OUTPUT, and FORWARD. Default action for both INPUT and FORWARD is DROP. For OUTPUT, the default action is ACCEPT. As mentioned before, outbound connections are allowed by default. This, combined with another rule that allows established connections, make it unnecessary to explicitly permit fabric-initiated connections through out-of-band interfaces.
These chains refer to other custom chains that group similar rules together and simplify iptables management:
● Chain "CNI_ADMIN" and "CNI_FORWARD" contain the rules required for Cisco CNI communication. Cisco Container Network Interface (CNI) is the plugin developed by Cisco to extend Cisco ACI capabilities to container runtime environments, and it's a key component in Cisco ACI and Kubernetes Integration.
● Chain "apic-default" contains the default rules to allow inbound connections using ICMP, HTTPS (443), SSH (22), and, if enabled, HTTP (80) and Web SSH (4200). Even if these ports are allowed in the iptables, that does not mean the ports are opened, as there are no services listening on those ports unless HTTP or SSH access through the web have been explicitly enabled. More about this is covered in the Exposed ports on Cisco ACI devices section.
● Chain "apic-default-allow" contains a set of predefined rules to allow established and related sessions (both TCP and UDP), as well as some internal traffic coming from interfaces different from oobmgmt.
● Chain "apic-default-drop" contains a set of rules to drop traffic, including some blocked ports that should not be reachable from outside under any circumstance, traffic with some specific TCP flags, and more. This rule is in the top position under the chain INPUT, which means that no customer configuration can override these rules.
● Chain "apic-default-ifm" contains a set of rules to allow IFM (Inter-Fabric Messaging) traffic originated from the APIC IP address and destined to other services running in the APIC.
● Chain "apic-docker-allow" contains a set of rules for the traffic belonging to apps running on the APIC docker environment.
Once an out-of-band management contract is applied, iptables rules are modified accordingly to implement the administrator's intent. The example below shows how iptables look after applying a contract that allows HTTPS, SSH, and ICMP from subnet 10.0.0.0/8. Only chains that have changed are displayed.
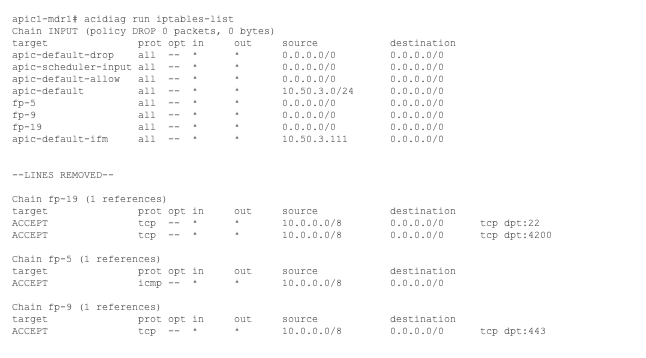
The following changes are made in iptables when contracts are applied:
● New iptables chains are added, one per each filter associated to the contract. The chain name is indeed mapped to the filter ID associated to the filter when rendered on the leaf switches.
● The chains "fp-xx" are referenced from the INPUT chain right after the "apic-default" chain is referenced.
● The chain "apic-default" reference in chain INPUT is modified by applying a source IP address filter. After a contract is applied, the default opened ports will only be accessible from the local subnet. Connections from anywhere else beyond the local subnet is blocked, unless specifically allowed on the contract.
Note: As soon as an out-of-band contract is added, access using HTTPS and SSH will be restricted to the directly connected out-of-band management subnet. Ensure the out-of-band contract explicitly allows SSH and HTTPS.
Note: Out-of-band contracts should contain filters where only the destination port is specified. As of Cisco APIC release 6.0, if source port is specified it will be rendered in iptables as destination port anyway, hence not matching administrator's intent.
In-band management contracts are not implemented using iptables, but rather using regular zoning rules programmed on the switches' TCAM, in the same way it is done for other contracts in Cisco ACI. The following example shows how zoning rules are programmed when an in-band management contract is applied:
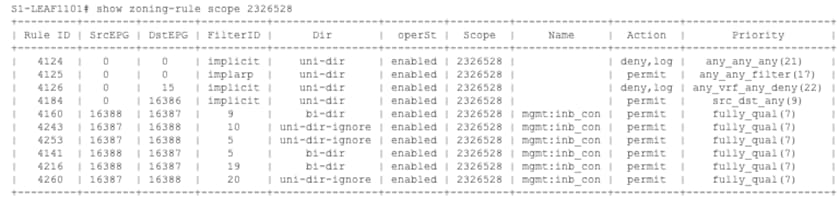
Rules 4160, 4141, and 4216 allow inbound connections to in-band management interfaces using HTTPS, ICMP, and SSH respectively, given that the source EPG with pcTag 16388 belongs, in this example, to the external EPG under the L3Out and the destination EPG with pcTag 16387 belongs to the in-band EPG.
Rules 4243, 4253, and 4260 allow return traffic for the previous rules. These rules have been created automatically by checking the flag "Reverse Filter Ports" under the contract subject level.
Note: There is no traffic being allowed by default through the in-band management interfaces.
One of the value propositions of the Cisco ACI solution is the powerful REST API the solution offers, which exposes the full capabilities of the product through a very robust, scalable, and performant REST programmable interface.
This REST API is another management interface that needs to be protected from potential attacks or misuses that could compromise overall system availability and responsiveness. Two different topics will be covered in this section: authentication methods using the REST API, and the available DoS protection mechanism.
Authentication Using the REST API
Cisco ACI offers two authentication mechanisms that can be used via REST API: authentication using the username and password, and signature-based authentication using X.509 certificates.
Authentication with the Username and Password
REST API authentication using the username and password uses a POST request to a specific URI to initiate the login process. The username and password will be passed to the Cisco APIC as an XML or JSON payload in the POST request. Therefore, it is important that HTTP transactions are secured using SSL (HTTPS).
The response to the POST operation will contain an authentication token as both a Set-Cookie header and as an attribute in the response. This token will have a limited lifetime, after which the subject needs to refresh the token.
Subsequent operations on the REST API can use this token value as a cookie named APIC-cookie to authenticate future requests.
While username and password authentication is widely used and secure enough if used in combination with HTTPS with valid certificates, it may present some challenges in some scenarios. A typical challenge this authentication method presents is the request throttling in the login API endpoint when the script or automation engine refreshes the token for every API request; this behavior will make APIC eventually reject the API request and return an error code.
The next method resolves this challenge while also providing an extra level of security.
Authentication with Signature-based Transactions
REST API authentication using signature-based transactions utilizes a signature that is calculated for every transaction. The calculation of that signature uses a private key that must be kept secret in a secure location. When the Cisco APIC receives a request with a signature rather than a token, the APIC utilizes an X.509 certificate to verify the signature.
In signature-based authentication, every transaction to the APIC must have a newly calculated signature. This is not a task that a user should do manually for each transaction. Ideally this function should be utilized by a script or an application that communicates with the APIC.
Note: Cisco ACI Terraform provider and Ansible collections support signature-based authentication.
This method is the most secure as it requires an attacker to crack the RSA/DSA key to forge or impersonate the user credentials. This method does require you to configure the X.509 certificate for the local user to be used.
Note: X.509 certificates can only be configured for local users. Remote users are not supported with signature-based authentication.
While signature-based authentication does not expose any sensitive value in the payload, such as the username or password, we still recommend that you use HTTPS to prevent other type of attacks, such as replay attacks.
REST API Denial-of-Service Protections
The Cisco ACI REST API is the single interface to Cisco ACI's backend. Other interfaces such as the GUI or the CLI are in fact using the REST API under the hood. Therefore, ensuring that the REST API is available for trusted clients is critical.
If an attacker, or a misbehaving script, is sending multiple requests to the REST API at a fast pace, these requests may compete with other legitimate applications using the same API, including the Cisco APIC interface. Cisco ACI provides two different protections against DoS attacks directed to the REST API.
HTTP/HTTPS Throttling for AAA Login
Cisco ACI web server (NGINX) is pre-configured by default to throttle requests directed to the endpoints used to log in, that is, aaaLogin and aaaRefresh. A two-stage rate limiter is configured on NGINX to limit the rate of requests to those endpoints to a maximum of 2 request per second, with a maximum burst of 4.
This rate limit is user-configurable, although modifying these values is not required in most scenarios. In case this is required, see the Cisco APIC REST API Configuration Guide.
Beginning with Cisco APIC release 4.2(3), Cisco ACI supports the configuration of a global rate limit that is applicable to any API endpoint. This global rate limiter is disabled by default, and can be enabled through the Management Access policy, located in Fabric > Fabric Policies > Pod Policies > Management Access.
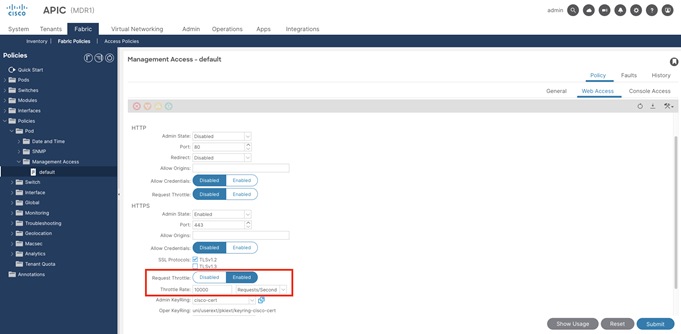
Enabling HTTPS global request throttling is a good practice to protect the REST API against DoS attacks or misbehaving scripts.
We do not have a recommended value for the throttle rate that works for every environment, as this value heavily depends on the needs and behavior of the automation tools and remote systems using the Cisco ACI REST API.
When evaluating a possible value for this rate limit, consider the following things:
· A maximum burst of 2x the rate limit is automatically configured
· Rate limit is applied independently on a per-client-IP-address basis. Hence, if one client is exceeding the allowed rate and being throttled, this does not affect other clients with a different IP address.
· Request coming from the APIC itself (GUI/CLI) are not subject to the rate limit.
Cisco Nexus 9000 switches running Cisco ACI code have the USB port enabled by default. When the USB port is enabled, switches will try to boot from the USB drive first. This may be a security risk in case a malicious actor has physical access to the switch, given they could power-cycle the device to try to boot the switch from a USB image that contains malicious code.
Even if this is not a common scenario considering that most organizations have physical access security guidelines in place, Cisco ACI release 5.2(3) introduced the option to disable the USB port using a specific switch policy.
We recommend disabling the USB port in those environments where physical access to the devices is not strictly controlled, or in environments where this extra layer of protection is required.
More information about how to disable the USB port can be found here.
In some legal jurisdictions, malicious users cannot be prosecuted or legally monitored unless they have been notified that they are not permitted to use the system. One way to provide this notification is to place this information in a banner message that is presented to users when they try to access the system.
Legal notification requirements are complex and vary by jurisdiction and situation and should be discussed with legal counsel. Some of the information typically found in those banners may include:
· Notice that the system is to be logged into or used only by specifically authorized personnel, and perhaps information about who can authorize use.
· Notice that any unauthorized use of the system is unlawful and can be subject to civil and criminal penalties.
· Notice that any use of the system can be logged or monitored without further notice, and that the resulting logs can be used as evidence in court.
· Specific notices required by local laws.
From a security (rather than legal) point of view, a login banner should not contain any specific information about the router name, model, software, or ownership. This information can be abused by malicious users. The figure below shows the GUI configuration for CLI and GUI banners:

Cisco CIMC is the baseboard management controller that provides embedded server management for Cisco UCS C-series servers, such as the servers on which Cisco APIC runs. As with any other management interface, you must harden the CIMC interface as well.
This section contains an overview of the capabilities that you must use in the CIMC to harden this management interface. Recommendations are grouped based on where they can be found in CIMC GUI:
· User Management
o Enable Strong Password enforcement and automatic password expiration.
o Use LDAP remote authentication if possible.
o Alternatively, TACACS+ is supported starting with CIMC 4.1(3b).
o Other remote authentication options are not supported.
· Network Security
o Enable IP Blocking to block an IP address after several unsuccessful login attempts.
o Enable IP Filtering to allow CIMC access only from a restricted set of IP addresses.
· Communication Services
o NTP
§ Configure NTP.
§ NTP authentication is not supported.
o HTTP/HTTPS
§ Enable HTTP to HTTPS redirection to enforce HTTPS.
§ Replace a self-signed certificate by a trusted CA-signed certificate.
o SSH/TELNET
§ Telnet is not supported.
§ Enable SSH access.
o SNMP
§ Use SNMPv3 whenever possible.
§ Alternatively, restrict IP addresses that can have read-only SNMPv2 access.
· Security Management
o Replace a self-signed certificate with a certificate signed by a trusted CA.
o If required, enable FIPS and CC modes. For more information about FIPS and CC modes, see FIPS Mode.
· Other
o Enable remote logging so that logs are forwarded to an external syslog server. This can be found under Chassis > Faults and Logs > Logging Controls.
o Configure a login banner, following the same recommendations given for Cisco APIC. This can be done from Admin > Utilities > Add/Update Cisco IMC Banner.
Note: Cisco IMC is another piece of management software that can have vulnerabilities. Hence, monitor PSIRT security advisories related to CIMC and upgrade when needed. When upgrading CIMC, we strongly recommend that you upgrade all server firmware components as well. All these components, including CIMC, can be upgraded in one process using the UCS Host Upgrade Utility (HUU). This includes server BIOS, VIC firmware, RAID controller, and disks.
Note: If you are using vAPIC on ESXi, see the VMware Security Hardening Guides.
The Federal Information Processing Standards (FIPS) Publication 140-2, Security Requirements for Cryptographic Modules, details the U.S. government requirements for cryptographic modules.
FIPS specifies certain cryptographic algorithms as secure, and it also identifies which algorithms should be used if a cryptographic module is to be called FIPS compliant.
Cisco ACI allows administrators to enable FIPS mode. When FIPS mode is enabled, Cisco ACI will change the underlying crypto libraries being used and start using FIPS Object Module version 7.2a (Certificate #4036), a FIPS 140-2 approved cryptographic module.
Note: Enabling FIPS mode requires a system-wide reboot to take effect.
After enabling FIPS mode, Cisco ACI will be FIPS 140-2 compliant, as stated in the Compliance Letter.
This FIPS-compliant cryptographic module will be used not only for the encrypted SSL sessions established internally in the Cisco ACI software, but also for northbound protocols that use encryption algorithms.
The FIPS Object Module is supported for the following protocols:
· TLS v1.2 and v1.3
· SSHv2
· SNMPv3
Therefore, before enabling FIPS mode, we strongly recommend that you disable non-supported versions of the protocols listed above, which is aligned with the recommendations provided in this hardening guide.
For more information about guidelines and limitations for FIPS, see the Cisco APIC Security Configuration Guide.
To enable FIPS mode:
Step 1. Ensure all prerequisites and guidelines to enable FIPS mode listed in the Security Configuration Guide have been satisfied.
Step 2. Enable FIPS mode in the Cisco APIC. This setting can be found under System Settings > Fabric Security.
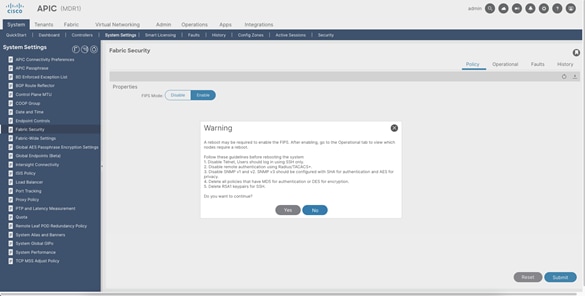
Step 3. Reboot all nodes for FIPS mode to take effect. The operational status will show which nodes are pending reboot.
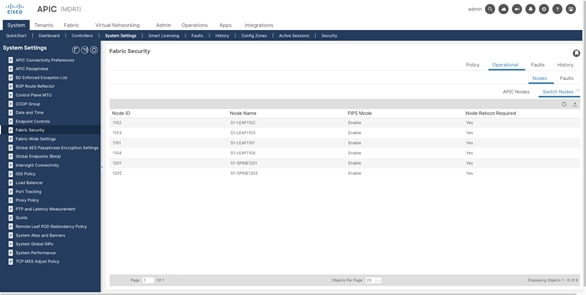
You can also use the following CLI command in APIC to verify the operational status of FIPS mode:
apic1-mdr1# show fips status
Node Id Node Name Fips State Reboot Required
---------- -------------------- -------------------- ----------
1 apic1-mdr1 enable no
1101 S1-LEAF1101 enable yes
1102 S1-LEAF1102 enable yes
1103 S1-LEAF1103 enable yes
1104 S1-LEAF1104 enable yes
1201 S1-SPINE1201 enable yes
1202 S1-SPINE1202 enable yes
In the example above, switch nodes need to be reloaded for FIPS mode to take effect, while the APIC has already been reloaded.
As general guidance, FIPS mode only needs to be enabled in case your organization needs to adhere to FIPS standards.
FIPS Mode in Cisco Integrated Management Controller (CIMC)
Cisco Integrated Management Controller (CIMC) is also FIPS compliant starting with release 3.1(3). This release offers a FIPS mode that you can enable if your organization requires FIPS compliance. See the Cisco IMC Configuration Guides for specific instructions.
There are several types of attacks against the control plane that a data center fabric can suffer, such as denial of service or control plane protocol poisoning attacks. It is critical to protect the availability of the fabric by properly hardening the control plane. In this section, you will see the available features and recommended configurations to achieve an optimal protection.
Control Plane Policing (CoPP) is one of the main protection mechanisms for the control plane of Cisco ACI switches. Control Plane Policing allows users to configure rate limits to manage the traffic flow of control plane packets to the switches' CPU to protect against reconnaissance and denial of service (DoS) attacks.
CoPP inspects and applies a traffic policer to traffic destined to the switch CPU interface, where control plane packets are destined to (or punted to). Examples of traffic going to the CPU are those originated by IGP protocols or BGP sessions, IP exceptions such as TTL expired, ARP packets, and more.
Traffic between fabric endpoints, forwarded by the switch, is not inspected by CoPP. Only packets whose destination is the switch itself are inspected.
CoPP is enabled by default and pre-configured with Cisco-calculated values that have been formulated and tested by Cisco engineering teams and proven to be sufficient in most fabric deployments. However, there might be scenarios where additional tuning is needed.
Therefore, the recommended approach is:
1. Initially, use the default policy.
2. Monitor CoPP drops.
3. Modify CoPP thresholds only if drops increment constantly.
There are multiple methods to monitor CoPP statistics and drops, including CLI commands and Cisco APIC GUI statistics. Out of all the different mechanisms, the one that provides the most accurate results is running the following CLI command in the switches:
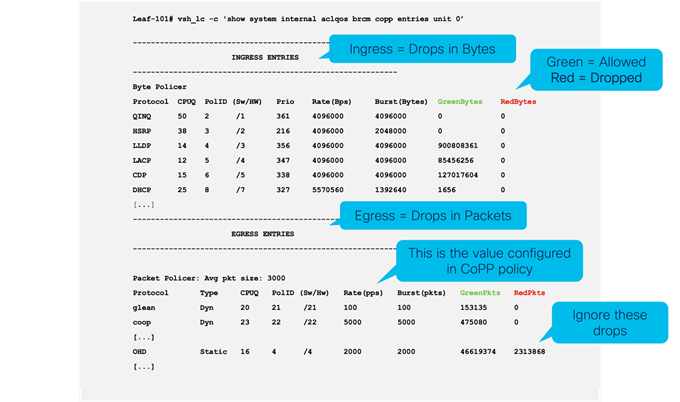
The command output has two sections, one for ingress and one for egress, with similar structure:
· Protocol indicates the protocol or class where traffic gets classified.
· Rate (bps or pps) indicates the configured rate in the policer.
· GreenPackets or GreenBytes indicates the packets or bytes that are accepted by the policer.
· RedPackets or RedBytes indicates the packets that are discarded by the policer. This is the value that should be monitored.
Note: There is one class called OHD where drops may likely be seen in most fabrics. Drops in this class can be ignored as they do not represent any control plane packet that is being dropped.
If drops are seen in any class (other than OHD), and these drops are increasing over time, you must take action. If there are drops but they do not increase in a constant way, they may have been produced by a peak in traffic and hence the drops are expected and desired (we want to protect the control plane from being saturated).
Monitoring a large fabric using this CLI command might not be the preferred method, especially if you want to set up some automation. Therefore, you can also monitor the entire fabric using the REST API, and only use this command to deep-dive further in case you see an issue.
As mentioned above, you might need to customize CoPP thresholds in case you identify undesired drops by monitoring CoPP statistics. In this case, Cisco ACI provides several configuration options to tune CoPP behavior.
For example, you can modify CoPP thresholds for each particular class (or protocol). You can apply a different threshold per switch, and even per interface. Additionally, Cisco ACI allows users to configure CoPP pre-filters, which act as infrastructure ACLs to filter control plane packets being sent to the CPU.
These configuration options are described in the Control Plane Traffic section in the Cisco APIC Security Configuration Guide.
ICMP Messages are potential attack vectors that can be used either inadvertently or maliciously to perpetrate DoS attacks. An ICMP redirect message can be generated by a router when a packet is received and transmitted on the same interface. In this situation, the router forwards the packet and sends an ICMP redirect message back to the sender of the original packet. This behavior allows the sender to bypass the router and forward future packets directly to the destination (or to a router closer to the destination).
A malicious user can exploit the capability of the router to send ICMP redirect messages by continually sending packets to the router, forcing the router to respond with ICMP redirect messages, resulting in adverse impact on the CPU and on the performance of the router.
An ICMP Unreachable message can be sent back to the source of a traffic flow whenever packets are filtered in the network.
In a similar way, a malicious user can exploit this by flooding the target device with a large number of packets that contain a destination address that is unreachable from the flooded device, hence producing an increase in CPU utilization and potentially impacting the performance of the device.
It is a common hardening best practice to prevent network devices from sending ICMP redirect and unreachable messages, or to rate-limit these to prevent the negative consequences. However, in Cisco ACI this hardening configuration is not required because ICMP Redirect and ICMP Unreachable messages are disabled by default and cannot be enabled.
Control-Plane Protocols Authentication
Cisco strongly recommends using authentication in control plane protocols, as long as both the protocol supports it and all peers support it. This helps to protect the control plane against poisoning attacks, man-in-the-middle attacks, and other attacks.
Cisco ACI supports authentication for most control plane protocols, including NTP, BFD, OSPF, BGP, and EIGRP, as well as other protocols used internally, such as CooP.
Authentication in Council of Oracle Protocol (COOP)
Council of Oracle Protocol (COOP) is used to communicate endpoint mapping information (location and identity) to the spine switch proxy. A leaf switch forwards endpoint address information to the spine switch (known as the Oracle) using COOP. COOP, which runs on the spine nodes, ensures all spine nodes maintain a consistent copy of endpoint address and location information and additionally maintains a distributed repository of endpoint identity-to-location mapping database.
COOP messages are exchanged between leaf and spine switches over the infrastructure VLAN using a protocol called Zero Message Queue (ZMQ). Therefore, under normal circumstances, only devices that are part of the fabric have access to the infrastructure VLAN and can send and receive ZMQ messages.
COOP has the option to leverage MD5 authentication to protect COOP messages from malicious traffic injection. Cisco ACI supports two ZMQ authentication modes: Strict and Compatible. In Strict mode, COOP allows MD5 authenticated ZMQ connections only. In Compatible mode, COOP accepts both MD5 authenticated and non-authenticated ZMQ connections.
By default, Cisco ACI uses Compatible mode. For secured, hardened fabrics, we recommend Strict mode, especially when the infrastructure VLAN needs to be extended outside the fabric, or in other words, when Enable Infrastructure VLAN is active in any Attachable Access Entity Profile (AAEP).
Note: During an ACI fabric upgrade, COOP will fall back to compatible mode until all switches are upgraded. This protection prevents the unexpected rejection of a COOP connection that could be triggered by prematurely enabling the strict mode during the upgrade process. There is no action required from user standpoint, this is automatically handled as part of the upgrade procedure.
When using some specific VMM features, such as integration with container solutions using Cisco ACI CNI, the infrastructure VLAN may need to be extended outside of the fabric and all the way to an external server or hypervisor.
In such circumstances, we recommend that you increase the level of isolation between hypervisors and restrict what communications are allowed though the infrastructure VLAN. You can achieve this by enabling the option "Restrict Infra VLAN Traffic" at the fabric level.
After you enable this option, each leaf switch limits Infra VLAN traffic to allow only OpFlex, DHCP/ARP/ICMP, and iVXLAN/VXLAN traffic to specific destinations, blocking any other traffic that is not expected. Cisco APIC management traffic is also allowed on front panel ports on the Infra VLAN.
Fabric Internode Authentication Security Level
When a Cisco ACI fabric is brought up, the different nodes that form the fabric will authenticate against each other and build a trusted relationship between them as well as forming secure channels using TLS to exchange information. A fabric administrator can configure this internode authentication to be performed with two different security levels.
Prior to Cisco APIC release 6.1(1), the default configuration for the Fabric Internode Authentication Security Level is permissive. In permissive mode:
· SSL certificates are not validated.
· Serial number validation is not enforced.
· Controllers are automatically authorized to join the fabric.
· Switches must be manually authorized to join the fabric.
Fabrics using permissive mode can operate normally even though one or more switches have an invalid certificate. In normal situations, legitimate switches should not have invalid certificates, as they are programmed as part of the manufacturing process. Even if certificates are not validated, communications between nodes are still encrypted using TLS.
When a Cisco APIC joins the fabric using permissive mode, it is automatically added as part of the cluster as long as the initial parameters match. There is no serial number or certificate validation, and there is no user approval required.
Fabric administrators can configure Fabric Internode Authentication Security Level to strict. Strict mode adds additional security mechanisms on top of the default permissive behavior. In strict mode:
· SSL certificates are validated.
· Serial Number validation is enforced.
· Controllers and switches must be manually authorized to join the fabric.
In strict mode, SSL certificates are validated before nodes are allowed to join the fabric. Additionally, the serial number is also validated by comparing the serial number of the device against the serial number that is included as part of the factory SSL certificate. Only nodes where both conditions are satisfied are allowed to join the fabric.
The second difference compared to permissive mode can be found in the way controllers join the fabric. After strict mode is enabled, an administrator must manually authorize new APIC nodes before they are accepted to join the cluster. Meanwhile, the leaf switches where the APIC is connected will set the port to the out-of-service state to prevent this APIC from communicating with anything else in the fabric.
We recommend using strict mode in any customer fabric. This ensures an extra level of protection in case an unauthorized device manages to have access to the fabric and the Infra VLAN and tries to join the fabric.
Moving from permissive mode to strict mode has no impact as long as all nodes have valid SSL certificates. Therefore, before changing this configuration in a fabric that is already in production, the fabric administrator should verify that all certificates are valid and have not expired. You can verify these certificates under Fabric > Inventory > Fabric Membership > Registered Nodes. After performing this check, the administrator can change the mode to strict.
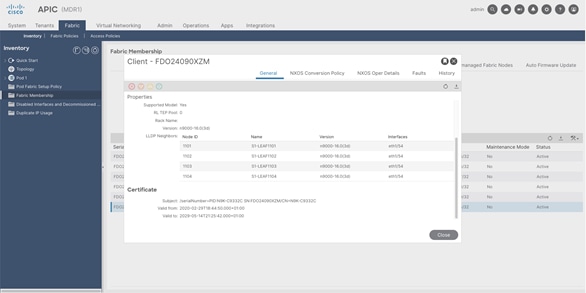
Starting with Cisco APIC release 6.1(1), the Fabric Internode Authentication Security Level is set to strict by default, which aligns with the recommendation given above. Existing Cisco ACI fabrics that are upgraded to release 6.1(1) or later will have the configuration for Fabric Internode Authentication Security Level unchanged during the upgrade process. It is then administrator’s responsibility to decide whether they want the strict mode to be enabled or not, and to enable it manually whenever possible.
You can find the Fabric Internode Authentication Security Level in the APIC GUI under System > Controllers > Controllers > <apic_name> Cluster as Seen by Node.
Cisco ACI's data plane carries all customer data that is sent between different endpoints in the fabric or between these endpoints and external routed and switched domains. Therefore, protecting the data plane is critical to prevent any data from being compromised, whether that is in terms of integrity, confidentiality, or availability.
This area is the one where Cisco offers more flexibility to fabric administrators to decide whether a feature is relevant for their use case or not, especially due to the different nature of endpoints that can be connected to the fabric, as well as the diverse environments and use cases where Cisco ACI can be used.
There are some general best practices we recommend in all data center networks. Some of these are already enforced in Cisco ACI by default and hence no action is required from the administrator.
IP source routing uses either the Loose Source and Record Route (LSRR) or the Strict Source and Record Route (SSRR) options to enable the source of the IP datagram to specify the network path that a packet takes. This function can be used in attempts to route traffic around security controls in the network.
IP Source Routing is disabled by default in Cisco ACI, and it cannot be enabled. Hence, Cisco ACI will not honor IP source routing information, the fabric will just route the packet according to switches’ routing table. Therefore, no action is required.
IP directed broadcasts make it possible to send an IP broadcast packet to a remote IP subnet. After the packet reaches the remote network, the forwarding IP device sends the packet as a Layer 2 broadcast to all stations on the subnet. This directed broadcast function has been used as an amplification and reflection aid in several attacks, including the Smurf attack.
IP directed broadcast is disabled by default in Cisco ACI, and it cannot be enabled; Cisco ACI switches drops any IP directed broadcast packet. Therefore, no action is required.
A traffic storm occurs when packets flood the LAN, creating excessive traffic and degrading network performance. Although this typically occurs inadvertently, consequence of a network misconfiguration or hardware failure, it can also be part of a malicious attack to impact availability of the network.
Administrators can use traffic storm control policies to prevent disruptions on Layer 2 ports by broadcast, unknown multicast, or unknown unicast traffic storms on physical interfaces.
When initially defining the rate for storm control, we recommend that you either base the rate on already used values in similar environments, peak broadcast traffic level of selected interfaces, or any previous broadcast maximum level you have used as a basis of the threshold.
Base the suppression threshold on your observed data, plus some additional capacity. For example, if the peak broadcast traffic that is acceptable for an interface is 1 percent, a threshold of 1.5 percent might be appropriate. The faster the port speed, the less additional capacity is required.
After having applied storm control, monitor the interfaces for undesired drops due to storm-control and increase the rate in such a case.
The default configuration in Cisco ACI with regard to storm control is to have it enabled with a rate of 100%, which effectively disables storm-control. We recommend that all customers enable storm control, setting the values based on the general guidelines explained above.
Cisco ACI offers other mechanisms beside storm control to reduce flooding. These mechanisms can be enabled on a per bridge domain basis, such as hardware proxy, which can prevent unknown unicast from being flooded throughout the bridge domain.
In traditional networks, the filtering of fragmented IP packets can pose a challenge to security devices. Because of the nonintuitive nature of fragment handling, IP fragments are often inadvertently permitted by ACLs. Hence, fragmentation is often used in attempts to evade detection by intrusion-detection systems.
Additionally, IP fragments are often used in other types of malicious attacks exploiting datagram fragmentation mechanisms, such as teardrop attacks. For these reasons, we recommend that you filter them at the top of any ACL applied in the network.
Once again, Cisco ACI provides a higher level of security in this area out-of-the-box. Cisco ACI implements a zero-trust security model by default, which means that any traffic not explicitly allowed will be dropped. To determine if a packet is permitted or dropped, the information from IP/TCP headers (Layer 3 and Layer 4) are used.
When IP fragments are received in Cisco ACI, the leaf switches have no way to determine the information needed to apply the appropriate filters. Hence, ACI discards IP fragments by default. If IP fragments need to be allowed, they needed to be explicitly permitted with a filter entry that matches subsequent fragments (the first fragment will have the packet headers and hence it will be processed normally).
In summary, no action is required from administrator's standpoint to filter IP Fragments. On the other hand, if IP fragments need to be allowed for any application or communication, those need to be permitted explicitly.
Protecting from Loops Using the Mis-Cabling Protocol (MCP)
Unlike traditional networks, the Cisco ACI fabric does not participate in the Spanning Tree Protocol (STP) and does not generate bridge protocol data units (BPDUs). BPDUs are instead transparently forwarded through the fabric between ports mapped to the same endpoint group and VLAN. Therefore, Cisco ACI relies to a certain degree on the loop prevention capabilities of external devices.
Some scenarios, such as the accidental cabling of two leaf ports together, are handled directly using LLDP in the fabric. However, there are some situations where an additional level of protection is necessary; in those cases, enabling the Mis-Cabling Protocol (MCP) can help.
MCP is a lightweight protocol designed to protect against loops inside the fabric that cannot be discovered by either STP or LLDP. MCP uses small Layer 2 packets that are timestamped and uniquely identified by the MCP key configured in the fabric. MCP packets are sent out of all operational (in-service) ports that have MCP enabled, and if the fabric sees that the MCP packet comes back in, then the fabric knows that there is a loop, and it will take action based on that event.
When a loop is detected, MCP will generate faults, events, and syslog messages to inform you about the situation. Additionally, if configured to do so, MCP will also err-disable the port. Cisco ACI can be configured to automatically recover from the err-disabled status by configuring an error disabled recovery policy.
MCP can be enabled globally and per-interface. By default, it is disabled globally and enabled on each port. For MCP to work, it must also be enabled globally, regardless of the per-interface configuration.
By default, MCP PDUs are sent over the native VLAN only. By enabling per-VLAN MCP, MCP will send MCP PDU on each VLAN active on the port, up to the maximum supported (256 or 2000 depending on the release, see the ACI Scalability Guide on MCP for your specific version). With per-VLAN MCP, MCP can detect loops on non-native VLANs. However, keep in mind that the action will still be applied to the entire port.
From a hardening perspective, Cisco recommends enabling MCP on all ports facing external devices, and per-VLAN MCP only on those interfaces where it really adds extra value (enabling per-VLAN MCP in all ports may not be supported depending on the scale of the fabric).
For more recommendations about the usage of MCP, see the Miscabling Protocol (MCP) section in the Cisco ACI Design Guide.
IP and MAC address spoofing are techniques where an attacker alters the source IP or MAC address in a network packet to make it appear as if it originates from a different network entity. Spoofing can be used for various malicious purposes, such as bypassing security controls or impersonating legitimate entities.
Cisco ACI offers some capabilities to help reduce the risk of address spoofing. The capabilities described below are effective against other type of attacks beyond spoofing, even if they are mentioned under this section.
Enforce Subnet Check feature enforces subnet checks at the VRF level to ensure that Cisco ACI only learns endpoints whose IP address are not off-subnet. Although the subnet check scope is at the VRF level, this feature can be enabled and disabled only globally under the Fabric Wide Setting policy, and hence is applicable to all VRF instances in the fabric.
Enforce Subnet Check behaves differently depending on whether the endpoint is a local endpoint (traffic received on the ingress leaf), or a remote endpoint (traffic received from another leaf).
On the ingress leaf (local endpoint learning), Cisco ACI learns an IP address and MAC address as a new local endpoint only when the source IP address of the incoming packet belongs to one of the ingress bridge domain subnets.
On the egress leaf (remote endpoint learning), Cisco ACI learns an IP address as a remote endpoint only when the source IP address of the incoming packet belongs to any bridge domain subnet in the same VRF instance on the egress leaf.
This behavior prevents IP address spoofing scenarios, in which an endpoint sends a packet with an unexpected source IP address that does not belong to any of the bridge domains on the VRF instance, such as an IP address that exists behind the L3Out connection.
We recommend that you enable Enforce Subnet Check.
Note: Enabling Enforce Subnet Check clears all of the remote entries and prevents learning remote entries for a short amount of time (30 seconds). The entries in the spine-proxy are not cleared, hence traffic forwarding keeps working even during the configuration change. However, while no disruption is expected when enabling Enforce Subnet Check, there is the possibility that a given network is working with traffic from subnets that do not belong to the VRF instance. If this is the case, enabling this feature will cause interruption of these traffic flows.
Port security in Cisco ACI protects the fabric from being flooded with unknown MAC addresses by limiting the number of MAC addresses per port. Port security can also be used to mitigate MAC address spoofing at the access interface.
Using this feature, administrators can specify the maximum number of MAC endpoints that are allowed to be learned on a given interface (access, port channel, or VPC). After the number of MAC addresses exceeds the maximum configured value on that specific port, MAC learning is disabled, and MAC addresses are not added to the CAM table. MAC learning is re-enabled after the configured timeout value.
We recommend that you carefully evaluate the need for this feature based on your specific risk assessment for the data center. Administrators should consider that DC environments, especially when virtualized, are dynamic and hence the number of MAC addresses behind a port can fluctuate a lot over time. Hence, it is normally not possible to predict what should be the maximum number of endpoints.
For additional guidelines and considerations, see the Port Security section in the Cisco APIC Security Configuration Guide.
802.1X is a network authentication protocol that provides port-based network access control. It is part of the IEEE 802.1X standard, which defines the mechanism for authentication and authorization of devices attempting to connect to a network, typically over Ethernet.
802.1X offers the capability to permit or deny network connectivity based on the end user or device connected to the port. An 802.1X-enabled port can be dynamically enabled or disabled based on the identity of the user or device that connects to it.
Although 802.1x plays a critical role in enforcing security rules in the access layer in campus networks, it is normally not used in DC environments. Servers are not usually required to authenticate themselves to the data center switch, as the DC is normally considered physically secure and controlled.
However, there are a few use cases were 802.1x can be leveraged to enhance access control within the Data Center. For example, in VDI environments where 802.1x can be used to provide the VM user access to the appropriate resources in the DC.
Cisco ACI supports 802.1X, hence administrators can configure it in case they consider this feature necessary for a particular use case. For more information about 802.1X configuration in Cisco ACI, see the 802.1X section in the Cisco APIC Security Configuration Guide.
First Hop Security (FHS) refers to a set of security features that aim to protect against various network attacks, including spoofing and man-in-the-middle attacks. Implemented at the first-hop router or switch in a network, these features improve the overall security of certain protocols such as ARP, DHCP, or ND by performing role enforcement, binding enforcement, and DoS attack mitigations.
In Cisco ACI, FHS features are enabled on a per tenant bridge domain (BD) basis. Supported features in Cisco ACI are:
· IP Inspection: Includes ARP, ND and DHCP Inspection
· Source Guard: Includes IPv4 and IPv6 Source Guard
· Router Advertisement (RA) Guard
Additionally, Trust Control policies can be configured on a per EPG basis, to set specific endpoints as trusted from the point of view of DHCP, ARP, or ND inspection.
Although these features can certainly help add extra security in a data center environment, even protecting against accidental issues (such as unintended IP address spoofing), the impact these have on scale make these features not recommended for every data center deployment.
Data centers are normally an environment where endpoints are trusted and connecting or bringing up new endpoints is restricted to authorized administrators only. However, although this is the norm, there are some scenarios where this might not be the case, such as shared DC facilities where access is granted to multiple actors or environments with a loosely controlled self-service access, where many individuals can spin-up resources with very little control.
In those scenarios, the usage of the First Hop Security (FHS) features is recommended. Even in those scenarios, FHS must be enabled only on those bridge domains where this is necessary.
For more information about FHS guidelines and considerations, see the First Hop Security section in the Cisco APIC Security Configuration Guide. For scalability guidance, see the Verified Scalability Guide for your release.
MACsec is an IEEE 802.1AE standards-based Layer 2 hop-by-hop encryption that provides data confidentiality and integrity for media access independent protocols.
Cisco ACI supports MACsec on fabric ports, that is, interfaces between leaf and spine switches (Fabric MACsec), as well as on access ports to external devices (Access MACsec).
We recommend using MACsec on distributed architectures, such as Cisco ACI Multi-Pod, whenever possible. In these scenarios, MACsec helps protect traffic going across the interconnection network (inter-pod network, or IPN, in this case), especially in those cases where traffic goes across links that are not entirely under your organization's control.
Because MACsec provides hop-by-hop encryption, protecting IPN traffic using MACsec requires that all devices in the path can implement MACsec (or another alternative encryption mechanism).
MACsec supports two different modes in Cisco ACI: Must Secure mode and Should Secure mode.
Must Secure mode only allows encrypted traffic on the link, while Should Secure mode allows both clear and encrypted traffic on the link. Before deploying MACsec in Must Secure mode, the keychain must be deployed on the affected links, or the links will go down. To address this issue, we recommend that you deploy MACsec in Should Secure mode, and after all the links are up, change the security mode to Must Secure.
Other considerations about MACsec in Cisco ACI, including extra considerations about Must Secure mode, can be found under the MACsec section in the Cisco APIC Layer 2 Networking Configuration Guide.
Cisco ACI Security Policies (a.k.a. Contracts)
In addition to the hardening and security features covered in this section, Cisco ACI offers an allow-list policy model that enables customers to implement a zero-trust network security architecture. Using Cisco ACI, the communication between two given endpoint groups (EPG) is denied by default, hence you must explicitly permit any desired communication.
Policies are expressed as contracts that permit, deny, log, or redirect traffic between two EPGs. Even if two endpoints belonging to distinct EPGs are connected to interfaces on the same physical or virtual switch, there is no connectivity between these endpoints unless there is an explicit permit/redirect policy on a contract to allow communication between these EPGs.
Cisco ACI provides numerous features to cover different use cases to restrict traffic between EPGs to help organizations in the segmentation and micro-segmentation journey. This includes features such as:
· Inter-VRF and Intra-VRF Contracts
· Policy-based Redirection and Layer 4 to Layer 7 Services Insertion
· Intra-EPG Isolation and Intra-EPG Contracts
· vzAny Contracts
· Endpoint Security Groups (ESG)
We recommend that you make use of Cisco ACI contracts and segmentation capabilities to provide segmentation within the data center for East-West traffic flows, as well as for North-South traffic flows, combined in this former case with other security devices or solutions to implement a defense-in-depth strategy.
Going through each of these features is out of the scope of this white paper. See the Cisco ACI documentation to explore all of those capabilities. Some reference material around this topic includes:
● Cisco ACI Contract Guide White Paper
● Cisco ACI Policy-Based Redirect Service Graph Design White Paper
● Cisco ACI Endpoint Security Group (ESG) Design Guide
Factory Hardening and System Integrity
The previous sections of this white paper covered what are the recommended configurations to harden the Cisco ACI solution, reducing its attack surface and hence making the overall solution more secure. However, Cisco ACI has several additional layers of security built into the architecture of the product since its inception that are also oriented to make Cisco ACI inherently secure. In this section, some of these solutions are explained.
Device Authentication and Intra-Fabric Messaging Encryption
During Cisco ACI fabric bring-up, or whenever a new device is added into the fabric, an authentication process will be triggered, in which every node will be authenticated by the Cisco APICs using X.509 certificates that are unique and digitally signed at manufacturing time.
These certificates are securely stored in a secure hardware crypto-module knows as the Trusted Platform Module (TPM) on the APIC side, and the Trusted Anchor Module (TAM) in a Cisco Nexus 9000 switch.
Certificates are validated according to the Fabric Internode Authentication Security Level configured in the fabric (see the Fabric Internode Authentication Security Level section in this document).
After validation is completed, Cisco ACI fabric uses those X.509 certificates to establish secure communications within the fabric using TLS1.2. Therefore, all messaging within the fabric used for configuration, monitoring, and operations are encrypted.
A TPM chip is a secure crypto-module that is designed to perform cryptographic operations. The TPM includes multiple security mechanisms to make it tamper-resistant. The TPM securely stores artifacts that are used to authenticate the server, an ensure integrity of the platform during the boot process. These artifacts can include passwords, certificates, and encryption keys.
Cisco APIC uses TPM to securely store the certificate that uniquely identifies the APIC server and is used to prove that is a legitimate Cisco APIC server with a given serial number. Cisco APIC also uses TPM to store the cryptographic keys required to validate digitally signed software images that are allowed to run on the server.
Similar to TPM, a Trusted Anchor Module (TAM) is a tamper-resistant Cisco Trust Anchor chip installed in Cisco Nexus 9000 switches (and other devices in Cisco's portfolio) used to implement anti-counterfeit measures, being a fundamental piece of Cisco Secure Boot process.
Cisco Nexus 9000 switches use TAM to securely store its X.509 certificate in the hardware, including not only the certificate, but also the associated key pair and the entire certificate chain. All this information is programmed into the TAM during the closed, secured, and audited manufacturing processes. This programming provides strong supply chain security, which is important for embedded systems such as routers and switches.
Cisco Secure Boot ensures that the first code executed on a Cisco hardware platform is authentic and unmodified. This process involves two separated pieces.
On one side, Cisco software images must be signed so that integrity and authenticity are guaranteed. All Cisco ACI software images are digitally signed using RSA-2048 private keys.
On another side, Cisco hardware platforms must be able to verify that the image is valid, unmodified and authentic before being installed. This software authentication in Cisco ACI platforms is anchored in the hardware, thus providing the most robust security.
When the image is loaded into a Cisco ACI fabric device, the signed image must always be verified for its authenticity using hardware rooted Cisco Secure Boot, leveraging either the TPM or TAM crypto-modules for APIC or switch image validation, respectively. Only when this validation is successfully completed, image loading and booting can be completed. If any of the digital signature checks fail, the Cisco ACI fabric device will not let that software to boot, thus ensuring that malicious code does not run on the device.
Cisco APIC web interface is probably the most widely used interface to interact with Cisco ACI, followed by its powerful REST API. In line with Cisco's commitment to make products more secure, Cisco ACI implements modern Web security mechanisms to prevent or mitigate common Web attacks.
Some of these security mechanisms include:
· Cross-Site Scripting (XSS) protection, including user input validation and protection against reflected XSS attacks.
· Usage of HTTP Strict Transport Security (HTST) to prevent main-in-the-middle attacks and force the use of SSL. HSTS uses the response header field named Strict-Transport-Security to inform the browser that the site should only be accessed using HTTPS, and that any future attempts to access it using HTTP should automatically be converted to HTTPS.
· Prevention of OS Fingerprinting and reduction of information provided to potential attackers in the HTTP server header, which in Cisco ACI does not include any information about web server being used.
Exposed Ports on Cisco ACI Devices
Organizations often have the requirement to identify what are the open ports in a given system to evaluate the potential exposure to specific attacks or understand what the attack surface is. Depending on how the analysis is performed, this may lead to confusion as it may give the impression of more ports being exposed than what there really are.
It is important to make a clear distinction between ports being allowed by the host firewall, iptables, and ports being served.
If an administrator checks the processes running on the APIC and in which ports they are listening, they will find multiple processes and ports being opened. However, that does not mean those ports are exposed externally, as this is where iptables comes into play.
The opposite can happen as well, if an administrator checks the iptables entries at the APIC level, they will notice there are some ports they may not want to have open (for example, HTTP/80) and they are shown as allowed in iptables. The question then becomes: Is the port actually being served or not?
A port being served means that a given service or application is actively listening and accepting incoming connections on that specific port, and the port is accessible from the outside. In nmap terminology, this would be an open port, in contrast to ports that are filtered or closed.
In fact, none of those verifications can provide a complete view of what are the exposed ports in Cisco ACI. A better approach would be to use tools such as nmap to perform a port scanning against the fabric and prove what ports are accessible from the outside and actively listening for incoming connections.
In a Cisco ACI fabric with the default configuration, that is, with no extra management protocols configured or management contracts applied, this is the result of a complete port scan using nmap:
[root@utils-01-mdr1 ~]# nmap -Pn -n -p0- -v -A -T4 apic1-mdr1.cisco.com
Starting Nmap 6.40 ( http://nmap.org ) at 2023-07-11 16:16 WEST
NSE: Loaded 110 scripts for scanning.
NSE: Script Pre-scanning.
Initiating ARP Ping Scan at 16:16
Scanning apic1-mdr1.cisco.com (10.50.3.111) [1 port]
Completed ARP Ping Scan at 16:16, 0.20s elapsed (1 total hosts)
Initiating SYN Stealth Scan at 16:16
Scanning apic1-mdr1.cisco.com (10.50.3.111) [65536 ports]
Discovered open port 22/tcp on 10.50.3.111
Discovered open port 443/tcp on 10.50.3.111
SYN Stealth Scan Timing: About 4.14% done; ETC: 16:28 (0:11:58 remaining)
--LINES REMOVED--
Completed SYN Stealth Scan at 16:26, 618.63s elapsed (65536 total ports)
Initiating Service scan at 16:26
Scanning 2 services on apic1-mdr1.cisco.com (10.50.3.111)
Completed Service scan at 16:26, 18.04s elapsed (2 services on 1 host)
Initiating OS detection (try #1) against apic1-mdr1.cisco.com (10.50.3.111)
Retrying OS detection (try #2) against apic1-mdr1.cisco.com (10.50.3.111)
NSE: Script scanning 10.50.3.111.
Initiating NSE at 16:26
Completed NSE at 16:26, 0.10s elapsed
Nmap scan report for apic1-mdr1.cisco.com (10.50.3.111)
Host is up (0.00025s latency).
Not shown: 65532 filtered ports
PORT STATE SERVICE VERSION
22/tcp open ssh OpenSSH 8.2 (protocol 2.0)
80/tcp closed http
443/tcp open ssl/https?
|_http-favicon: Unknown favicon MD5: D05D9B3C0EB82AB07AD1496EE983996C
|_http-methods: No Allow or Public header in OPTIONS response (status code 405)
|_http-title: APIC
| ssl-cert: Subject: commonName=apic1-mdr1.cisco.com/organizationName=Cisco Systems Inc./stateOrProvinceName=California/countryName=US
| Issuer: commonName=HydrantID Server CA O1/organizationName=IdenTrust/countryName=US
| Public Key type: rsa
| Public Key bits: 2048
| Not valid before: 2023-01-11T09:22:00+00:00
| Not valid after: 2024-01-11T09:21:00+00:00
| MD5: ddae b5ff 4f52 2d4d 0af5 8988 eb48 e279
|_SHA-1: 7615 e12e ea42 874e eff1 cb6c c131 3f8b af3f 7c09
4200/tcp closed vrml-multi-use
1 service unrecognized despite returning data. If you know the service/version, please submit the following fingerprint at http://www.insecure.org/cgi-bin/servicefp-submit.cgi :
SF-Port443-TCP:V=6.40%T=SSL%I=7%D=7/11%Time=64AD74B6%P=x86_64-redhat-linux
SF:-gnu%r(GetRequest,FDE,"HTTP/1\.1\x20200\x20OK\r\nServer:\x20Cisco\x20AP
SF:IC\r\nDate:\x20Tue,\x2011\x20Jul\x202023\x2015:27:13\x20GMT\r\nContent-
SF:Type:\x20text/html;\x20charset=utf-8\r\nContent-Length:\x203251\r\nConn
SF:ection:\x20close\r\nVary:\x20Accept-Encoding\r\nLast-Modified:\x20Mon,\
SF:x2013\x20Mar\x202023\x2022:10:33\x20GMT\r\nVary:\x20Accept-Encoding\r\n
SF:ETag:\x20\"640f9f59-cb3\"\r\nExpires:\x20Thu,\x2001\x20Jan\x201970\x200
SF:0:00:01\x20GMT\r\nCache-Control:\x20no-cache\r\nAccess-Control-Allow-He
SF:aders:\x20Origin,\x20X-Requested-With,\x20Content-Type,\x20Accept,\x20D
SF:evCookie,\x20APIC-challenge,\x20Request-Tag\r\nAccess-Control-Allow-Met
SF:hods:\x20POST,GET,OPTIONS,DELETE\r\nX-Frame-Options:\x20SAMEORIGIN\r\nS
SF:trict-Transport-Security:\x20max-age=31536000;\x20includeSubDomains\r\n
SF:Client-Cert-Enabled:\x20false\r\nX-Content-Type-Options:\x20nosniff\r\n
SF:X-XSS-Protection:\x201;\x20mode=block\r\nAccess-Control-Allow-Origin:\x
SF:20http://127\.0\.0\.1:8000\r\nAccess-Control-Allow-Credentials:\x20fals
SF:e\r\nAccept-Ranges:\x20bytes\r\n\r\n<html>\n<head><!--\x20production\x2
SF:0-->\n<title>APIC</title>\n<meta\x20content=\"text/html\">\n<meta\x20ch
SF:a")%r(HTTPOptions,310,"HTTP/1\.1\x20405\x20Not\x20Allowed\r\nServer:\x2
SF:0Cisco\x20APIC\r\nDate:\x20Tue,\x2011\x20Jul\x202023\x2015:27:18\x20GMT
SF:\r\nContent-Type:\x20text/html;\x20charset=utf-8\r\nContent-Length:\x20
SF:331\r\nConnection:\x20close\r\nETag:\x20\"640f9f59-14b\"\r\nAccess-Cont
SF:rol-Allow-Headers:\x20Origin,\x20X-Requested-With,\x20Content-Type,\x20
SF:Accept,\x20DevCookie,\x20APIC-challenge,\x20Request-Tag\r\nAccess-Contr
SF:ol-Allow-Methods:\x20POST,GET,OPTIONS,DELETE\r\nAccess-Control-Allow-Or
SF:igin:\x20http://127\.0\.0\.1:8000\r\nAccess-Control-Allow-Credentials:\
SF:x20false\r\n\r\n<!DOCTYPE\x20html\x20PUBLIC\x20\"-//W3C//DTD\x20XHTML\x
SF:201\.0\x20Transitional//EN\"\x20\"http://www\.w3\.org/TR/xhtml1/DTD/xht
SF:ml1-transitional\.dtd\">\n<html\x20xmlns=\"http://www\.w3\.org/1999/xht
SF:ml\">\n<head>\n<meta\x20http-equiv=\"Content-Type\"\x20content=\"text/h
SF:tml;\x20charset=UTF-8\"\x20/>\n<title>Untitled\x20Document</title>\n</h
SF:ead>\n\n<body>\n405\x20Method\x20Not\x20Allowed\n</body>\n</html>\n");
MAC Address: 10:F9:20:BE:B1:7E (Unknown)
Aggressive OS guesses: Netgear DG834G WAP or Western Digital WD TV media player (94%), OpenWrt Kamikaze 7.09 (Linux 2.6.22) (93%), Asus RT-N10 router or AXIS 211A Network Camera (Linux 2.6) (92%), AXIS 211A Network Camera (Linux 2.6.20) (92%), OpenWrt (Linux 2.4.32) (92%), OpenWrt White Russian 0.9 (Linux 2.4.30) (92%), Linux 2.6.24 (92%), Linux 2.6.18 - 2.6.24 (92%), Linux 2.6.16 (92%), OpenWrt 0.9 - 7.09 (Linux 2.4.30 - 2.4.34) (92%)
No exact OS matches for host (test conditions non-ideal).
Network Distance: 1 hop
IP ID Sequence Generation: All zeros
TRACEROUTE
HOP RTT ADDRESS
1 0.25 ms 10.50.3.111
NSE: Script Post-scanning.
Read data files from: /usr/bin/../share/nmap
OS and Service detection performed. Please report any incorrect results at http://nmap.org/submit/ .
Nmap done: 1 IP address (1 host up) scanned in 641.47 seconds
Raw packets sent: 197149 (8.679MB) | Rcvd: 529 (22.502KB)
As per the output above, we can see that there are four ports allowed by iptables (22, 80, 443, and 4200) and out of those, only ports 22 and 443 are being actively served. There are no services listening on ports 80 and 4200 by default.
Similar results can be obtained by doing this same test against a leaf or spine switch; by default, only ports 22 and 443 are opened or served.
In conclusion, in a world where cyber-attacks are becoming increasingly frequent and sophisticated, infrastructure hardening is more important than ever before. By implementing a range of security measures to strengthen their digital infrastructure, organizations can reduce their risk exposure, protect their critical assets and information, and maintain their operations even in the face of persistent threats.
Cisco ACI implements multiple security mechanisms to reduce the attack surface and provide organizations with a solid and secure data center network infrastructure. This level of security by default, together with the recommendations mentioned in this document, make Cisco ACI a solid infrastructure that meets the more demanding security requirements.
![]()
