Using the REST API

About the REST API

The Application Policy Infrastructure Controller (APIC) REST API is a programmatic interface that uses REST architecture. The API accepts and returns HTTP (not enabled by default) or HTTPS messages that contain JavaScript Object Notation (JSON) or Extensible Markup Language (XML) documents. You can use any programming language to generate the messages and the JSON or XML documents that contain the API methods or Managed Object (MO) descriptions.

The REST API is the interface into the management information tree (MIT) and allows manipulation of the object model state. The same REST interface is used by the APIC CLI, GUI, and SDK, so that whenever information is displayed, it is read through the REST API, and when configuration changes are made, they are written through the REST API. The REST API also provides an interface through which other information can be retrieved, including statistics, faults, and audit events. It even provides a means of subscribing to push-based event notification, so that when a change occurs in the MIT, an event can be sent through a web socket.

Standard REST methods are supported on the API, which includes POST, GET, and DELETE operations through HTTP. The POST and DELETE methods are idempotent, meaning that there is no additional effect if they are called more than once with the same input parameters. The GET method is nullipotent, meaning that it can be called zero or more times without making any changes (or that it is a read-only operation).

Payloads to and from the REST interface can be encapsulated through either XML or JSON encoding. In the case of XML, the encoding operation is simple: the element tag is the name of the package and class, and any properties of that object are specified as attributes of that element. Containment is defined by creating child elements.

For JSON, encoding requires definition of certain entities to reflect the tree-based hierarchy; however, the definition is repeated at all levels of the tree, so it is fairly simple to implement after it is initially understood.

  • All objects are described as JSON dictionaries, in which the key is the name of the package and class. The value is another nested dictionary with two keys: attribute and children.

  • The attribute key contains a further nested dictionary describing key-value pairs that define attributes on the object.

  • The children key contains a list that defines all the child objects. The children in this list are dictionaries containing any nested objects, which are defined as described here.

Authentication

REST API username- and password-based authentication uses a special subset of request Universal Resource Identifiers (URIs), including aaaLogin, aaaLogout, and aaaRefresh as the DN targets of a POST operation. Their payloads contain a simple XML or JSON payload containing the MO representation of an aaaUser object with the attribute name and pwd defining the username and password: for example, <aaaUser name='admin' pwd='password'/>. The response to the POST operation will contain an authentication token as both a Set-Cookie header and an attribute to the aaaLogin object in the response named token, for which the XPath is /imdata/aaaLogin/@token if the encoding is XML. Subsequent operations on the REST API can use this token value as a cookie named APIC-cookie to authenticate future requests.

Subscription

The REST API supports the subscription to one or more MOs during your active API session. When any MO is created, changed, or deleted because of a user- or system-initiated action, an event is generated. If the event changes the data on any of the active subscribed queries, the APIC will send out a notification to the API client that created the subscription.

Management Information Model

All the physical and logical components that comprise the Application Centric Infrastructure fabric are represented in a hierarchical management information model (MIM), also referred to as the MIT. Each node in the tree represents an MO or group of objects that contains its administrative state and its operational state.

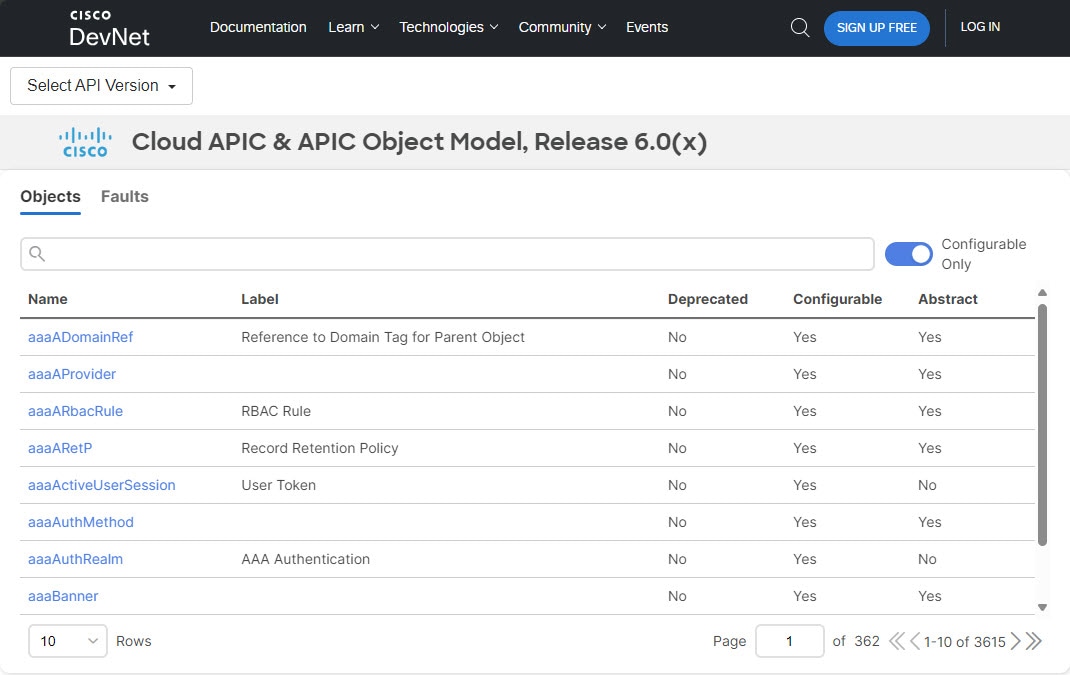
To view the MIM, see Cisco APIC Management Information Model Reference Guide.

The hierarchical structure starts at the top (Root) and contains parent and child nodes. Each node in this tree is an MO and each object in the ACI fabric has a unique distinguished name (DN) that describes the object and its place in the tree. MOs are abstractions of the fabric resources. An MO can represent a physical object, such as a switch or adapter, or a logical object, such as a policy or fault.

Configuration policies make up the majority of the policies in the system and describe the configurations of different ACI fabric components. Policies determine how the system behaves under specific circumstances. Certain MOs are not created by users but are automatically created by the fabric (for example, power supply objects and fan objects). By invoking the API, you are reading and writing objects to the MIM.

The information model is centrally stored as a logical model by the APIC, while each switch node contains a complete copy as a concrete model. When a user creates a policy in the APIC that represents a configuration, the APIC updates the logical model. The APIC then performs the intermediate step of creating a fully elaborated policy from the user policy and then pushes the policy into all the switch nodes where the concrete model is updated. The models are managed by multiple data management engine (DME) processes that run in the fabric. When a user or process initiates an administrative change to a fabric component (for example, when you apply a profile to a switch), the DME first applies that change to the information model and then applies the change to the actual managed endpoint. This approach is called a model-driven framework.

The following branch diagram of a leaf switch port starts at the top Root of the ACI fabric MIT and shows a hierarchy that comprises a chassis with two line module slots, with a line module in slot 2.


|——root———————————–– (root)
    |——sys———————————––– (sys)
        |——ch————————————————(sys/ch)
            |——lcslot-1——————————(sys/ch/lcslot-1)
            |——lcslot-2——————————(sys/ch/lcslot-2)
                |——lc————————————————(sys/ch/lcslot-2/lc)
                    |——leafport-1————————(sys/ch/lcslot-2/lc/leafport-1)

Object Naming

You can identify a specific object by its distinguished name (DN) or by its relative name (RN).


Note


You cannot rename an existing object. To simplify references to an object or group of objects, you can assign an alias or a tag.


Distinguished Name

The DN enables you to unambiguously identify a specific target object. The DN consists of a series of RNs:


dn = {rn}/{rn}/{rn}/{rn}...

In this example, the DN provides a fully qualified path for fabport-1 from the top of the object tree to the object. The DN specifies the exact managed object on which the API call is operating.


< dn =”sys/ch/lcslot-1/lc/fabport-1” />

Relative Name

The RN identifies an object from its siblings within the context of its parent object. The DN contains a sequence of RNs.

For example, this DN:


<dn = "sys/ch/lcslot-1/lc/fabport-1"/>

contains these RNs:

Relative Name Class Description
sys top:System Top level of this system
ch eqpt:Ch Hardware chassis container
lcslot-1 eqpt:LCSlot Line module slot 1
lc eqpt:LC Line (I/O) module
fabport-1 eqpt:FabP Fabric-facing external I/O port 1

Guidelines and Limitations for Using the REST API

The following guidelines and limitations apply when using the Cisco Application Policy Infrastructure Controller (APIC) REST API:

  • On scale setups, if you send generic class queries to the Cisco APIC that result in a large set of managed objects, the queries intermittently fail due to a timeout with error code 503 and the following error message:

    Unable to deliver the message, destination is not available
    Unable to process the query, result dataset is too big

    For REST API queries on a class that has more than 100,000 objects across the fabric, the Cisco APIC generates the indicated errors due to one of the following reasons:

    • Cisco APIC does not respond with more than 100,000 objects to avoid an out-of-memory issue. The APIC returns the "too big" error.

    • Cisco APIC allows a maximum of 90 seconds to respond to any query that possibly timed out due to having too many activities. In this case, the Cisco APIC responds with "destination not available" because the destination could not finish the request in 90 seconds.

    To mitigate this limitation:

    • On a timeout response, such as "destinations not available," have the client retry from 3 to 5 times.

    • If the response is the "too big" error, the client can use filtering to reduce the size of the result set.

    • If the system page indicates that there are too many critical faults, we recommend that you take care of the faults.

Composing REST API Requests

Read and Write Operations and Filters

Read Operations

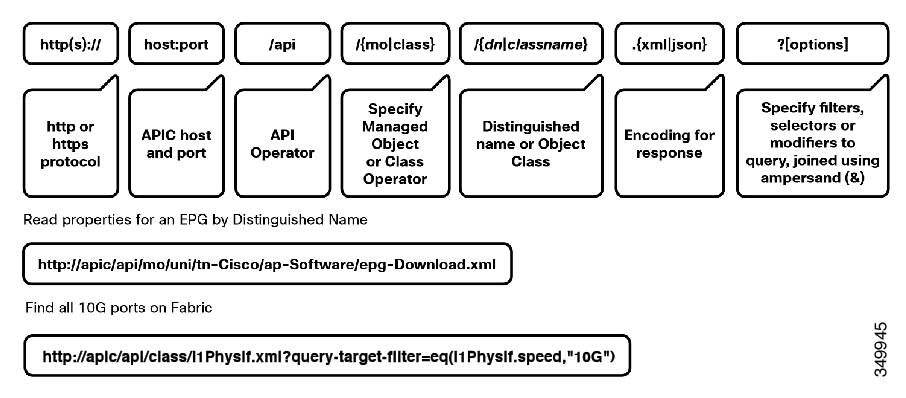
After the object payloads are properly encoded as XML or JSON, they can be used in create, read, update, or delete operations on the REST API. The following diagram shows the syntax for a read operation from the REST API.

Figure 1. REST syntax


Because the REST API is HTTP-based, defining the URI to access a certain resource type is important. The first two sections of the request URI simply define the protocol and access details of the Cisco Application Policy Infrastructure Controller (APIC). Next in the request URI is the literal string /api, indicating that the API will be invoked. Generally, read operations are for an object or class, as discussed earlier, so the next part of the URI specifies whether the operation will be for an MO or class. The next component defines either the fully qualified domain name (DN) being queried for object-based queries, or the package and class name for class-based queries. The final mandatory part of the request URI is the encoding format: either .xml or .json. This is the only method by which the payload format is defined. The Cisco APIC ignores Content-Type and other headers.

Write Operations

Both create and update operations in the REST API are implemented using the POST method, so that if an object does not already exist, it will be created, and if it does already exist, it will be updated to reflect any changes between its existing state and desired state.

Both create and update operations can contain complex object hierarchies, so that a complete tree can be defined in a single command so long as all objects are within the same context root and are under the 1MB limit for data payloads for the REST API. This limit is in place to guarantee performance and protect the system under high loads.

The context root helps define a method by which the Cisco APIC distributes information to multiple controllers and helps ensure consistency. For the most part, the configuration should be transparent to the user, though very large configurations may need to be broken into smaller pieces if they result in a distributed transaction.

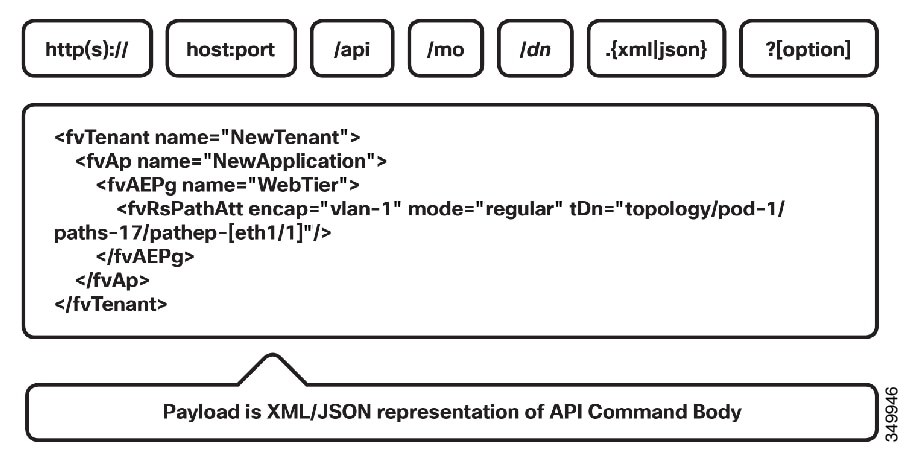
Figure 2. REST Payload


Create and update operations use the same syntax as read operations, except that they are always targeted at an object level, because you cannot make changes to every object of a specific class (nor would you want to). The create or update operation should target a specific managed object, so the literal string /mo indicates that the DN of the managed object will be provided, followed next by the actual DN. Filter strings can be applied to POST operations; if you want to retrieve the results of your POST operation in the response, for example, you can pass the rsp-subtree=modified query string to indicate that you want the response to include any objects that have been modified by your POST operation.

The payload of the POST operation will contain the XML or JSON encoded data representing the MO that defines the Cisco API command body.

Filters


Note


For a Cisco APIC REST API query of event records, the Cisco APIC system limits the response to a maximum of 100,000 event records. If the response is more than 100,000 events, NGINX times out or runs out of memory. Use filters to refine your queries. For more information, see Composing Query Filter Expressions.


The REST API supports a wide range of flexible filters, useful for narrowing the scope of your search to allow information to be located more quickly. The filters themselves are appended as query URI options, starting with a question mark (?) and concatenated with an ampersand (&). Multiple conditions can be joined together to form complex filters.

The following query filters are available:

Table 1. Query Filters

Filter Type

Syntax

Cobra Query Property

Description

query-target
{self | children | subtree}
AbstractQuery.queryTarget

Defines the scope of a query. For more information, see Composing Query Filter Expressions.

target-subtree-class
classname
AbstractQuery.classFilter

Respond-only elements including the specified class. For more information, see Applying Query Scoping Filters.

query-target-filter
filter expressions
AbstractQuery.propFilter

Respond-only elements matching conditions. For more information, see Applying Query Scoping Filters.

rsp-subtree
{no | children | full}
AbstractQuery.subtree

Specifies child object level included in the response. For more information, see Applying Query Scoping Filters.

rsp-subtree-class
classname
AbstractQuery.
subtreeClassFilter

Respond-only specified classes. For more information, see Applying Query Scoping Filters.

rsp-subtree-filter
filter expressions
AbstractQuery.
subtreePropFilter

Respond-only classes matching conditions. For more information, see Applying Query Scoping Filters.

rsp-subtree-include
{faults | health :stats :…}
AbstractQuery.
subtreeInclude

Requests additional objects. For more information, see Applying Query Scoping Filters.

order-by
classname.property | {asc | desc}

AbstractQuery.orderBy

Sorts the response based on the property values. For more information, see Sorting and Paginating Query Results.

page
page number

AbstractQuery.page

Specifies the page to be returned in the response that is divided into groups (pages) by the page-size filter. Use this query filter when there is a huge number of objects in the response. For more information, see Sorting and Paginating Query Results.

page-size
number of objects per page

AbstractQuery.pageSize

Divides the response into groups (pages) with the specified size for pagination. Use this query filter when there is a huge number of objects in the response. For more information, see Sorting and Paginating Query Results.

time-range
{24h | 1week | 1month | 3month | range}

Not Implemented

Introduced in the 5.2(3) release only for log records. Use this query filter for log records that tend to have a huge number of objects in the response. Specifies the range of created time of records to be queried for optimized query performance with some limitations in sorting and pagination. For more information, see Log Record Query Enhancements.

Using Classes in REST API Commands

The Application Policy Infrastructure Controller (APIC) classes are crucial from an operational perspective to understand how system events and faults relate to objects within the object model. Each event and/or fault in the system is a unique object that can be accessed for configuration, health, fault, and/or statistics.

All the physical and logical components that make up the Cisco Application Centric Infrastructure (ACI) fabric are represented in a hierarchical management information tree (MIT). Each node in the tree represents a managed object (MO) or group of objects that contains its administrative state and its operational state.

To access the complete list of classes, point to the APIC and reference the doc/html directory at the end of the URL:

https://apic-ip-address/doc/html/

Using Managed Objects in REST API Commands

Before performing an API operation on a managed object (MO) or its properties, you should view the object's class definition in the Cisco APIC Management Information Model Reference, which is a web-based document. The Management Information Model (MIM) serves as a schema that defines rules such as the following:

  • The classes of parent objects to which an MO can be attached

  • The classes of child objects that can be attached to an MO

  • The number of child objects of a class type that can be attached to an MO

  • Whether a user can create, modify, or delete an MO, and the privilege level required to do so

  • The properties (attributes) of an object class

  • The data type and range of a property

When you send an API command, the APIC checks the command for conformance with the MIM schema. If an API command violates the MIM schema, the APIC rejects the command and returns an error message. For example, you can create an MO only if it is allowed in the path you have specified in the command URI and only if you have the required privilege level for that object class. You can configure an MO's properties only with valid data, and you cannot create properties.

When composing an API command to create an MO, you need only include enough information in the command's URI and data structure to uniquely define the new MO. If you omit the configuration of a property when creating the MO, the property is populated with a default value if the MIM specifies one, or it is left blank.

When modifying a property of an MO, you need only specify the property to be modified and its new value. Other properties will be left unchanged.

Guidelines and Restrictions

  • When you modify an MO that affects APIC or switch management communication policy, you might experience a brief disruption of any operations in progress on any APIC or switch web interface in the fabric. Configuration changes that can result in disruption include the following:

    • Changing management port settings, such as port number

    • Enabling or disabling HTTPS

    • Changing the state of redirection to HTTPS

    • Public key infrastructure (PKI) changes, such as key ring

  • When you read an existing MO, any password property of the MO is read as blank for security reasons. If you then write the MO back to APIC, the password property is written as blank.


    Tip


    If you need to store an MO with its password information, use a configuration export policy. To store a specific MO, specify the MO as the target distinguished name in the policy.

Creating the API Command

You can invoke an API command or query by sending an HTTP or HTTPS message to the APIC with a URI of this form for an operation on a managed object (MO):

{http | https}://host [:port] /api/mo/dn. {json | xml} [?options]

Use this form for an operation on an object class:

{http | https}://host [:port] /api/class/className. {json | xml} [?options]


Note


While the preceding examples use /api/mo and /api/class in the URI string, the APIC UI and Visore also use the /api/node/mo and /api/node/class syntax in the URI string. Both formats are valid and are used interchangeably in this document.


This example shows a URI for an API operation that involves an MO of class fv:Tenant:


https://apic-ip-address/api/mo/uni/tn-ExampleCorp.xml

URI Components

The components of the URI are as follows:

  • http:// or https://—Specifies HTTP or HTTPS. By default, only HTTPS is enabled. HTTP or HTTP-to-HTTPS redirection, if desired, must be explicitly enabled and configured, as described in Configuring HTTP and HTTPS Using the GUI. HTTP and HTTPS can coexist.

  • host—Specifies the hostname or IP address of the APIC.

  • :port—Specifies the port number for communicating with the APIC. If your system uses standard port numbers for HTTP (80) or HTTPS (443), you can omit this component.

  • /api/—Specifies that the message is directed to the API.

  • mo | class—Specifies whether the target of the operation is an MO or an object class.

  • dn—Specifies the distinguished name (DN) of the targeted MO.

  • className—Specifies the name of the targeted class. This name is a concatenation of the package name of the object queried and the name of the class queried in the context of the corresponding package.

    For example, the class aaa:User results in a className of aaaUser in the URI.

  • json | xml—Specifies whether the encoding format of the command or response HTML body is JSON or XML.

  • ?options—(Optional) Specifies one or more filters, selectors, or modifiers to a query. Multiple option statements are joined by an ampersand (&).

The URI for an API Operation on an MO

In an API operation to create, read, update, or delete a specific MO, the resource path consists of /mo/ followed by the DN of the MO as described in the Cisco APIC Management Information Model Reference. For example, the DN of a tenant object, as described in the reference definition of class fv:Tenant, is uni/tn-[name]. This URI specifies an operation on an fv:Tenant object named ExampleCorp:


https://apic-ip-address/api/mo/uni/tn-ExampleCorp.xml

Alternatively, in a POST operation, you can POST to /api/mo and provide the DN in the body of the message, as in this example:


POST https://apic-ip-address/api/mo.xml

<fvTenant dn="uni/tn-ExampleCorp"/>

You can also provide only the name in the message body and POST to /api/mo and the remaining RN components, as in this example:


POST https://apic-ip-address/api/mo/uni.xml

<fvTenant name="ExampleCorp"/>

The URI for an API Operation on a Node MO

In an API operation to access an MO on a specific node device in the fabric, the resource path consists of /mo/topology/pod-number/node-number/sys/ followed by the node component. For example, to access a board sensor in chassis slot b of node-1 in pod-1, use this URI:


GET https://apic-ip-address/api/mo/topology/pod-1/node-1/sys/ch/bslot/board/sensor-3.json

The URI for an API Operation on a Class

In an API operation to get information about a class, the resource path consists of /class/ followed by the name of the class as described in the Cisco APIC Management Information Model Reference. In the URI, the colon in the class name is removed. For example, this URI specifies a query on the class aaa:User:


GET https://apic-ip-address/api/class/aaaUser.json

Composing the API Command Body

The HTML body of a POST operation must contain a JSON or XML data structure that provides the essential information necessary to execute the command. No data structure is sent with a GET or DELETE operation.

Guidelines for Composing the API Command Body

  • The data structure does not need to represent the entire set of attributes and elements of the target MO or method, but it must provide at least the minimum set of properties or parameters necessary to identify the MO and to execute the command, not including properties or parameters that are incorporated into the URI.

  • The data structure is a single tree in which all child nodes are unique with a unique DN. Duplicate nodes are not allowed. You cannot make two changes to a node by including the same node twice. In this case, you must merge your changes into a single node.

  • In the data structure, the colon after the package name is omitted from class names and method names. For example, in the data structure for an MO of class zzz:Object, label the class element as zzzObject.

  • Although the JSON specification allows unordered elements, the APIC REST API requires that the JSON 'attributes' element precede the 'children' array or other elements.

  • If an XML data structure contains no children or subtrees, the object element can be self-closing.

  • The API is case sensitive.

  • When sending an API command, with 'api' in the URL, the maximum size of the HTML body for the API POST command is 1 MB.

  • When uploading a device package file, with 'ppi' in the URL, the maximum size of the HTML body for the POST command is 10 MB.

Composing the API Command Body to Call a Method

To compose a command to call a method, create a JSON or XML data structure containing the parameters of the method using the method description in the Cisco APIC Management Information Model Reference.

The API reference for a typical method lists its input parameters, if any, and its return values, if any. The method is called with a structure containing the essential input parameters, and a successful response returns a complete structure containing the return values.

The description for a hypothetical method config:Method might appear in the API reference as follows:


Method config:Method(
  	inParameter1,
  	inParameter2,
  	inParameter3,
  	outParameter1,
  	outParameter2
)

The parameters beginning with "in" represent the input parameters. The parameters beginning with "out" represent values returned by the method. Parameters with no "in" or "out" prefix are input parameters.

A JSON structure to call the method resembles the following structure:


{
  "configMethod":
  {
    "attributes":
    {
      "inParameter1":"value1",
      "inParameter2":"value2",
      "inParameter3":"value3"
    }
  }
}

An XML structure to call the method resembles the following structure:


<configMethod
    inParameter1="value1"
    inParameter2="value2"
    inParameter3="value3" 
/>


Note


The parameters of some methods include a substructure, such as filter settings or configuration settings for an MO. For specific information, see the method description in the Cisco APIC Management Information Model Reference.


Composing the API Command Body for an API Operation on an MO

To compose a command to create, modify, or delete an MO, create a JSON or XML data structure that describes the essential properties and children of the object's class by using the class description in the Cisco APIC Management Information Model Reference. You can omit any attributes or children that are not essential to execute the command.

A JSON structure for an MO of hypothetical class zzz:Object resembles this structure:


{
  "zzzObject" : {
    "attributes" : {
      "property1" : "value1",
      "property2" : "value2",
      "property3" : "value3"
    },
    "children" :
    [{
        "zzzChild1" : {
          "attributes" : {
            "childProperty1" : "childValue1",
            "childProperty2" : "childValue1"
          },
          "children" : []
        }
      }
    ]
  }
}

An XML structure for an MO of hypothetical class zzz:Object resembles this structure:


<zzzObject
  property1 = "value1",
  property2 = "value2",
  property3 = "value3">
    <zzzChild1
      childProperty1 = "childValue1",
      childProperty2 = "childValue1">
    </zzzChild1>
</zzzObject>


A successful operation returns a complete data structure for the MO.

Using Tags and Alias

To simplify API operations, you can assign tags or an alias to an object. In an API operation, you can refer to the object or group of objects by the alias or tag name instead of by the distinguished name (DN). Tags and aliases differ in their usage as follows:

  • Tag—A tag allows you to group multiple objects by a descriptive name. You can assign the same tag name to multiple objects and you can assign one or more tag names to an object.

  • Alias—An alias can be a simpler and more descriptive name than the DN when referring to a single object. You can assign a particular alias name to only one object. The system will prevent you from assigning the same alias name to a second object.


Note


Not every object supports a tag. To determine whether an object is taggable, inspect the class of the object in the Cisco APIC Management Information Model Reference. If the contained hierarchy of the object class includes a tag instance (such as tag:AInst or a class that derives from tag:AInst), an object of that class can be tagged.


Adding Tags

You can add one or more tags by using the following syntax in the URI of an API POST operation:

/api/tag/mo/dn. {json | xml}?add= [, name, ...] [, name, ...]

In this syntax, name is the name of a tag and dn is the distinguished name of the object to which the tag is assigned.

This example shows how to assign the tags tenants and orgs to the tenant named ExampleCorp:


POST https://apic-ip-address/api/tag/mo/uni/tn-ExampleCorp.xml?add=tenants,orgs

Removing Tags

You can remove one or more tags by using the following syntax in the URI of an API POST operation:

/api/tag/mo/dn. {json | xml}?remove=name [, name, ...]

This example shows how to remove the tag orgs from the tenant named ExampleCorp:


POST https://apic-ip-address/api/tag/mo/uni/tn-ExampleCorp.xml?remove=orgs

You can delete all instances of a tag by using the following syntax in the URI of an API DELETE operation:

/api//tag/name. {json | xml}

This example shows how to remove the tag orgs from all objects:


DELETE https://apic-ip-address/api/tag/orgs.xml

Adding an Alias

You can add an alias by using the following syntax in the URI of an API POST operation:

/api/alias/mo/dn. {json | xml}?set=name

In this syntax, name is the name of the alias and dn is the distinguished name of the object to which the alias is assigned.

This example shows how to assign the alias tenant8 to the tenant named ExampleCorp:


POST https://apic-ip-address/api/alias/mo/uni/tn-ExampleCorp.xml?set=tenant8

Removing an Alias

You can remove an alias by using the following syntax in the URI of an API POST operation:

/api/alias/mo/dn. {json | xml}?clear=yes

This example shows how to remove any alias from the tenant named ExampleCorp:


POST https://apic-ip-address/api/alias/mo/uni/tn-ExampleCorp.xml?clear=yes

Additional Examples


Note


In the examples in this section, the responses have been edited to remove attributes unrelated to tags.


This example shows how to find all tags assigned to the tenant named ExampleCorp:


GET https://apic-ip-address/api/tag/mo/uni/tn-ExampleCorp.xml

RESPONSE:
<imdata>
    <tagInst
         dn="uni/tn-ExampleCorp/tag-tenants" 
         name="tenants" 
    />
    <tagInst
         dn="uni/tn-ExampleCorp/tag-orgs"  
         name="orgs" 
    />
</imdata>

This example shows how to find all objects with the tag 'tenants':


GET https://apic-ip-address/api/tag/tenants.xml

RESPONSE:
<imdata>
    <fvTenant
        dn="uni/tn-ExampleCorp" 
        name="ExampleCorp"
    />
</imdata>

Composing REST API Queries

Composing Query Filter Expressions

You can filter the response to an API query by applying an expression of logical operators and values.

A basic equality or inequality test is expressed as follows:


query-target-filter=[eq|ne](attribute,value)

You can create a more complex test by combining operators and conditions using parentheses and commas:


query-target-filter=[and|or]([eq|ne](attribute,value),[eq|ne](attribute,value),...)


Note


A scoping filter can contain a maximum of 20 '(attribute,value)' filter expressions. If the limit is exceeded, the API returns an error.


Available Logical Operators

This table lists the available logical operators for query filter expressions.

Operator Description
eq

Equal to

ne

Not equal to

lt

Less than

gt

Greater than

le

Less than or equal to

ge

Greater than or equal to

bw

Between

not

Logical inverse

and

Logical AND

or

Logical OR

xor

Logical exclusive OR

true

Boolean TRUE

false

Boolean FALSE

anybit

TRUE if at least one bit is set

allbits

TRUE if all bits are set

wcard

Wildcard

pholder

Property holder

passive

Passive holder

Examples

This example returns all managed objects of class aaaUser whose last name is equal to "Washington":


GET https://apic-ip-address/api/class/aaaUser.json?
      query-target-filter=eq(aaaUser.lastName,"Washington")

This example returns endpoint groups whose fabEncap property is "vxlan-12780288":


GET https://apic-ip-address/api/class/fvAEPg.xml?
    query-target-filter=eq(fvAEPg.fabEncap,"vxlan-12780288")

This example shows all tenant objects with a current health score of less than 50:


GET https://apic-ip-address/api/class/fvTenant.json?
    rsp-subtree-include=health,required
        &
        rsp-subtree-filter=lt(healthInst.cur,"50")

This example returns all endpoint groups and their faults under the tenant ExampleCorp:


GET https://apic-ip-address/api/mo/uni/tn-ExampleCorp.xml?
    query-target=subtree
        &
        target-subtree-class=fvAEPg
            &
            rsp-subtree-include=faults

This example returns aaa:Domain objects whose names are not "infra" or "common":


GET https://apic-ip-address/api/class/aaaDomain.json?
    query-target-filter=
        and(ne(aaaDomain.name,"infra"),
            ne(aaaDomain.name,"common"))

Applying Query Scoping Filters

You can limit the scope of the response to an API query by applying scoping filters. You can limit the scope to the first level of an object or to one or more of its subtrees or children based on the class, properties, categories, or qualification by a logical filter expression.

query-target={self | children | subtree}

This statement restricts the scope of the query. This list describes the available scopes:

  • self —(Default) Considers only the MO itself, not the children or subtrees.

  • children —Considers only the children of the MO, not the MO itself.

  • subtree —Considers the MO itself and its subtrees.

target-subtree-class=mo-class1[,mo-class2]...

This statement specifies which object classes are to be considered when the query-target option is used with a scope other than self . You can specify multiple desired object types as a comma-separated list with no spaces.

To request subtree information, combine query-target=subtree with the target-subtree-class statement to indicate the specific subtree as follows:


query-target=subtree&target-subtree-class=className

This example requests information about the running firmware. The information is contained in the firmware:CtrlrRunning subtree (child) object of the APIC firmware status container firmware:CtrlrFwStatusCont:

GET https://apic-ip-address/api/class/firmwareCtrlrFwStatusCont.json?
    query-target=subtree&target-subtree-class=firmwareCtrlrRunning

query-target-filter=filter-expression

This statement specifies a logical filter to be applied to the response. This statement can be used by itself or applied after the query-target statement.

rsp-subtree={no | children | full}

For objects returned, this option specifies whether child objects are included in the response. This list describes the available choices:

  • no —(Default) Response includes no children.

  • children —Response includes only the children.

  • full —Response includes the entire structure including the children.

rsp-subtree-class=mo-class

When child objects are to be returned, this statement specifies that only child objects of the specified object class are included in the response.

rsp-subtree-filter=filter-expression

When child objects are to be returned, this statement specifies a logical filter to be applied to the child objects.


Note


When an rsp-subtree-filter query statement includes a class.property operand, the specified class name is used only to identify the property and its type. The returned results are not filtered by class, and may include any child object that contains a property of the same name but belonging to a different class if that object's property matches the query condition. To filter by class, you must use additional query filters.


rsp-subtree-include=category1[,category2...][option]

When child objects are to be returned, this statement specifies additional contained objects or options to be included in the response. You can specify one or more of the following categories in a comma-separated list with no spaces:

  • audit-logs —Response includes subtrees with the history of user modifications to managed objects.

  • event-logs —Response includes subtrees with event history information.

  • faults —Response includes subtrees with currently active faults.

  • fault-records —Response includes subtrees with fault history information.

  • health —Response includes subtrees with current health information.

  • health-records —Response includes subtrees with health history information.

  • relations —Response includes relations-related subtree information.

  • stats —Response includes statistics-related subtree information.

  • tasks —Response includes task-related subtree information.

With any of the preceding categories, you can also specify one of the following options to further refine the query results:

  • count —Response includes a count of matching subtrees but not the subtrees themselves.

  • no-scoped —Response includes only the requested subtree information. Other top-level information of the target MO is not included in the response.

  • required —Response includes only the managed objects that have subtrees matching the specified category.

For example, to include fault-related subtrees, specify faults in the list. To return only fault-related subtrees and no other top-level MO information, specify faults,no-scoped in the list as shown in this example:


query-target=subtree&rsp-subtree-include=faults,no-scoped


Note


Some types of child objects are not created until the parent object has been pushed to a fabric node (leaf). Until such a parent object has been pushed to a fabric node, a query on the parent object using the rsp-subtree-include filter might return no results. For example, a class query for fvAEPg that includes the query option rsp-subtree-include=stats will return stats only for endpoint groups that have been applied to a tenant and pushed to a fabric node.


rsp-prop-include={all | naming-only | config-only}

This statement specifies what type of properties should be included in the response when the rsp-subtree option is used with an argument other than no .

  • all —Response includes all properties of the returned managed objects.

  • naming-only —Response includes only the naming properties of the returned managed objects.

  • config-only —Response includes only the configurable properties of the returned managed objects.


    Note


    If the managed object is not configurable or cannot be exported (backed up), the managed object is not returned.


Filtering API Query Results

You can filter the results of an API query by appending one or more condition statements to the query URI as a parameter in this format:


https://URI?condition[&condition[&...]]

Multiple condition statements are joined by an ampersand (&).


Note


The condition statement must not contain spaces.


Options are available to filter by object attributes and object subtrees.

Filter Conditional Operators

The query filtering feature supports the following condition operators:

Operator Description
eq

Equal to

ne

Not equal to

lt

Less than

gt

Greater than

le

Less than or equal to

ge

Greater than or equal to

bw

Between

not

Logical inverse

and

Logical AND

or

Logical OR

xor

Logical exclusive OR

true

Boolean TRUE

false

Boolean FALSE

anybit

TRUE if at least one bit is set

allbits

TRUE if all bits are set

wcard

Wildcard

pholder

Property holder

passive

Passive holder

Sorting and Paginating Query Results

When sending an API query that returns a large quantity of data, you can have the return data sorted and paginated to make it easier to find the information you need.

Sorting the Results

By adding the order-by operator to the query URI, you can sort the query response by one or more properties of a class, and you can specify the direction of the order using the following syntax.

order-by= classname.property [| {asc | desc}] [,classname.property [| {asc | desc}]] [,...]

Use the optional pipe delimiter ('|') to specify either ascending order (asc) or descending order (desc). If no order is specified, the default is ascending order.

You can perform a multi-level sort by more than one property (for example, last name and first name), but all properties must be of the same managed object or they must be inherited from the same abstract class.

The following example shows you how to sort users by last name, then by first name:

GET https://apic-ip-address/api/class/aaaUser.json?order-by=aaaUser.lastName|asc,aaaUser.firstName|asc

Paginating the Results

By adding the page-size operator to the query URI, you can divide the query results into groups (pages) of objects using the following syntax. The operand specifies the number of objects in each group.

page-size= number-of-objects-per-page

By adding the page operator in the query URI, you can specify a single group to be returned using the following syntax. The pages start from number 0.

page= page-number

The following example shows you how to specify 15 fault instances per page in descending order, returning only the first page:

GET https://apic-ip-address/api/class/faultInfo.json?order-by=faultInst.severity|desc&page=0&page-size=15

Note


Every query, whether paged or not, generates a new set of results. When you perform a query that returns only a single page, the query response includes a count of the total results, but the unsent pages are not stored and cannot be retrieved by a subsequent query. A subsequent query generates a new set of results and returns the page requested in that query.


Log Record Query Enhancements

Beginning with the Cisco Application Policy Infrastructure Controller (APIC) 5.1(1) release, the query performance for log record objects such as eventRecord was improved with a trade off of that the sorting across pages is not guaranteed. This enhancement is applicable only to the class query for the following log record objects against the entire fabric or a specific node:

  • faultRecord

  • eventRecord

  • aaaModLR

  • aaaSessionLR

  • healthRecord

To overcome the sorting issue, beginning with the Cisco APIC release 5.2(3), the time-range filter is supported for these log record objects. When using the time-range filter to limit the scope of the query, the amount of the objects to be processed is optimized, which allows sorting across pages. However, to keep the sorting consistent across pages with the time-range filter, the page filter must always start with zero. Then, navigate through pages one by one, such as page=0 in the first API query, page=1 in the next query, then page=2, and so on. If the page number jumps such as to page=3 without querying previous pages, the order of the log record entries that are supposed to be sorted by created timestamp using time-range is not guaranteed. As an exception, you can query the last page and navigate backward through the pages one by one. To obtain the last page number, you can query page=0, which returns the totalCount. Then, you can divide totalCount by the page-size that you are using.

You can specify the time range of the log record objects to be queried using the following syntax:

time-range = { 24h | 1week | 1month | 3month | | range }

range represents a custom range of dates, which you specify as follows:

yyyy-mm-dd|yyyy-mm-dd

or

yyyy-mm-ddThh:mm:ss|yyyy-mm-ddThh:mm:ss

Beginning with Cisco APIC release 6.0(3), the range can include the time stamp details too, as indicated above (yyyy-mm-ddThh:mm:ss).

The following example is a custom range from January 1, 2021 through February 15, 2021.

time-range=2021-01-01|2021-02-15

The following example is a custom range from midnight at January 1, 2024 through 30 seconds past 9:00 am on January 2, 2024.

time-range=2024-01-01T00:00:00|2024-01-01T09:00:30

The following example queries the fault log records within the past 24 hours, using the log records for the entire fabric that is stored in the database distributed within the Cisco APIC cluster:

https://apic-ip-address/api/class/faultRecord.json?time-range=24h

The following example queries the event log records within the past 1 week of the switch with the ID of node-101 in pod 1:

https://apic-ip-address/api/class/topology/pod-1/node-101/eventRecord.json?time-range=1week

Note


If you do not specify time-range, the query retrieves all of the log record objects regardless of the date on the objects, except as limited by any other filters that you specify.

When using time-range, the query result is always sorted based on the created time of the log record objects. When used along with order-by, order-by sorts the results only within the returned page.

Beginning with the 5.1(1) release, when the number of returned objects in a single page, that is a single query, happens to be larger than 2000, the returned result will be limited to 2000 per page. Beginning with the 5.2(3) release, this limitation was lifted only for page=0, but we recommend that you use page-size to limit the number of entries to a reasonable number if you need the size to be more than 2000.


Subscribing to Query Results

When you perform an API query, you have the option to create a subscription to any future changes in the results of that query that occur during your active API session. When any MO is created, changed, or deleted because of a user- or system-initiated action, an event is generated. If that event changes the results of an active subscribed query, the APIC generates a push notification to the API client that created the subscription.

Opening a WebSocket

The API subscription feature uses the WebSocket protocol (RFC 6455) to implement a two-way connection with the API client through which the API can send unsolicited notification messages to the client. To establish this notification channel, you must first open a WebSocket connection with the API. Only a single WebSocket connection is needed to support multiple query subscriptions with multiple APIC instances. The WebSocket connection is dependent on your API session connection, and closes when your API session ends.


Note


When MO events go through the event manager (eventmgr), clients receive notification of WebSocket subscription for any MO. Although most of the APIC MOs do go through eventmgr, stats objects do not go through it, because updates are very frequent and not scalable. Therefore, if you subscribe to stats objects, you will receive no notification. Instead you can periodically query or export stats MOs.


The WebSocket connection is typically opened by a JavaScript method in an HTML5-compliant browser, as in the following example:


var Socket = new WebSocket(https://apic-ip-address/socket%TOKEN%);

In the URI, the %TOKEN% is the current API session token (cookie). This example shows the URI with a token:


https://apic-ip-address/socketGkZl5NLRZJl5+jqChouaZ9CYjgE58W/pMccR+LeXmdO0obG9NB
Iwo1VBo7+YC1oiJL9mS6I9qh62BkX+Xddhe0JYrTmSG4JcKZ4t3bcP2Mxy3VBmgoJjwZ76ZOuf9V9AD6X
l83lyoR4bLBzqbSSU1R2NIgUotCGWjZt5JX6CJF0=

After the WebSocket connection is established, it is not necessary to resend the API session token when the API session is refreshed.

Creating a Subscription

To create a subscription to a query, perform the query with the option ?subscription=yes. This example creates a subscription to a query of the fv:Tenant class in the JSON format:


GET https://apic-ip-address/api/class/fvTenant.json?subscription=yes

To specify a refresh-timeout in seconds, perform the query with the option ?&subscription=yes&refresh-timeout=timeout-time, where timeout-time is the refresh-timeout in seconds. This example creates a subscription to a query of the fv:Tenant class in the JSON format, with a refresh-timeout of 140 seconds:


GET https://apic-ip-address/api/class/fvTenant.json?&subscription=yes&refresh-timeout=140

The query response contains a subscription identifier, subscriptionId , that you can use to refresh the subscription and to identify future notifications from this subscription.


{
  "subscriptionId" : "72057611234574337",
  "imdata" : [{
      "fvTenant" : {
        "attributes" : {
          "instanceId" : "0:0",
          "childAction" : "",
          "dn" : "uni/tn-common",
          "lcOwn" : "local",
          "monPolDn" : "",
          "name" : "common",
          "replTs" : "never",
          "status" : ""
        }
      }
    }
  ]
}

Receiving Notifications

An event notification from the subscription delivers a data structure that contains the subscription ID and the MO description. In this JSON example, a new user has been created with the name "sysadmin5":


{
  "subscriptionId" : ["72057598349672454", "72057598349672456"],
  "imdata" : [{
      "aaaUser" : {
        "attributes" : {
          "accountStatus" : "active",
          "childAction" : "",
          "clearPwdHistory" : "no",
          "descr" : "",
          "dn" : "uni/userext/user-sysadmin5",
          "email" : "",
          "encPwd" : "TUxISkhH$VHyidGgBX0r7N/srt/YcMYTEn5248ommFhNFzZghvAU=",
          "expiration" : "never",
          "expires" : "no",
          "firstName" : "",
          "intId" : "none",
          "lastName" : "",
          "lcOwn" : "local",
          "name" : "sysadmin5",
          "phone" : "",
          "pwd" : "",
          "pwdLifeTime" : "no-password-expire",
          "pwdSet" : "yes",
          "replTs" : "2013-05-30T11:28:33.835",
          "rn" : "",
          "status" : "created"
        }
      }
    }
  ]
}

Because multiple active subscriptions can exist for a query, a notification can contain multiple subscription IDs as in the example shown.


Note


Notifications are supported in either JSON or XML format.


Refreshing the Subscription

To continue to receive event notifications, you must periodically refresh each subscription during your API session. To refresh a subscription, send an HTTP GET message to the API method subscriptionRefresh with the parameter id equal to the subscriptionId as in this example:


GET https://apic-ip-address/api/subscriptionRefresh.json?id=72057611234574337

The API returns an empty response to the refresh message unless the subscription has expired.


Note


The timeout period for a subscription is one minute. To prevent lost notifications, you must send a subscription refresh message at least once every 60 seconds.


Scoped Class Query

A feature is available in the Cisco APIC REST API that allows to read a class of a parent tree, where /api/class/<parent-mo>/subtreeclass.xml will get all of the entries under this parent managed object.

For example:

  • /api/class/uni/tn-common/fvAEPg.xml will get all of the EPGs for tn-common, regardless of what application they are under

  • /topology/pod-1/node-101/l1PhysIf.xml will get all of the entries of l1PhysIf for the node 101

REST API Examples

Information About the API Examples

In the examples, the JSON and XML structures have been expanded with line feeds, spaces, and indentations for readability.

Example: Using the JSON API to Add a Leaf Port Selector Profile

This example shows how to add a leaf port selector profile.

As shown in the Cisco APIC Management Information Model Reference, this hierarchy of classes forms a leaf port selector profile:

  • fabric:LePortP — A leaf port profile is represented by a managed object (MO) of this class, which has a distinguished name (DN) format of uni/fabric/leportp-[name], in which leportp-[name] is the relative name (RN). The leaf port profile object is a template that can contain a leaf port selector as a child object.

    • fabric:LFPortS — A leaf port selector is represented by an MO of this class, which has a RN format of lefabports-[name]-typ-[type]. The leaf port selector object can contain one or more ports or ranges of ports as child objects.

      • fabric:PortBlk — A leaf port or a range of leaf ports is represented by an MO of this class, which has a RN format of portblk-[name].

The API command that creates the new leaf port selector profile MO can also create and configure the child MOs.

This example creates a leaf port selector profile with the name "MyLPSelectorProf." The example profile contains a selector named "MySelectorName" that selects leaf port 1 on leaf switch 1 and leaf ports 3 through 5 on leaf switch 1. To create and configure the new profile, send this HTTP POST message:


POST http://apic-ip-address/api/mo/uni/fabric/leportp-MyLPSelectorProf.json

{
  "fabricLePortP" : {
    "attributes" : {
      "descr" : "Selects leaf ports 1/1 and 1/3-5"
    },
    "children" : [{
        "fabricLFPortS" : {
          "attributes" : {
            "name" : "MySelectorName",
            "type" : "range"
          },
          "children" : [{
              "fabricPortBlk" : {
                "attributes" : {
                  "fromCard" : "1",
                  "toCard" : "1",
                  "fromPort" : "1",
                  "toPort" : "1",
                  "name" : "block2"
                }
              }
            }, {
              "fabricPortBlk" : {
                "attributes" : {
                  "fromCard" : "1",
                  "toCard" : "1",
                  "fromPort" : "3",
                  "toPort" : "5",
                  "name" : "block3"
                }
              }
            }
          ]
        }
      }
    ]
  }
}

A successful operation returns this response body:


{
  "imdata" : [{
      "fabricLePortP" : {
        "attributes" : {
          "instanceId" : "0:0",
          "childAction" : "deleteNonPresent",
          "descr" : "Select leaf ports 1/1 and 1/3-5",
          "dn" : "uni/fabric/leportp-MyLPSelectorProf",
          "lcOwn" : "local",
          "name" : "MyLPSelectorProf",
          "replTs" : "never",
          "rn" : "",
          "status" : "created"
        },
        "children" : [{
            "fabricLFPortS" : {
              "attributes" : {
                "instanceId" : "0:0",
                "childAction" : "deleteNonPresent",
                "dn" : "",
                "lcOwn" : "local",
                "name" : "MySelectorName",
                "replTs" : "never",
                "rn" : "lefabports-MySelectorName-typ-range",
                "status" : "created",
                "type" : "range"
              },
              "children" : [{
                  "fabricPortBlk" : {
                    "attributes" : {
                      "instanceId" : "0:0",
                      "childAction" : "deleteNonPresent",
                      "dn" : "",
                      "fromCard" : "1",
                      "fromPort" : "3",
                      "lcOwn" : "local",
                      "name" : "block3",
                      "replTs" : "never",
                      "rn" : "portblk-block3",
                      "status" : "created",
                      "toCard" : "1",
                      "toPort" : "5"
                    }
                  }
                }, {
                  "fabricPortBlk" : {
                    "attributes" : {
                      "instanceId" : "0:0",
                      "childAction" : "deleteNonPresent",
                      "dn" : "",
                      "fromCard" : "1",
                      "fromPort" : "1",
                      "lcOwn" : "local",
                      "name" : "block2",
                      "replTs" : "never",
                      "rn" : "portblk-block2",
                      "status" : "created",
                      "toCard" : "1",
                      "toPort" : "1"
                    }
                  }
                }
              ]
            }
          }
        ]
      }
    }
  ]
}

To delete the new profile, send an HTTP POST message with a fabricLePortP attribute of "status":"deleted", as in this example:


POST http://apic-ip-address/api/mo/uni/fabric/leportp-MyLPSelectorProf.json

{
  "fabricLePortP" : {
    "attributes" : {
      "status" : "deleted"
    }
  }
}

Alternatively, you can send this HTTP DELETE message:


DELETE http://apic-ip-address/api/mo/uni/fabric/leportp-MyLPSelectorProf.json

Example: Using the JSON API to Get Information About a Node

This example shows how to query the APIC to access a node in the system.

To direct an API operation to a specific node device in the fabric, the resource path consists of /mo/topology/pod-number/node-number/sys/ followed by the node component. For example, this URI accesses board sensor 3 in chassis slot B of node 1:


GET http://apic-ip-address/api/mo/topology/pod-1/node-1/sys/ch/bslot/board/sensor-3.json

A successful operation returns a response body similar to this example:


{
  "imdata" :
  [{
      "eqptSensor" : {
        "attributes" : {
          "instanceId" : "0:0",
          "childAction" : "",
          "dn" : "topology/pod-1/node-1/sys/ch/bslot/board/sensor-3",
          "id" : "3",
          "majorThresh" : "0",
          "mfgTm" : "not-applicable",
          "minorThresh" : "0",
          "model" : "",
          "monPolDn" : "",
          "rev" : "0",
          "ser" : "",
          "status" : "",
          "type" : "dimm",
          "vendor" : "Cisco Systems, Inc."
        }
      }
    }
  ]
}

Example: Using the JSON API to Get Running Firmware

This example shows how to query the APIC to determine which firmware images are running.

The detailed information on running firmware is contained in an object of class firmware:CtrlrRunning, which is a child class (subtree) of the APIC firmware status container class firmware:CtrlrFwStatusCont. Because there can be multiple running firmware instances (one per APIC instance), you can query the container class and filter the response for the subtree of running firmware objects.

This example shows the API query message:


GET http://apic-ip-address/api/class/firmware:CtrlrFwStatusCont.json?
        query-target=subtree
        &
        target-subtree-class=firmwareCtrlrRunning

A successful operation returns a response body similar to this example:


{
  "imdata" : [{
      "firmwareCtrlrRunning" : {
        "attributes" : {
          "instanceId" : "0:0",
          "applId" : "3",
          "childAction" : "",
          "dn" : "Ctrlrfwstatuscont/ctrlrrunning-3",
          "lcOwn" : "local",
          "replTs" : "never",
          "rn" : "",
          "status" : "",
          "ts" : "2012-12-31T16:00:00.000",
          "type" : "ifc",
          "version" : "1.1"
        }
      }
    }, {
      "firmwareCtrlrRunning" : {
        "attributes" : {
          "instanceId" : "0:0",
          "applId" : "1",
          "childAction" : "",
          "dn" : "ctrlrfwstatuscont/ctrlrrunning-1",
          "lcOwn" : "local",
          "replTs" : "never",
          "rn" : "",
          "status" : "",
          "ts" : "2012-12-31T16:00:00.000",
          "type" : "ifc",
          "version" : "1.1"
        }
      }
    }, {
      "firmwareCtrlrRunning" : {
        "attributes" : {
          "instanceId" : "0:0",
          "applId" : "2",
          "childAction" : "",
          "dn" : "ctrlrfwstatuscont/ctrlrrunning-2",
          "lcOwn" : "local",
          "replTs" : "never",
          "rn" : "",
          "status" : "",
          "ts" : "2012-12-31T16:00:00.000",
          "type" : "ifc",
          "version" : "1.1"
        }
      }
    }
  ]
}

This response describes three running instances of APIC firmware version 1.1.

Example: Using the JSON API to Get Top Level System Elements

This example shows how to query the APIC to determine what system devices are present.

General information about the system elements (APICs, spines, and leafs) is contained in an object of class top:System.

This example shows the API query message:


GET http://apic-ip-address/api/class/topSystem.json

A successful operation returns a response body similar to this example:


{
  "imdata" :
  [{
      "topSystem" : {
        "attributes" : {
          "instanceId" : "0:0",
          "address" : "10.0.0.32",
          "childAction" : "",
          "currentTime" : "2013-06-14T04:13:05.584",
          "currentTimeZone" : "",
          "dn" : "topology/pod-1/node-17/sys",
          "fabricId" : "0",
          "id" : "17",
          "inbMgmtAddr" : "0.0.0.0",
          "lcOwn" : "local",
          "mode" : "unspecified",
          "name" : "leaf0",
          "nodeId" : "0",
          "oobMgmtAddr" : "0.0.0.0",
          "podId" : "1",
          "replTs" : "never",
          "role" : "leaf",
          "serial" : "FOX-270308",
          "status" : "",
          "systemUpTime" : "00:00:02:03"
        }
      }
    }, {
      "topSystem" : {
        "attributes" : {
          "instanceId" : "0:0",
          "address" : "10.0.0.1",
          "childAction" : "",
          "currentTime" : "2013-06-14T04:13:29.301",
          "currentTimeZone" : "PDT",
          "dn" : "topology/pod-1/node-1/sys",
          "fabricId" : "0",
          "id" : "1",
          "inbMgmtAddr" : "0.0.0.0",
          "lcOwn" : "local",
          "mode" : "unspecified",
          "name" : "apic0",
          "nodeId" : "0",
          "oobMgmtAddr" : "0.0.0.0",
          "podId" : "0",
          "replTs" : "never",
          "role" : "apic",
          "serial" : "",
          "status" : "",
          "systemUpTime" : "00:00:02:26"
        }
      }
    }
  ]
}

This response indicates that the system consists of one APIC (node-1) and one leaf (node-17).

Example: Using the XML API and OwnerTag to Add Audit Log Information to Actions

This example shows how to use the ownerTag or ownerKey property to add custom audit log information when an object is created or modified.

All configurable objects contain the properties ownerTag and ownerKey , which are user-configurable string properties. When any configurable object is created or modified by a user action, an audit log record object (aaa:ModLR ) is automatically created to contain information about the change to be reported in the audit log. The audit log record object includes a list (the changeSet property) of the configured object's properties that were changed by the action. In the command to create or modify the configurable object, you can add your own specific tracking information, such as a job ticket number or the name of the person making the change, to the ownerTag or ownerKey property of the configurable object. This tracking information will then be included in the audit log record along with the details of the change.


Note


The ownerTag information will appear in the log only when the ownerTag contents have been changed. To include the same information in a subsequent configuration change, you can clear the ownerTag contents before making the next configuration change. This condition applies also to the ownerKey property.


In the following example, a domain reference is added to a tenant configuration. As part of the command, the operator's name is entered as the ownerKey and a job number is entered as the ownerTag .


POST https://apic-ip-address/api/mo/uni/tn-ExampleCorp.xml

<fvTenant name=“ExampleCorp" ownerKey=“georgewa" ownerTag=“chg:00033">
    <aaaDomainRef name=“ExampleDomain" ownerKey=“georgewa" ownerTag="chg:00033"/>
</fvTenant>

In this case, two aaa:ModLR records are generated — one for the fv:Tenant object and one for the aaa:DomainRef object. Unless the ownerKey or ownerTag properties are unchanged from a previous configuration, their new values will appear in the changeSet list of the aaa:ModLR records, and this information will appear in the audit log record that reports this configuration change.

Example: XML Get Endpoints (Devices) with IP and MAC Addresses

The fvCEp class can be used to derive a list of endpoints (devices) attached to the fabric and the associated IP and MAC address and the encapsulation for each object.

Procedure


Use an XML query, such as the following example, to get a list of endpoints with the IP and MAC address for each one:

Example:

GET https://apic-ip-address/api/node/class/fvCEp.xml

Example: Monitoring Using the REST API

In the examples in this topic, the JSON and XML structures have been expanded with line feeds, spaces, and indentations for readability.

XML Example: Get the Current List of Faults in the Fabric

You can use the faultInst class to derive all faults associated with the fabric, tenant, or individual managed objects within the APIC. Send a query with XML such as this example:
 GET https://apic-ip-address/api/node/class/faultInst.xml?
query-target-filter=and(eq(faultInst.cause,"config-failure"))
 

XML Example: Get the Current List of Faults in the Fabric That Were Caused by a Failed Configuration

You can also use the fault Inst class with filters to limit the response to faults that were caused by a failed configuration, with XML such as this example:

 GET https://apic-ip-address/api/node/class/faultInst.xml?
query-target-filter=and(e(stultification,"config-failure"))
 

XML Example: Get the Properties for a Specific Managed Object, DN

You can use a MO query to obtain the properties of the tenant name, with XML such as the following example:

 GET https://apic-ip-address/api/node/mo/uni/tn-common.xml?query-target=self 

Accessing the REST API

Accessing the REST API

Procedure


By using a script or a browser-based REST client, you can send an API POST or GET message of the form: https://apic-ip-address/api/api-message-url

Use the out-of-band management IP address that you configured during the initial setup.

Note

 
  • Only https is enabled by default. By default, http and http-to-https redirection are disabled.

  • You must send an authentication message to initiate an API session. Use the administrator login name and password that you configured during the initial setup.


Invoking the API

You can invoke an API function by sending an HTTP/1.1 or HTTPS POST, GET, or DELETE message to the Application Policy Infrastructure Controller (APIC). The HTML body of the POST message contains a Javascript Object Notation (JSON) or XML data structure that describes an MO or an API method. The HTML body of the response message contains a JSON or XML structure that contains requested data, confirmation of a requested action, or error information.


Note


The root element of the response structure is imdata. This element is merely a container for the response; it is not a class in the management information model (MIM).

Configuring the HTTP Request Method and Content Type

API commands and queries must use the supported HTTP or HTTPS request methods and header fields, as described in the following sections.


Note


For security, only HTTPS is enabled as the default mode for API communications. HTTP and HTTP-to-HTTPS redirection can be enabled if desired, but are less secure. For simplicity, this document refers to HTTP in descriptions of protocol components and interactions.


Request Methods

The API supports HTTP POST, GET, and DELETE request methods as follows:

  • An API command to create or update an MO, or to execute a method, is sent as an HTTP POST message.

  • An API query to read the properties and status of an MO, or to discover objects, is sent as an HTTP GET message.

  • An API command to delete an MO is sent as either an HTTP POST or DELETE message. In most cases, you can delete an MO by setting its status to deleted in a POST operation.

Other HTTP methods, such as PUT, are not supported.


Note


Although the DELETE method is supported, the HTTP header might show only these: Access-Control-Allow-Methods: POST, GET, OPTIONS


Content Type

The API supports either JSON or XML data structures in the HTML body of an API request or response. You must specify the content type by terminating the URI pathname with a suffix of either .json or .xml to indicate the format to be used. The HTTP Content-Type and Accept headers are ignored by the API.

Configuring HTTP and HTTPS Using the GUI

This procedure configures the supported communication protocol for access to the GUI and the REST API.

By default, only HTTPS is enabled. HTTP or HTTP-to-HTTPS redirection, if desired, must be explicitly enabled and configured. HTTP and HTTPS can coexist.

Procedure


Step 1

On the menu bar, click Fabric > Fabric Policies.

Step 2

In the Navigation pane, expand Policies > Pod > Management Access.

Step 3

Under Management Access, click the default policy.

Step 4

In the Work pane, in the HTTP or HTTPS areas, enable or disable the protocol by selecting the desired state from the Admin State drop-down list.

Step 5

In the HTTP area, enable or disable HTTP-to-HTTPS redirection by selecting the desired state from the Redirect drop-down list.

Step 6

Click Submit.


Configuring HTTP and HTTPS Throttling Using the CLI

This procedure limits the rate of HTTP and HTTPS requests to the GUI and the REST API.


Note


This procedure describes how to configure HTTP and HTTPS AAA login throttling. For information on configuring the NGINX rate limit (global throttling), see the Cisco ACI Support for NGINX Rate Limit document.


Procedure

  Command or Action Purpose

Step 1

configure terminal

Example:


apic1# configure terminal
apic1(config)# 

Enter configuration mode.

Step 2

comm-policy policy-name

Example:


apic1(config)# comm-policy default
apic1(config-comm-policy)# 

Create a new communications policy or edit an existing policy, such as the default policy.

Step 3

http | https

Example:


apic1(config-comm-policy)# https
apic1(config-https)# 

Select HTTP or HTTPS for throttling configuration.

Step 4

[no] enable-throttle

Example:


apic1(config-https)# enable-throttle
apic1(config-https)# 

Enable or disable throttling on the selected protocol. The no prefix disables throttling.

Step 5

throttle 1-100

Example:


apic1(config-https)# throttle 50
apic1(config-https)# 

Set the maximum rate of requests per second.

Configuring a Custom Certificate for Cisco ACI HTTPS Access Using the GUI

CAUTION: PERFORM THIS TASK ONLY DURING A MAINTENANCE WINDOW AS THERE IS A POTENTIAL FOR DOWNTIME. The downtime affects access to the Cisco Application Policy Infrastructure Controller (APIC) cluster and switches from external users or systems and not the Cisco APIC to switch connectivity. The NGINX process on the switches will also be impacted, but that will be only for external connectivity and not for the fabric data plane. Access to the Cisco APIC, configuration, management, troubleshooting, and such will be impacted. The NGINX web server running on the Cisco APIC and switches will be restarted during this operation.

Before you begin

Determine from which authority you will obtain the trusted certification so that you can create the appropriate Certificate Authority.

Procedure


Step 1

On the menu bar, choose Admin > AAA.

Step 2

In the Navigation pane, choose Security.

Step 3

In the Work pane, choose Public Key Management > Certificate Authorities > Create Certificate Authority.

Step 4

In the Create Certificate Authority dialog box, in the Name field, enter a name for the certificate authority.

Step 5

In the Certificate Chain field, copy the intermediate and root certificates for the certificate authority that will sign the Certificate Signing Request (CSR) for the Cisco APIC.

The certificate should be in Base64 encoded X.509 (CER) format. The intermediate certificate is placed before the root CA certificate. It should look similar to the following example:
-----BEGIN CERTIFICATE-----
<Intermediate Certificate>
-----END CERTIFICATE-----
-----BEGIN CERTIFICATE-----
<Root CA Certificate>
-----END CERTIFICATE-----

Step 6

Click Submit.

Step 7

In the Navigation pane, choose Public Key Management > Key Rings.

Step 8

In the Work pane, choose Actions > Create Key Ring.

The key ring enables you to manage a private key (imported from external device or internally generated on APIC), a CSR generated by the private key, and the certificate signed via the CSR.

Step 9

In the Create Key Ring dialog box, in the Name field, enter a name.

Step 10

In the Certificate field, do not add any content if you will generate a CSR using the Cisco APIC through the key ring. Alternately, add the signed certificate content if you already have one that was signed by the CA from the previous steps by generating a private key and CSR outside of the Cisco APIC,

Step 11

In the Modulus field, click the radio button for the desired key strength.

Step 12

In the Certificate Authority field, from the drop-down list, choose the certificate authority that you created earlier, then click Submit.

Step 13

In the Private Key field, do not add any content if you will generate a CSR using the Cisco APIC through the key ring. Alternately, add the private key used to generate the CSR for the signed certificate that you entered in step 10.

Note


Do not delete the key ring. Deleting the key ring will automatically delete the associated private key used with CSRs.

If you have not entered the signed certificate and the private key, in the Work pane, in the Key Rings area, the Admin State for the key ring created displays Started, waiting for you to generate a CSR. Proceed to step 14.

If you entered both the signed certificate and the private key, in the Key Rings area, the Admin State for the key ring created displays Completed. Proceed to step 23.

Step 14

In the Navigation pane, choose Public Key Management > Key Rings > key_ring_name.

Step 15

In the Work pane, choose Actions > Create Certificate Request.

Step 16

In the Subject field, enter the common name (CN) of the CSR.

You can enter the fully qualified domain name (FQDN) of the Cisco APICs using a wildcard, but in a modern certificate, we generally recommend that you enter an identifiable name of the certificate and enter the FQDN of all Cisco APICs in the Alternate Subject Name field (also known as the SAN – Subject Alternative Name) because many modern browsers expect the FQDN in the SAN field.

Step 17

In the Alternate Subject Name field, enter the FQDN of all Cisco APICs, such as "DNS:apic1.example.com,DNS:apic2.example.com,DNS:apic3.example.com" or "DNS:*example.com".

Alternatively, if you want SAN to match an IP address, enter the Cisco APICs' IP addresses with the following format:

IP:192.168.2.1

You can use DNS names, IPv4 addresses, or a mixture of both in this field. IPv6 addresses are not supported.

Step 18

Fill in the remaining fields as appropriate.

Note


Check the online help information available in the Create Certificate Request dialog box for a description of the available parameters.

Step 19

Click Submit.

Inside the same key ring, the Associated Certificate Request area is now displayed with the Subject, Alternate Subject Name and other fields you entered in the previous steps along with the new field Request, which contains the content of the CSR that is tied to this key ring. Copy the content from the Request field to submit the content to the same certificate authority that is tied to this key ring for signing.

Step 20

In the Navigation pane, choose Public Key Management > Key Rings > key_ring_name.

Step 21

In the Work pane, in the Certificate field, paste the signed certificate that you received from the certificate authority.

Step 22

Click Submit.

Note


If the CSR was not signed by the Certificate Authority indicated in the key ring, or if the certificate has MS-DOS line endings, an error message is displayed and the certificate is not accepted. Remove the MS-DOS line endings.

The key is verified, and in the Work pane, the Admin State changes to Completed and is now ready for use in the HTTP policy.

Step 23

On the menu bar, choose Fabric > Fabric Policies.

Step 24

In the Navigation pane, choose Pod Policies > Policies > Management Access > default.

Step 25

In the Work pane, in the Admin Key Ring drop-down list, choose the desired key ring.

Step 26

(Optional) For Certificate based authentication, in the Client Certificate TP drop-down list, choose the previously created Local User policy and click Enabled for Client Certificate Authentication state.

Step 27

Click Submit.

All web servers restart. The certificate is activated, and the non-default key ring is associated with HTTPS access.

What to do next

You must remain aware of the expiration date of the certificate and take action before it expires. To preserve the same key pair for the renewed certificate, you must preserve the CSR as it contains the public key that pairs with the private key in the key ring. Before the certificate expires, the same CSR must be resubmitted. Do not delete or create a new key ring as deleting the key ring will delete the private key stored internally on the Cisco APIC.

Authenticating and Maintaining an API Session

Before you can access the API, you must first log in with the name and password of a configured user.

When a login message is accepted, the API returns a data structure that includes a session timeout period in seconds and a token that represents the session. The token is also returned as a cookie in the HTTP response header. To maintain your session, you must send an aaaRefresh message as a POST or GET to the API, as described below, where the message is sent within the session timeout period. The token changes each time that the session is refreshed.


Note


The default session timeout period is 600 seconds or 10 minutes.


These API methods enable you to manage session authentication:

  • aaaLogin —Sent as a POST message, this method logs in a user and opens a session. The message body contains an aaa:User object with the name and password attributes, and the response contains a session token and cookie. If multiple AAA login domains are configured, you must prepend the user's name with apic:domain\\ .

  • aaaRefresh —Sent as a GET message with no message body or as a POST message with the aaaLogin message body, this method resets the session timer. The response contains a new session token and cookie.

  • aaaLogout —Sent as a POST message, this method logs out the user and closes the session. The message body contains an aaa:User object with the name attribute. The response contains an empty data structure.

  • aaaListDomains —Sent as a GET message, this method returns a list of valid AAA login domains. You can send this message without logging in.

You can call the authentication methods using this syntax, specifying either JSON or XML data structures:

{http | https}://host [:port] /api/methodName. {json | xml}

This example shows a user login message that uses a JSON data structure:


POST https://apic-ip-address/api/aaaLogin.json

{
  "aaaUser" : {
    "attributes" : {
      "name" : "georgewa",
      "pwd" : "paSSword1"
    }
  }
}

This example shows part of the response upon a successful login, including the token and the refresh timeout period:


RESPONSE:
{
  "imdata" : [{
      "aaaLogin" : {
        "attributes" : {
          "token" : 
             "GkZl5NLRZJl5+jqChouaZ9CYjgE58W/pMccR+LeXmdO0obG9NB
             Iwo1VBo7+YC1oiJL9mS6I9qh62BkX+Xddhe0JYrTmSG4JcKZ4t3
             bcP2Mxy3VBmgoJjwZ76ZOuf9V9AD6Xl83lyoR4bLBzqbSSU1R2N
             IgUotCGWjZt5JX6CJF0=",
          "refreshTimeoutSeconds" : "300",
          "lastName" : "Washington",
          "firstName" : "George"
        },
        "children" : [{
    ...
[TRUNCATED]
    ...
}

In the preceding example, the refreshTimeoutSeconds attribute indicates that the session timeout period is 300 seconds.

This example shows how to request a list of valid login domains:


GET https://apic-ip-address/api/aaaListDomains.json

RESPONSE:
{
  "imdata": [{
    "name": "ExampleRadius"
  },
  {
    "name": "local",
    "guiBanner": "San Jose Fabric"
  }]
}

In the preceding example, the response data shows two possible login domains, 'ExampleRadius' and 'local.' The following example shows a user login message for the ExampleRadius login domain:


POST https://apic-ip-address/api/aaaLogin.json

{
  "aaaUser" : {
    "attributes" : {
      "name" : "apic:ExampleRadius\\georgewa",
      "pwd" : "paSSword1"
    }
  }
}

Requiring a Challenge Token for an API Session

For stronger API session security, you can require your session to use a challenge token. When you request this feature during login, the API returns a token string that you must include in every subsequent message to the API. Note that this feature is available only for standalone REST API calls and is not available for the browser.

Your API commands and queries must provide the challenge token using one of the following methods:

  • The challenge token is sent as a 'challenge' parameter in the URI of your API message.

  • The challenge token is part of the HTTP or HTTPS header using 'APIC-challenge'.

To initiate a session that requires a challenge token, include the URI parameter statement ?gui-token-request=yes in your login message, as shown in this example:


POST https://192.0.20.123/api/aaaLogin.json?gui-token-request=yes

The response message body contains an attribute of the form "urlToken":"token", where token is a long string of characters representing the challenge token. All subsequent messages to the API during this session must include the challenge token, as shown in this example where it is sent as a 'challenge' URI parameter:


GET https://192.0.20.123/api/class/aaaUser.json?challenge=fa47e44df54562c24fef6601dc...

This example shows how the challenge token is sent as an 'APIC-challenge' field in the HTTP header:


GET //api/class/aaaUser.json
 HTTP/1.1 
 Host: 192.0.20.123 
 Connection: keep-alive 
 Accept: text/html,application/xhtml+xml,application/xml,application/json 
 APIC-challenge: fa47e44df54562c24fef6601dcff72259299a077336aecfc5b012b036797ab0f 
.
.
.

Logging In

You can log in to the APIC REST API by sending a valid username and password in a data structure to the aaaLogin API method, as described in Authenticating and Maintaining an API Session. Following a successful login, you must periodically refresh the session.

The following examples show how to log in as an administrator, refresh the session during configuration, and log out using XML and JSON.


Note


At this time, the aaaLogout method returns a response but does not end a session. Your session ends after a refresh timeout when you stop sending aaaRefresh messages.


Changing Your Own User Credentials

When logged in to APIC, you can change your own user credentials, including your password, SSH key, and X.509 certificate. The following API methods are provided for changing the user credentials of the logged-in user:

  • changeSelfPassword

  • changeSelfSshKey

  • changeSelfX509Cert


Note


Using these methods, you can change the credentials only for the account under which you are logged in.


The message body of each method contains the properties of the object to be modified. The properties are shown in the Cisco APIC Management Information Model Reference.

Changing Your Password

To change your password, send the changeSelfPassword API method, which modifies the aaa:changePassword object. The following object properties are required in the message body:

  • userName — Your login ID.

  • oldPassword — Your current password.

  • newPassword — Your new password.

This example, when sent by User1, changes the password for User1.


POST http://192.0.20.123/api/changeSelfPassword.json

{
  "aaaChangePassword" : {
    "attributes" : {
      "userName" : "User1",
      "oldPassword" : "p@$sw0rd",
      "newPassword" : "dr0ws$@p"
    }
  }
}

A successful operation returns an empty imdata element, as in this example:


{
    "totalCount" : "0",
    "imdata" : []
}

Changing Your SSH Key

To change your SSH key, send the changeSelfSshKey API method, which modifies the aaa:changeSshKey object. The following object properties are required in the message body:

  • userName — Your login ID.

  • name — The symbolic name of the key. APIC supports up to 32 SSH keys for a single user.

  • data — Your new SSH key.

This example, when sent by User1, changes the SSH key for User1.


POST http://192.0.20.123/api/changeSelfSshKey.json

{
  "aaaChangeSshKey" : {
    "attributes" : {
      "userName" : "User1",
      "name" : "A",
      "data" : "ssh-rsa AAAAB3NzaC1yc2EAAAABIwAAAQEAuKxY5E4we6uCR2z== key@example.com"
    }
  }
}

A successful operation returns an empty imdata element.

Changing Your X.509 Certificate

To change your X.509 certificate, send the changeSelfX509Cert API method, which modifies the aaa:changeX509Cert object. The following object properties are required in the message body:

  • userName — Your login ID.

  • name — The symbolic name of the certificate. APIC supports up to 32 X.509 certificates for a single user.

  • data — The entire data body of your new X.509 certificate.

This example, when sent by User1, changes the X.509 certificate for User1.


POST http://192.0.20.123/api/changeSelfX509Cert.json

{
  "aaaChangeX509Cert" : { 
    "attributes" : {
      "userName" : "User1",
      "name" : "A",
      "data" : "-----BEGIN CERTIFICATE-----\nMIIE2TCCA8GgAwIBAgIKamlnsw

[EXAMPLE TRUNCATED]

       1BCIolblPFft6QKoSJFjB6thJksaE5/k3Npf\n-----END CERTIFICATE-----"
    }
  }
}

A successful operation returns an empty imdata element.

Deleting an SSH Key or X.509 Certificate

To delete a key or certificate, send the key or certificate change method with the name of the key or certificate to be deleted and with the data attribute blank.

This example, when sent by User1, deletes the SSH key for User1.


POST http://192.0.20.123/api/changeSelfSshKey.json

{
  "aaaChangeSshKey" : {
    "attributes" : {
      "userName" : "User1",
      "name" : "A",
      "data" : ""
    }
  }
}

A successful operation returns an empty imdata element.

REST API Tools

Management Information Model Reference

The Management Information Model (MIM) contains all of the managed objects in the system and their properties. For details, see the Cisco APIC Management Information Model Reference Guide.

See the following figure for an example of how an administrator can use the MIM to research an object in the MIT in the Cisco APIC 6.0 releases.

Figure 3. MIM Reference for the Cisco APIC 6.0 Releases

Viewing an API Interchange in the GUI

When you perform a task in the APIC graphical user interface (GUI), the GUI creates and sends internal API messages to the operating system to execute the task. By using the API Inspector, which is a built-in tool of the APIC, you can view and copy these API messages. A network administrator can replicate these messages in order to automate key operations, or you can use the messages as examples to develop external applications that will use the API. .

Procedure


Step 1

Log in to the APIC GUI.

Step 2

In the upper right corner of the APIC window, click the "welcome, <name>" message to view the drop-down list.

Step 3

In the drop-down list, choose the Show API Inspector.

The API Inspector opens in a new browser window.

Step 4

In the Filters toolbar of the API Inspector window, choose the types of API log messages to display.

The displayed messages are color-coded according to the selected message types. This table shows the available message types:

Name Description
trace Displays trace messages.
debug Displays debug messages. This type includes most API commands and responses.
info Displays informational messages.
warn Displays warning messages.
error Displays error messages.
fatal Displays fatal messages.
all Checking this checkbox causes all other checkboxes to become checked. Unchecking any other checkbox causes this checkbox to be unchecked.

Step 5

In the Search toolbar, you can search the displayed messages for an exact string or by a regular expression.

This table shows the search controls:

Name Description
Search In this text box, enter a string for a direct search or enter a regular expression for a regex search. As you type, the first matched field in the log list is highlighted.
Reset Click this button to clear the contents of the Search text box.
Regex Check this checkbox to use the contents of the Search text box as a regular expression for a search.
Match case Check this checkbox to make the search case sensitive.
Disable Check this checkbox to disable the search and clear the highlighting of search matches in the log list.
Next Click this button to cause the log list to scroll to the next matched entry. This button appears only when a search is active.
Previous Click this button to cause the log list to scroll to the previous matched entry. This button appears only when a search is active.
Filter Check this checkbox to hide nonmatched lines. This checkbox appears only when a search is active.
Highlight all Check this checkbox to highlight all matched fields. This checkbox appears only when a search is active.

Step 6

In the Options toolbar, you can arrange the displayed messages.

This table shows the available options:

Name Description
Log Check this checkbox to enable logging.
Wrap Check this checkbox to enable wrapping of lines to avoid horizontal scrolling of the log list
Newest at the top Check this checkbox to display log entries in reverse chronological order.
Scroll to latest Check this checkbox to scroll immediately to the latest log entry.
Clear Click this button to clear the log list.
Close Click this button to close the API Inspector.

Example

This example shows two debug messages in the API Inspector window:


13:13:36 DEBUG - method: GET url: http://192.0.20.123/api/class/infraInfra.json 
response: {"imdata":[{"infraInfra":{"attributes":{"instanceId":"0:0","childAction":"",
"dn":"uni/infra","lcOwn":"local","name":"","replTs":"never","status":""}}}]}

13:13:40 DEBUG - method: GET url: http://192.0.20.123/api/class/l3extDomP.json?
query-target=subtree&subscription=yes 
response: {"subscriptionId":"72057598349672459","imdata":[]} 

Testing the API Using Browser Add-Ons

Using a Browser

To test an API request, you can assemble an HTTP message, send it, and inspect the response using a browser add-on utility. RESTful API clients, which are available as add-ons for most popular browsers, provide a user-friendly interface for interacting with the API. Clients include the following:

  • For Firefox/Mozilla—Poster, RESTClient

  • For Chrome—Advanced REST client, Postman

Browser add-ons pass the session token as a cookie so that there is no need to include the token in the payload data structure.

Testing the API with cURL

You can send API messages from a console or a command-line script using cURL, which is a tool for transferring files using URL syntax.

To send a POST message, create a file that contains the JSON or XML command body, and then enter the cURL command in this format:


curl -X POST --data "@<filename>" <URI>

You must specify the name of your descriptor file and the URI of the API operation.


Note


Make sure to include the "@" symbol before the descriptor filename.


This example creates a new tenant named ExampleCorp using the JSON data structure in the file "newtenant.json":


curl -X POST --data "@newtenant.json" https://apic-ip-address/api/mo/uni/tn-ExampleCorp.json

To send a GET message, enter the cURL command in this format:


curl -X GET <URI>

This example reads information about a tenant in JSON format:


curl -X GET https://apic-ip-address/api/mo/uni/tn-ExampleCorp.json


Note


When testing with cURL, you must log in to the API, store the authentication token, and include the token in subsequent API operations.

Cisco APIC Python SDK

The Python API provides a Python programming interface to the underlying REST API, allowing you to develop your own applications to control the Cisco Application Policy Infrastructure Controller (APIC) and the network fabric, enabling greater flexibility in infrastructure automation, management, monitoring and programmability.

The Cobra SDK supports Python version 2.7 and later 2.x versions, and 3.6 and later 3.x versions.

For more information, see Cisco APIC Python SDK Documentation, Installing the Cisco APIC Python SDK and http://www.python-requests.org.

Using the Managed Object Browser (Visore)

The Managed Object Browser, or Visore, is a utility built into the APIC that provides a graphical view of the managed objects (MOs) using a browser. The Visore utility uses the APIC REST API query methods to browse MOs active in the Application Centric Infrastructure fabric, allowing you to see the query that was used to obtain the information. The Visore utility cannot be used to perform configuration operations.


Note


Only the Firefox, Chrome, and Safari browsers are supported for Visore access.


Visore Browser Page

Filter Area

The filter form is case sensitive. This area supports all simple APIC REST API query operations.

Name Description

Class or DN field

Object class name or fully distinguished name of a managed object.

Property field

The property of the managed object on which you want to filter the results. If you leave the Property field empty, the search returns all instances of the specific class.

Op drop-down list

Operator for the values of the property on which you want to filter the results. The following are valid operators:

  • == (equal to)

  • != (not equal to)

  • < (less than)

  • > (greater than)

  • (less than or equal to)

  • (greater than or equal to)

  • between

  • wildcard

  • anybit

  • allbits

Val1 field

The first value for the property on which you want to filter.

Val2 field

The second value on which you want to filter.

Display XML of Last Query Link

The Display XML of last query link displays the full APIC REST API translation of the most recent query run in Visore.

Results Area

You can bookmark any query results page in your browser to view the results again because the query is encoded in the URL.


Note


Many of the managed objects are only used internally and are not generally applicable to APIC REST API program development.


Name Description

Pink background

Separates individual managed object instances and displays the class name of the object below it.

Blue or green background

Indicates the property names of the managed object.

Yellow or beige background

Indicates the value of a property name.

dn property

Absolute address of each managed object in the object model.

dn link

When clicked, displays all managed objects with that dn.

Class name link

When clicked, displays all managed objects of that class.

Left arrow

When clicked, takes you to the parent object of the managed object.

Right arrow

When clicked, takes you to the child objects of the managed object.

Question mark

Links you to the XML API documentation for the managed object.

Accessing Visore

Procedure


Step 1

Open a supported browser and enter the URL of the APIC followed by /visore.html.

Example:


https://apic-ip-address/visore.html

Step 2

When prompted, log in using the same credentials you would use to log in to the APIC CLI or GUI user interfaces.

You can use a read-only account.


Running a Query in Visore

Procedure


Step 1

Enter a class or DN name of the MO in the Class or DN text box.

Step 2

(Optional) You can filter the query by entering a property of the MO in the Property text box, an operator in the Op text box, and one or two values in the Val1 and Val2 text boxes.

Step 3

Click Run Query.

Visore sends a query to the APIC and the requested MO is displayed in a tabular format.

Step 4

(Optional) Click the Display URI of last query link to display the API call that executed the query.

Step 5

(Optional) Click the Display last response link to display the API response data structure from the query.

Step 6

(Optional) In the dn field of the MO description table, click the < and > icons to retrieve the parent and child classes of the displayed MO.

Clicking > sends a query to the APIC for the children of the MO. Clicking < sends a query for the parent of the MO.

Step 7

(Optional) In the dn field of the MO description table, click the additional icons to display statistics, faults, or health information for the MO.