Breakout Tool

Breakout Tool Overview

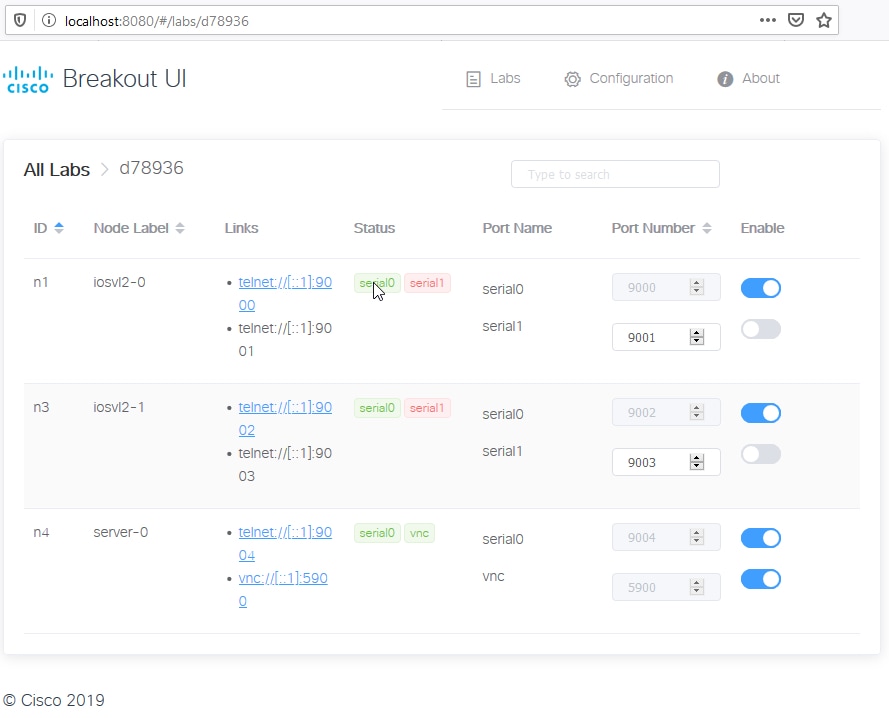
The Breakout Tool gives you local access to consoles and graphical interfaces of VMs running in a remote lab. The telnet protocol is used for console access, and VNC protocol is used for graphics-capable VMs. The Breakout Tool is a single executable file that you run on the command line. It provides a kind of proxy connection from the local machine, where the tool has been configured and started, to the nodes in the lab simulation. Once you install it, you can configure the Breakout Tool using a web interface that is accessible via the localhost (i.e. 127.0.0.1or [::1]) or loopback address on port 8080 by default. The port and listen address and the CML server's URL can be configured via command line options or the tool's configuration file (config.yaml). Using the Breakout Tool, you can use your favorite terminal emulator app to connect to your nodes' consoles on configurable local ports.

Installing the Breakout Tool

Procedure


Step 1

Log into the CML server UI.

Step 2

On the Lab Manager page, click Tools > Breakout Tool.

Step 3

The Breakout page will open in a new window. The page includes instructions for using the Breakout Tool.

Step 4

Scroll to the bottom of page. There is a list of links to breakout executable binaries for a variety of platforms.

Step 5

Click on the appropriate breakout executable file for your local computer's operating system to download the file.

Step 6

Save the breakout binary to its own folder. The Breakout Tool will generate configuration and labs files to this folder.

Step 7

(macOS and Linux) Open a terminal application.

On macOS and Linux operating systems, you must make the binary executable before you can run it.

Step 8

(macOS and Linux) Change directory to the Breakout Tool's location: cd /path/to/breakout_tool

Step 9

(macOS and Linux) Change permissions to set the execution bit: chmod u+x breakout-platform-x86_amd64


You have downloaded and installed the Breakout Tool and are ready to run it on your local machine.

What to do next

You must configure the Breakout Tool before you can start using it with your labs.

Breakout Tool Command Line Interface

The Breakout Tool is provided as a single executable file. While the executable file has a platform-specific name, such as breakout-windows-x86_amd64.exe, this command reference refers to it as breakout. Open a local terminal or command prompt to run breakout on the command line: you must specify a command and may optionally provide one or more option flags.

breakout [flags] COMMAND

Command

Description

config

Creates a default configuration file.

init

Retrieves lab information from the CML server. When a lab ID or unique lab name is provided as a second argument, the Breakout Tool will only retrieve the information for the specified lab and enable it by default.

run

Runs the tool, reading all configuration information from config files, CLI flags, and environment variables.

ui

Runs the tool with a web interface for both configuring the tool and enabling connections.

Option Flag

Option Argument

Description

-noverify

N/A

Overrides the verify setting in the configuration. When specified, breakout does not verify the TLS certificates.
-listen ipaddress The address overrides the listen address. This option can be used to specify, e.g. -listen 127.0.0.1, that breakout should listen on the localhost IPv4 address instead of the IPv6 in the default configuration.
-labs filename Specifies the name of the lab configuration file to use (default: labs.yaml).
-config filename Specifies the name of the global configuration file to use (default: config.yaml).
-extralf N/A Sends an extra LF when serial line is opened.
-port num Specifies the local port number to listen on for UI mode (default: 8080).

Breakout Tool Configuration Settings

Other than the controller address, username, and password, the following settings for the Breakout Tool may not be empty, but for most applications you may simply use the default values. The Breakout Tool's config command and the Breakout UI can both write a default config.yaml with default configuration values for these settings.

Setting

Description

Controller Address

The URL for the CML server.

Username

The CML application user; normally, this setting is just the owner of the lab.

Password

The application password for the specified user.

Console Start Port Connections to console ports will be enumerated starting with the specified port number.
VNC Start Port Connections to VNC consoles will be enumerated starting with the specified port number.
Listen Address Local IP address or interface used by the Breakout UI web interface when it is run with the Breakout Tool's ui command.
UI Server Port The local TCP port used by the Breakout UI web interface when it is run with the Breakout Tool's ui command.
Labs Filename The Breakout UI uses the Labs Filename (labs.yaml) to save the settings for all running labs from the CML server. This file is not the same as the individual lab topology files shown in the Lab Manager. Settings for all running labs and running (default) nodes will be written to this file when you click Save labs to local disk in the Breakout UI.

Configuring the Breakout Tool

The Breakout Tool may be run entirely from the command line, specifying all settings using the tool's command line options. For most users, we recommend that you configure the Breakout Tool with the provided web interface. The following section describes how to configure the tool for the first time and save all settings for future use.

Before you begin

The Breakout Tool is already installed on the local machine. You have opened a local terminal application to the Breakout Tool's installation directory.

Procedure


Step 1

In the Lab Manager or the Workbench, start one or more labs.

Step 2

Run the Breakout Tool and specify the ui command.

Example:

The exact command will depend on your platform. For example, on Windows, it would be:
breakout-windows-x86_amd64 ui
On Mac OS X, it would be:
./breakout-macos-x86_amd64 ui
Step 3

Wait until the Breakout Tool's web UI is ready and the command outputs a message indicating that it is running and "serving UI/API".

On first launch, the tool will try to connect to an unspecified host, and you must wait until the connection times out.

Example:

Figure 1. CLI output that indicates the Breakout Tool's web UI is ready

Screenshot: CLI output that indicates the Breakout Tool's web UI is ready
Step 4

With web UI running, open a supported web browser and navigate to the Breakout Tool's configuration page, http://localhost:8080 by default.

The Breakout UI will be shown in the browser.
Step 5

Click Configuration at the top of the Breakout UI.

Step 6

Enter the IP Address or hostname of your CML installation in the Controller Address field.

Step 7

Enter the username and password that you use to log into the CML web interface in the Username and Password fields.

The Breakout Tool will only have access to simulations that the specified username can access. On a multi-user system, if you want to connect to a particular lab simulation, be sure to use the credentials of a user who can see that lab in the Lab Manager.
Step 8

Click the Save button.

The configuration settings are saved to the config.yaml file in the Breakout Tool's installation directory.
Step 9

Click Labs at the top of the Breakout UI.

Step 10

After changing the configuration, you may need to click the Refresh button at the top of the All Labs page to refresh the list of labs.

Example:

Figure 2. Breakout UI's All Labs page

Screenshot: Breakout UI's All Labs page
All running labs are displayed on the Labs page of the Breakout UI.

Since the Breakout Tool's configuration settings are stored to the config.yaml file, they will be used the next time you run the Breakout UI. You shouldn't have to provide the controller address or user credentials on the Configuration page of the Breakout UI in the future unless those values change.

What to do next

You're now ready to use the Breakout Tool to connect to nodes in your simulation.

Using the Breakout Tool

Before you begin

With one or more lab simulations running on the CML server, start the Breakout UI locally, using the configured settings from the config.yaml file. See Configuring the Breakout Tool.

Procedure


Step 1

Open the Breakout UI in a supported web browser.

Example:

Figure 3. Breakout UI's All Labs page

Screenshot: Breakout UI's All Labs page
The Breakout UI shows your list of running labs in the Labs page.
Step 2

Click on a lab in the All Labs list to view the available serial and VNC ports for the nodes in that lab simulation.

Example:

Figure 4. The Breakout UI's page for a specific lab

Screenshot: the Breakout UI's page for a specific lab
Step 3

Optional: You may click the Enable slider to enable or disable specific node and port name connections.

The Breakout Tool will only provide local access to enabled nodes and port names. Enabled serial and VNC connections will be displayed in green under the Status column.

Step 4

Optional: You may set the local port number for specific node and port name combinations. To change the port number, you may need to click the Enable slider to disable that connection first.

Step 5

To open an enabled telnet or VNC connection, click on the link in the Links column. Alternatively, you may simply start a local terminal emulator application or VNC client and then connect to localhost on the specified port number.

For the links to function as expected, you must configure a telnet:// and vnc:// connection handler in your web browser.