System Settings

Logging into the System Administration Cockpit

Use the system administrator account to log into the System Administration Cockpit. While it is possible to view system settings in the System Administration Cockpit, making changes is considered a privileged task. To make system changes, be sure to login with elevated write access permissions.

Procedure


Step 1

Open a web browser, and visit the System Administration Cockpit page for the system.

By default, the System Administration Cockpit page is at port 9090 on the same hostname or IP address as your CML server, for example https://nnn.nnn.nnn.nnn:9090.

Step 2

Before you log into the System Administration Cockpit, make sure to check the Reuse my password for privileged tasks check box, as shown in this screenshot.

Example:

Figure 1. The login page for the System Administration Cockpit

Screenshot: the Reuse my password for privileged tasks option on the login page
Step 3

After you log into the System Administration Cockpit, you can verify that your current session has elevated privileges by looking for the Privileged indicator at the top of the page.

Example:
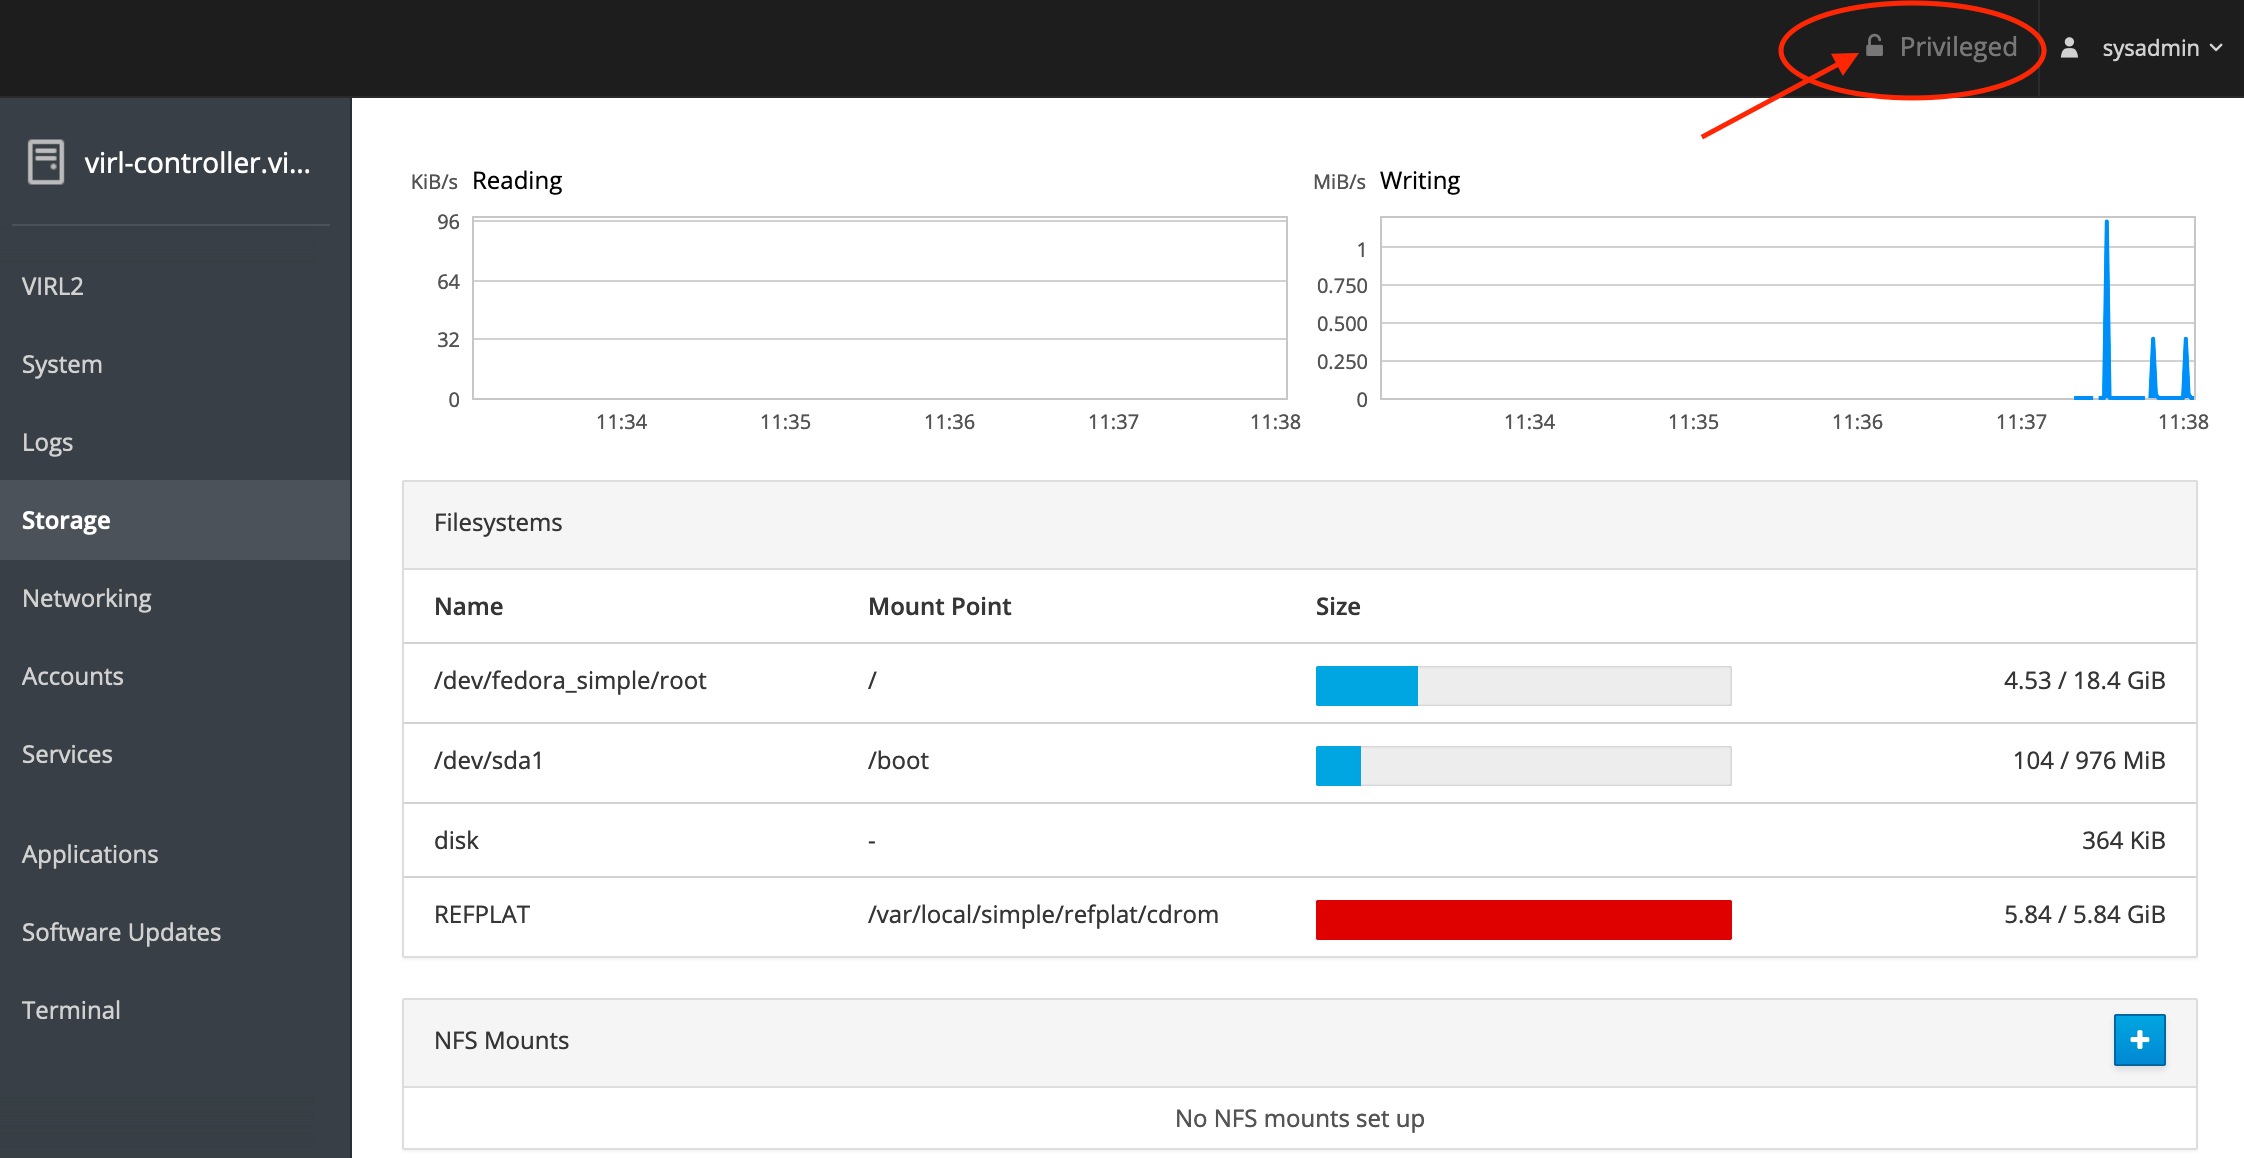
Figure 2. Privileged indicator for current login

Screenshot: Privileged indicator for current login

Landing Page

The landing page of the System Administration Cockpit provides access to system logs and services tasks. It allows the administrator to reset the system back to its defaults.


Caution

The Factory Defaults button is destructive and will destroy all user data on the server.


Caution

The System Administration Cockpit contains settings and actions to manage and maintain the Linux operating system. These settings and actions may have an adverse effect on the CML application, making it unstable or inaccessible. Updating the Linux Operating System (OS) or installing new packages is not supported and is done at your own risk. Only perform these actions with the guidance of Cisco Technical Support or the Cisco Technical Assistance Center (TAC).


CML Server Tab

Component

Functions

Supported Actions

CML2 Various maintenance functions. Before performing any maintenance action, make sure to back-up your data.
  • Log File Download: Log collection

  • Restart Services: All labs must be stopped prior to performing this action.

  • Restart Controller Services: All labs must be stopped prior to performing this action.

  • Clean up: (DESTRUCTIVE) Removes all running simulations and associated data and restarts the CML services.

  • Factory Reset: (DESTRUCTIVE) Removes all user-defined information and server settings and creates a system-defined default user.

  • Controller Software Upgrade: After the application RPM file has been uploaded, installation is performed here.

System

Displays server performance and load in real time via live charts for:

  • CPU

  • Memory (including swap)

  • Disk IO

  • Network Traffic

  • Hostname: User-specified hostname

  • Power Options: Start/Stop or Restart CML server

  • Domain: Not supported

  • System Time: Automatic (default) or manually specify NTP server

Logs Displays system logging information in real time

Filter:

  • Date (last 7 days max.)

  • Severity

Storage

Displays local storage information:

  • IO Statistics

  • Mounted volumes and disks

  • Storage logs

  • RAID

  • Volume Groups

  • iSCSI (not supported)

  • Disk Drive summary information

  • Other devices ()

See Adding or Editing Storage Volumes for details.

  • Add Volume Group

  • Expand disk space

Networking Displays rx and tx (receive and transmit) real-time metrics, firewall rules, interface(s) details, and networking-specific logs.
  • Modify the IP address and other network settings.

    Caution 
    Making changes to the network settings can leave your system inaccessible. For example, creating a bonding interface, adding a bridge interface, or adding VLAN information to any of the interfaces is not supported.
Accounts Displays user and admin accounts for System Administration access. The accounts created here do not correlate to application user accounts for CML HTML5 UI.
  • Create New Account: creates additional accounts for System Administration access only. Accounts created here cannot be used for Lab Manager login.

Services Displays all system services information, including their IDs and current state. N/A
Applications Displays currently-installed applications. No applications are installed by default. NONE
Diagnostics Reports N/A NONE
Kernel Dump N/A NONE
SELinux

Enable or disable SELinux security rules. Enabled by default.

NONE
Software Updates Displays all available host system updates. Updates listed here are NOT part of the CML server, and you should only apply updates when instructed by Cisco Technical Support. NONE
Terminal

Provides direct console access to the CML server.

Caution 
This terminal is provided for troubleshooting purposes only and should not be used to make system changes without the guidance of Cisco Technical Support.

Storage Administration

Adding or Editing Storage Volumes

Increasing HDD space on the CML virtual machine is simple and may be done while the system is running; however, a reboot will be required for the newly added space to be recognized. If a simulation is running, changes to the storage volumes may disrupt the simulation nodes. We recommend stopping all simulations prior to provisioning additional disk space. We also recommend powering down the CML virtual machine when provisioning additional space or adding an additional hard disk.

Method 1 - Adding a Second Virtual Disk (.vmdk)

Before you begin

Adding a second virtual disk (.vmdk) requires that a new virtual device (HDD) has already been added to the CML server by editing the virtual machine's settings using an ESXi web interface (vSphere, vCenter, etc.).

To avoid disrupting network simulations, stop all simulations prior to adding a second virtual disk.

Procedure


Step 1

Log into the System Administration Cockpit as the system administrator account. See Logging into the System Administration Cockpit.

Step 2

Click Storage in the navigation bar on the left side of the page.

Step 3

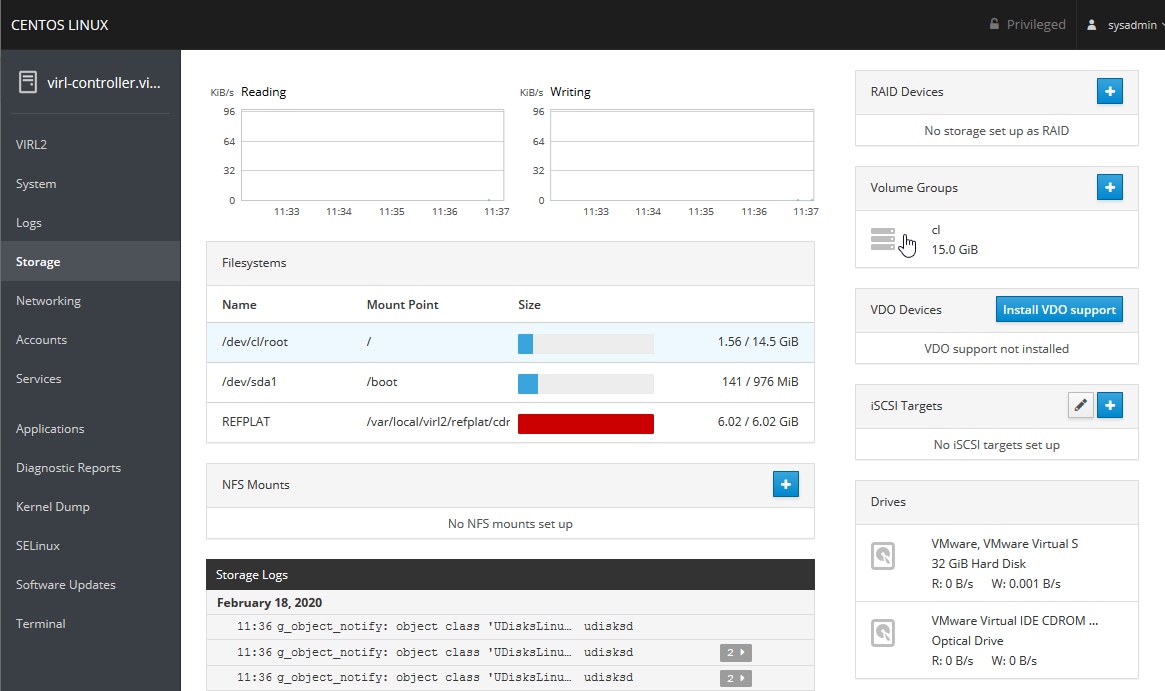
Edit Volume Group. In the Volume Groups box, click the cl volume.

Example:

Figure 3. Selecting the volume group on the Storage page

Screenshot: selecting the volume group on the Storage page
Step 4

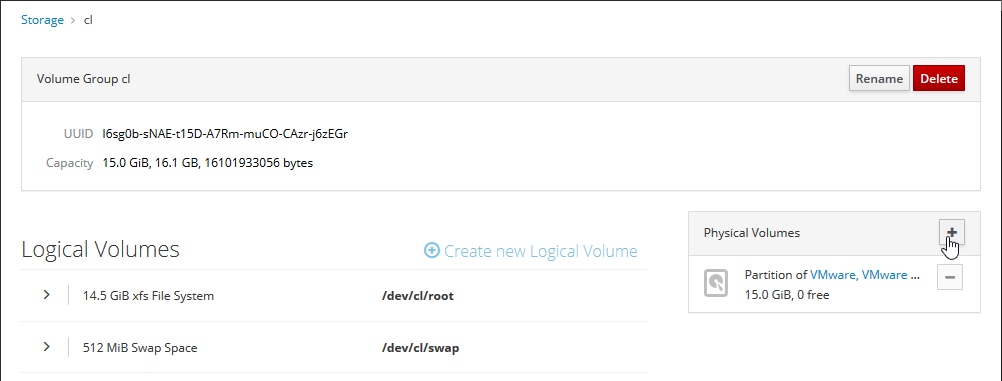
Add Physical Volume. In the Physical Volumes box, click the + button to add a new virtual hard disk.

Example:

Figure 4. Adding a physical volume to the cl volume group

Screenshot: adding a physical volume to the cl volume group
Step 5

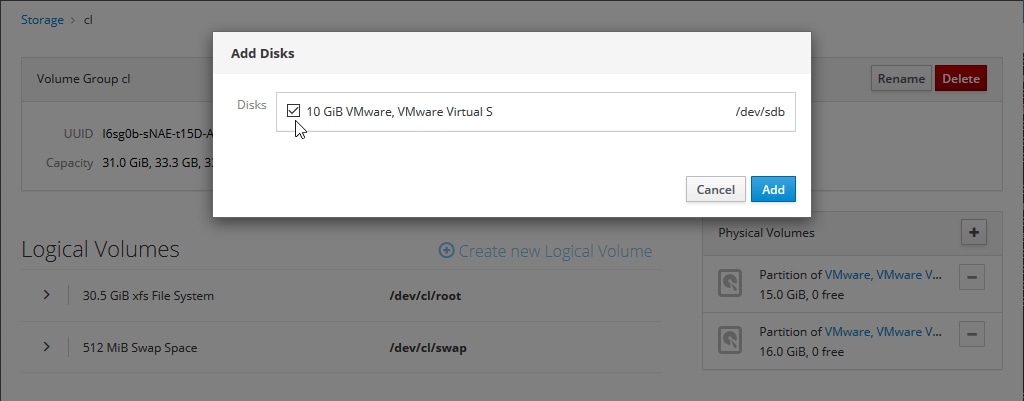
Select Disk. Select the new virtual disk and click Add. Note: the new disk will be marked as /dev/sdb or higher.

Example:

Figure 5. Add Disks dialog

Screenshot: Add Disks dialog
Step 6

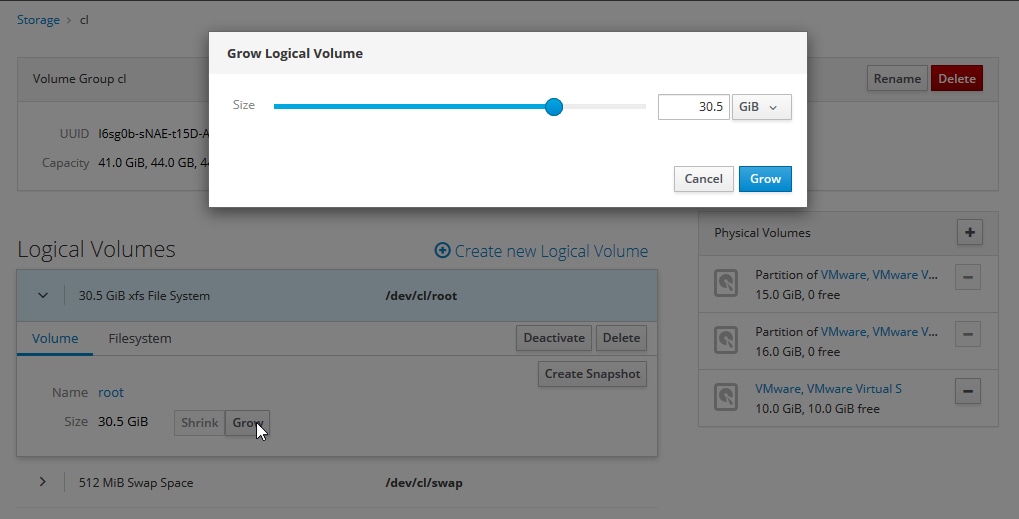
Grow Logical Volume. Expand the Logical Volumes area and click Grow.

The Grow Logical Volume pop-up dialog is shown.
Step 7

Grow Logical Volume Dialog. Use the slider to increase the disk size to the desired amount; then click the Grow button in the dialog.

Example:

Figure 6. Grow Logical Volume dialog

Screenshot: Grow Logical Volume dialog

The Logical Volumes area should now report the new total size. The new disk size is also shown in the Lab Manager.

Method 2 - Expanding the Existing Virtual Disk


Note

A virtual machine's hard disk cannot be expanded (edited) when the VM contains a snapshot. The snapshot must be deleted in VMware before expanding the existing virtual disk. Alternatively, you may follow Method 1 - Adding a Second Virtual Disk (.vmdk) to add a new "physical" disk.

Before you begin

This method requires that the existing virtual disk (HDD) size has already been edited (expanded) using the CML server's virtual machine settings.

Procedure


Step 1

Log into the System Administration Cockpit as the system administrator account. See Logging into the System Administration Cockpit.

Step 2

Click Storage in the navigation bar on the left side of the page.

Step 3

Edit Volume Group. Click cl volume group shown in the Volume Groups box.

Example:

Figure 7. Selecting the volume group on the Storage page

Screenshot: selecting the volume group on the Storage page
Step 4

Add Physical Volume. In the Physical Volumes box, click the + button to add the new virtual hard disk.

Example:

Figure 8. Grow Logical Volume dialog

Screenshot: Grow Logical Volume dialog
Step 5

Select Disk. Select the new unpartitioned space and click Add. Note: disk will be marked as /dev/sda.

Example:

Figure 9. Add Disks dialog

Screenshot: Add Disks dialog
Step 6

Set the size of the logical volume by skipping to step 6 in the adding a virtual disk instructions. See Method 1 - Adding a Second Virtual Disk (.vmdk)


The Logical Volumes area should now report the new total size. The new disk size is also shown in the Lab Manager.

System Upgrade

Upgrading the CML server application begins with uploading the upgrade RPM file via Tools > Upgrade System on the Lab Manager page. Once the RPM has been uploaded, completing the upgrade is performed in the System Administration Cockpit.

Procedure


Step 1

From the Lab Manager, select Tools > System Upgrade.

Step 2

Click Browse, and select the appropriate upgrade RPM file.

Step 3

Click on the link to open the System Administration Cockpit and log in as the system administrator account. See Logging into the System Administration Cockpit.

Step 4

Click Controller Software Upgrade to expand that section.

Step 5

Click Upgrade Controller to start the upgrade process.


The upgrade process starts. The CML controller application will be stopped before the software upgrade begins. The upgrade progress is displayed in the Output section. The controller will reboot upon successful completion of the upgrade.