Implement Disaster Recovery

Overview

Disaster recovery adds another layer of redundancy to safeguard against network downtime. It responds to a cluster failure by handing off network management duties to a connected cluster (referred to as a site going forward). Cisco DNA Center's disaster recovery implementation consists of three components: the main site, the recovery site, and the witness site. At any given time, the main and recovery sites are operating in either the active or standby role. The active site manages your network while the standby site maintains a continuously updated copy of the active site's data and managed services. Whenever an active site goes down, Cisco DNA Center automatically initiates a failover, completing the tasks necessary to designate the former standby site as the new active site.

Refer to the topics in this chapter for a description of how to set up and use disaster recovery in your production environment.

Key Terms

The following terms are key for understanding Cisco DNA Center's disaster recovery implementation:

  • Main site: The first site you configure when setting up your disaster recovery system. By default, it operates as the active site that manages your network. For information on how to configure the sites in your system, see Configure Disaster Recovery.

  • Recovery site: The second site you configure when setting up your disaster recovery system. By default, it acts as your system's standby site.

  • Witness site: The third site you configure when setting up your disaster recovery system. This site, which resides on a virtual machine or separate server, is not involved with the replication of data or managed services. Its role is to give the current active site the quorum it needs to carry out disaster recovery tasks. In the event that a site fails, this prevents the split brain scenario from taking place. This scenario can occur in a two-member system when the sites cannot communicate with each other. Each site believes that it should become active, creating two active sites. Cisco DNA Center uses the witness site to arbitrate between the active and standby sites, allowing only one active site at any given time. For a description of witness site requirements, see Prerequisites.

  • Register: To add a site to a disaster recovery system, you must first register it with the system by providing information such as your main site's VIP. When registering your recovery or witness site, you will also need to provide the token that is generated when you register your main site. For more information, see Configure Disaster Recovery.

  • Configure Active: The process of establishing a site as the active site, which involves tasks such as exposing the appropriate managed service ports.

  • Active site: The site that is currently managing your network. Cisco DNA Center continuously replicates its data to your standby site.

  • Configure Standby: The process of establishing a site as the standby site, which involves tasks such as configuring the replication of the active site's data and disabling the services which manage the network on the standby site.

  • Standby Ready: When an isolated site meets the prerequisites to become a standby site, Cisco DNA Center moves it to this state. To establish this site as your system's standby site, click Rejoin in the Action area.

  • Standby site: The site that maintains an up-to-date copy of your active site's data and managed services. In the event that your active site goes down, your system initiates a failover and your standby site takes over as the active site.


    Note

    After a failover, Assurance restarts and processes a fresh set of data on the new active site. Historical Assurance data from the former active site is not migrated over.


  • Failover: Cisco DNA Center supports two types of failover:

    • System-triggered: As soon as Cisco DNA Center recognizes that your active site has gone down, it automatically carries out the tasks required to establish your standby site as the new active site. You can monitor these tasks from the Event Timeline.

    • Manual: You can initiate a manual failover to designate the current standby site as the new active site. For more information, see Initiate a Manual Failover.

  • Isolate: During a failover, the former active site is separated from the disaster recovery system. Cisco DNA Center suspends its services and stops advertising its virtual IP address (VIP). From here, Cisco DNA Center completes the tasks necessary to establish the former standby site as the new active site.

  • Pause: Temporarily suspend your disaster recovery system in order to separate the sites that make up your system and stop data and service replication. For more information, see Pause Your Disaster Recovery System.

  • Rejoin: From the Disaster Recovery > Monitoring tab, click this button in the Action area in order to add a Standby Ready or Paused site back into a disaster recovery system as the new standby site (after a failover has taken place). You would also click this button in order to restart a disaster recovery system that is currently paused.

  • Activate DR: User-initiated operation that creates your system's active and standby sites. This operation entails setting up intracluster communication, verifying that the sites meet disaster recovery prerequisites, and replicating data between the two sites.

  • Deregister: Click this button in the Action area to remove the three sites you have configured for your disaster recovery system. You must do so in order to make changes to any of the site settings you have entered previously.

  • Retry: In the Action area, click this button in order to reinitiate any action that failed previously.

Data Replication Overview

The data replication process syncs data between your disaster recovery system’s main site and recovery site. Its duration will depend on a few factors: the amount of data that needs to be replicated, your network’s effective bandwidth, and the amount of latency that exists between the main and recovery sites. When disaster recovery is active for your Cisco DNA Center deployment, data replication will not impact any operations or application use on the current active site (which is managing your network).

Either a full or incremental replication of data takes place, depending on which of the following scenarios is applicable:

  • After initial activation: After the initial configuration and activation of your disaster recovery system, the recovery site does not have any data. In this scenario, a full replication of data between the main and recovery sites happens.

  • After a failover: Whenever the current active site fails, the disaster recovery system triggers a failover. In this scenario, a full data replication between the main and recovery sites occurs after the failed site rejoins the system.

  • During normal operation: This is the scenario that will typically apply to your system. During its day-to-day operation, changes that take place on the current active site are continuously synced with the current standby site.

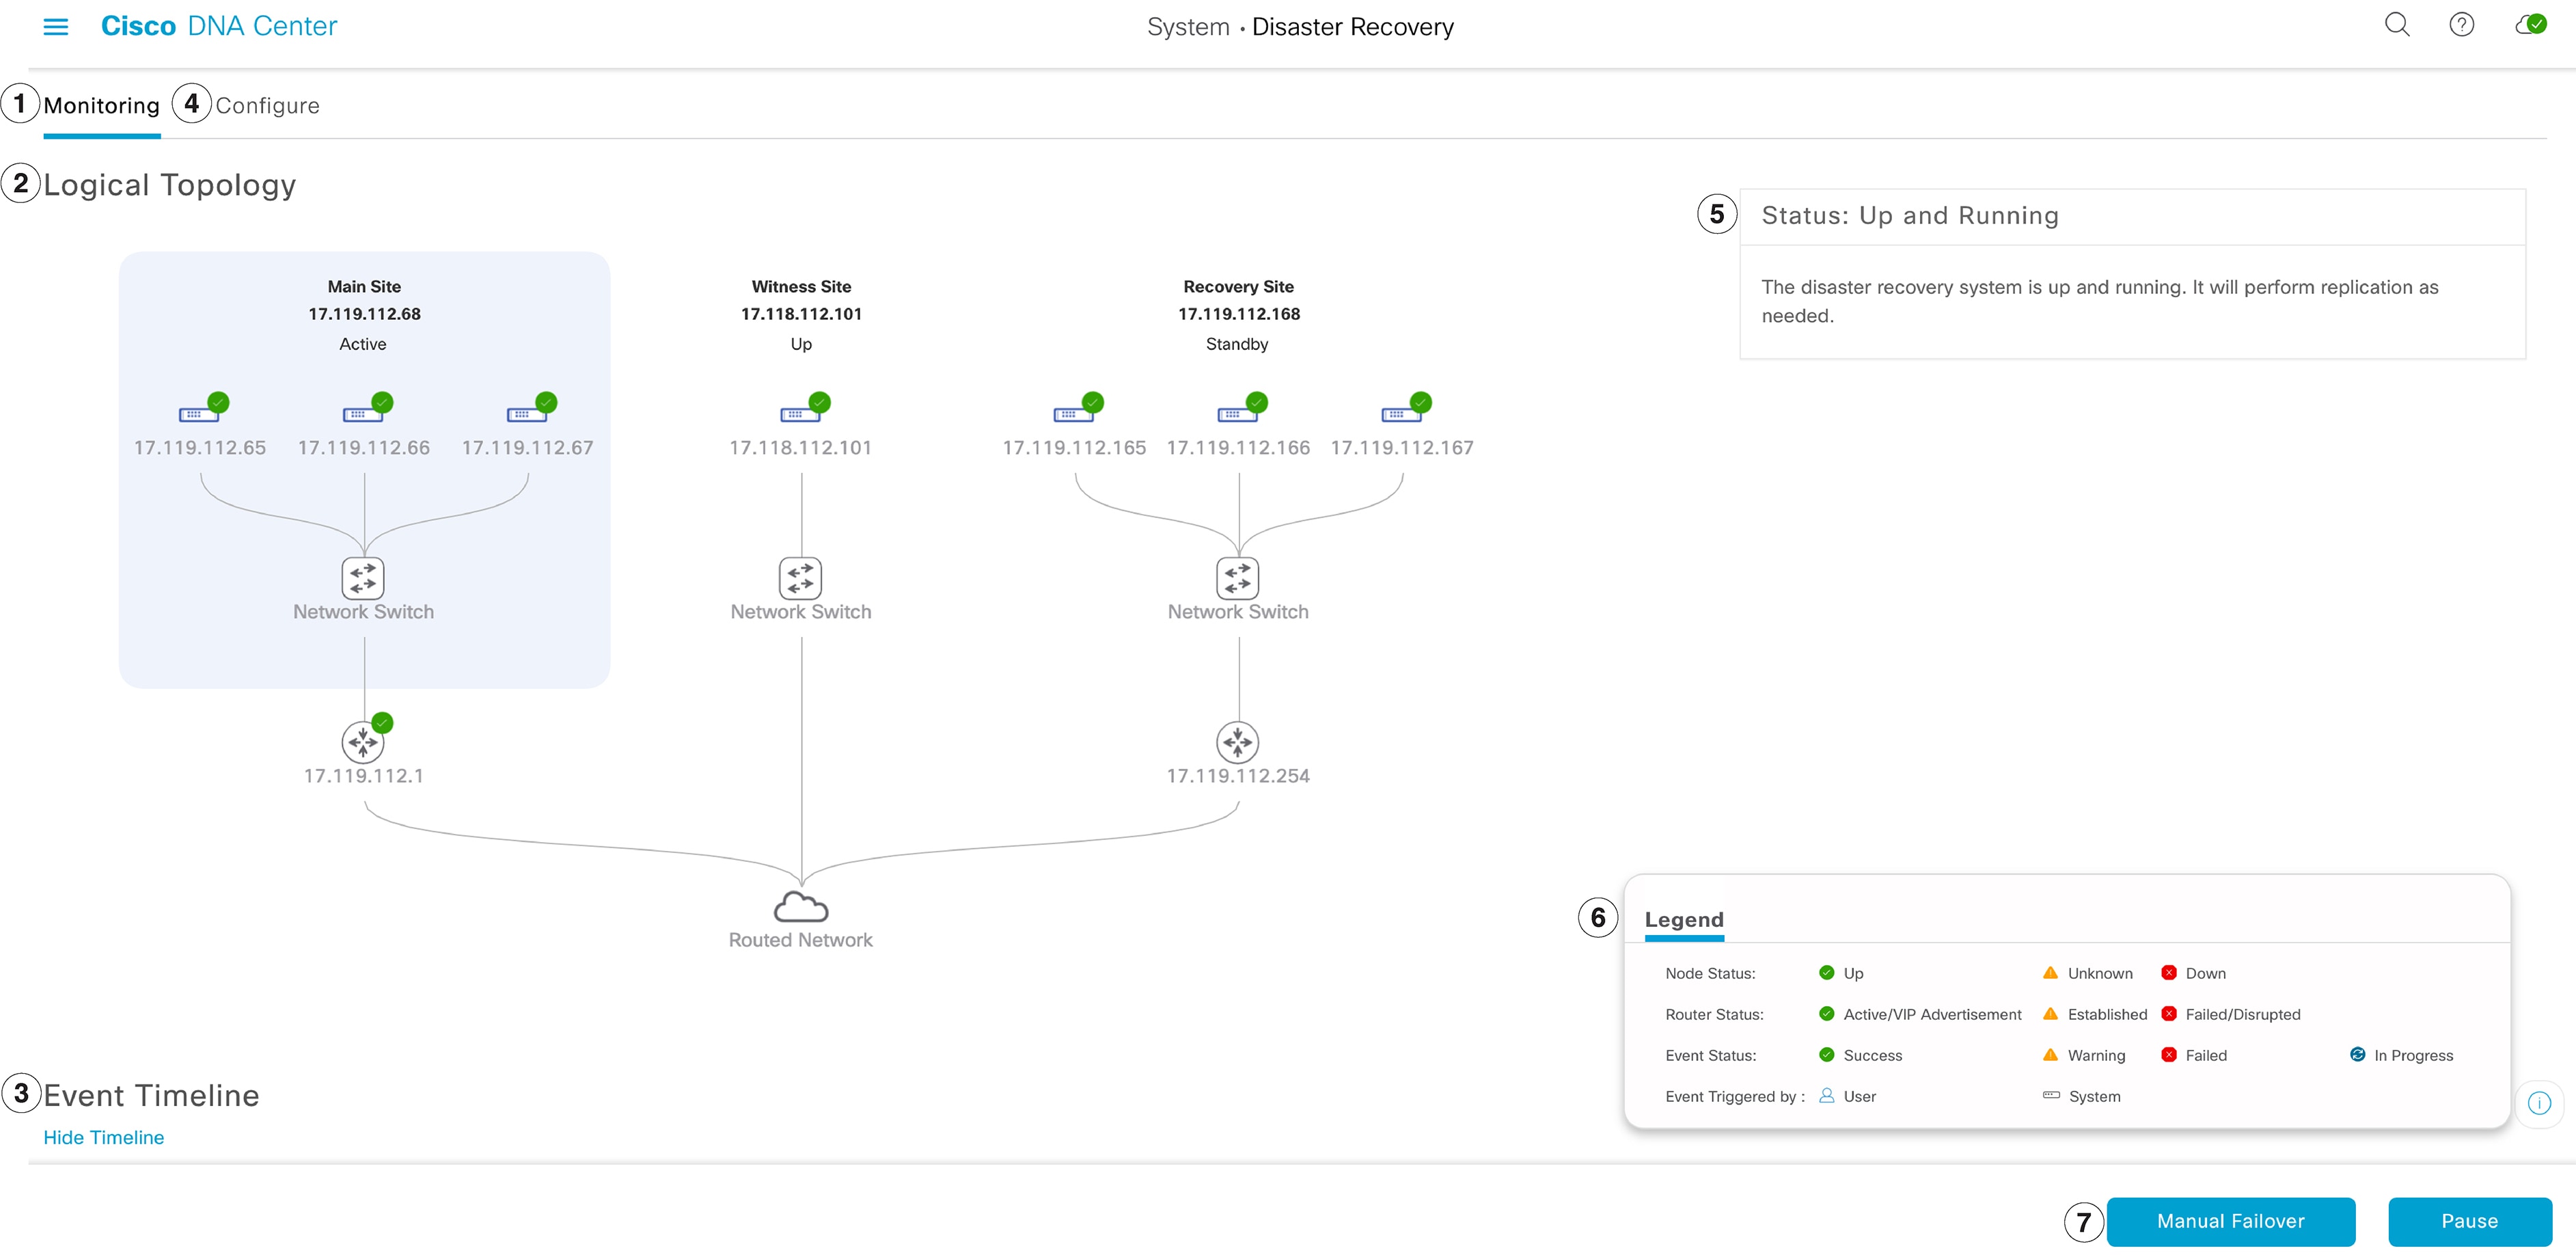
Navigate the Disaster Recovery GUI

The following table describes the components that make up Cisco DNA Center's disaster recovery GUI and their function.

Callout

Description

1

Monitoring tab: Click to do the following:

  • View a topology of the sites that make up your system.

  • Determine the current status of your system.

  • Perform disaster recovery tasks.

  • View a listing of the tasks that have been completed to date.

2

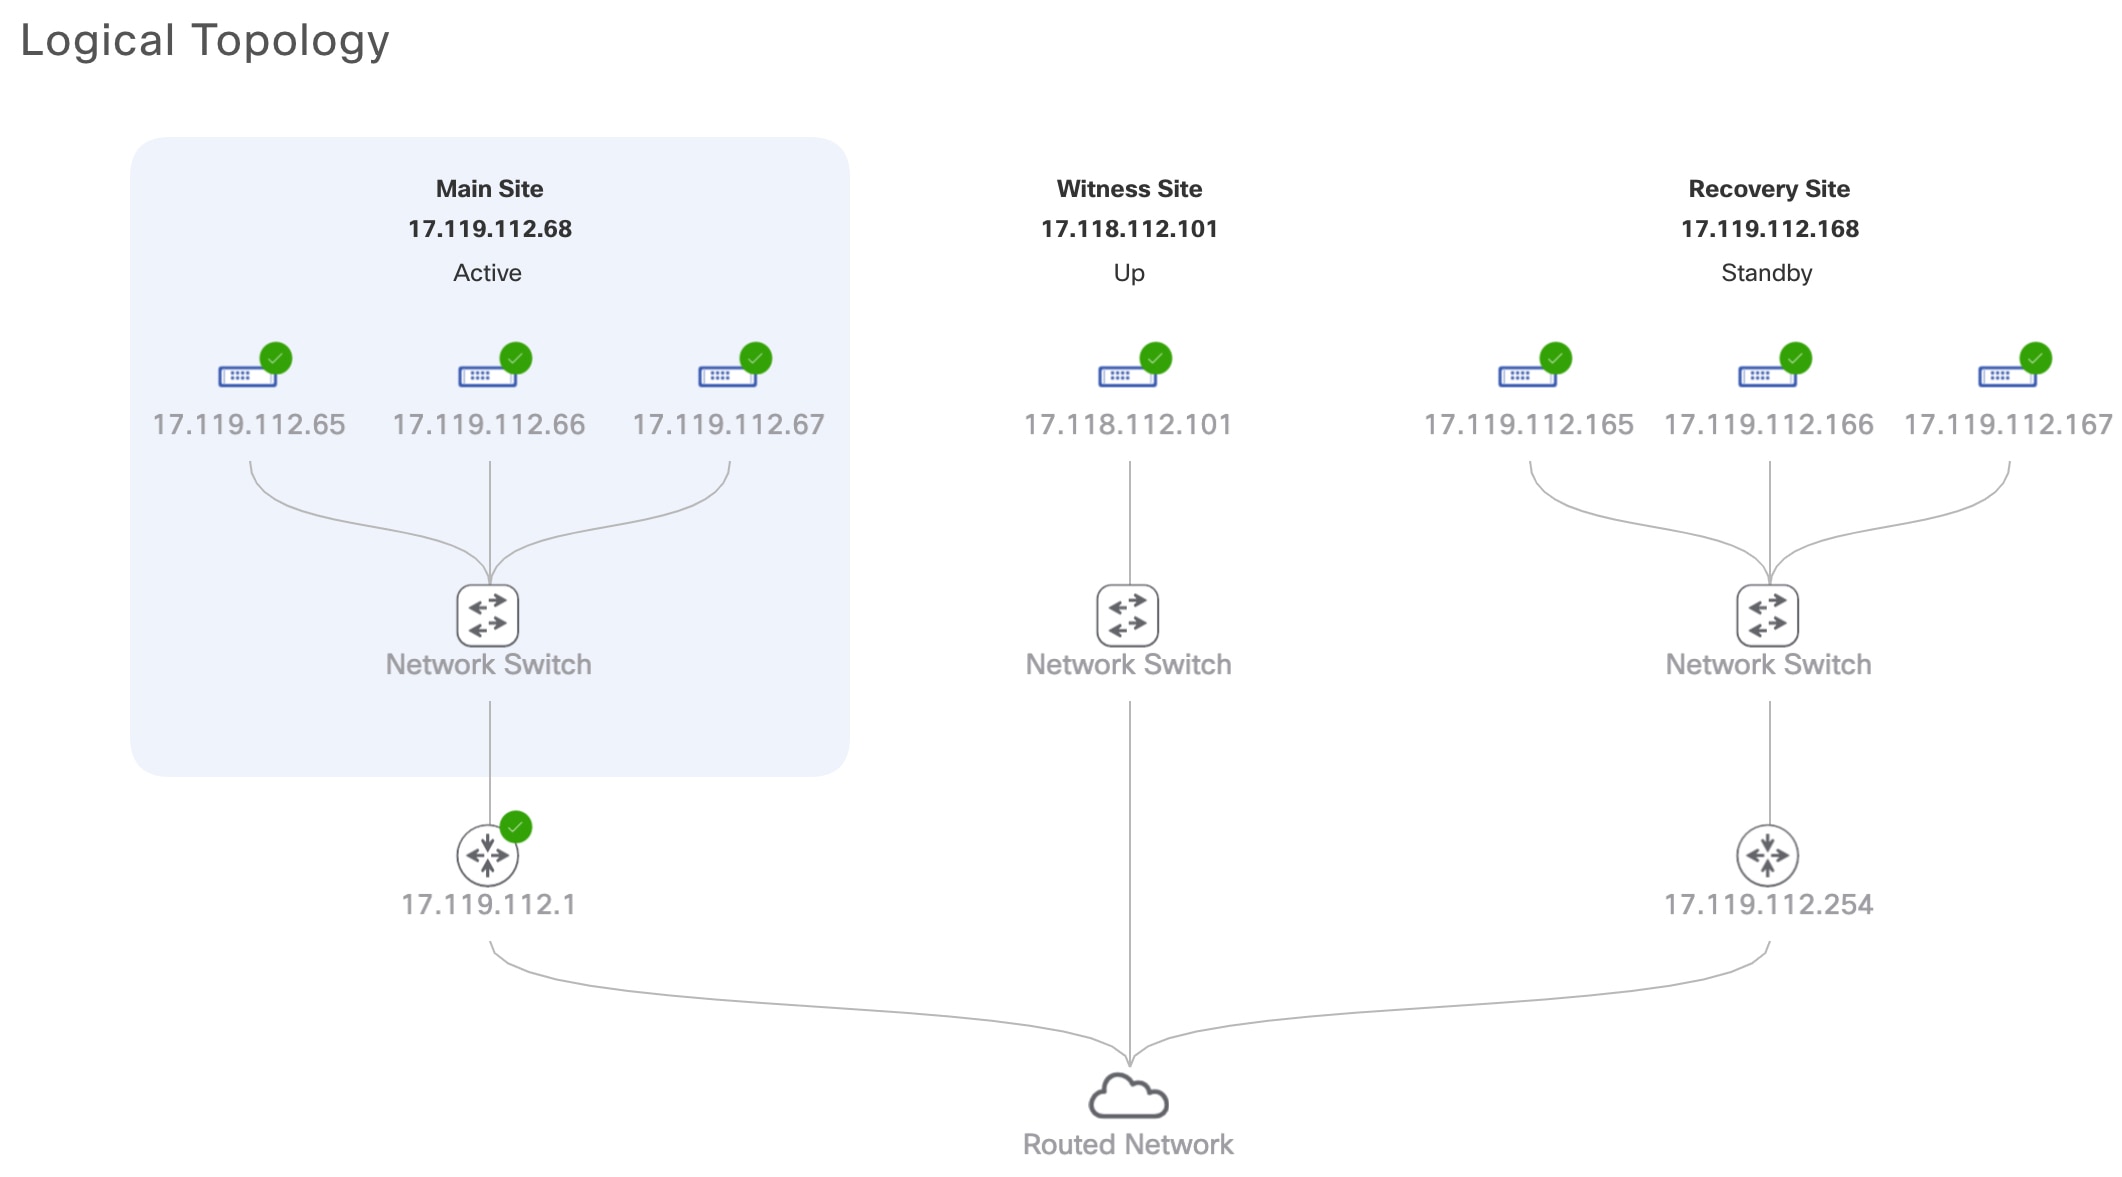
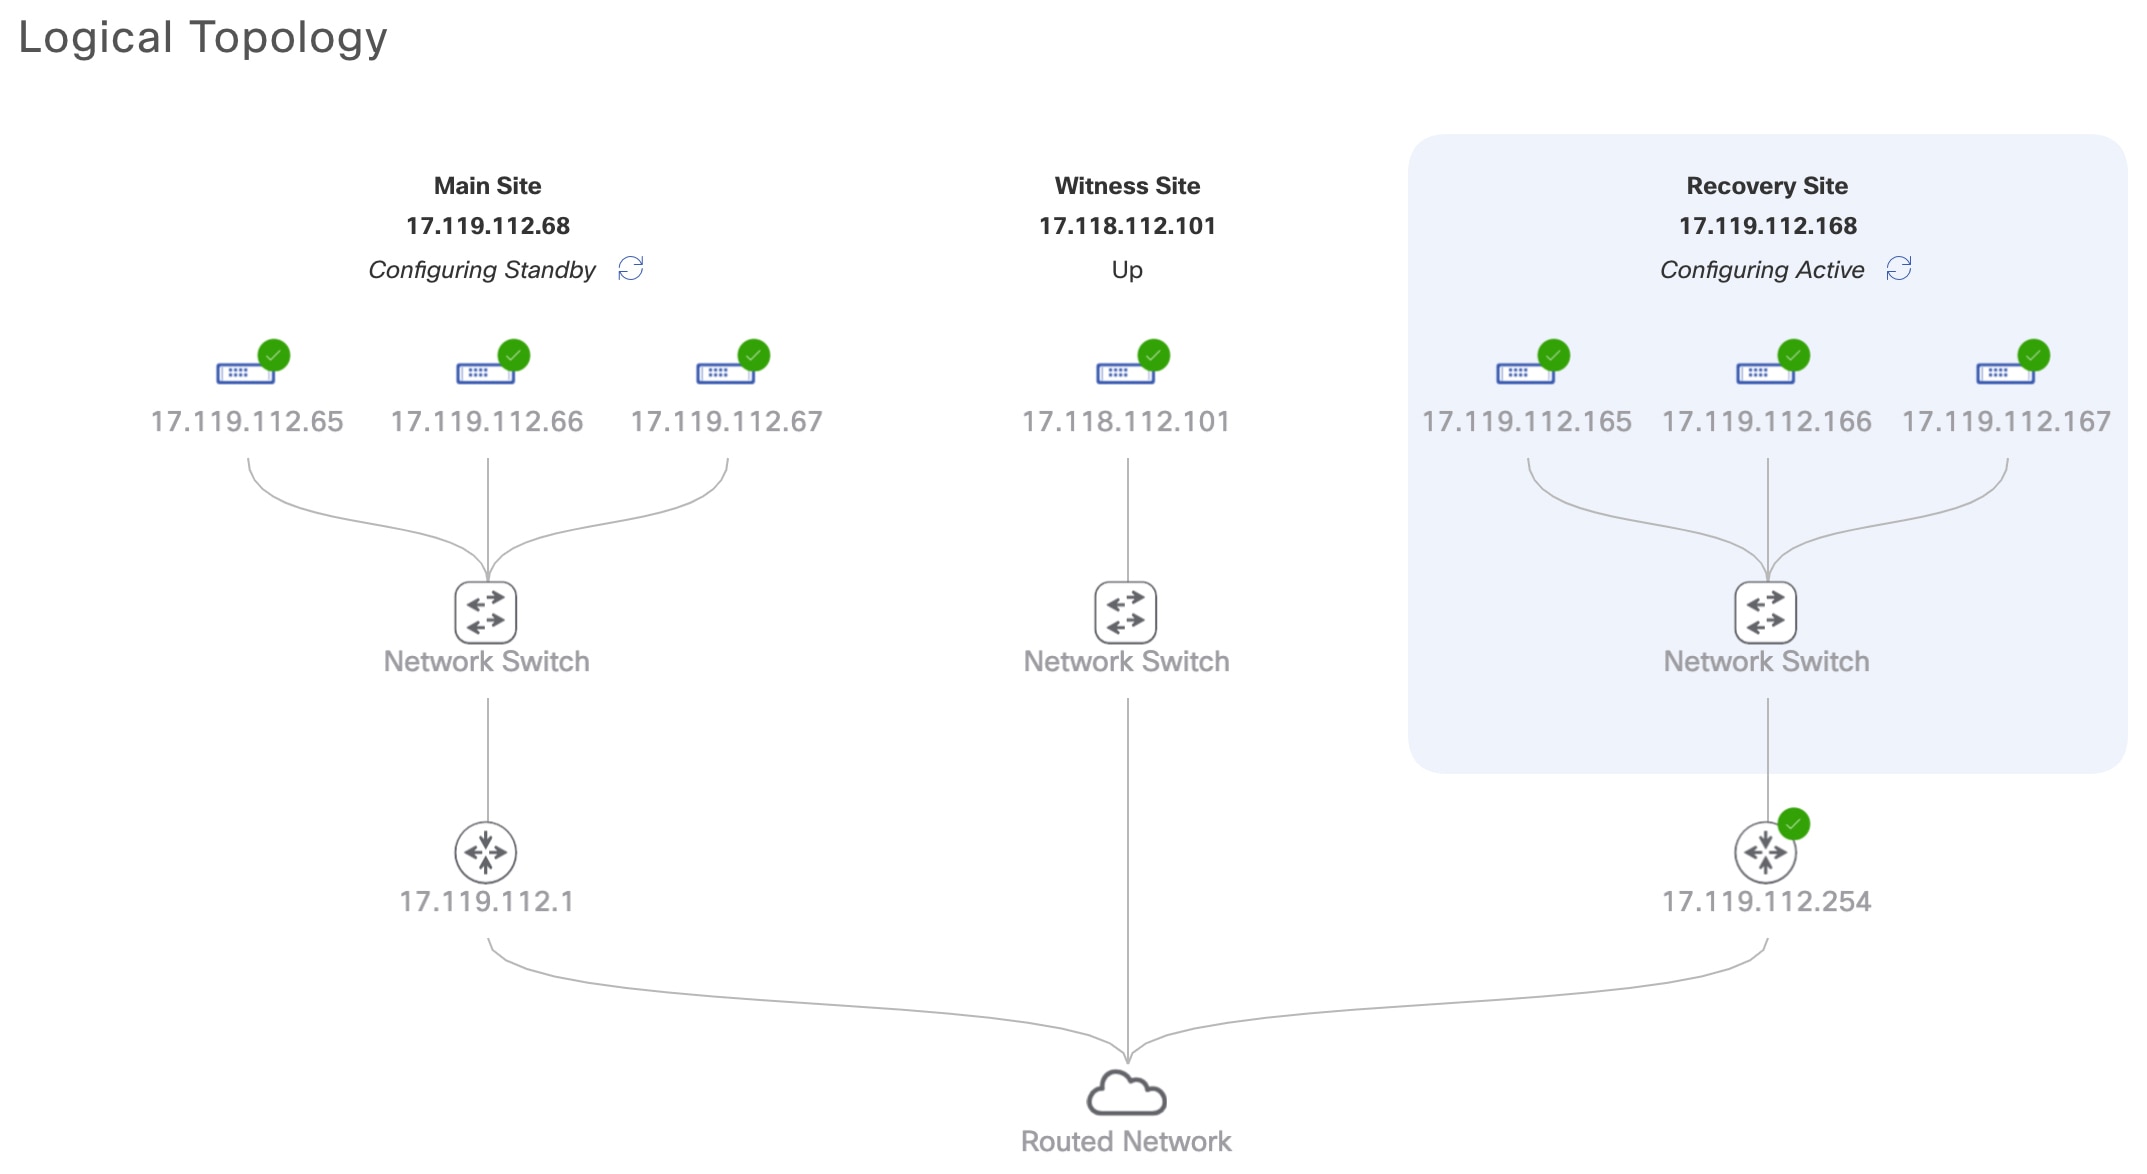
Logical Topology: Displays a topology of your system that indicates the current status of your sites and their members. To view a description of the possible site states, see System and Site States.

3

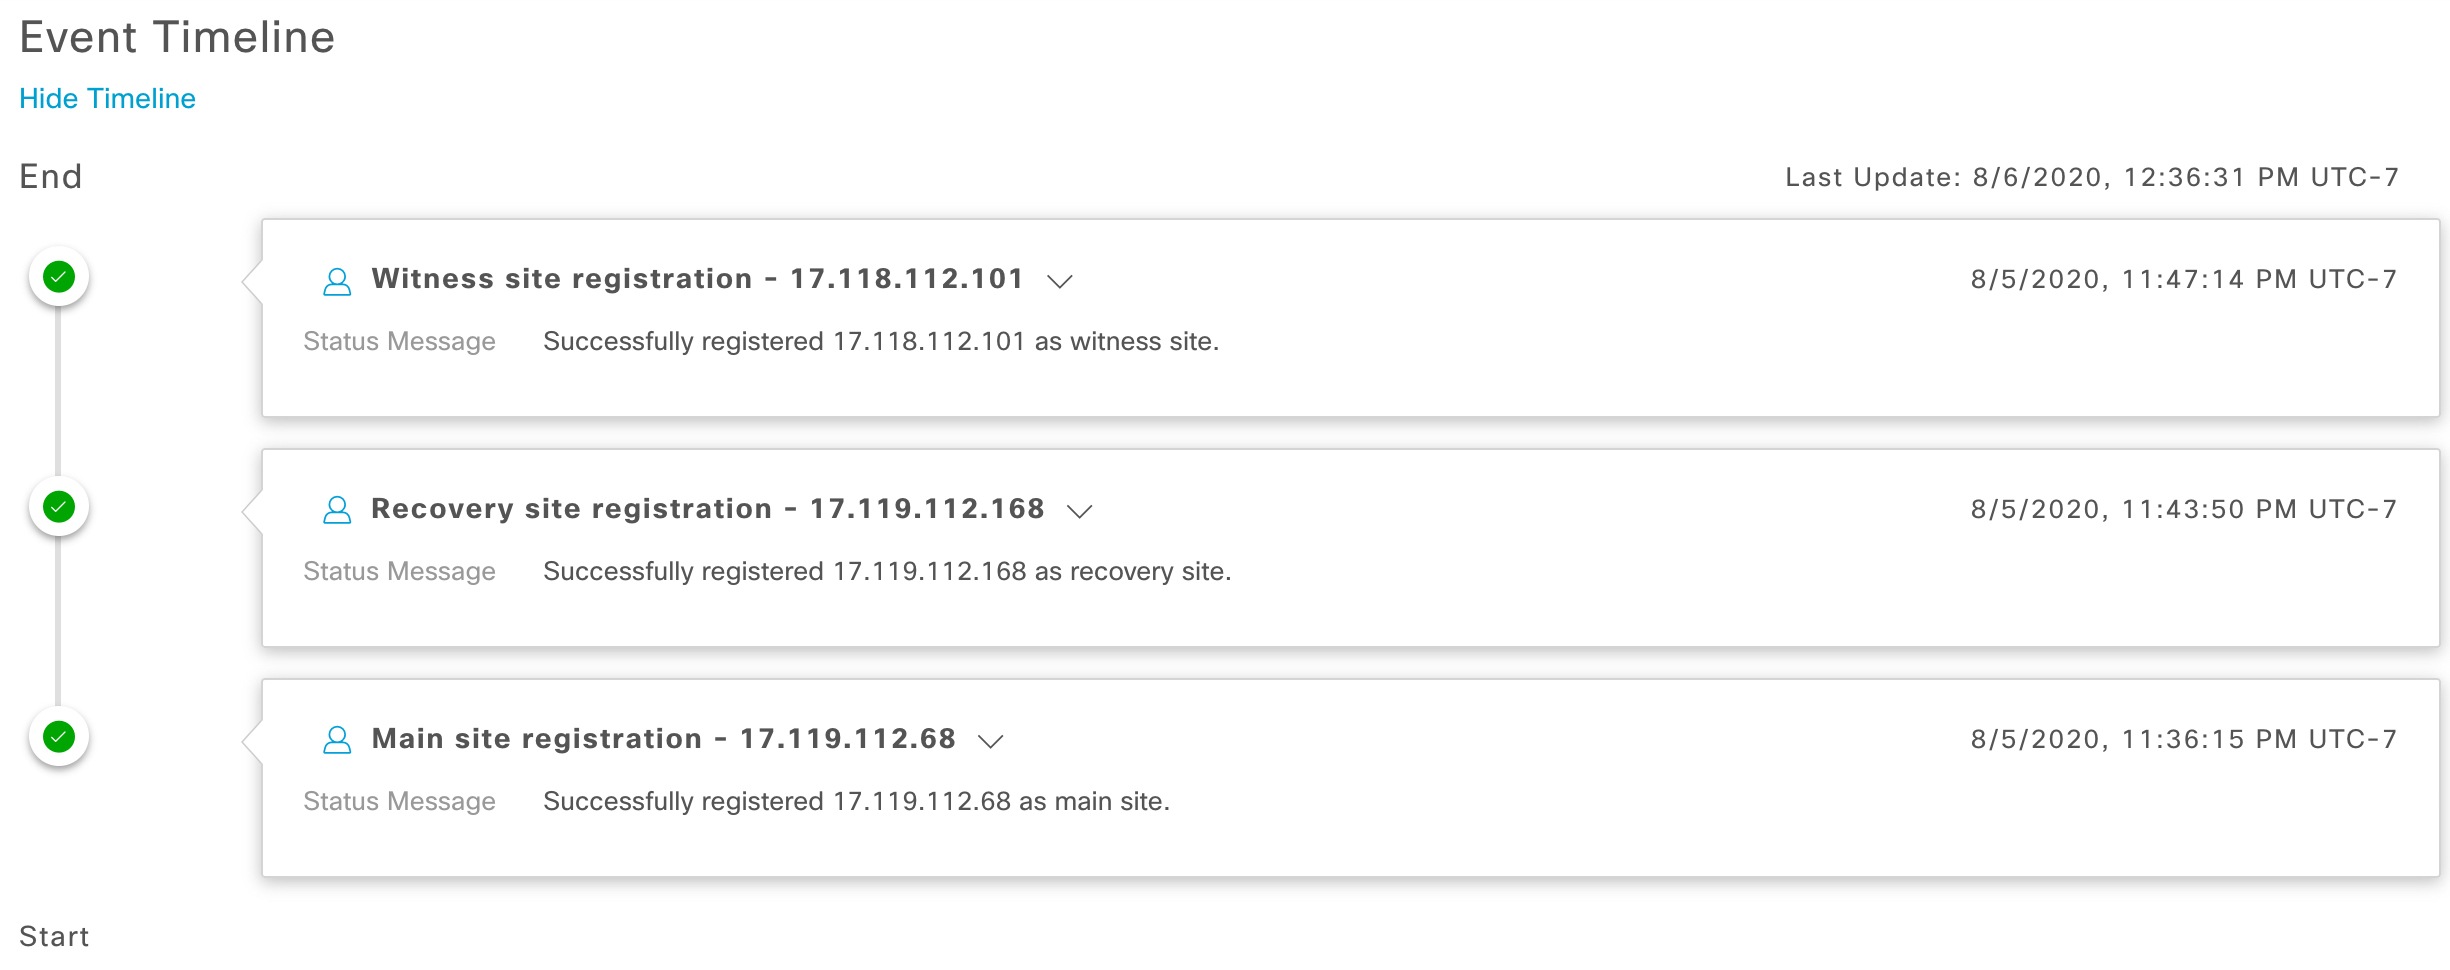
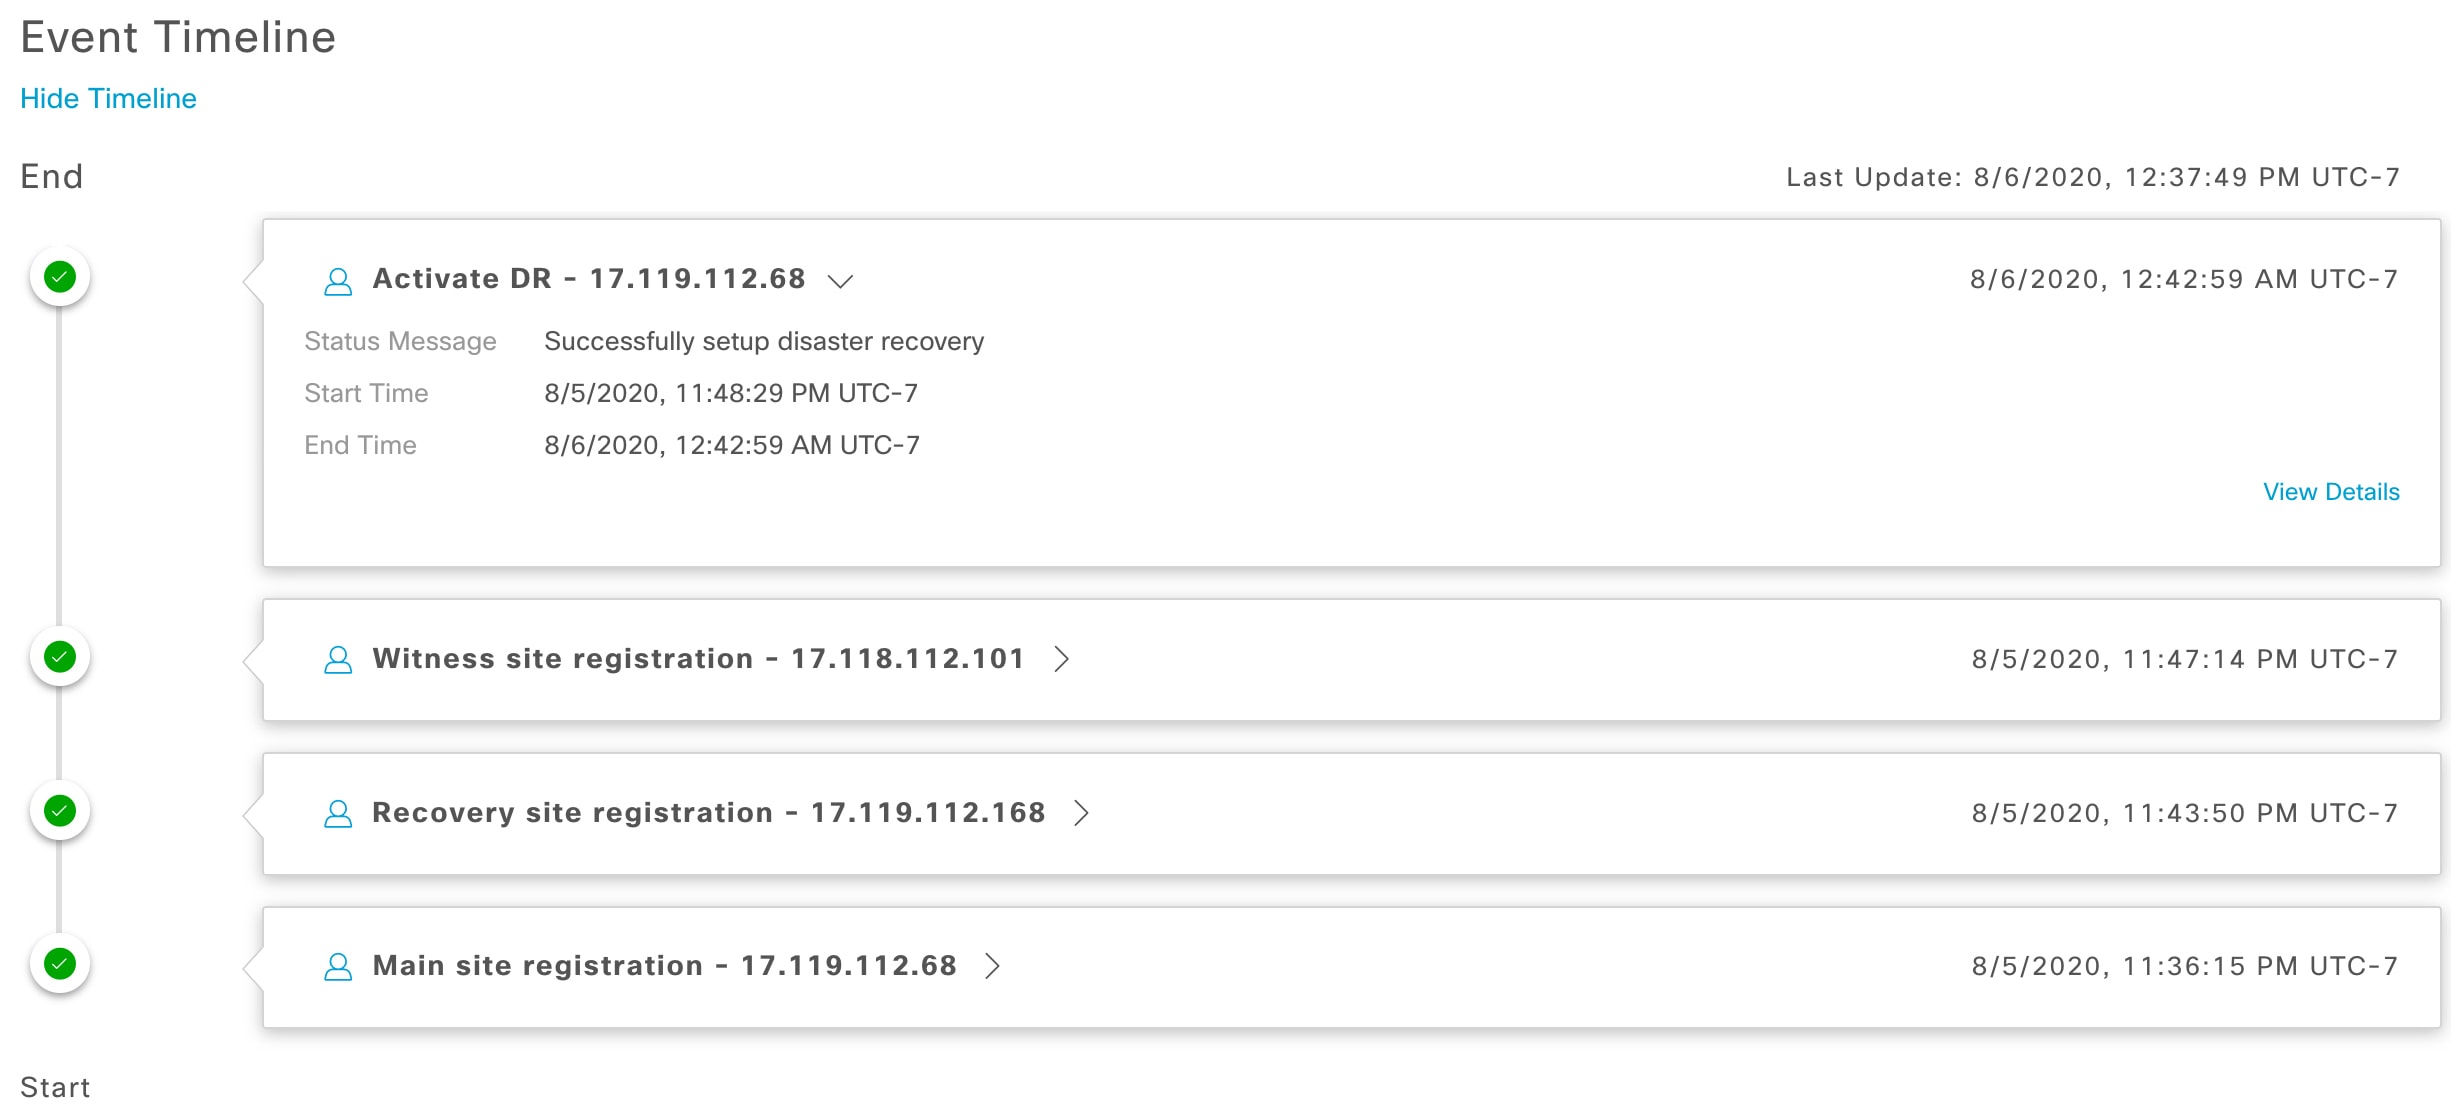
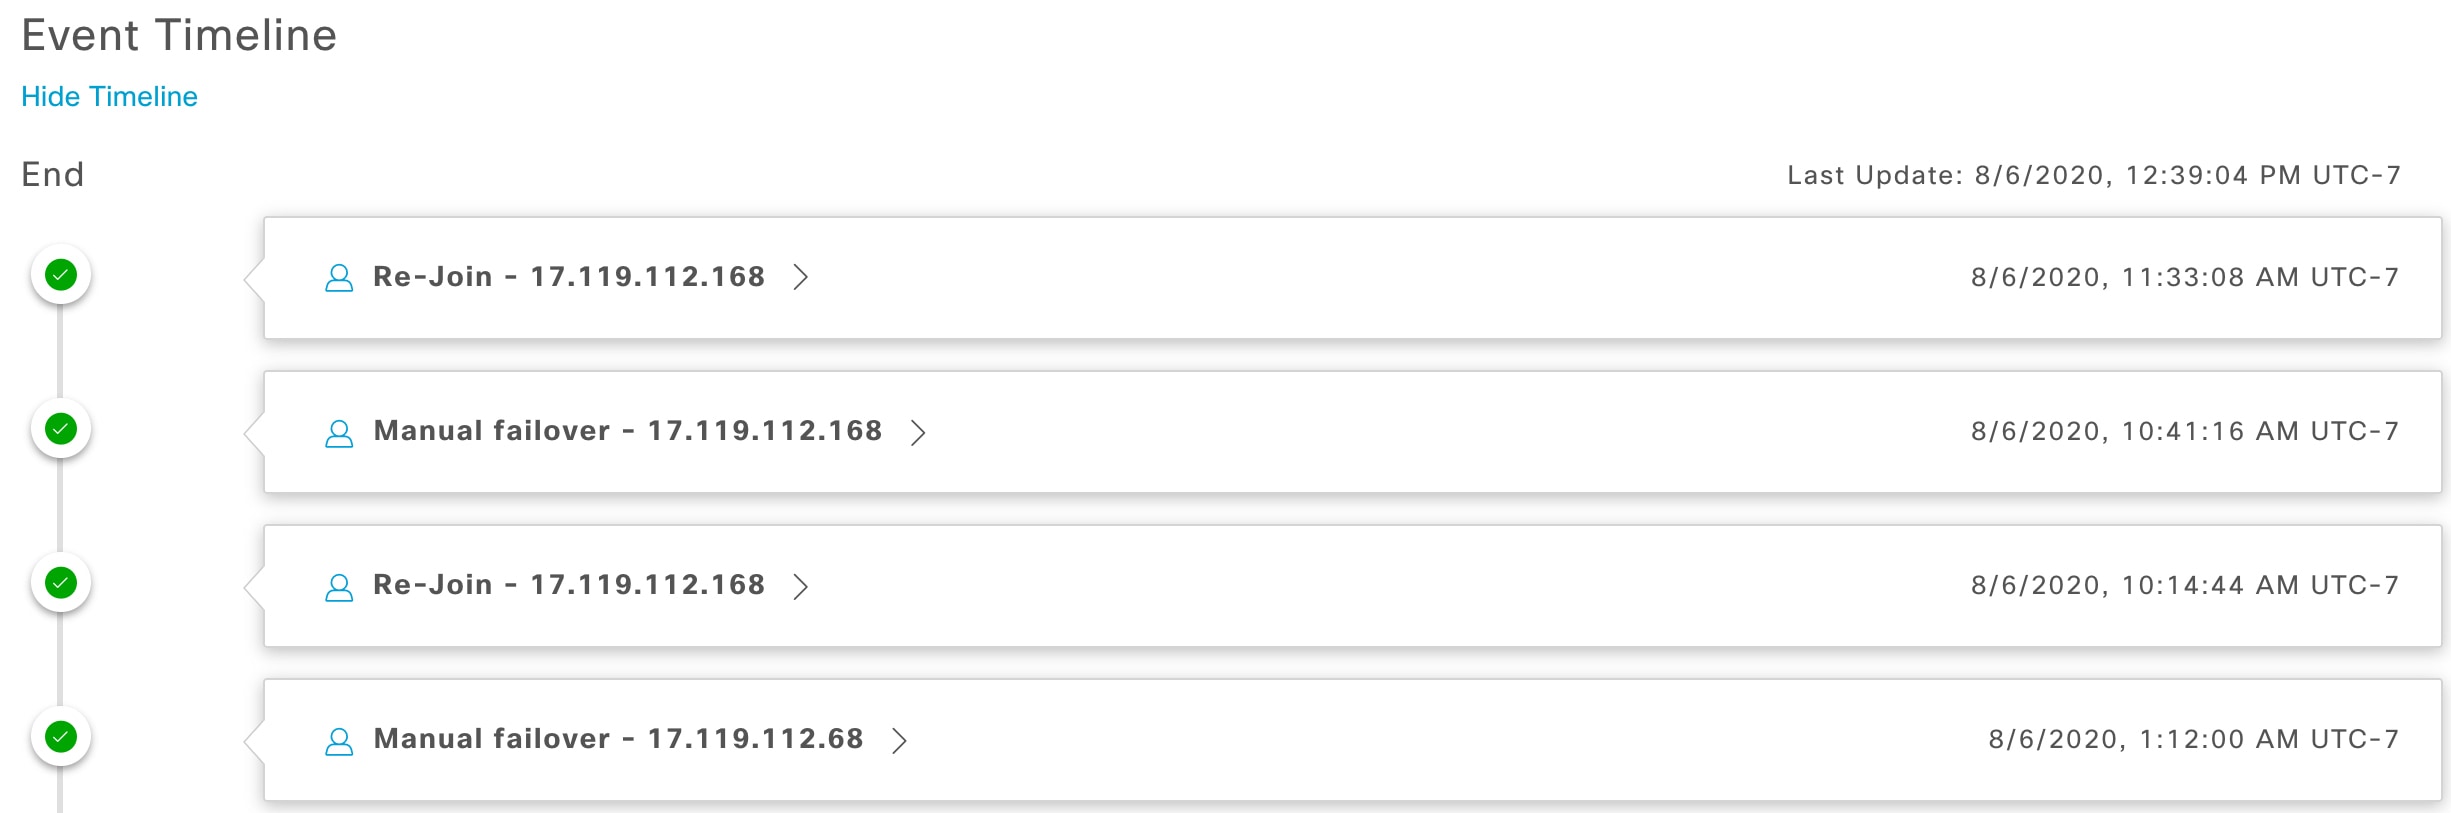
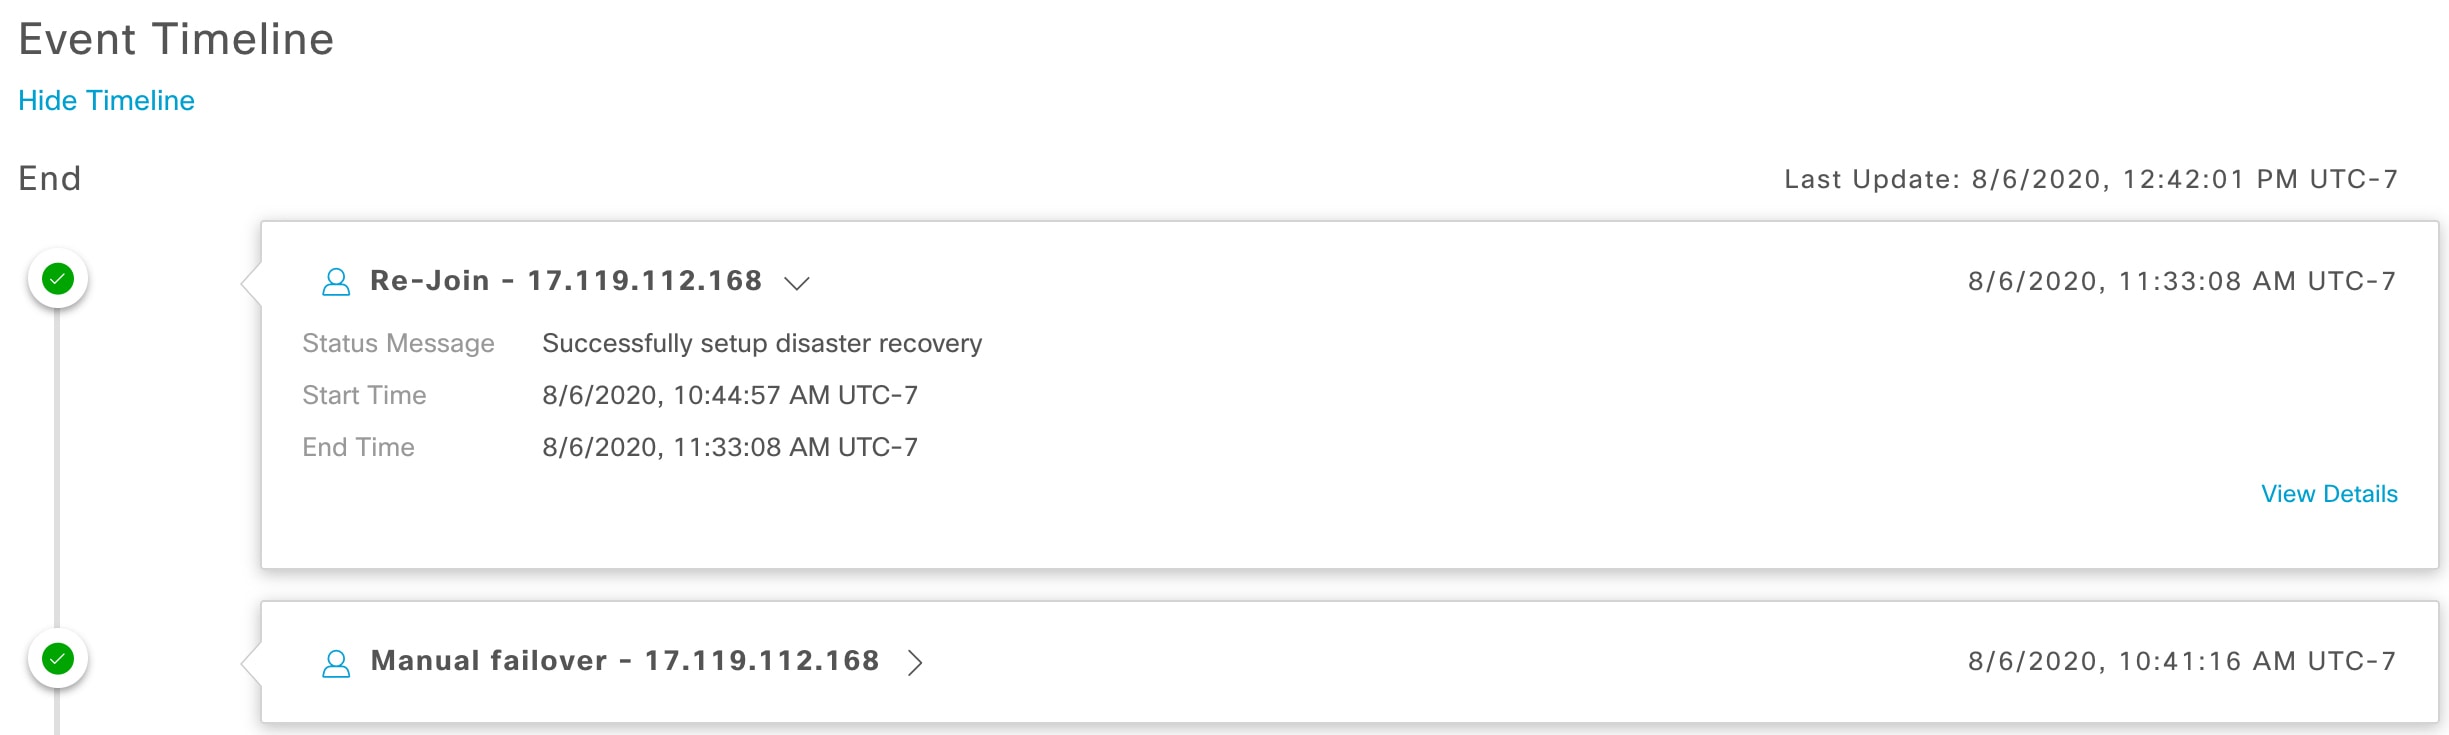
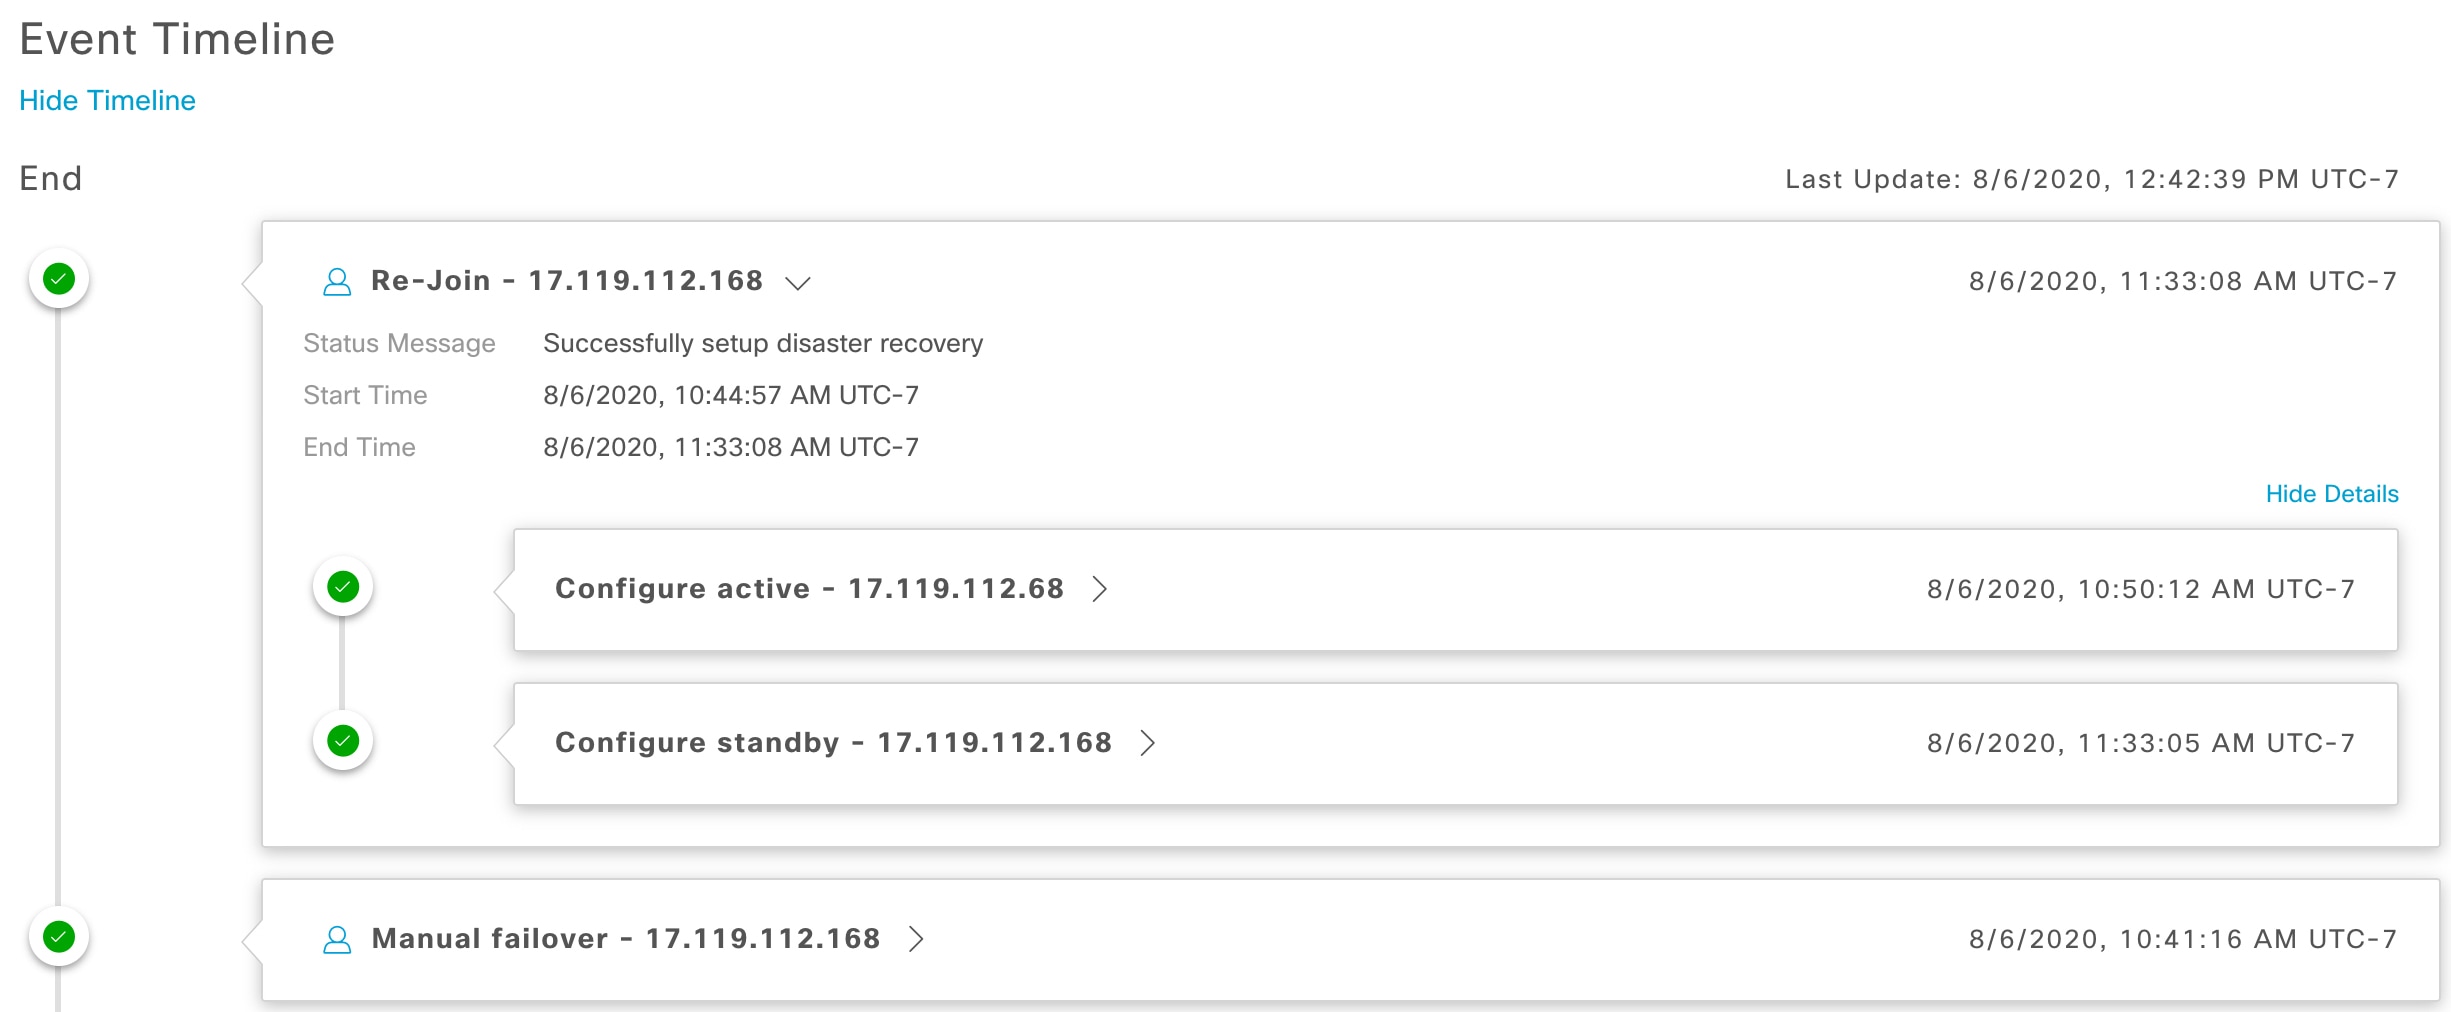
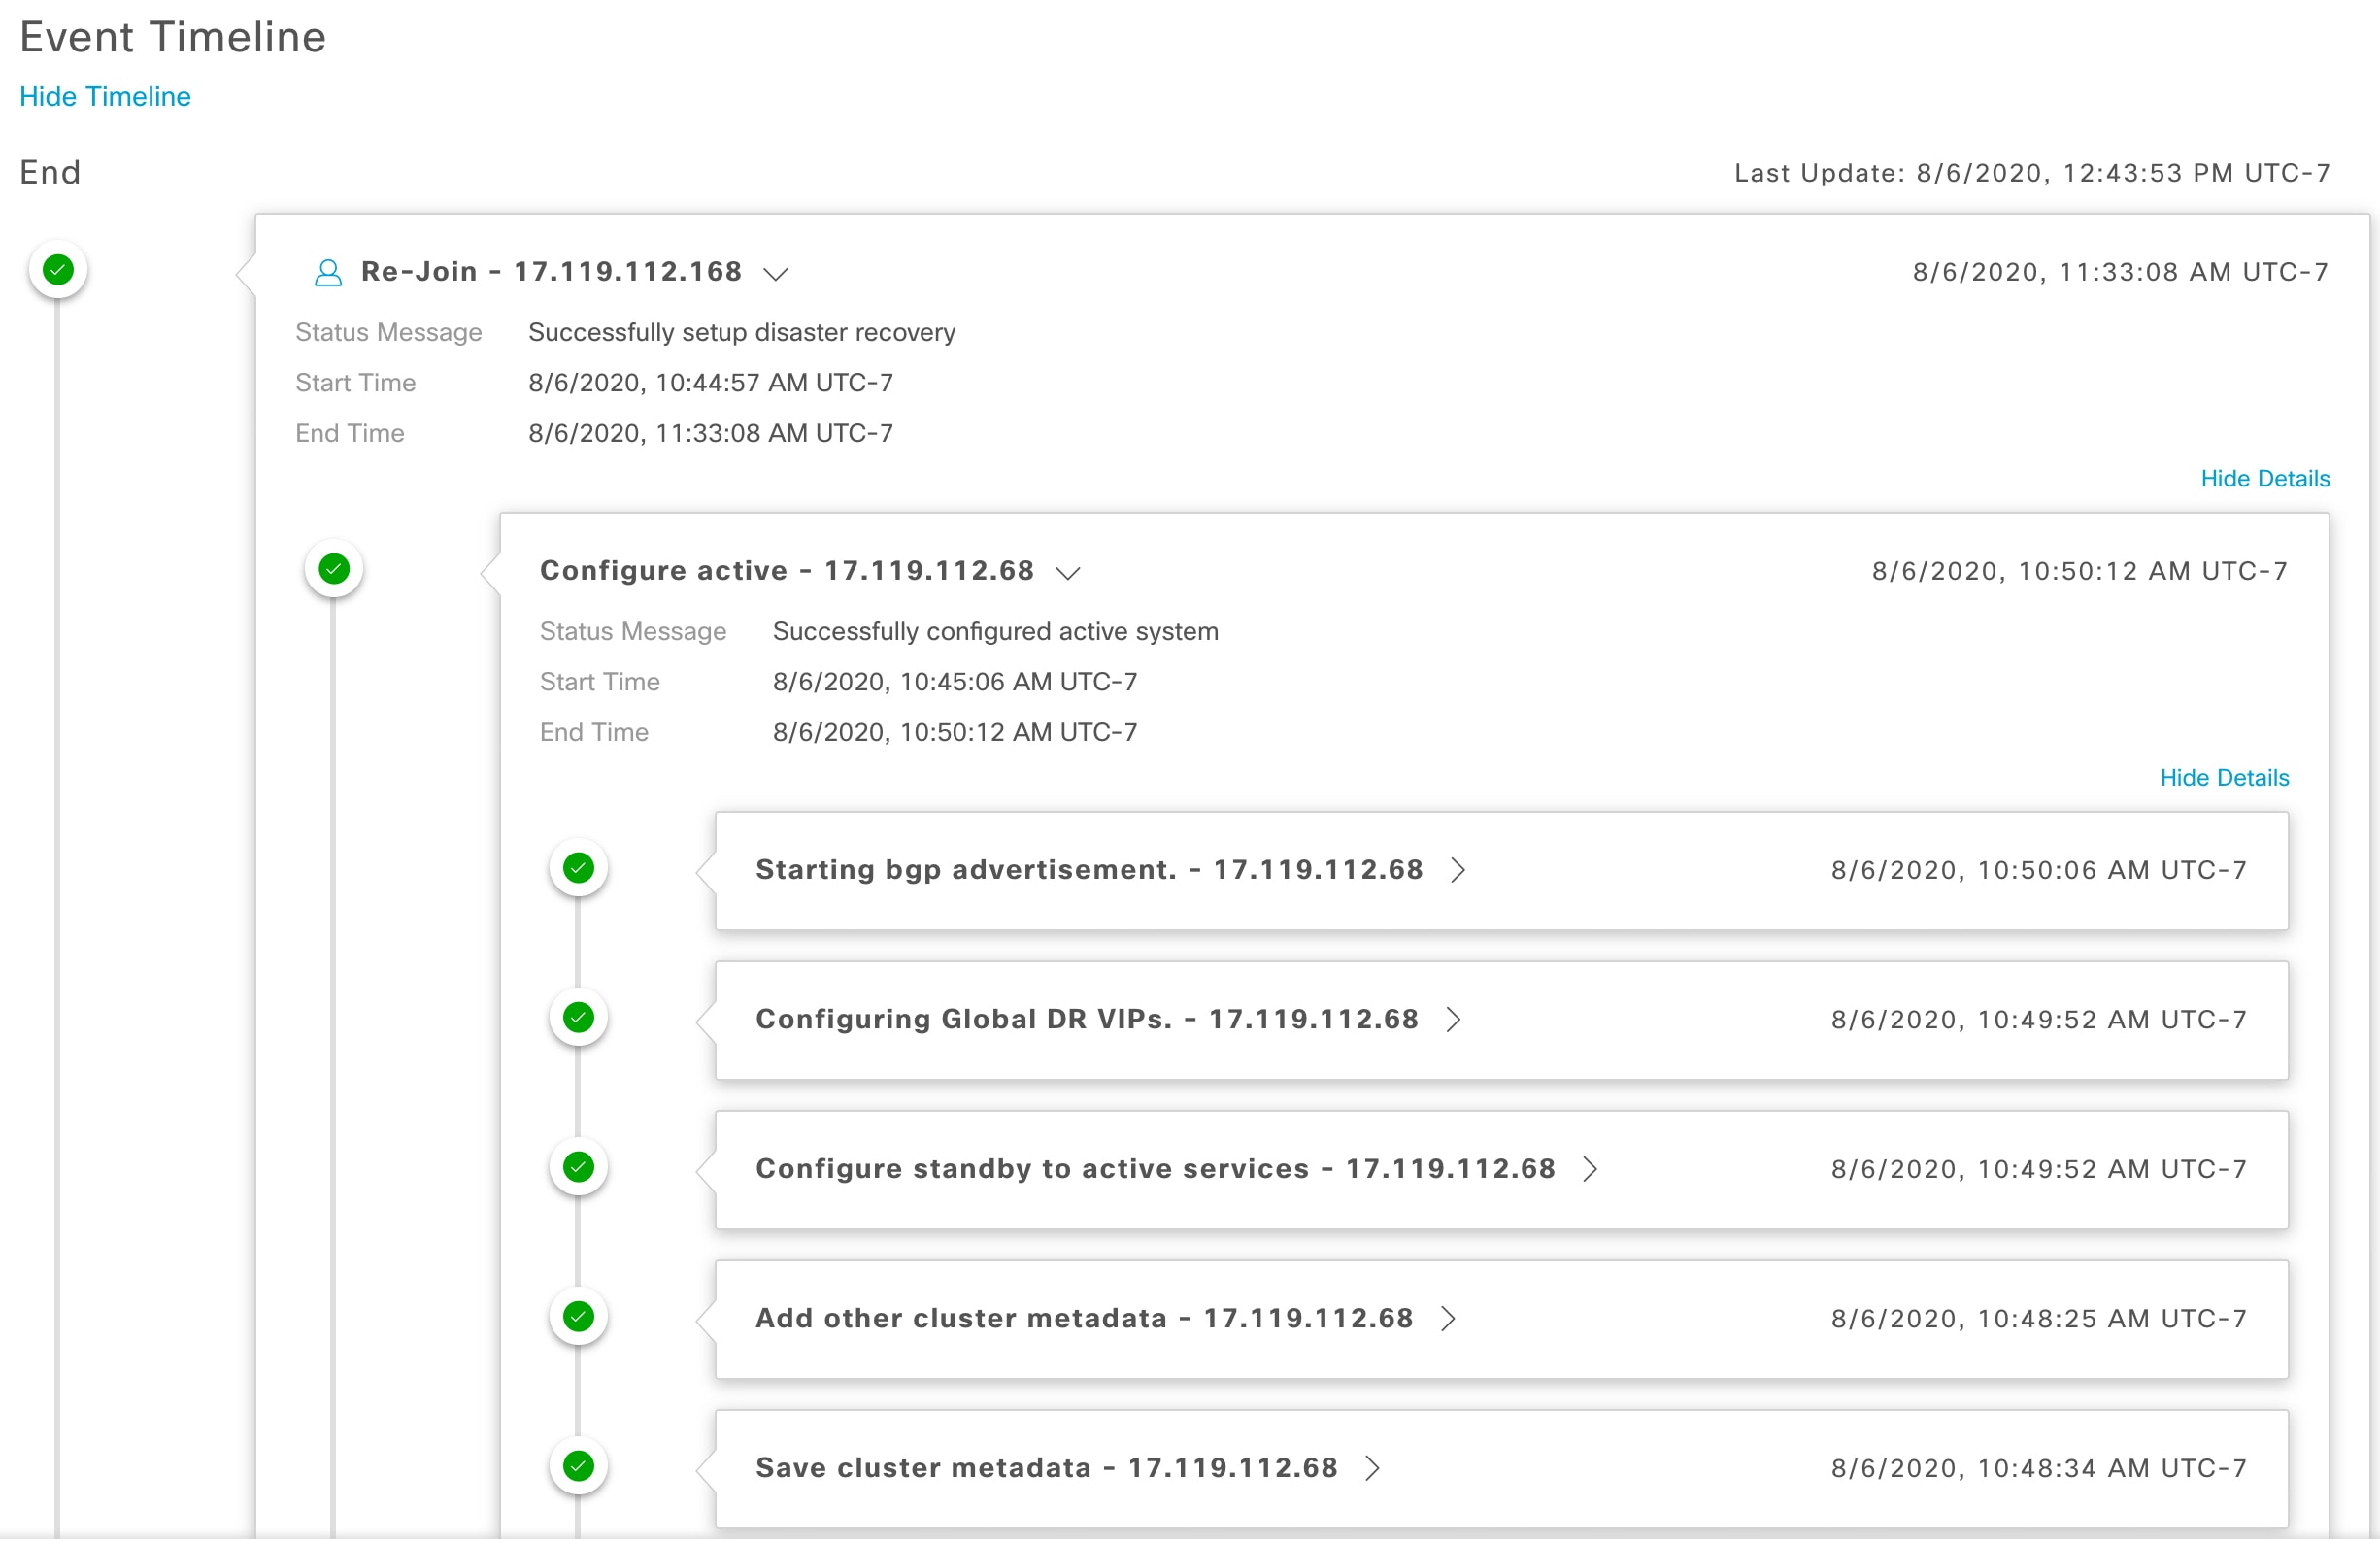
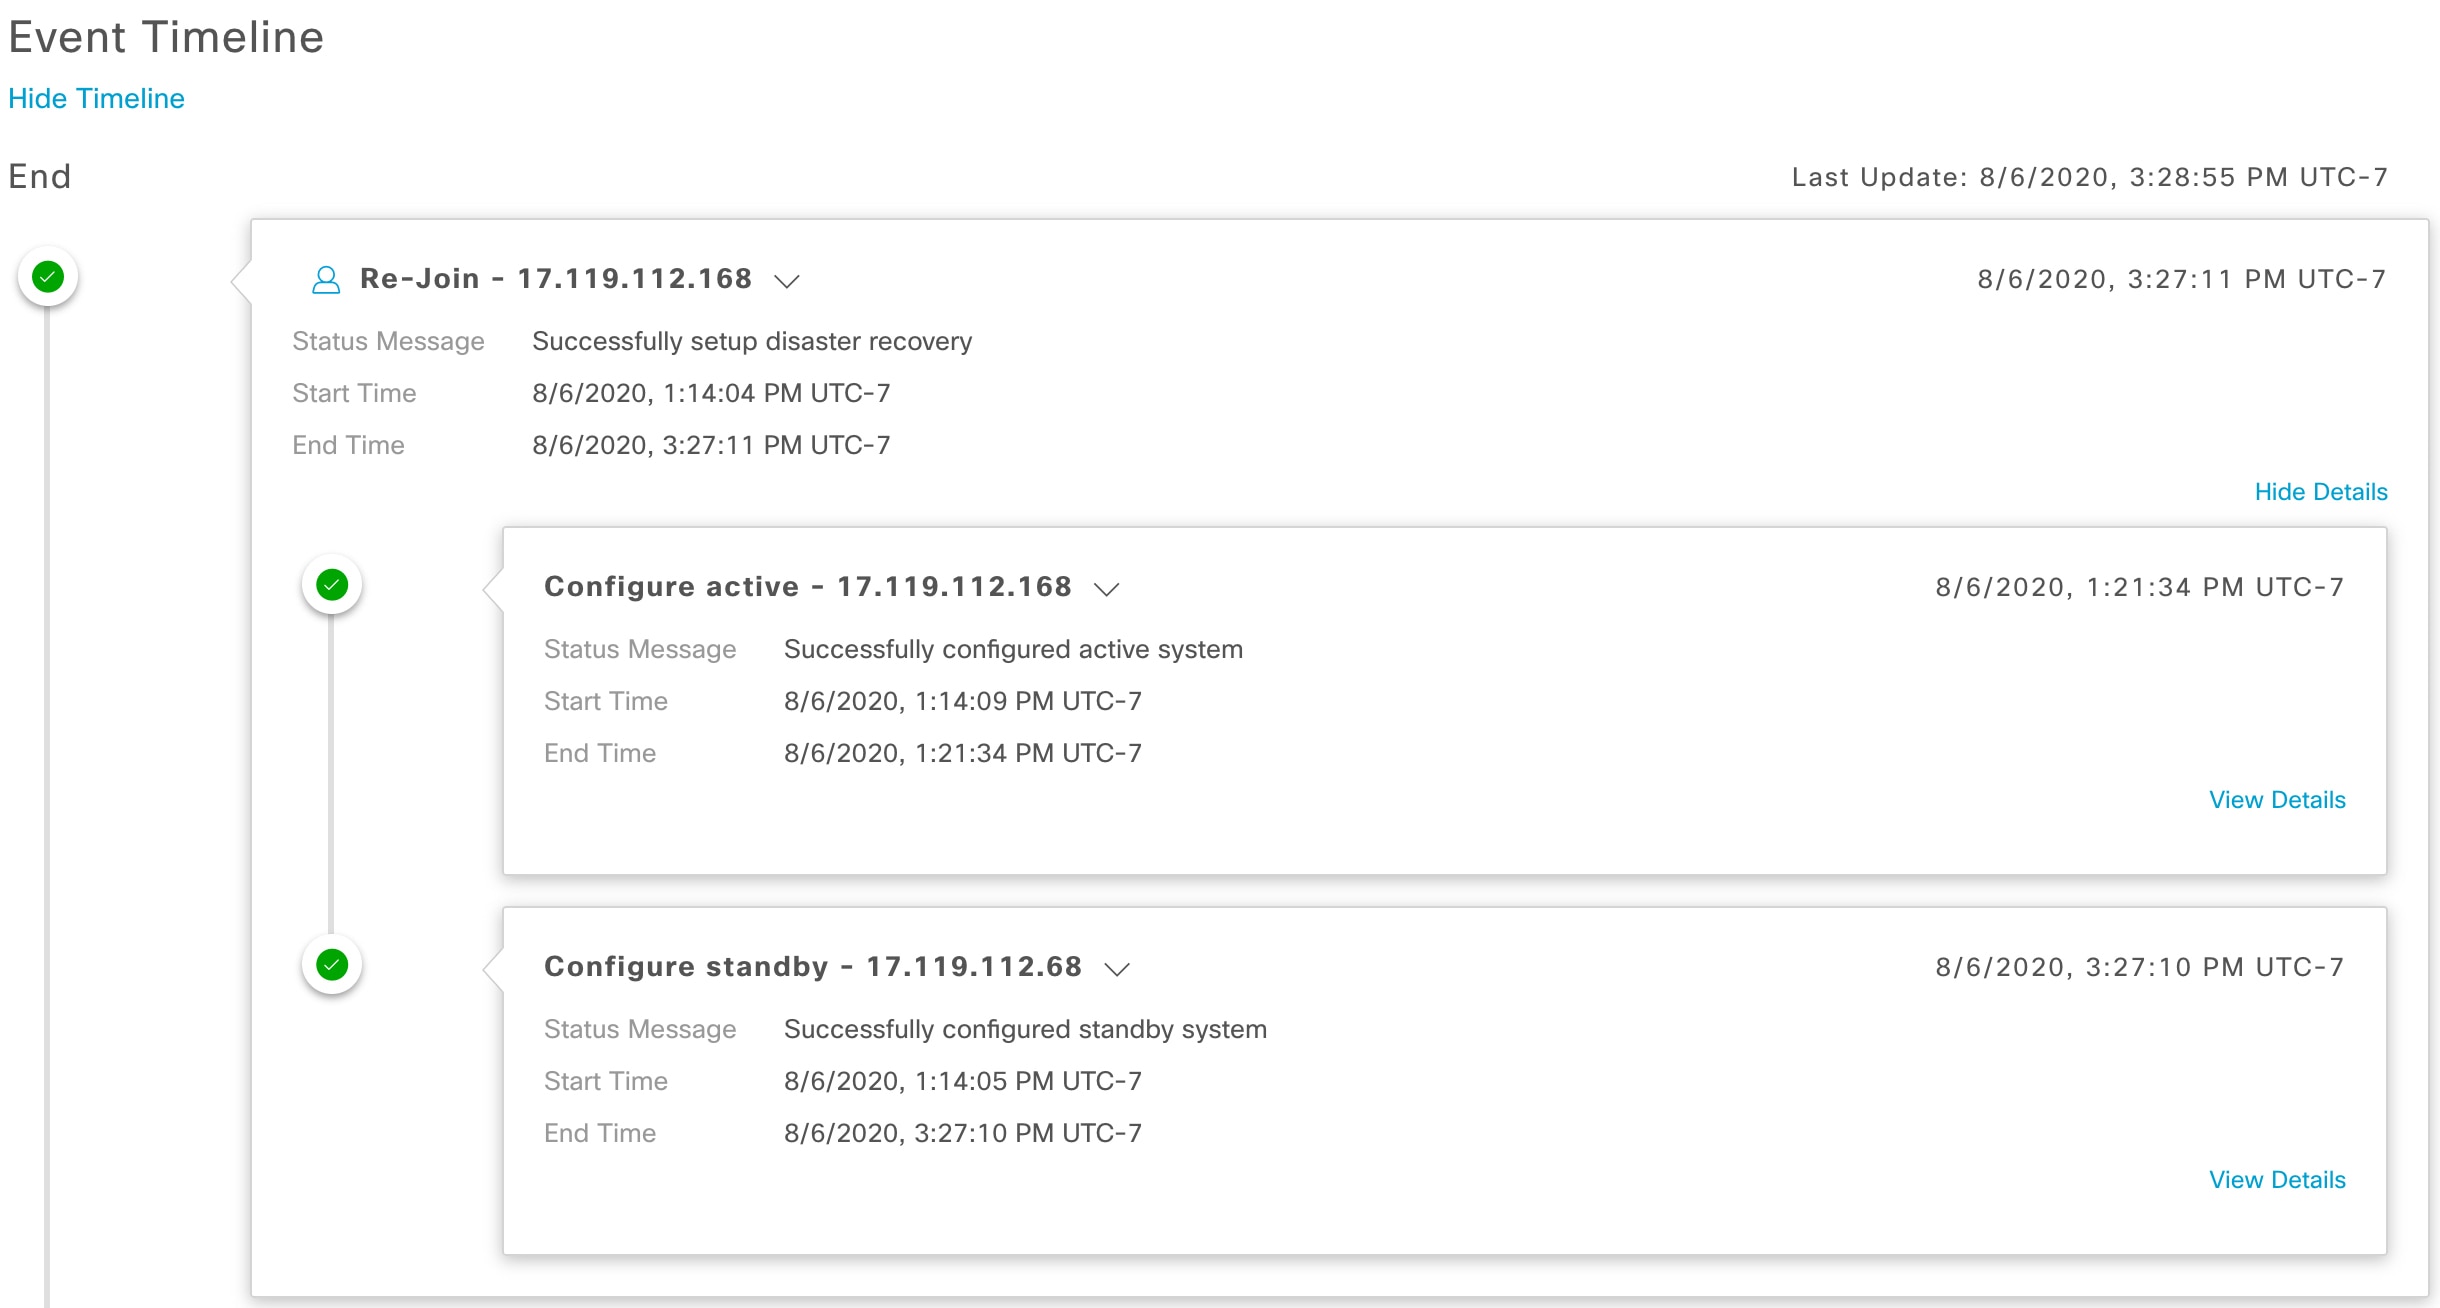
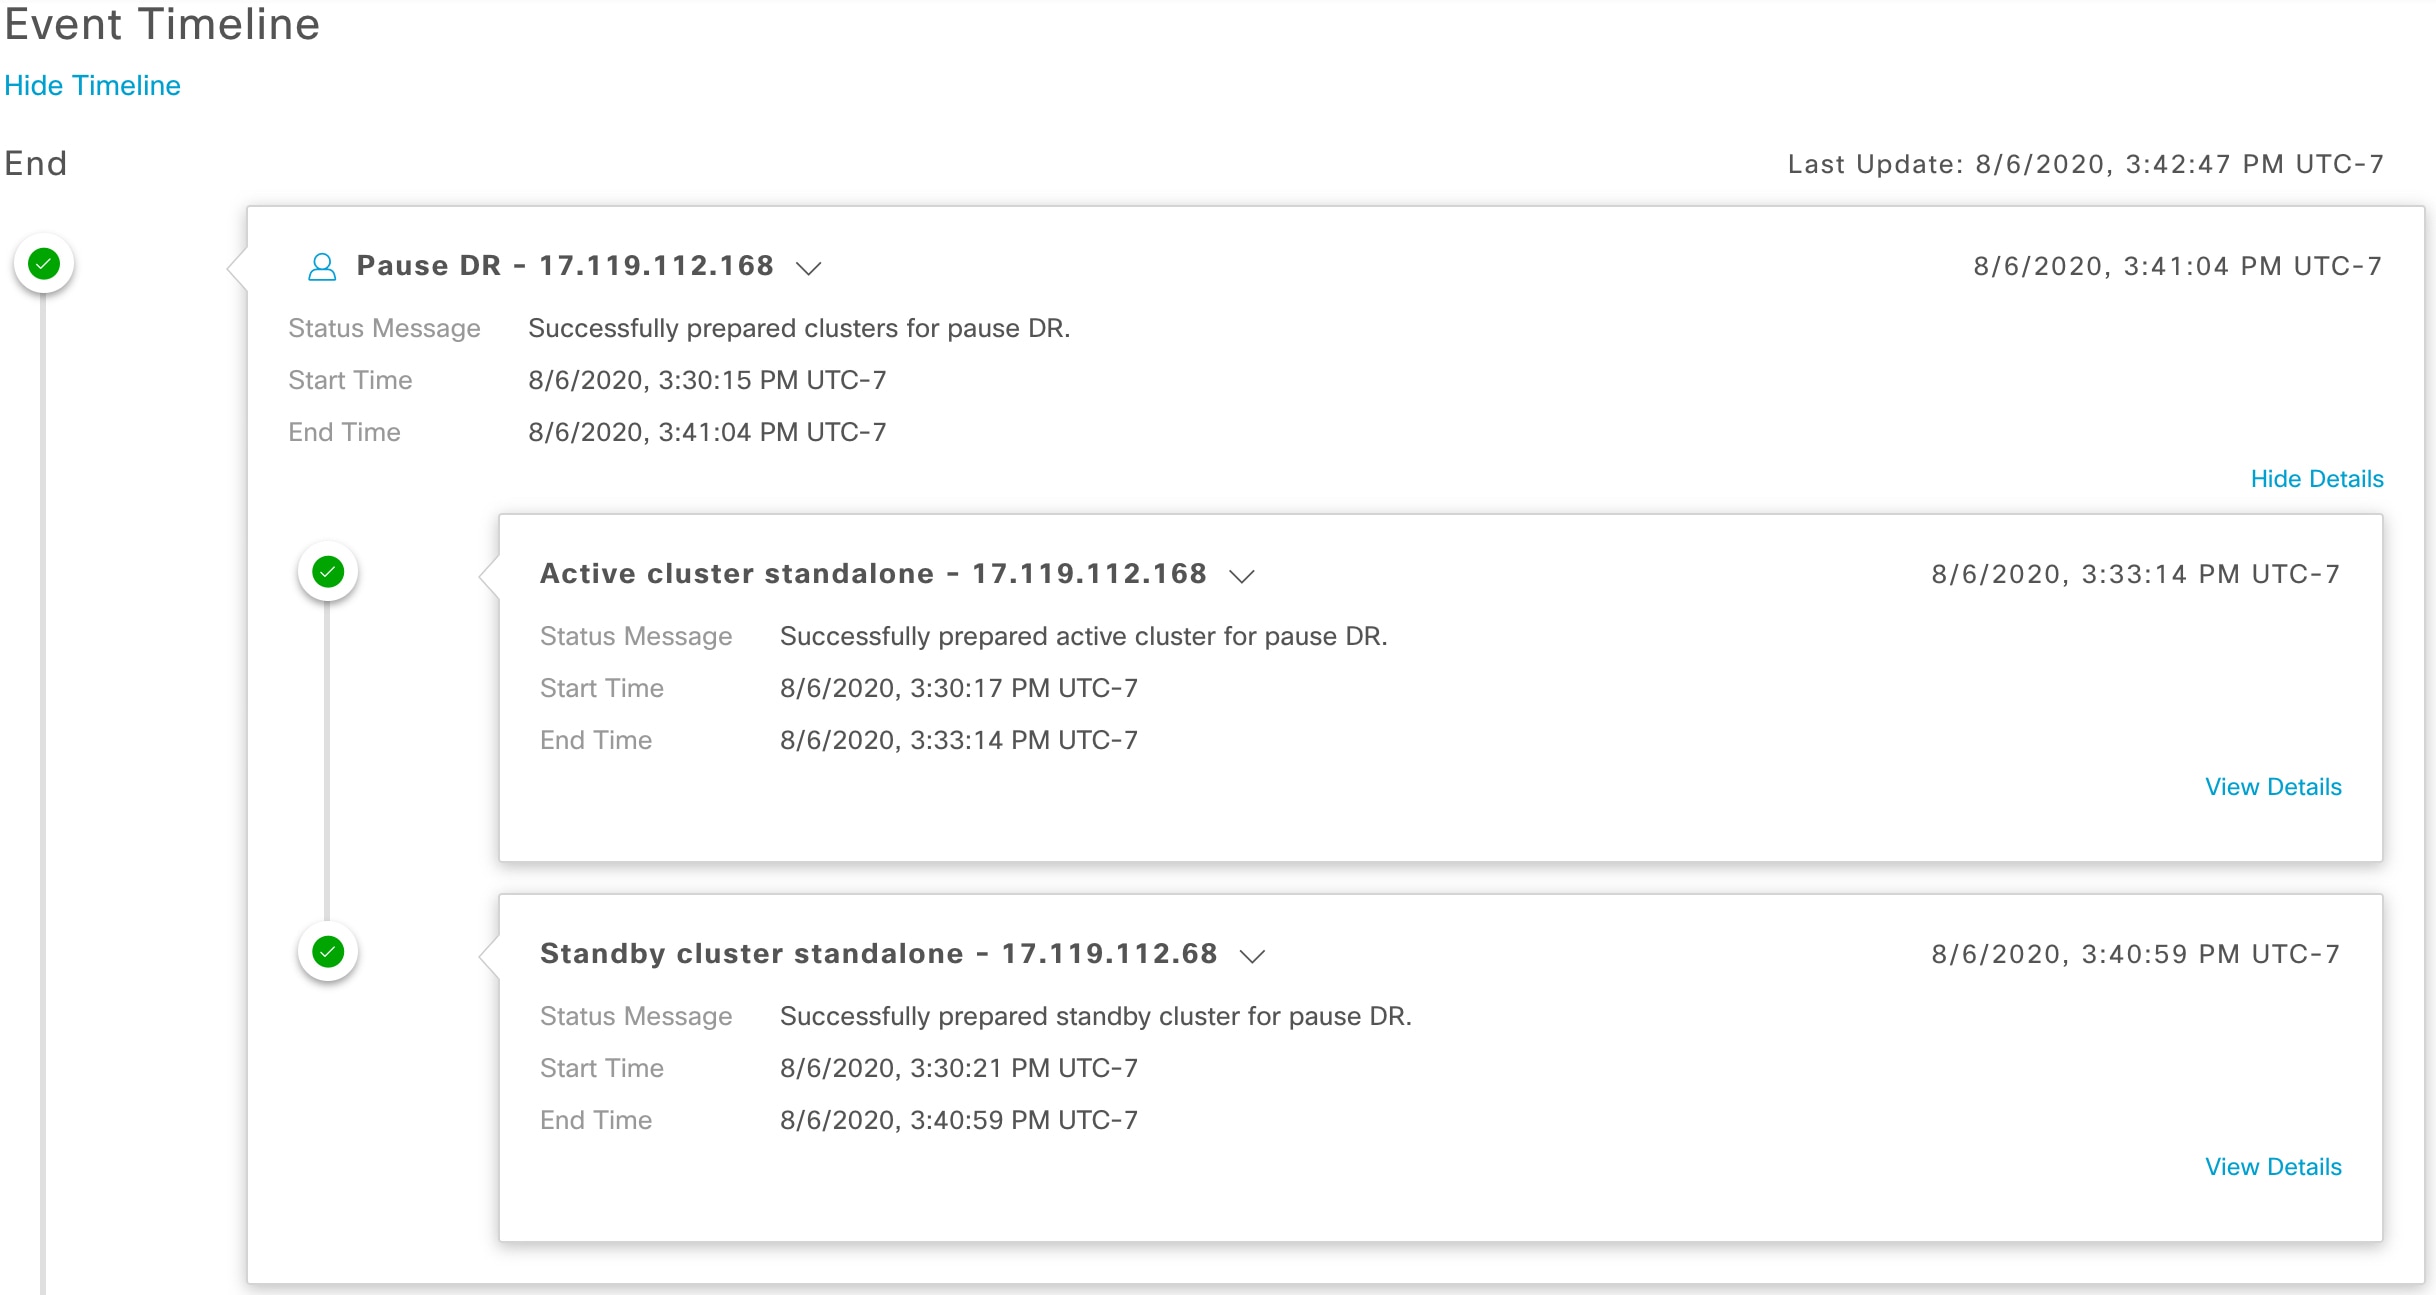
Event Timeline: Lists every disaster recovery task that is currently in progress or has been completed for your system. For more information, see Monitor the Event Timeline.

4

Configure tab: Click to enter the settings necessary to establish a connection between your disaster recovery system's sites. See Configure Disaster Recovery for more information.

5

Status area: Indicates the current status of your system. To view a description of the possible system states, see System and Site States.

6

Legend: Indicates what the topology icons represent. To view the legend, click in the bottom right corner of the Disaster Recovery page.

7

Action area: Displays the disaster recovery tasks that are currently available for you to initiate. The tasks you can choose from vary, depending on whether you have configured your sites and your system's status.

Prerequisites

Before you enable disaster recovery in your production environment, ensure that the following prerequisites have been met.


Important

If you plan to upgrade to the latest Cisco DNA Center 2.2.1.x release, you will need to complete a few steps in order to ensure that disaster recovery works properly after the upgrade. See Configure Disaster Recovery After an Upgrade for more information.


General Prerequisites

  • You have allocated three systems to disaster recovery. Cisco DNA Center supports the following setups:

    • Three-node setup: One node functions as your main site, a second node serves as your recovery site, and a third system (residing on a virtual machine) acts as your witness site.

    • Seven-node setup: One three-node cluster functions as your main site, a second three-node cluster serves as your recovery site, and a third system (residing on a virtual machine) acts as your witness site.

  • You have configured a VIP for the Enterprise port interface on your Cisco DNA Center appliances. This is required because disaster recovery uses the Enterprise network for intrasite communication. In the Cisco DNA Center Second-Generation Appliance Installation Guide, refer to the following:

    • For more information about the Enterprise port, see the "Interface Cable Connections" topic.

    • For more information about Enterprise port configuration, see either the "Configure the Primary Node Using the Maglev Wizard" or "Configure the Primary Node Using the Expert Configuration Wizard" topic.

  • You have assigned a super-admin user to carry out disaster recovery tasks. Only users with this privilege level can access this functionality.

  • You have confirmed that the links connecting the following sites are one GB links with 200 ms RTT latency (at most):

    • Main and recovery sites

    • Main and witness sites

    • Recovery and witness sites

  • You have generated a third-party certificate and installed this certificate on both the main and recovery sites. Otherwise, site registration will fail.


    Note

    Cisco DNA Center copies this certificate to the witness site automatically during the registration process.


    Ensure that all of the IP addresses and fully qualified domain names (FQDN) that these sites use are included in these certificates. For a description of how to generate third-party certificates, see Generate a Certificate Request Using Open SSL in the Cisco DNA Center Security Best Practices Guide.

Main and Recovery Site Prerequisites

  • Both your main and recovery site must consist of the same number of nodes. Cisco DNA Center will not allow you to register and activate a disaster recovery system that does not meet this requirement.

  • Both your main and recovery site must consist of Cisco DNA Center appliances that have the same number of cores. This means that one site cannot consist of 56-core second-generation appliances while the other site consists of 112-core appliances. The following table lists the appliances that support disaster recovery and their corresponding Cisco part number:

    Second-generation Cisco DNA Center appliance, which is based on either the Cisco UCS C220 M5 small form-factor (SFF) chassis or Cisco UCS C480 M5 chassis.

    56-core appliance: Cisco part number DN2-HW-APL-L

    56-core promotional appliance: Cisco part number DN2-HW-APL-L-U

    112-core appliance: Cisco part number DN2-HW-APL-XL

    112-core promotional appliance: DN2-HW-APL-XL-U

  • You have configured and enabled high availability (HA) on both your main and recovery site. Otherwise, the registration of these sites will fail. For more information, see the latest Cisco DNA Center High Availability guide.


    Note

    This is applicable to seven-node setups only.


  • If you want to use Border Gateway Protocol (BGP) to advertise your system's virtual IP address routes, you need to configure your system's Enterprise virtual IP address on each of the main and recovery site's neighbor routers. The configuration you need to enter will look similar to one the following examples:

    Interior BGP (iBGP) Configuration Example

    router bgp 64555
     bgp router-id 10.30.197.57
     neighbor 172.25.119.175 remote-as 64555
     neighbor 172.25.119.175 update-source 10.30.197.57
     neighbor 172.25.119.175 next-hop-self

    where:

    • 64555 is the neighbor router's local and remote AS number.

    • 10.30.197.57 is the neighbor router's IP address.

    • 172.25.119.175 is your system's Enterprise virtual IP address.

    Exterior BGP (eBGP) Configuration Example

    router bgp 62121
     bgp router-id 10.30.197.57
     neighbor 172.25.119.175 remote-as 64555
     neighbor 172.25.119.175 update-source 10.30.197.57
     neighbor 172.25.119.175 next-hop-self
     neighbor 172.25.119.175 ebgp-multihop 255

    where:

    • 62121 is the neighbor router's local AS number.

    • 64555 is the neighbor router's remote AS number.

    • 10.30.197.57 is the neighbor router's IP address.

    • 172.25.119.175 is your system's Enterprise virtual IP address.

  • If you enable BGP route advertisement (as described in the previous bullet), we recommend that you filter routes towards Cisco DNA Center in order to improve its performance. To do so, enter the following configuration:

    neighbor system's-Enterprise-virtual-IP-address route-map DENYALL out
    !
    ip prefix-list deny-all seq 5 deny 0.0.0.0/0 le 32
    !
    route-map DENYALL permit 10
    match ip address prefix-list deny-all

Witness Site Prerequisites

  • You have confirmed that the virtual machine that hosts your witness site is running (at a minimum) VMware ESXi hypervisor version 6.0 or later with a 2.1-GHz core and two virtual CPUs, 4 GB of RAM, and 10 GB of hard drive space.

  • You have set up your witness site in a different location than your main and recovery sites and confirmed that it is reachable from both of these sites.

  • You have configured an NTP server that is accessible by the witness site. You must synchronize this NTP server with the NTP servers that are used by the main and recovery sites.

Configure Disaster Recovery After an Upgrade

To successfully configure disaster recovery after upgrading your system to the latest Cisco DNA Center 2.2.1.x version, complete the steps that are applicable to your situation:

Scenario 1

In this scenario, the first Cisco DNA Center version installed on your appliances was a version previous to 2.1.x. Now you want to upgrade to the latest 2.2.1.x version from 2.1.x. Complete the following steps to ensure that disaster recovery functions properly after the upgrade:

Procedure

Step 1

On your appliances, upgrade from your current Cisco DNA Center version to the latest 2.2.1.x version (see the Cisco DNA Center Upgrade Guide).

Step 2

Back up your data (see Back Up Data Now).

Ensure that your backup file resides on a remote server, as the next step will completely erase the data on your appliances and virtual machine.

Step 3

Install the latest Cisco DNA Center 2.2.1.x ISO image onto your appliances (see the "Reimage the Appliance" topic in the Cisco DNA Center Second-Generation Appliance Installation Guide.

Step 4

Restore the data from your backup file (see Restore Data from Backups).

Step 5

Proceed with the configuration of your disaster recovery system.


Scenario 2

In this scenario, the first Cisco DNA Center version installed on your appliances was an earlier 2.1.x version and now you want to upgrade to the latest 2.2.1.x version. Also, disaster recovery is enabled and operational on these appliances. Complete the following steps:

Procedure

Step 1

Place Your System on Pause.

Step 2

Upgrade the appliances at your main and recovery sites to the latest 2.2.1.x version. In the Cisco DNA Center Upgrade Guide, see the "Upgrade to Cisco DNA Center 2.2.1.x" chapter.

Step 3

Replace the Current Witness Site.

Step 4

Rejoin Your System.


Scenario 3

In this scenario, the first Cisco DNA Center version installed on your appliances was an earlier 2.1.x version and now you want to upgrade to the latest 2.2.1.x version. Unlike Scenario 2, disaster recovery has not been configured on these appliances. Complete the following steps:

Procedure

Step 1

Configure the Witness Site.

Step 2

Configure Disaster Recovery.


Add the Disaster Recovery Certificate

Cisco DNA Center supports the import and storage of an X.509 certificate and private key into Cisco DNA Center. The disaster recovery certificate is used for intracluster communications.

You must obtain a valid X.509 certificate that is issued by your internal CA and the certificate must correspond to a private key in your possession.


Note

If you want your disaster recovery system to use the same certificate that Cisco DNA Center uses, you can skip this procedure. When you configure the certificate, make sure that you check the Use system certificate for Disaster Recovery as well check box (see Update the Cisco DNA Center Server Certificate).


Procedure


Step 1

In the Cisco DNA Center GUI, click the Menu icon () and choose System > Settings > Trust & Privacy > Certificates > Disaster Recovery.

Step 2

In the Add Certificate area, choose the file format type for the certificate that you are importing into Cisco DNA Center:

  • PEM: Privacy-enhanced mail file format

  • PKCS: Public-Key Cryptography Standard file format

Step 3

If you chose PEM, perform the following tasks:

  • For the Certificate field, import the PEM file by dragging and dropping the file into the Drag and Drop area.

    Note 

    A PEM file must have a valid PEM format extension (.pem). The maximum file size for the certificate is 10 MB.

    After the upload succeeds, the system certificate is validated.

  • For the Private Key field, import the private key by dragging and dropping the file into the Drag and Drop area.

    Note 

    Private keys must have a valid private key format extension (.key). The maximum file size for the private key is 10 MB.

    After the upload succeeds, the private key is validated.

    • Choose the encryption option from the Encrypted area for the private key.

    • If you chose encryption, enter the password for the private key in the Password field.

Step 4

If you chose PKCS, perform the following tasks:

  • For the Certificate field, import the PKCS file by dragging and dropping the file into the Drag and Drop area.

    Note 

    A PKCS file must have a valid PKCS format extension (.pfx or .p12). The maximum file size for the certificate is 10 MB.

    After the upload succeeds, the system certificate is validated.

  • For the Certificate field, enter the passphrase for the certificate in the Password field.

    Note 

    For PKCS, the imported certificate also requires a passphrase.

  • For the Private Key field, choose the encryption option for the private key.

  • For the Private Key field, if encryption is chosen, enter the password for the private key in the Password field.

Step 5

Click Save.

After the Cisco DNA Center server’s SSL certificate is replaced, you are automatically logged out and you must log in again.


Configure the Witness Site

Complete the following procedure to configure the virtual machine that will serve as the witness site for your disaster recovery system.

Procedure


Step 1

Download the OVF package that's specific to the Cisco DNA Center version that the witness site is running:

  1. Open https://software.cisco.com/download/home/286316341/type.

    Note 

    You need a Cisco.com account to access this URL. See the following page for a description of how to create an account: https://www.cisco.com/c/en/us/about/help/registration-benefits-help.html

  2. In the Select a Software Type area, click the Cisco DNA Center software link.

    The Software Download page updates, listing the software that's available for the latest Cisco DNA Center release.

  3. Do one of the following:

    • If the OVF package (*.ova) you need is already listed, click its Download icon.

    • Enter the relevant version number in the Search field, click its link in the navigation pane, and then click the Download icon for that version's OVF package.

Step 2

Copy this package to a local machine running VMware vSphere 6.0 or 6.5.

Step 3

From the vSphere client, choose File > Deploy OVF Template.

Step 4

Complete the Deploy OVF Template wizard:

  1. Do the following in the wizard's Source screen:

    1. Click Browse.

    2. Navigate to the witness site's OVF package (.ova).

    3. Click Open.

    4. In the Deploy from a file or URL field, verify that the package's path is displayed and then click Next >.

      The wizard's OVF Template Details screen opens.

  2. Click Next >.

  3. Do the following in the wizard's Name and Location screen:

    • In the Name field, enter the name you want to set for the package.

    • In the Inventory Location field, select the folder that you want the package to reside in.

    • Click Next >.

    The wizard's Host/Cluster screen opens.

  4. Click the host or cluster on which you want to run the deployed template and then click Next >.

    The wizard's Storage screen opens.

  5. Click the storage drive that the virtual machine files will reside on and then click Next >.

    The wizard's Disk Format screen opens.

  6. Click the Thick Provision radio button and then click Next >.

  7. Do the following in the wizard's Network Mapping screen and then click Next >:

    1. Click the IP address that is listed in the Destination Networks column.

    2. In the resulting drop-down list, choose the network that the deployed template should use.

    The wizard's Ready to Complete screen opens, displaying all of the settings that you have entered.

  8. Check the Power on after deployment check box and then click Finish.

  9. When the Deployment Completed Successfully dialog box appears, click Close.

Step 5

Enter the network settings for your witness site:

  1. Open a console to the virtual machine you just created by doing one of the following:

    • Right-click the virtual machine from the vSphere Client list and choose Open Console.

    • Click the Open Console icon in the vSphere Client menu.

    The Witness User Configuration window appears.

  2. Enter and confirm the desired password for the admin user (maglev), then press N to proceed.

  3. Enter the following settings, then press N to proceed:

    • Its IP address

    • The netmask associated with the virtual machine's IP address

    • The IP address of your default gateway

    • (Optional) The IP address of the preferred DNS server

  4. Enter one or more NTP server addresses or hostnames (separated by spaces), then press S to submit your settings and begin the configuration of the witness site.

    At least one NTP address or hostname is required.

  5. Verify that configuration has completed by using SSH port 2222 to log in to the IP address you configured for the witness site.


Configure Disaster Recovery

To configure your disaster recovery system for use, complete the tasks described in the following procedure.


Note

When configuring your system, you have a couple of options:

  • You can specify a virtual IP address that uses Border Gateway Protocol (BGP) route advertising.

  • You can choose to not configure a virtual IP address. If you choose this option, you must enable device controllability so that a site's virtual IP address can be reconfigured after a failover occurs.


Procedure


Step 1

In the Cisco DNA Center GUI, click the Menu icon () and choose System > Disaster Recovery to open the Disaster Recovery page.

The Monitoring tab is selected, by default.

Step 2

Register your main site:

Note 

At any point before Step 2d, you can click Reset to clear all of the settings that you have entered. You will then need to repeat Step 2 and enter the correct settings before you register the main site.

  1. Click the Configure tab.

    The Main Site radio button should already be selected.

  2. Enter the following information in the Setting up this cluster area:

    • Main Site VIP: The virtual IP address that manages traffic between the active site's cluster nodes and your Enterprise network. Choose the Enterprise virtual IP address for the main site from the drop-down list.

    • Recovery Site VIP: The Enterprise virtual IP address that manages traffic between the recovery site's cluster nodes and your Enterprise network.

    • Witness Site IP: The IP address that manages traffic between the witness site's virtual machine and your Enterprise network.

    Important 

    Ensure that the addresses you enter are currently reachable. Otherwise, the registration of your system's sites will fail.

  3. Enter the following information in the Additional Protocols area:

    • Routing Protocol: Specify whether you want to use BGP to advertise your system's virtual IP address routes.

    • Border Gateway Protocol Type: If you clicked the Border Gateway Protocol (BGP) radio button, specify whether your BGP peers will establish exterior (Exterior BGP (eBGP)) or interior (Interior BGP (iBGP)) sessions with one another.

    • Enterprise VIP for Disaster Recovery: When configured, this floating virtual IP address automatically moves to and operates on the site that is currently acting as your network's active site. This address manages traffic between your disaster recovery system and your Enterprise network.

      Note 

      You must enter a value for this field if you selected the Border Gateway Protocol (BGP) option.

    • Main Site Router Settings: If you selected the Border Gateway Protocol (BGP) option, enter the IP address of your main site's remote router, as well as its local and remote autonomous system (AS) numbers. Click the Add (+) icon if you want to configure additional remote routers.

      Note 

      When the iBGP option is selected, Cisco DNA Center will automatically set the local AS number to the value you enter as the remote AS number.

    • Recovery Site Router Settings: If you selected the Border Gateway Protocol (BGP) option, enter the IP address of your recovery site's remote router, as well as its local and remote AS numbers. Click the Add (+) icon if you want to configure additional remote routers.

      Note 

      When the iBGP option is selected, Cisco DNA Center will automatically set the local AS number to the value you enter as the remote AS number.

    • (Optional) Management VIP for Disaster Recovery: When configured, this floating virtual IP address automatically moves to and operates on the site that is currently acting as your network's active site. This address manages traffic between your disaster recovery system and your Management network.

      Note 

      If you configure a Management virtual IP address and selected the Border Gateway Protocol (BGP) option, you must enter the appropriate remote router information (like you did for the Enterprise virtual IP address).

  4. From the Action area, click Register.

    The Disaster Recovery Registration dialog opens.

  5. Click Continue.

    The token that your recovery and witness sites need to use in order to register with your main site is generated.

Step 3

In the Supplement area, click Copy Token.

Step 4

Register your recovery site:

Note 

At any point before Step 4d, you can click Reset to clear all of the settings that you have entered. You will then need to repeat Step 4 and enter the correct settings before you register the recovery site.

  1. From the Supplement area, right-click the Recovery Site link and open the resulting page in a new browser tab.

  2. If necessary, enter the appropriate username and password to log in to your recovery site.

    The Disaster Recovery page's Configure tab opens, with the Recovery Site radio button already selected.

    Note 

    If the Enterprise VIP you configured in Step 2c is not reachable from a browser, update the URL that is provided by replacing the Enterprise VIP with your recovery site's Management VIP and open the resulting URL.

  3. Enter the following information:

    • Main Site VIP: The virtual IP address that manages traffic between the active site's cluster nodes and your Enterprise network.

    • Recovery Site VIP: The virtual IP address that manages traffic between the recovery site's cluster nodes and your Enterprise network. Choose the recovery site's Enterprise virtual IP address from the drop-down list.

    • The registration token you generated in Step 2.

    • The username and password configured for the your active site's super-admin user.

  4. From the Action area, click Register.

    The Disaster Recovery Registration dialog opens.

  5. Click Continue.

    The topology updates the status for the main and recovery sites after they have been connected.

Step 5

Register your witness site:

  1. Return to the main site's browser tab.

  2. From the Supplement area, click Copy Witness Login Cmmd.

  3. Open an SSH console to the witness site, paste the command you just copied, and then run it to log in.

  4. When prompted, enter the default (maglev) user's password.

  5. Return to the Supplement area and click Copy Witness Register Cmmd.

  6. In the SSH console, paste the command you just copied.

  7. Replace <main_admin_user> with the super-admin user's username and then run the command.

  8. When prompted, enter the super-admin user's password.

Step 6

Verify that your main, recovery, and witness sites have been registered successfully:

  1. Return to the main site's browser tab and click Monitoring to view the Disaster Recovery Monitoring tab.

  2. In the Logical Topology area, confirm that the three sites are displayed and their status is Registered.

  3. In the Event Timeline area, confirm that the registration of each site is listed as an event and that each task completed successfully.

Step 7

In the Action area, click Activate.

A dialog appears, indicating that all of the data that currently resides in your recovery site will be erased.

Step 8

To begin the configuration of your disaster recovery system and the replication of your main site's data to the recovery site, click Continue.

Note 

The activation process may take some time to complete. View the Event Timeline in order to monitor its progress.

Step 9

After Cisco DNA Center has completed the necessary tasks, verify that your system is operational:

  1. View its topology and confirm that the following status is displayed for your respective sites:

    • Main site: Active

    • Recovery site: Standby

    • Witness site: Up

  2. View the Event Timeline and confirm that the Activate DR task completed successfully.

  3. Verify that your sites are reachable by pinging them from the main site.


Replace the Current Witness Site

Complete the following procedure if you need to upgrade or replace your current witness site.

Procedure


Step 1

Log in to the current witness site:

  1. Open an SSH console to the witness site and run the ssh -p 2222 maglev@witness-site's-IP-address command.

  2. Enter the default (maglev) user's password.

Step 2

Run the witness reset command.

Step 3

Delete the current witness site's virtual machine.

Step 4

Install the new witness site's virtual machine, as described in Configure the Witness Site.

Step 5

Log in to the new witness site:

  1. Open an SSH console to the witness site and run the ssh -p 2222 maglev@witness-site's-IP-address command.

  2. Enter the default (maglev) user's password.

Step 6

Run the witness reconnect command.


Deregister Your System

After your disaster recovery system has been activated, you may need to update the settings that you entered for a particular site. If you find yourself in this situation, complete the following procedure. Before you proceed, note that the settings that are currently set for all of the sites in your system will be cleared.

Procedure


Step 1

From the Action area, click Pause DR to suspend the operation of your system.

See Place Your System on Pause for more information.

Step 2

From the Action area, click Deregister.

Cisco DNA Center deletes all of the settings that you configured previously for your system's sites.

Step 3

Complete the tasks described in Configure Disaster Recovery in order to enter the appropriate settings for your sites, reregister them, and reactivate your system.


Monitor the Event Timeline

From the Event Timeline, you can track the progress of disaster recovery tasks that are currently running and confirm when these tasks have completed. To view the timeline, do the following:

  1. In the Cisco DNA Center GUI, click the Menu icon () and choose System > Disaster Recovery to open the Disaster Recovery page.

    The Monitoring tab is selected, by default.

  2. Scroll to the bottom of the page.

Every task that is in progress or has completed for your system is listed here (in descending order based on their completion timestamp), starting with the most recent task. Cisco DNA Center indicates whether each task was initiated by the system () or a user ().

Say you want to monitor the restoration of your system after it was paused. Cisco DNA Center updates the Event Timeline as each task in the restoration process is started and then completed. To view a summary of what took place during a particular task, click >.

If the View Details link is displayed for a task, click it to view a listing of the relevant subtasks that were completed.

As with tasks, you can click > to view summary information for a particular subtask.

See Troubleshoot Your Disaster Recovery System for a description of the issues you may encounter while monitoring the Event Timeline and how to remedy them.

System and Site States

The following tables explain the various states you may see for your system in the Status area or your sites in the Topology.

Table 1. Disaster Recovery System States
State Description

Unconfigured

Newly installed system. Disaster recovery has not been configured yet.

Registered

The active, standby, and witness sites have been registered and all registration validation checks have completed successfully. The three sites can communicate with one another.

Configuring

This state can indicate any of the following situations:

  • Activate DR was clicked in the Action area, which initiates a number of workflows in both the active and standby sites. If any of these workflows fail, this site reverts back to the Registered state.

  • The tasks that run prior to the configuration of your system's active and standby sites have completed successfully.

Up

This state can indicate any of the following situations:

  • Disaster recovery has been configured and system-triggered failover is available.

  • Disaster recovery has been configured. However, system-triggered failover is not available because either the witness site has not been configured or the witness site is down.

  • The standby system is unavailable and data replication is not taking place.

  • Either a system-triggered or manual failover completed successfully.

Up (with no Failover)

The system enters this state when either:

  • The active and standby sites lose connectivity with the witness site.

  • The active and witness sites lose connectivity with the standby site.

Down

The disaster recovery system detected that the active site is down and initiated a failover, but the failover failed. When your system is in this state, resolve the issue and then initiate a manual failover.

Failover in progress

After detecting that the active site is down, the disaster recovery system triggered a failover.

Deregistering

Deregistration is in progress. After this process completes, all registration information and related network settings are reset.

Deregistered

The main, recovery, and witness sites have been deregistered from your disaster recovery system.

Pausing Disaster Recovery System

The disaster recovery system is temporarily being paused for maintenance or other activities.

Disaster Recovery System Paused

The disaster recovery system has been paused. The main and recovery sites are currently operating as two standalone clusters that are not replicating data between each other. To restart the system and resume data replication, click Rejoin.

Pausing Disaster Recovery Failed

Errors occurred while pausing your disaster recovery system.

User intervention required

Both the main and recovery sites went offline and then restarted. However, the disaster recovery system remains in a disconnected state. Pause and then restart your system to see if that resolves the issue.

Table 2. Active Site States
State Description

Unconfigured

Newly installed site. Disaster recovery information is not available yet.

Registered

This site was designated as the active site. Also, the validation checks and registration have completed successfully.

Configuring Active

The workflows that run before a site is configured as the active site are in progress.

Active

The workflows that run before a site is configured as either the active or standby site have completed successfully.

Failed to Configure

Unable to complete the workflows that run before a site is configured as the active site.

Active

This site was successfully configured as the active site.

Isolating

Indicates that the isolation of this site from the disaster recovery system is in progress. This is triggered after you initiate a manual failover and the site that was previously acting as the active site comes back online.

Isolated

This site was successfully isolated from the disaster recovery system.

Isolate Failed

Unable to isolate this site from the disaster recovery system.

Down

Either the automated health monitor recognizes that the witness system is down or the system has not provided a health update within the configured threshold time.

Pausing Active

The active site is temporarily being paused for maintenance or other activities.

Active Paused

The active site has been paused. The active and standby sites are currently operating as two standalone clusters that are not replicating data between each other. To restart the system and resume data replication, click Rejoin.

Pausing Active Failed

Errors occurred while pausing your active site.

Table 3. Standby Site States
State Description

Unconfigured

Newly installed site. Disaster recovery information is not available yet.

Registered

This site was designated as the standby site and the validation checks have completed successfully.

Configuring Standby

The workflows that run before a site is configured as the standby site are in progress.

Standby

The workflows that run before a site is configured as the standby site have completed successfully.

Failed to Configure

Unable to complete the workflows that run before a site is configured as the standby site.

Passive

This site was successfully configured as the standby site.

Activating passive

Indicates that a system-triggered or manual failover is in progress, which will convert your standby site into the new active site.

Failover success

A system-triggered or manual failover completed successfully and the disaster recovery system is ready to operate.

Failover failed

A system-triggered or manual failover did not complete successfully.

Standby ready

The site previously acting as the active site is ready to be configured as the new standby site.

Down

Either the automated health monitor recognizes that the witness system is down or the system has not provided a health update within the configured threshold time.

Pausing Standby

The standby site is temporarily being paused for maintenance or other activities.

Standby Paused

The standby site has been paused. The active and standby sites are currently operating as two standalone clusters that are not replicating data between each other. To restart the system and resume data replication, click Rejoin.

Pausing Standby Failed

Errors occurred while pausing your standby site.

Table 4. Witness Site States
State Description

Unconfigured

Newly installed site. Disaster recovery information is not available yet.

Registered

This site has been designated as the witness site and the validation checks have completed successfully.

Up

Configuration of the witness site has completed successfully.

Down

Either the automated health monitor recognizes that the witness site is down or the witness site has not provided a health update within the configured threshold time.

Up and Replicating

The disaster recovery system is up and running. Replication is in progress.

Up (Manual failover)

The disaster recovery system is running without the quorum that the witness site provides. System-triggered failover is not currently available.

Failover in progress

Failover is in progress. After resolving any issues on the new standby site (if any), click Rejoin after failover completes.

Failover in progress (User initiated)

A manually-initiated failover is in progress. The witness site is not currently reachable.

Up (No failover)

The configuration and activation of the disaster recovery system have been completed. However, the witness site is not reachable, so failover is not currently available.

Down (User intervention required)

Failover did not complete successfully. The witness system is not reachable. Pause and then restart your system to see if that resolves the issue.

Failovers: An Overview

A failover takes place when your disaster recovery system's standby site takes over the responsibilities of the former active site and becomes the new active site. Cisco DNA Center supports two types of failover:

  • System-triggered: Occurs when your system's active site experiences an issue that brings it offline (such as a hardware failure or network outage). When Cisco DNA Center recognizes that the active site has not been able to communicate with the rest of the Enterprise network (as well as the standby and witness sites) for seven minutes, it completes the tasks necessary for your standby site to assume its role so that network operations can continue without interruption.

  • Manual: Occurs when a super-admin user instructs Cisco DNA Center to swap the roles that are currently held by your system's active and standby sites. You would typically do this before you update the Cisco DNA Center software that is installed on a site's appliances or perform routine site maintenance.

After either type of failover has taken place and the former active site has come back online, your disaster recovery system automatically moves the site to the Standby Ready state. To establish this site as the new standby site, click Rejoin in the Action area of the Monitoring tab.

Initiate a Manual Failover

When you manually initiate a failover, you instruct Cisco DNA Center to swap the roles that are currently assigned to your disaster recovery system's main and recovery site. This is handy if you know that the current active site is experiencing issues and you want to proactively designate the standby site as the new active site. Complete the following procedure to initiate a manual failover.


Note

You cannot initiate a manual failover from your witness site. You can only do so from the current active site.


Procedure


Step 1

In the Cisco DNA Center GUI, click the Menu icon () and choose System > Disaster Recovery to open the Disaster Recovery page.

The Monitoring tab is selected, by default, and displays your disaster recovery system's topology. In the following example, the user is logged in to the current active site.

Step 2

In the Action area, click Manual Failover.

The Disaster Recovery Manual Failover dialog opens, indicating that the standby site will assume the Active role.

Step 3

Click Continue to proceed.

A message appears in the bottom right corner of the page, indicating that the failover process has started. The site previously acting as the active site is isolated from the system and enters the Standby Ready state.

At this point, the main and recovery sites are not connected and data replication is not taking place. If the former active site is experiencing issues, now is a good time to resolve those issues.

A subsequent failover (initiated by either the system or a user) cannot take place until you add the former active site back to your disaster recovery system.

Step 4

Reconnect the main and recovery sites and reconfigure your disaster recovery system:

  1. Log in to your recovery site.

  2. In the Action area, click Rejoin.

A dialog opens, indicating that data on the standby site will be erased.

Step 5

Click Continue to proceed and restart data replication.

After Cisco DNA Center completes the relevant workflows, the manual failover completes. The main site, which was currently serving as the active site, is now the standby site.

Step 6

Confirm that your disaster recovery system is operational again:

  1. In the top right corner of the Monitoring tab, verify that its status is listed as Up and Running.

  2. In the Event Timeline, verify that the Rejoin task completed successfully.


Pause Your Disaster Recovery System

By pausing your main and recovery sites, you are effectively breaking up your disaster recovery system. The sites will no longer be connected and instead will act as standalone clusters. You would want to pause your system to temporarily disable the replication of data from the active site to the standby site if you plan to break up your system for an extended period of time. You would also pause your system if you need to perform any administrative tasks, such as installing additional packages. By pausing your disaster recovery system, you can protect Cisco DNA Center from known network disruptions or disable disaster recovery without deleting your system's settings.

Place Your System on Pause

To temporarily pause your disaster recovery system, which you would typically do before performing maintenance on a system component, complete the following procedure:

Procedure


Step 1

In the Cisco DNA Center GUI, click the Menu icon () and choose System > Disaster Recovery to open the Disaster Recovery page.

The Monitoring tab is selected, by default, and displays your disaster recovery system's topology.

Step 2

In the Action area, click Pause DR.

Step 3

In the resulting dialog, click Continue to proceed.

A message appears in the bottom right corner of the page, indicating that the process to pause your system has started. To pause your system, Cisco DNA Center disables data and service replication. It also reinstates the services that were suspended on your recovery site. As this is taking place, the status for your main and recovery sites is set to Pausing in the topology.

After Cisco DNA Center completes the necessary tasks, the topology updates and sets the status for your main, recovery, and witness sites as Paused.

Step 4

Confirm that your disaster recovery system has been paused:

  1. In the top right corner of the Monitoring tab, verify that its status is listed as Disaster Recovery System Paused.

  2. In the Event Timeline, verify that the Pause DR task completed successfully.


Rejoin Your System

Complete the following procedure in order to restart a disaster recovery system that is currently on pause.

Procedure


Step 1

In the Cisco DNA Center GUI, click the Menu icon () and choose System > Disaster Recovery to open the Disaster Recovery page.

The Monitoring tab is selected, by default, and displays your disaster recovery system's topology.

Step 2

In the Action area, click Rejoin.

A dialog opens, indicating that all of the data on your standby site will be erased.

Step 3

Click Continue to proceed.

A message appears in the bottom right corner of the page, indicating that the process to reconnect your main, recovery, and witness sites has started. As this is taking place, the status for your main and recovery sites is set to Configuring in the topology.

After Cisco DNA Center completes the necessary tasks, the topology updates the status for your main, recovery, and witness sites.

Step 4

Confirm that your disaster recovery system is operational again by verifying that its status is listed as Up and Running in the top right corner of the Monitoring tab.


Backup and Restore Considerations

Keep the following points in mind when backing up and restoring your disaster recovery system:

  • A backup can only be scheduled from your system's active site.

  • You cannot restore a backup file when disaster recovery is enabled. You must first pause your system temporarily. See Place Your System on Pause for more information.

  • You should only restore a backup file on the site that was the active site prior to pausing your system. After you restore the backup file, you then need to rejoin your system's sites. Doing so will reinstate disaster recovery and initiate the replication of the active site's data to the standby site. See Rejoin Your System for more information.

  • You can only restore a backup file on cluster nodes that have the same Cisco DNA Center version installed as the other nodes in your system.

For more information on backing up and restoring your disaster recovery system, see Backup and Restore.

Disaster Recovery Event Notifications

You can configure Cisco DNA Center to send a notification whenever a disaster recovery event takes place. See the "Work with Events" topic in the Cisco DNA Center Platform User Guide for a description of how to configure and subscribe to these notifications. When completing this procedure, ensure that you select and subscribe to the SYSTEM-DISASTER-RECOVERY event in the Platform > Developer Toolkit > Events table.

After you subscribe, Cisco DNA Center sends a notification indicating that the IPsec session is down because the system's certificate has expired. Do the following to update this certificate:

  1. Place Your System on Pause.

  2. On both your main and recovery site, replace the current system certificate. In the Cisco DNA Center GUI, click the Menu icon () and choose System > Settings > Trust & Privacy > Certificates > System.

  3. Rejoin Your System.

Supported Events

The following table lists the disaster recovery events that Cisco DNA Center generates notifications for when they take place.

System Health Status

Event

Notification

OK

The disaster recovery system is operational.

Activate DR (Disaster Recovery Setup Sucessful)

OK

Failover to either the main or recovery site has completed successfully.

Failover Successful

Degraded

Failover to either the main or recovery site has failed.

Failover Failed

Degraded

Automated failover is not available because the standby site is currently down.

Standby Cluster Down

Degraded

Automated failover is not available because the witness site is currently down.

Witness Cluster Down

Degraded

Unable to place the disaster recovery system on pause.

Pause Failure

Degraded

BGP route advertisement failed.

BGP Failure

Degraded

The IPsec tunnel connecting your system's sites is operational.

IPsec Up

Degraded

The IPsec tunnel connecting your system's sites is currently down.

IPsec Down

NotOk

Disaster recovery system configuration failed.

Activate DR Failure

NotOk

The site that is currently in the Standby Ready state is unable to rejoin the disaster recovery system.

Activate DR Failure

Troubleshoot Your Disaster Recovery System

The following table describe the issues that your disaster recovery system may present and how to deal with them.

Table 5. Disaster Recovery System Issues

Error Code

Message

Solution

SODR10007

Token does not match.

The token provided during recovery site registration does not match the token generated during main site registration. From the main site's Disaster Recovery > Configuration tab, click Copy Token to ensure that you copy the correct token.

SODR10048

Packages (package names) are mandatory and not installed on the main site.

Install the listed packages before registering the system.

SODR10056

Invalid credentials.

Confirm that you entered the correct credentials for the main site during recovery and witness site registration.

SODR10062

() site is trying to () with invalid IP address. Expected is (); actual is ().

The main site IP address provided during recovery and witness site registration is different from the IP address that was provided during main site registration.

SODR10067

Unable to connect to (recovery or witness site).

Verify that the main site is up.

SODR10072

All the nodes are not up for (main or recovery site).

Check whether all three of the site's nodes are up.

SODR10076

High availability should be enabled on (main or recovery) site cluster.

Enable high availability (HA):

  1. Log in to the site you need to enable HA on.

  2. In the Cisco DNA Center GUI, click the Menu icon () and choose System > Settings > System Configuration > High Availability.

  3. Click Activate High Availability.

SODR10100

(Main or recovery) site has no third party certificate.

Replace the default certificate that Cisco DNA Center is currently using with a third-party certificate. See Update the Cisco DNA Center Server Certificate for more information.

SODR10118

Appliance mismatch between main () and recovery ().

Different appliances are used by the main and recovery sites. To successfully register disaster recovery, both sites must use the same 56 or 112 core appliance.

SODR10121

Failed to advertise BGP. Reason: ().

See Troubleshoot BGP Route Advertisement Issues for more information.

SODR10122

Failed to stop BGP advertisement. Reason: ().

See Troubleshoot BGP Route Advertisement Issues for more information.

SODR10123

Failed to establish secure connection between main () and ()().

No solution is available for this issue. Please contact Cisco TAC for support.

SODR10124

Cannot ping VIP: (main, recovery, or witness site's VIP or IP address).

Do the following:

  • Verify that the address specified is correct.

  • Check whether the address is reachable from the other addresses.

SODR10129

Unable to reach main site. ()

Check whether the Enterprise virtual IP address configured for the main site is reachable from the recovery and witness sites.

SODR10132

Unable to check IP addresses are on the same interface. Retry the operation. ()

Retry the operation you just attempted.

SODR10133

The disaster recovery enterprise VIP () and the IP addresses () are not configured or reachable via the same interface. Check the gateway or static routes configuration.

Communication between a disaster recovery system's sites relies on the Enterprise network. The main and recovery site's Enterprise virtual IP address, as well as the witness site's IP address, need to be reachable via the Enterprise interface.

This error indicates that the IP address/virtual IP address configured for one or multiple sites uses an interface other than the Enterprise interface for communication.

SODR10134

The disaster recovery management VIP (VIP address) and the IPs (IP addresses) are configured/reachable via same interface. It should be configured/reachable via management interface. Check the gateway or static routes' configuration.

The disaster recovery system's Management virtual IP address needs to be configured on the Management interface. This error indicates that the virtual IP address is currently configured on an interface where the Management cluster's virtual IP address has not been configured.

Add a /32 static route to the Management virtual IP address that's configured on the Management interface.

SODR10136

Certificates required to establish IPsec session not found.

From the System Certificate page (System > Settings > Trust & Privacy > Certificates > System), try uploading the third-party certificate again and then retry registration. If the problem persists, contact Cisco TAC for assistance.

SODR10138

Self-signed certificate is not allowed. Upload a third-party certificate and retry.

SODR10139

Disaster recovery requires first non-wildcard DNS name to be same in main and recovery. {} in {} site certificate is not same as {} in {} site certificate.

The third-party certificate installed on your main and recovery sites has different DNS names specified for your disaster recovery system. Generate a third-party certificate that specifies a DNS name for your system and upload this certificate to both sites.

Note 

Ensure that the DNS name does not use a wildcard.

SODR10140

Disaster recovery requires at least one non-wildcard DNS name. No DNS name found in certificate.

The third-party certificate installed on your main and recovery sites does not specify a DNS name for your disaster recovery system. Cisco DNA Center uses this name to configure the IPsec tunnel that connects your system's sites. Generate a third-party certificate that specifies a DNS name for your system and upload this certificate to both sites.

Note 

Ensure that the DNS name does not use a wildcard.

When all three of your system's sites are not connected due to network partitioning or another condition, Cisco DNA Center sets the status of the sites to Isolated. Contact Cisco TAC for help with completing the appropriate recovery procedure.

External postgres services does not exists to check service endpoints.

Do the following:

  1. Log in to the site that the error occurred on.

  2. Run the following commands:

    • Kubectl get sep -A

    • kubectl get svc -A | grep external

  3. In the resulting output, search for external-postgres.

  4. If present, run the following command: kubectl delete sep external-postgres -n fusion

  5. Retry the operation that failed previously.

Cannot ping VIP: (VIP address).

Verify that the Enterprise VIP address configured for your system is reachable.

VIP drop-down list is empty.

Confirm that your system's VIP addresses and intracluster link are configured properly.

Cannot perform (disaster recovery operation) due to ongoing workflow: BACKUP. Please try again at a later time.

A disaster recovery operation was triggered while a scheduled backup was running. Retry the operation after the backup finishes.

The GUI indicates that the standby site is still down after it has come back online.

If the standby site goes down and Cisco DNA Center's first attempt to isolate it from your disaster recovery system fails, it may not automatically initiate a second attempt. When this happens, the GUI will indicate that the site is down, even if it is operational again. In addition, you will not be able to restart your system as the standby site is stuck in maintenance mode.

To restore the standby site, do the following:

  1. In an SSH client, log in to the standby site.

  2. Run the maglev maintenance disable command to take the site out of maintenance mode.

  3. Log in to Cisco DNA Center.

  4. In the GUI, click the Menu icon () and choose System > Disaster Recovery.

    The Monitoring tab is selected, by default.

  5. In the Action area, click Rejoin in order to restart your disaster recovery system.

Multiple services exists for MongoDB to check node-port label.

For debugging, the MongoDB node port is exposed as a service. Run the following commands to identify this port and hide it:

  • kubectl get svc --all-namespaces | grep mongodb

  • magctl service unexpose mongodb <port-number>

Multiple services exist for Postgres to check node-port label.

For debugging, the Postgres node port is exposed as a service. Run the following commands to identify this port and hide it:

  • kubectl get svc --all-namespaces | grep postgres

  • magctl service unexpose postgres <port-number>

Troubleshoot BGP Route Advertisement Issues

If you receive a BGP route advertisement error, complete the following procedure in order to troubleshoot the cause.

Procedure


Step 1

From the Cisco DNA Center cluster, validate the BGP session's status:

  1. In the Event Timeline, confirm whether the Starting BGP advertisement task completed successfully (Activate DR > View Details > Configure active).

    If the task failed, do the following before proceeding to Step 1b:

    1. Check whether the neighbor router indicated in the error message is up.

    2. Confirm whether the neighbor router has connectivity with Cisco DNA Center. If it doesn't, restore connectivity and then retry activating the new disaster recovery system or restarting an existing system that was paused.

  2. In the Cisco DNA Center GUI, view the disaster recovery system's Logical Topology and determine whether the neighbor router is currently active.

    If it's down, check whether the Cisco DNA Center cluster is configured as a BGP neighbor from the router's perspective. If it's not, configure the cluster as a neighbor and then retry activating the new disaster recovery system or restarting an existing system that was paused.

  3. Check the status of the BGP session between Cisco DNA Center and its neighbor router by running the following command:

    etcdctl get /maglev/config/network_advertisement/bgp/address1_address2 | jq

    where:

    • address1 is the Cisco DNA Center cluster's virtual IP address.

    • address2 is the neighbor router's IP address.

    If Established is listed in the state field, this indicates that the session is active and functioning properly.

  4. Run the following commands to view the bgpd and bgpmanager log files:

    • sudo vim /var/log/quagga/bgpd.log

    • magctl service logs -rf bgpmanager | lql

    When viewing the log files, look for error messages. If you can't find any, this indicates that the BGP session is functioning properly.

  5. Check the status of the BGP session between Cisco DNA Center and its neighbor router by running the following command: echo admin-password| sudo VTYSH_PAGER=more -S -i vtysh -c 'show ip bgp summary'

    In the command output, look for the neighbor router's IP address. At the end of the same line, confirm that the router's connection state is listed as 0. If this is the case, this indicates that the BGP session is active and functioning properly.

Step 2

From the neighbor router indicated in the error message, validate the BGP session's status:

  1. Run the show ip bgp summary command.

  2. In the command output, look for the Cisco DNA Center cluster's virtual IP address. At the end of the same line, confirm that the cluster's connection state is listed as 0. If this is the case, this indicates that the BGP session is active and functioning properly.

  3. Run the show ip route command.

  4. View the command's output and confirm whether the disaster recovery sytem's Enterprise virtual IP address is being advertised.

    For example, say your system's Enterprise virtual IP address is 10.30.50.101. If this is the first IP address that you see in the output, this confirms that it is being advertised.