Custom Classification of Rogue APs

About the allowed list workflow

The Catalyst Center Rogue Management and aWIPS workflow allows you to review and mark the MAC addresses of rogue access points to move them to the allowed list in bulk. You can then process the allowed list of selected AP MAC addresses.

The Rogue Management and aWIPS workflow supports APs that are associated with Cisco AireOS Wireless Controllers and Cisco Catalyst 9800 Series Wireless Controllers.

See Set up the allowed list workflow for instructions about moving these rogue AP types to the allowed list:

  • Rogue on Wire

  • Honeypot

  • Interferer

  • Neighbor

The Rogue Management and aWIPS workflow does not support moving these AP types to the allowed list:

  • Beacon Wrong Channel

  • Beacon DS Attack

  • AP Impersonation

  • Friendly

Set up the allowed list workflow

This procedure shows how to move rogue AP MAC addresses to the allowed list in bulk. You do not want to report these addresses as high threat in Catalyst Center.

Before you begin

To perform this procedure, you must have SUPER-ADMIN-ROLE or NETWORK-ADMIN-ROLE permissions.

Procedure


Step 1

From the main menu, choose Workflows > Set up Rogue Management and aWIPS.

The Set up Rogue Management and aWIPS window opens.

Step 2

Click Let's Do it.

To skip this step in the future, check the Don't show this to me again check box.

The Bulk upload allowed access points window opens.

Step 3

Using the Search field, search for the MAC addresses that were already added in the About the allowed list workflow.

Step 4

Click Export to export the allowed list.

Step 5

Click the Download the sample CSV template from here link to download the sample file. Manually add the MAC address, operation, and category to the bulk allowed list template.

Hover your cursor over the notification symbol to view the format of allowed MAC addresses, operations, and categories.

Step 6

Either drag and drop the CSV file into the boxed area or click Choose a file and browse to the CSV file on your system. The maximum size of the CSV file should be 1.2 MB.

Note


Catalyst Center performs a validation check. An error message appears if the uploaded CSV file does not meet these requirements:

  • The MAC address is not a valid rogue point MAC address.

  • All the rogue access point MAC addresses exist in the system already, or no rogue access point MAC addresses are eligible for the delete operation.

  • A green check mark indicates that the uploaded CSV file content is valid.

Step 7

Click Next.

Step 8

In the Summary window, the Uploaded bulk allowed list MAC addresses table displays the list of allowed MAC addresses in bulk, and the respective operation and action:

  • All: Shows the list of all the MAC addresses in bulk, and their respective operation and action.

  • Create: Shows the list of created MAC addresses in bulk, and their respective operation and action.

  • Delete: Shows the list of deleted MAC addresses in bulk, and their respective operation and action.

  • No Action: Shows the list of MAC addresses that are already deleted, and their respective operation and action.

Step 9

Click Continue to allowed list, and, in the dialog box that opens, click Yes.

The Done! Allowed List Updated window opens.

Step 10

Click Go to Rogue and aWIPS Home Page.

The Rogue and aWIPS dashboard opens.

Click the Threats tab to display the Threat table. Catalyst Center now categorizes the specified rogue AP MAC addresses as Allowed List under the Type column.

Step 11

To add or delete a rogue AP MAC address individually, click the rogue MAC address listed under the Threat MAC address column.

The Threat 360 window opens.

Step 12

From the Action drop-down list, select Add to Allowed list.

To remove a rogue AP MAC address from the allowed list individually, from the Action drop-down list, select Remove from Allowed list.


About custom rogue rule creation

Rogue rules are an easy way to segregate and manage rogues with different risk profiles. Rogue rules are easy to configure and they are applied in order of priority. They reduce false positives, noise for sites with interferers, number of alerts, and provide the ability to adjust organizational risk profiles on global and site basis.

You can move these rogue AP types to the custom classification type:

  • Interferer

  • Neighbor

Edit a rogue rule

Procedure


Step 1

From the main menu, choose Assurance > Rogue and aWIPS > Rules.

Step 2

In the Rogue Rules table, click the rule name that you want to edit.

Step 3

In the Edit Rogue Rule window, make changes as needed.

Note


The previous classification remains unchanged, even if old rules are used to modify the rule conditions. The change affects only the new data classification.

Step 4

(Optional) Check the Enable Auto-Containment check box to check box to enable automatic containment of the rogue rule.

Note

 
  • Cisco Catalyst 9800 Series Wireless Controllers have a limit of 625 configurations for rogue containment at a time. When the limit is reached, containment won't work for any new rogue on those devices.

  • You can only enable automatic containment for Honeypot and the custom rule with the High level threat.

  • If you want to disable automatic containment after it has been enabled, you must do so manually. Disabling automatically is not supported.

Step 5

Click Save.

Verify whether the rogue containment is enabled or not in the Auto-Containment column.


Delete a rogue rule

Procedure


Step 1

From the main menu, choose Assurance > Rogue and aWIPS > Rules.

Step 2

In the Rogue Rules table, click the Rule Name that you want to delete and click Delete.

Note


If you delete the only rogue rule in a rule profile, the rule profile is also deleted.

Step 3

In the confirmation dialog box, click Delete.

Note


Honeypot is a predefined rule; you cannot delete it.

Step 4

(Optional) To view the deleted rules, click the Inactive tab in the Rogue Rules table.


Create a custom rogue rule

You can create a rule with specific conditions and associate this rule to a rule profile.

Procedure


Step 1

From the main menu, choose Workflows > Create a Rogue Rule.

Step 2

In the Create a Rogue Rule window, click Get Started.

Step 3

In the Rule Name field, enter a unique name for the rule.

While creating new rogue rules, you cannot enter the rogue rule names that were deleted earlier.

Step 4

In the Description field, enter a description for the rule.

Step 5

Click Next.

Step 6

In the Create Rogue Rule window, select one of these threat level options: High, Potential, and Informational.

Step 7

(Optional) Check the Enable Auto-Containment check box to automatically contain the rogue rule.

Note

 
  • Cisco Catalyst 9800 Series Wireless Controllers have a limit of only 625 configurations for rogue containment at a time. After the limit is reached, containment won't work for any new rogue on those devices.

  • Automatic containment is only applicable to the rogue rules classified with the High threat level. By default, Enable Auto-containment is disabled for the Potential and Informational threat levels.

Step 8

From the Match drop-down list, choose either All to match all the conditions, or Any to match your choice of conditions.

Step 9

From the Add Condition drop-down list, choose the rule conditions.

You can add multiple conditions to a rule. The available rule conditions are: SSID, RSSI, Encryption Condition, Channel Width, and Minimum Rogue Client Count.

Step 10

Click Next.

Step 11

(Optional) To assign this rule to an existing rule profile, click Yes in the Do you want to assign this rule to a rule profile? dialog box.

Note


Rogue rules must be assigned to a rule profile. A rogue rule cannot function on its own.

Step 12

In the Available rule profiles table, check the check box next to the corresponding profile name, and click Next.

You can select one or more rule profiles.

Note


You cannot assign more than five rules to a rule profile.

Step 13

In the confirmation dialog box, click Proceed.

The new rule is set to the lowest priority. You can edit the rule profile to change the priority.

Note


After the rogue rule is created, you cannot use the same rogue rule name to create another rogue rule.

Step 14

Review the rogue rule configuration in the Summary window.

Note


The existing classification based on earlier rules does not change, even if the new rule conditions apply. The updated rules affect only new data classification.

Step 15

(Optional) To create another rogue rule, click the Create Another Rogue Rule button and repeat the preceding steps in this procedure.

Step 16

(Optional) To view the created rogue rules, click View all Rogue Rules and Profiles.

The Rogue Rules tab lists all the rogue rules that have been created.

You can also view the created rogue rules by clicking the menu icon and choosing Assurance > Rogue and aWIPS > Rules > Rogue Rules.


About rogue rule profiles

You can create a rogue rule with specific conditions, and then associate it to a rule profile. You can prioritize rogue rules after associating them to a rogue rule profile.

When a rogue rule profile is assigned to a site, the rogues reported from the site are verified against the rules in the rule profile.


Note


You can assign only one rogue rule profile to a site.


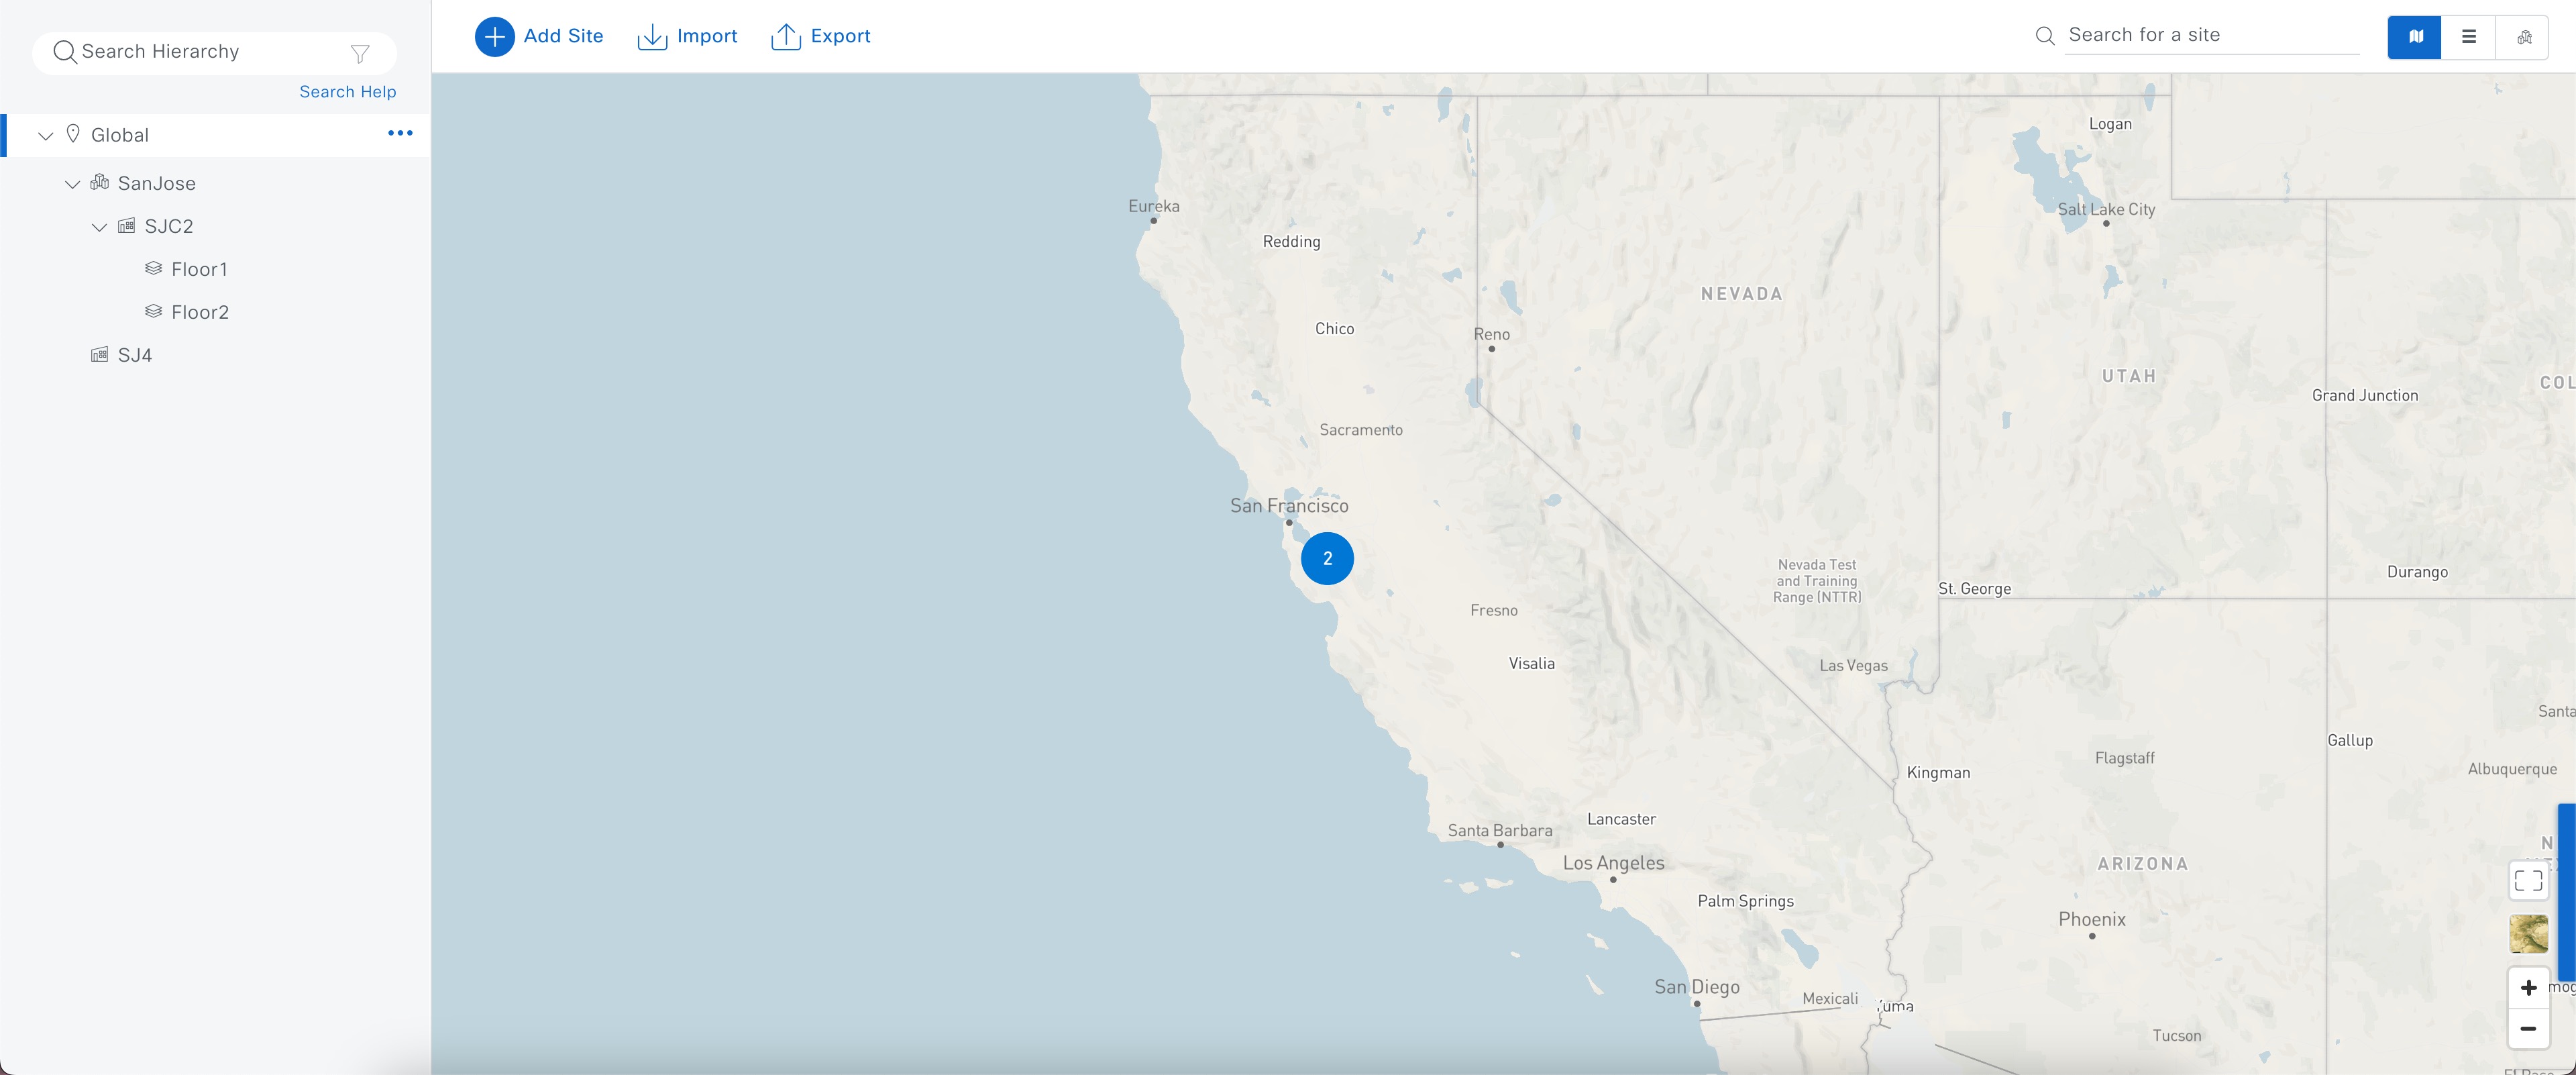
Due to site inheritance, all floors under a particular site inherit the rogue rule profile mapped at the area, site, or building level. For example, as shown in the figure, Floor1 and Floor2 will inherit the rogue rule profile that is mapped at the SanJose level.

A rogue rule profile mapped to a floor has precedence over a rogue rule inherited from a parent site. For example, as shown in the the figure, Rogue Rule Profile A is directly mapped to Floor1. Rogue Rule Profile A takes precedence over Rule Profile B that is assigned to the parent site, SJC2.

Figure 1. Network hierarchy

Edit a rogue rule profile

Procedure


Step 1

From the main menu, choose Assurance > Rogue and aWIPS > Rules.

Step 2

Click the Rogue Rule Profiles tab.

Step 3

In the Rogue Rule Profiles table, click the profile name that you want to edit.

Step 4

In the Edit Rule Profile window, make the necessary changes.

Note


Edited rule profiles do not modify any previously classified data. The edits only apply to the new modified data that is processed after changes are made.

Step 5

(Optional) Check the Enable Auto-Containment check box to autocontain the rogue rule.

Note

 
  • Cisco Catalyst 9800 Series Wireless Controllers have a limit of 625 Rogue Containment configurations at a time. Once the limit is reached, containment won't work for any new rogue on those devices.

  • Honeypot is a predefined rule that is added to all the newly created rogue rule profiles by default.

  • If you want to disable autocontainment after enabling autocontainment, you must disable autocontainment manually because it cannot be disabled automatically.

Step 6

In the confirmation window, click Yes.

Step 7

(Optional) You can toggle between User Defined and Predefined to view the corresponding rules.

Step 8

Verify whether the rogue containment is enabled or not in the Auto-containment column.

Step 9

Click Save.


Delete a rogue rule profile

Procedure


Step 1

From the main menu, choose Assurance > Rogue and aWIPS > Rules.

Step 2

Click the Rogue Rule Profiles tab.

Step 3

In the Rogue Rules table, click the profile name to delete then click Delete.

Step 4

In the confirmation dialog box, click Delete.


Create a rogue rule profile

You can create a rule with specific conditions and then associate it to a rogue rule profile.

Procedure


Step 1

From the main menu, choose Workflows > Create a Rogue Rule Profile.

Step 2

In the Create Rogue Rule Profile window, click Get Started.

Step 3

In the Profile Name field, enter a unique name for the rule profile.

Step 4

(Optional) Check the Enable Auto-Containment check box to automatically contain the rogue rule.

Note

 
  • Cisco Catalyst 9800 Series Wireless Controllers have a limit of 625 configurations for rogue containment at a time. When the limit is reached, containment won't work for any new rogues on those devices.

  • You can only automatically contain Honeypot and the custom rules classified with the High threat level.

Step 5

In the confirmation window, click Yes.

Step 6

Click Next.

Step 7

In the Rule List table, check the check box next to the rule name, and click Next.

You can add up to five rogue rules in a profile.

Step 8

In the Sort rules in order of priority window, drag and drop the rules to set their priority. The highest priority rule is listed first.

Step 9

Click Next to associate a rogue rule profile to a location.

Step 10

Check the check box next to a site to associate the rule profile to that site, and click Next.

Rule profiles can exist without being assigned to any site. Rules are only checked when you assign the rule profile to a site.

Note


If a vendor rule and rule profile are mapped to the same site, the vendor rule takes precedence.

Step 11

In the Summary window, review the rogue rule profile configuration.

Step 12

Click Back to make changes, if any, to the values entered in the previous window.

Step 13

Click Create Rule Profile.

A message appears to confirm the rule profile creation was successful.

Step 14

(Optional) To view all the rogue rules and profiles, click View all Rogue Rules and Profiles.

The Rogue Rule Profiles tab lists all the created rogue rules and rule profiles.

You can also view the created rule profiles by clicking the menu icon and choosing Assurance > Rogue and aWIPS > Rules > Rogue Rule Profiles.


View the allowed access points list

Procedure


Step 1

From the main menu, choose Assurance > Rogue and aWIPS.

The Rogue and aWIPS dashboard appears.

Step 2

In the Allowed List tab, click the Allowed Access Points List.

The Allowed Access Points List table displays the MAC Address and Last Changed details of all the allowed access points.

Step 3

Click the search icon or filter icon to find a specific access point in the allowed list.

Step 4

(Optional) Click Add Access Point List to add a rogue AP MAC address to the allowed list. For more information, see Set up the allowed list workflow.

Step 5

(Optional) Click Export to save the allowed access points list as a CSV file.

Step 6

(Optional) Select an access point and click Delete to remove the access point from the allowed list.


About the allowed vendor list

The Allowed Vendor List feature lets you determine if APs from specific vendors trigger a specific threat level. You can create a list of allowed vendors, so that threats from these vendors are not marked as High threats. You can decide whether to mark them as Potential or Informational threats. In a given workflow, you can add up to five vendors to the allowed list.

An allowed vendor rule that is mapped at any level takes precedence over the inherited rule. For example, if allowed vendor rule A is mapped to a floor level, vendor rule A takes precedence over allowed vendor rule B that is present at the site, area, or building level.

View vendor rule list information

Procedure


Step 1

From the main menu, choose Assurance > Rogue and aWIPS.

Step 2

Click the Allowed List tab.

The Allowed Vendor List table lists the allowed vendors with details. Each vendor rule appears as an entity:
  • Vendor Name

  • Match Criteria

  • Threat Level

  • Associated Site(s)

  • Last Changed


Edit a vendor rule

Procedure


Step 1

From the main menu, choose Assurance > Rogue and aWIPS.

Step 2

Click the Allowed List tab.

Step 3

In the Allowed Vendor List table, select the vendor name that you want to edit.

Step 4

In the Edit Allowed Vendor List window, edit these parameters as needed:

  • Threat Level

  • Match Criteria

  • Vendor Name

  • Associated Sites

Step 5

Click Save.


Delete a vendor rule

Procedure


Step 1

From the main menu, choose Assurance > Rogue and aWIPS.

Step 2

Click the Allowed List tab.

Step 3

In the Allowed Vendor List table, check the check box of the vendor name that you want to delete, and click Delete.

Step 4

At the prompt, click Delete.


Create a list of allowed vendors

You can create a list of allowed vendors. Vendors on this list are not marked as High threats.

You can add five vendors in a single workflow for a set of sites.

Procedure


Step 1

From the main menu, choose Workflows > Create Allowed Vendor List.

You can also create a list of allowed vendors by clicking the menu icon and choosing Assurance > Rogue and aWIPS > Allowed List.

Step 2

In the Create Allowed Vendor List window, click Let's Do it.

To skip this window in the future, check the Don't show this to me again check box.

The Create Allowed Vendor List window opens.

Step 3

From the Selection Criteria drop-down list, select a criterion (Exactly Matches or Contains) for the vendor name.

Step 4

In the Vendor Name field, enter the vendor name.

Vendor name matching is case sensitive.

Step 5

Click to add another vendor to the allowed list.

Per workflow, you can add a maximum of five vendors to the allowed list.

Step 6

In the Site Selection window, check the check box next to the site to which you want to apply your allowed vendor list.

Site inheritance applies the vendor rule to all floors of a site. The rule maps to the area, site, or building level.

Step 7

Click Next.

Step 8

In the Summary window, view the details about the allowed vendor and site selection.

Step 9

Click Done.

The Allowed Vendor List Created window opens.

Step 10

(Optional) To create another allowed vendor list, click Create New Allowed Vendor List and repeat Step 3 to Step 8.

Step 11

(Optional) To view the created vendor lists, click View all allowed Lists.