Perform Administrative Tasks

This section contains the following topics:

Manage Cisco Crosswork Network Automation

The Crosswork Manager window gives you consolidated information about the current status of each installed Cisco Crosswork Change Automation and Health Insights application and its supporting services. It also supplies tools and information that, with support and guidance from your Cisco Customer Experience account team, you can use to identify, diagnose and fix issues with Cisco Crosswork Change Automation and Health Insights.

Select Admin > Crosswork Manager to display a Crosswork Manager window, with information like the window shown in the following example.
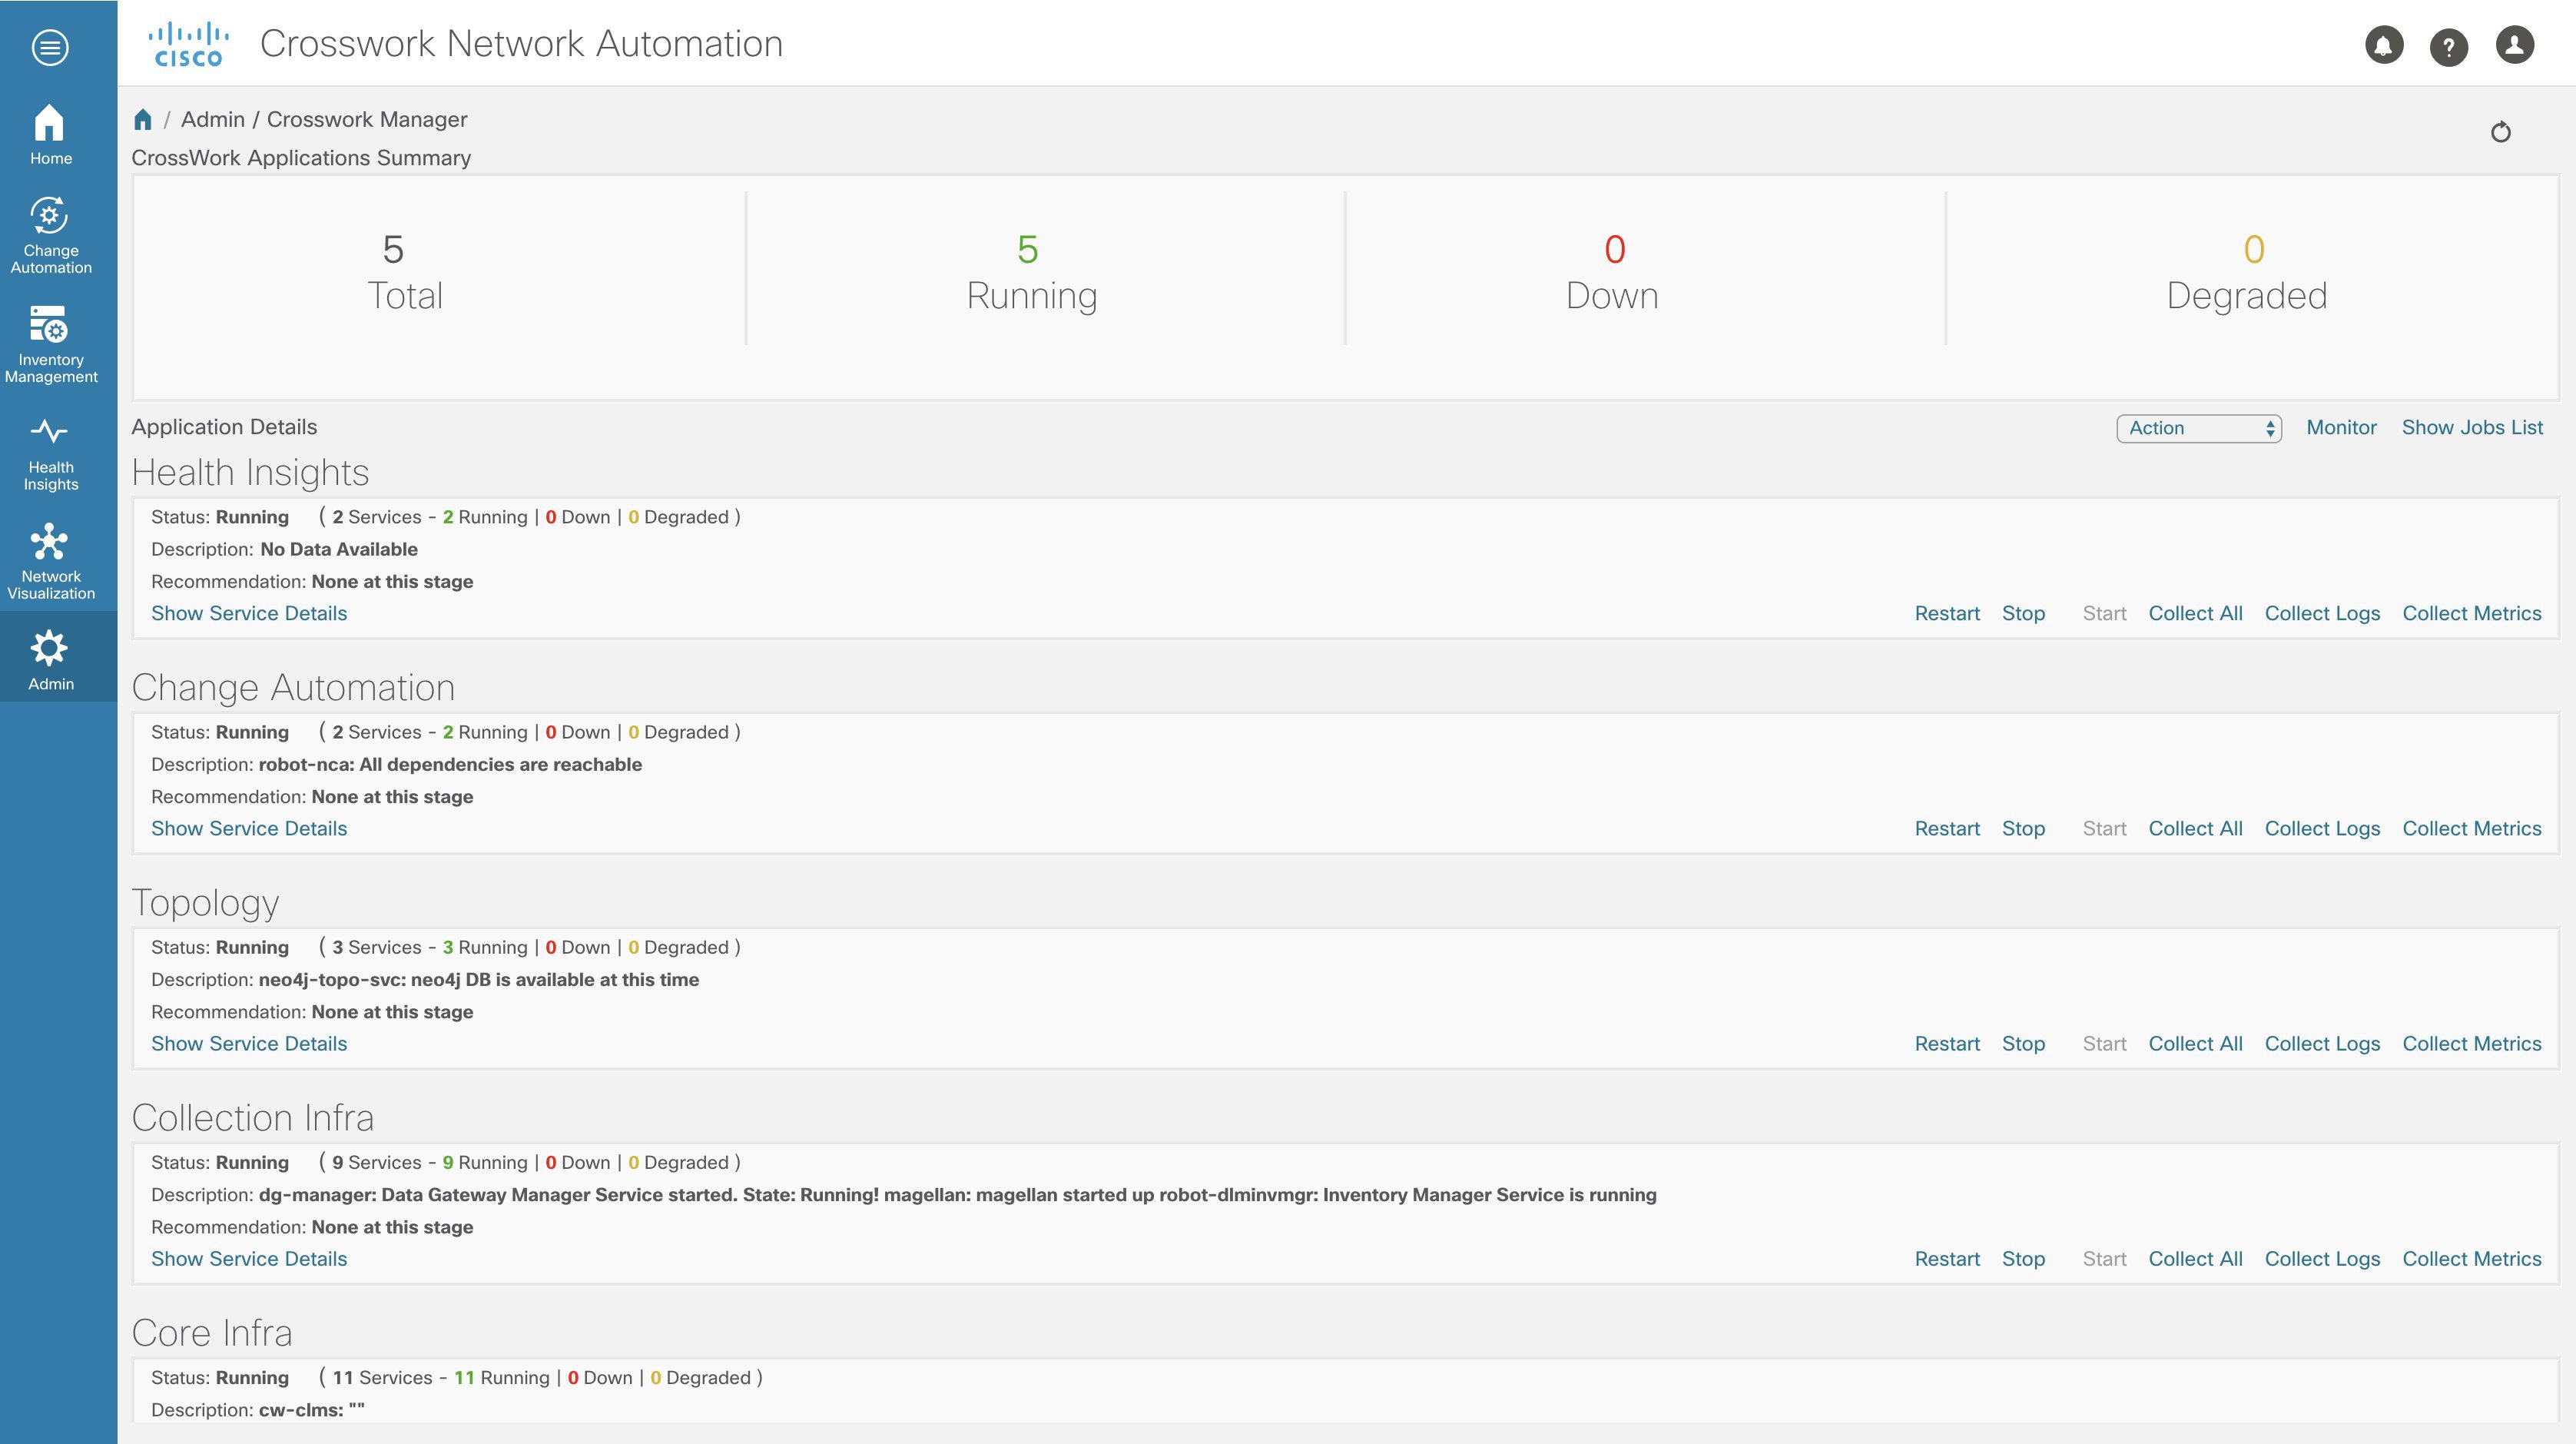


The Crosswork Manager window has two main views. The Crosswork Applications Summary view, at the top of the window, is a dashboard giving you a quick look at the overall health of the system. It displays the total number of Cisco Crosswork Change Automation and Health Insights applications currently installed in the system, and how many of that total are Running, Down, or Degraded.

The Applications Detail view, below the Crosswork Applications Summary view, allows you to:

  • View the name and current runtime status of each installed application and its supporting services.

  • Get advice about what to do when an application or one of its services has issues.

  • Collect logs and metrics on any application or service, or for the system as a whole.

  • Stop, start, or restart any application or service.

The Applications Detail view, shown in the following figure, is the best way to investigate any system health issues indicated in the Crosswork Applications Summary.
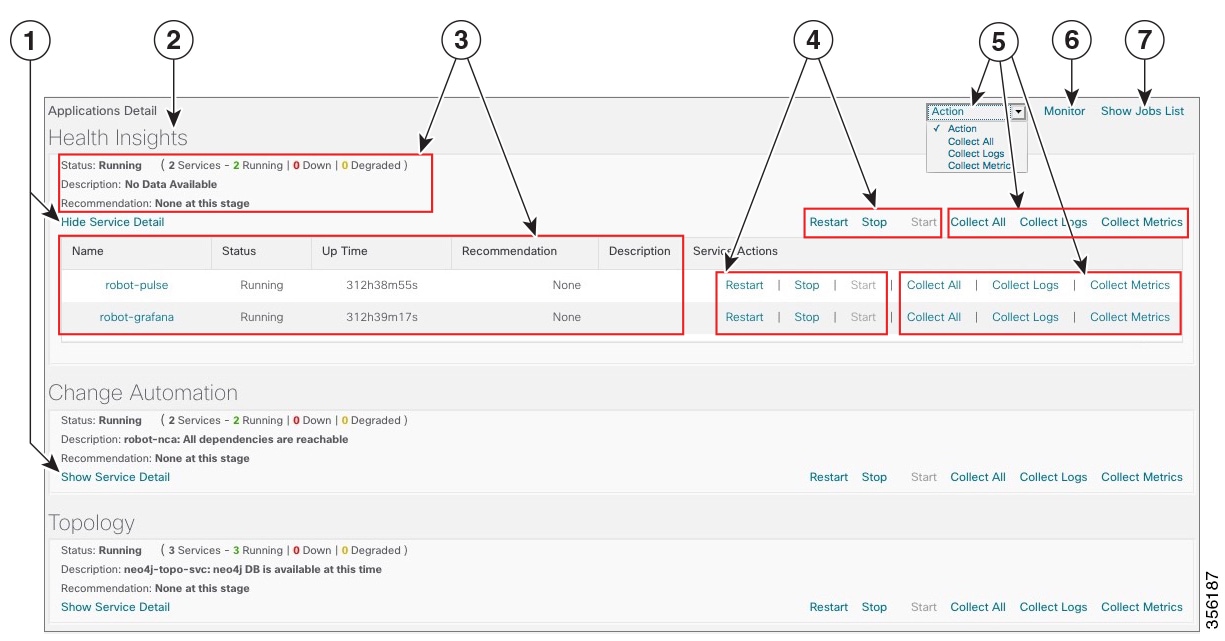
Figure 1. Applications Detail View
Applications Detail view
Item Description

1

Click the Show/Hide Service Detail link in each application tile to view the detailed status of the underlying services for that application.

2

An application tile like this shows the current status of the named application and a summary of the status of that application's services. This includes the total number of services, and how many of those services are Running, Down, or Degraded.

3

Both the application tile and its Service Detail table provide the name, status, description and recommendation for the respective application or service. The Service Detail table also provides service uptime, and you can click on the link in the Name column to see more details about the service, such as its process ID and pod identifier.

4

To control an application or service, click on any of the links in this section of the application tile or Service Detail table. You can click:

  • Restart to restart the application or service.

  • Stop to stop the application or service.

  • Start to start the application or service.

See Control Cisco Crosswork Network Automation Applications and Services.

5

To gather logs and metrics for the entire system, or for any application or service, click on any of the "collect" links at the system (in the dropdown menu), application, or service level. You can choose:

  • Collect All to collect both logs and metrics.

  • Collect Logs to collect only logs.

  • Collect Metrics to collect only metrics.

See Collect and Share Cisco Crosswork Network Automation Logs and Metrics.

6

Click the Monitor link to monitor individual Cisco Crosswork Change Automation and Health Insights functions and features, using analytical dashboards and data gathered over the last 24 hours of run time.

See Monitor Cisco Crosswork Network Automation Functions in Real Time.

7

Choosing any of the control or collect actions at the system, application or service level will initiate a job. You can view each job's progress by clicking the Show Jobs Listlink at the top right corner of the window. You can also use the Show Jobs Listto publish collected logs and metrics files, and check on the status of publish jobs you initiate.

Monitor Cisco Crosswork Network Automation Functions in Real Time

You can monitor the health of Cisco Crosswork Change Automation and Health Insights and any of its functions in real time, using a set of monitoring dashboards you can access from the Crosswork Manager window.

Cisco Crosswork Change Automation and Health Insights uses Grafana to create these dashboards. They give you a graphical view of the product's infrastructure, using metrics collected in its database. You can use these dashboards to diagnose problems you may encounter with individual Cisco Crosswork Change Automation and Health Insights applications or their underlying services.

There are multiple monitor dashboards, categorized by the type of functionality they monitor and the metrics they provide, as shown in the following table.

Table 1. Monitoring Dashboard Categories

This dashboard category...

Monitors...

Change Automation

Playbook functions. Metrics include the number of MOP jobs executed, response latency, API calls, database activity, and so on.

Collection - Manager

Device-data collection functions. Metrics include telemetry collection latencies, total collection operations, memory and database activity related to telemetry, delayed collections, and so on.

Health Insights

Key Performance Indicator functions. Metrics include the number of KPI alerts, API calls, and so on.

Infra

System infrastructure messaging and database activity.

Inventory

Inventory manager functions. These metrics include total numbers of inventory change activities.

Platform

System hardware and communications usage and performance. Metrics include disk and CPU usage, database size, network and disk operations, and client/server communications.

ZTP

Zero Touch Provisioning functions.

To conserve disk space, Cisco Crosswork Change Automation and Health Insights maintains a maximum of 24 hours of collected metric data.

Grafana is an open-source visualization tool. The following provides general information about how to use the Cisco Crosswork Change Automation and Health Insights implementation of Grafana. For more information about Grafana itself, see https://grafana.com and http://docs.grafana.org

Procedure


Step 1

From the main menu, choose Admin > Crosswork Manager.

Step 2

At the right, just below the Crosswork Applications Summary view, click the Monitor link, highlighted below.

The Grafana user interface appears within the Crosswork Manager window, replacing the Applications Detail view.

Step 3

In the Grafana user interface, click Home. Grafana displays the list of monitoring dashboards and their categories, as shown in the following example.
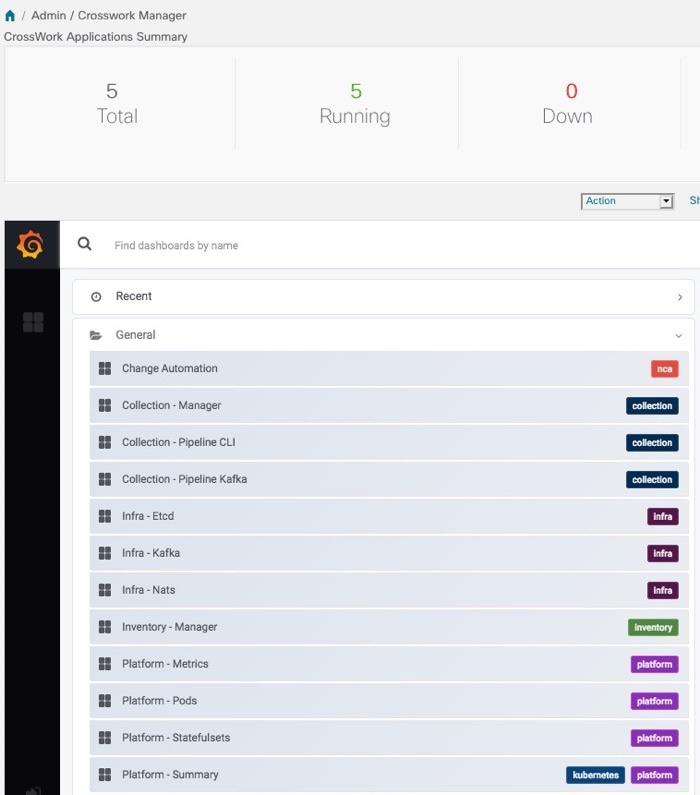
Grafana Dashboard list
Step 4

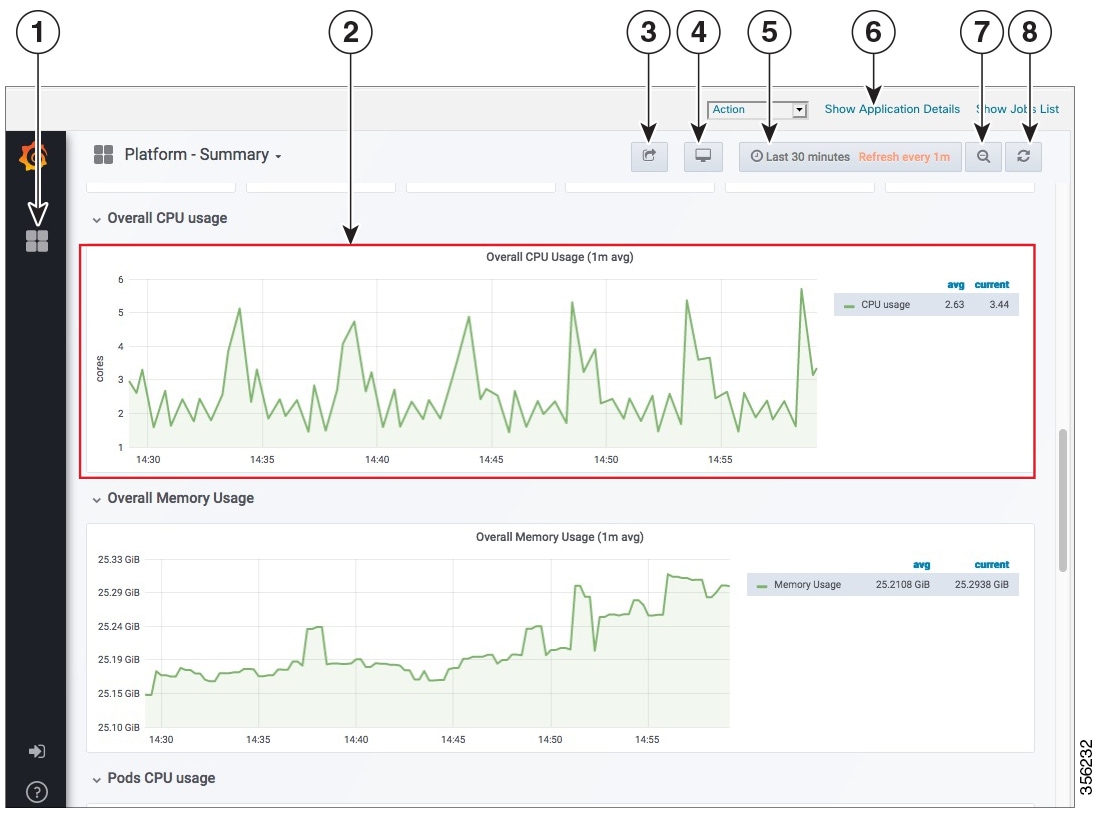
Click the Grafana dashboard icon next to the dashboard you want to view. For example: Clicking on the Platform - Summary dashboard displays a view like the one shown in the following figure. For more information on how to use Grafana go to htttps://grafana.com.

Example: Platform - Summary Dashboard
Step 5

Scroll the dashboard as needed to display all of the metrics it provides, or select any of the functions described in the following table.

Item

Description

1

Dashboard Icon: Click the icon to re-display the dashboard list and select a different dashboard.

2

Time Series Graph Zoom: You can zoom in on a specific time period within the graph of any time series data, as follows:

  1. Click a time-period starting point in the graph line and hold down the mouse.

  2. Drag the cursor to the endpoint. Light gray shading will appear in the block you are selecting. When you reach the endpoint, release the mouse.

To reset a zoomed time series graph to the default, click the Zoom Out icon.

3

Share Dashboard icon: Click the icon to make the dashboard you are viewing shareable with other users. Clicking this icon displays a popup window with tabs and options to share the dashboard in your choice of these forms:

  • URL Link: Click the Link tab and then click Copy to copy the dashboard's URL to your clipboard. You can also choose whether to retain the current time and template settings with the URL.

  • Local Snapshot File: Click the Snapshot tab and then click Local Snapshot. Grafana creates a local snapshot of the dashboard on the server. When the snapshot is ready, click Copy Link to copy the URL of the snapshot to your clipboard.

  • Export to JSON File: Click the Export tab and then click Save to file. You will be prompted to save or open the exported JSON file. You can also choose to turn data source names in the file into templates by selecting the Export for sharing externally checkbox before clicking Save to file.

  • View JSON File and Copy to Clipboard: Click the Export tab and then click View JSON (you can choose to templatize data source names by selecting the Export for sharing externally checkbox before clicking View JSON). Grafana displays the exported JSON code in a popup window. Click Copy to Clipboard to copy the file to your clipboard.

4

Cycle View Mode icon: Click this icon to toggle between the default Grafana TV view mode and the Kiosk mode. The Kiosk view hides most of the Grafana menu. Press Esc to exit the Kiosk view.

5

Time/Refresh Selector: Indicates the time period for the metrics displayed in the dashboard and how often the metrics are refreshed. Click the selector to choose a different time range and refresh rate.

You can specify a custom pair of time-range start and end points, or choose from one of several predefined ranges, such as Today so far or Last three hours.

You can choose predefined refresh rates from Off to 2 Days.

When you have finished making changes, click Apply.

When making selections, remember that Cisco Crosswork Change Automation and Health Insights keeps only 24 hours of data. If you select time ranges or refresh rates beyond that limit, the dashboard may be blank.

6

Show Application Details: Click this link to re-display the Crosswork Manager window's Applications Detail view.

7

Zoom Out icon: Click this icon to reset a zoomed time series graph back to the unzoomed state.

8

Refresh icon: Immediately refresh the data shown.


Collect and Share Cisco Crosswork Network Automation Logs and Metrics

You can collect logs and metrics on multiple levels of Cisco Crosswork Change Automation and Health Insights. You can collect logs and metrics for the entire system, for any of its installed application, or for any service supporting an application. You can also choose to collect only logs, only the additional metrics, or both.


Note

Collected logs include audit log files that capture user details and application-specific data. Application-specific data contains information on any CRUD (Create, Replace, Update, Delete) operation performed by the users along with the session history. For more information, see Audit Log.


Collected logs and metrics are stored in gzipped tar archive files. You can publish these archives to an HTTP or HTTPS server of your choice.

Procedure


Step 1

From the main menu, choose Admin > Crosswork Manager. The Crosswork Manager window displays, with the Application Detail section listing all the applications.

Step 2

Click the option for the collection level and target information you want, as follows:
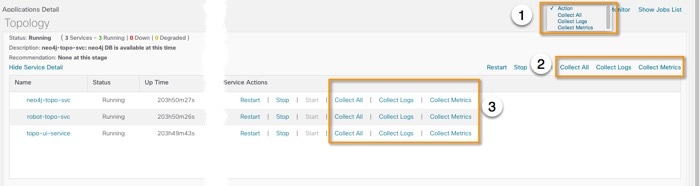
  • To collect for the entire system: From the Action drop down on the right, opposite the Applications Detail section title, choose Collect All, Collect Logs, or Collect Metrics. See item 1 in the following figure.
  • To collect for an application: Scroll to the Application Detail tile for the application you want. Then click the Collect All, Collect Logs, or Collect Metrics link on the right, opposite the application's name. See item 2 in the following figure.
  • To collect for a service: Scroll to the Application Detail tile for the application whose service you want to collect. Click the Show Service Detail link for that application. Then click the Collect All, Collect Logs, or Collect Metrics link on the right, opposite the service's name. See item 3 in the following figure.
Collection Choices
Step 3

When you click on the collection option you want, the Crosswork Manager window displays a popup message indicating that a job was successfully created and giving the job ID. Click on the Show Jobs List link at the right to view the job's progress in the Crosswork Managerwindow's Jobs List view, which replaces the Applications Detail view.

Step 4

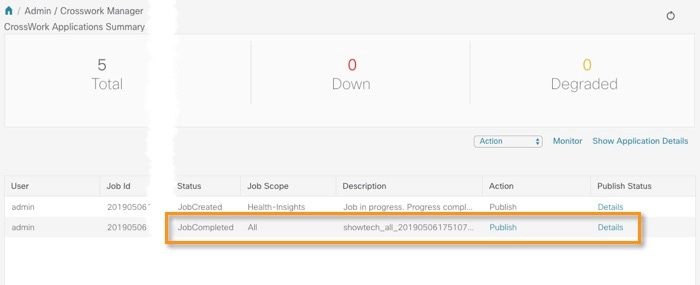
Wait for the job to complete. When the Jobs List view's Status column for your job has changed to JobCompleted, the Action column for the job will show an enabled Publish link for the completed job, and the Description column will show the file name of the gzipped tar archive file containing the collected information.
Step 5

(Optional) Click on the Publish link to publish the collected information to an HTTP or HTTPS server, as follows:

  1. A popup window will prompt you for the destination server host name, the storage path on the server, the port number, and the login user name and password for the server (if required). Enter the server information and click Publish.

  2. The Job List view's Publish Status column for the job shows an enabled Details link. Click the Details link to view a popup window showing the status of the publish job.

Step 6

When you are finished, click the Show Application Details link to re-display the Applications Detail view.


Audit Log

Audit logs map the user information in Cisco Crosswork Change Automation and Health Insights with all the critical user actions performed in the system.

User actions related to the following operations are included in the audit log:

  • Manage playbooks (import, export or delete) and playbook execution


    Note

    When a playbook execution request is sent, Change Automation prints an audit log with details like playbook name, user information, session details and execution ID of the job. When a maintenance task in this playbook is executed, an audit log is printed with details such as execution ID and commit label (if a commit is performed on NSO). All the commit labels associated with an execution ID can be identified in this manner. You can use the commit labels to perform a lookup on NCS CLI and see the exact configuration changes that were pushed to the device.


  • KPIs, KPI Profiles, and Alert group creation, deletion, and configuration updates

  • Enabling and disabling of KPI Profiles

  • Device onboarding

  • User creation, deletion, and configuration updates

  • Cisco Crosswork Data Gateway management operations

  • Collection job creation

  • Administrative tasks (show-tech execution, topology updates, NSO-related actions)

Sample Audit Log entry

This is a sample audit log entry created when a playbook is run by a local admin user.

time="2020-06-09 21:24:31.103312" level=info msg="playbook scheduled for execution" backend=local execution_id=1591737871096-a6699d03-8264-4ea8-8f6f-03e8a58f32a3 latency=11.330355ms loginTime="2020-06-09T20:27:11Z" method=POST playbook="router_config_traffic_steering" policyId=admin set_id=5405fdb1-6b37-41cb-94a3-32b180d3b773 set_name=static-acl-b180d3b773 tag="ROBOT_manager-nca-7689b-fdn8g" user=admin
Table 2. Common Audit Log entry fields
Field Description

time

Time when the audit log is printed.

msg

Message sent between applications.

user

Name of the user.

policyId

Role or permission of user (taken from local database, TACACS, or LDAP server).

backend

Server (local database, TACACS, or LDAP) against which user is authenticated.

loginTime

The epoch time when the user has logged in. Epoch time is intentionally selected, as it shorter and independent of time zones.

Other fields

Individual applications use additional fields specific to that application.

For example: In the sample audit log entry above, playbook field refers to the playbook being executed in Change Automation.

Audit Log location

Logs are placed in /var/log/robot/audit/audit.log under the respective application pods. For example: the sample audit log mentioned above is stored in <robot-nca> data directory under the Change Automation pod.

In addition to the individual application audit logs, all audit log files are collected every hour as separate gzipped tar files in the following data directory: /mnt/robot_datafs/<app-name>/<instance>/auditlogs/auditlogs.tar.gz

The audit log files are collected and circulated based on the maximum size and maximum number of backups on Cisco Crosswork Change Automation and Health Insights. For example: MaxSize:20 megabytes and MaxBackups: 5.

Control Cisco Crosswork Network Automation Applications and Services

Users with administrator privileges can control the runtime status of any Cisco Crosswork Change Automation and Health Insights application or service. This can include:

  • Stopping a running application or service

  • Starting a stopped application or service

  • Restarting a running or stopped application or service

Please note that stopping, starting and restarting Cisco Crosswork Change Automation and Health Insights applications and services can result in anomalous system behavior and possible data loss. Use these functions only with the supervision of Cisco TAC staff.

Procedure


Step 1

From the main menu, choose Admin > Crosswork Manager. The Crosswork Manager window displays, with the Application Detail view listing all the applications.

Step 2

Display the application or service whose runtime status you want to control:

  • To control an application: Scroll to the Application Detail tile for the application you want.
  • To control a service: Scroll to the Application Detail tile for the application whose service you want to control, then click the Show Service Detail link for that application to show its services.
Step 3

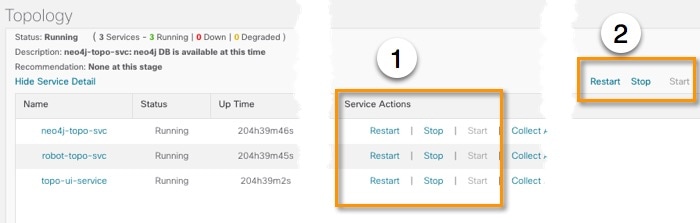
Click on the Start, Stop, or Restart link shown next to the service (item 1 in the following figure) or the application whose runtime status you want to control.
Application and Service Control Choices
Step 4

Click the Show Jobs List link at upper right to view the runtime control job's progress in the Crosswork Managerwindow's Jobs List view.

Step 5

When you are finished, click the Show Application Details link to re-display the Applications Detail view.


Manage Backup and Restore

The Backup Restore functionality is critical to prevent data loss in your Cisco Crosswork Change Automation and Health Insights VM.

Follow the steps below to create a backup for the Cisco Crosswork Change Automation and Health Insights VM and to restore a backup.


Important

  • Cisco recommends that you perform the backup or restore operation only during a scheduled maintenance window when admin users should not access the UI. Both operations are time-consuming and stops all other applications running in the system.

  • The same Cisco Crosswork Change Automation and Health Insights software image that was used to backup must also be used when doing a restore operation.

  • Stay on the Backup Restore window until the backup/restore process completes. Otherwise, you may see incorrect content or UI errors since various services are rebooting frequently.

  • Only one backup or restore operation can be running at any given time.


Before you begin, ensure that:

  • You have the Host Name, Port number, and Remote path to a Secure FTP server to use as the destination for backup files.

  • You have the user credentials to an account with write permissions to create files and directories in the destination server remote path.

Procedure


Step 1

From the main menu, choose Admin > Backup Restore. The Backup Restore window is displayed.

Step 2

During your first login, you should configure a destination server to store the backup file. This is a one-time activity and has to be completed before taking the backup. Click Destination to display the Edit Destination dialog box. Make relevant entries in the fields provided.

Click Save to confirm the server details.

Step 3

To create a backup:

  1. Click Backup. The Backup dialog box is displayed with destination server details pre-filled.

  2. Provide a relevant name in the Job Name field.

  3. (Optional) Click Verify Backup to check if Cisco Crosswork Change Automation and Health Insights has enough resources to complete the operation. If the check is successful, a warning message is displayed about the time-consuming nature of the operation. Click OK.

  4. Click Start Backup to start the backup operation. The corresponding backup job set is created and added to the job list. See Step 5 to view Backup progress.

Step 4

To restore a backup file:

  1. Select the required backup file from the Backup Restore Job Sets table, and the job details are displayed on the right side.

  2. Click the Restore button to display the Restore dialog box with destination server details pre-filled.

  3. Provide a relevant name in the Job Name field.

  4. (Optional) Click Verify Restore and a prompt is displayed that suggests doing the backup or restore during maintenance window owing to the time-consuming nature of the operation. Click OK.

  5. Click Start Restore to start the restore operation. The corresponding restore job set is created and added to the job list.

Step 5

To view a job progress:

  1. Enter the job details (such as Status, Job Name, or Job Type) in the search fields in Backup Restore Job Sets table on the left side. Click Settings icon to select which columns to display in the Job set list. The list is automatically filtered based on your search string. Click the required job set from the search results.

  2. Alternately, you can manually scroll the list and click the required job set.

  3. The Job Details table on the right side displays information about the selected job set such as Status, Job Type and Start time. In case of a failed job, hover the mouse pointer over the Details icon icon near Status to view the error details.


Disaster Restore

Disaster Restore is a restore operation, appropriately named to be used in case of a disaster, such as VM crash. The Disaster Restore option is displayed if no backup jobs have been initiated in the system. After the completion of the first backup job, this button is disabled.


Note

While using disaster recovery operation, please note the following:

  • The new VM that you use needs to have the same IP address as the one where backup was performed. This is important as internal certificates are tied to the IP address.

  • The same software image that was used to backup must also be used when doing a restore operation.

  • The VM which is brought up should have same services running when the backup was performed. If the previous VM was patched/upgraded then the new VM also needs to be patched/upgraded before disaster restore is performed.

  • The disaster restore operation trusts the backup file which is provided. Caution is advised while selecting the appropriate backup file.


To perform a disaster restore:

Procedure


Step 1

From the main menu, choose Admin > Backup Restore. The Backup Restore window is displayed.

Step 2

Click Destination to display the Edit Destination dialog box. Enter the details of the remote destination server where the backup file is uploaded.

Step 3

Click Disaster Restore to display the Disaster Restore dialog box with destination server detailed pre-filled.

Step 4

Make relevant entry in the Backup File Name field.

Step 5

Click Start Restore to start the disaster restore operation.

Note 

If disaster restore operation fails, you are recommended to bring up a new VM to retry the disaster restore operation.


Integration with TACACS+ and LDAP servers

In addition to supporting local users, Cisco Crosswork Change Automation and Health Insights supports TACACS+ and LDAP users through integration with the TACACS+ and LDAP servers. The integration process has the following steps:

  • Configure the TACACS+ and LDAP server.

  • Create the roles that are referenced by the TACACS+ and LDAP users.


Note

If you try to login to Cisco Crosswork Change Automation and Health Insights as a TACACS+ or LDAP user before creating the required user roles, you will get an error message: "Key not authorized: no matching policy". If this occurs, close the browser. Login as a local admin user and create the missing user roles. After the roles are created, you can logout and login back as a TACACS+ or LDAP user.


Manage TACACS+ Servers

In addition to local database authentication, Cisco Crosswork Change Automation and Health Insights can use TACACS+ servers to authenticate users. TACACS+ is a security protocol that provides centralized validation of users attempting to access your network. It allows for a single access control server (the TACACS+ daemon) to provide authentication, authorization, and accounting (AAA) services independently of one another.

Local database authorization takes precedence over authorization by TACACS+ server. When adding the TACACS+ server, you can specify the priority value for each instance. Priority field value is unique across TACACS+ and LDAP servers. Providing a duplicate value will result in an error.


Note

  • Please note that any operation you do following the instructions in this section will affect all new logins to the Cisco Crosswork Change Automation and Health Insights user interface. To minimize session interruption, Cisco recommends that you perform all your TACACS+ changes and submit them in a single session.

  • As the AAA server page works in bulk update mode wherein all the servers are updated in a single request, it is advised to give write permission for "Remote Authentication Servers Integration api" only to users who have the relevant authorization to delete the servers. For more information, see Create User Roles.

  • AAA page operations are captured in the audit log file with generic messages that mention that the AAA servers have been updated. For more information on collecting logs, see Collect and Share Cisco Crosswork Network Automation Logs and Metrics


Add a TACACS+ Server

Before adding a TACACS+ server, you will need to know the server's IP address, port number, shared secret, and service name.

Procedure

Step 1

From the main menu, choose Admin > AAA.

The AAA window opens. If it is not already displayed, click the TACACS+ Servers tab.

Step 2

Click Add icon to open the Add Server dialog box.

Step 3

Enter the TACACS+ server's settings, then click Add.

Note 

Only the server's IP address, port number, shared secret, and service name are required. You can leave the other values blank, as needed.

Step 4

Click Save Server Changes to submit the changes. You will be prompted with a warning message about restarting the server to update the changes. Click Save Changes to confirm.


Edit a TACACS+ Server

Procedure

Step 1

From the main menu, choose Admin > AAA.

The AAA window opens. If it is not already displayed, click the TACACS+ Servers tab.

Step 2

Click the check box next to the TACACS+ server whose settings you want to update, then click Edit icon.

The Edit Server dialog box opens.

Step 3

Make the necessary changes, then click Update.

Note 

You cannot change the value for the Shared Secret parameter.

Step 4

Click Save Server Changes to submit the changes. You will be prompted with a warning message about restarting the server to update the changes. Click Save Changes to confirm.


Delete a TACACS+ Server

Procedure

Step 1

From the main menu, choose Admin > AAA.

The AAA window opens. If it is not already displayed, click the TACACS+ Servers tab.

Step 2

Click the check box next to the TACACS+ server you want to delete.

Note 

You can delete only one TACACS+ server at a time.

Step 3

Click Delete icon. The Delete server-IP-address dialog box opens.

Step 4

Click Delete to confirm.


Manage LDAP Servers

Cisco Crosswork Change Automation and Health Insights supports the use of LDAP servers to authenticate users. Lightweight Directory Access Protocol (LDAP) is a server protocol used to access and manage directory information. It manages directories over IP networks and runs directly over TCP/IP using simple string formats for data transfer.

Like TACACS+ server, you can specify a unique priority value to assign precedence in the authentication request.


Note

  • Please note that any operation you do following the instructions in this section will affect all new logins to the Cisco Crosswork Change Automation and Health Insights user interface. To minimize session interruption, Cisco recommends that you perform all your TACACS+ changes and submit them in a single session.

  • As the AAA server page works in bulk update mode wherein all the servers are updated in a single request, it is advised to give write permission for "Remote Authentication Servers Integration api" only to users who have the relevant authorization to delete the servers. For more information, see Create User Roles.


Add a LDAP Server

Before adding a LDAP server, you will need to know the Server name and URL, Bind DN and credential, Base DN, user filter, DN format, Principal Attribute ID, Policy ID, and connection timeout value.

Procedure

Step 1

From the main menu, choose Admin > AAA.

The AAA window opens. Click on the LDAP Servers tab.

Step 2

Click Add icon to open the Add Server dialog box.

Step 3

Enter the LDAP server settings, then click Add.

Step 4

Click Save Server Changes to submit the changes. You will be prompted with a warning message about restarting the server to update the changes. Click Save Changes to confirm.


Edit a LDAP Server

Procedure

Step 1

From the main menu, choose Admin > AAA.

The AAA window opens. Click on the LDAP Servers tab.

Step 2

Click the check box next to the LDAP server whose settings you want to update, then click Edit icon.

The Edit Server dialog box opens.

Step 3

Make the necessary changes, then click Update.

Step 4

Click Save Server Changes to submit the changes. You will be prompted with a warning message about restarting the server to update the changes. Click Save Changes to confirm.


Delete a LDAP Server

Procedure

Step 1

From the main menu, choose Admin > AAA.

The AAA window opens. Click on the LDAP Servers tab.

Step 2

Click the check box next to the LDAP server you want to delete.

Note 

You can delete only one LDAP server at a time.

Step 3

Click Delete icon. The Delete server-IP-address dialog box opens.

Step 4

Click Delete to confirm.


Manage Users

From the main menu, select Admin > Users to display the Users window. Using this window, you can add a new user, edit the settings for an existing user, delete a user from the network, and create user roles.


Note

Before you can create a new user that does not have admin-level access to Cisco Crosswork Change Automation and Health Insights functionality, you must first create a new role that limits the features they can access. See Define Role Settings for more information.

Only a local admin user can add, update, and delete other local user accounts. A TACACS+ user, regardless of role assigned, will not be able to manage local users.


Administrative Users Created During Installation

During installation, Cisco Crosswork Change Automation and Health Insights creates two special administrative IDs:

  1. The virtual machine administrator, with the username cw-admin, and the default password admin. Data center administrators use this ID to log in to and troubleshoot the VM hosting the Cisco Crosswork Change Automation and Health Insights server.

  2. The Crosswork administrator, with the username admin and the default password admin. Product administrators use this ID to log in to and configure the Cisco Crosswork Change Automation and Health Insights user interface, and to perform special operations, such as creating new user IDs.

The default password for both administrative user IDs must be changed the first time they are used. You can also change the Crosswork administrator password using the following methods:

  • Log in as the admin user and edit the admin user password, as explained in Edit Users.

  • Enter the following command: admin(config)# username admin <password>

Add Users

Follow the steps below to create a new user ID.

The user ID's user name must be unique. You cannot create a new user ID with the same user name as an existing user ID.

The special administrative user names admin (for administering Cisco Crosswork Change Automation and Health Insights) and cw-admin (for administering the virtual machine hosting the product) are created during installation and are reserved for those purposes (see Administrative Users Created During Installation).

Procedure


Step 1

From the main menu, choose Admin > Users.

The Users window opens.

If it is not already displayed, click the Users tab.

Step 2

Click Add icon to open the Add New User dialog box.

Step 3

Enter the following information for the user you are adding:

  • User Name: Enter a unique name for the user ID. User names cannot contain spaces or special characters.

  • First Name and Last Name: Enter the first and last name of the person assigned to this user ID.

  • From the Role drop-down at the bottom of the dialog box, choose the role that you want to assign to the user. See Define Role Settings for more information.

  • Password and Confirm Password: Enter the default password for this user ID. The user will be required to change the default password the first time they attempt to log on using it.

Note 

The user password must be string of minimum 8 characters without spaces and should include letters, numbers, upper-case and lower-case characters, and one of the allowed special characters ("@!$%*?&").

Step 4

Click Save.


Edit Users

Users with administrator privileges can edit any user ID's User Name, First Name, Last Name, and Role.

Administrators cannot change a user's password by editing the user ID. Users can change their passwords by logging in, clicking User Account icon, and selecting Change Password.

Procedure


Step 1

From the main menu, choose Admin > Users.

The Users window opens.

If it is not already displayed, click the Users tab.

Step 2

Click on the check box of the user whose settings you want to update, then click Edit icon to open the Edit User dialog box.

Step 3

Make the necessary updates to the user ID.

Note 

First Name, Last Name and Role can be edited for user accounts with administrative privileges.

Step 4

Click Update to save your changes.


Delete Users

Follow the steps below to delete an existing user ID.

The administrative user IDs admin and cw-admin created during installation cannot be deleted (see Administrative Users Created During Installation).

Procedure


Step 1

From the main menu, choose Admin > Users.

The Users window opens.

If it is not already displayed, click the Users tab.

Step 2

Click on the check box of the user you want to delete, then click Delete icon. TheDelete Username User dialog displays.

Step 3

Click Delete to confirm deletion.


User Roles, Functional Categories and Permissions

The Roles window lets users with the appropriate privileges define custom user roles. As with the default admin role, a custom user role consists of:

  • A unique name, such as “Operator” or “admin”.

  • One or more selected, named functional categories, which control whether or not a user with that role has access to the APIs needed to perform specific Crosswork functions controlled by that API. For example: The “Health Insights” category provides access to all of the “Health Insights API” functions, such as selecting and running KPI Profiles, importing custom user-defined KPIs, deleting custom KPIs, and so on.

  • One or more selected permissions, which control the scope of what a user with that role can do in the functional category.

For a user role to have access to a functional category, that category and its underlying API must show as selected on the Roles page for that role. If the user role shows a functional category as unselected, then users with this role assigned will have no access to that functional area at all.

Some functional categories group multiple APIs under one category name. For example: The “AAA” category controls access to the Password Change, Remote Authentication Servers Integration, and Users and Role Management APIs. With this type of category, you can deny access to some of the APIs by leaving them unselected, while providing access to other APIs under the category by selecting them . For example: If you want to create an “Operator” role who is able to change his own password, but not see or change the settings for your installation’s integration with remote AAA servers, or create new users and roles, you would select the “AAA” category name, but uncheck the “Remote Authentication Server Integration API” and “Users and Role Management API” checkboxes.

For each role with a selected category, the Roles page also lets you define permissions to each underlying functional API:

  • Read permission lets the user see and interact with the objects controlled by that API, but not change or delete them.

  • Write permission lets the user see and change the objects controlled by that API, but not delete them.

  • Delete permission gives the user role delete privileges over the objects controlled by that API. It is useful to remember that delete permission does not override basic limitations set by the Crosswork platform and it applications.

Although you can mix permissions as you wish:

  • If you select an API for user access, you must provide at least “Read” permission to that API.

  • When you select an API for user access, Cisco Crosswork Change Automation and Health Insights will assume that you want the user to have all permissions on that API, and will select all three permissions for you, automatically.

  • If you uncheck all of the permissions, including “Read”, Cisco Crosswork Change Automation and Health Insights will assume that you want to deny access to the API, and unselect it for you.

Best Practices:

Cisco recommends that you follow these best practices when creating custom user roles:

  • Restrict Delete permissions in roles for admin users with explicit administrative responsibility for maintenance and management of the Crosswork deployment as a whole.

  • Roles for developers working with all the Crosswork APIs will need the same permissions as admin users.

  • Apply at least Read and Write permissions in roles for users who are actively engaged in managing the network using Cisco Crosswork Change Automation and Health Insights.

  • Give read-only access to roles for users who only need to see Cisco Crosswork Change Automation and Health Insights data to help their work as system architects or planners.

The following table describes some sample custom user roles you should consider creating:

Table 3. Sample custom user roles

Role

Description

Categories/API

Privileges

Operator

Active network manager, triggers Playbooks in response to KPI alerts

All

Read, Write

Monitor

Monitors alerts only

Health Insights, Inventory, Topology

Read only

KPI Developer

Develops custom KPIs for others to use

Core Infra, Health Insights, Inventory/All

All

API Integrator

All

All

All


Note

Admin role needs to include permissions for Read, Write, and Delete, while read-write roles need to include both Read and Write permissions. Using Zero Touch Provisioning features requires access to all ZTP APIs.


Create User Roles

Local users with administrator privileges can create new users as needed (see Add Users).

Users created in this way can perform only the functions or tasks that are associated with the user role they are assigned.

The local admin role enables access to all functionality. It is created during installation and cannot be changed or deleted. However, its privileges can be assigned to new local users. Only local users can create or update user roles; TACACS users cannot.

Follow the steps below to create a new user role.

Procedure


Step 1

From the main menu, choose Admin > Users.

The Users window opens.

If it is not already displayed, click the Roles tab. The Roles window has a Roles table on the left side and a corresponding admin table on the right side which shows the grouping of user permissions for the selected role.

Step 2

On the Roles table, click Add icon to display a new role entry in the table.

Step 3

Enter a unique name for the new role.

Step 4

Define the user role's privilege settings:

  1. Check the check box for every API that users with this role can access. The APIs are grouped logically based their corresponding application.

  2. For each API, define whether the user role has Read, Write, and Delete permission by checking the appropriate check box. You can also select an entire API group (such as AAA), and all the APIs under the group will be selected with Read,Write and Delete permissions pre-selected.

Step 5

Click Save to create the new role.

To assign the new user role to one or more user IDs, edit the Role setting for the user IDs (see Edit Users).


Edit User Roles

Users with administrator privileges can quickly change the privileges of any user role other than the default admin role.

Procedure


Step 1

From the main menu, choose Admin > Users.

The Users window opens.

If it is not already displayed, click the Roles tab.

Step 2

In the Roles table, click on an existing role to select it. The Admin table on the right side displays the permission settings for the selected role.

Step 3

Define the role's settings:

  1. Check the check box for every API that the role can access.

  2. For each API, define whether the role has Read, Write, and Delete permission by checking the appropriate check box. You can also select an entire API group (such as AAA), and all the APIs under the group will be selected with Read,Write and Delete permissions pre-selected.

Step 4

When you are finished, click Save to save your changes.


Clone User Roles

Cloning an existing user role is the same as creating a new user role (see Create User Roles), except that you need not set privileges for it. If you like, you can let the cloned user role inherit all the privileges of the original user role.

Cloning user roles is a handy way to create and assign many new user roles quickly. Following the steps below, you can clone an existing role multiple times. Defining the cloned user role's privileges is an optional step; you are only required to give the cloned role a new name. If you like, you can assign it a name that indicates the role you want a group of users to perform. You can then edit the user IDs of that group of users to assign them their new role (see Edit Users). Later, you can edit the roles themselves to give users the privileges you want (see edit user roles).

Procedure


Step 1

From the main menu, choose Admin > Users.

The Users window opens.

If it is not already displayed, click the Roles tab.

Step 2

Click on an existing role to select it.

Step 3

Click Copy icon to create a new duplicate entry in the Roles table with all the permissions of the original role.

Step 4

Enter a unique name for the cloned role.

Step 5

(Optional) Define the role's settings:

  1. Check the check box for every API that the cloned role can access.

  2. For each API, define whether the clone role has Read, Write, and Delete permission by checking the appropriate check box. You can also select an entire API group (such as AAA), and all the APIs under the group will be selected with Read,Write and Delete permissions pre-selected.

Step 6

Click Save to create the newly cloned role.


Delete User Roles

Users with administrator privileges can delete any user role that is not the default admin user role or that is not currently assigned to a user ID. If you want to delete a role that is currently assigned to one or more user IDs, you must first edit those user IDs to assign them to a different user role.

Procedure


Step 1

From the main menu, choose Admin > Users.

The Users window opens.

If it is not already displayed, click the Roles tab.

Step 2

Click on the role you want to delete, to select it.

Step 3

Click Delete icon to display the Delete Role dialog box.

Step 4

Click Delete to confirm that you want to delete the user role.


Manage Providers

Cisco Crosswork Change Automation and Health Insights communicates with external providers. You decide which providers to use and then configure them. Cisco Crosswork Change Automation and Health Insights stores the provider connectivity details and makes that information available to applications.

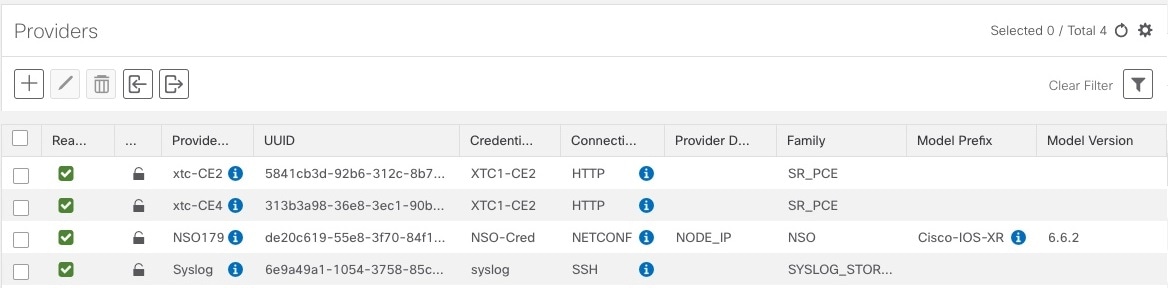
From the Providers window, you can add a new provider, update the settings configured for an existing provider, and delete a particular provider. To open this window, choose Admin > Providers.

Note

Wait until the application responds between performing a succession of updates. For example, adding, deleting, then readding providers in a short time. Topology services may not receive these changes if you perform these actions too quickly. However, if you find that topology is out of sync, restart the topology service. See Control Cisco Crosswork Network Automation Applications and Services.


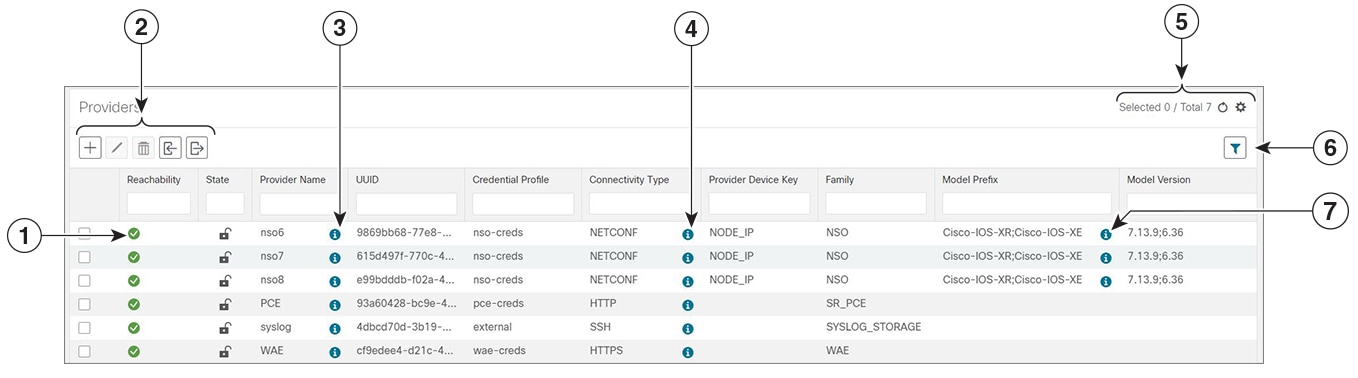
Figure 2. Providers window
Item Description

1

The icon shown next to the provider in this column indicates the provider's Reachability. For more information, see Reachability and Operational State.

2

Click Add icon to add a provider. See About Adding Providers.

Click Edit icon to edit the settings for the selected provider. See Edit Providers.

Click Delete icon to delete the selected provider. See Delete Providers.

Click Import icon to import new providers or update existing providers from a CSV file. You can also download a CSV file template by clicking this icon. The template includes sample data that you can use as a guide for building your own CSV file. See Import Providers.

Click Export icon to export a provider to a CSV file. See Export Providers.

3

Click Details icon next to the provider in the Provider Name column to open the Properties for pop-up window, showing the details of any startup session key/value pairs for the provider.

4

Click Details icon next to the provider in the Connectivity Type column to open the Connectivity Details pop-up window, showing the protocol, IP, and other connection information for the provider.

5

Click Refresh icon to refresh the Providers window.

Click Settings icon to choose the columns to make visible in the Providers window (see Set, Sort and Filter Table Data).

6

Click Set Filter icon to set filter criteria on one or more columns in the Providers window.

Click the Clear Filter link to clear any filter criteria you may have set.

7

Click Details icon next to the provider in the Model Prefix column to open the Supported Models pop-up window, showing a list of the model prefix names and versions in use (for Cisco NSO providers only).

About Provider Families

Cisco Crosswork Change Automation and Health Insights supports different types, or families, of providers. Each provider family supplies its own mix of special services to Cisco Crosswork Change Automation and Health Insights, and each comes with unique requirements and options.

The currently supported provider families are shown in the following table.

Table 4. Supported Provider Families

Provider Family

Description

NSO

Instances of Cisco Network Services Orchestrator (Cisco NSO), used to configure network devices. See Add Cisco NSO Providers.

WAE

Instances of Cisco WAN Automation Engine (Cisco WAE) provide "what if" analysis used to evaluate network changes as part of Cisco Crosswork Change Automation and Health Insights Playbooks. See Add Cisco WAE Providers.

SR-PCE

Instances of Cisco Segment Routing Path Computation Elements (Cisco SR-PCE) containing the configuration information needed to allow Cisco Crosswork Change Automation and Health Insights to communicate with and retrieve segment routing information for the network. See Add Cisco SR-PCE Providers.

Syslog Storage

Instances of storage servers (remote or on the Cisco Crosswork Change Automation and Health Insights VM itself) where you want store syslogs and other data retrieved from devices by KPIs and Playbooks. See Add Syslog Storage Providers.

Alert

Instances of providers (such as Cisco Crosswork Situation Manager) to which alerts collected during KPI monitoring are to be forwarded. See Add an Alert Provider

Optimization Engine

Instances of Cisco Crosswork Optimization Engine, to provide real-time network optimization allowing operators to effectively maximize network utilization as well as increase service velocity. See Add Optimization Engine Providers.

About Adding Providers

Cisco Crosswork Change Automation and Health Insights depends on a variety of providers to perform various functions. For example, Cisco Network Services Orchestrator provides device and routing information. Features that depend on new providers may be added in the future, and you may need to communicate with more than one instance of a single provider. Also, not every Cisco Crosswork Change Automation and Health Insights deployment will use the same mix of providers. In any case, to access each provider's services, the provider must be added to the Cisco Crosswork Change Automation and Health Insights system configuration.

There are two ways to add providers:

  1. Adding providers via the UI: This method is explained in Add Providers Through the UI. Although this method is the most time-consuming, it is more often used because most deployments will not need a lot of separate providers or provider instances.

  2. Importing providers from a providers CSV file: This method is explained in Import Providers. Importing a CSV file is useful when you have a lot of separate providers or provider instances to add or update at one time.

Note that both methods require that you:

  • Create a corresponding credential profile, beforehand, so that Cisco Crosswork Change Automation and Health Insights can access the provider. For help, see Create Credential Profiles.

  • Know the protocol, IP address, port number, and other information needed to connect with the provider.

  • Know any special properties the provider may require during the session startup.


Note

Cisco Crosswork Change Automation and Health Insights version 3.2 only supports single stack deployment modes. You can configure multiple IP addresses (IPv4 or IPv6) for each protocol, but at least one of the IP addresses in each protocol should match the deployment type. For example, for an IPv4 deployment mode, at least one of the configured IP addresses should be IPv4. Instead, if you configure only IPv6 addresses, the request will be rejected.

Stack/Deployment mode

IPv4 deployment

IPv6 deployment

Provider IP address

  • IPv4 address (mandatory)

  • IPv6 address (optional)

  • IPv4 address (optional)

  • IPv6 address (mandatory)


For help on adding the most common providers using the UI, see the following topics.

Add Providers Through the UI

Use this procedure to add a new external provider. You can then map the provider to devices.

Procedure

Step 1

From the main menu, choose Admin > Providers.

Step 2

Click Add icon.

Step 3

Enter values for the provider as listed in the following table.

Step 4

When you have complete entries in all of the required fields, click Save to add the new provider.

Step 5

(Optional) Repeat to add more providers.


Table 5. Add Provider Fields (*=required)
Field Description

* Provider Name

The name for the provider that will be used to refer to it in Cisco Crosswork Change Automation and Health Insights. For example: MyWAE. The name can contain a maximum of 128 alphanumeric characters, plus dots (.), underscores ("_") or hyphens ("-"). No other special characters are allowed.

* Credential Profile

Select the name of the credential profile that Cisco Crosswork Change Automation and Health Insights will use to connect to the provider.

* Family

Select the provider family. Choices are: NSO, WAE, SR-PCE, ALERT and SYSLOG_STORAGE.

* Device Key

Select the method that the Cisco NSO provider uses to identify devices uniquely. This will serve as the way Cisco Crosswork Change Automation and Health Insights maps the device in its own inventory to the device as it is stored in the Cisco NSO provider. Choices are:

  • INVENTORY_ID—Use this value if the device identifier Cisco NSO uses is the inventory ID.

  • HOST_NAME—If Cisco NSO uses the device hostname as the device identifier, this value must match the hostname that is specified for the device in the inventory.

Note that the Device Key is only required for the Cisco NSO provider. It is not needed for other providers.

Connection Type(s)

* Protocol

Select the principal protocol that Cisco Crosswork Change Automation and Health Insights will use to connect to the provider. Options include: HTTP, HTTPS, SSH, SNMP, NETCONF, TELNET, and more.

To add more connectivity protocols for this provider, click Add icon at the end of the first row. To delete a protocol you have entered, click Delete iconshown next to that row.

You can enter as many sets of connectivity details as you want, including multiple sets for the same protocol.

* IP Address/ Subnet Mask

Enter the IP address (IPv4 or IPv6) and subnet mask of the provider's server.

* Port

Enter the port number to use to connect to the provider's server. This is the port corresponding to the protocol being configured. For example, if the protocol used to communicate with the provider server is SSH, the port number is usually 22.

Timeout

Enter the amount of time (in seconds) to wait before the connection times out. The default is 30 seconds.

Model Prefix Info

* Model

Required only if you are adding a Cisco NSO provider: Select the model prefix that matches the NED CLI used by Cisco NSO. Valid values are:

Cisco-IOS-XR

Cisco-NX-OS

Cisco-IOS-XE

For telemetry, only Cisco-IOS-XR is supported.

To add more model prefix information for this Cisco NSO provider, click the Add icon at the end of any row in the Model Prefix Info section. To delete a model prefix you have entered, click the Delete icon shown next to that row.

* Version

Required only if you are adding a Cisco NSO provider: Enter the Cisco NSO NED driver version used on the NSO server.

Provider Properties

Property Key

Enter the name of the key for the special provider property you want to configure.

Provider properties control how Cisco Crosswork Change Automation and Health Insights interacts with the provider. Not all providers need them, and the number and type of properties vary with the provider family. These properties are documented in topics about adding specific providers elsewhere in this Guide. Please note, however, that Cisco Crosswork Change Automation and Health Insights does not validate provider properties. Make sure the properties you enter are valid for the provider.

Note 

In a two network interface configuration, Cisco Crosswork Change Automation and Health Insights defaults to communicating with providers using the Management Network Interface (eth0). You can change this behavior by adding Property Key and Property Value as outgoing-interface and eth1 respectively. This is most often necessary when creating the SR-PCE provider, as its management interface may reside on the data network instead of the management network.

Property Value

Enter the value to assign to the property key.

To add more special properties for this provider, click Add icon at the end of any key/value pair in the Provider Properties section. To delete a key/value pair you have entered, click Delete icon shown next to that pair.

Import Providers

Complete the steps below to create a CSV file that specifies providers and then import it into Cisco Crosswork Change Automation and Health Insights.

Importing providers from a CSV file adds any providers not already in the database, and updates any providers with the same name as an imported provider. For this reason, it is a good idea to export a backup copy of all your current providers before an import (see Export Providers).

Procedure

Step 1

From the main menu, choose Admin > Providers.

Step 2

Click Import icon to open the Import CSV File dialog box.

Step 3

If you have not already created a provider CSV file to import:

  1. Click the Download sample 'Provider template (*.csv)' file link and save the CSV file template to a local storage resource.

  2. Open the template using your preferred tool. Begin adding rows to the file, one row for each provider.

    Use a semicolon to separate multiple entries in the same field. Use two semicolons with no space between them to indicate that you are leaving the field blank. When you separate entries with semicolons, the order in which you enter values is important. For example, if you enter SSH;SNMP;NETCONF;TELNET in the connectivity_type field and you enter 22;161;830;23 in the connectivity_port field, the order of entry determines the mapping between the two fields:

    • SSH: port 22

    • SNMP: port 161

    • NETCONF: port 830

    • Telnet: port 23

    Field Description

    Required or Optional

    Provider Name

    Enter the name for the provider that will be used in Cisco Crosswork Change Automation and Health Insights. For example: MyWAE. The name can contain a maximum of 128 alphanumeric characters, plus dots (.), underscores ("_") or hyphens ("-"). No other special characters are allowed.

    Required

    Connectivity Type

    Enter the name of the protocol that Cisco Crosswork Change Automation and Health Insights will use to connect to the provider. Valid values are: ROBOT_MSVC_TRANS_TCP, ROBOT_MSVC_TRANS_UDP, ROBOT_MSVC_TRANS_HTTP, ROBOT_MSVC_TRANS_HTTPS, ROBOT_MSVC_TRANS_GRPC, ROBOT_MSVC_TRANS_SSH, ROBOT_MSVC_TRANS_NETCONF, ROBOT_MSVC_TRANS_TELNET, ROBOT_MSVC_TRANS_SNMP, ROBOT_MSVC_TRANS_TL1, ROBOT_MSVC_TRANS_TL1_SECURE, ROBOT_MSVC_TRANS_ICMP, ROBOT_MSVC_TRANS_KAFKA, ROBOT_MSVC_TRANS_NATS.

    Required

    Connectivity IP

    Enter the IP address (IPv4 or IPv6) of the provider.

    Required

    Connectivity Port

    Enter the port number to use to connect to the provider's server.

    Required

    Connectivity Timeout

    Enter the amount of time (in seconds) to wait before the connection to the provider times out. The default is 30 seconds.

    Required

    Credential Profile

    Enter the name of the credential profile that Cisco Crosswork Change Automation and Health Insights will use to connect to the provider. This profile must already exist in the system.

    Required

    Provider Device Key

    Enter the enum value corresponding to the key that the Cisco NSO provider uses to identify devices uniquely. This will serve as the way Cisco Crosswork Change Automation and Health Insights maps the device to the Cisco NSO provider. Valid values are:

    • ROBOT_PROVDEVKEY_HOST_NAME—If you are using the device hostname as the device ID within NSO, this value must match the hostname that is specified for the device in the inventory.

    • ROBOT_PROVDEVKEY_INVENTORY_ID—Use this enum value if the inventory ID is the device identifier for NSO.

    This entry is only required if you are creating or updating a Cisco NSO provider.

    Required

    Family

    Enter the provider family. Valid entries are: WAE, SYSLOG_STORAGE, ALERT, SR_PCE, and NSO.

    Required

    Model Prefix

    If you are adding a Cisco NSO provider: Select the model prefix that matches the NED CLI used by the NSO server. Valid entries are: Cisco-IOS-XR, Cisco-NX-OS, Cisco-IOS-XE.

    For telemetry, only Cisco-IOS-XR is supported.

    Required for Cisco NSO providers only

    Model Version

    If you adding a Cisco NSO provider: Enter the Cisco NSO NED driver version used on the

    Required for Cisco NSO only

    server (should be 6.0.4).

    Required for Cisco NSO providers only

    Properties

    Enter the name of the key for the special provider property you want to configure.

    See the documentation on adding individual providers for property key/value requirements. Cisco Crosswork Change Automation and Health Insights does not validate provider property key names or values. Make sure the properties you enter are valid for the provider.

    Required for some providers, otherwise optional

    Be sure to delete the sample data rows before saving the file, or they will be imported along with the data you want. The column header row can stay, as it is ignored during import.

  3. When you are finished, save the new CSV file.

Step 4

Click Browse to navigate to the CSV file you just created and then click Open to select it.

Step 5

With the CSV file selected, click Import.

The provider information you imported should now be displayed in the Providers window.

Step 6

Resolve any errors reported during the import and check provider details to confirm connection.


Add Cisco NSO Providers

Cisco Network Services Orchestrator (Cisco NSO) providers supply device management and configuration maintenance services to Cisco Crosswork Change Automation and Health Insights.

Follow the steps below to add (through the UI) a Cisco NSO provider for Cisco Crosswork Change Automation and Health Insights. You can also add providers using CSV files (see Import Providers).

Before you begin
You will need to:
  • Create a credential profile for the Cisco NSO provider (see Create Credential Profiles).

  • Know the name you want to assign to the Cisco NSO provider.

  • Know the Cisco NSO NED device models and driver versions used in your topology.


    Note

    You can find the Cisco NSO and NED versions using the version and package-version commands, as shown in the below examples:
    nso@nso-virtual-machine:~$ ncs --version
    5.2.03
    admin@ncs> show packages package  package-version
    NAME                           PACKAGE VERSION
    -----------------------------------------------
    cisco-iosxr-cli-7.13                7.13.9

  • Know the Cisco NSO server IP address and hostname.

  • Confirm Cisco NSO device configurations (see Sample Configuration for Devices in Cisco NSO).

Procedure

Step 1

From the main menu, choose Admin > Providers.

Step 2

Click Add icon.

Step 3

Enter the following values for the Cisco NSO provider fields:

  1. Required fields:

    • Provider Name: Enter a name for the provider that will be used in Cisco Crosswork Change Automation and Health Insights.

    • Credential Profile: Select the previously created Cisco NSO credential profile.

    • Family: Select NSO.

    • Device Key: Select the method that Cisco NSO uses to identify devices uniquely. This will serve as the way Cisco Crosswork Change Automation and Health Insights maps the device to Cisco NSO. Choices are: NONE, INVENTORY_ID, or HOST_NAME.

    • Under Connection Type(s), Protocol: Select the protocol that Cisco Crosswork Change Automation and Health Insights will use to connect to the provider. NETCONF is usually preferred.

    • IP Address/Subnet Mask: Enter the IP address (IPv4 or IPv6) and subnet mask of the Cisco NSO server.

    • Port: Enter the port to use to connect to the Cisco NSO server. The default is 2022.

    • Model: Select the model (Cisco-IOS-XR, Cisco-NX-OS, or Cisco-IOS-XE) from the drop-down list and enter its associated NED driver version. Add a model for each type of device that will be used in the topology. If you have more than one, select Add icon to add another supported model.

    • Version: Enter the NED software version installed for the device model in NSO.

    For more information on fields, see Import Providers.

  2. Optional values:

    • Timeout: The amount of time (in seconds) to wait before timing out the connection to the Cisco NSO server. The default is 30 seconds.

Step 4

When you have completed entries in all of the required fields, click Save to add Cisco NSO as a provider.


Add Cisco SR-PCE Providers

Cisco Segment Routing Path Computation Elements (Cisco SR-PCE) providers supply device discovery, management, configuration-maintenance and route-calculation services to Cisco Crosswork Change Automation and Health Insights. At least one SR-PCE provider is required in order to learn and discover SR policies, Layer 3 links, and devices that are part of the topology using XR Topology Controller (XTC). You have the option to configure a second SR-PCE as a backup. Both SR-PCE devices must be connected to the same network as does not support managing more than one domain.


Note

To enable Cisco Crosswork Change Automation and Health Insights access to an SR-PCE as an SDN controller on the management domain, SR-PCE needs to be added as a provider.


Follow the steps below to add (through the UI) one or more instances of Cisco SR-PCE as providers for Cisco Crosswork Change Automation and Health Insights.

Before you begin
You will need to:
  • Create a credential profile for the Cisco SR-PCE provider (see Create Credential Profiles). This should be a basic HTTP text-authentication credential (currently, MD5 authentication is not supported). If the Cisco SR-PCE server you are adding does not require authentication, you must still supply a credential profile for the provider, but it can be any profile that does not use the HTTP protocol.

  • Know the name you want to assign to the Cisco SR-PCE provider. This is usually the DNS hostname of the Cisco SR-PCE server.

  • Know the Cisco SR-PCE server IP address.

  • Know the interface you want to use to communicate between Cisco Crosswork Change Automation and Health Insights server and Cisco SR-PCE.

  • Determine whether you want to auto-onboard the devices that Cisco SR-PCE discovers and, if so, whether you want the new devices to have their management status set to off, managed or unmanaged when added. Your options, set using the Provider Properties fields, are as follows:

    • auto-onboard is off: If you set these Provider Properties values, you will add or import devices manually. When Cisco SR-PCE discovers devices, the device data is recorded in the Cisco SR-PCE database, but is not registered in the Cisco Crosswork Change Automation and Health Insights Device Management database.

    • auto-onboard is unmanaged: If you set these Provider Properties values, all devices that Cisco SR-PCE discovers will be registered in the Cisco Crosswork Change Automation and Health Insights Device Management database, with their configured state set to unmanaged. SNMP polling will be disabled for these devices, and no management IP information will be included. To get these devices into the managed state later, you will need to download them as a CSV file (see Export Network Devices), and modify the CSV file to add the SNMP and management IP address information. You can then update the auto-onboarded devices with this information by importing the modified CSV file (see Import Network Devices). You can also assign credential profiles by adding them to the device CSV file before import (the credential profiles must already exist).

    • auto-onboard is managed: If you set these Provider Properties values, all devices that Cisco SR-PCE discovers will be registered in the Cisco Crosswork Change Automation and Health Insights Device Management database, with their configured state set to managed. Their connectivity IP addresses will be set to their router IDs, and SNMP polling will be enabled. For successful SNMP polling, you will have to correct the connectivity IP address. You can do this by editing the device, or use the device CSV import feature to correct it. You will also need to add a second Provider Properties key/value pair, with the key device-profile and the value being the name of an SNMP credential profile for the new devices.

  • If you plan to auto-onboard devices that the Cisco SR-PCE provider discovers, and set them to a managed state when they are added to the database:

    • Assign an existing credential profile for communication with the new managed devices.

    • The credential profile must be configured with an SNMP protocol.

  • For high availability, ensure that you set up two separate Cisco SR-PCE providers with unique names and IP addresses, but with matching configurations .

Procedure

Step 1

From the main menu, choose Admin > Providers.

Step 2

Click Add icon.

Step 3

Enter the following values for the Cisco SR-PCE provider fields:

  1. Required fields:

    • Provider Name: Name of the SR-PCE provider that will be used in Cisco Crosswork Change Automation and Health Insights.

    • Credential Profile: Select the previously created Cisco SR-PCE credential profile.

    • Family: Select SR_PCE. All other options should be ignored.

    • Protocol: Select HTTP.

    • IP Address/ Subnet Mask: Enter the IP address (IPv4 or IPv6) and subnet mask of the server.

    • Provider Properties: Enter one of the following key/value pairs in the first set of fields:

      Property Key

      Value

      auto-onboard

      off

      Note 
      Use this option if you plan to manually (via UI or CSV import) enter all of your network devices.

      auto-onboard

      unmanaged

      auto-onboard

      managed

      Note 

      This option is only supported on IPv4 deployments. If you enable this option for an IPv6 deployment, devices will still register as unmanaged in the inventory.

      device-profile

      The name of a credential profile that contains SNMP credentials for all the new devices.

      Note 

      This field is necessary only if auto-onboard is set to managed or unmanaged.

      outgoing-interface

      eth1

      Note 

      You have to set this only if you want to enable Cisco Crosswork Change Automation and Health Insights access to SR-PCE via the data network interface when using the two NIC configuration.

  2. Optional values:

    • Timeout: The amount of time (in seconds) to wait before timing out the connection to the SR-PCE server. The default is 30 seconds.

Step 4

When you have completed entries in all of the required fields, click Save to add the SR-PCE provider.

Step 5

Confirm that the SR-PCE provider shows a green Reachability status without any errors. You can also view the Events window to see if the provider has been configured correctly.

Step 6

Repeat this process for each SR-PCE provider.


Note

It is not recommended to modify auto-onboard options (managed/unmanaged/off) once set. If you need to modify them, do the following:

  1. Delete the provider and wait until deletion confirmation is displayed in the Events page.

  2. Re-add the provider with the updated auto-onboard option.

  3. Confirm the provider has been added with the correct auto-onboard option in the Events page.


Add Cisco WAE Providers

Cisco WAN Automation Engine (Cisco WAE) providers supply traffic and topology analysis to Cisco Crosswork Change Automation and Health Insights. The foundation software is Cisco WAE Planning, which provides a cross-sectional view of traffic, topology, and equipment state. It takes advantage of a predictive model that performs "what if" analysis of failure impacts.

Follow the steps below to use the UI to add one or more instances of Cisco WAE as providers. You can also add providers using CSV files (see About Adding Providers).

Before you begin
You will need to:
  • Create a credential profile for the Cisco WAE provider (see Create Credential Profiles). This should be a basic HTTP/HTTPS text-authentication credential (currently, MD5 authentication is not supported). If the Cisco WAE server you are adding does not require authentication, you must still supply a credential profile for the provider, but it can be any profile that does not use the HTTP/HTTPS protocol.

  • Know the name you want to assign to the provider. This is usually the DNS hostname of the Cisco WAE server.

  • Know the Cisco WAE server IP address and port. The connection protocol will be HTTP or HTTPS.

Procedure

Step 1

From the main menu, choose Admin > Providers.

Step 2

Click Add icon.

Step 3

Enter the following values for the provider fields:

  1. Required fields:

    • Provider Name: Name of the Cisco WAE provider that will be used in Cisco Crosswork Change Automation and Health Insights.

    • Credential Profile: Select the previously created credential profile.

    • Family: Select WAE.

    • Protocol: Select HTTP or HTTPS respectively as per the credential profile you are using.

    • IP Address/ Subnet Mask: Enter the IP address (IPv4 or IPv6) and subnet mask of the server.

    • Port: Enter the port number (usually, 8080 for HTTP, and 8083 for HTTPS).

  2. Optional values:

    • Timeout: The amount of time (in seconds) to wait before timing out the connection to the server. The default is 30 seconds.

Step 4

When you have completed entries in all of the required fields, click Save to add the provider.


Add Syslog Storage Providers

Storage providers supply storage for data collected during KPI monitoring, Playbook execution, and other operations (such as syslog storage).

Follow the steps below to use the UI to add one or more storage providers for Cisco Crosswork Change Automation and Health Insights. You can also add providers using CSV files (see About Adding Providers).

Before you begin
You will need to:
  • Create a credential profile for the storage provider (see Create Credential Profiles). This should be an SSH or HTTPS credential, depending on the protocol you plan to use (SSH is recommended).

  • Know the name you want to assign to the storage provider. This is usually the DNS hostname of the server.

  • Know the storage provider's server IPv4 address and port. The connection protocol will be SSH or HTTPS.

  • Know the destination directory on the storage provider's server. You will need to specify this using the Provider Properties fields.

Procedure

Step 1

From the main menu, choose Admin > Providers.

Step 2

Click Add icon.

Step 3

Enter the following values for the provider fields:

  1. Required fields:

    • Provider Name: Name of the storage provider that will be used in Cisco Crosswork Change Automation and Health Insights.

    • Credential Profile: Select the previously created storage credential profile.

    • Family: Select SYSLOG_STORAGE.

    • Protocol: Select the protocol that Cisco Crosswork Change Automation and Health Insights will use to connect to the provider.SSH or HTTPS are usually preferred.

    • IP Address/ Subnet Mask: Enter the IP address (IPv4 or IPv6) and subnet mask of the server.

    • Port: Enter the port number (usually, 22 for SSH or 443 for HTTPS).

    • Provider Properties: Enter the following key/value pair in these fields:

      Property Key

      Property Value

      DestinationDirectory

      The absolute path where the collected data will be stored on the server. For example: /root/cw-syslogs

  2. Optional values:

    • Timeout: The amount of time (in seconds) to wait before timing out the connection to the storage server.

Step 4

When you have completed entries in all of the required fields, click Save to add the syslog storage provider.


Add an Alert Provider

An Alert provider is a destination to which you want to forward alerts collected during KPI monitoring (such as Cisco Crosswork Situation Manager). An alert provider must be capable of receiving and processing incoming alert packages.

Follow the steps below to use the UI to add an alert provider for Cisco Crosswork Change Automation and Health Insights. You can also add the alert provider by importing a CSV file (see About Adding Providers).

Currently, only one alert provider is supported.

Before you begin
You will need to:
  • Create a credential profile for the alert provider (see Create Credential Profiles). This should be a basic HTTP text-authentication credential (currently, MD5 authentication is not supported). If the provider does not require authentication, you must still supply a credential profile for the provider, but it can be any profile that does not use the HTTP protocol.

  • Know the name you want to assign to the alert provider. This is usually the DNS hostname of the server.

  • Know the alert server IPv4 address and port. The connection protocol will be HTTP.

  • Know the URL of the alert server endpoint. You will need to specify this using the Property Value field.

Procedure

Step 1

From the main menu, choose Admin > Providers.

Step 2

Click Add icon.

Step 3

Enter the following values for the provider fields:

  1. Required fields:

    • Provider Name: Name of the provider that will be used in Cisco Crosswork Change Automation and Health Insights.

    • Credential Profile: Select the previously created alert provider credential profile.

    • Family: Select ALERT.

    • Protocol: HTTP is pre-selected.

    • IP Address/ Subnet Mask: Enter the IP Address (IPv4 or IPv6) and subnet mask of the alert server.

    • Port: Enter the port number (usually, 80 for HTTP).

    • Provider Properties: The alertEndpointUrl property key name is pre-entered. In the Property Value field, enter the alert server endpoint only. For example, if the complete path to the endpoint is http://aws.amazon.com:80/myendpoint/bar1/, you would enter /myendpoint/bar1/ only.

  2. Optional values:

    • Timeout: The amount of time (in seconds) to wait before timing out the connection to the alert server.

Step 4

When you have completed entries in all of the required fields, click Save to add the alert provider.


Add Optimization Engine Providers

Follow the steps below to use the UI to add one or more instances of Optimization Engine as providers. You can also add providers using CSV files (see About Adding Providers).

Before you begin
You will need to:
  • Create a credential profile for the Optimization Engine provider (see Create Credential Profiles). This should be a basic HTTPS text-authentication credential.

  • Know the name you want to assign to the provider. This is usually the DNS hostname of the Optimization Engine server.

  • Know the Optimization Engine server IP address and port. The connection protocol will be HTTPS.

Procedure

Step 1

From the main menu, choose Admin > Providers.

Step 2

Click Add icon.

Step 3

Enter the following values for the provider fields:

  1. Required fields:

    • Provider Name: Name of the Optimization Engine provider that will be used in Cisco Crosswork Change Automation and Health Insights.

    • Credential Profile: Select the previously created credential profile.

    • Family: Select OPTIMIZATION ENGINE.

    • Protocol: Select HTTPS.

    • IP Address/ Subnet Mask: Enter the IP address (IPv4 or IPv6) and subnet mask of the server.

    • Port: Enter the port number (usually, 30603 for HTTPS).

  2. Optional values:

    • Timeout: The amount of time (in seconds) to wait before timing out the connection to the server. The default is 30 seconds.

Step 4

When you have completed entries in all of the required fields, click Save to add the provider.


Get Provider Details

Use the Providers window to get details about your providers and to check on their reachability.

Procedure


Step 1

From the main menu, choose Admin > Providers.

For each provider configured in Cisco Crosswork Change Automation and Health Insights, the Providers window lists information such as the provider's name, universally unique identifier (UUID), associated credential profile, device key, and more, as shown in the figure below.
Figure 3. Providers Window
Providers Window
Step 2

The icons in the Reachability column indicate whether a provider is reachable via the listed connectivity protocols. For a description of each icon and its meaning, see Reachability and Operational State.

Cisco Crosswork Change Automation and Health Insights checks provider reachability immediately after a provider is added or modified. Other than these events, Cisco Crosswork Change Automation and Health Insights checks reachability every 5 minutes.
Step 3

Get additional details for any provider, as follows:

  1. In the Provider Name column, click the Details icon to view provider-specific key/value properties.

  2. In the Connectivity Type column, click the Details icon to view detailed connectivity information for the provider, such as provider-specific protocol, IP format, IP address, port, and timeout information.

  3. In the Model Prefix column, click the Details icon to view the supported NED version(s) for a Cisco Network Services Orchestrator (Cisco NSO) provider's configured NED model prefix(es).

  4. When you are finished, click Close icon to close the details window.

If you are running into provider reachability problems, you can troubleshoot as follows:

  1. Ping the provider host.

  2. Attempt a connection using the protocols specified in the connectivity settings for the provider. For an SR-PCE provider, it is typically HTTP and port 8080.

    The following CLI command can be used to perform this check:

    curl -v -H "X-Subscribe: stream" "http://<ip-address>:8080/
    bwod/subscribe/json?keepalive-30&priority=5"
  3. Check your firewall setting and network configuration.

  4. Check the provider host or intervening devices for Access Control List settings that might limit who can connect.


Edit Providers

When editing provider settings, be aware that a provider can be mapped to many devices, even thousands of devices in a large network.


Note

  • Before making any changes to a provider configuration you should be certain that you understand the full impact of the change. If you are unsure about the potential risk of making a change, contact Cisco services for guidance.

  • See Add Cisco SR-PCE Providers before modifying an SR-PCE provider. There are additional steps that must be done when editing an SR-PCE provider.

.

Before editing any provider, it is always good practice to export a CSV backup of the providers you want to change (see Export Providers).

Procedure


Step 1

From the main menu, choose Admin > Providers.

Step 2

In the Providers window, choose the provider you want to update and click Edit icon.

Step 3

Make the necessary changes and then click Save.

Step 4

Resolve any errors and confirm provider reachability.


Delete Providers

Follow the steps below to delete a provider.

You are alerted when you try to delete a provider that is associated with one or more devices or credential profiles.

Procedure


Step 1

Export a backup CSV file containing the provider you plan to delete (see Export Providers).

Step 2

(Optional) Check whether any devices are mapped to the provider and change the provider before deletion.

  1. From the main menu, choose Device Management > Devices. The Network Devices tab is displayed by default.

  2. In the Network Devices window, enter the obsolete provider name in the Search field.

  3. Check the check box for the device that is mapped to the obsolete provider, and click Edit icon.

  4. Choose a different provider from the Provider drop-down list.

  5. Click Save.

Step 3

Delete the provider as follows:

  1. From the main menu, choose Admin > Providers.

  2. In the Providers window, choose the provider(s) that you want to delete and click Delete icon.

  3. In the confirmation dialog box, click Delete.


Export Providers

You can quickly export provider data to a CSV file. This is a handy way to keep backup copies of your provider information.


Note

You cannot edit a CSV file and then re-import it to update existing providers.


Procedure


Step 1

From the main menu, choose Admin > Providers.

Step 2

(Optional) In the Providers window, filter the provider list as needed.

Step 3

Check the check boxes for the providers you want to export. Check the check box at the top of the column to select all the providers for export.

Step 4

Click Export icon. Depending on your browser, you will be prompted to select a path and file name to use when saving the CSV file, or to open it immediately.


Manage Tags

Use the Tag Management window to manage the tags available for assignment to the devices in your network. Tags can provide information such as the device’s physical location and its administrator’s email ID, and are used to group devices.

To open this window, choose Admin > Tags from the Cisco Crosswork Change Automation and Health Insights main window.


Note

Cisco Crosswork Change Automation and Health Insights automatically creates a default set of tags and assigns them to every device it manages:

  • cli

  • mdt

  • reach-check

  • snmp

  • clock-drift-check

You cannot select, edit, delete, or manually associate these default tags with any device.


Item Description

1

Click Add icon to create new device tags. See Create Device Tags.

2

Click Delete icon to delete currently selected device tags. See Delete Device Tags.

3

Click Import icon to import the device tags defined in a CSV file into Cisco Crosswork Change Automation and Health Insights. See Import Tags. You can also download a CSV file template by clicking this icon. The template includes sample data that you can use as a guide for building your own CSV file.

4

Click Export icon to export a CSV file that lists the tags that are currently configured and their attributes. You can update this file and import it back into Cisco Crosswork Change Automation and Health Insights to quickly add or edit multiple tags. See Export Tags.

5

Displays the tags currently available in Cisco Crosswork Change Automation and Health Insights and their attributes.

6

Indicates the number of tags that are currently selected in the table.

7

Click Refresh icon to refresh the Tag Management window.

8

Click Settings icon to choose the columns to make visible in the Tag Management window (see Set, Sort and Filter Table Data).

Click Set Filter icon to set filter criteria on one or more columns in the Tag Management window.

Click the Clear Filter link to clear any filter criteria you may have set.

Create Tags

You can create as many tags and tag categories as you want. If you will have many tags, it might be quicker to list them in a CSV file and import the file, instead of creating each tag individually. See Import Tags.


Note

Tag and tag category names are case-insensitive and can contain a maximum of 128 alphanumeric characters, plus dots (.), underscores ("_") or hyphens ("-"). No other special characters are allowed.


Procedure


Step 1

From the main menu, choose Admin > Tags. The Tag Management window opens.

Step 2

Click Add icon. The Create New Tags pane opens.

Step 3

In the Category area:

  • To associate your new tags with an existing category: Choose the category from the drop-down list.

  • To associate your new tags with a new category: Click the New Category link, enter the new category's name in the text field, and click Save.

All the new tags you create after this step will be assigned to the category you selected or created.

Step 4

In the Tags area: Start entering the names of the new tags that you want to create. Press Return after you type each tag.

To keep from entering duplicate tags, click the Show Tags link. The Create New Tags window will list only the tags that already exist in your currently selected category.

Step 5

When you are finished entering new tags, click Save.


What to do next

Add tags to devices. See Apply or Remove Device Tags.

Import Tags

Complete the steps below to create a CSV file that lists the tags you want to apply to your devices, and then import it into Cisco Crosswork Change Automation and Health Insights. This is the easiest way to create a lot of new tags and tag categories quickly.

When you import the CSV file, any tags not already in the database will be added. Tags with the same name as an imported tag will be overwritten. For this reason, it is a good idea to export a backup copy of all your current tags before import (see Export Tags).

Procedure


Step 1

From the main menu, choose Admin > Tags.

Step 2

Click Import icon to open the Import CSV File dialog box.

Step 3

If you have not already created a CSV file to import:

  1. Click the Download sample 'Tags template (*.csv)' file link and save the CSV file template to a local storage resource.

  2. Open the template using your preferred tool. Begin adding rows to the file, one row for each tag. Use a comma to delimit each field within a row. Use a semicolon to separate multiple entries in the same field.

    Field Description

    Required or Optional

    Tag Name

    Enter the name of the tag. For example: SanFrancisco or Spine/Leaf.

    Required

    Tag Category

    Enter the tag category. For example: City or Network Role.

    Required

    Note 

    Tag Name and Tag Category fields are case-insensitive and can contain a maximum of 128 alphanumeric characters, plus dots (.), underscores ("_") or hyphens ("-"). No other special characters are allowed.

    Be sure to delete the sample data rows before saving the file, or they will be imported along with the data you want. The column header row can stay, as it is ignored during import.

  3. When you are finished, save the new CSV file.

Step 4

Click Browse to navigate to the CSV file you just created and then click Open to select it.

Step 5

With the CSV file selected, click Import.

The tags and tag categories that you imported should now be displayed in the Tag Management window.


What to do next

Add tags to devices. See Apply or Remove Device Tags.

Apply or Remove Device Tags

Tags and their categories are your main tool for grouping devices. Once you have tagged a set of devices with the same tag, they are considered part of a group, and you can manage them more easily.

In order to apply a tag to a device or group of devices, the tag must already exist (see Create Tags).

For efficiency, Cisco Crosswork Change Automation and Health Insights automatically updates inventory data, including topology, for all the devices in a tagged group, as a single set of inventory collection jobs. But please note that tag-group membership is static for other functions. For example, if you add or remove a device from a tagged group after applying a KPI, the KPI will monitor only the original group members. If you change group membership and want the KPI to monitor all the members of the group, re-apply the KPI to the changed group.

You can apply a maximum of 15 tags to any one device.

To apply tags to a device or set of devices, do the following:

Procedure


Step 1

From the main menu, choose Device Management > Devices. The Network Devices tab is displayed, showing the list of devices.

Step 2

(Optional) If the list is long, click Set Filter icon to set one or more filters and narrow the list to only those devices you want to tag.

Step 3

Check the check box next to the device(s) you want to tag. If you select multiple devices, any changes you make will be applied to all the devices you selected.

Step 4

From the toolbar, click Edit Tags icon. The Modify Tags window opens, showing the tags currently applied to the device(s) you selected.

Step 5

Click in the Type to autocomplete item field to display the list of existing tags, or begin typing the name of the tag you want.

Step 6

Click on individual tags in the list to add them to the list of tags applied to the device(s). To delete an applied tag, click the X icon shown next to that tag.


Delete Tags

Use caution when deleting existing tags. They are used to group devices and deleting them can affect which KPIs are being monitored and the Playbooks run on them.

To delete device tags, do the following:


Note

If the tag is mapped to any devices, then the tag cannot be deleted.


Procedure


Step 1

Export a backup CSV file containing the tags you plan to delete (see Export Tags).

Step 2

From the main menu, choose Admin > Tags. The Tag Management window is displayed.

Step 3

Check the check box next to the tags you want to delete.

Step 4

From the toolbar, click Delete icon.

Step 5

The confirmation dialog box will list the number of devices currently using the tag(s) you are about to delete. Click Delete to confirm deletion.


Export Tags

You can quickly export tags and tag categories to a CSV file. This will allow you to keep backup copies of your tags. You can also edit the CSV file as needed, and re-import it to overwrite existing tags. Note that you will need to re-associate devices and tags in some cases.

Procedure


Step 1

From the main menu, choose Admin > Tags.

Step 2

(Optional) In the Tag Management window, filter the tag list as needed.

Step 3

Check the check boxes for the tags you want to export. Check the check box at the top of the column to select all the tags for export.

Step 4

Click Export icon. Depending on your browser, you will be prompted to select a path and file name to use when saving the CSV file, or to open it immediately.


Manage Certificates

The Cisco Crosswork Change Automation and Health Insights VM-hosted server and its browser-based user interface communicate with each other using SSL certificates exchanged over HTTPS. For details about these protocols, see SSL Certificates and HTTPS

When installed, Cisco Crosswork Change Automation and Health Insights secures these interactions using a self-signed TLS certificate. This certificate has a two-year lifespan, after which it expires. If you want to continue using the expired self-signed certificate to secure server/client communications, you will need to regenerate it by following the steps in Extend Self-Signed Certificate Expiration

If you prefer to secure these communications with a user-provided certificate, either purchased from a Certificate Authority (CA) or self-signed by your organization, you can validate and upload it by following the steps in Substitute a User-Provided Certificate.

The user-provided certificate must meet the following requirements:

  • Cisco Crosswork Change Automation and Health Insights supports IP Subject Alternative Name (SAN) server certificates only. The IP address is the primary means to reach the user interface.

  • The server will present your user-provided certificates to the browser, so the certificates you supply must be valid both for Cisco and for Cisco Crosswork Change Automation and Health Insights.

  • It must also include the required fields and field values shown in the following table.

    Table 6. Required User-Provided Certificate Fields and Values

    Field

    Description

    Value

    <NUMBER OF DAYS>

    Number of days the certificate will be valid.

    Must be greater than 30 days and less than 730 days (or two years)

    <COUNTRY>

    Country (C=)

    US

    <STATE>

    State (ST=)

    CALIFORNIA

    <LOCATION>

    Location (L=)

    SAN JOSE

    <ORGANIZATION>

    Organization (O=)

    CISCO SYSTEMS INC

    <ORGANIZATIONAL UNIT NAME>

    Organizational Unit (OU=)

    CROSSWORK

    <COMMON NAME>

    Common Name (CN=)

    The IP address of the Cisco Crosswork Change Automation and Health Insights server VM.

  • The certificate must also have the SAN extension set, with both DNS and IP address keys. The following provides an example of how to generate a self-signed certificate using OpenSSL:

    /usr/bin/openssl req \
                       -x509 \
                       -nodes \
                       -days 730 \
                       -newkey rsa:4096 \
                       -keyout "filename.key" \
                       -out "filename.crt" \
                       -subj "/C=US/ST=CALIFORNIA/L=SAN JOSE/O=CISCO SYSTEMS INC/OU=CROSSWORK/CN=1.1.1.1" \
                       -extensions SAN \
                       -config <(cat /etc/ssl/openssl.cnf \
                        <(printf "\n[SAN]\nsubjectAltName=DNS:0.0.0.0,IP:1.1.1.1"))

Extend Self-Signed Certificate Expiration

Follow these steps to regenerate the self-signed certificate and extend its lifetime by two years.

Procedure


Step 1

From the main menu, select Admin > Certificate Management. The Certificate Management window appears.

Step 2

Select the Regenerate Crosswork Certificate radio button.

Certificate Management window
Step 3

When you are ready, click Regenerate Certificate.

When Cisco Crosswork Change Automation and Health Insights has finished regenerating the certificate, it displays an alert message indicating that the regeneration operation is successful and you will be logged out. You must log in again to continue using Cisco Crosswork Change Automation and Health Insights.

Note 

In certain situations, your internet browser may fail to load the GUI page contents after a Cisco Crosswork Change Automation and Health Insights certificate regeneration, even if you try to log out and login again. You may also see invalid certificate errors or authentication errors. To prevent these errors, you need to refresh the browser after a certificate regeneration, specially if the browser is in incognito or private browsing mode.


Substitute a User-Provided Certificate

Follow the steps below to validate and upload a user-provided certificate. The certificate must meet the requirements explained in Manage Certificates.

Before you begin

You must know the names of the user-provided certificate and key files and their locations in your local storage.

Procedure


Step 1

From the main menu, select Admin > Certificate Management. The Certificate Management window appears.

Step 2

Select the Validate/Update radio button.

Step 3

Use the Browse button next to each field to browse to and select the key and certificate files you want to validate and use.

Certificate Management window
Step 4

Click Validate to validate the certificate and key files.

Step 5

Click Update to replace the existing certificate with the user-provided certificate you have validated.


Smart Licensing Registration

This section provides an overview of the Cisco Smart Licensing feature integrated with the Cisco Crosswork Change Automation and Health Insights and describes the instructions to complete the product registration.

Overview

Smart Licensing is a software based end-to-end license platform that comprises several tools and processes that authorizes customers to use Cisco products. Smart Licensing provides a software inventory management system that provides Customers, Cisco, and selected Partners with information about Software Ownership and Software Utilization.

A Cisco Smart Account provides the repository for Smart enabled products and enables you to activate Cisco licenses, monitor license usage and track Cisco purchases. The Cisco Smart Software Manager (CSSM) enables you to manage all your Cisco Smart software licenses from one centralized website. With Cisco Smart Software Manager, you may create and manage multiple virtual accounts within your Smart Account to manage licenses. For more information, see https://www.cisco.com/c/en/us/buy/smart-accounts/software-manager.html

From the main menu, select Admin > Smart Licensing Registration to display the Smart Software Licensing window. Using this window, you can register your Cisco Crosswork Change Automation and Health Insights application, edit the transport settings, renew the license, and de-register your application.

Prerequisites for Smart Licensing Registration

You should have:

  • A Cisco Smart Account.

  • Purchased licenses for the Cisco Crosswork Change Automation and Health Insights application.

Configure Transport Settings

You can configure the transport settings to decide how Cisco Crosswork Change Automation and Health Insights communicates with the Cisco servers.

  • Direct: The application directly connects with Cisco Smart Software Manager (CSSM).

  • Transport Gateway: The application communicates via a Transport Gateway or CSSM on-prem, which replicates the cloud-based user experience but keeps all communication on premises.


    Note

    For more information on the CSSM on-prem option, see the Smart Software Manager guide.


  • HTTP/HTTPS Gateway: The application connects via an intermediate proxy server. This is applicable only for Direct mode.


Note

Transport Settings cannot be changed while the Cisco Crosswork Change Automation and Health Insights is in Registered mode. You have to de-register to change them.


Procedure


Step 1

In the Smart Software Licensing window, the Transport Settings display the current transport mode selected. To modify, click View/Edit.

The Transport Settings dialog box is displayed.

Step 2

Select the relevant transport mode and make relevant entries in the fields provided.

Step 3

Click Save.


Register Cisco Crosswork Change Automation and Health Insights

To enable licensed features, Cisco Crosswork Change Automation and Health Insights must be registered to CSSM using a registration ID token. Once registered, an Identity Certificate is saved securely in the Smart Account and used for all ongoing communications. The certificate is valid for one year and will be renewed automatically after six months to ensure continuous operation.


Note

For information on generating the registration token, please refer to the support resources provided in the Smart Software Manager webpage.


Procedure


Step 1

From the main menu, select Admin > Smart Licensing Registration to display the Smart Software Licensing window. The registration status

The registration status and license authorization status will be Unregistered and Evaluation mode respectively.

Figure 4. Smart Software Licensing Unregistered
Smart Software Licensing Unregistered
Step 2

In the Smart Software Licensing window, click Register.

The Smart Software Licensing Product Registration dialog box is displayed.

Step 3

In the Product Instance Registration Token field, enter the registration token generated from your Smart Account. Make sure the token ID is accurate and within validity period. For more information, see https://www.cisco.com/c/en_in/products/software/smart-accounts/software-licensing.html.

Step 4

(Optional) If you are re-registering the application, check the Re-register this product registration if it is already registered checkbox.

Note 

After a backup restore or disaster restore operation, you must manually re-register the Cisco Crosswork Change Automation and Health Insights VM to CSSM. This is applicable in case of a Cisco Crosswork Change Automation and Health Insights VM that has been already registered while taking the backup which is used in the restore operations.

Step 5

Click Register. It may take a few minutes to process the registration. If successful, the 'Product Registration completed successfully' message is displayed.

The registration status and license authorization status will be updated as Registered and Authorized respectively.

Note 
  • If you encounter a communication timeout error during registration, click OK in the error dialog box and the application will reattempt the registration.

  • In some cases, after succesful registration, the page may need to be refreshed manually to see the updated status.


Manual Actions

The renewal of registration and authorization are automatically enabled for Cisco Crosswork Change Automation and Health Insights, by default. However, in the event of a communication failure between the application and the Cisco server, these actions can be manually initiated. You can use the Actions drop-down button to manually renew, re-register and de-register the application.

Procedure


Step 1

In the Smart Software Licensing window, click Actions drop-down button and select the relevant option for the following quick actions.

  1. Actions > Renew Authorization: To renew the authorization manually if the automatic renewal service fails at the end of 30 days.

  2. Actions > Renew Registration: To renew the registration manually if the automatic renewal service fails at the end of 6 months.

  3. Actions > Re-register: Re-register the application, for example, on account of the expiry of registration tokens.

  4. Actions > De-register: De-register the application, for example, when the transport settings need to be changed.

    Note 

    Once de-registered, the Cisco Crosswork Change Automation and Health Insights application will be moved to Evaluation mode (if evaluation period is available), or Evaluation Expired mode. For more information, see License Authorization Statuses

Step 2

The selected action is executed successfully.


License Authorization Statuses

Based on the registration status of your Cisco Crosswork Change Automation and Health Insights application, you can see the following License Authorization Statuses.

Table 7. License Authorization Statuses

Registration Status

License Authorization Status

Description

Unregistered

Evaluation mode

A 90-day evaluation period during which the licensed features of the application can be freely used. This state is initiated when you use the application for the first time.

Evaluation Expired

The application has not been successfully registered at the end of the evaluation period. During this state, the application features are disabled, and you must register to continue using the application.

Registered Expired

The application is unable to contact the CSSM before the expiration of Identity Certificates and has returned to the unregistered state. The application resumes the remaining evaluation period, if available. At this stage, new registration ID token is required to reregister the application.

Registered

Authorized (In Compliance)

The application has been fully authorized to use the reserved licensed features. The authorization is automatically renewed every 30 days.

Out of Compliance

The associated Virtual Account does not have enough licenses to reserve for the application’s current feature use. You must renew the entitlement/usage limit registered with the token to continue using the application.

Authorization Expired

The application is unable to communicate with the CSSM for 90 days or more, and the authorization has expired.

Security Hardening Overview

Security hardening entails making adjustments to ensure that the following components optimize their security mechanisms:

  • Cisco Crosswork Change Automation and Health Insights infrastructure

  • Cisco Crosswork Change Automation and Health Insights storage system (local or external)

Hardening Cisco Crosswork Change Automation and Health Insights security requires completion of the following tasks:

  • Shutting down insecure and unused ports

  • Configuring network firewalls

  • Hardening the Cisco Crosswork Change Automation and Health Insights infrastructure, as needed

Although your primary source of information is your Cisco representative, who can provide server hardening guidance specific to your deployment, you can also follow the steps in this section to secure Cisco Crosswork Change Automation and Health Insights.

Authentication Throttling

Cisco Crosswork Change Automation and Health Insights throttles the login attempts after a failed login attempt to avoid password guessing and other related abuse scenarios. After a failed login attempt for a username, all authentication attempts for that username would be blocked for 3 seconds. The throttling is applicable to all supported authentication schemes such as TACACS, LDAP and the default local authentication.

Core Security Concepts

If you are an administrator and are looking to optimize the security of your Cisco Crosswork Change Automation and Health Insights product, you should have a good understanding of the following security concepts.

HTTPS

Hypertext Transfer Protocol Secure (HTTPS) uses Secure Sockets Layer (SSL) or its subsequent standardization, Transport Layer Security (TLS), to encrypt the data transmitted over a channel. Several vulnerabilities have been found in SSL, so Cisco Crosswork Change Automation and Health Insights now supports TLS only.


Note

TLS is loosely referred to as SSL often, so we will also follow this convention.

SSL employs a mix of privacy, authentication, and data integrity to secure the transmission of data between a client and a server. To enable these security mechanisms, SSL relies upon certificates, private-public key exchange pairs, and Diffie-Hellman key agreement parameters.

SSL Certificates

SSL certificates and private-public key pairs are a form of digital identification for user authentication and the verification of a communication partner’s identity. Certificate Authorities (CAs), such as VeriSign and Thawte, issue certificates to identify an entity (either a server or a client). A client or server certificate includes the name of the issuing authority and digital signature, the serial number, the name of the client or server that the certificate was issued for, the public key, and the certificate's expiration date. A CA uses one or more signing certificates to create SSL certificates. Each signing certificate has a matching private key that is used to create the CA signature. The CA makes signed certificates (with the public key embedded) readily available, enabling anyone to use them to verify that an SSL certificate was actually signed by a specific CA.

In general, setting up certificates in both High Availability (HA) and non-HA environments involves the following steps:

  1. Generating an identity certificate for a server.

  2. Installing the identity certificate on the server.

  3. Installing the corresponding root certificate on your client or browser.

The specific tasks you need to complete will vary depending on your environment.

Note the following:

  • The start-stop sequencing of servers needs to be done carefully in HA environments.

  • Non-HA environments, where a virtual IP address is configured, require the completion of a more complicated certificate request process.

1-Way SSL Authentication

This authentication method is used when a client needs assurance that it is connecting to the right server (and not an intermediary server), making it suitable for public resources like online banking websites. Authentication begins when a client requests access to a resource on a server. The server on which the resource resides then sends its server certificate (also known as an SSL certificate) to the client in order to verify its identity. The client then verifies the server certificate against another trusted object: a server root certificate, which must be installed on the client or browser. After the server has been verified, an encrypted (and therefore secure) communication channel is established. At this point, the Cisco Crosswork Change Automation and Health Insights server prompts for the entry of a valid username and password in an HTML form. Entering user credentials after an SSL connection is established protects them from being intercepted by an unauthorized party. Finally, after the username and password have been accepted, access is granted to the resource residing on the server.


Note

A client might need to store multiple server certificates to enable interaction with multiple servers.

To determine whether you need to install a root certificate on your client, look for a lock icon in your browser’s URL field. If you see this icon, this generally indicates that the necessary root certificate has already been installed. This is usually the case for server certificates signed by one of the bigger Certifying Authorities (CAs), because root certificates from these CAs are included with popular browsers.

If your client does not recognize the CA that signed a server certificate, it will indicate that the connection is not secure. This is not necessarily a bad thing. It just indicates that the identity of the server you want to connect has not been verified. At this point, you can do one of two things: First, you can install the necessary root certificate on your client or browser. A lock icon in your browser’s URL field will indicate the certificate was installed successfully. And second, you can install a self-signed certificate on your client. Unlike a root certificate, which is signed by a trusted CA, a self-signed certificate is signed by the person or entity that created it. While you can use a self-signed certificate to create an encrypted channel, understand that it carries an inherent amount of risk because the identity of the server you are connected with has not been verified.

Disable Insecure Ports and Services

As a general policy, any ports that are not needed should be disabled. You need to first know which ports are enabled, and then decide which of these ports can be safely disabled without disrupting the normal functioning of Cisco Crosswork Change Automation and Health Insights. You can do this by listing the ports that are open and comparing it with a list of ports needed for Cisco Crosswork Change Automation and Health Insights.

To view a list of all open listening ports:

Procedure


Step 1

Log in as a Linux CLI admin user and enter the netstat -aln command.

The netstat -aln command displays the server's currently open (enabled) TCP/UDP ports, the status of other services the system is using, and other security-related configuration information. The command returns output similar to the following:

[root@vm ~]# netstat -aln
Active Internet connections (servers and established)
Proto  Recv-Q   Send-Q   Local Address            Foreign Address         State
tcp    0        0        0.0.0.0:111              0.0.0.0:*               LISTEN
tcp    0        0        127.0.0.1:8080           0.0.0.0:*               LISTEN
tcp    0        0        0.0.0.0:22               0.0.0.0:*               LISTEN
tcp    0        0        127.0.0.1:25             0.0.0.0:*               LISTEN
tcp    0        0        127.0.0.1:10248          0.0.0.0:*               LISTEN
tcp    0        0        127.0.0.1:10249          0.0.0.0:*               LISTEN
tcp    0        0        192.168.125.114:40764    192.168.125.114:2379    ESTABLISHED
tcp    0        0        192.168.125.114:48714    192.168.125.114:10250   CLOSE_WAIT
tcp    0        0        192.168.125.114:40798    192.168.125.114:2379    ESTABLISHED
tcp    0        0        127.0.0.1:33392          127.0.0.1:8080          TIME_WAIT
tcp    0        0        192.168.125.114:40814    192.168.125.114:2379    ESTABLISHED
tcp    0        0        192.168.125.114:40780    192.168.125.114:2379    ESTABLISHED
tcp    0        0        127.0.0.1:8080           127.0.0.1:44276         ESTABLISHED
tcp    0        0        192.168.125.114:40836    192.168.125.114:2379    ESTABLISHED
tcp    0        0        192.168.125.114:40768    192.168.125.114:2379    ESTABLISHED
tcp    0        0        127.0.0.1:59434          127.0.0.1:8080          ESTABLISHED
tcp    0        0        192.168.125.114:40818    192.168.125.114:2379    ESTABLISHED
tcp    0        0        192.168.125.114:22       192.168.125.1:45837     ESTABLISHED
tcp    0        0        127.0.0.1:8080           127.0.0.1:48174         ESTABLISHED
tcp    0        0        127.0.0.1:49150          127.0.0.1:8080          ESTABLISHED
tcp    0        0        192.168.125.114:40816    192.168.125.114:2379    ESTABLISHED
tcp    0        0        192.168.125.114:55444    192.168.125.114:2379    ESTABLISHED

Step 2

Check the Cisco Crosswork Change Automation and Health Insights Installation Guide for the table of ports used by Cisco Crosswork Change Automation and Health Insights, and see if your ports are listed in that table. That table will help you understand which services are using the ports, and which services you do not need—and thus can be safely disabled. In this case, safe means you can safely disable the port without any adverse effects to the product.

Note 
If you are not sure whether you should disable a port or service, contact your Cisco representative.  
Step 3

If you have firewalls in your network, configure the firewalls to only allow traffic that is needed for Cisco Crosswork Change Automation and Health Insights to operate.


Harden Your Storage

We recommend that you secure all storage elements that will participate in your Cisco Crosswork Change Automation and Health Insights installation, such as the database, backup servers, and so on.

  • If you are using external storage, contact your storage vendor and your Cisco representative.

  • If you are using internal storage, contact your Cisco representative.

  • If you ever uninstall or remove Cisco Crosswork Change Automation and Health Insights, make sure that all VM-related files that might contain sensitive data are digitally shredded (as opposed to simply deleted). Contact your Cisco representative for more information.