Cisco Crosswork Data Gateway Installation Workflow
Cisco Crosswork Data Gateway is installed as a base VM that contains only enough software to register itself with Cisco Crosswork.
 Note |
If you are redeploying the same Cisco Crosswork Data Gateway with Cisco Crosswork, delete the previous Crosswork Data Gateway entry from the Virtual Machine table under Data Gateway Management. For information on how to delete a Crosswork Data Gateway VM, see Delete Crosswork Data Gateway VM from Cisco Crosswork. |
To install Crosswork Data Gateway VM for use with Cisco Crosswork, follow these steps:
-
Choose the deployment profile for the Crosswork Data Gateway VM. See Crosswork Data Gateway VM Requirements.
-
Review the installation parameters at Cisco Crosswork Data Gateway Parameters and Deployment Scenarios and make sure that you have all the required information to install Crosswork Data Gateway using your the preferred deployment scenario.
-
Install Cisco Crosswork Data Gateway using yours preferred method:
Table 1. Crosswork Data Gateway installation options VMware
Install Cisco Crosswork Data Gateway using vCenter vSphere Client
-
Complete the post-installation tasks mentioned in the section Crosswork Data Gateway Post-installation Tasks

Note
If you plan to install multiple Cisco Crosswork Data Gateway VMs due to load or scale requirements or you wish to leverage Cisco Data Gateway High Availability, we recommend that you install all the Crosswork Data Gateway VMs first and then proceed with adding them to a Data Gateway pool.
-
Verify that the Crosswork Data Gateway VM has enrolled successfully with Cisco Crosswork. For information on how to verify the enrollment process, see Cisco Crosswork Data Gateway Authentication and Enrollment.
After verifying that the Crosswork Data Gateway VM has enrolled successfully with Cisco Crosswork, set up the Crosswork Data Gateway for collection by creating a Crosswork Data Gateway pool. For more information, see the Create a Crosswork Data Gateway Pool section in Cisco Crosswork Network Controller 5.0 Administration Guide.
Cisco Crosswork Data Gateway Parameters and Deployment Scenarios
Before you begin installing the Crosswork Data Gateway, read through this section to understand the deployment parameters and possible deployment scenarios.
Crosswork Data Gateway supports either IPv4 or IPv6 addresses for all interfaces. Cisco Crosswork does not support dual stack configurations. Therefore, plan ALL addresses for the environment as either IPv4 or IPv6.
During installation, Cisco Crosswork Data Gateway creates two user accounts:
-
Cisco Crosswork Data Gateway administrator, with the username, dg-admin, and the password set during installation The administrator uses this ID to log in and troubleshoot Cisco Crosswork Data Gateway.
-
Cisco Crosswork Data Gateway operator, with the username, dg-oper and the password set during installation. The dg-oper user has permissions to perform all ‘read’ operations and limited ‘action’ commands.
To know what operations an admin and operator can perform, see the Supported User Roles topic in the Cisco Crosswork Network Controller 5.0 Administration Guide.
The dg-admin and dg-oper user accounts are reserved user names and cannot be changed. You can change the password in the console for both the accounts. For more information, see the Change Passphrase section in Cisco Crosswork Network Controller 5.0 Administration Guide. In case of lost or forgotten passwords, destroy the current VM, you have to create a new VM, and re-enroll the new VM with Cisco Crosswork, if required.
In the following table:
* Denotes the mandatory parameters. Parameters without this mark are optional. You can choose them based on your deployment scenario. Deployment scenarios are explained (wherever applicable) in the Additional Information column.
** Denotes parameters that you can enter during install or address later using additional procedures.
|
Label |
Key |
Description |
Additional Information |
||
|---|---|---|---|---|---|
|
Host Information |
|||||
|
Hostname* |
Hostname |
Name of the Cisco Crosswork Data Gateway VM specified as a fully qualified domain name (FQDN). In larger systems, you are likely to have more than one Cisco Crosswork Data Gateway VM. The host name must, therefore, be unique and created in a way that makes identifying a specific VM easy. |
|||
|
Description* |
Description |
A detailed description of the Cisco Crosswork Data Gateway. |
|||
|
Label |
Label |
Label used by Cisco Crosswork to categorize and group multiple Cisco Crosswork Data Gateway VMs. |
|||
|
Deployment* |
|
Parameter that conveys the type of controller application that Crosswork Data Gateway is deployed with. For an on-premise installation, it is Crosswork On-Premise. The default value is All data gateways in a pool must be of the deployment type. |
|||
|
Profile* |
|
Parameter conveys the VM resource profile. For an on-premise installation, choose either:
The default value is |
For VMware vCenter, you cannot configure this parameter. The OVF tool configures this parameter with the default value. |
||
|
AllowRFC8190* |
AllowRFC8190 |
Choose how to validate interface addresses that fall in a usable RFC 8190 range. Options are: |
The default value is |
||
|
Private Key URI |
DGCertKey |
SCP URI to private key file for session key signing. You can retrieve this using SCP ( |
Cisco Crosswork uses self-signed certificates for handshake with Cisco Crosswork Data Gateway. These certificates are generated at installation. However, if you want to use third party or your own certificate files, then enter these parameters. Certificate chains override any preset or generated certificates in the Cisco Crosswork Data Gateway VM and are given as an SCP URI (user:host:/path/to/file). The host with the URI files must be reachable on the network (from the vNIC0 interface via SCP) and files must be present at the time of install. |
||
|
Certificate File and Key Passphrase |
DGCertChainPwd |
Passphrase of the SCP user to retrieve the Cisco Crosswork Data Gateway PEM formatted certificate file and private key. |
|||
|
Data Disk Size |
DGAppdataDisk |
Indicates the size in GB of a second data disk. The default value of this parameter in each profile is:
|
|||
|
HA Network Mode* |
|
Indicates the mode for the HA network. Options are:
The default value is |
|||
|
Passphrase |
|||||
|
dg-admin Passphrase* |
dg-adminPassword |
The password you have chosen for the dg-admin user. Password must be 8-64 characters. |
|||
|
dg-oper Passphrase* |
dg-operPassword |
The password you have chosen for the dg-oper user. Password must be 8-64 characters. |
|||
|
Interfaces In a 3-NIC deployment, you need to provide IP address for Management Traffic (vNIC0) and Control/Data Traffic (vNIC1) only. IP address for Device Access Traffic (vNIC2) is assigned during Crosswork Data Gateway pool creation as explained in the Create a Crosswork Data Gateway Pool section in Cisco Crosswork Network Controller 5.0 Administration Guide.
|
|||||
|
NicDefaultGateway* |
|
The interface used as the Default Gateway for processing the DNS and NTP traffic. Options are |
|||
|
NicAdministration* |
|
The interface used to access the VM through the SSH access. Options are |
|||
|
NicExternalLogging* |
|
The interface used to send logs to an external logging server. Options are |
|||
|
NicManagement* |
|
The interface used to send the enrollment and other management traffic. Options are |
|||
|
NicControl* |
|
The interface used to send the destination, device, and collection configuration. Options are |
|||
|
NicNBExternalData* |
|
The interface used to send the collection data to the external destinations. Options are |
|||
|
NicSBData* |
|
The interface used to collect data from the devices. Options are |
|||
|
vNIC IPv4 Address (vNIC0, vNIC1, and vNIC2 based on the number of interfaces you choose to use)
|
|||||
|
vNIC IPv4 Method* For example, the parameter name for vNIC0 is vNIC0 IPv4 Method. |
|
Method in which the interface is assigned an IPv4 address - The default value is |
If you have selected Method as:
|
||
|
vNIC IPv4 Address |
|
IPv4 address of the interface. |
|||
|
vNIC IPv4 Netmask |
|
IPv4 netmask of the interface in dotted quad format. |
|||
|
vNIC IPv4 Skip Gateway |
|
The default value is Setting this to |
|||
|
vNIC IPv4 Gateway |
|
IPv4 address of the vNIC gateway. |
|||
|
vNIC IPv6 Address (vNIC0, vNIC1, and vNIC2 based on the number of interfaces you choose to use) |
|||||
|
vNIC IPv6 Method* |
|
Method in which the vNIC interface is assigned an IPv6 address - The default value is |
If you have selected Method as:
Do not change the VnicxIPv6Address default values. |
||
|
vNIC IPv6 Address |
|
IPv6 address of the interface. |
|||
|
vNIC IPv6 Netmask |
|
IPv6 prefix of the interface. |
|||
|
vNIC IPv6 Skip Gateway |
|
Options are Selecting |
|||
|
vNIC IPv6 Gateway |
|
IPv6 address of the vNIC gateway. |
|||
|
vNIC Roles |
|||||
|
Default Gateway |
|
The interface that allows all types of traffic to flow. This interface is configured using the route metrics. The DNS and NTP traffic uses the The default value is |
For information on the type of roles that you must assign to the vNICs, see Table 3. |
||
|
Administration |
|
The SSH traffic uses the Administration role to access the console menu. The default value is |
|||
|
External Logging |
|
The interface that allows a connection to an external syslog and auditd servers for sending logs. The default value is |
|||
|
Management |
|
The interface that allows a connection to dg-manager for enrollment and other management traffic. The default value is |
|||
|
Control |
|
The interface that allows a connection to collection service for destination, device, and collection configuration. The default value is |
|||
|
NB System Data |
|
As the system destinations share the same IP as interface that allows connection to the collection service, the northbound data for system destinations uses the Control role's interface. |
|||
|
NB External Data |
|
The interface that allows connection to the destinations provided by the user. The default value is |
|||
|
SB Data |
|
The interface that allows a connection to collect the device data. An interface with only the SB Data role does not need an IP during the deployment. The default value is |
|||
|
DNS Servers |
|||||
|
DNS Address* |
DNS |
Space delimited list of IPv4 or IPv6 addresses of the DNS servers accessible from the management interface. |
|||
|
DNS Search Domain* |
Domain |
DNS search domain. The default value is |
|||
|
DNS Security Extensions * |
DNSSEC |
Options are The default value is Select |
|||
|
DNS over TLS* |
DNSTLS |
Options are The default value is Select |
|||
|
Multicast DNS* |
mDNS |
Options are The default value is |
If you choose Resolve, only resolution support is enabled. Responding is disabled. |
||
|
Link-Local Multicast Name Resolution* |
LLMNR |
Options are The default value is Select |
If you choose Resolve, only resolution support is enabled. Responding is disabled. |
||
|
NTPv4 Servers |
|||||
|
NTPv4 Servers* |
NTP |
Space-delimited list of IPv4, IPv6 addresses, or hostnames of the NTPv4 servers accessible in the management interface. |
You must enter a value here, such as pool.ntp.org. NTP server is critical for time synchronization between Crosswork Data Gateway VM, Crosswork, and devices. Using a nonfunctional or dummy address may cause issues when Cisco Crosswork and Crosswork Data Gateway try to communicate with each other. If you are not using an NTP server, ensure that time gap between Crosswork Data Gateway and Crosswork is not more than 10 minutes. Else, Crosswork Data Gateway fails to connect. |
||
|
Use NTPv4 Authentication |
NTPAuth |
Select The default value is |
|||
|
NTPv4 Keys |
NTPKey |
Key IDs to map to the server list. Enter space-delimited list of Key IDs. |
|||
|
NTPv4 Key File URI |
NTPKeyFile |
SCP URI to the chrony key file. |
|||
|
NTPv4 Key File Passphrase |
NTPKeyFilePwd |
Password of SCP URI to the chrony key file. |
|||
|
Remote Syslog Server |
|||||
| Use Remote Syslog Server* | UseRemoteSyslog |
Options are True and False. Select True to send Syslog messages to a remote host.The default value is |
Configuring an external syslog server sends service events (CLI/MDT/SNMP/gNMI) to the external syslog server. Otherwise, they are logged only to the Cisco Crosswork Data Gateway VM. If you want to use an external syslog server, specify the following settings:
|
||
|
Syslog Server Address |
|
Hostname, IPv4, or IPv6 address of a syslog server accessible in the management interface. |
|||
|
Syslog Server Port |
SyslogPort |
Port number of the syslog server. The default port number is 514. |
|||
|
Syslog Server Protocol |
SyslogProtocol |
Options are The default value is |
|||
|
Syslog Multiserver Mode |
|
Multiple servers in the failover or simultaneous mode. This parameter is applicable only when the protocol is set to a non-UDP value. UDP must use the simultaneous mode. Options are The default value is |
|||
|
Use Syslog over TLS? |
SyslogTLS |
Select The default value is |
|||
|
Syslog TLS Peer Name |
SyslogPeerName |
Syslog server hostname exactly as entered in the server certificate SubjectAltName or subject common name. |
|||
|
Syslog Root Certificate File URI |
|
PEM formatted root cert of syslog server retrieved using SCP. The host with the URI files must be reachable on the network (from vNIC0 interface via SCP) and files must be present at the time of install. |
|||
|
Syslog Certificate File Passphrase |
|
Password of SCP user to retrieve Syslog certificate chain. |
|||
|
Remote Auditd Server |
|||||
|
Use Remote Auditd Server* |
UseRemoteAuditd |
Options are True and False. The default value is False.Select True to send auditd messages to a remote host. |
If desired, you can configure an external Auditd server. Cisco Crosswork Data Gateway sends audit notifications to the Auditd server when configured and present on the network. Specify these three settings to use an external Auditd server. |
||
|
Auditd Server Address |
AuditdAddress |
Hostname, IPv4, or IPv6 address of an optional Auditd server. |
|||
|
Auditd Server Port |
AuditdPort |
Port number of an optional Auditd server. The default port is 60. |
|||
|
Controller and Proxy Settings |
|||||
|
Crosswork Controller IP* |
ControllerIP |
The Virtual IP address or the host name of Cisco Crosswork Cluster.
|
This is required so that the Crosswork Data Gateway can enroll with the Crosswork server during the installation and initial start up. Excluding this step will require you to manually ingest the certificate. For more information, see Import Controller Signing Certificate File. |
||
|
Crosswork Controller Port* |
ControllerPort |
Port of the Cisco Crosswork controller. The default port is 30607. |
|||
|
Controller Signing Certificate File URI* |
ControllerSignCertChain |
PEM formatted root cert of Cisco Crosswork to validate signing certs retrieved using SCP. Cisco Crosswork generates the PEM file and is available at the following location: cw-admin@<Crosswork_VM_ Management_VIP_Address> :/home/cw-admin /controller.pem |
Crosswork Data Gateway requires the Controller Signing Certificate File to enroll automatically with Cisco Crosswork. If you specify these parameters during the installation, the certificate file is imported once Crosswork Data Gateway boots up for the first time. If you do not specify these parameters during installation, then import the certificate file manually by following the procedure Import Controller Signing Certificate File. |
||
|
Controller SSL/TLS Certificate File URI |
ControllerTlsCertChain |
Cisco Crosswork Controller PEM formatted SSL/TLS certificate file retrieved using SCP. |
|||
|
Controller Certificate File Passphrase* |
ControllerCertChainPwd |
Password of SCP user (cw-admin) to retrieve Cisco Crosswork certificate chain. |
|||
|
Proxy Server URL |
|
URL of the HTTP proxy server. |
The proxy parameters apply to the Crosswork Data Gateway cloud deployment. Crosswork Data Gateway must connect to the Internet via TLS, and a proxy server may be required if it is not present in your environment. If you want to use a proxy server, specify these parameters. |
||
|
Proxy Server Bypass List |
ProxyBypass |
Comma-delimited list of addresses and hostnames that will not use the proxy server. |
|||
|
Authenticated Proxy Username |
ProxyUsername |
Username for authenticated proxy servers. |
|||
|
Authenticated Proxy Passphrase |
ProxyPassphrase |
Passphrase for authenticated proxy servers. |
|||
|
HTTPS Proxy SSL/TLS Certificate File URI |
ProxyCertChain |
HTTPS proxy PEM formatted SSL/TLS certificate file retrieved using SCP. |
|||
|
HTTPS Proxy SSL/TLS Certificate File Passphrase |
ProxyCertChainPwd |
Password of SCP user to retrieve proxy certificate chain. |
|||
vNIC Role Assignment
Role assignment allows you to control the traffic that an interface must handle. If the preassigned roles don’t meet the specific needs of your organization, you can explicitly assign roles to interfaces. For example, you can assign the role 'ADMINISTRATION' to an interface to route only the SSH traffic.
Each parameter has a predefined role. The parameter accepts the interface value as eth0, eth1, or eth2.
Install Cisco Crosswork Data Gateway using vCenter vSphere Client
 Note |
We have included sample images of Cisco Crosswork Data Gateway on-premise Standard deployment in the procedure. |
Procedure
|
Step 1 |
Download the Cisco Crosswork Data Gateway 5.0 image file from cisco.com (*.ova).
|
||||||
|
Step 2 |
Connect to vCenter vSphere Client and select Actions > Deploy OVF Template. |
||||||
|
Step 3 |
The VMware Deploy OVF Template wizard appears and highlights the first step, 1 Select template. 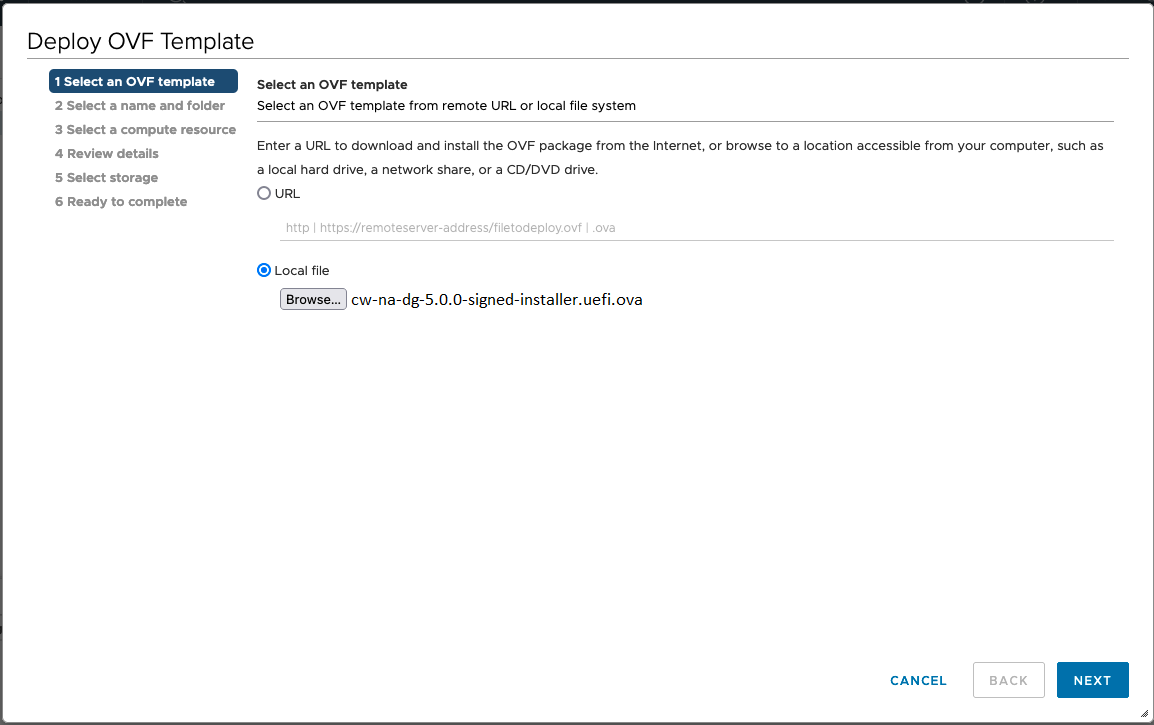
|
||||||
|
Step 4 |
Click Next to go to 2 Select a name and folder, as shown in the following figure. |
||||||
|
Step 5 |
Click Next to go to 3 Select a computer resource. Choose the VM’s host. 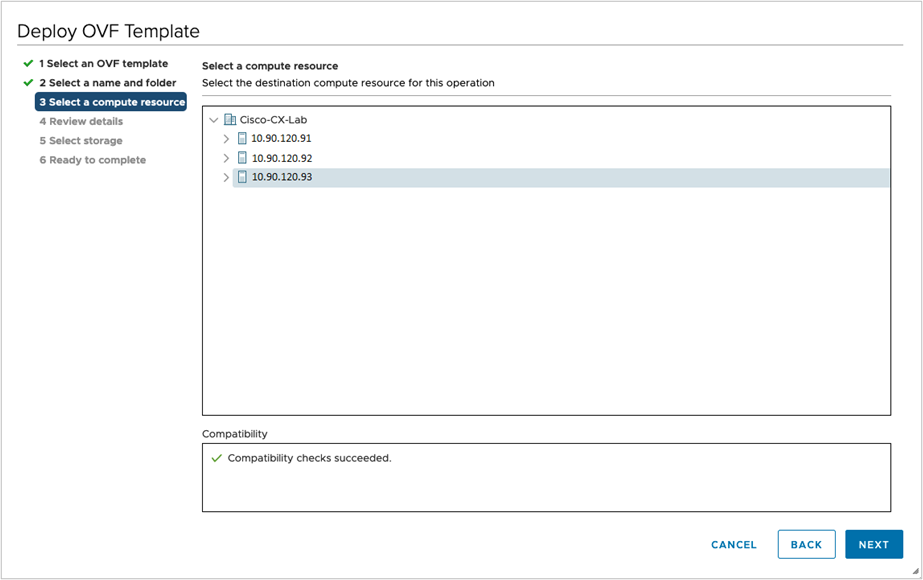
|
||||||
|
Step 6 |
Click Next. The VMware vCenter Server validates the OVA. Network speed determines how long validation takes. When the validation is complete, the wizard moves to 4 Review details. Take a moment to review the OVF template you are deploying and click Next.
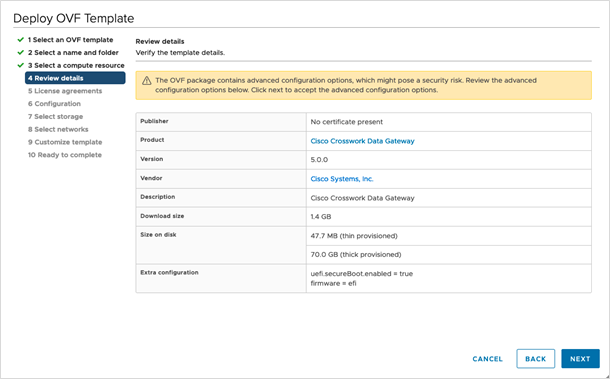
|
||||||
|
Step 7 |
Click Next to go to 5 License agreements. Review the end-user license agreement, and then click Accept if you agree with the conditions. Contact your Cisco representative, if you do not agree with the conditions. |
||||||
|
Step 8 |
Click Next to go to 6 Configuration, as shown in the following figure. Select Crosswork On-Premise Standard or Crosswork On-Premise Extended. See Selecting the Crosswork Data Gateway Deployment Type for more information. 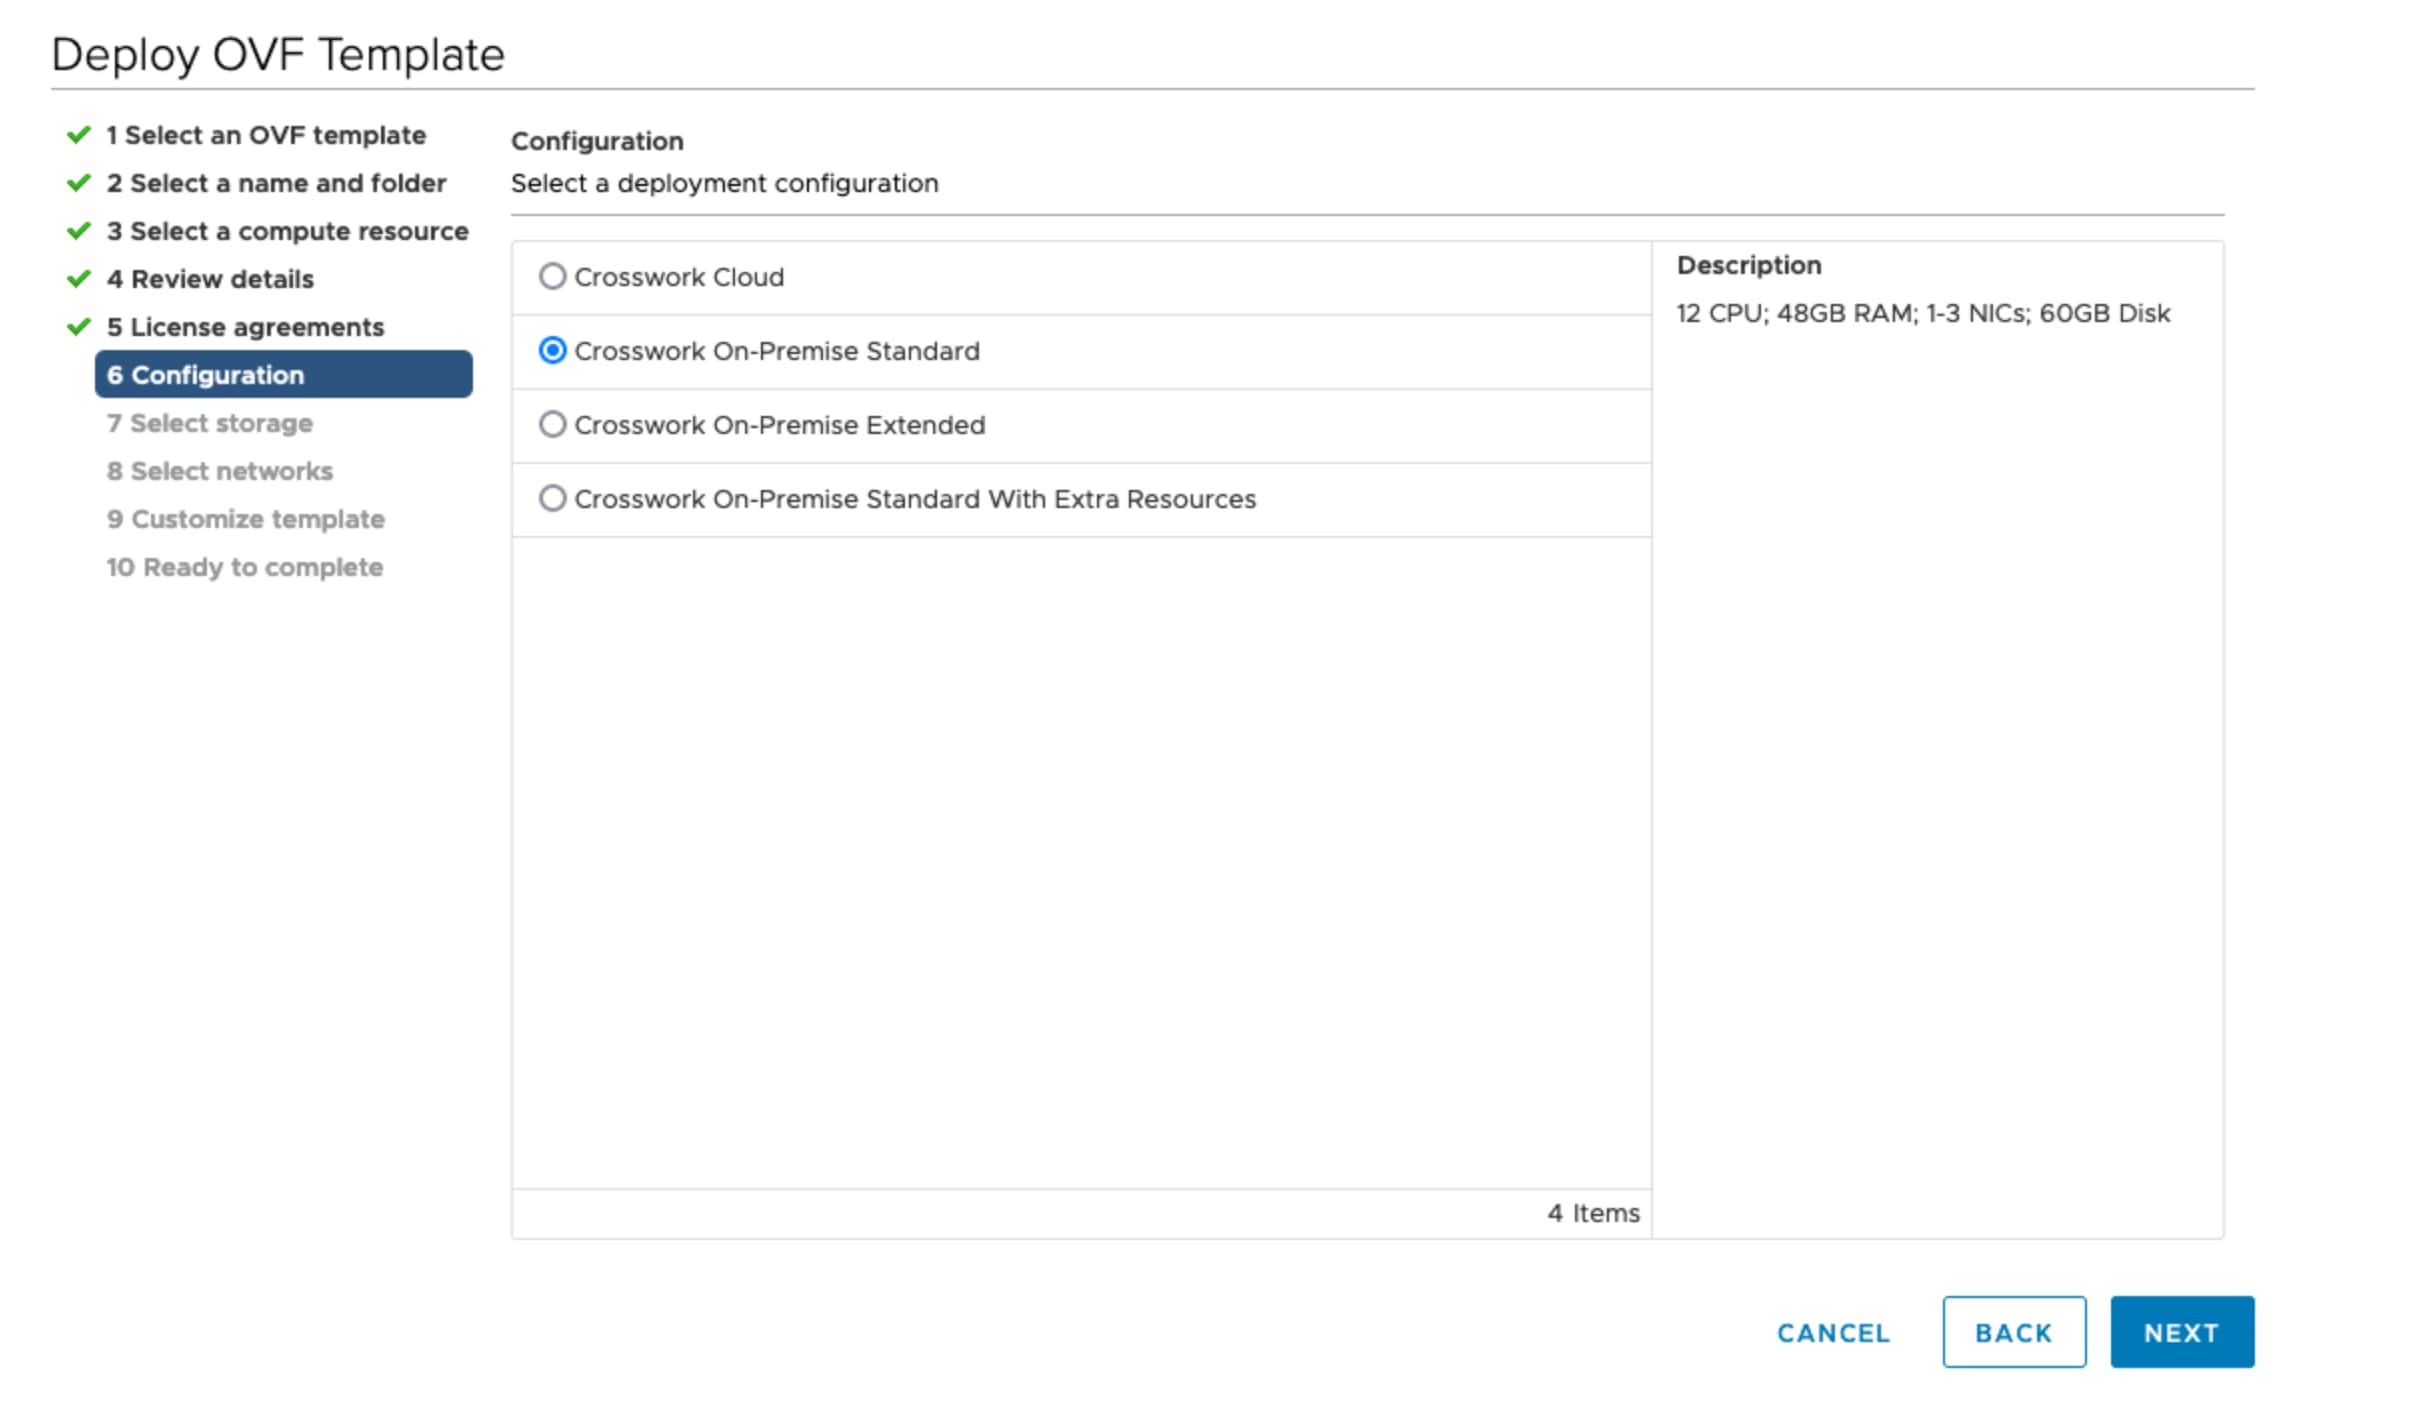
|
||||||
|
Step 9 |
Click Next to go to 7 Select storage, as shown in the following figure.
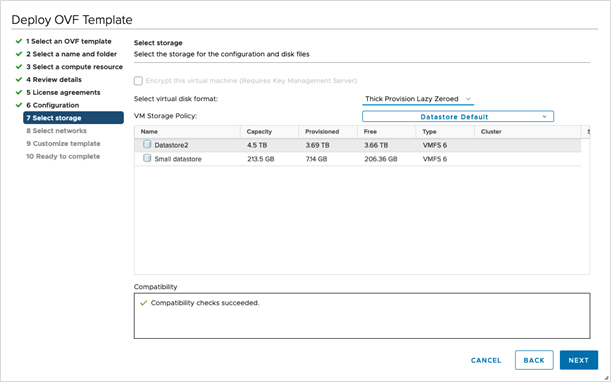
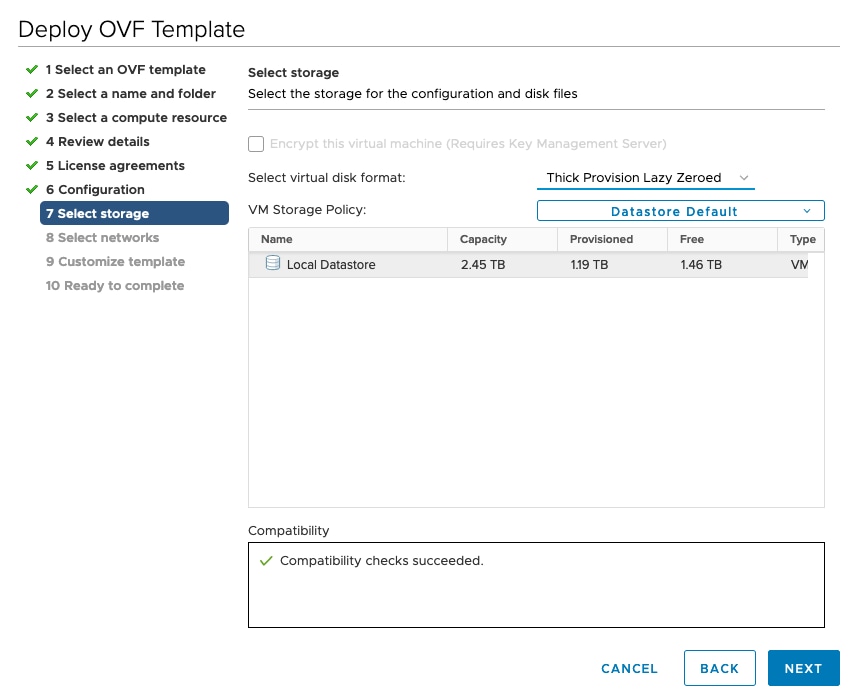
|
||||||
|
Step 10 |
Click Next to go to 8 Select networks, as shown in the following figure. From the drop-down, at the top of the page, choose the appropriate vNIC role for each interface. 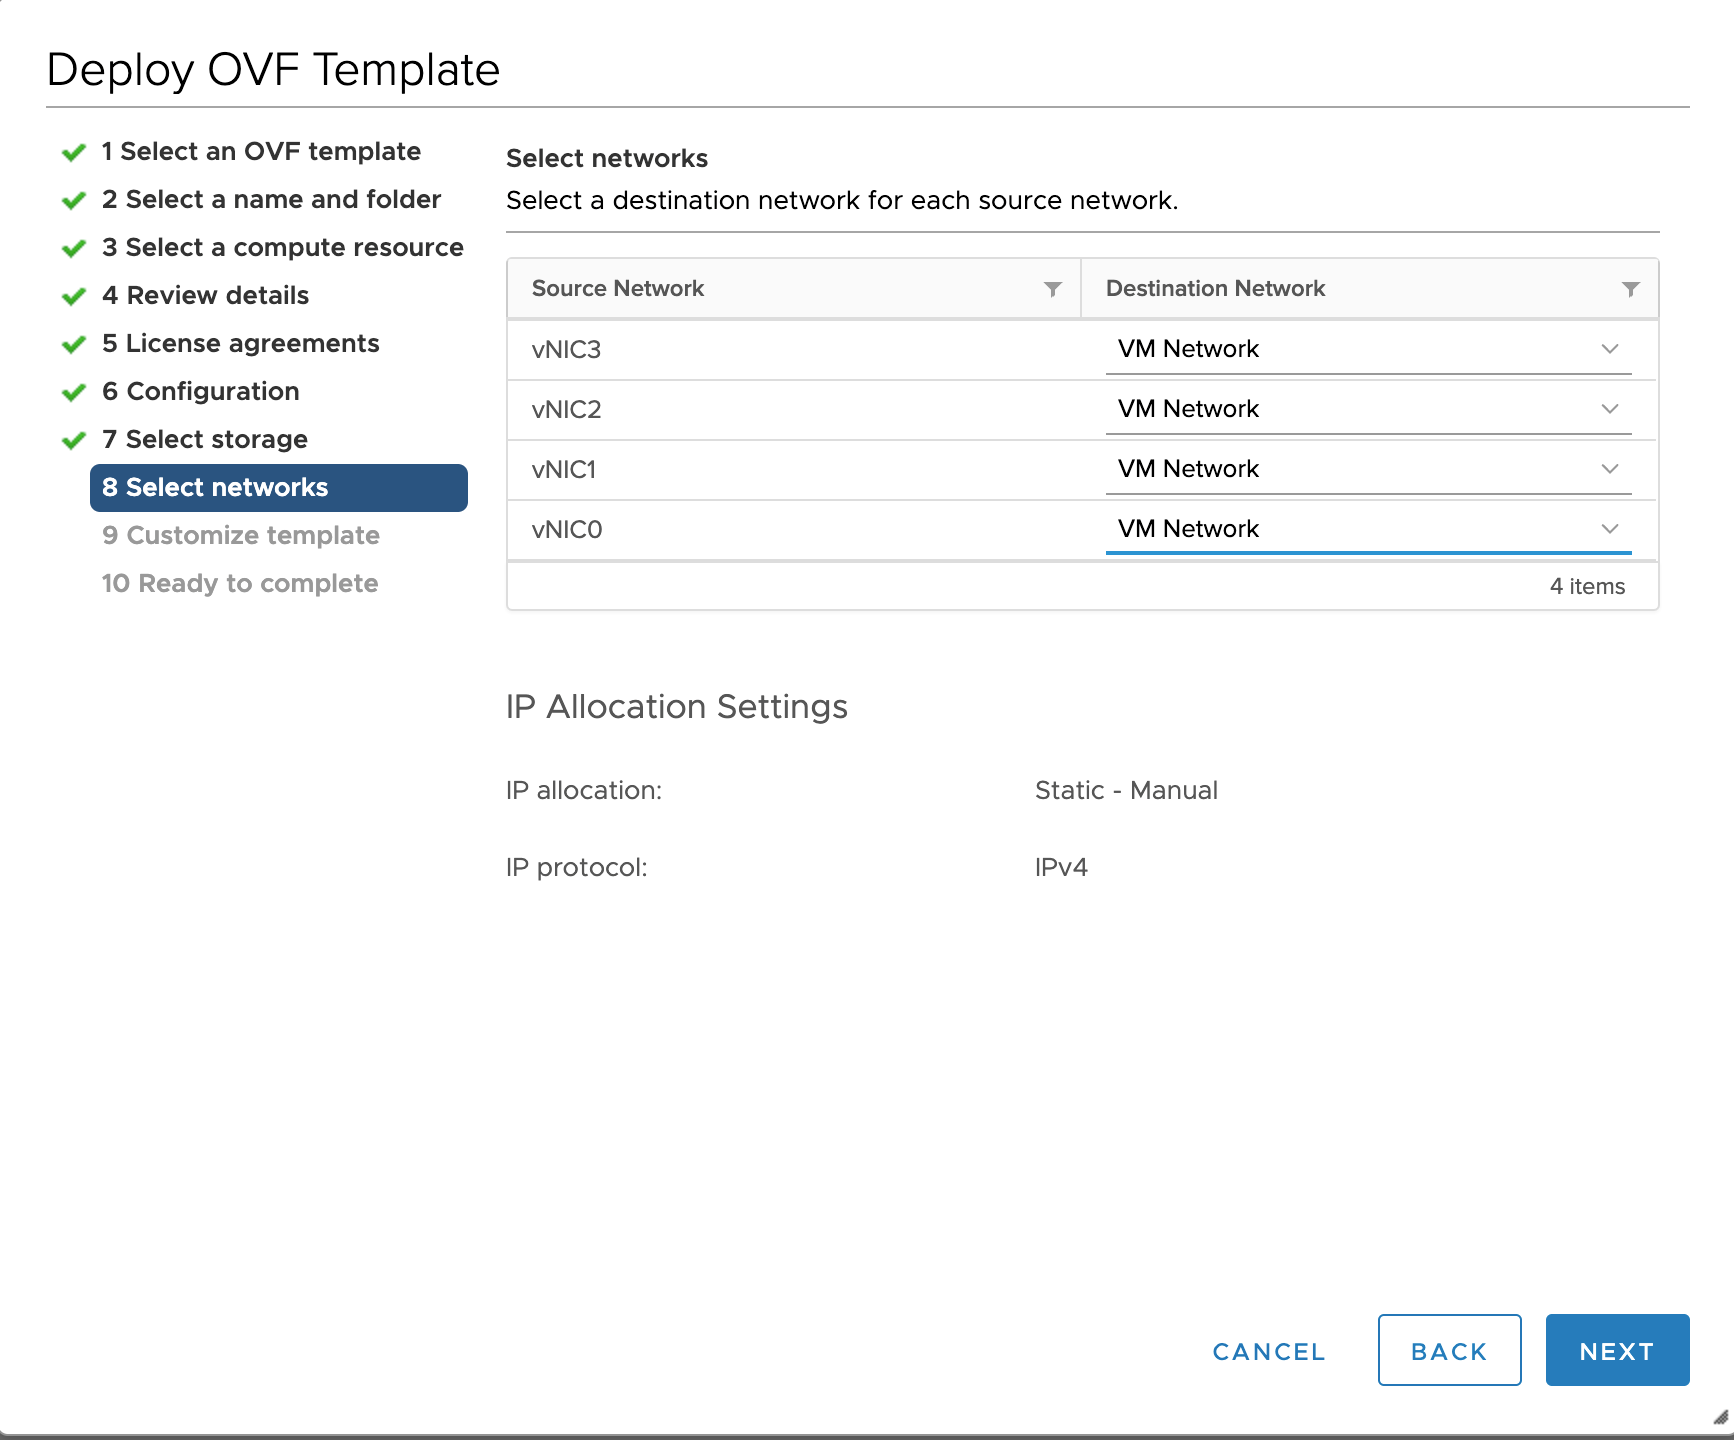
|
||||||
|
Step 11 |
Click Next to go to 9 Customize template, with the Host information already expanded. Enter the information for the parameters as explained in Table 1.
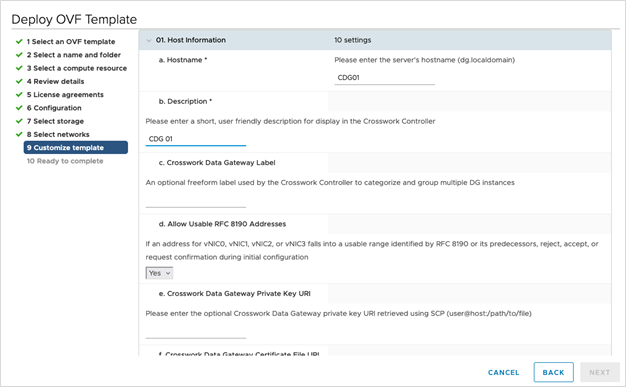
Crosswork Data Gateway supports the following pool mode options:
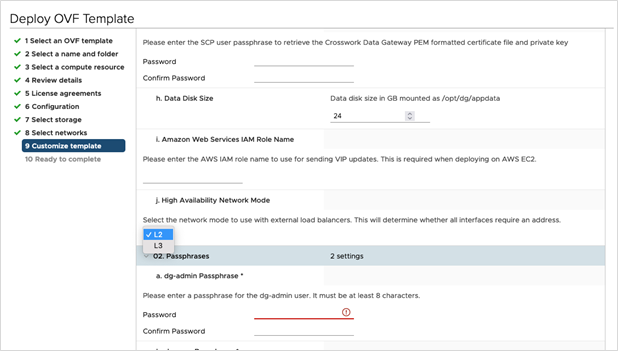
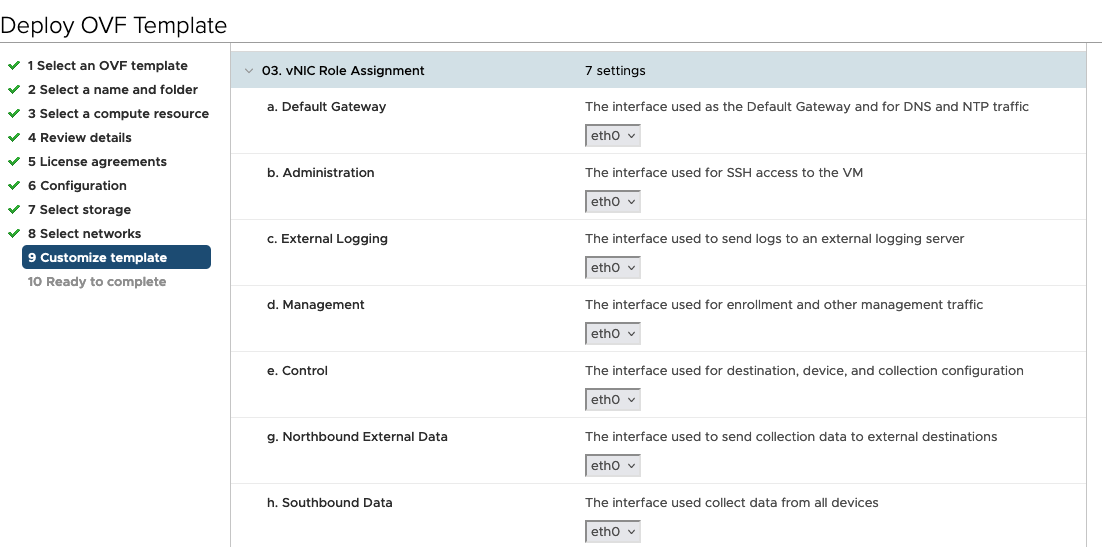
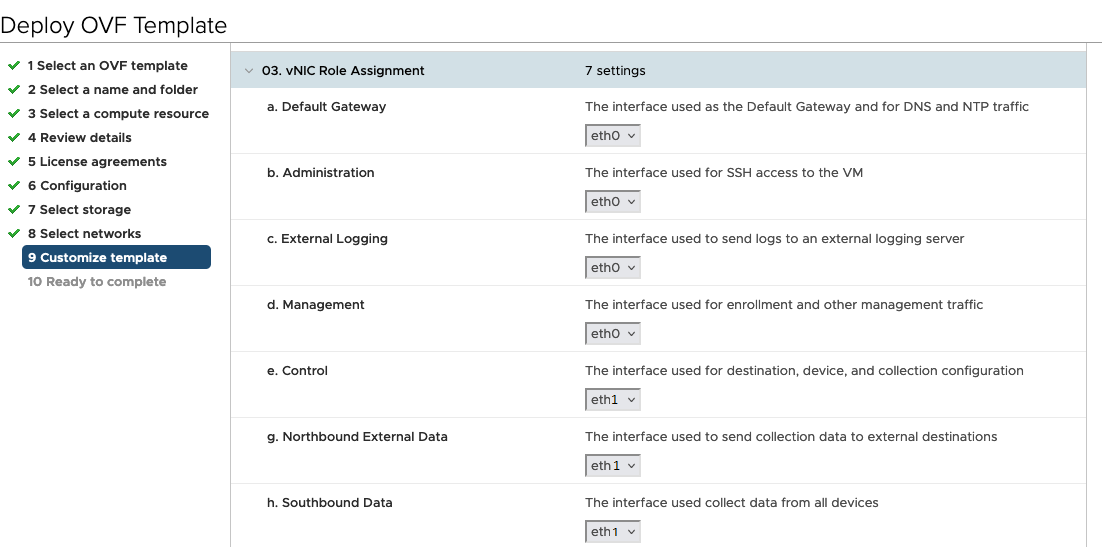 For 3 vNIC deployments, you can leave the settings with the default values. 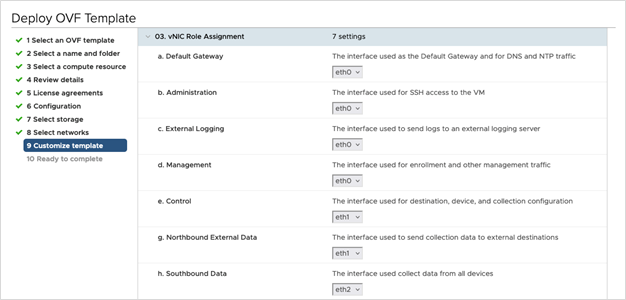
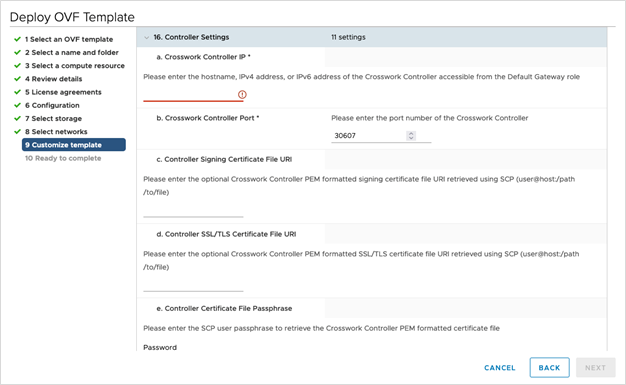 |
||||||
|
Step 12 |
Click Next to go to 10 Ready to complete. Review your settings and then click Finish if you are ready to begin deployment. 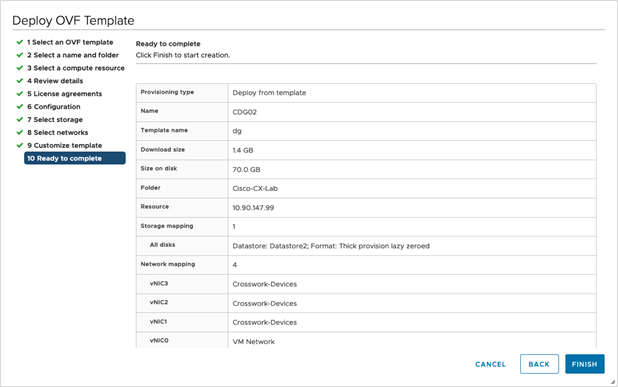
|
||||||
|
Step 13 |
Wait for the deployment to finish before continuing. To check the deployment status:
Wait for the deployment status to become 100%. You can now proceed to power on the VM. |
||||||
|
Step 14 |
Once the deployment status is 100%, power on the VM to complete the deployment process. Expand the host’s entry so you can click the VM and then choose Actions > Power > Power On, as shown in the following figure: 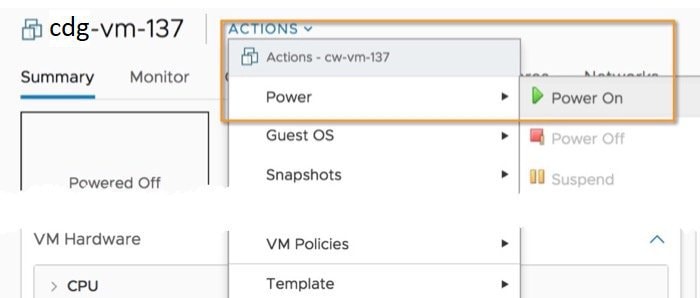
Wait for at least 5 minutes for the VM to come up and then log in via vCenter or SSH as explained below.
|
What to do next
After you log in, the Crosswork Data Gateway should present you with the welcome screen and options menu indicating that the installation completed successfully. For information on how to log in, see Log in and Log out of Crosswork Data Gateway VM.
Log out and proceed with the postinstallation tasks explained in the next section.
Return to the installation workflow: Install Cisco Crosswork Network Controller on VMware vCenter
Install Cisco Crosswork Data Gateway via OVF Tool
You must modify the list of mandatory and optional parameters in the script as per your requirements and run the OVF Tool. Refer to Table 1 for the list of installation parameters and their default values.
 Note |
The file names mentioned in this topic are sample names and may differ from the actual file names on cisco.com. |
Follow these steps to log in to the Cisco Crosswork Data Gateway VM from SSH:
Before you begin
-
In your vCenter datacenter, go to Host > Configure > Networking > Virtual Switches and select the virtual switch.
-
In the virtual switch, select Edit > Security, and ensure that the following DVS port group properties are as shown:
-
Set Promiscuous mode as Reject
-
Set MAC address changes as Reject
Confirm the settings and repeat the process for each virtual switch used by Crosswork Data Gateway.
-
Procedure
|
Step 1 |
On the machine where you have the OVFtool installed, use the following command to confirm that you have OVFtool version 4.4: |
|
Step 2 |
Download the OVA and the sample script files from cisco.com. For these instructions, we use the file name as cw-na-dg-5.0.0-45-release-20230418.uefi.ova and cw-na-dg-5.0.0-sample-install-scripts.tar.gz . |
|
Step 3 |
Use the following command to extract the files from the tar bundle: The file bundle is extracted. It includes the DG-sample-install-scripts.tar file and scripts for validating the samples install scripts. |
|
Step 4 |
Use the following command to extract the install scripts from the tar bundle: |
|
Step 5 |
Review the contents of the README file to understand the components that are in the package and how they are validated. |
|
Step 6 |
Choose the sample script that corresponds to the deployment you plan to use. Cisco provides scripts for 1, 2, and 3 vNIC deployments, which you may optimize to meet your needs. Sample scripts for 3 vNIC deployment are included in this document. For more information, see Sample Script for Crosswork Data Gateway IPv4 Deployment and Sample Script for Crosswork Data Gateway IPv6 Deployment. |
|
Step 7 |
Use the following command to make the script executable: |
|
Step 8 |
Use the following command to execute the script from the directory where the OVA and script files are stored: For example: |
|
Step 9 |
If the values provided in the script are valid, provide the vCenter user’s password when you are prompted. If the script fails due to invalid values, a message like the following is displayed: After entering the password, monitor the screen or the vCenter console to review the installation progress. For example, When the installation is complete, the Crosswork Data Gateway VM is powered on, is automatically configured based on the settings that you have provided in the script, and registers with the Crosswork cluster. |
What to do next
Log in to the VM. For more information, see Log in and Log out of Crosswork Data Gateway VM. After you log in, the Crosswork Data Gateway should present you with the welcome screen, and options menu indicating that the installation is complete. Log out and proceed with the postinstallation tasks explained in Crosswork Data Gateway Post-installation Tasks.
Sample Script for Crosswork Data Gateway IPv4 Deployment
The following example deploys a Crosswork Data Gateway with IPv4 addresses.
 Note |
Before running the scripts, ensure that the OVFtool version is 4.4.x. |
#!/usr/bin/env bash
DM="<thin/thick>"
Disclaimer="<Disclaimer>"
DNSv4="<DNS Server>"
NTP="<NTP Server>"
Domain="<Domain>"
Hostname="<CDG hostname>"

VM_NAME="<VM name on vcenter>"
DeploymentOption="<onpremise-standard/onpremise-extended>"
DS="<Datastore>"
Host="<ESXi host>"
ManagementNetwork="<vSwitch/dvSwitch>"
DataNetwork="<vSwitch/dvSwitch>"
DeviceNetwork="<vSwitch/dvSwitch>"
ManagementIPv4Address="<CDG managment IP>"
ManagementIPv4Netmask="<CDG managment mask>"
ManagementIPv4Gateway="<CDG managment gateway>"
DataIPv4Address="<CDG Data network IP>"
DataIPv4Netmask="<CDG Data network mask>"
DataIPv4Gateway="<CDG Data network gateway>"
dgadminpwd="<CDG password for dg-admin user>"
dgoperpwd="<CDG password for dg-admin user>"
ControllerIP="<CNC Managment VIP>"
ControllerPassword="<CNC Password>"
ControllerPort="30607"


ROBOT_OVA_PATH=$1

VCENTER_LOGIN="Administrator%40vsphere.local@<vCenter-IP>"
VCENTER_PATH="<vCenter-DC-NAME>/host"

ovftool --acceptAllEulas --skipManifestCheck --X:injectOvfEnv -ds=$DS --diskMode=$DM --overwrite --powerOffTarget --powerOn --noSSLVerify \
--allowExtraConfig \
--name=$VM_NAME \
--deploymentOption=${DeploymentOption} \
--net:"vNIC0=${ManagementNetwork}" \
--prop:"ControllerIP=${ControllerIP}" \
--prop:"ControllerPort=${ControllerPort}" \
--prop:"ControllerSignCertChain=cw-admin@${ControllerIP}:/home/cw-admin/controller.pem" \
--prop:"ControllerCertChainPwd=${ControllerPassword}" \
--prop:"Hostname=${Hostname}" \
--prop:"Description=${Disclaimer}" \
--prop:"DNS=${DNSv4}" \
--prop:"NTP=${NTP}" \
--prop:"Domain=${Domain}" \
--prop:"Vnic0IPv4Method=Static" \
--prop:"Vnic0IPv4Address=${ManagementIPv4Address}" \
--prop:"Vnic0IPv4Gateway=${ManagementIPv4Gateway}" \
--prop:"Vnic0IPv4Netmask=${ManagementIPv4Netmask}" \
--prop:"NicDefaultGateway=eth0" \
--prop:"NicAdministration=eth0" \
--prop:"NicExternalLogging=eth0" \
--prop:"NicManagement=eth0" \
--prop:"NicControl=eth0" \
--prop:"NicNBExternalData=eth0" \
--prop:"NicSBData=eth0" \
--prop:"dg-adminPassword=${dgadminpwd}" \
--prop:"dg-operPassword=${dgoperpwd}" \
$ROBOT_OVA_PATH \
vi://$VCENTER_LOGIN/$VCENTER_PATH/$Host

#############################################################
Append section below for Two NIC deployment
#############################################################
#--net:"vNIC1=${DataNetwork}" \
#--prop:"Vnic1IPv4Method=Static" \
#--prop:"Vnic1IPv4Address=${DataIPv4Address}" \
#--prop:"Vnic1IPv4Gateway=${DataIPv4Gateway}" \
#--prop:"Vnic1IPv4Netmask=${DataIPv4Netmask}" \
#--prop:"NicDefaultGateway=eth0" \
#--prop:"NicAdministration=eth0" \
#--prop:"NicExternalLogging=eth0" \
#--prop:"NicManagement=eth0" \
#--prop:"NicControl=eth1" \
#--prop:"NicNBExternalData=eth1" \
#--prop:"NicSBData=eth1" \

#############################################################
Append section below for three NIC deployment
#############################################################
#--net:"vNIC1=${DataNetwork}" \
#--net:"vNIC2=${DeviceNetwork}" \
#--prop:"Vnic1IPv4Method=Static" \
#--prop:"Vnic2IPv4Method=Static" \
#--prop:"Vnic1IPv4Address=${DataIPv4Address}" \
#--prop:"Vnic1IPv4Gateway=${DataIPv4Gateway}" \
#--prop:"Vnic1IPv4Netmask=${DataIPv4Netmask}" \
#--prop:"NicDefaultGateway=eth0" \
#--prop:"NicAdministration=eth0" \
#--prop:"NicExternalLogging=eth0" \
#--prop:"NicManagement=eth0" \
#--prop:"NicControl=eth1" \
#--prop:"NicNBExternalData=eth1" \
#--prop:"NicSBData=eth2" \
Sample Script for Crosswork Data Gateway IPv6 Deployment
The following example deploys a Crosswork Data Gateway with IPv6 addresses.
 Note |
Before running the scripts, ensure that the OVFtool version is 4.4.x. |
#!/usr/bin/env bash
DM="<thin/thick>"
Disclaimer="<Disclaimer>"
DNSv4="<DNS Server>"
NTP="<NTP Server>"
Domain="<Domain>"
Hostname="<CDG hostname>"

VM_NAME="<VM name on vcenter>"
DeploymentOption="<onpremise-standard/onpremise-extended>"
DS="<Datastore>"
Host="<ESXi host>"
ManagementNetwork="<vSwitch/dvSwitch>"
DataNetwork="<vSwitch/dvSwitch>"
DeviceNetwork="<vSwitch/dvSwitch>"
ManagementIPv6Address="<CDG managment IP>"
ManagementIPv6Netmask="<CDG managment mask>"
ManagementIPv6Gateway="<CDG managment gateway>"
DataIPv6Address="<CDG Data network IP>"
DataIPv6Netmask="<CDG Data network mask>"
DataIPv6Gateway="<CDG Data network gateway>"
dgadminpwd="<CDG password for dg-admin user>"
dgoperpwd="<CDG password for dg-admin user>"
ControllerIP="<CNC Managment VIP>"
ControllerPassword="<CNC Password>"
ControllerPort="30607"

ROBOT_OVA_PATH=$1

VCENTER_LOGIN="Administrator%40vsphere.local@<vCenter-IP>"
VCENTER_PATH="<vCenter-DC-NAME>/host"

ovftool --acceptAllEulas --skipManifestCheck --X:injectOvfEnv -ds=$DS --diskMode=$DM --overwrite --powerOffTarget --powerOn --noSSLVerify \
--allowExtraConfig \
--name=$VM_NAME \
--deploymentOption=${DeploymentOption} \
--net:"vNIC0=${ManagementNetwork}" \
--prop:"ControllerIP=${ControllerIP}" \
--prop:"ControllerPort=${ControllerPort}" \
--prop:"ControllerSignCertChain=cw-admin@${ControllerIP}:/home/cw-admin/controller.pem" \
--prop:"ControllerCertChainPwd=${ControllerPassword}" \
--prop:"Hostname=${Hostname}" \
--prop:"Description=${Disclaimer}" \
--prop:"DNS=${DNSv4}" \
--prop:"NTP=${NTP}" \
--prop:"Domain=${Domain}" \
--prop:"Vnic0IPv6Method=Static" \
--prop:"Vnic0IPv6Address=${ManagementIPv6Address}" \
--prop:"Vnic0IPv6Gateway=${ManagementIPv6Gateway}" \
--prop:"Vnic0IPv6Netmask=${ManagementIPv6Netmask}" \
--prop:"NicDefaultGateway=eth0" \
--prop:"NicAdministration=eth0" \
--prop:"NicExternalLogging=eth0" \
--prop:"NicManagement=eth0" \
--prop:"NicControl=eth0" \
--prop:"NicNBExternalData=eth0" \
--prop:"NicSBData=eth0" \
--prop:"dg-adminPassword=${dgadminpwd}" \
--prop:"dg-operPassword=${dgoperpwd}" \
$ROBOT_OVA_PATH \
vi://$VCENTER_LOGIN/$VCENTER_PATH/$Host

#############################################################
Append section below for Two NIC deployment
#############################################################
#--net:"vNIC1=${DataNetwork}" \
#--prop:"Vnic1IPv6Method=Static" \
#--prop:"Vnic1IPv6Address=${DataIPv6Address}" \
#--prop:"Vnic1IPv6Gateway=${DataIPv6Gateway}" \
#--prop:"Vnic1IPv6Netmask=${DataIPv6Netmask}" \
#--prop:"NicDefaultGateway=eth0" \
#--prop:"NicAdministration=eth0" \
#--prop:"NicExternalLogging=eth0" \
#--prop:"NicManagement=eth0" \
#--prop:"NicControl=eth1" \
#--prop:"NicNBExternalData=eth1" \
#--prop:"NicSBData=eth1" \

#############################################################
Append section below for three NIC deployment
#############################################################
#--net:"vNIC1=${DataNetwork}" \
#--net:"vNIC2=${DeviceNetwork}" \
#--prop:"Vnic1IPv6Method=Static" \
#--prop:"Vnic1IPv6Address=${DataIPv6Address}" \
#--prop:"Vnic1IPv6Gateway=${DataIPv6Gateway}" \
#--prop:"Vnic1IPv6Netmask=${DataIPv6Netmask}" \
#--prop:"NicDefaultGateway=eth0" \
#--prop:"NicAdministration=eth0" \
#--prop:"NicExternalLogging=eth0" \
#--prop:"NicManagement=eth0" \
#--prop:"NicControl=eth1" \
#--prop:"NicNBExternalData=eth1" \
#--prop:"NicSBData=eth2" \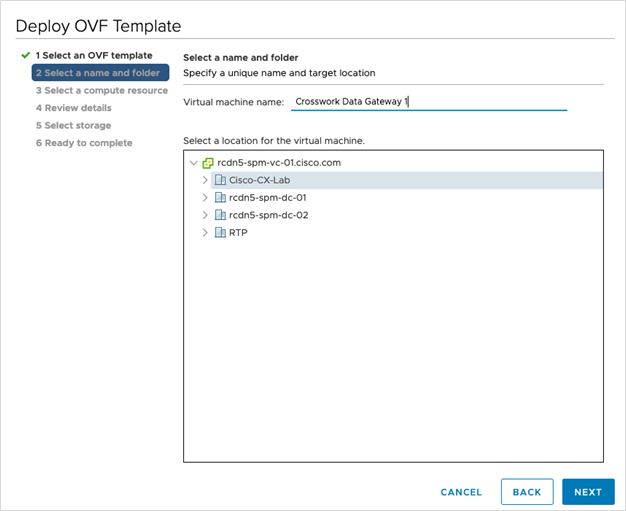

 Feedback