- Introduction
- Cisco Service Control Solution Overview
- Cisco SCA BB System Overview
- Introduction to Traffic Processing
- Getting Started with Cisco SCA BB Console
- The Network Navigator
- Using the Service Configuration Editor
- Traffic Classification Using Service Configuration Editor
- Traffic Accounting and Reporting Using the Service Configuration Editor
- Traffic Control Using the Service Configuration Editor
- Service Configuration Editor: Additional Options
- Subscriber Manager GUI Tool
- Anonymous Group Manager GUI Tool
- The Signature Editor Overview
- Additional Management Tools and Interfaces
Cisco Service Control Application for Broadband (Cisco SCA BB) User Guide
Bias-Free Language
The documentation set for this product strives to use bias-free language. For the purposes of this documentation set, bias-free is defined as language that does not imply discrimination based on age, disability, gender, racial identity, ethnic identity, sexual orientation, socioeconomic status, and intersectionality. Exceptions may be present in the documentation due to language that is hardcoded in the user interfaces of the product software, language used based on RFP documentation, or language that is used by a referenced third-party product. Learn more about how Cisco is using Inclusive Language.
- Updated:
- February 17, 2015
Chapter: Traffic Control Using the Service Configuration Editor
- Introduction to Managing Bandwidth
- Managing Global Bandwidth Overview
- Viewing Global Controller Settings
- Filtering Global Controllers
- Editing the Total Link Limits
- Introduction to Defining Global Controllers
- Setting Global Controller Bandwidth Limits Separately with a Different Rate Per Link
- Setting Global Controller Bandwidth Limits as the Sum of All Links with a Different Rate Per Link
- Setting Global Controller Bandwidth Limits as the Sum of All Links with an Equal Rate Per Link
- Setting Global Controller Bandwidth Limits with Equal Rate for All Links
- Setting Global Controller Bandwidth for Virtual Links
- Introduction to Managing Subscriber Bandwidth
- A Practical Example of Managing Bandwidth
- Configuring a Rule, Bandwidth Controller, and Global Controller Using the Wizard
- Configuring the Upstream Configuration of the Global Bandwidth Controller for IPv6
- Setting Bandwidth Management Prioritization Mode
- Introduction to Managing Virtual Links
- Collection Manager Virtual Links Names Utility
- Enabling Virtual Links Mode
- Viewing Virtual Links Global Controller Settings
- Managing Virtual Links Global Controllers
- Configuring a Service Configuation in Virtual Links Mode
- Editing the Virtual Links Total Link Limits
- Managing Virtual Links with CLI Commands
- The Default Service Rule
- Rule Hierarchy
- Viewing the Rules of a Package
- Adding Rules to a Package
- Defining Per-Flow Actions for a Rule
- Editing Rules
- Deleting Rules
- Displaying the Services Affected by a Rule
- Global Rules
- Adding Global Rules
- Editing a Global Rule
- Adding Additional Global Rules for a Service
- Deleting a Global Rule from a Service
- Deleting All Additional Rules from a Service
- Adding a Global Rule to a Package
- Deleting a Global Rule from a Package
- Displaying Packages Associated to a Global Rule
- Time-Based Rules Overview
- How to Manage DSCP ToS Marker Values
Traffic Control Using the Service Configuration Editor
The Traffic Control capabilities of the Service Control Engine (Service Control platform, and the Cisco Service Control Application for Broadband) are used to limit and prioritize traffic flows. Control of traffic is based on parameters such as the service of the flow, the package of the subscriber, and the quota state of the subscriber. This chapter consists of these sections:
- Introduction to Managing Bandwidth
- Introduction to Managing Virtual Links
- Introduction to Managing Packages
- Introduction to Add-on Packages
- Introduction to Managing Rules
- Quota Management
- Unknown Subscriber Traffic
Introduction to Managing Bandwidth
The upstream and downstream interfaces are each assigned one default global controller. You can add additional global controllers.
The number of global controllers a service configuration can contain varies based on the Cisco SCE hardware. The maximum number of global controllers including the default global controllers are:
- Cisco SCE 8000 multi-Gigabit Ethernet—1024 upstream and 1024 downstream
- Cisco SCE 10000 10 Gigabit Ethernet—4096 upstream and 4096 downstream
After you have defined global controllers, you can add subscriber BW controllers (BWCs) to packages, and map these subscriber BWCs to different global controllers.
 Note | In release 3.7.5, the global bandwidth controller for IPv6 works in the subscriberless mode. The IPv6 traffic is mapped to a default subscriber (N/A). Bandwidth control should be performed on the Unknown Subscriber Package. The maximum and the default package ID of the Unknown Subscriber value is 4999. |
Note | If you enable or disable Virtual Links mode, all user-defined global controllers are deleted from the service configuration. A subscriber BWC that pointed to a user-defined global controller now points to the default global controller. (Other parameters of these subscriber BWCs remain unchanged.) |
- Managing Global Bandwidth Overview
- Viewing Global Controller Settings
- Filtering Global Controllers
- Editing the Total Link Limits
- Introduction to Defining Global Controllers
- Introduction to Managing Subscriber Bandwidth
- A Practical Example of Managing Bandwidth
- Configuring a Rule, Bandwidth Controller, and Global Controller Using the Wizard
- Configuring the Upstream Configuration of the Global Bandwidth Controller for IPv6
- Setting Bandwidth Management Prioritization Mode
Managing Global Bandwidth Overview
The upstream and downstream interfaces are each assigned one default global controller that, by default, controls the total link traffic. Based on the Cisco SCE hardware, the number of global controllers you can add to a service configuration varies. For details, see the Introduction to Managing Bandwidth section.
You can also define the bandwidth total link limit to be less than the physical capacity of the Cisco SCE platform for each interface separately. When another device that has limited BW capacity is next to the Cisco SCE platform on the IP stream, you can have this limitation enforced in a policy-aware manner by the Cisco SCE platform, instead of having it enforced arbitrarily by the other device.
Viewing Global Controller Settings
Note | Global controller bandwidth is based on Layer 1 volume. Accounting, reporting, and subscriber bandwidth control in Cisco SCA BB is based on Layer 3 volume. |
The Global Bandwidth Settings dialog box is displayed in the right (Rule) pane. 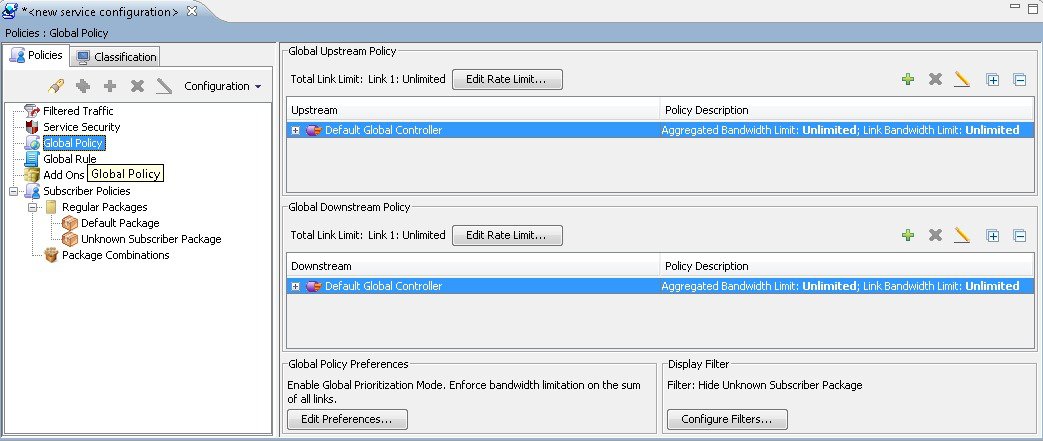 The two check boxes near the top of the Global Controllers tab are used only in dual-link systems (see Introduction to Defining Global Controllers section). The main part of the pane contains the Upstream area listing upstream global controllers and the Downstream area listing downstream global controllers. Each list has two columns:
For each global controller, you can set different values for the maximum bandwidth for each of the four time frames defined by the default calendar. For details, see Managing Calendars Overview section.

 Above the area (Upstream or Downstream) of each interface, the total link limit is displayed.  |
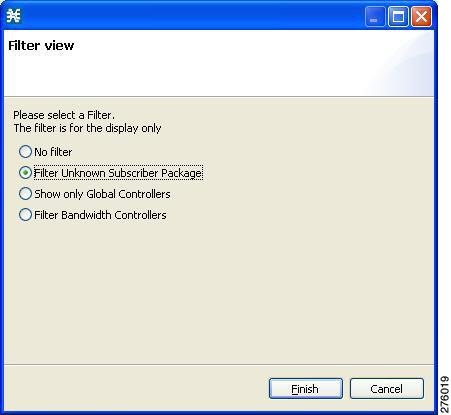
Filtering Global Controllers
Editing the Total Link Limits
You can limit the total bandwidth for each Cisco SCE link passing through the Cisco SCE platform.
For example, if a device connected to the Cisco SCE platform on the IP stream has limited BW capacity, you can limit the bandwidth for each Cisco SCE link passing through the Cisco SCE platform to match the capacity of the other device.
Note | The total bandwidth here means the limit for each Cisco SCE link and not the aggregated limit on all the links. |
The total link limits, for each Cisco SCE link, for upstream and downstream traffic are defined independently.
Introduction to Defining Global Controllers
This section describes how to define global controllers in both dual-link and multi-gigabit Ethernet systems.
In both systems, you can define each link separately with equal rates or you can define each link separately with different rates.
Alternatively, you can apply bandwidth limitations as an aggregate for all links or as an aggregate with individual control of each links.
You can:
- Control each link separately with equal rate to all links.
- Control each link separately without with different rate per link.
- Control the links in aggregate and in addition maximum rate per-link, which is equal between all links.
- Control the links in aggregate and in addition maximum rate per-link, which is different between the links.
- Control the links in Virtual Link mode.
Note | If Virtual Links mode is enabled, bandwidth limitations are applied to the sum of the all links. |
Note | Any attempt to change the global controller bandwidth for invalid link results in an error message during apply policy, similar to the following: “Invalid value set on Link ID 6 for upstream GC ‘Default Global Controller’. Link ID 6 does not exist. Available Link IDs: 1, 2, 3, 4” |
To activate the respective edit dialog of the Global Controller settings:
- Double click on a global controller row in the global controller table view on the right main panel of the Global Policy setting.
- Click on the edit button that is located on the top right main panel of the Global Policy setting.
Note | The behavior is the same whether you configure upstream or downstream GC. |
Refer to the following sections for configuration details:
- Setting Global Controller Bandwidth Limits Separately with a Different Rate Per Link
- Setting Global Controller Bandwidth Limits as the Sum of All Links with a Different Rate Per Link
- Setting Global Controller Bandwidth Limits as the Sum of All Links with an Equal Rate Per Link
- Setting Global Controller Bandwidth Limits with Equal Rate for All Links
- Setting Global Controller Bandwidth for Virtual Links
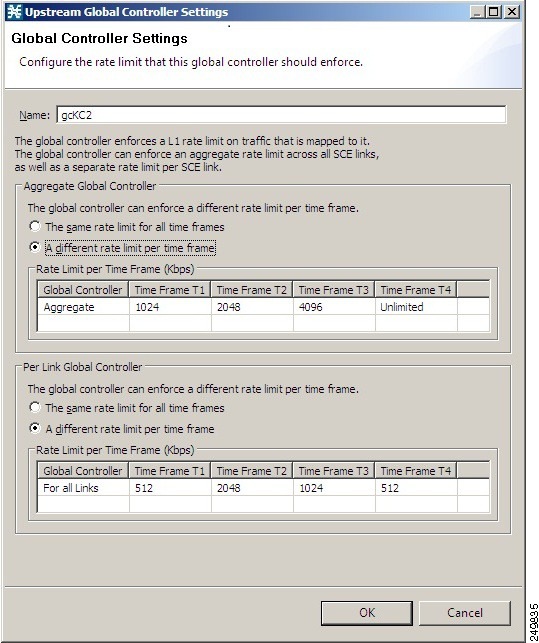
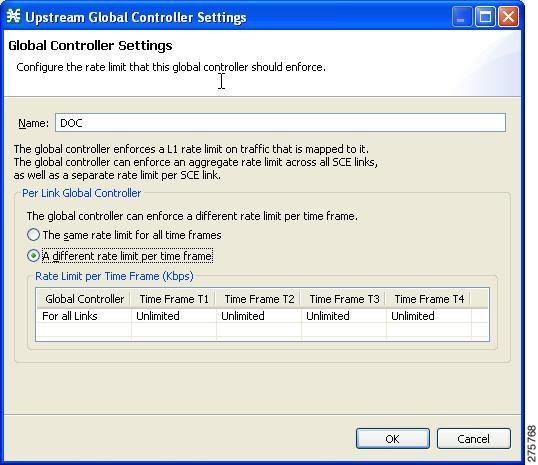
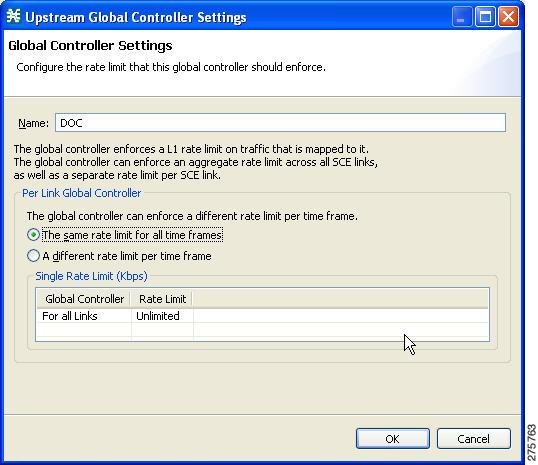
Setting Global Controller Bandwidth Limits Separately with a Different Rate Per Link
Use the following procedure to configure the global controller with a different rate per link.
| Step 1 | In the Policies
tab, click Global Policy.
The Global Bandwidth Settings dialog box in the right (Rule) pane. | ||
| Step 2 | Add global controllers, as described in Adding Global Controllers. | ||
| Step 3 | Click Edit
Preferences.
The Global Controllers mode dialog box appears. 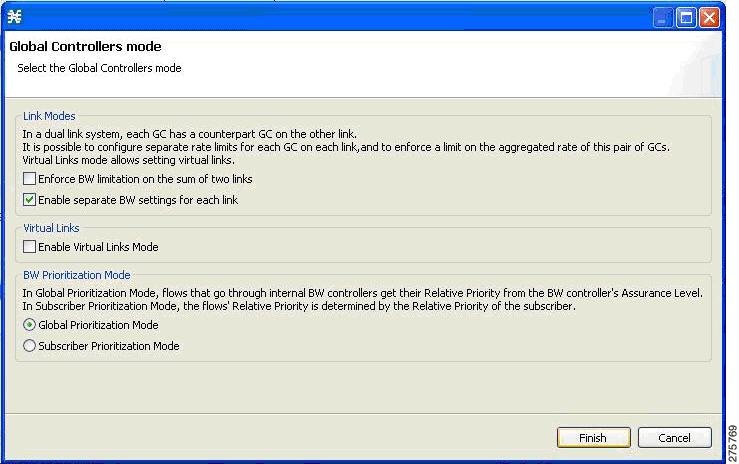 | ||
| Step 4 | Check the Enable separate BW setting for each link check box. | ||
| Step 5 | Click Finish .
The Global Controllers mode dialog box closes. | ||
| Step 6 | In the Policies
tab, click Global Policy.
The Global Bandwidth Settings dialog box is displayed in the right (Rule) pane. | ||
| Step 7 | Select a global controller. | ||
| Step 8 | Click the Edit
( )
icon. )
icon.
The Global Controller Settings dialog box appears. 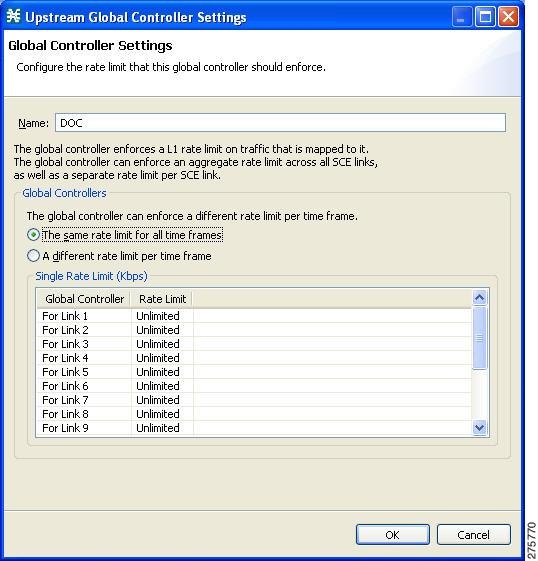
| ||
| Step 9 | Set a single value for the maximum bandwidth limit that this global controller carries for each link. | ||
| Step 10 | Choose the The same rate limit for all time frames radio button. | ||
| Step 11 | Enter the desired value in Kbps for the maximum bandwidth in the Rate limit for the Per Link Global Controller (in Kbps) field. | ||
| Step 12 | Set the maximum limit that this global controller carries to vary according to time frame for each link. | ||
| Step 13 | Choose the A different rate limit per time frame radio button. | ||
| Step 14 | Enter the
desired value for each time frame.
 | ||
| Step 15 | Click OK .
Your changes are saved. |
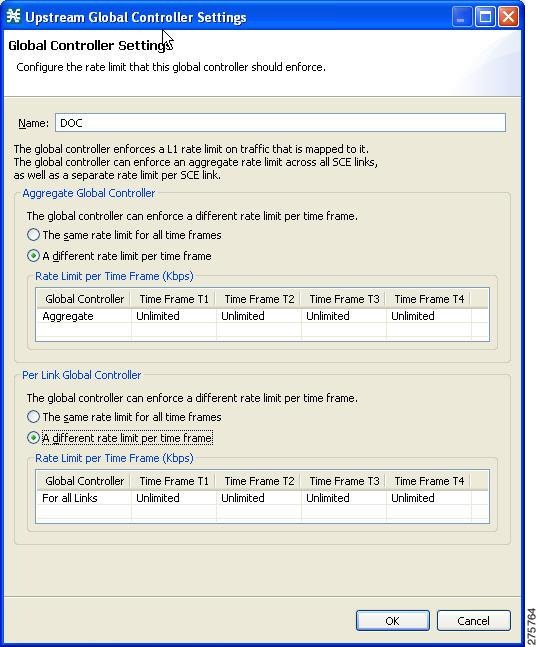
Setting Global Controller Bandwidth Limits as the Sum of All Links with a Different Rate Per Link
In this link control mode, the maximum bandwidth is the sum of links but bandwidth settings can be configured for each link up the maximum bandwidth for all links. When you create a GC in this mode you can configure the aggregate global controller of the link and in addition specify a bandwidth limitation per link. This mode is used when the Cisco SCE serves multiple edge devices and you want to enforce two rules: One aggregate rule on all the links together and one rule per specific link. In this mode, you can enforce bandwidth limitation on the sum of all links and enable separate bandwidth settings for each link. You can control the links in aggregate and set maximum rate per-link which is different between the links.
Use the following procedure to configure global controller as the sum of all links with a different rate per link.
| Step 1 | In the Policies
tab, click Global Policy.
The Global Bandwidth Settings dialog box in the right (Rule) pane. | ||
| Step 2 | Add global controllers, as described in Adding Global Controllers. | ||
| Step 3 | Click Edit
Preferences .
The Global Controllers mode dialog box appears. 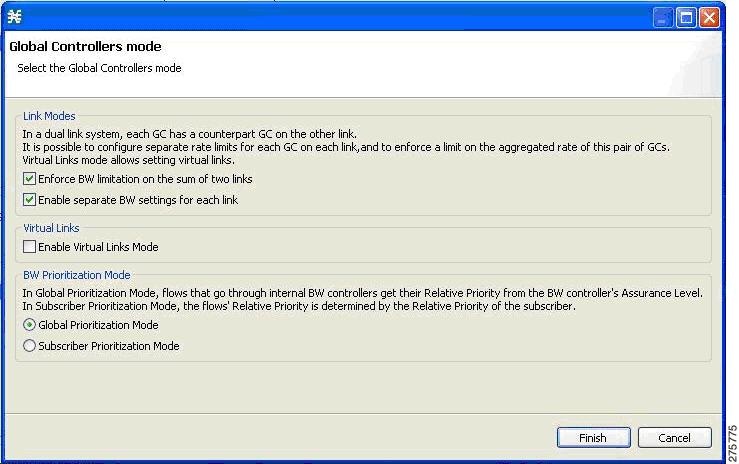 | ||
| Step 4 | Check the Enforce BW limitation on the sum of the links and Enable separate BW setting for each link check boxes. | ||
| Step 5 | Click Finish.
The Global Controllers mode dialog box closes. | ||
| Step 6 | In the Policies
tab, click Global Policy.
The Global Bandwidth Settings dialog box is displayed in the right (Rule) pane. | ||
| Step 7 | Select a global controller. | ||
| Step 8 | Click the Edit
( The Global Controller Settings dialog box appears. 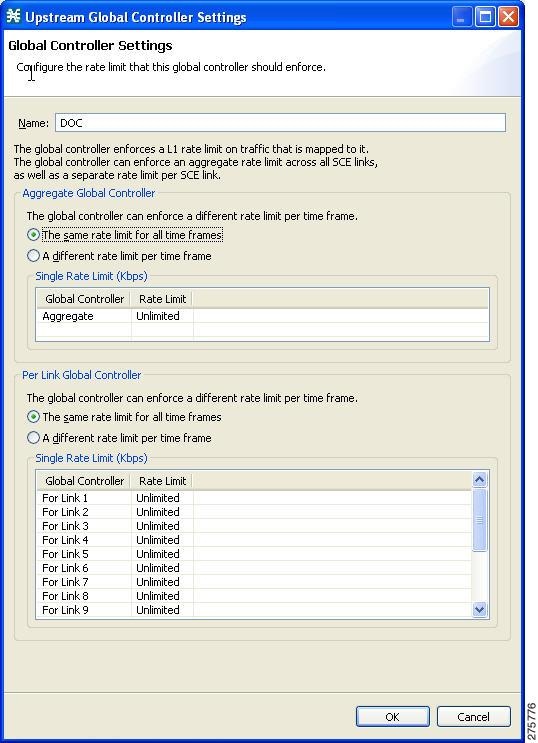
| ||
| Step 9 | Set a single value for the maximum bandwidth limit that this global controller carries. | ||
| Step 10 | Choose the same rate limit for all time frames radio button on the Per Link Global Controller tab. | ||
| Step 11 | Enter the desired value in Kbps for the maximum bandwidth in the Rate limit for the Link 1 (in Kbps) field. | ||
| Step 12 | Repeat Step 9b for each link. | ||
| Step 13 | Set the maximum limit that this global controller carries to vary according to time frame. | ||
| Step 14 | Choose the A different rate limit per time frame radio button the Per Link Global Controller tab. | ||
| Step 15 | Enter the desired value for each time frame. | ||
| Step 16 | Repeat Step 10b
for each link.
 | ||
| Step 17 | Click OK.
Your changes are saved. |
Setting Global Controller Bandwidth Limits as the Sum of All Links with an Equal Rate Per Link
In this link control mode, the maximum bandwidth limitation is configured as sum of all links. When you create a GC in this mode, you can configure the aggregate global controller of the link and configure the maximum rate per link. In this mode, you can enforce bandwidth limitation on the sum of all links and control the links in aggregate and in addition maximum per-link which is equal between all links.
Use the following procedure to configure global controller as the sum of all links with an equal rate per link.
| Step 1 | In the Policies
tab, click Global Policy.
The Global Bandwidth Settings dialog box in the right (Rule) pane. | ||
| Step 2 | Add global controllers, as described in Adding Global Controllers. | ||
| Step 3 | Click Edit
Preferences .
The Global Controllers mode dialog box appears. 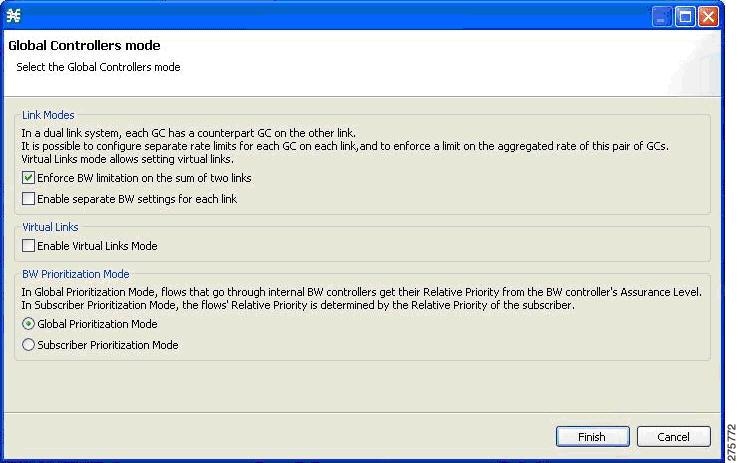 | ||
| Step 4 | Check the Enforce BW limitation on the sum of the links check box. | ||
| Step 5 | Click Finish .
The Global Controllers mode dialog box closes. | ||
| Step 6 | In the Policies
tab, click Global Policy.
The Global Bandwidth Settings dialog box is displayed in the right (Rule) pane. | ||
| Step 7 | Select a global controller. | ||
| Step 8 | Click the Edit
()
icon.
The Global Controller Settings dialog box appears. 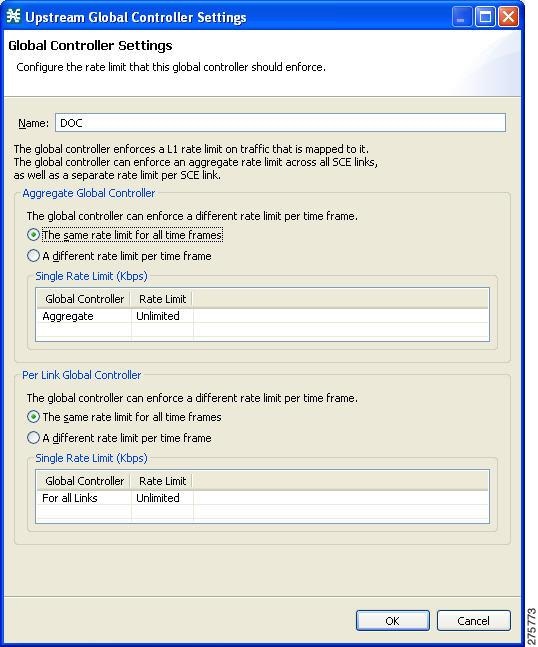
| ||
| Step 9 | Set a single value for the maximum bandwidth limit that this global controller carries. | ||
| Step 10 | Choose the The same rate limit for all time frames radio button on the Aggregate Global Controller tab. | ||
| Step 11 | Enter the desired value in Kbps for the maximum bandwidth in the Rate limit for the Per Link Global Controller (in Kbps) field. | ||
| Step 12 | Set the maximum limit that this global controller carries to vary according to time frame. | ||
| Step 13 | Choose the A different rate limit per time frame radio button the Aggregate Global Controller tab. | ||
| Step 14 | Enter the
desired value for each time frame.
 | ||
| Step 15 | Click OK.
Your changes are saved. |
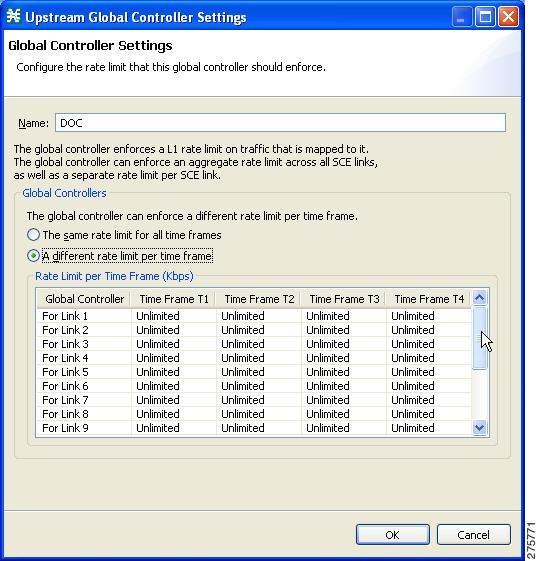
Setting Global Controller Bandwidth Limits with Equal Rate for All Links
Use the following procedure to configure the global controller with equal rate for all links.
| Step 1 | In the Policies
tab, click Global Policy.
The Global Bandwidth Settings dialog box in the right (Rule) pane. | ||
| Step 2 | Add global controllers, as described in Adding Global Controllers. | ||
| Step 3 | Click Edit
Preferences .
The Global Controllers mode dialog box appears.  | ||
| Step 4 | Verify that the Link Modes check boxes are unchecked. | ||
| Step 5 | Click Finish.
The Global Controllers mode dialog box closes. | ||
| Step 6 | In the Policies
tab, click Global Policy.
The Global Bandwidth Settings dialog box is displayed in the right (Rule) pane. | ||
| Step 7 | Select a global controller. | ||
| Step 8 | Click the Edit
()
icon.
The Global Controller Settings dialog box appears. 
| ||
| Step 9 | Set a single value for the maximum bandwidth limit that this global controller carries. | ||
| Step 10 | Choose the same rate limit for all time frames radio button. | ||
| Step 11 | Enter the desired value in Kbps for the maximum bandwidth in the Rate limit for the Per Link Global Controller (in Kbps) field. | ||
| Step 12 | Set the maximum limit that this global controller carries to vary according to time frame. | ||
| Step 13 | Choose the A different rate limit per time frame radio button. | ||
| Step 14 | Enter the
desired value for each time frame.
 | ||
| Step 15 | Click OK .
Your changes are saved. |
Setting Global Controller Bandwidth for Virtual Links
In this mode, you can control each link separately using configured rate templates and default rates. The template rate limits are applied to newly created virtual links. The default rate limits are applied to the default virtual link (virtual link 0).
| Step 1 | In the Policies
tab, click Global Policy.
The Global Bandwidth Settings dialog box in the right (Rule) pane. | ||
| Step 2 | Add global controllers, as described in Adding Global ControllersHow to Add Global Controllers, page 9-7 . | ||
| Step 3 | Click Edit
Preferences .
The Global Controllers mode dialog box appears. 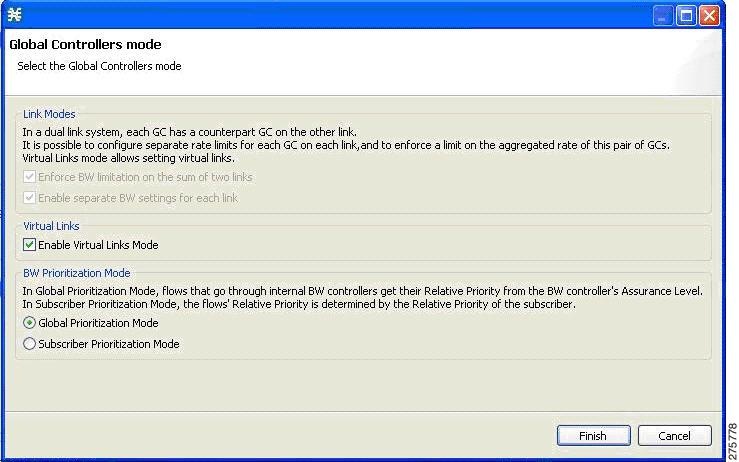 | ||
| Step 4 | Check the Enable Virtual Links Mode check box. | ||
| Step 5 | Click Finish.
The Global Controllers mode dialog box closes.
| ||
| Step 6 | In the Policies
tab, click Global Policy.
The Global Bandwidth Settings dialog box is displayed in the right (Rule) pane. | ||
| Step 7 | Select a global controller. | ||
| Step 8 | Click ()
Edit.
The Global Controller Settings dialog box appears. 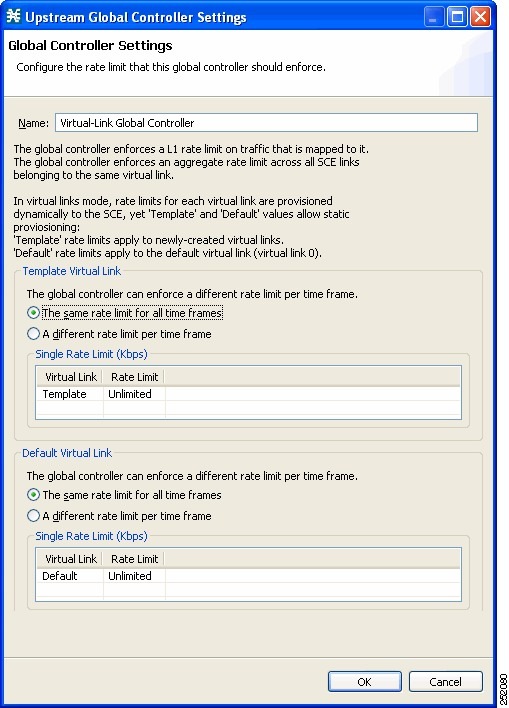
| ||
| Step 9 | Set a single value for the maximum bandwidth limit that this global controller carries. | ||
| Step 10 | Choose the same rate limit for all time frames radio button on the Template Virtual Link tab. | ||
| Step 11 | Enter the desired value in Kbps for the maximum bandwidth in the Rate limit for the Link 1 (in Kbps) field. | ||
| Step 12 | Set the maximum limit that this global controller carries to vary according to time frame. | ||
| Step 13 | Choose the A different rate limit per time frame radio button the Template Virtual Link tab. | ||
| Step 14 | Enter the
desired value for each time frame.
| ||
| Step 15 | Set a single value for the maximum bandwidth limit that this global controller carries. | ||
| Step 16 | Choose the The same rate limit for all time frames radio button on the Default Virtual Link tab. | ||
| Step 17 | Enter the desired value in Kbps for the maximum bandwidth in the Rate limit for the Link 1 (in Kbps) field. | ||
| Step 18 | Set the maximum limit that this global controller carries to vary according to time frame. | ||
| Step 19 | Choose the A different rate limit per time frame radio button the Default Virtual Link tab. | ||
| Step 20 | Enter the
desired value for each time frame.
 | ||
| Step 21 | Click OK.
Your changes are saved. |
Introduction to Managing Subscriber Bandwidth
After you have defined global controllers, you can add subscriber BWCs to packages and map these subscriber BWCs to different global controllers.
A Subscriber BWC controls subscriber bandwidth consumption for upstream or downstream flows. It controls and measures the bandwidth of an aggregation of traffic flows of a service or group of services.
Each package has its own set of BWCs that determine the bandwidth available per package subscriber for each available service.
The two Primary BWCs, one for upstream traffic and one for downstream traffic, allocate bandwidth to specific subscribers. Bandwidth is allocated based on the Committed Information Rate (CIR), the Peak Information Rate (PIR), and the Subscriber relative priority settings. You can configure these parameters, but the Primary BWCs cannot be deleted.
There are two default BWCs, one for upstream traffic and one for downstream traffic. By default, all services are mapped to one of these two BWCs. The BWC mechanism controls rate subpartitioning within the default BWC rate control, based on the CIR, PIR, and AL. You can configure these parameters, but the default BWCs cannot be deleted.
You can add up to 32 user-defined BWCs per package:
- Subscriber BWCs operate at the service-per-subscriber level. They allocate bandwidth for services for each subscriber, based upon the CIR, PIR, global controller, and Assurance Level (AL) set for the BWC. Each rule defines a link between the flow of the service and one of the BWCs (unless the flows are to be blocked). See Defining Per-Flow Actions for a Rule section.
- Extra BWCs also operate at the subscriber level. Extra BWCs (based on the CIR, PIR, global controller, and AL) can be allocated for services that are not included in the Primary BWC. These are services that are not often used but have strict bandwidth requirements, for example, video conference calls. The Extra BWCs are BWCs that control a single service (or service group). BWCs cannot borrow bandwidth from Extra BWCs and vice versa.
Each user-defined BWC controls either downstream or upstream traffic.
Note | If you enable or disable Virtual Links mode, all user-defined global controllers are deleted from the service configuration. A BWC that pointed to a user-defined global controller now points to the default global controller. Other parameters of these BWCs remain unchanged. |
The Cisco SCE supports a maximum of 2000 BWCs. You cannot apply a PQB file to a Cisco SCE if the file contains more than 2000 BWCs. But, the Subscriber BWCs with same values for GC Index, AL Level, PIR, and CIR are considered as a single BWC; even if the BWCs are mapped to different flows. So, in effect, Cisco SCA BB may support more than 2000 BWCs.
Subscriber BWC Parameters
The Subscriber BW Controllers tab of the Package Settings dialog box has the following configuration parameters:
- Name—A unique name for each BWC.
- CIR (L3 Kbps)—The minimum bandwidth that must be granted to traffic controlled by the BWC.
- PIR (L3
Kbps)—The maximum bandwidth allowed to traffic controlled by the BWC.
Note
The minimum bandwidth for a subscriber BWC is 16 Kbps with a granularity of 1 Kbps and the maximum bandwidth is 1000000 Kbps. - Global Controller—The global controller with which this BWC is associated. The global controllers are virtual queues that are part of the bandwidth control mechanism. Direct traffic with similar bandwidth control properties to the same global controller.
- Assurance
Level—How fast bandwidth either decreases from the PIR to the CIR as congestion
builds or else increases from the CIR to the PIR as congestion decreases. A
higher AL ensures a higher bandwidth compared to a similar BWC with a lower AL.
The lowest assurance value is 1, the highest is Persistent (10).
Assurance Level 10 (persistent) never goes below the relevant CIR, unless the total line rate cannot sustain this value.
- Subscriber relative priority—Assurance Level given to the Primary BWC of the subscriber. It determines the assurance given to all the subscriber traffic when competing for bandwidth with subscribers to other packages. The lowest value is 1; the highest is 10.
Note | Subscriber bandwidth control (and accounting and reporting) is based on Layer 3 volume. Global controller bandwidth is based on Layer 1 volume. |
Editing Package Subscriber BWCs
| Step 1 | In the Policies tab, click Global Policy. The Global Bandwidth Settings dialog box in the right (Rule) pane. |
| Step 2 | In the right
(Rule) pane, select a BWC and click the Edit ()
icon.
The
Package Settings dialog box appears.
|
| Step 3 | In the Package
Settings dialog box, click the Subscriber BW Controllers tab.
The
Subscriber BW Controllers tab opens.
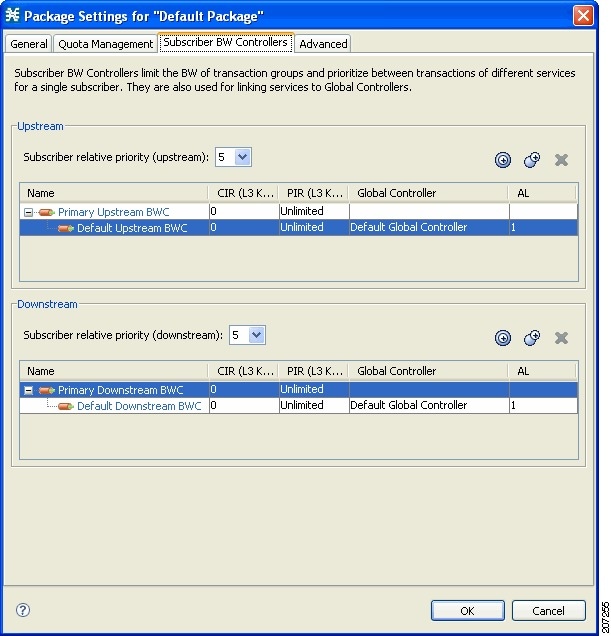 |
| Step 4 | Set your requirements for upstream bandwidth control in the Upstream area of the dialog box. |
| Step 5 | Select a value from the Subscriber relative priority drop-down list. |
| Step 6 | Set the
parameters for the Primary Upstream BWC.
|
| Step 7 | Set the
parameters for each BWC (including the Primary and Default BWCs).
|
| Step 8 | Set the global
controller, with which this BWC is associated:
|
| Step 9 | Repeat Step 3 for downstream bandwidth control in the Downstream area of the dialog box. |
| Step 10 | Click OK.
The Package Settings dialog box closes. All changes to the BWC settings are saved. |
 )
icon once for each additional BWC.
)
icon once for each additional BWC.
 )
icon once for each additional BWC.
)
icon once for each additional BWC.
The effect of Assurance Level on bandwidth allocation for subscriber BWCs will be as follows:
If there are 4 BWCs namely “Priority”, “Gold”, “Silver” and “default” with Assurance Levels 9, 6, 3 and 1 respectively, the “priority” BWC gets the bandwidth first, followed by the "Gold" and the "Silver" BWC. The “default” BWC will be the last to get the bandwidth.
A Practical Example of Managing Bandwidth
This section explains how to achieve effective bandwidth control by combining the configuration of global controllers and subscriber BWCs, and gives a practical example.
- Configuring Total Bandwidth Control
- Example for Limiting P2P and Streaming Traffic Using the Console
Configuring Total Bandwidth Control
| Step 1 | Configure the necessary global controllers.
Ascertain which services are likely to be problematic, and what the maximum total bandwidth should be for each. You do not need to configure services and packages that are unlikely to be problematic; you can include them in the default global controllers. |
| Step 2 | Configure the subscriber BWCs for the package. |
| Step 3 | Add a subscriber BWC for each type of upstream or downstream traffic that you want to limit, and configure the CIR and the PIR accordingly. |
| Step 4 | Select an appropriate global controller for each subscriber BWC. |
| Step 5 | For each service that is to have its own BWC, create a rule and select appropriate upstream and downstream BWCs. |
Example for Limiting P2P and Streaming Traffic Using the Console
Note | This example assumes that the traffic flow is bidirectional; you may decide that you only need upstream controllers or downstream controllers. |
Note | The P2P Traffic Optimization wizards allow you to create a simple model of devices, connect to them, and limit P2P traffic to a specified bandwidth. (See Using the P2P Traffic Optimization Wizards section.) |
| Step 1 | In the Policies
tab, click Global Policy.
The Global Bandwidth Settings dialog box in the right (Rule) pane. |
| Step 2 | Add two
upstream global controllers and two downstream global controllers and assign
the desired bandwidth to each global controller.
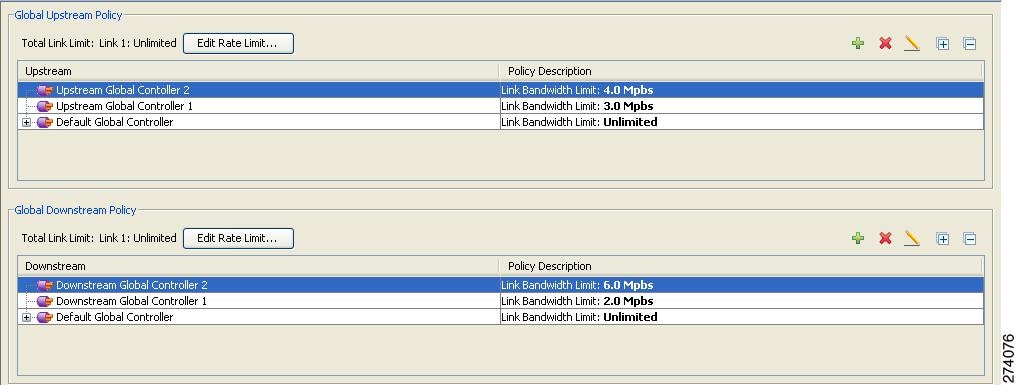 (Here, Upstream Controller 1 and Downstream Controller 1 is used for P2P traffic, and Upstream Controller 2 and Downstream Controller 2 is used for streaming traffic.) |
| Step 3 | In a Package
Settings dialog box, add two upstream BWCs and two downstream BWCs, map them to
the appropriate global controllers, and set their parameters (CIR, PIR, AL).
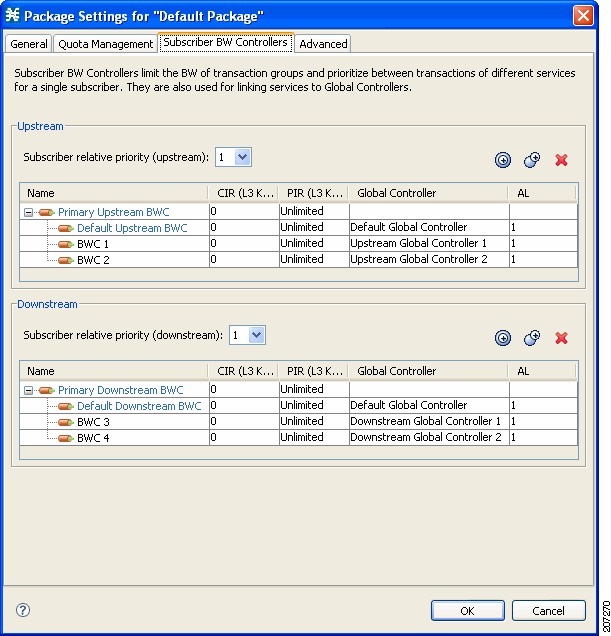 (Here, BWC1 is for upstream P2P traffic and BWC3 is for downstream P2P traffic; BWC2 is for upstream streaming traffic and BWC4 is for downstream streaming traffic.) |
| Step 4 | Add a rule for
the P2P service.
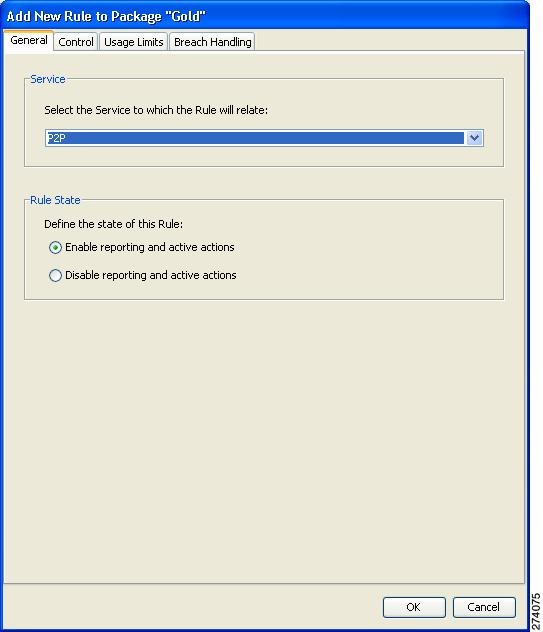 |
| Step 5 | In the Control
tab, assign BWC 1 as the upstream BWC and BWC 3 as the downstream BWC.
 |
| Step 6 | Repeat Step 4
and Step 5 for the Streaming service, using BWC 2 as the upstream BWC and BWC 4
as the downstream BWC.
All subscriber traffic using these services are added to the virtual queue total for these queues. In turn, the bandwidth available to the subscriber for these protocols fluctuate, depending on how “full” these queues are. |
| Step 7 | Click Global
Policy to view the hierarchy of the GCs, BWCs, and rules.
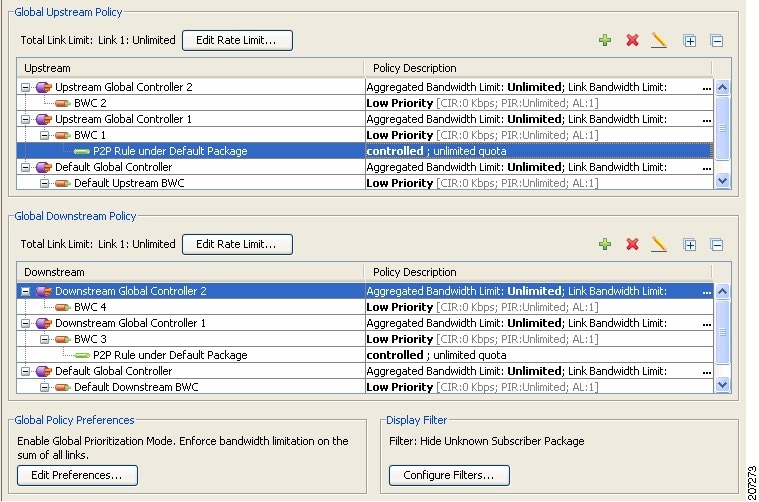 |
Configuring a Rule, Bandwidth Controller, and Global Controller Using the Wizard
You can configure a rule, BWC, and GC together from the Global Policy window.
| Step 1 | In the Policies tab, click Global Policy . The Global Bandwidth Settings are displayed in the right (Rule) pane. |
| Step 2 | Above the area
(Upstream or Downstream) of the desired interface, click the Add ( )
icon.
The
Select addition mode dialog box appears. )
icon.
The
Select addition mode dialog box appears.
|
| Step 3 | Choose the Add a Global Controller and map a Rule and BWC to it radio button. |
| Step 4 | Click Finish.
The GC Selection dialog box appears. 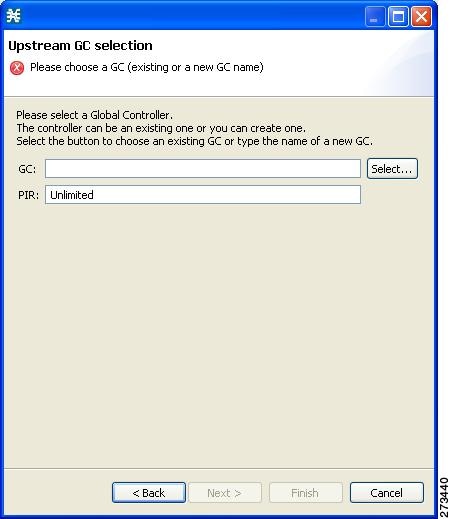 |
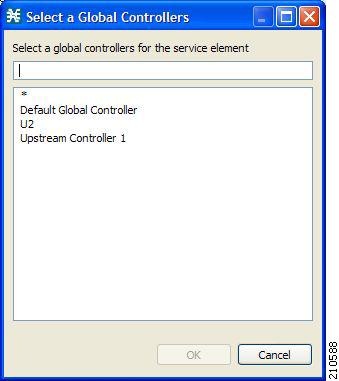
| Step 5 | In the GC field, enter a new GC name, or click Select to choose an existing GC. |
| Step 6 | (Optional)In the PIR field, enter the maximum bandwidth limit that this global controller carries in Kbps. |
| Step 7 | Click Next.
The
Service and Packages selection dialog box appears.
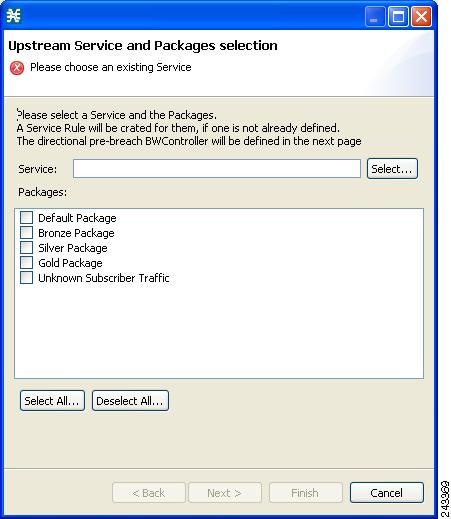 |
| Step 8 | In the Service field, select an existing service. |
| Step 9 | In the Packages section, select one or more packages for the rule to apply to. If a rule does not exist for the service, it is created. The new, or existing rule is then mapped to the selected package or packages. |
| Step 10 | Click Next.
The BWC
selection dialog box appears.
 |
| Step 11 | Enter a new BWC name, or click Select to choose an existing BWC. |
| Step 12 | Click OK . |
Configuring the Upstream Configuration of the Global Bandwidth Controller for IPv6
You can configure the upstream configuration of the global bandwidth controller for IPv6 from the Global Policy window. For details on managing the bandwidth, see the Introduction to Managing Bandwidth“Managing Bandwidth” section.
| Step 1 | In the Service Configuration Editor window, click the Policies tab. |
| Step 2 | Under the
Policies tab, click Global Policy.
The Global Bandwidth Settings dialog box is displayed in the right (Rule) pane. |
| Step 3 | Above the area
(Upstream or Downstream) of the corresponding interface, click the Add ()
icon.
The
Select Addition mode dialog box is displayed.
|
| Step 4 | Click the Add a Global Controller and map a Rule and a BWC to it radio button to add a global controller with a rule mapped to it and a BWC added to it. |
| Step 5 | Select an existing global controller by clicking the Select button or create a new global controller by typing the name of a global controller. |
| Step 6 | Enter the PIR value and click Next. |
| Step 7 | Select the service to control and check the Unknown Subscriber Package check box and Click Next. |
| Step 8 | Select an existing BWC by clicking the Select button or create a new BWC by typing the name of the BWC. Click Next. |
| Step 9 | Double-click on the unknown subscriber package to verify the bandwidth controller and the global controller association. |
What to Do Next
Follow the same procedure for the downstream configuration of the global bandwidth controller for IPv6.
Setting Bandwidth Management Prioritization Mode
Relative priority is the level of assurance that an internal BWC (iBWC) receives when competing against other iBWCs for bandwidth.
The relative priority of one of the following modes determines the relative priority of the flow that goes through an iBWC:
| Step 1 | In the Policies
tab, click Global Policy .
The Global Bandwidth Settings are displayed in the right (Rule) pane. |
| Step 2 | Click Edit
Preferences .
The Global Controllers mode dialog box appears. 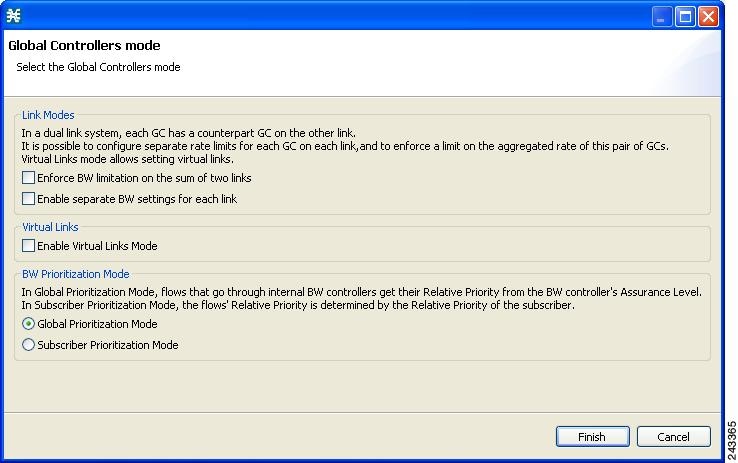 |
| Step 3 | Select one of
the BW Prioritization Mode radio buttons.
|
| Step 4 | Click OK .
The Global Controllers mode dialog box closes. The selected BW management parameter is saved. |
Introduction to Managing Virtual Links
In Virtual Links mode, template bandwidth controllers are defined for packages. Actual bandwidth parameters are assigned when a subscriber enters the system. This bandwidth depends on the package of the subscriber and the physical link assigned to the subscriber. The package of the subscriber defines the template controllers.
For each service configuration that has Virtual Links mode enabled, there is one default upstream virtual link and one default downstream virtual link. The upstream and downstream interfaces are each assigned one default template global controller.
You can add additional template global controllers. You can add, modify, and delete virtual links using a command-line interface (CLI).
The number of directional template global controllers limits the maximum number of virtual links. The number of template global controllers times the number of virtual links cannot exceed 1024 or 4096. Based on the Cisco SCE hardware, the number of global controllers varies. For details, see the Introduction to Managing Bandwidthsection.
To support the DOCSIS 3.0 Downstream bonding, a two level virtual link hierarchy is created for the wideband channels. The wideband channels are associated with the Aggregate Global Control (AGC) that provides a constant output signal despite variations in input signal strength. Wideband channels are associated with three AGCs in a two level hierarchy. At the lower level of the hierarchy, all the DOCSIS 3.0 modems for wideband are aggregated into one AGC and the other AGC contains both legacy and 3.0 modems. The AGC at the top level of the hierarchy is used to limit the aggregated bandwidth of the wideband channel.
For more information on the support for DOCSIS 3.0 solution, see the Cisco Service Control for Managing Remote Cable MSO Links Solution Guide.
For more information on managing the virtual links global controllers, see the Managing Virtual Links Global Controllers section.
Note | If you enable or disable Virtual Links mode, all user-defined global controllers are deleted from the service configuration. A subscriber BWC that pointed to a user-defined global controller now points to the default global controller. (Other parameters of these subscriber BWCs remain unchanged.) |
Note | While applying a policy in virtual link mode, if the new template includes a different number of global controllers than the currently applied template, you must choose the Reset all Virtual Links to Template Rate Limits. Otherwise, selecting apply results in en error message, similar to the following: “Template Upstream Virtual Link differ from the one in the SCE - cannot apply without the force template virtual link option.” |
- Collection Manager Virtual Links Names Utility
- Enabling Virtual Links Mode
- Viewing Virtual Links Global Controller Settings
- Managing Virtual Links Global Controllers
- Configuring a Service Configuation in Virtual Links Mode
- Editing the Virtual Links Total Link Limits
- Managing Virtual Links with CLI Commands
Collection Manager Virtual Links Names Utility
The Cisco Service Control Collection Manager includes a command-line utility for managing the names of virtual links.
For more information about the Cisco Service Control Collection Manager Virtual Links Names Utility, see the “Managing Virtual Links” section in the “Managing the Collection Manager” chapter of Cisco Service Control Management Suite Collection Manager User Guide .
Enabling Virtual Links Mode
To use virtual links, you must enable Virtual Links mode.
Note | If you enable or disable Virtual Links mode, all user-defined global controllers are deleted from the service configuration. |
| Step 1 | In the Policies
tab, click Global Policy .
The Global Bandwidth Settings are displayed in the right (Rule) pane. | ||
| Step 2 | Click Edit
Preferences .
The Global Controllers mode dialog box appears. | ||
| Step 3 | Check the
Enable Virtual Links Mode check box.
If you have already added
global controllers or if you selected asymmetric routing classification mode, a
warning message appears. To continue, click OK .
The Virtual Links Global Controllers tab opens. | ||
| Step 4 | Click Finish .
The Global Bandwidth Settings dialog box closes. |
Viewing Virtual Links Global Controller Settings
Note | Global controller bandwidth is based on Layer 1 volume. (Accounting, reporting, and subscriber bandwidth control in Cisco SCA BB is based on Layer 3 volume.) |
| Step 1 | In the
Policies tab, click
Global
Policy .
The Global Bandwidth Settings are displayed in the right (Rule) pane. |
| Step 2 | Select a global
controller, and click the Edit ()
icon.
The
Global Controller Settings dialog box appears.
The values of the global controllers defined in the dialog box depends on the values displayed in the Global Bandwidth Settings. So, for example, if the Total Link Upstream Bandwidth Limit: Link 1 has a value of 10 Mbps then the upstream default global controller value cannot exceed 10 Mbps. The Name field contains a unique name assigned to the global controller. The system automatically assigns the names Controller 1, Controller 2, and so on. The dialog box contains the following two tabs:
|
| Step 3 | Click OK.
The Global Bandwidth Settings dialog box closes. |
Managing Virtual Links Global Controllers
Virtual link global controllers can be added edited and deleted in the same way as regular global controllers. For more information, see the following sections:
- Adding Global Controllers
- Setting the Maximum Bandwidth of Global Controllers
- Deleting Global Controllers
Adding Global Controllers
Based on the Cisco SCE hardware, the number of global controllers you can add to a service configuration varies. For details, see the Introduction to Managing Bandwidth section.
| Step 1 | In the Policies tab, click Global Policy. The Global Bandwidth Settings dialog box is displayed in the right (Rule) pane. | ||
| Step 2 | Above the area
(Upstream or Downstream) of the desired interface, click the Add ( | ||
| Step 3 | Choose the Add a new Global Controller radio button, to add a new global controller. | ||
| Step 4 | Click Finish.
The
Global Controller Settings dialog box appears.
 | ||
| Step 5 | In the Name field enter a meaningful name. | ||
| Step 6 | To edit the maximum bandwidth of the global controller, continue with the instructions in the section Setting the Maximum Bandwidth of Global Controllers. | ||
| Step 7 | Click OK.
Your changes are saved. The Global Controller Settings dialog box closes. |
Setting the Maximum Bandwidth of Global Controllers
You can edit the maximum bandwidth that a global controller can carry.
You can set a different maximum bandwidth for each of the four available time frames.
You can set different values for each link and for the aggregated BW of all links.
| Step 1 | In the Policies
tab, click Global Policy.
The Global Bandwidth Settings dialog box is displayed in the right (Rule) pane. | ||||
| Step 2 | Select a global controller. | ||||
| Step 3 | Click the Edit
()
icon.
The
Global Controller Settings dialog box appears.
 | ||||
| Step 4 | Set a single
value for the maximum bandwidth limit that this global controller carries.
| ||||
| Step 5 | Set the maximum limit that this global controller carries to vary according to time frame. | ||||
| Step 6 | Choose the A
different rate limit per time frame radio button, and enter the desired value
for each time frame.
| ||||
| Step 7 | Click OK .
Your changes are saved. The value in the Policy Description column changes to reflect the new bandwidth limits. | ||||
| Step 8 | Repeat Step 2 through Step 6 for other global controllers. |
Deleting Global Controllers
You can delete unused global controllers at any time. The default global controller and the Total Link Limit cannot be deleted.
| Step 1 | In the Policies
tab, click Global Policy.
The Global Bandwidth Settings dialog box appears. | ||
| Step 2 | Select a global controller. | ||
| Step 3 | Click the Delete
( )
icon. )
icon.
The global controller is deleted. | ||
| Step 4 | Click OK.
Your changes are saved. The Global Bandwidth Settings dialog box closes. |
Configuring a Service Configuation in Virtual Links Mode
The following steps outline configuring a service configuration in Virtual Links mode. The procedure is similar to that for configuring any service configuration, but virtual links must be added using the CLI.
| Step 1 | Create a new service configuration. |
| Step 2 | Open the Global Bandwidth Settings dialog box and check the Enable Virtual Links Mode check box. |
| Step 3 | Create template global controllers. |
| Step 4 | Create packages. |
| Step 5 | Add subscriber BW controllers to the packages and associate them with appropriate global controllers. |
| Step 6 | Apply the service configuration. |
| Step 7 | The bandwidth values of the default global controllers are set; the values of all other global controllers are not set – these global controllers are templates. |
| Step 8 | Add virtual links using the CLI. |
Each virtual link gets a set of global controllers with the PIR values of the template global controller configuration.
If necessary, you can use the CLI to change the PIR values of the global controller.
- A subscriber is introduced to the Cisco SCE platform. Upstream and downstream virtual links are associated with the subscriber as well as a package.
- Rule resolution for each flow of the subscriber is according to the package of the subscriber and the global controller configuration of the virtual link.
Editing the Virtual Links Total Link Limits
You can limit the total bandwidth passing through the physical link.
The total link limits for upstream and downstream traffic are defined independently.
In Virtual Links mode, bandwidth limitations are applied to the sum of all links.
| Step 1 | In the Policies tab, click Global Policy. The Global Bandwidth Settings dialog box is displayed in the right (Rule) pane. |
| Step 2 | In the Upstream or Downstream section, click Edit Rate Limit . The Total Rate Limit dialog box appears. |
| Step 3 | In the Total Rate Limit for each SCE link (Kbps) field, enter the maximum bandwidth of the Cisco SCE platform capacity that the platform carries, or enter Unlimited. |
| Step 4 | Click OK. The Total Rate Limit dialog box closes. The Total Link Bandwidth Limit: Link 1 field is updated. |
Managing Virtual Links with CLI Commands
You can configure, enable, and disable virtual links using the Cisco SCE platform Command-Line Interface (CLI). For more information about the Cisco SCE platform CLI, see the Cisco SCE8000 CLI Command Reference Cisco SCE10000 CLI Command Reference.
- Use the following CLI commands in
line interface configuration mode to manage virtual links:
- virtual-links index <index> direction [upstream | downstream]
- virtual-links index <VL index> direction [upstream | downstream] gc <gc index> set-PIR value <PIR 1, PIR2, PIR3, PIR4>
- virtual-links index <VL index> direction [upstream | downstream] gc <gc index> set-PIR value <PIR for all timeframes>
- virtual-links index <VL index> direction [upstream | downstream] gc <gc index> reset-PIR
- no virtual-links index <index> direction [upstream | downstream]
- Use the following
CLI command in line interface configuration mode to set the virtual links index
of a subscriber:
- subscriber name <name> property name [vlUp | vlDown] value <vl index>
- Use the following
CLI command in EXEC mode to monitor the status of virtual links:
- Show interface LineCard 0 virtual-links [all | changed | different-from-template]
Description of Virtual Links CLI Commands
| Command | Description |
|---|---|
|
virtual-links index <index> direction [upstream | downstream] |
Add a virtual link |
|
virtual-links index <VL index> direction [upstream | downstream] gc <gc index> set-PIR value <PIR 1, PIR2, PIR3, PIR4> |
Update the global controller PIR values of a virtual link - separate values for each time frame |
|
virtual-links index <VL index> direction [upstream | downstream] gc <gc index> set-PIR value <PIR for all timeframes> |
Update the global controller PIR values of a virtual link - one value for all time frames |
|
virtual-links index <VL index> direction [upstream | downstream] gc <gc index> reset-PIR |
Update the global controller PIR values of a virtual link - take the values defined in the template global controller |
|
no virtual-links index <index> direction [upstream | downstream] |
Delete a virtual link |
|
subscriber name <name> property name [vlUp | vlDown] value <vl index> |
Set a virtual links index for the subscriber |
|
show interface LineCard 0 virtual-links all |
Show information about all virtual links |
|
Show interface LineCard 0 virtual-links [all | changed | different-from-template] |
Show information about virtual links whose PIR is changed or differs from the value defined in the template global controller |
Entering Line Interface Configuration Mode
To run line interface configuration commands you must enter line interface configuration mode and see the SCE(config if)# prompt displayed.
| Step 1 | At the Cisco SCE platform CLI prompt (SCE#), type configure . |
| Step 2 | Press Enter. The SCE(config)# prompt appears. |
| Step 3 | Type interface LineCard 0. |
| Step 4 | Press Enter. The SCE(config if)# prompt appears. |
Introduction to Managing Packages
A package is a description of subscriber policy. It is a collection of rules that defines the reaction of the system when it encounters flows that are mapped to the service to which the rule is related. It is recommended that you first define services (see Introduction to Managing Services section) and only then add and define packages.
Every Cisco SCA BB service configuration contains a package, the default package, which is the root package and cannot be deleted.
A subscriber is mapped to the default package in one of the following conditions:
- No other package is specifically assigned to the subscriber
- A nonexistent package is assigned to the subscriber.
A service configuration can contain up to 10000 packages.
Note | For SCE 8K, it will be 5000 packages. For SCE 10K, it will be 10000 packages. |
- Package Parameters
- Viewing Packages
- Adding Packages
- Setting Advanced Package Options
- Duplicating Packages
- Editing Packages
- Deleting Packages
Package Parameters
The following parameters define a package:
- General parameters:
- Quota Management
parameters:
- Quota Management Mode—Specifies how the subscriber quotas are managed—by external quota manager or replenished periodically by Cisco SCA BB.
- Aggregation Period Type—The quota aggregation period used when quotas are replenished periodically.
- Quota Buckets—16 resource buckets used for quota management.
- Subscriber BW
Controllers parameters:
- Subscriber
relative priority—The relative priority given to subscribers of the package at
times of Network congestion.
Separate priorities are defined for upstream and downstream flows.
- Subscriber
Bandwidth Controllers—A list of BW controllers (BWCs) that are available to
services that are part of the package. Various parameters are defined for each
BWC, including a mapping to a global controller.
Separate BWCs are defined for upstream and downstream flows.
- Subscriber
relative priority—The relative priority given to subscribers of the package at
times of Network congestion.
- Advanced
parameters:
- Package Index—The unique number by which the system recognizes a package. Changing the package name does not affect Cisco SCE platform activity. The system provides a default value of the package index. Do not modify this value.
- Parent Package—The package one level higher in the package hierarchy. The parent package is important when packages share usage counters. The default package is the base of the package hierarchy, and does not have a parent.
- Package
Usage Counter—Used by the system to generate data about the total use by each
package. A package can use either an exclusive package usage counter or the
package usage counter of the parent package.
Each usage counter has:
- A name
assigned by the system (based on the package name).
Note
An asterisk is appended to a package usage counter name whenever the counter applies to more than one package. - A unique counter index—The system provides a default value of the counter index. Do not modify this value.
- Calendar—The calendar used as the basis for the time-based rules of the package.
- VAS Traffic Forwarding Table—The forwarding table used by the package.
- A name
assigned by the system (based on the package name).
These parameters are defined when you add a new package (see Adding Packages section). You can modify them at any time (see Editing Packages section).
Viewing Packages
You can view a hierarchy tree of all existing packages, and you can see a list of services for which specific rules are defined for any selected package.
| Step 1 | In the current
service configuration, click the Policies tab.
A list of all packages is displayed in the package tree.
| ||
| Step 2 | Click a package
in the hierarchy to display the rules of the package.
A list of all rules of this package is displayed in the right (Rule) pane. 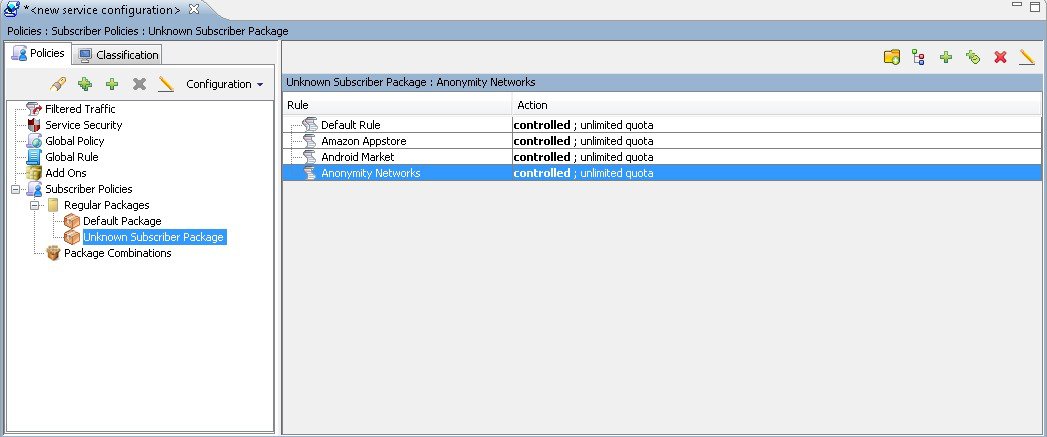 |
Adding Packages
A default package is predefined in the Console installation. You can add additional packages to a service configuration, subject to the limit of 5000 packages per service configuration.
After you have added a new package, you can define rules for the package (see Adding Rules to a Package section).
| Step 1 | In the Policies tab, select a package from the package tree. This package is the parent of the package you are adding. |
| Step 2 | In the Policies
tab, click the Add Package ()
icon.
The
Package Settings dialog box appears.
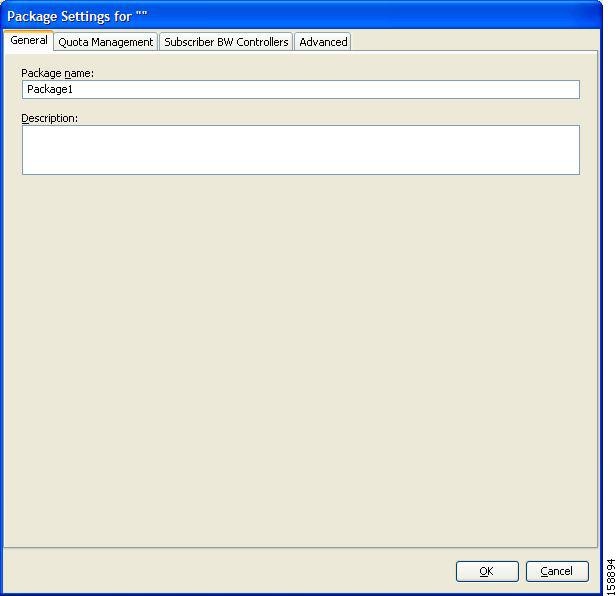 |
| Step 3 | In the Package name field, enter a unique and relevant name for the package. |
| Step 4 | (Optional) In the Description field, enter a meaningful and useful description of the package. |
| Step 5 | To configure parameters in the Advanced tab, continue with the instructions in the following section. |
| Step 6 | Click OK .
The Package Settings dialog box closes. The new package is added as a child to the package selected in the package tree and becomes the selected package. The default service rule is displayed in the right (Rule) pane. |
What to Do Next
To edit the default service rule, and to add new rules to the package, see Introduction to Managing Rules section.
To configure parameters in the Quota Management tab see Editing Quota Management Settings for Packages section.
To configure parameters in the Subscriber BW Controllers tab, see Editing Package Subscriber BWCs section.
Setting Advanced Package Options
You can change the index for the package, specify an exclusive usage counter, or select a calendar for the package in the Advanced tab.
| Step 1 | In the Package
Settings dialog box, click the Advanced tab.
The Advanced tab opens. 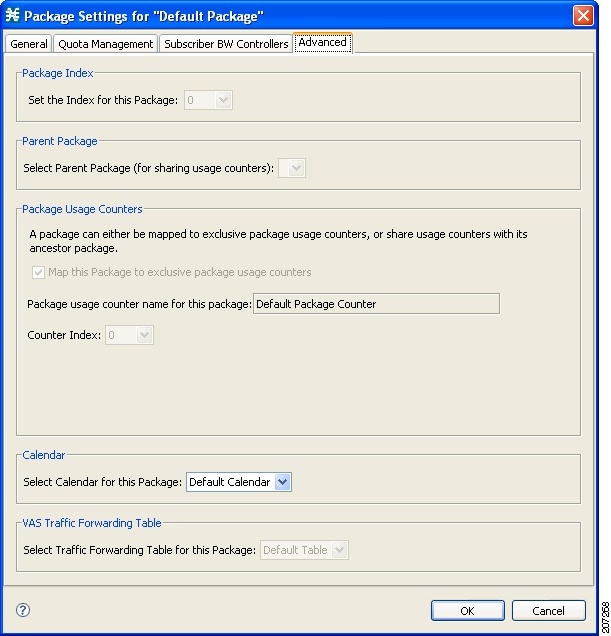 | ||
| Step 2 | To change the
package index for this package, from the Set the Index for this Package
drop-down list, select a package index.
| ||
| Step 3 | To set a different parent package for this package, select the desired parent from the Select Parent Package drop-down list. | ||
| Step 4 | By default, a
new package uses an exclusive usage counter. To share the parent package usage
counter, uncheck the
Map this
Service to exclusive package usage counters check box.
The name in the read-only Package usage counter name for this package field changes to reflect your choice. The Counter Index drop-down list is dimmed. | ||
| Step 5 | To change the
counter index (if you are using an exclusive package usage counter), select a
value for the index from the Counter Index drop-down list.
| ||
| Step 6 | To set a calendar for this package (to use its time frames for time-based rules), select the desired calendar from the Select Calendar for this Package drop-down list. | ||
| Step 7 | To set a VAS
traffic-forwarding table for this package, select the desired
traffic-forwarding table from the Select Traffic Forwarding Table for this
Package drop-down list.
| ||
| Step 8 | Click OK.
The Package Settings dialog box closes. |
The new package is added as a child to the selected parent package and becomes the selected package. The default service rule is displayed in the right (Rule) pane.
What to Do Next
To edit the default service rule, and to add new rules to the package, see Introduction to Managing Rules section.
Duplicating Packages
Duplicating an existing package is a useful way to create a new package similar to an existing package. It is faster to duplicate a package and then modify it than to define the package from beginning.
A duplicated package is added at the same level in the package tree as the original package.
| Step 1 | In the Policies tab, select a package from the package tree. |
| Step 2 | In the Policies
tab, click the Duplicate Package ( )
icon )
icon
A duplicate package is created with all the same attributes as the original package. If the package is duplicated several times, the name of the new package is the name of the selected package followed by “(1)”, “(2)”, and so on. |
| Step 3 | Modify the package parameters (see Editing Packages section). |
Editing Packages
You can modify the parameters of a package (including the default package) at any time.
| Step 1 | In the Policies tab, select a package from the package tree. | ||
| Step 2 | In the Policies
tab, click the Edit Package ()icon.
The Package Settings dialog box appears. | ||
| Step 3 | In the Package name field, enter a new name for the package. | ||
| Step 4 | In the Description field, enter a new description of the package. | ||
| Step 5 | (Optional)Change quota management settings, see Editing Package Quota Management Settings (Using the Quota Management Tab (Packages) Editing Quota Management Settings for Packages section. | ||
| Step 6 | (Optional) (Optional) Change bandwidth control settings, see Editing Package Subscriber BWCs section. | ||
| Step 7 | To change
advanced settings, click the
Advanced tab.
The Advanced tab opens. | ||
| Step 8 | To change the
package index for this package, from the Set the Index for this Package
drop-down list, select a Package Index.
| ||
| Step 9 | To change the parent package of this package, select the desired parent from the Select Parent Package drop-down list. | ||
| Step 10 | To share the
parent package usage counter, uncheck the Map this Service to exclusive package
usage counters check box.
The name in the read-only Package usage counter name for this package field changes to reflect your choice. The Counter Index drop-down list is dimmed. | ||
| Step 11 | To use an
exclusive package usage counter, check the Map this Service to exclusive
package usage counters check box.
The name in the read-only Package usage counter name for this package field changes to reflect your choice. The Counter Index drop-down list is dimmed. | ||
| Step 12 | To change the
counter index if you are using the exclusive package usage counter, select a
value for the index from the Counter Index drop-down list.
| ||
| Step 13 | To change the calendar used by this package, select the desired calendar from the Select Calendar for this Package drop-down list. | ||
| Step 14 | To change the
VAS traffic-forwarding table for this package, select the desired
traffic-forwarding table from the Select Traffic Forwarding Table for this
Package drop-down list.
| ||
| Step 15 | Click
OK.
The Package Settings dialog box closes. All changes to the package parameters are saved. |
Deleting Packages
You can delete user-defined packages. The default package cannot be deleted.
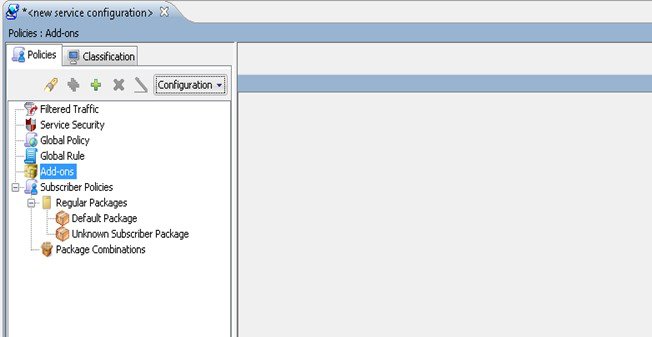
Introduction to Add-on Packages
The Add-on Package has been added to Cisco SCABB 5.1 to reduce the complexity of maintaining large number of packages. The package enables you to create up to ten Add-on groups, and add up to 20 Add-on templates under each group.
The three node hierarchies of the Add-on Package are:
-
Add-on Group, which groups similar templates under one category.
-
Add-on Template, which is similar to the normal package with the minimal option.
-
Package Combination, which is a combination of the base package and Add-on Templates that is provisioned to SCE.
Figure 43. Enable Add-on feature 
Note
Enable Add-on Package under Configuration > Policies > System Settings > Advanced Options > Advanced Service Configuration Options before creating Add-on groups.
Note
Effective with release 5.1.0, SCABB supports Add-on Package solution. This feature is at a nascent stage and will evolve to a complete feature in the future releases of Cisco Service Control Engine. Please contact Cisco Service Control Engine Marketing team for further details and assistance on Add-on package feature.
Adding Add-on Groups
To add the Add-on Groups, follow the below procedure:
| Step 1 | Navigate to
Service
Configuration Editor > Policies > Add-ons.
| ||
| Step 2 | Select
Add-on >
Add-ons Group.
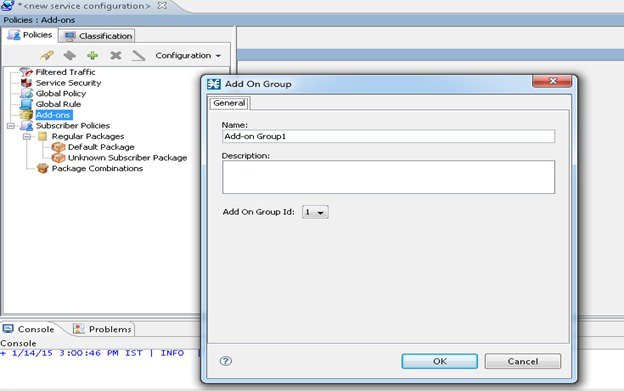
| ||
| Step 3 | In the Add-on Group dialog box, enter the name and the description of the group. | ||
| Step 4 | Select the
Add-on Group
Id from the drop down menu and click
OK to create
the
Add-on Group
dialog box.
|
Adding Add-on Template
To create an Add-on Template, follow the below procedure:
| Step 1 | Navigate toService Configuration Editor > Policies > Add-ons. | ||
| Step 2 | Navigate to Add-on Group > Add-ons Group Package | ||
| Step 3 | In the Add-on
Template dialog box, enter the template name and description.
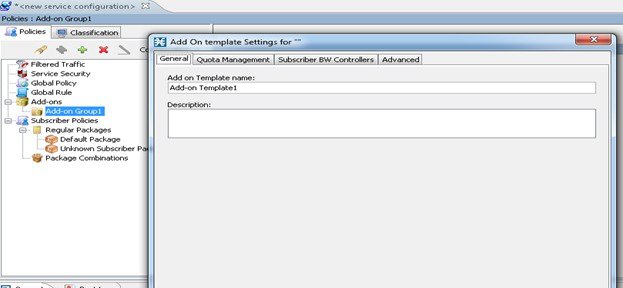
| ||
| Step 4 | Click the Quota Management tab and select the appropriate Quota Profile and Quota Bucket. | ||
| Step 5 | Click the
Subscriber BW
Controllers tab and select the Subscriber relative priority for the
upstream and downstream BWC.
| ||
| Step 6 | Click on the Advanced Tab and assign the Index, Calendar and Traffic Forwarding Table for the Add-on Template. |
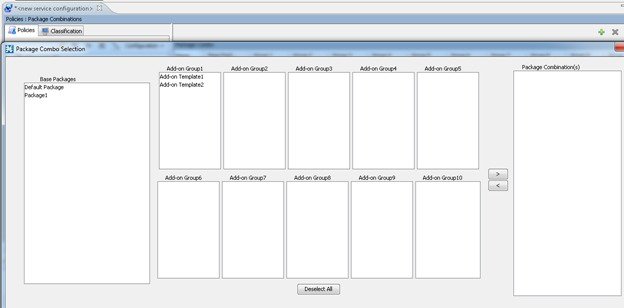
Package Combinations
You can create package combinations using the regular package and Add-on templates under each group. Each package combination must have a base package. Package combinations cannot be repeated. You can filter the Package Combinations based on the Base Package and Add-on Group.
While creating Package Combinations:
-
The Package Combination has the Base Package rules. The Add-on Template rules are overwritten in the Package Combination.
-
The Package Combination displays the Add-on Template Calendar and VAS settings if the Override option is selected while creating the Add-on template in Advanced tab.
-
The Quota Profile of the Add-on Template is overwritten for Package Combination. The Add-on Template quota definition is set to No Override.
-
The Bandwidth Controller defined in the Add-on Template is also overridden while creating Package Combinations.
-
The Transaction Usage RDR Settings for the Package Combination are based on the TUR option enabled for Add-on template.
Creating a Package Combination
To create a Package combination, follow the below procedure:
| Step 1 | Navigate to Service Configuration Editor > Policies > Subscriber Policies > Package Combinations. | ||
| Step 2 | Click Add.
| ||
| Step 3 | Select the
appropriate package under the base package and the Add-on group.
| ||
| Step 4 | Click OK to
view the Package Combination displayed under the Package Combo node.
|
Introduction to Managing Rules
After you have defined services and basic packages, you can define rules for the package.
You can configure rules to do some or all of the following:
- Block the service
- Define maximum bandwidth for the service
- Change the DSCP ToS value of packets in a flow
- Set a quota for the service
- Define behavior when the quota for this service is breached
A rule usually applies at all times. To allow additional flexibility, you can divide the week into four separate time frames. You can define subrules—time-based rules—for each time frame.
Note | In Cisco SCA BB, the maximum number of unique rules that can be applied is limited to 5000. If the number of unique rules exceeds the maximum limit, an error occurs. The number of unique rules are identified from the Package ID, Service, and Timeframe fields. |
- The Default Service Rule
- Rule Hierarchy
- Viewing the Rules of a Package
- Adding Rules to a Package
- Defining Per-Flow Actions for a Rule
- Editing Rules
- Deleting Rules
- Displaying the Services Affected by a Rule
- Global Rules
The Default Service Rule
A default service rule is assigned to every package. It cannot be deleted or disabled.
The default values of this rule are:
- Admit (do not block) traffic.
- Map traffic to the default BWCs.
- Do not limit quotas for either upstream or downstream traffic.
Rule Hierarchy
The Cisco SCE platform applies the most specific rule to any flow.
For example, if you define rules for E-Mail and POP3:
- Any flow mapped to the SMTP or IMAP service is handled according to the e-mail rule.
- Any flow mapped to the POP3 service is handled according to the POP3 rule
This means, for example, that POP3 can have its own usage limits, whereas SMTP and IMAP must share usage limits.
Note | If you add a rule for a child service, the settings for the parent rule are not copied to the new rule. All new rules start with default values. |
![]() Indicates any rule
that also applies to child services.
Indicates any rule
that also applies to child services.
![]() Indicates any rule
that does not apply to any child services.
Indicates any rule
that does not apply to any child services.
Indicates a global rule.
![]() Time-based rules are
shown as children of the relevant rule. The icon for a time-based rule also
shows if the rule applies to child services ( or ).
Time-based rules are
shown as children of the relevant rule. The icon for a time-based rule also
shows if the rule applies to child services ( or ).
See also “How to Display the Services Affected by a Rule” section.
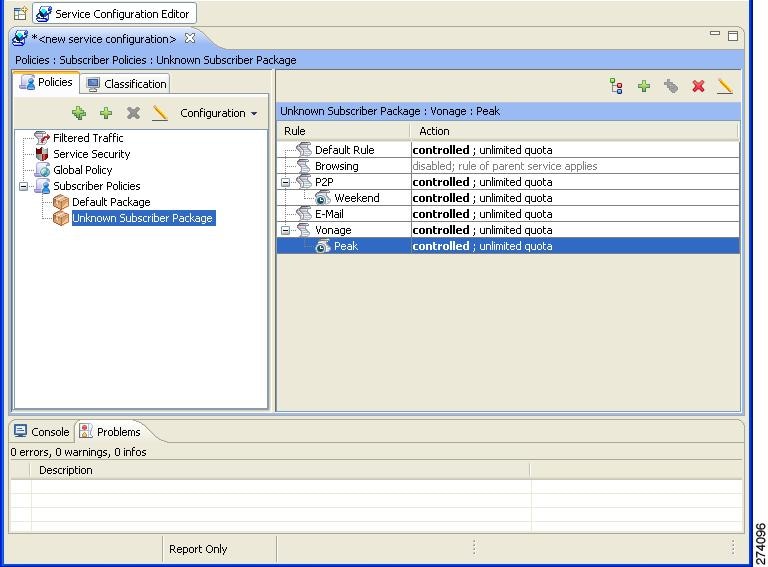
Viewing the Rules of a Package
You can view a list of the rules of a package.
The listing for each rule includes an icon, the name of the service or group of services to which the rule applies, whether the rule is enabled or disabled, and a brief description of the rule.
 |
To see more information about a rule, open the Edit Rule for Service dialog box (see “How to Edit Rules” section).
To see more information about a time-based rule, open the Edit Time-Based Rule for Service dialog box (see “How to Edit Time-Based Rules” section).
Adding Rules to a Package
A default service rule is assigned to every package. You can add additional rules to a package.
Adding time-based rules is described in the section How to Add Time-Based Rules to a Rule.
| Step 1 | In the Policies tab, select a package from the package tree. | ||
| Step 2 | In the right
(Rule) pane, click the Add Rule icon.
The Add
New Rule to Package dialog box appears.
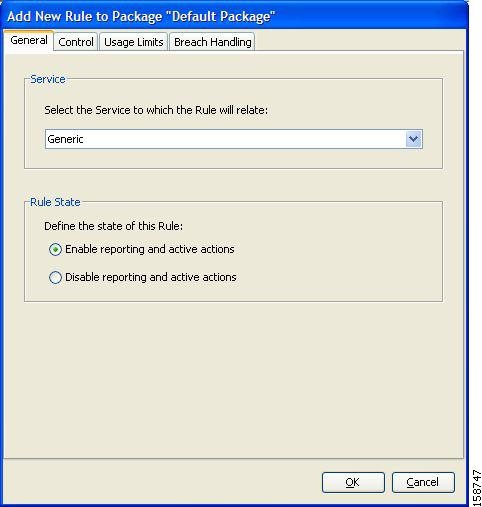 | ||
| Step 3 | In the Service
area of the Add New Rule to Package dialog box, select a service from the
Select the Service to Which the Rule Relates drop-down list.
| ||
| Step 4 | In the Rule
State area, select one of the Define the State of this Rule radio buttons.
| ||
| Step 5 | (Optional)To set behavior per traffic flow for this rule, continue with the instructions in the “How to Define Per-Flow Actions for a Rule” section. | ||
| Step 6 | Click OK. The Add New Rule to Package dialog box closes. |
The new rule is added to the list of rules displayed in the right (Rule) pane.
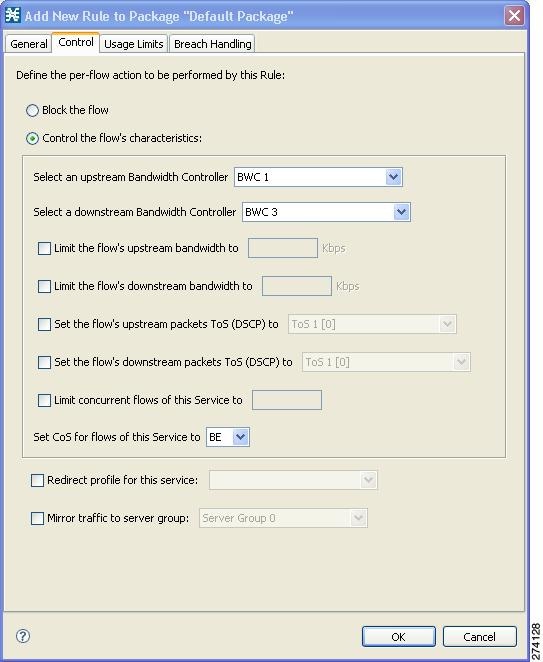
Defining Per-Flow Actions for a Rule
The Control tab of the Add New Rule to Package dialog box allows you to set behavior per traffic flow for sessions that are mapped to the current service.
| Step 1 | In the Add New
Rule to Package dialog box, click the Control tab.
The Control tab opens. 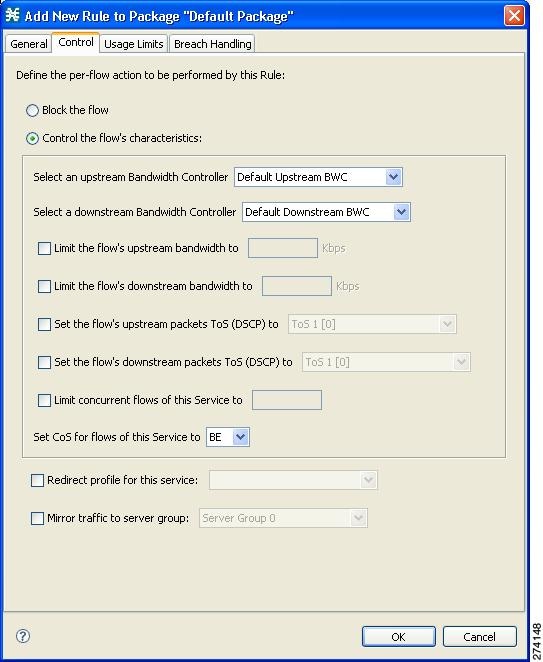 To control flows that are mapped to the service of this rule, continue at Step 3. | ||
| Step 2 | To block flows that are mapped to the service of this rule, select the Block the flow radio button and continue at Step 12. | ||
| Step 3 | Select the
Control the flow’s characteristics radio button.
The options in the Flow Characteristic area are enabled. | ||
| Step 4 | From the
upstream Bandwidth Controller drop-down list, select an upstream BWC. This sets
up bandwidth metering of all concurrent flows mapped to this rule, based on the
characteristics of the selected BWC.
The BWCs in this drop-down list are defined when creating or editing the package.
When the mouse is placed over the drop-down list, a tooltip appears ( Figure 9-51 ). The tool tip contains the properties of the selected BWC, such as Peak Information Rate [PIR], Committed Information Rate [CIR], Global Controller, and Assurance Level. 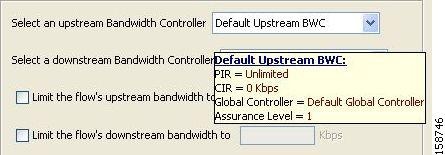 | ||
| Step 5 | From the downstream Bandwidth Controller drop-down list, choose a downstream BWC. | ||
| Step 6 | (Optional) To set a
per-flow upstream bandwidth limit, check the Limit the flow’s upstream
bandwidth check box and enter a value in the Kbps field.
| ||
| Step 7 | (Optional) To set a per-flow downstream bandwidth limit, check the Limit the flow’s downstream bandwidth check box and enter a value in the Kbps field. | ||
| Step 8 | (Optional) To change the
DSCP ToS marker of all packets in upstream flows, check the Set the flow's
upstream packets ToS (DSCP) to check box and select a value from the drop-down
list.
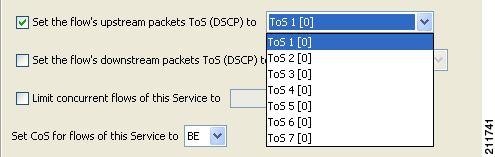 | ||
| Step 9 | (Optional) To change the DSCP ToS marker of all packets in downstream flows, check the Set the flow's downstream packets ToS (DSCP) to check box and select a value from the drop-down list. | ||
| Step 10 | (Optional) To set the maximum number of concurrent flows (mapped to this rule) permitted to a subscriber, check the Limit concurrent flows of this Service check box and enter a value in the associated field. | ||
| Step 11 | From the Set CoS for flows of this Service drop-down list, select a class-of-service. | ||
| Step 12 | (Optional) To enable subscriber redirection, check the Redirect profile for this service check box and choose a redirect profile from the drop-down list. | ||
| Step 13 | (Optional) To enable
traffic mirroring, check the Mirror traffic to server group check box and
choose a server group from the drop-down list.
| ||
| Step 14 | Click OK.
The Add New Rule to Package dialog box closes. The new rule is added to the list of rules displayed in the right (Rule) pane. |
Editing Rules
You can edit any rule, including the default service rule.
Note | You cannot disable the default service rule. |
Note | The tabs of the Edit Rule for Service dialog box are the same as the tabs of the Add New Rule to Package dialog box, except for the General tab—you cannot change the service to which the rule applies. |
| Step 1 | In the Policies tab, select a package from the package tree. | ||
| Step 2 | In the right (Rule) pane, select a rule. | ||
| Step 3 | Click
Edit Rule.
The Edit Rule for Service dialog box appears. 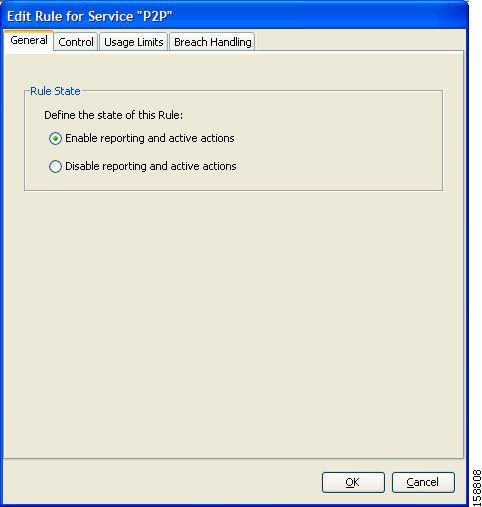
| ||
| Step 4 | In the Rule
State area, select one of the
Define
the State of this Rule radio buttons.
| ||
| Step 5 | Change behavior per traffic flow. | ||
| Step 6 | Click the
Control tab.
The Control tab opens. | ||
| Step 7 | Follow the instructions in Defining Per-Flow Actions for a Rule section. | ||
| Step 8 | Change usage limits. | ||
| Step 9 | Click the
Usage
Limits tab.
The Usage Limits tab opens. | ||
| Step 10 | Follow the instructions in Selecting Quota Buckets for Rules section. | ||
| Step 11 | Define behavior when a quota is breached. | ||
| Step 12 | Click the
Breach
Handling tab.
The Breach Handling tab opens. | ||
| Step 13 | Follow the instructions in Editing Breach-Handling Parameters for a Rule section. | ||
| Step 14 | Click
OK.
The Edit Rule for Service dialog box closes. All changes to the rule are saved. |
Deleting Rules
You can delete any user-defined rule. The default service rule cannot be deleted.
Note | You can disable a rule without losing its profile. For details, see Step 4 of “How to Edit Rules” section. This feature allows you to enable the rule again later, without having to reset all its parameters. You cannot disable the default service rule. |
Displaying the Services Affected by a Rule
You can define a service as the child of another service (the parent service is a service group).
Until you define a separate rule for a child service, the rule of the parent service applies to the child service. A rule that affects any of child services of a service is indicated in the rules list by a different icon, as illustrated for the P2P rule and the FTP rule in.

You can display all (child) services that are affected by a rule.
Note | The default service rule applies to all services for which a specific rule is not defined. |
Global Rules
Effective with Cisco SCE Release 4.1.0, you can define global rules. Using global rules, you can create a rule and apply it to multiple packages. If you modify a global rule, the changes you make affects all its associated packages. You can create upto 10 rules definitions per service.
- Adding Global Rules
- Editing a Global Rule
- Adding Additional Global Rules for a Service
- Deleting a Global Rule from a Service
- Deleting All Additional Rules from a Service
- Adding a Global Rule to a Package
- Deleting a Global Rule from a Package
- Displaying Packages Associated to a Global Rule
- Time-Based Rules Overview
- How to Manage DSCP ToS Marker Values
Adding Global Rules
To create a single service rule definition under a global rule, perform these steps:
| Step 1 | Under the Policies tab, click Global Rule. | ||
| Step 2 | In the right
(Rule) pane, click the Add Rule
icon.
The Add
New Rule to Package Global Rule dialog box appears.
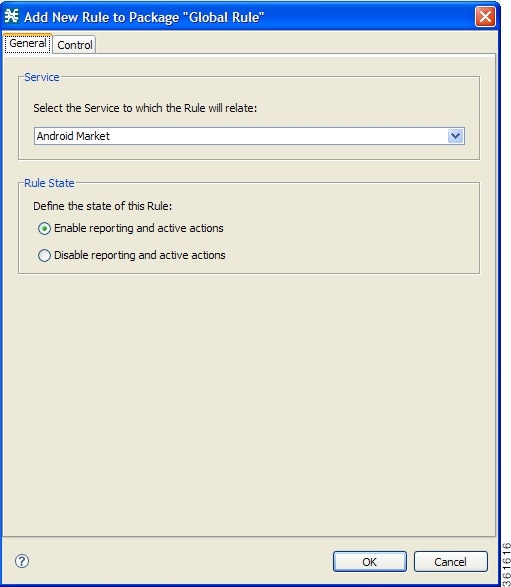 | ||
| Step 3 | In the Service
area of the Add New Rule to Package Global Rule dialog box, select a service
from the Select the Service to Which the Rule Relates drop-down list.
| ||
| Step 4 | In the Rule
State area, select one of the
Define the State of this Rule
radio buttons.
| ||
| Step 5 | (Optional)To set behavior per traffic flow for this rule, continue with the instructions in the How to Define Per-Flow Actions for a Rule section. | ||
| Step 6 | Click
OK.
The Add New Rule to Package Global Rule dialog box closes. The new rule is added to the list of rules displayed in the right (Rule) pane. |
Editing a Global Rule
If you edit a global rule, the changes are reflected in all the associated packages.
| Step 1 | Under the Policies tab, click Global Rule. |
| Step 2 | Double-click the
service rule that you want to edit or click the rule and click the
Edit Rule
button.
A Rule
Warning message appears.
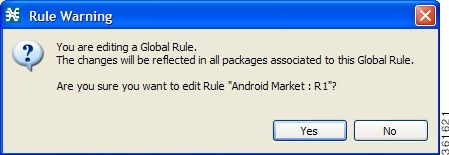 |
| Step 3 | Click
Yes.
The Edit Additional Rule dialog box appears. 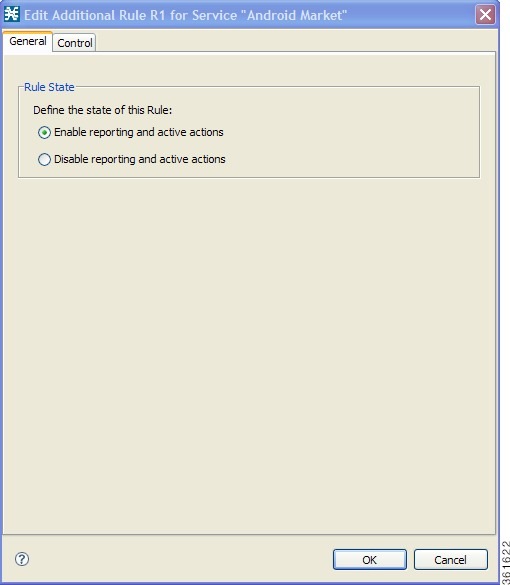 |
| Step 4 | In the Rule State area, select one of the Define the State of this Rule radio buttons. |
| Step 5 | Change behavior per traffic flow. |
| Step 6 | Click the
Control tab.
The Control tab opens. |
| Step 7 | Follow the instructions in How to Define Per-Flow Actions for a Rule. |
| Step 8 | Click
OK.
The Edit Rule for Service dialog box closes. All changes to the rule are saved. |
Adding Additional Global Rules for a Service
After creating a service rule definition under a global rule, you can optionally create more rule definitions for a service. To create more rule definitions for a service, perform these steps:
| Step 1 | Under the Policies tab, click Global Rule. | ||
| Step 2 | Click the service rule to which you want to add additional rules. | ||
| Step 3 | Click the
Add Additional Rule
 button.
The Add
Additional Rule to Package “Global Rule” dialog box appears.
button.
The Add
Additional Rule to Package “Global Rule” dialog box appears.
| ||
| Step 4 | In the
Additional Rule area, select an additional rule from the Select Additional rule
for this service drop-down list.
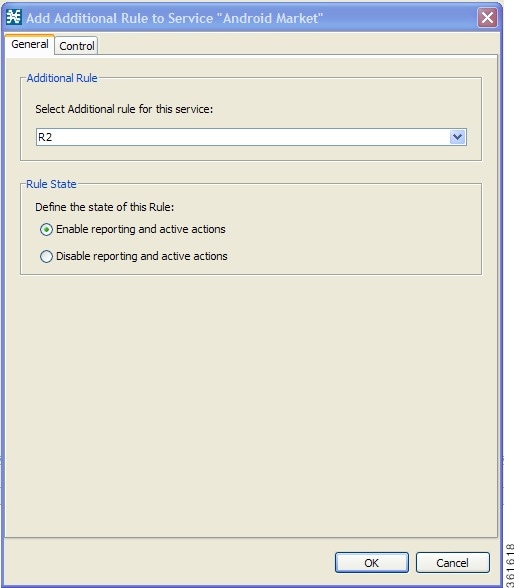
| ||
| Step 5 | In the Rule
State area, select one of the
Define the State of this Rule
radio buttons.
| ||
| Step 6 | (Optional)To set behavior per traffic flow for this rule, continue with the instructions in the How to Define Per-Flow Actions for a Rule section. | ||
| Step 7 | Click OK. The Add Additional Rule to Package “Global Rule” dialog box closes. |
The new additional rule is added to the list of rules displayed in the right (Rule) pane.
Deleting a Global Rule from a Service

Deleting All Additional Rules from a Service
| Step 1 | In the Policies tab, click Global Rule. |
| Step 2 | In the right (Rule) pane, select a service to delete. |
| Step 3 | In the Rule pane, click the
Delete Rule
icon.
A Rule Warning message appears.
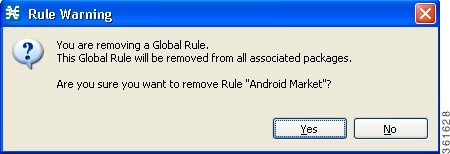 |
| Step 4 | Click
Yes.
A Rule Warning message appears again. 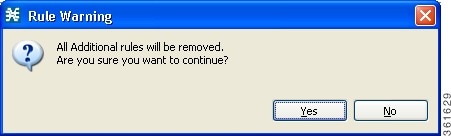 |
| Step 5 | Click
Yes.
All the global rules associated with the service are deleted. |
Adding a Global Rule to a Package
| Step 1 | In the Policies tab, click a package from the package tree. | ||
| Step 2 | In the right
(Rule) pane, click the
Add Global Rule
 button.
The Add
New Global rules to package dialog box appears.
button.
The Add
New Global rules to package dialog box appears.
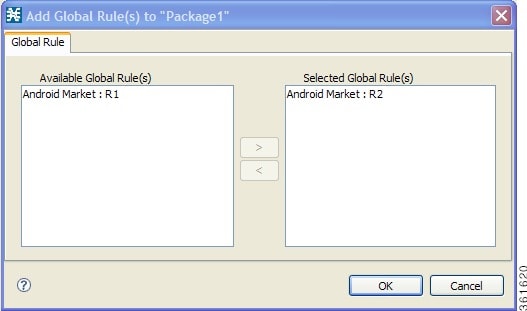 | ||
| Step 3 | In the Global
Rules Available area of the Add New Global rules to package dialog box, click
the rule and click the
Add button.
| ||
| Step 4 | Click
OK.
The Add New Global rules to package dialog box closes. The service rule is applied to the package. |
What to Do Next
Usage limits and breach handling are part of quota management (see “Managing Quotas” section):
- To configure parameters in the Usage Limits tab, see the How to Select Quota Buckets for Rules section.
- To configure parameters in the Breach Handling tab, see the How to Edit Breach-Handling Parameters for a Rule section.
Deleting a Global Rule from a Package
You can delete a global rule from a package. If you delete a global rule from a package, the global rule is deleted only from the specific package and not from other packages.
To delete a global rule from a package, perform these steps:
Displaying Packages Associated to a Global Rule
You can view all the packages associated to a global rule. To view the services affected by any global rule, perform these steps:
| Step 1 | In the Policies tab, click Global Rule. |
| Step 2 | In the right (Rule) pane, select a global rule. |
| Step 3 | In the Rule
pane, click the
Show All Packages Associated With This Rule
 icon.
icon.
A Packages Associated with a Global Rule dialog box appears. 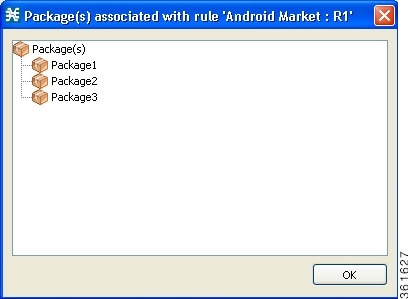 |
| Step 4 | Click OK to close the dialog box. |
Time-Based Rules Overview
The Console allows you to divide the week into four time frames (see “Managing Calendars” section). A time-based rule is a rule that applies to one time frame.
You can add time-based rules to any rule. If a time-based rule is not defined for a time frame, the parent rule is enforced.
Often, you want the rules for the different time frames to be similar. When you add a time-based rule, the settings of the parent rule are copied to the new time-based rule; you can make any needed changes. Subsequent changes to the parent rule do not affect the time-based rule.
You must define the calendar before defining the related time-based rules.
- Adding Time-Based Rules to a Rule
- Editing Time-Based Rules
- Deleting Time-Based Rules
- Managing Calendars Overview
Adding Time-Based Rules to a Rule
Adding a time-based rule to a rule allows you to specify alternate rule parameters applicable only for a specific time frame. If a time-based rule is not defined for a time frame, the parent rule is enforced.
- When you add a time-based rule, all parameters are initially set to the values defined for the parent rule. Subsequent changes to the parent rule do not change the time-base rule.
- The tabs of the Add New Time-Based Rule dialog box are the same as the tabs of the Add New Rule to Package dialog box, except for the General tab. In the Add New Rule to Package dialog box, you select a service; in the Add New Time-Based Rule dialog box, you select a time frame.
A service whose time-based rule affects any of its child services is indicated in the rules list by a modified icon
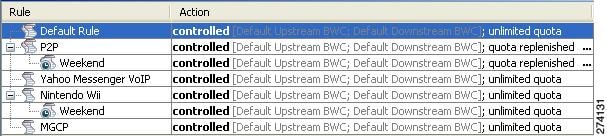
| Step 1 | In the Policies tab, select a package from the package tree. |
| Step 2 | In the right (Rule) pane, select a rule. |
| Step 3 | Click the Add
Time-Based Rule
icon.
The Add New Time-Based Rule dialog box appears. |
| Step 4 | In the Time Frame area, from the Select the Time Frame for this Rule drop-down list, select one of the four time frames. |
| Step 5 | In the Rule
State area, select one of the
Define
the State of this Rule radio buttons.
|
| Step 6 | Define behavior per traffic flow. |
| Step 7 | Click the
Control tab.
The Control tab opens. |
| Step 8 | Follow the instructions in How to Define Per-Flow Actions for a Rule. |
| Step 9 | Change usage limits. |
| Step 10 | Click the
Usage
Limits tab.
The Usage Limits tab opens. |
| Step 11 | Follow the instructions in How to Select Quota Buckets for Rules. |
| Step 12 | Define behavior when a quota is breached. |
| Step 13 | Click the
Breach Handling tab.
The Breach Handling tab opens. |
| Step 14 | Follow the instructions in How to Edit Breach-Handling Parameters for a Rule. |
| Step 15 | Click
OK.
The Add New Time-Based Rule dialog box closes. The new time-based rule is displayed as a child of the rule in the Rule pane. |
Editing Time-Based Rules
You can edit time-based rules.
Note | The tabs of the Edit Time-Based Rule for Service dialog box are the same as the tabs of the Add New Time-Based Rule dialog box, except for the General tab. You cannot change the time frame to which the rule applies. |
| Step 1 | In the Policies tab, select a package from the package tree. |
| Step 2 | In the right (Rule) pane, select a time-based rule. |
| Step 3 | Click the Edit
Rule icon.
The Edit
Time-Based Rule for Service dialog box appears.
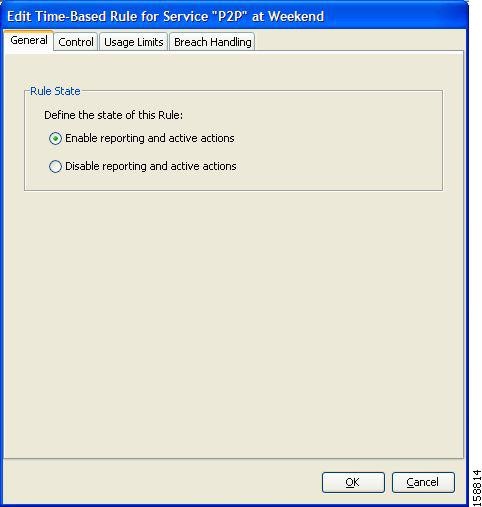 |
| Step 4 | In the Rule
State area, select one of the Define the State of this Rule radio buttons.
|
| Step 5 | Define behavior per traffic flow. |
| Step 6 | Click the Control tab. The Control tab opens. |
| Step 7 | Follow the instructions in How to Define Per-Flow Actions for a Rule. |
| Step 8 | Change usage limits. |
| Step 9 | Click the Usage
Limits tab.
The Usage Limits tab opens. |
| Step 10 | Follow the instructions in How to Select Quota Buckets for Rules. |
| Step 11 | Define behavior when a quota is breached. |
| Step 12 | Click the
Breach Handling tab.
The Breach Handling tab opens. |
| Step 13 | Follow the instructions in How to Edit Breach-Handling Parameters for a Rule. |
| Step 14 | Click OK.
The Edit Time-Based Rule for Service dialog box closes. All changes to the time-based rule are saved. |
Deleting Time-Based Rules
You can delete any time-based rule.
Note | You can disable a rule without losing its profile (see “How to Edit Time-Based Rules” section). This allows you to enable the rule again later, without having to reset all its parameters. |
Managing Calendars Overview
Calendars are used to divide the hours of the week into four time frames.
After you have configured a calendar, you can add time-based rules to a package that uses the calendar. A time-based rule is a rule that applies to only one time frame. Time-based rules allow you to set rule parameters that apply only at specific times. You might, for example, want to define different rules for peak, off-peak, nighttime, and weekend usage.
Each service configuration includes one default calendar. You can add nine more calendars, each with a different time-frame configuration. You can use different calendars for different packages. You can also use different calendars where a service provider has customers in more than one time zone by configuring calendars with a one-hour offset from each other.
- How to View Calendars
- How to Add Calendars
- How to Rename the Time Frames
- How to Delete Calendars
- How to Configure the Time Frames
- Adding Calendars
- Renaming the Time Frames
- Viewing Calendars
- Deleting Calendars
- Configuring the Time Frames
Adding Calendars
Each service configuration includes one default calendar. You can add up to nine more calendars.
| Step 1 | From the Policies tab of the left pane, choose Configuration > Policies > Weekly Calendars. The Calendar Settings dialog box appears. |
| Step 2 | In the Calendar tab, click the Add (158725.jpg) icon. A new calendar is added with the name Calendar (1). |
| Step 3 | In the Calendar Parameters tab, click in the Calendar Name field
and enter the name for this calendar.
 |
| Step 4 | Click Close. The Calendar Settings dialog box closes, and the new calendar name is saved. |
Renaming the Time Frames
By default, the time frames are named T1, T2, T3, and T4. You can change these names at any time; for example, you may want to name the time frames Peak, Off Peak, Night, and Weekend.
Note | Although you can configure the time frames differently in each calendar, the names of the time frames are the same in all of the calendars. If you change the name when configuring one calendar, the names are also changed for all other calendars. |
| Step 1 | From the
Policies tab of the left pane, choose Configuration > Policies > Weekly
Calendars .
The Calendar Settings dialog box appears. In the Calendar Parameters tab, below the grid, each of the four time frames is listed in a field next to a colored square. |
| Step 2 | Click in a Time
Frame Name field, and enter a new name for the time frame.
 |
| Step 3 | Repeat Step 2 for the other three time frames. |
| Step 4 | Click Close.
The Calendar Settings dialog box closes, and the changes to the names of the time frames are saved. |
Viewing Calendars
You can view a list of existing calendars and their time frames.
| Step 1 | From the
Policies tab of the left pane, choose Configuration > Policies > Weekly
Calendars .
The Calendar Settings dialog box appears with a list of existing calendars.  |
| Step 2 | Click a calendar
in the list to display its time-frame settings.
The time frames for the selected calendar are displayed and configured in the Calendar Parameters tab. |
| Step 3 | Click Close.
The Calendar Settings dialog box closes. |
Deleting Calendars
You can delete any user-added calendar. The default calendar cannot be deleted.
Note | A calendar used by a package cannot be deleted. (When you select the calendar, the Delete icon is dimmed.) To delete the calendar, you must first select a different calendar for each package using the calendar that is deleted. See “How to Set Advanced Package Options” section for information about changing the calendar associated with a package. |
| Step 1 | From the Policies tab of the left pane, choose Configuration > Policies > Weekly Calendars. The Calendar Settings dialog box appears. |
| Step 2 | In the Calendar
tab, select a calendar and click the Delete icon.
A Calendar Removal Confirmation message appears.  |
| Step 3 | Click Yes .
The calendar is deleted. |
| Step 4 | Click Close. |
Configuring the Time Frames
By default, all the hours of the week belong to one time frame. The Console allows you to assign each of the 168 (24x7) hours of the week to one of four separate time frames. These time frames allow you to supply time-dependent differentiated services and to impose constraints on any service.
You might want, for example, to divide the week as follows:
You can define different time frames for each calendar.
| Step 1 | From the Policies tab of the left pane, choose Configuration > Policies > Weekly Calendars. The Calendar Settings dialog box appears. |
| Step 2 | In the
Calendars tab, select a calendar to configure.
In the Calendar Parameters tab, the selected calendar’s Define Time Frames for this Calendar grid is displayed. The grid, representing one week, is laid out in a format of 24 hours x 7 days. Each cell represents one hour. Below the grid, the name of each time frame appears next to a colored button. |
| Step 3 | Click one of the colored buttons. |
| Step 4 | Select all the
cells in the grid that represent hours that are part of the selected time
frame.
You can select a group of cells by holding down the mouse button and dragging across the cells. 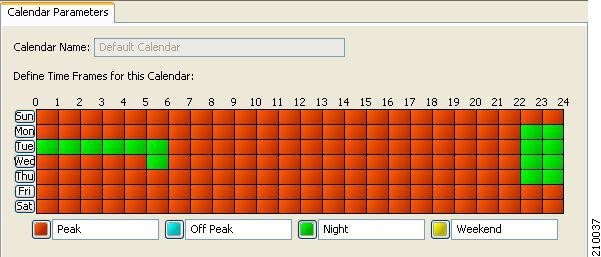 The changes are written to the service configuration as you make them. |
| Step 5 | Repeat Steps 3
and 4 for the other time frames until you have mapped the entire grid.
You have now mapped the week into four different time frames. 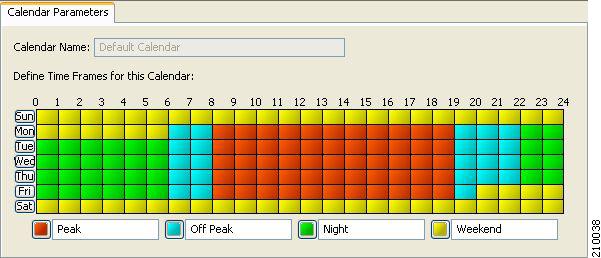 |
| Step 6 | Click Close.
The Calendar Settings dialog box closes. |
How to Manage DSCP ToS Marker Values
Cisco SCA BB can change the value of the DSCP ToS marker of packets of flows that match a filter rule or a service rule.
For details on how to change the value of the DSCP ToS marker, see the following steps:
- For Filter Rule—see Step 11 of “How to Add Filter Rules” section
- For Service Rule—see Steps 10 and 11 of “How to Define Per-Flow Actions for a Rule” section and Step 9 of “How to Edit Breach-Handling Parameters for a Rule” section
Cisco SCA BB supports seven ToS Marker Classes. You assign each class a specific value to apply to the packets of a flow.
Note | If you have used DSCP marking on a Cisco SCA BB release before 3.1.5 and you are converting your old service configurations, you must reconfigure the service configurations to obtain the same network behavior as in the former release. |
Configuring DSCP ToS Marking
DSCP ToS marking is used in IP networks as a means to signal the type and priority of a flow between network elements.
The default marking option is not to mark the packet. The classification may take a few packets to finalize. So after the ToS marking is enabled, the first few packets may still be processed under the default option and therefore may not be marked.
Note | In an MPLS environment, the Cisco SCE platform does not map the DSCP bits to the EXP bits of the MPLS header. |
| Step 1 | From the
Policies tab of the left pane, choose Configuration > Policies > ToS
Marking Settings .
The ToS
Marking Settings dialog box appears.
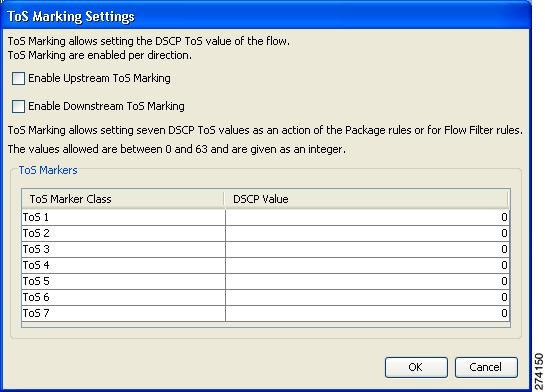 | ||
| Step 2 | (Optional)To enable DSCP
ToS marking on upstream flows, check the Enable Upstream ToS Marking check box.
If Upstream ToS Marking is disabled, it overrides filter rule and service rule settings. | ||
| Step 3 | (Optional) To
enable DSCP ToS marking on downstream flows, check the Enable Downstream ToS
Marking check box.
If Downstream ToS Marking is disabled, it overrides filter rule and service rule settings. | ||
| Step 4 | Give unique
names to the ToS Marker Classes.
| ||
| Step 5 | Assign values
to the ToS Marker Classes.
Values must be in the range from 0 to 63.
| ||
| Step 6 | Click OK .
Your changes are saved. The ToS Marking Settings dialog box closes. |
Quota Management
- Adding Quota Profiles
- Editing Quota Profiles
- Deleting Quota Profiles
- Editing Quota Management Settings for Packages
- Selecting Quota Buckets for Rules
- Editing Breach-Handling Parameters for a Rule
- Example for Creating Tiered Subscriber Services
Adding Quota Profiles
You can add and define new profiles and edit existing profiles. Additionally, you can add up to 16 new buckets.
You also define the quota buckets associated with the package. Rules can use quota buckets to set limits to the consumption of particular service groups (see “How to Select Quota Buckets for Rules” section).
| Step 1 | From the
Policies tab in the left pane, choose Configuration > Policies > Quota
Settings.
The Quota
Profile Editor dialog box appears.
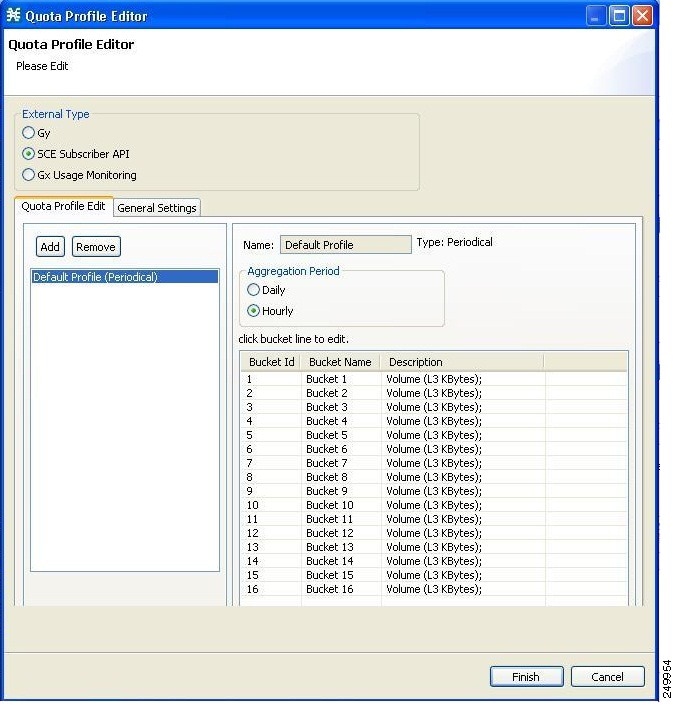 | ||
| Step 2 | Select one of
the External Type radio buttons.
| ||
| Step 3 | For Periodical
quota profile, select one of the Aggregation Period radio buttons to specify
when the quota is renewed for the package:
| ||
| Step 4 | In the Quota
Profile Edit tab, click Add.
The Add
Quota Profile dialog box appears.
 | ||
| Step 5 | In the Name field, enter a unique name for the new quota profile. | ||
| Step 6 | Select the Type
from the drop-down list.
| ||
| Step 7 | Click Finish.
The Add Quota Profile window closes. |
The new profile is added to the list of profiles displayed in the left (Quota Profile Edit) pane.
Editing Quota Profiles
You can edit the profiles to update the bucket profile.
Note | You cannot edit or remove the default profile. |
| Step 1 | From the
Policies tab in the left pane, choose
.
The Quota Profile Editor dialog box appears. | ||
| Step 2 | Select a quota
profile from the profile tree.
All the buckets defined for the selected profile are listed on the right pane. | ||
| Step 3 | Double-click a
bucket line in the right pane.
The Quota Bucket Editor window appears. 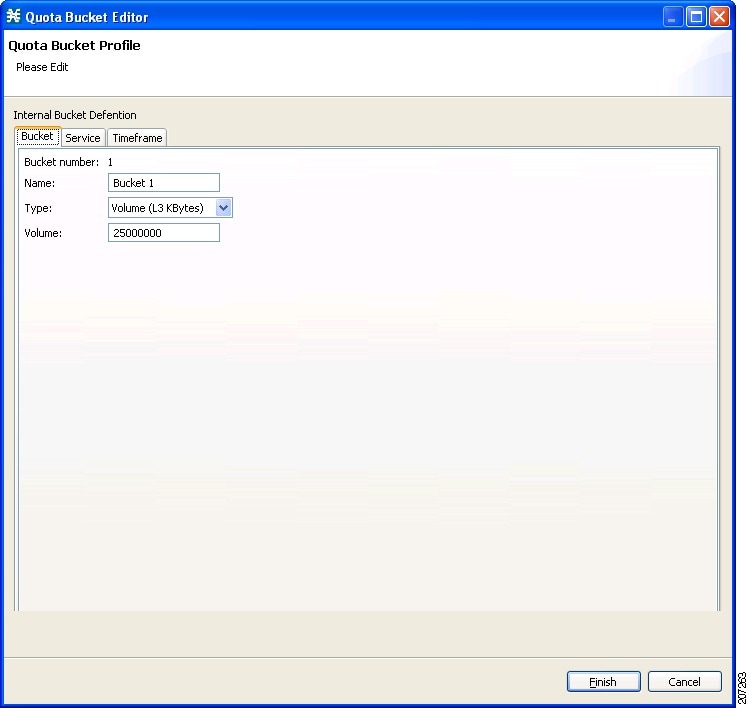 | ||
| Step 4 | Change the
Name, Type, and Volume.
| ||
| Step 5 | Click on the
Service tab, to associate the services to the quota profile.
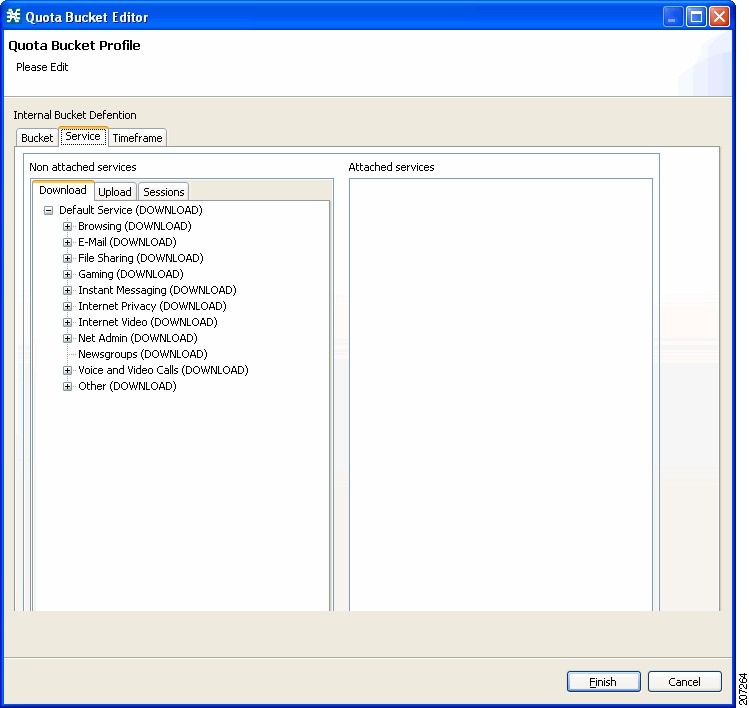 | ||
| Step 6 | Select a
service from the Non Attached Service pane and move it to the Attached Service
pane on the right.
The selected service is moved along with its sub services. 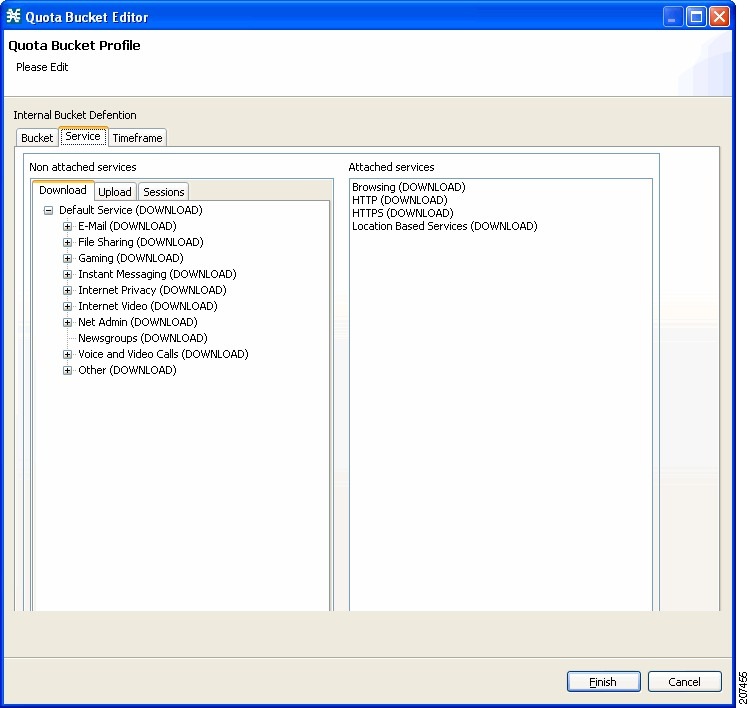 | ||
| Step 7 | Based on the
bucket type, you can select services from the following tabs:
| ||
| Step 8 | Click on the
Timeframe tab, to associate different timeframes to
the quota profile.
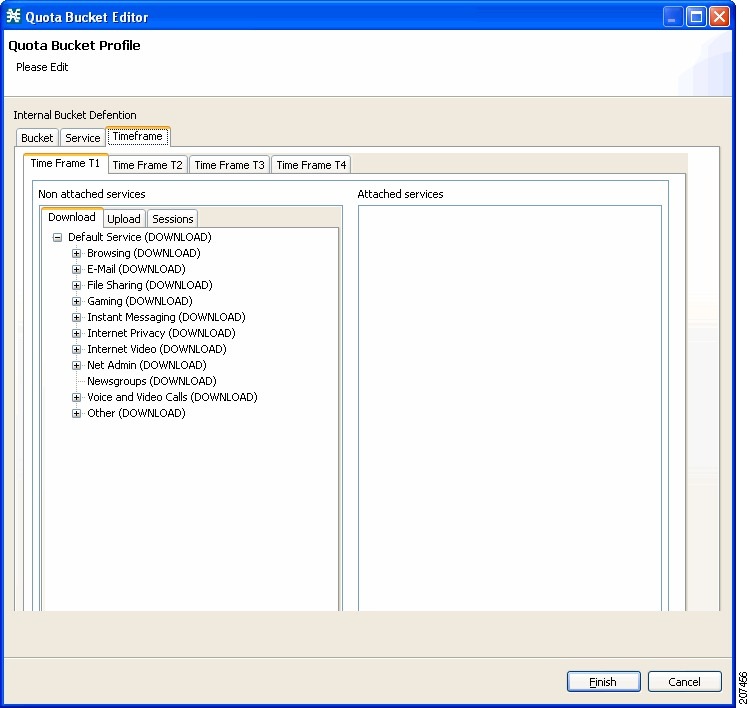 | ||
| Step 9 | Select a
service from the Non Attached Service pane and move it to the Attached Service
pane on the right.
The selected service is moved along with its sub services. | ||
| Step 10 | Based on the
bucket type, you can select services from the following tabs:
| ||
| Step 11 | Click
Finish.
The Quota Bucket Editor closes. | ||
| Step 12 | Click Finish. The Quota Profile Editor closes. |
What to Do Next
To select a service to which the rule relates to, see “How to Add Rules to a Package” section.
Deleting Quota Profiles
Note | The default profile cannot be deleted. |
| Step 1 | From the Policies tab in the left pane, choose Configuration > Policies
> Quota Settings . The Quota Profile Editor dialog box appears. |
| Step 2 | Select a quota profile from the profile tree. |
| Step 3 | Click Remove. |
| Step 4 | Click Finish. The Quota Profile Editor dialog box closes. |
Editing Quota Management Settings for Packages
You can define whether an external quota manager or the Cisco SCA BB performs the quota management for a package.
| Step 1 | In the Policies
tab, select a package from the package tree, and click the Edit Package
icon.
The Package Settings dialog box appears. |
| Step 2 | In the Package
Settings dialog box, click the Quota Management tab.
The Quota Management tab opens. 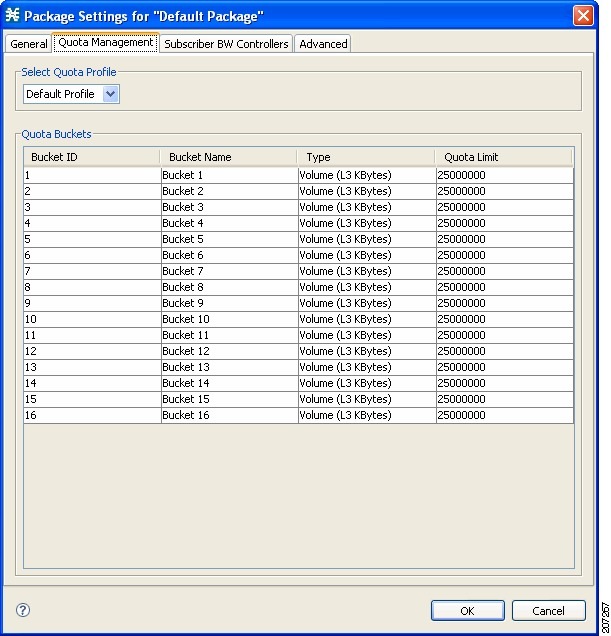 |
| Step 3 | Select the Select quota profile from the drop-down list. |
| Step 4 | Click
OK.
The Package Settings dialog box closes. All changes to the quota management settings are saved. |
Quota Replenish Scatter
By default, if subscriber quota is replenished using periodical quota management, the quota of all subscribers is replenished at the same time. To smooth quota replenishment, you can scatter the time of quota replenishment.
To activate this feature, enter a non-zero value for the Length of the time frame for quota replenish scatter (minutes) property of the Advanced Options tab of the Systems Settings dialog box (see “Managing Advanced Service Configuration Options” section). By default, this property has a value of zero, that is, all quota is replenished at the same time.
Quota for each subscriber is replenished at a random time within the quota replenish scatter time frame, with replenish events split evenly before and after the quota aggregation time.
Best results are obtained if the scatter time frame is the same length as the quota aggregation period, which should completely smooth replenish events. Do not enter a value larger than the quota replenish period. Therefore, for an hourly quota replenish period, set the scatter to 60 minutes.
The quota replenish scatter function is independent of all other quota management parameters.
Selecting Quota Buckets for Rules
Select the quota buckets that the flows mapped to a rule uses. The quota buckets are defined during package setup (see “How to Edit Quota Management Settings for Packages” section ). If no quota bucket is appropriate for the rule, add a new quota bucket to the package or edit an existing bucket.
| Step 1 | In the Network Traffic tab, select a package from the package tree. |
| Step 2 | In the right
(Rule) pane, click the Add Rule icon.
The Add New Rule to Package dialog box appears. |
| Step 3 | In the Service area, select a service from the Select the Service to Which the Rule Relates drop-down list. |
| Step 4 | Click the Usage
Limits tab.
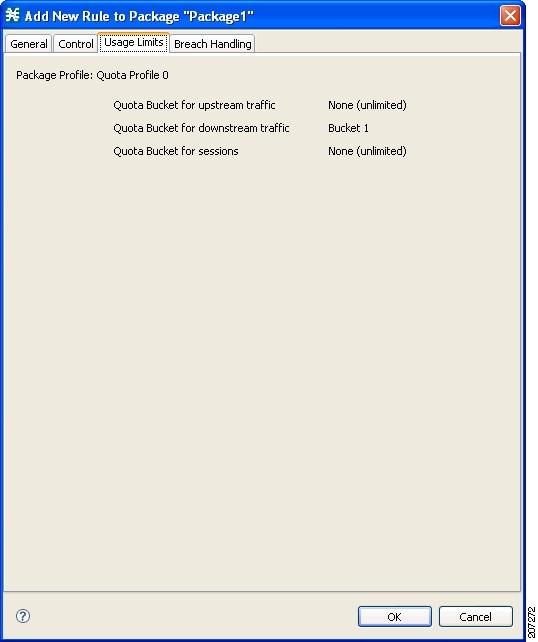 |
| Step 5 | The Usage
Limits tab displays the package profile details.
The quota bucket selected for the rule is displayed. For more information on adding services to quota profile, see Step 5 of the “How to Edit Quota Profiles” section. |
| Step 6 | Click OK .
The Edit Rule for Services dialog box closes. |
Editing Breach-Handling Parameters for a Rule
You can define the Cisco SCE platform behavior when an aggregated volume limit or the total number-of-sessions limit is exceeded. You can also notify subscribers when they exceed their quotas.
| Step 1 | In the Policies tab, select a package from the package tree. | ||||
| Step 2 | In the right (Rule) pane, select a rule. | ||||
| Step 3 | Click the
Edit
Rule icon.
The Edit Rule for Service dialog box appears. | ||||
| Step 4 | Click the Breach
Handling tab.
The
Breach Handling tab opens.
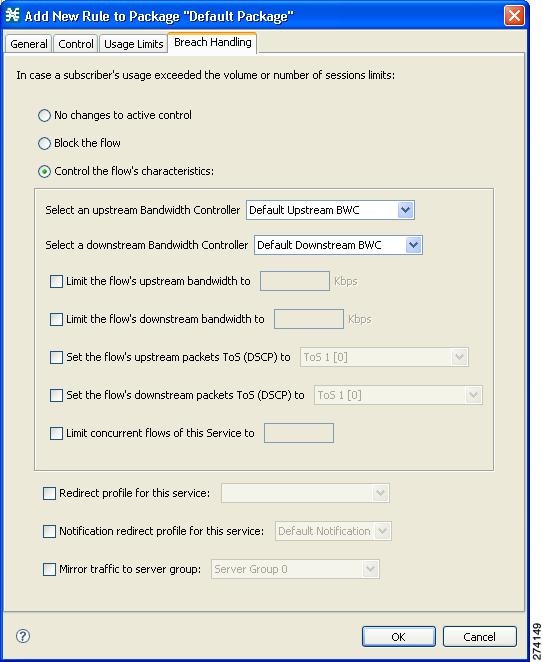 | ||||
| Step 5 | Set the behavior
of the flow when quota is breached.
| ||||
| Step 6 | To block the flow, select the Block the flow radio button. | ||||
| Step 7 | Continue at Step 10 | ||||
| Step 8 | Change the
characteristics of the flow.
| ||||
| Step 9 | (Optional)To enable subscriber redirect, check the check box, and select a redirect profile from the drop-down list. | ||||
| Step 10 | (Optional)To enable
subscriber notification, check the Notification redirect profile for this
service check box and select a notification redirect profile from the drop-down
list.
| ||||
| Step 11 | Click OK to continue. | ||||
| Step 12 | (Optional)To enable mirror
traffic to a server group, check Mirror traffic to server group and choose a
server group to send the mirror traffic to.
| ||||
| Step 13 | Click
OK.
The Edit Rule for Service dialog box closes. All changes to the rule are saved. |
Breach-Handling Parameters
The following are the configuration parameters in the Breach Handling tab of the Edit Rule for Service Settings dialog box.
- You determine what happens to flows identified as belonging to this rule when a quota is
breached:
- No changes to active control—Flows mapped to this rule are not affected when quota is breached. Cisco SCA BB can generate Quota Breach RDRs even when this option is selected (see “How to Manage Quota RDRs” section).
- Block the flow—Flows mapped to this rule are blocked when quota is breached.
Redirect to—Redirect the flow to a specified, protocol-dependent URL, where a posted web page explains the reason for the redirection. URL redirection sets are defined in the System Settings dialog box. (See “How to Add a Set of Redirection URLs” section.) Only three protocol types support redirection: HTTP, HTTP Streaming, and RTSP. Redirection is not supported when unidirectional classification is enabled.
- Control the flow characteristics—The behaviors of flows mapped to this rule change when quota is breached:
Select an upstream Bandwidth Controller—Map the traffic flow of this rule to a specific upstream BW controller (BWC). This sets up bandwidth metering of all concurrent flows mapped to this rule, based on the characteristics of the selected BWC.
Select a downstream Bandwidth Controller—The same functionality as the previous option, but for downstream flow.
Limit the flow’s upstream bandwidth—Set a per-flow upstream bandwidth limit (for flows mapped to the service of this rule).
Limit the flow’s downstream bandwidth—Set a per-flow downstream bandwidth limit.
Set the flow's upstream packets ToS—Set the DSCP ToS marker of all packets of upstream flows.
Set the flow's downstream packets ToS—Set the DSCP ToS marker of all packets of downstream flows.
Limit concurrent flows of this Service—Set the maximum number of concurrent flows (mapped to this rule) permitted to a subscriber.
- Activate a Subscriber Redirect—Activate a Subscriber Redirect when subscribers exceed their quota limit.
- Activate a Subscriber Notification—Activate a Subscriber Notification when subscribers exceed their quota limit. This notification can, for example, convey the quota breach situation to the subscriber and explain how to obtain additional quota.
Note | Subscriber notification is not supported when unidirectional classification is enabled. |
To define Subscriber Notifications, see “Managing Subscriber Notifications” section.
- Activate Traffic Mirroring—Activate traffic mirroring when subscribers exceed their quota limit
Example for Creating Tiered Subscriber Services
Tiered subscriber services can be implemented using the Cisco SCA BB Console. Because the definition of such services is open ended, this section describes how to define two of the tiers outlined in the value proposition description. The two tiers are defined as follows:
- Silver
- Weekly bandwidth limited to 4.2 GB (corresponds to a daily limit of 600 MB)
- Email and browsing services are limited to 256 kbps
- Audio and video streaming services are limited to 64 kbps
- P2P services are limited to 28 kbps
- Gold
- Weekly bandwidth limited to 5.6 GB (corresponds to a daily limit of 800 MB)
- Email and browsing services are not bandwidth limited
- Audio and video streaming services are limited to 128 kbps
- P2P services are limited to 28 kbps
The following steps are applicable to both the 'Silver' and 'Gold' packages.
| Step 1 | Create a new package as described in “How to Add Packages” section. | ||
| Step 2 | Enable periodical (internal) quota management. | ||
| Step 3 | Set the aggregation period to Daily | ||
| Step 4 | Set the quota limit to the desired value and give the quota
bucket a meaningful name
For further information, see “How to Edit Quota Management Settings for Packages” section. | ||
| Step 5 | Add the bandwidth controllers for the required services and set
the PIR to the desired rate.
For further information, see “How to Edit Package Subscriber BWCs” section . | ||
| Step 6 | Add a rule to the package for each bandwidth limited service.
For further information, see “How to Add Rules to a Package” section . | ||
| Step 7 | Configure the rule to control the characteristics of the flow
with the bandwidth controller for the relevant service.
For further information, see “How to Define Per-Flow Actions for a Rule” section . | ||
| Step 8 | Set the usage limit for the package to use the quota bucket
defined in Step 2.
For further information, see the “How to Select Quota Buckets for Rules” section section. |
Unknown Subscriber Traffic
Cisco SCE platform processes a traffic flow that does not match any filter rule (see “Filtering the Traffic Flows” section on page 10-23 ). Cisco SCE platform tries to identify the subscriber responsible for the traffic flow. The platform checks its internal database for a subscriber identified by the IP address or VLAN tag of the traffic flow. If no such subscriber exists, the traffic flow is mapped to the Unknown Subscriber Traffic category.
The Unknown Subscriber Traffic category is included in the tree in the Network Traffic tab but is not part of the package hierarchy. The Unknown Subscriber Traffic category cannot be deleted.
Note | Traffic of one unknown subscriber cannot be distinguished from traffic of other unknown subscribers. Therefore, you cannot set either per-subscriber usage limits or subscriber-level metering with subscriber BWCs. You can use subscriber BWCs only to link a selected service to a global controller. |
The Unknown Subscriber Traffic category behaves like a package with the following parameters:
- Package Name = Unknown Subscriber Traffic
- Package Index = 4999
- One package usage counter:
- Counter Name = Unknown Subscriber Traffic Counter
- Counter Index = 1023
You can:
- Edit the Unknown Subscriber Traffic package settings:
- Add extra BWCs (see “How to Edit Package Subscriber BWCs” section).
- Select a calendar (see “How to Set Advanced Package Options” section).
- Edit the default service rule for the Unknown Subscriber Traffic category:
- Change the Rule State (see “How to Edit Rules” section).
- Change per-flow actions for the rule (see “How to Define Per-Flow Actions for a Rule” section).
- Add rules to the Unknown Subscriber Traffic package:
- Add rules (see “How to Add Rules to a Package” section); edit (see “How to Edit Rules” section) and delete (see “How to Delete Rules” section) these rules.
- Add time-based rules (see “How to Add Time-Based Rules to a Rule” section); edit (see “How to Edit Time-Based Rules” section) and delete (see “How to Delete Time-Based Rules” section) these rules.
 Feedback