- About this Guide
- Cisco Service Control Overview
- Getting Started
- Using the Cisco Service Control Application Reporter
- Managing Report Instances
- Working with Reports
- The SCA Reporter Command-Line Interface
- Installing and Upgrading SCA Reporter Templates
- Troubleshooting
- SCA Reporter as a Tool in the SCA BB Console
- SCA Reporter Templates
- Introduction
- System Components
- System Requirements
- Installing the SCA Reporter in Windows
- Installing the SCA Reporter in Linux
- Starting the SCA Reporter
- Configuring the SCA Reporter
- Using Online Help
- QuickStart—Getting Started with the SCA Reporter
Getting Started
Introduction
The Cisco Service Control Application Reporter (SCA Reporter) is the Cisco Service Control Application tool that allows you to produce reports based on the traffic analysis performed by the Cisco SCE platform. The information is sent from the Cisco SCE platform and is stored in a database. The SCA Reporter can query and retrieve information from the database and present the results in a comprehensive range of reports, including global monitoring, subscriber monitoring, P2P, and traffic discovery statistics reports.
•![]() Installing the SCA Reporter in Windows
Installing the SCA Reporter in Windows
•![]() Installing the SCA Reporter in Linux
Installing the SCA Reporter in Linux
•![]() QuickStart—Getting Started with the SCA Reporter
QuickStart—Getting Started with the SCA Reporter
System Components
The SCA Reporter is a valuable tool for understanding the habits and resource consumption of the applications and subscribers that use your network. It can also be used to judge the efficacy of various rules and the possible impact of their implementation on the network.
The SCA Reporter is available only in a deployment with a database. You can generate reports using any of the following methods:
•![]() Standalone application
Standalone application
•![]() Command-line interface (CLI)—See The SCA Reporter Command-Line Interface
Command-line interface (CLI)—See The SCA Reporter Command-Line Interface
•![]() Tool of the SCA BB Console—See SCA Reporter as a Tool in the SCA BB Console
Tool of the SCA BB Console—See SCA Reporter as a Tool in the SCA BB Console
The available reports can be displayed in various chart renderings (for example, stacked-bar or area) or in tabular form. You can adjust the chart display for various presentation options (for example, 3D). You can export both tabular and chart reports to multiple file formats as well as print or send the reports through e-mail. You can also modify the reports by changing the values assigned to the properties (for example, time boundaries). You can duplicate, save, and add reports to Favorites.
You can also generate reports using the SCA Reporter command-line interface (CLI) without using the GUI.
SCA Reporter consists of visual components (known as views). The following are the views and the tasks that you can perform in each view:
•![]() Templates view—Select a report template, create a new report instance, and generate a report.
Templates view—Select a report template, create a new report instance, and generate a report.
•![]() Properties view—View properties of the object in focus and their values. The object in focus can be a template group, a report template, a report instance, or the chart display of a report. You can configure report instance and chart display properties.
Properties view—View properties of the object in focus and their values. The object in focus can be a template group, a report template, a report instance, or the chart display of a report. You can configure report instance and chart display properties.
•![]() Report view—View a graphical representation or tabular display of the data of the report. Each report is displayed in its own report view.
Report view—View a graphical representation or tabular display of the data of the report. Each report is displayed in its own report view.
•![]() Progress view—Monitor reports executed or exported. You can view progress details in this view, and also choose to generate reports in the background so that you can continue working on other reports.
Progress view—Monitor reports executed or exported. You can view progress details in this view, and also choose to generate reports in the background so that you can continue working on other reports.
•![]() Favorites view—View a list of frequently used report templates and generate a report.
Favorites view—View a list of frequently used report templates and generate a report.
•![]() Hierarchy view—View the report metrics in a hierarchical tree. You can select and deselect metrics to add and remove them from the report.
Hierarchy view—View the report metrics in a hierarchical tree. You can select and deselect metrics to add and remove them from the report.
Generating a report can be divided into five broad steps:
1. ![]() Create a report instance from the Templates view using the New Report wizard.
Create a report instance from the Templates view using the New Report wizard.
a. ![]() Configure the properties of the report instance.
Configure the properties of the report instance.
b. ![]() Execute the new report instance (optional).
Execute the new report instance (optional).
c. ![]() Add the new report instance to the favorites view (optional).
Add the new report instance to the favorites view (optional).
2. ![]() View the report in tabular or graphic form in its report view.
View the report in tabular or graphic form in its report view.
3. ![]() Select and deselect chart items in the hierarchy view to view a subset of the report data.
Select and deselect chart items in the hierarchy view to view a subset of the report data.
4. ![]() Expand and collapse chart items in the hierarchy view.
Expand and collapse chart items in the hierarchy view.
5. ![]() Adjust the chart display of the report in the Properties view.
Adjust the chart display of the report in the Properties view.
You can generate multiple reports simultaneously and later export, print or send the reports through e-mail. While the reports are executing, you can monitor them and put them in the background by using the Progress view.
System Requirements
You can install and run the SCA Reporter GUI front end and command-line application on any computer running Windows 2000, Windows XP or Windows 7.
You can install the SCA Reporter command-line application for Linux on any computer running Red Hat Enterprise Linux 4 or 5.
The computer should have a minimum of 512 MB of memory; 1024 MB of memory is highly recommended.
Minimum screen resolution is 1024 by 768 pixels.
Installing the SCA Reporter in Windows
•![]() Installing the SCA Reporter in Windows
Installing the SCA Reporter in Windows
•![]() Uninstalling the SCA Reporter in Windows
Uninstalling the SCA Reporter in Windows
Installing the SCA Reporter in Windows
Step 1 ![]() Navigate to the SCA Reporter installation file, SCA Reporter 4.0.x Setup.exe, and double-click it.
Navigate to the SCA Reporter installation file, SCA Reporter 4.0.x Setup.exe, and double-click it.
The Welcome to the SCA Reporter 4.0.x Setup wizard window appears.
Step 2 ![]() Click Next. The Choose Install Location window of the SCA Reporter 4.0.x Setup wizard appears.
Click Next. The Choose Install Location window of the SCA Reporter 4.0.x Setup wizard appears.
Step 3 ![]() (Optional) To install it on a different directory, click Browse.
(Optional) To install it on a different directory, click Browse.
Step 4 ![]() Click Next. The Choose Start Menu Folder window of the SCA Reporter 4.0.x Setup wizard appears.
Click Next. The Choose Start Menu Folder window of the SCA Reporter 4.0.x Setup wizard appears.
Step 5 ![]() (Optional) To install it on a different location, enter a different Start Menu folder in the Start Menu Folder field.
(Optional) To install it on a different location, enter a different Start Menu folder in the Start Menu Folder field.
Step 6 ![]() Click Install. The Installing window of the SCA Reporter 4.0.x Setup wizard appears.
Click Install. The Installing window of the SCA Reporter 4.0.x Setup wizard appears.
Step 7 ![]() Wait until installation is complete. The Completing the SCA Reporter 4.0.x Setup wizard window appears.
Wait until installation is complete. The Completing the SCA Reporter 4.0.x Setup wizard window appears.
Step 8 ![]() Click Finish. The SCA Reporter 4.0.x Setup wizard closes. The SCA Reporter is now installed on the machine.
Click Finish. The SCA Reporter 4.0.x Setup wizard closes. The SCA Reporter is now installed on the machine.
Uninstalling the SCA Reporter in Windows
Step 1 ![]() Choose Start > All Programs > Cisco SCA > SCA Reporter 4.0.x > Uninstall. The Welcome to the SCA Reporter 4.0.x Uninstall wizard appears.
Choose Start > All Programs > Cisco SCA > SCA Reporter 4.0.x > Uninstall. The Welcome to the SCA Reporter 4.0.x Uninstall wizard appears.
Step 2 ![]() Click Next. The Uninstall SCA Reporter 4.0.x window appears.
Click Next. The Uninstall SCA Reporter 4.0.x window appears.
Step 3 ![]() Click Uninstall. The Uninstalling window appears.
Click Uninstall. The Uninstalling window appears.
Step 4 ![]() Wait until uninstallation is complete. The Completing the SCA Reporter 4.0.x Uninstall wizard window appears.
Wait until uninstallation is complete. The Completing the SCA Reporter 4.0.x Uninstall wizard window appears.
Step 5 ![]() Click Finish. The SCA Reporter is uninstalled from the machine.
Click Finish. The SCA Reporter is uninstalled from the machine.
Installing the SCA Reporter in Linux
You can install the SCA Reporter in Linux, and then run it from the command line (see The SCA Reporter Command-Line Interface).
•![]() Installing the SCA Reporter in Linux
Installing the SCA Reporter in Linux
•![]() Uninstalling the SCA Reporter in Linux
Uninstalling the SCA Reporter in Linux
Installing the SCA Reporter in Linux
Step 1 ![]() Download the SCA BB installation package (reporter-cmd-linux.tgz) from the CCO.
Download the SCA BB installation package (reporter-cmd-linux.tgz) from the CCO.
Step 2 ![]() Open the installation package in a selected directory, using the tar xpzf reporter-cmd-linux-4.0.x.tgz command.
Open the installation package in a selected directory, using the tar xpzf reporter-cmd-linux-4.0.x.tgz command.
Step 3 ![]() Run the reportercmd.sh -setup command from the installation directory.
Run the reportercmd.sh -setup command from the installation directory.
Uninstalling the SCA Reporter in Linux
Delete the installation directory.
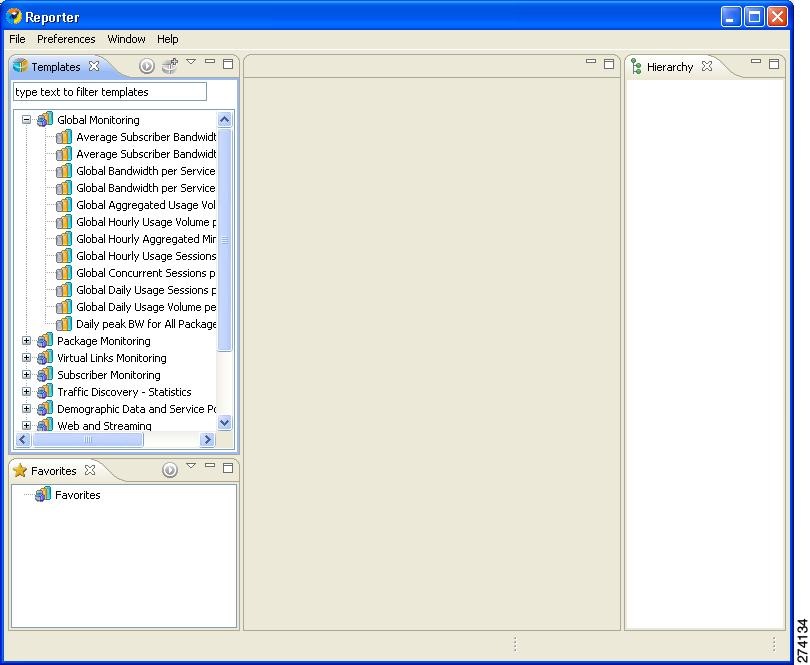
Starting the SCA Reporter
Access the SCA Reporter from the Start menu.
Step 1 ![]() Choose Start > All Programs > Cisco SCA > SCA Reporter 4.0.x > SCA Reporter 4.0.x.
Choose Start > All Programs > Cisco SCA > SCA Reporter 4.0.x > SCA Reporter 4.0.x.
The Cisco Service Control SCA Reporter splash window appears. After the SCA Reporter loads, the main window of the SCA Reporter appears, displaying the Welcome view.
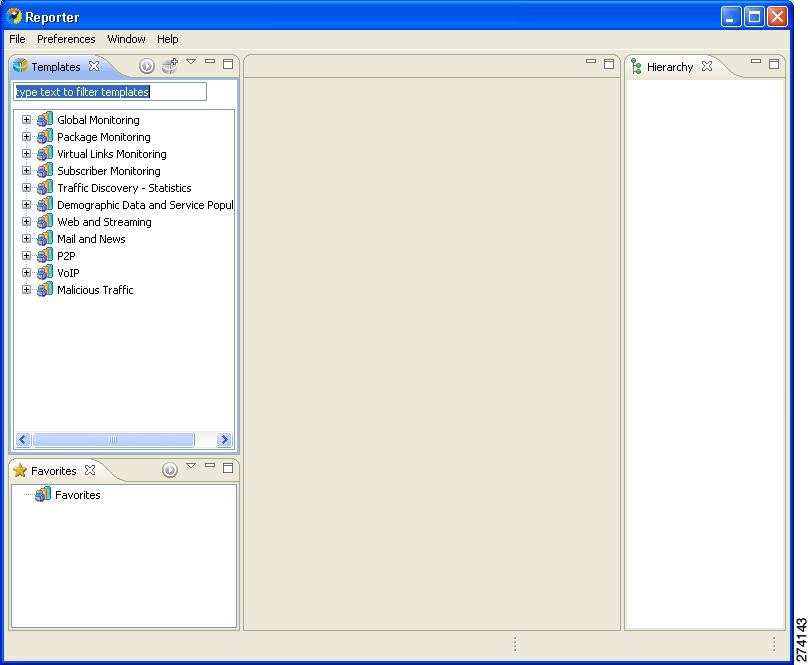
Step 2 ![]() Close the Welcome pane. The Templates pane appears, see Figure 2-1.
Close the Welcome pane. The Templates pane appears, see Figure 2-1.
Figure 2-1 Templates
T
Configuring the SCA Reporter
To configure the SCA reporter, create a basic configuration for the SCA reporter. This procedure includes selecting a database type, connecting to a database, activating the database, and setting the IP address of the Cisco SCE platform whose service configuration data is to be used.
In bundled mode, the Cisco Service Control Collection Manager (CM) is used with the Sybase Adaptive Server Enterprise (Sybase ASE). The Sybase data management platform supports transaction-intensive enterprise applications. It enables you to store and retrieve information online and can warehouse information as needed. (For more information, see Cisco Service Control Management Suite Collection Manager User Guide.) The CM can also be configured to work with Oracle and MySQL databases.
After a database is activated, select the IP address of one of the Cisco SCE platforms in tThe database. The choice is made for each repository, represented by a tab in the Preferences (Filtered) window. The service configuration applied to the configured Cisco SCE platform determines all options offered in the Templates view of the SCA Reporter (available packages, services). Each report is generated according to the Cisco SCE device to which it is configured. In the example configuration, there is one Cisco SCE device connected to the database and one repository preference.
•![]() Managing Database Connections
Managing Database Connections
•![]() Setting the IP Address of Cisco SCE Platform
Setting the IP Address of Cisco SCE Platform
•![]() Configuring the Legend in Charts
Configuring the Legend in Charts
•![]() Configuring Advanced Options for the SCA Reporter
Configuring Advanced Options for the SCA Reporter
Managing Database Connections
To use the SCA Reporter, you must create and activate a connection to a database containing data generated from Cisco SCE platform.
You can add connections to a number of databases, and then change the active database as required.
•![]() Activating Database Connections
Activating Database Connections
Adding a Database Connection
A database connection can be added using the Add Database wizard.
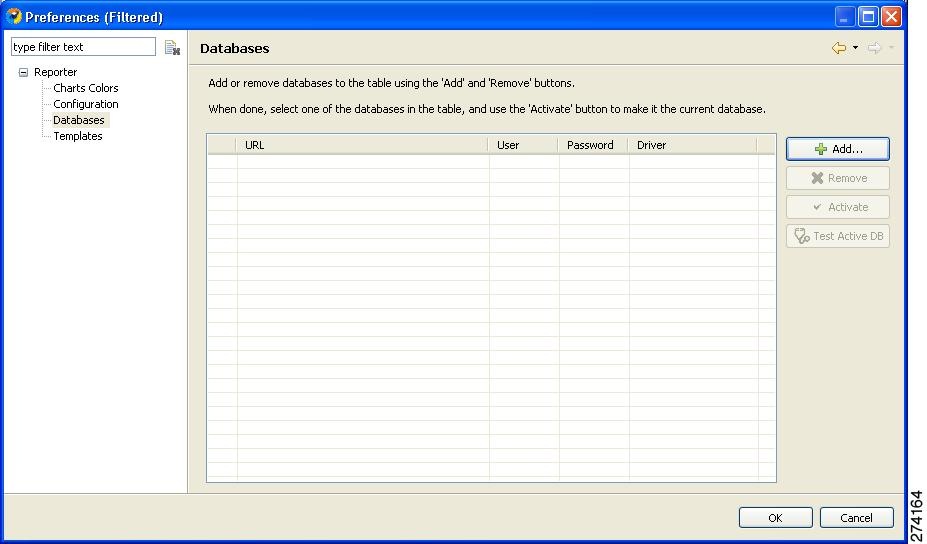
Step 1 ![]() At the Main menu, choose Preferences (Filtered) > Reporter. The Preferences (Filtered) window appears, see Figure 2-2.
At the Main menu, choose Preferences (Filtered) > Reporter. The Preferences (Filtered) window appears, see Figure 2-2.
Step 2 ![]() From the Reporter tree, choose Reporter > Databases.
From the Reporter tree, choose Reporter > Databases.
Figure 2-2 Preferences (Filtered) (Databases)
Step 3 ![]() In the Databases pane, click Add. The Add Database wizard window appears, see Figure 2-3.
In the Databases pane, click Add. The Add Database wizard window appears, see Figure 2-3.
Figure 2-3 Add Database Wizard
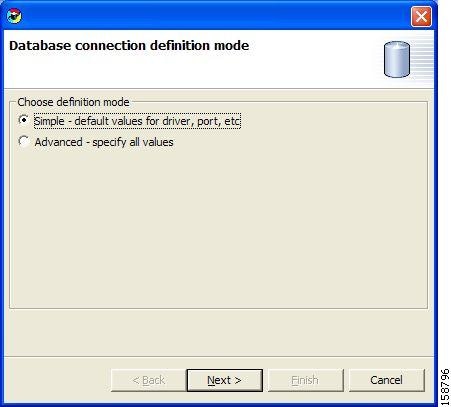
Step 4 ![]() Select one of the Choose definition mode radio buttons.
Select one of the Choose definition mode radio buttons.
•![]() Simple
Simple
•![]() Advanced
Advanced
Step 5 ![]() Click Next.
Click Next.
The Define new database connection window appears. The display depends upon the definition mode selected in Step 4:
•![]() If you selected Simple definition mode, the display of the Define new database connection window is as shown in Figure 2-4
If you selected Simple definition mode, the display of the Define new database connection window is as shown in Figure 2-4
Figure 2-4 Define New Database Connection

•![]() If you selected Advanced definition mode, the display of the Define new database connection window is as shown in Figure 2-5
If you selected Advanced definition mode, the display of the Define new database connection window is as shown in Figure 2-5
Figure 2-5 Advanced Definition
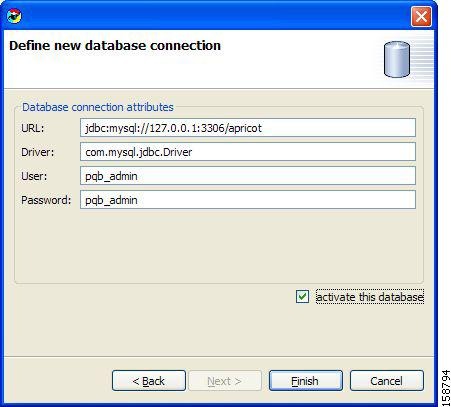
Step 6 ![]() Enter the required details to fill in all fields.
Enter the required details to fill in all fields.
Step 7 ![]() (Optional) Check the Activate this database check box.
(Optional) Check the Activate this database check box.
Step 8 ![]() Click Finish. The Add Database wizard closes.
Click Finish. The Add Database wizard closes.
The definition of the database is added to the list in the Preferences (Filtered) window, see Figure 2-6.
Figure 2-6 Preferences (Filtered)—Databases
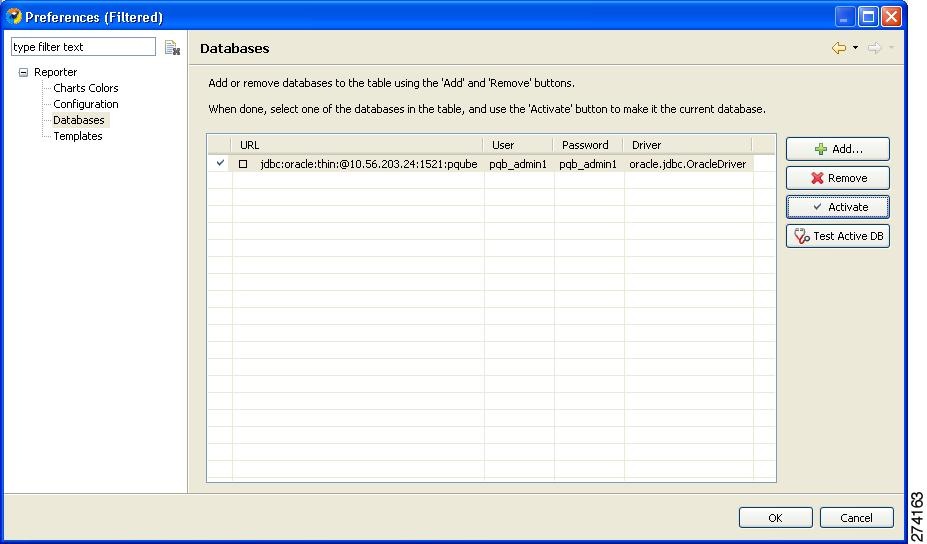
Step 9 ![]() Click Test Active DB.
Click Test Active DB.
The database connection is tested.
•![]() If successful, the following message appears: Click OK.
If successful, the following message appears: Click OK.
•![]() If unsuccessful, reconfigure the database connection.
If unsuccessful, reconfigure the database connection.
Step 10 ![]() Click OK. The Preferences (Filtered) window closes.
Click OK. The Preferences (Filtered) window closes.
Activating Database Connections
Step 1 ![]() At the main menu, choose Preferences (Filtered) > Reporter. The Preferences (Filtered) window appears.
At the main menu, choose Preferences (Filtered) > Reporter. The Preferences (Filtered) window appears.
Step 2 ![]() From the Reporter tree, choose Reporter > Databases. All defined database connections are listed in the table.
From the Reporter tree, choose Reporter > Databases. All defined database connections are listed in the table.
A check mark ( ) indiates the currently active database (if any).
Step 3 ![]() Choose the database connection you wish to activate.
Choose the database connection you wish to activate.
Step 4 ![]() Click Activate.
Click Activate.
Step 5 ![]() Click OK. The database is activated.
Click OK. The database is activated.
The first IP address listed for policy data is selected as the IP address of the Cisco SCE platform whose service configuration data is to be used in reports. The Preferences (Filtered) window closes.
Setting the IP Address of Cisco SCE Platform
The IP address is set automatically to the first entry of the IP list, when the database is activated. To change the IP address, use this procedure.

Note ![]() The Preferences (Filtered) window contains one tab for each repository (set of templates) available in the Reporter. In each template, you choose one Cisco SCE platform. If there is more than one repository, more than one set of template groups in the Templates view exists.
The Preferences (Filtered) window contains one tab for each repository (set of templates) available in the Reporter. In each template, you choose one Cisco SCE platform. If there is more than one repository, more than one set of template groups in the Templates view exists.
Step 1 ![]() At the main menu, choose Preferences (Filtered) > Reporter. The Preferences (Filtered) window appears, see Figure 2-7.
At the main menu, choose Preferences (Filtered) > Reporter. The Preferences (Filtered) window appears, see Figure 2-7.
Step 2 ![]() In the Reporter tree, select Reporter > Templates.
In the Reporter tree, select Reporter > Templates.
Figure 2-7 Preferences (Filtered)—Templates
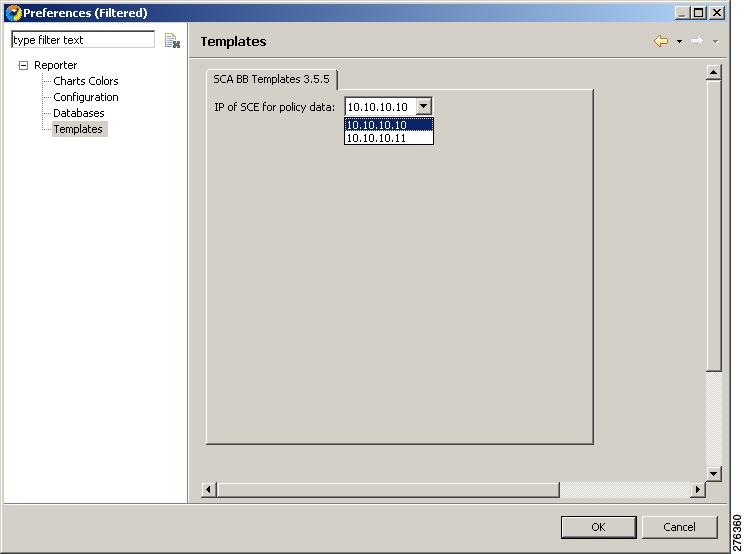
Step 3 ![]() In the Templates pane, from the IP of Cisco SCE for policy data drop-down list, choose the IP address of the Cisco SCE platform whose service configuration data is to be used in reports. This IP address is added to the SCA Reporter templates repository.
In the Templates pane, from the IP of Cisco SCE for policy data drop-down list, choose the IP address of the Cisco SCE platform whose service configuration data is to be used in reports. This IP address is added to the SCA Reporter templates repository.
Step 4 ![]() Click Apply. The IP address of the Cisco SCE platform is set for service configuration data.
Click Apply. The IP address of the Cisco SCE platform is set for service configuration data.
Note ![]() Before you close the dialog box, you must click Apply.
Before you close the dialog box, you must click Apply.
Step 5 ![]() Click OK. The Preferences (Filtered) window closes.
Click OK. The Preferences (Filtered) window closes.
Setting Chart Colors
Instead of using the default color set for charts that is installed as part of the Reporter installation (the predefined colors are packaged within the SCA BB Templates package), you can define your own color sets.
This feature allows you to ensure color persistence between different sessions of the Reporter, including:
•![]() Different sessions of the same Reporter installation
Different sessions of the same Reporter installation
•![]() Different Reporter installations using data from the same Cisco SCE platform, by exporting and importing color files
Different Reporter installations using data from the same Cisco SCE platform, by exporting and importing color files
•![]() Different Reporters using data from different Cisco SCE platforms
Different Reporters using data from different Cisco SCE platforms
•![]() Different versions of the Reporter
Different versions of the Reporter
For information on Color Sets and changing legend item color, see Using Color Sets and Changing a Single Legend Item Color.
Using Color Sets
Each line of a color set file defines the color of one legend item. It is recommended that you avoid editing the color set file manually.
Step 1 ![]() At the Main menu, choose Preferences (Filtered)> Reporter. The Preferences (Filtered) dialog box appears.
At the Main menu, choose Preferences (Filtered)> Reporter. The Preferences (Filtered) dialog box appears.
Step 2 ![]() In the Reporter tree, choose Reporter > Charts Colors. The Charts Colors pane appears, see Figure 2-8.
In the Reporter tree, choose Reporter > Charts Colors. The Charts Colors pane appears, see Figure 2-8.
Figure 2-8 Chart Colors Preference
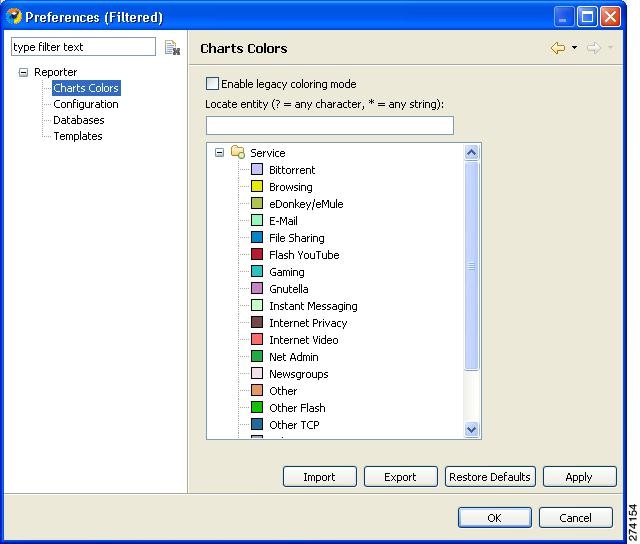
Step 3 ![]() Select an action to perform:
Select an action to perform:
•![]() To import a color set from a file, click Import.
To import a color set from a file, click Import.
An Open dialog box appears. Browse to the required file and click Open. The file is imported and overwrites the existing color set.
•![]() To export the current color set to a file, click Export.
To export the current color set to a file, click Export.
A Save As dialog box appears. Browse to the required directory, enter a file name in the File name field, and click Save. The color set is exported.
•![]() To Restore the default color set (the predefined colors delivered with the SCA BB Templates package), click Restore Defaults.
To Restore the default color set (the predefined colors delivered with the SCA BB Templates package), click Restore Defaults.
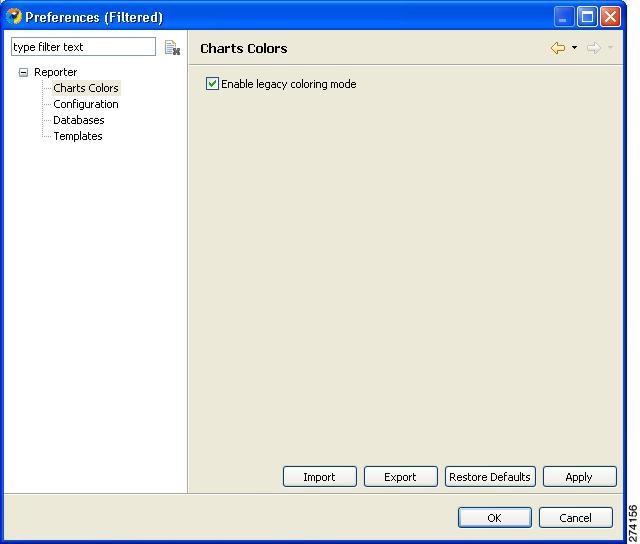
•![]() To enable the color allocation method used before release 3.5.0, check the Enable legacy coloring mode check box, see Figure 2-9.
To enable the color allocation method used before release 3.5.0, check the Enable legacy coloring mode check box, see Figure 2-9.
Figure 2-9 Chart Colors - Enable Legacy Coloring Mode
Note ![]() Before applying Import, Restore Defaults, or Enable legacy color mode, a Confirm discarding color settings dialog box appears, see Figure 2-10.
Before applying Import, Restore Defaults, or Enable legacy color mode, a Confirm discarding color settings dialog box appears, see Figure 2-10.
Figure 2-10 Confirm Discarding Color Settings

Step 4 ![]() Click OK. The Preferences (Filtered) window closes.
Click OK. The Preferences (Filtered) window closes.
Changing a Single Legend Item Color
Step 1 ![]() At the Main menu, choose Preferences (Filtered) > Reporter. The Preferences (Filtered) window appears.
At the Main menu, choose Preferences (Filtered) > Reporter. The Preferences (Filtered) window appears.
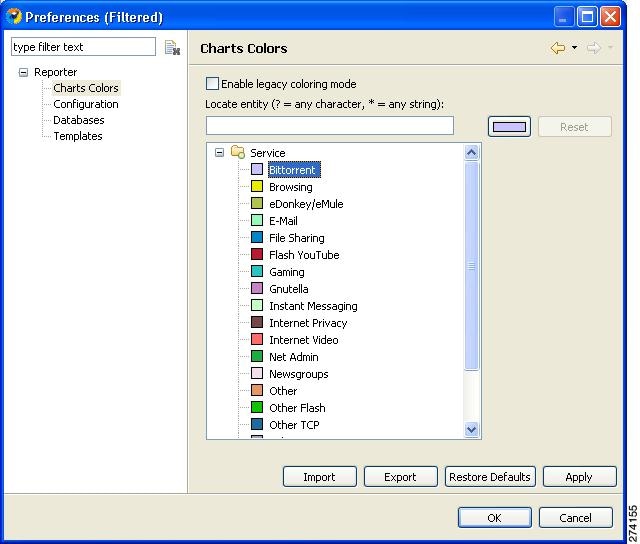
Step 2 ![]() In the Reporter tree, choose Reporter > Charts Colors. The Charts Colors preference pane appears.
In the Reporter tree, choose Reporter > Charts Colors. The Charts Colors preference pane appears.
Step 3 ![]() Select a legend item (in the following window, a service) from the color tree.
Select a legend item (in the following window, a service) from the color tree.
The current color of the legend item appears in the upper right corner of the Charts Colors pane, see Figure 2-11.
Figure 2-11 Current Color
Note ![]() Possible categories of legend items are Direction, Hostname, Host IP, Protocol, MOS, Range, Codec, Port Number, Newsgroup, Protocol, Service, Measure, and Subscriber.
Possible categories of legend items are Direction, Hostname, Host IP, Protocol, MOS, Range, Codec, Port Number, Newsgroup, Protocol, Service, Measure, and Subscriber.
Categories and legend items are only displayed in the Charts Colors pane after colors are allocated to legend items. Colors are allocated to any legend items in the chart the first time a report instance is executed.
Step 4 ![]() Click the color. A color palette window appears, see Figure 2-12.
Click the color. A color palette window appears, see Figure 2-12.
Figure 2-12 Color Palette
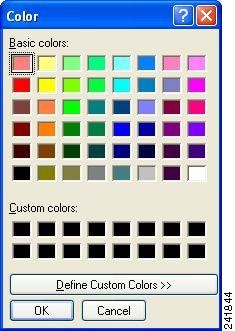
Step 5 ![]() Select a new color for the legend item and click OK.
Select a new color for the legend item and click OK.
The Color window closes. The selected color is applied to the legend item, see Figure 2-13.
The Reset button is enabled.
Figure 2-13 Selected Color Applied
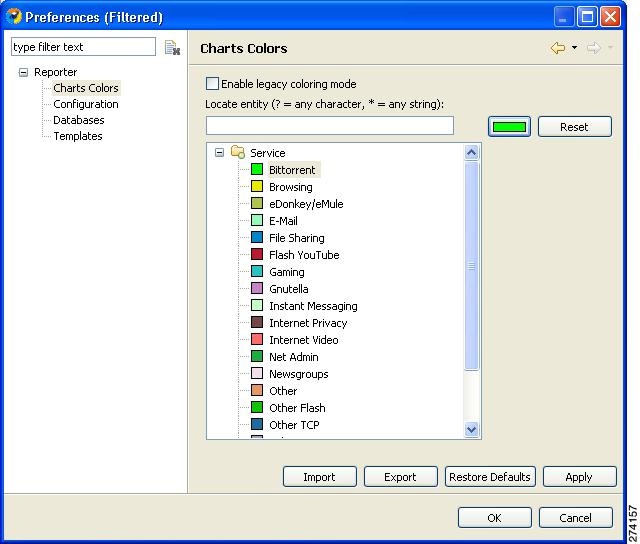
Note ![]() The Reset button restores the default color of a single selected legend item.
The Reset button restores the default color of a single selected legend item.
Configuring the Legend in Charts
You can globally configure the appearance of the legend in charts.
Step 1 ![]() At the Main menu, choose Preferences (Filtered) > Reporter. The Preferences (Filtered) window appears, see Figure 2-14.
At the Main menu, choose Preferences (Filtered) > Reporter. The Preferences (Filtered) window appears, see Figure 2-14.
Step 2 ![]() In the Reporter tree, select Reporter > Configuration.
In the Reporter tree, select Reporter > Configuration.
Figure 2-14 Preferences (Filtered)—Configuration
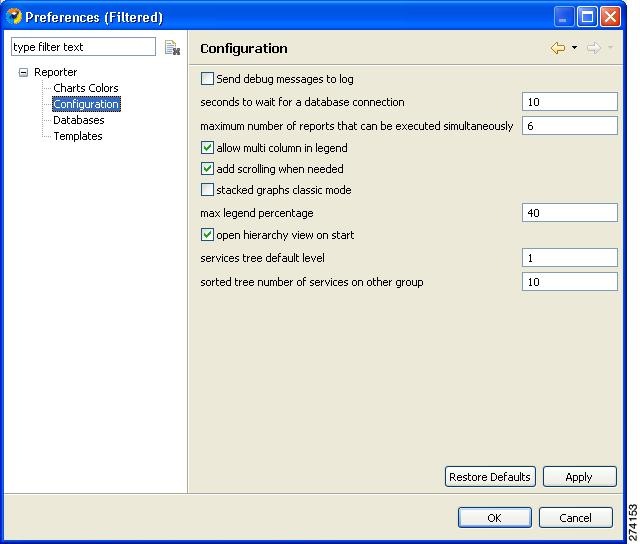
Step 3 ![]() (Optional) Uncheck the Show item check box in legend check box.
(Optional) Uncheck the Show item check box in legend check box.
Step 4 ![]() (Optional) Uncheck the Allow multi column in legend check box.
(Optional) Uncheck the Allow multi column in legend check box.
Step 5 ![]() (Optional) In the Max legend percentage field, enter a new value.
(Optional) In the Max legend percentage field, enter a new value.
Step 6 ![]() Click OK. The new settings are saved. The Preferences (Filtered) window closes.
Click OK. The new settings are saved. The Preferences (Filtered) window closes.
Configuring Hierarchy View
To configure several attributes of the Hierarchy view:
Step 1 ![]() At the Main menu, choose Preferences (Filtered) > Reporter. The Preferences (Filtered) window appears, see Figure 2-15.
At the Main menu, choose Preferences (Filtered) > Reporter. The Preferences (Filtered) window appears, see Figure 2-15.
Step 2 ![]() In the Reporter tree, select Reporter > Configuration.
In the Reporter tree, select Reporter > Configuration.
Figure 2-15 Preferences (Filtered)—Configuration

Step 3 ![]() (Optional) Check open hierarchy view on start.
(Optional) Check open hierarchy view on start.
Step 4 ![]() (Optional) In the services tree default level field, enter a new value.
(Optional) In the services tree default level field, enter a new value.
Step 5 ![]() (Optional) In the sorted tree number of services on other group field, enter a new value indicating the number of services to include in the Other group of the hierarchy.
(Optional) In the sorted tree number of services on other group field, enter a new value indicating the number of services to include in the Other group of the hierarchy.
Step 6 ![]() Click OK. The new settings are saved.
Click OK. The new settings are saved.
The Preferences (Filtered) window closes.
Configuring Advanced Options for the SCA Reporter
You can configure the following advanced options of the SCA reporter:
•![]() Logging debug messages
Logging debug messages
•![]() Length of time to wait for a database connection
Length of time to wait for a database connection
•![]() Maximum number of report instances that can be executed simultaneously
Maximum number of report instances that can be executed simultaneously
Step 1 ![]() At the Main menu, choose Preferences (Filtered) > Reporter. The Preferences (Filtered) window appears, see Figure 2-16.
At the Main menu, choose Preferences (Filtered) > Reporter. The Preferences (Filtered) window appears, see Figure 2-16.
Step 2 ![]() In the Reporter tree, choose Reporter > Configuration.
In the Reporter tree, choose Reporter > Configuration.
Figure 2-16 Preferences (Filtered)—Configuration
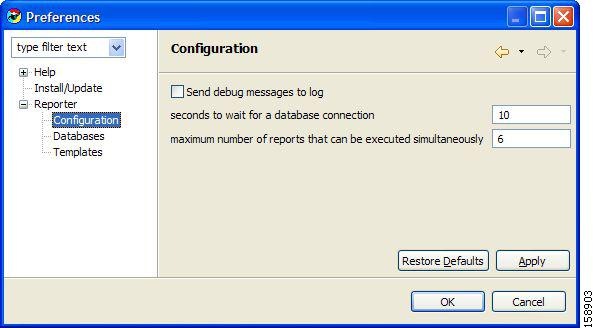
Step 3 ![]() To log debug messages, check the Send debug messages to log check box.
To log debug messages, check the Send debug messages to log check box.
Logging debug messages can cause the log file to grow rapidly.
Step 4 ![]() Enter a new value in the seconds to wait for a database connection field.
Enter a new value in the seconds to wait for a database connection field.
Step 5 ![]() Enter a new value in the maximum number of reports that can be executed simultaneously field.
Enter a new value in the maximum number of reports that can be executed simultaneously field.
Step 6 ![]() Click OK. The new settings are saved. The Preferences (Filtered) window closes.
Click OK. The new settings are saved. The Preferences (Filtered) window closes.
Using Online Help
Accessing Online Help
To access parts of this user guide from the SCA reporter:
Step 1 ![]() From the Help menu, choose Help Contents. Online help appears in a separate window. For more information, see "Using Online Help Search" section.
From the Help menu, choose Help Contents. Online help appears in a separate window. For more information, see "Using Online Help Search" section.
Using Online Help Search
You can also search online help from inside the SCA Reporter.
Step 1 ![]() From the Help menu, choose Search. The Help view appears in the Reporter window (Figure 2-17).
From the Help menu, choose Search. The Help view appears in the Reporter window (Figure 2-17).
Figure 2-17 Reporter Help

Step 2 ![]() Enter a word, phrase, or expression in the Search expression field.
Enter a word, phrase, or expression in the Search expression field.
The Go button is enabled.
Note ![]() Click >> (Expand) for an explanation of how to construct search expressions.
Click >> (Expand) for an explanation of how to construct search expressions.
Step 3 ![]() Click Go. Help topics containing your search expression appear under Local Help.
Click Go. Help topics containing your search expression appear under Local Help.
Step 4 ![]() To view its contents, click a help topic.
To view its contents, click a help topic.
Note ![]() You can bookmark topics for later reference.
You can bookmark topics for later reference.
Step 5 ![]() By clicking the appropriate link at the bottom of the Help view, you can switch to:
By clicking the appropriate link at the bottom of the Help view, you can switch to:
•![]() All topics
All topics
•![]() Related topics
Related topics
•![]() Bookmarks
Bookmarks
QuickStart—Getting Started with the SCA Reporter
This QuickStart section helps you get started with the SCA Reporter. You can configure the Reporter, create a report instance and generate a report, and then work with the report.
Creating a First Report
Step 1 ![]() Launch the SCA Reporter (choose Start > All Programs > Cisco SCA > SCA Reporter 4.0.x > SCA Reporter 4.0.x) (Figure 2-18).
Launch the SCA Reporter (choose Start > All Programs > Cisco SCA > SCA Reporter 4.0.x > SCA Reporter 4.0.x) (Figure 2-18).
Figure 2-18 Reporter
Step 2 ![]() Add, configure, and activate a database connection (see Managing Database Connections).
Add, configure, and activate a database connection (see Managing Database Connections).
Step 3 ![]() Confirm that there is an active database and that the system is configured correctly.
Confirm that there is an active database and that the system is configured correctly.
a. ![]() At the Main menu, choose Preferences (Filtered) > Reporter. The Preferences (Filtered) window appears.
At the Main menu, choose Preferences (Filtered) > Reporter. The Preferences (Filtered) window appears.
b. ![]() In the Reporter tree, choose Reporter > Databases.
In the Reporter tree, choose Reporter > Databases.
c. ![]() In the Databases pane, click Test Active DB.
In the Databases pane, click Test Active DB.
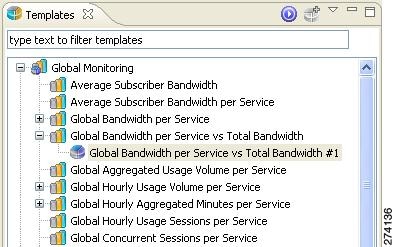
Step 4 ![]() In the Templates view, expand the node of one of the template groups, see Figure 2-19.
In the Templates view, expand the node of one of the template groups, see Figure 2-19.
Figure 2-19 Templates
Step 5 ![]() Do one of the following:
Do one of the following:
•![]() Double-click a report template
Double-click a report template
•![]() Right-click a report template.
Right-click a report template.
A report template popup menu appears, see Figure 2-20.
Figure 2-20 Templates Popup Menu
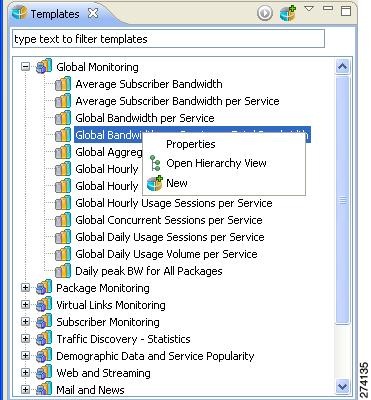
Step 6 ![]() From the menu, select New. The New Report wizard appears, see Figure 2-21.
From the menu, select New. The New Report wizard appears, see Figure 2-21.
Figure 2-21 New Report Wizard

The report instance has the same name as the report template with the addition of "#1". You can optionally rename the report instance by entering a name in the Report name field.
Step 7 ![]() Configure the report instance properties
Configure the report instance properties
If any property has the value ![]() (not set), you must assign a value to it.
(not set), you must assign a value to it.
Step 8 ![]() Click Next (Figure 2-22).
Click Next (Figure 2-22).
Figure 2-22 Select Report Actions
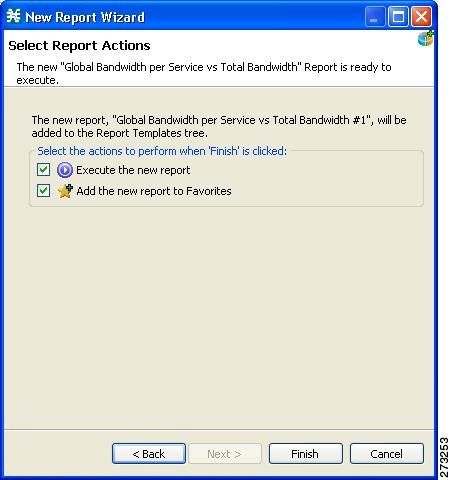
Step 9 ![]() Click Finish.
Click Finish.
A report instance is added below the report template, see Figure 2-23.
Figure 2-23 Report Instance Added
The report instance appears in the Favorites view, see Figure 2-24.
Figure 2-24 Favorites

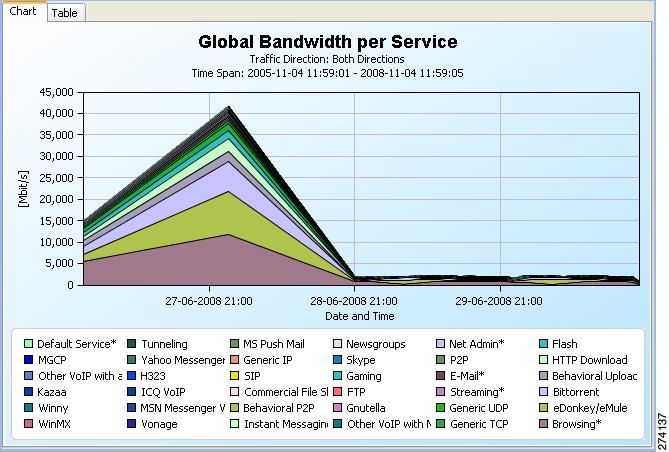
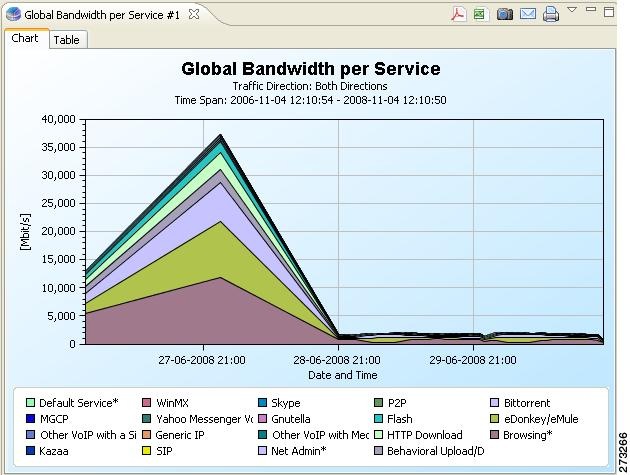
A report view, with the name of the report instance, appears in the top right of the SCA Reporter window, displaying a chart of the report, see Figure 2-25.
Figure 2-25 Report
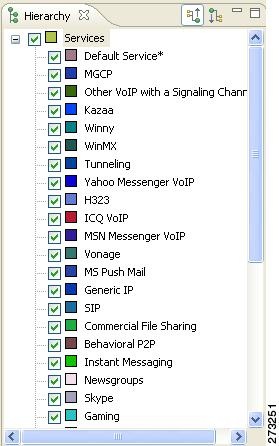
All the services included in the report are included in the Hierarchy view, see Figure 2-26.
Figure 2-26 Hierarchy
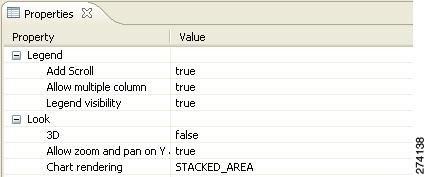
Step 10 ![]() View your report. The chart display properties are shown in the Properties view, see Figure 2-27.
View your report. The chart display properties are shown in the Properties view, see Figure 2-27.
Figure 2-27 Properties
Working with a First Report
Step 1 ![]() Create a report, as described in the previous procedure.
Create a report, as described in the previous procedure.
Step 2 ![]() Adjust the chart display by modifying the chart display properties in the Properties view. (See Adjusting the Chart Display.)
Adjust the chart display by modifying the chart display properties in the Properties view. (See Adjusting the Chart Display.)
Step 3 ![]() In the Hierarchy view, uncheck several chart items. The modified report appears in the report view, see Figure 2-28.
In the Hierarchy view, uncheck several chart items. The modified report appears in the report view, see Figure 2-28.
Step 4 ![]() In the report view, from the drop-down menu above the view, choose Go To Report.
In the report view, from the drop-down menu above the view, choose Go To Report.
Figure 2-28 Modified Report
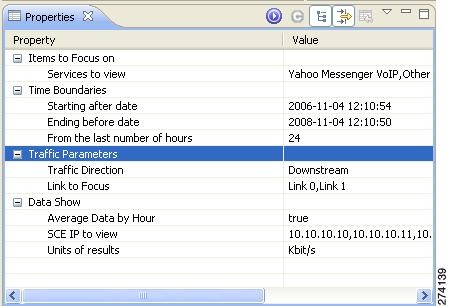
The Properties view displays the report instance properties.
Step 5 ![]() Display all the report instance properties by clicking
Display all the report instance properties by clicking  (Show Advanced Properties) (Figure 2-29).
Figure 2-29 Report Properties
Step 6 ![]() Modify one or more properties. (See Modifying Existing Report Instances.)
Modify one or more properties. (See Modifying Existing Report Instances.)
Step 7 ![]() Click
Click  (Execute) to regenerate the report.
The modified report is displayed in the report view, see Figure 2-30.
Figure 2-30 Modified Report
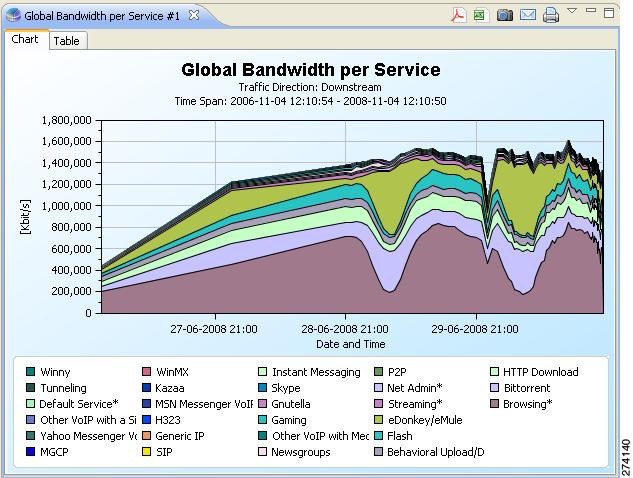
(In the illustrated example (Figure 2-30), the Traffic Direction and Units of results properties were modified).
 Feedback