-
null
- About Application Acceleration
- Enabling and Disabling the Global Optimization Features
- Configuring Individual Features and Application Accelerators
- Configuring DRE Settings
- Configuring HTTP Acceleration
- Configuring MAPI Acceleration
- Configuring Encrypted MAPI Acceleration
- MAPI Operating Considerations
- Terms Used with Microsoft Active Directory
- Work flow for Configuring Encrypted MAPI
- Configuring Encrypted MAPI Settings
- Configuring a Machine Account Identity
- Creating and Configuring a User Account
- Configuring Microsoft Active Directory
- Managing Domain Identities and Encrypted MAPI State
- Cisco WAAS MAPI RPC over HTTP(S)
- Configuring SMB Acceleration
- Configuring ICA Acceleration
- Configuring SSL Acceleration
- Prerequisites for Configuring SSL Acceleration
- Configuring SSL Global Settings
- Configuring a Service Certificate and Private Key
- Working with Cipher Lists
- Working with Certificate Authorities
- Configuring SSL Management Services
- Configuring SSL Peering Service
- Using SSL Accelerated Services
- Updating a Certificate/Key in a SSL Accelerated Service
- Configuring SSL Acceleration for SaaS Applications
- Determining Server Domains Used by SaaS Applications
- Configuring SMART-SSL Accelerator
- office365 optimization using Azure vWAAS
- Cisco Support for Microsoft Windows Update
- Modifying the Accelerator Load Indicator and CPU Load-Monitoring Threshold
- Viewing a List of Applications
- Viewing a Policy Report
- Viewing a Class Map Report
- Restoring Optimization Policies and Class Maps
- Monitoring Applications and Class Maps
- Defining Default DSCP Marking Values
- Modifying the Position of an Optimization Policy
- Modifying the Acceleration TCP Settings
Configuring Application Acceleration
This chapter describes how to configure the optimization policies, which determine the types of application traffic that is accelerated over your WAN on your WAAS system.

Note![]() Throughout this chapter, the term Cisco WAAS device is used to refer collectively to the Cisco Wide Area Application Services (Cisco WAAS) Central Managers and Cisco Wide Area Application Engines (WAEs) in your network. The term WAE refers to WAE and Cisco Wide Area Virtualization Engine (WAVE) appliances, and Cisco Virtual WAAS (vWAAS) instances.
Throughout this chapter, the term Cisco WAAS device is used to refer collectively to the Cisco Wide Area Application Services (Cisco WAAS) Central Managers and Cisco Wide Area Application Engines (WAEs) in your network. The term WAE refers to WAE and Cisco Wide Area Virtualization Engine (WAVE) appliances, and Cisco Virtual WAAS (vWAAS) instances.
About Application Acceleration
The Cisco WAAS software comes with over 150 predefined optimization policies that determine the type of application traffic your WAAS system optimizes and accelerates. These predefined policies cover the most common type of application traffic on your network. For a list of the predefined policies, see Appendix A, “Predefined Optimization Policy.”
Each optimization policy contains the following elements:
- Application definition—Identifies general information about a specific application, such as the application name and whether the WAAS Central Manager collects statistics about this application.
- Class map—Contains a matching condition that identifies specific types of traffic. For example, the default HTTP class map matches all the traffic going to ports 80, 8080, 8000, 8001, and 3128. You can create up to 512 class maps and 800 matching conditions.
- Policy—Combines the application definition and class map into a single policy. This policy also determines the optimization and acceleration features, if any, that a WAAS device applies to the defined traffic. You can create up to 512 policies. A policy can also contain a differentiated services code point (DSCP) marking value that is applied to the traffic and that overrides a DSCP value set at the application or global level.
You can use the WAAS Central Manager GUI to modify the predefined policies and to create additional policies for other applications. For more information on creating optimization policies, see Creating a New Traffic Optimization Policy. For more information on viewing reports, restoring policies, monitoring applications, and other functions, see Managing Application Acceleration.
Note![]() All application definitions configured in the WAAS Central Manager are globally applied to all the WAAS devices that register with the WAAS Central Manager, regardless of the device group membership configuration.
All application definitions configured in the WAAS Central Manager are globally applied to all the WAAS devices that register with the WAAS Central Manager, regardless of the device group membership configuration.
WAAS policies can apply two kinds of optimizations to matched traffic:
- Layer 4 optimizations that include TFO, DRE, and LZ compression. These features can be applied to all types of TCP traffic.
- Layer 7 optimizations that accelerate application-specific protocols. The application accelerators control these kinds of optimizations.
For a given optimization policy, the DRE feature can use different caching modes (beginning with WAAS Software Version 4.4.1):
- Bidirectional—The peer WAEs maintain identical caches for inbound and outbound traffic. This caching mode is best suited for scenarios where a significant portion of the traffic seen in one direction between the peers is also seen in the reverse direction. In WAAS software versions prior to 4.4.1, this mode is the only supported caching mode.
- Unidirectional—The peer WAEs maintain different caches for inbound and outbound traffic. This caching mode is best suited for scenarios where a significant portion of the traffic seen in one direction between the peers is not seen in the reverse direction.
- Adaptive—The peer WAEs negotiate either bidirectional or unidirectional caching based on the characteristics of the traffic seen between the peers.
The predefined optimization policies are configured to use the optimal DRE caching mode, depending on the typical application traffic, although you can change the mode if you want.
Enabling and Disabling the Global Optimization Features
The global optimization features determine if traffic flow optimization (TFO), data redundancy elimination (DRE), and persistent compression are enabled on a device or device group. By default, all of these features are enabled. If you choose to disable one of these features, the device will be unable to apply the full WAAS optimization techniques to the traffic that it intercepts.
In addition, the global optimization features include each of the following application accelerators: EPM, HTTP, ICA, MAPI, SMB, and SSL and SSL Interposer. By default, all of the application accelerators are enabled except SMB, SSL Interposer and Encrypted MAPI.
Note![]() The application accelerators require specific types of licenses to operate: a Transport license for TFO, DRE, and LZ optimization, and an Enterprise license for all other application accelerators. For more information on installing and managing licenses, see Managing Software Licenses in Chapter 10, “Configuring Other System Settings.”
The application accelerators require specific types of licenses to operate: a Transport license for TFO, DRE, and LZ optimization, and an Enterprise license for all other application accelerators. For more information on installing and managing licenses, see Managing Software Licenses in Chapter 10, “Configuring Other System Settings.”
This section contains the following topics:
Procedure for Enabling and Disabling the Global Optimization Features
Note![]() You must enable the accelerator on both of the peer WAEs at either end of a WAN link for all application accelerators to operate.
You must enable the accelerator on both of the peer WAEs at either end of a WAN link for all application accelerators to operate.
However, in case of single-sided SMART-SSL acceleration, you do not need a peer WAE to exist or for both WAEs to have the SSL Interposer accelerator enabled.
To enable or disable a global optimization feature, follow these steps:
Step 1![]() From the WAAS Central Manager menu, choose Devices > device-name ( or Device Groups > device-group-name).
From the WAAS Central Manager menu, choose Devices > device-name ( or Device Groups > device-group-name).
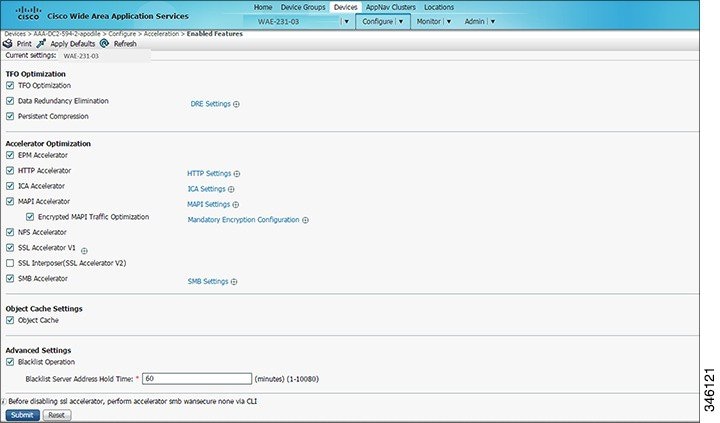
Step 2![]() Choose Configure > Acceleration > Enabled Features.
Choose Configure > Acceleration > Enabled Features.
The Enabled Features window appears.
Note![]() On WAAS Express devices, only a subset of the standard features are available. On ISR-WAAS devices, the SMB application accelerator is enabled by default. In the Enabled Features window for a device group, two SMB Accelerator options are shown, one for ISR-WAAS devices and one for all other kinds of WAEs.
On WAAS Express devices, only a subset of the standard features are available. On ISR-WAAS devices, the SMB application accelerator is enabled by default. In the Enabled Features window for a device group, two SMB Accelerator options are shown, one for ISR-WAAS devices and one for all other kinds of WAEs.
For WAAS Express, the following Express versions of application accelerators are supported:
- HTTP accelerator express (See Configuring HTTP Acceleration)
- SSL accelerator express (See Configuring SSL Acceleration)
Note![]() For a Cisco WAAS device running WAAS Version 6.x and a Cisco WAAS Express peer device running Cisco IOS Release 15.6(3)M, 15.6(2)T1 or later, TLS1 is supported, but SSL3 is removed. Before upgrading WAAS Express to one of these IOS releases, configure TLS1 in the WAAS Express Device Group:
For a Cisco WAAS device running WAAS Version 6.x and a Cisco WAAS Express peer device running Cisco IOS Release 15.6(3)M, 15.6(2)T1 or later, TLS1 is supported, but SSL3 is removed. Before upgrading WAAS Express to one of these IOS releases, configure TLS1 in the WAAS Express Device Group:
1. Navigate to Device Groups > DeviceGroupName > Configure > Enabled Features.
2. Select the SSL Accelerator Express Peering Service.
3. At the SSL Version: dropdown list, select TLS1.
4. Click Submit.
5. Upgrade the WAAS Express.
For information on upgrading and interoperability, see the Release Note for Cisco Wide Area Application Services.
Not all of the properties in the standard WAAS device are available in the WAAS Express version of the application accelerators, including SMART-SSL acceleration.
Note![]() If you try to enable DRE on a WAAS Express device on which it is not supported, a message stating that it is not supported is displayed.
If you try to enable DRE on a WAAS Express device on which it is not supported, a message stating that it is not supported is displayed.
The Restore Predefined Settings icon for WAAS Express applies the predefined settings for HTTP/HTTPS, and SSL cipher list and peering service.
Step 3![]() Check the check boxes adjacent to the optimization features that you want to enable, and uncheck the check boxes adjacent to the features that you want to disable. For a description of each of the optimization features, see Key Services of Cisco WAAS in Chapter 1, “Introduction to Cisco WAAS.”
Check the check boxes adjacent to the optimization features that you want to enable, and uncheck the check boxes adjacent to the features that you want to disable. For a description of each of the optimization features, see Key Services of Cisco WAAS in Chapter 1, “Introduction to Cisco WAAS.”
Some features have additional settings that you can configure by clicking the link next to the setting name. Hover your cursor over the small target icon next to the link to see a dialog box that shows the current settings.
- If you check the Data Redundancy Elimination check box, you can click the DRE Settings link as a shortcut to the DRE Settings Configuration window. For more information, see Configuring DRE Settings.
- If you check the HTTP Accelerator check box, you can click the HTTP Settings link as a shortcut to the HTTP/HTTPS Settings window. For more information, see Configuring HTTP Acceleration.
- If you check the ICA Accelerator check box, you can click the ICA Settings link as a shortcut to the ICA Acceleration Configuration window. For more information, see Configuring ICA Acceleration.
- If you check the MAPI Accelerator check box, you can click the MAPI Settings link as a shortcut to the MAPI Settings window. For more information, see Configuring MAPI Acceleration.
Note![]() When you check the MAPI Accelerator check box, Encrypted MAPI Traffic Optimization is enabled by default.
When you check the MAPI Accelerator check box, Encrypted MAPI Traffic Optimization is enabled by default.
- If you check the Encrypted MAPI Traffic Optimization check box, you can click the Mandatory Encryption Configuration link as a shortcut to the Encrypted Services Configuration window. For more information, see Configuring Encrypted MAPI Acceleration.
Note![]() You must enable MAPI acceleration first for Encrypted MAPI acceleration to be enabled.
You must enable MAPI acceleration first for Encrypted MAPI acceleration to be enabled.
- If you check the SMB Accelerator check box, you can click the SMB Settings link as a shortcut to the SMB Acceleration Configuration window. For more information, see Configuring SMB Acceleration.
- If you check the SSL Accelerator check box, you must configure additional settings to enable SSL acceleration. For more information, see Configuring SSL Acceleration. With release 6.2.1, you can accelerate o365 traffic. For more information, see office365 optimization using Azure vWAAS.
- If you check the SSL Interposer (SSL Accelerator V2) check box, you must configure additional settings to enable SMART-SSL acceleration. By default, the SSL Interposer is by default SMART ssl will be enabled on fresh install i.e. on new OVA deployments, ENCS platforms, 557 to 641 upgrades. It will be disabled when you upgrade the devices from software version 6.2.3 to 6.4.1. For more information, see Configuring SMART-SSL Accelerator.
Note![]() Both SSL accelerator and SMART-SSL can co-exist on a device.
Both SSL accelerator and SMART-SSL can co-exist on a device.
Step 4![]() To enable the object cache, in the Object Cache Settings section, check the Object Cache check box.
To enable the object cache, in the Object Cache Settings section, check the Object Cache check box.
WAAS performs object caching to increase client application performance for SMB file access. Object caching also minimizes bandwidth and latency over the WAN, by avoiding the repeated transfer of data over the WAN.
Note![]() Object Cache is not supported on vWAAS-200 and vWAAS-150 platforms.
Object Cache is not supported on vWAAS-200 and vWAAS-150 platforms.
To enable an individual application accelerator object cache, use the following guideline:
- Controls to enable and disable an individual object cache are displayed in that application accelerator’s Advanced Settings screen.
Note To ensure that the object cache and individual application accelerator object cache work successfully, note these guidelines:
- Each application accelerator object cache can be enabled or disabled independent of whether or not the global object cache is enabled or disabled.
- Enabling the object cache does not automatically enable individual application accelerator object caches.
- You can enable or disable an individual application accelerator object cache whether or not the associated application accelerator is enabled or disabled.
- Verify that disk assignments have been made to object cache before you enable object cache.
- The object cache has a limit of 15 GB. A request of a size larger than this limit will not cache the complete file. For example, for a file size of 25 GB, only 15 GB of this file would be cached.
Note To ensure that the object cache and SMB application accelerator work successfully, enable the object cache before you enable the SMB application accelerator.
Step 5![]() In the Advanced Settings area, uncheck the Blacklist Operation check box if you want to disable it. This feature allows a WAE to better handle situations in which TCP setup packets that have options are blocked or not returned to the WAE device. This behavior can result from network devices (such as firewalls) that block TCP setup packets that have options, and from asymmetric routes. The WAE can keep track of origin servers (such as those behind firewalls) that cannot receive optioned TCP packets, and learns not to send out TCP packets with options to these blacklisted servers. WAAS is still able to accelerate traffic between branch and data center WAEs in situations where optioned TCP packets are dropped. We recommend that you leave this feature enabled.
In the Advanced Settings area, uncheck the Blacklist Operation check box if you want to disable it. This feature allows a WAE to better handle situations in which TCP setup packets that have options are blocked or not returned to the WAE device. This behavior can result from network devices (such as firewalls) that block TCP setup packets that have options, and from asymmetric routes. The WAE can keep track of origin servers (such as those behind firewalls) that cannot receive optioned TCP packets, and learns not to send out TCP packets with options to these blacklisted servers. WAAS is still able to accelerate traffic between branch and data center WAEs in situations where optioned TCP packets are dropped. We recommend that you leave this feature enabled.
Step 6![]() If you want to change the default Blacklist Server Address Hold Time of 60 minutes, enter the new time in minutes in the Blacklist Server Address Hold Time field. The valid range is 1 minute to 10080 minutes (1 week).
If you want to change the default Blacklist Server Address Hold Time of 60 minutes, enter the new time in minutes in the Blacklist Server Address Hold Time field. The valid range is 1 minute to 10080 minutes (1 week).
When a server IP address is added to the blacklist, it remains there for the configured hold time. After that time, subsequent connection attempts will again include TCP options so that the WAE can redetermine if the server can receive them. It is useful to retry sending TCP options periodically because network packet loss may cause a server to be erroneously blacklisted.
You can shorten or lengthen the blacklist time by changing the Blacklist Server Address Hold Time field.
The changes are saved to the device or device group.
To configure TFO optimization, DRE, and persistent compression from the CLI, use the tfo optimize global configuration command.
To configure EPM acceleration from the CLI, use the accelerator epm global configuration command.
To configure HTTP acceleration from the CLI, use the accelerator http global configuration command.
To configure ICA acceleration from the CLI, use the accelerator ica global configuration command.
To configure MAPI acceleration from the CLI, use the accelerator mapi global configuration command.
To configure SMB acceleration from the CLI, use the accelerator smb global configuration command.
To configure SSL acceleration from the CLI, use the accelerator ssl global configuration command.
To configure global object cache from the CLI, use the object-cache enable global configuration command.
When object cache is enabled, you are prompted to confirm the repurposing of SMB resources if the disk has not already been partitioned for object cache.
If this is the first time disk resources are being assigned to object cache, the object-cache enable command will prompt you to reboot the device, since the disk partitioning only takes effect on the next reboot. The configuration is then saved, and the object cache does not have to be re-enabled on the next reboot.
Note To ensure success of the object-cache enable command, verify the following two conditions:
- Disk assignments have been made to object cache before you use this command.
- Use this command before you use the accelerator smb global configuration command.
To enable a specified application accelerator object cache, use the accelerator ao-name object-cache enable global configuration command.
Note To ensure that each application accelerator object cache and the global object cache function successfully, note these guidelines:
- Each application accelerator object cache can be enabled or disabled independent of whether or not the global object cache is enabled or disabled.
- You must disable all individual application accelerator object caches before you use the no object-cache enable global configuration command to disable the global object cache.
- The object-cache enable global configuration command does not automatically enable individual application accelerator object caches.
- You can enable or disable an individual application accelerator object cache whether or not the associated application accelerator is enabled or disabled.
To configure the Blacklist Operation feature from the CLI, use the auto-discovery global configuration command.
To display status and statistics on the application accelerators from the CLI, use the show accelerator and show statistics accelerator EXEC commands.
To display statistics on the SMB print accelerator, use the show statistics accelerator smb EXEC command.
Configuring Individual Features and Application Accelerators
This section contains the following topics:
- Configuring DRE Settings
- Configuring HTTP Acceleration
- Configuring MAPI Acceleration
- Configuring Encrypted MAPI Acceleration
- Configuring SMB Acceleration
- Configuring ICA Acceleration
- Configuring SSL Acceleration
- Configuring SMART-SSL Accelerator
Configuring DRE Settings
To enable DRE settings, check the Data Redundancy Elimination check box in the Enabled Features window.
To configure the DRE auto bypass and load monitor settings, follow these steps:
Step 1![]() From the WAAS Central Manager menu, choose Devices > device-name ( or Device Groups > device-group-name).
From the WAAS Central Manager menu, choose Devices > device-name ( or Device Groups > device-group-name).
Step 2![]() Choose Configure > Acceleration > DRE Settings.
Choose Configure > Acceleration > DRE Settings.
The DRE Settings window appears.
Step 3![]() Check the Enable DRE auto bypass check box to generate an alarm and automatically DRE bypass application traffic.
Check the Enable DRE auto bypass check box to generate an alarm and automatically DRE bypass application traffic.
Note![]() If you do not enable DRE auto bypass, the Device Status alarm displays yellow and the traffic gets bypassed without forwarding to the Service Node (SN). We recommend that you do not disable DRE through the configuration. Instead, configure individual policies to bypass DRE functionality.
If you do not enable DRE auto bypass, the Device Status alarm displays yellow and the traffic gets bypassed without forwarding to the Service Node (SN). We recommend that you do not disable DRE through the configuration. Instead, configure individual policies to bypass DRE functionality.
Step 4![]() Check the Enable DRE Load Monitor check box to enable load report.
Check the Enable DRE Load Monitor check box to enable load report.
- The disk latency maximum can be set from 1-1000; the default value is 5.
- The DRE load threshold can be set from 50-99; the default value is 95.
The changes are saved to the device or device group.
To enable DRE auto bypass from the CLI, use the dre auto-bypass enable global configuration command.
To enable DRE load monitor from the CLI, use the dre load-monitor report global configuration command.
Configuring HTTP Acceleration
The HTTP application accelerator accelerates HTTP traffic. To optimize HTTPS, you must enable both SSL and HTTP and also have protocol chaining enabled.
The default Web optimization policy is defined to send traffic to the HTTP accelerator. The Web optimization policy uses the HTTP class map, which matches traffic on ports 80, 8080, 8000, 8001, and 3128. If you expect HTTP traffic on other ports, add the other ports to the HTTP class map.
To enable the HTTP accelerator, check the HTTP Accelerator check box in the Enabled Features window.
To configure the HTTP acceleration settings, follow these steps:
Step 1![]() From the WAAS Central Manager menu, choose Devices > device-name ( or Device Groups > device-group-name).
From the WAAS Central Manager menu, choose Devices > device-name ( or Device Groups > device-group-name).
Step 2![]() Choose Configure > Acceleration > HTTP/HTTPS Settings.
Choose Configure > Acceleration > HTTP/HTTPS Settings.
The HTTP Acceleration Settings window appears (Figure 12-1).
Note![]() For WAAS Express, the HTTP acceleration settings are the same, but the fields are laid out differently in the HTTP/HTTPS Settings window.
For WAAS Express, the HTTP acceleration settings are the same, but the fields are laid out differently in the HTTP/HTTPS Settings window.
Figure 12-1 HTTP Acceleration Settings Window
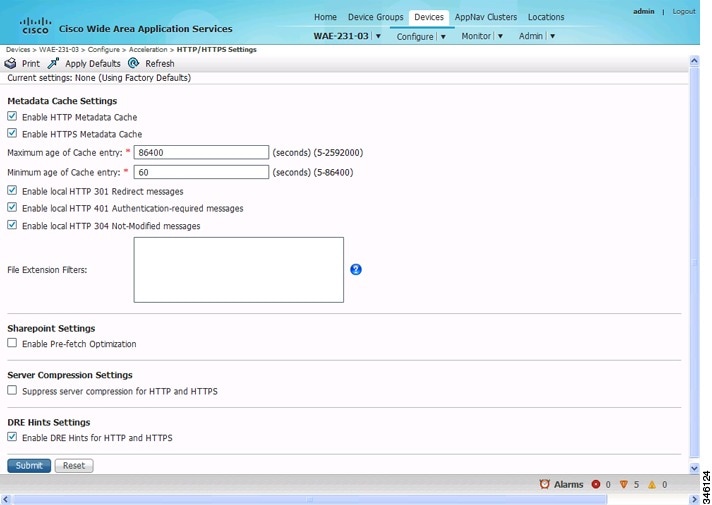
Step 3![]() Check the Enable HTTP metadatacache caching check box to enable the WAE to cache HTTP header (metadata) information. The default setting is checked.
Check the Enable HTTP metadatacache caching check box to enable the WAE to cache HTTP header (metadata) information. The default setting is checked.
This check box must be checked to enable any of the other settings in the Metadata Cache Settings area. If this box is not checked, no header caching is done.
For details on HTTP metadata caching, see About HTTP Metadata Caching.
Step 4![]() Check the Enable HTTPS metadatacache caching check box to enable the WAE to cache HTTPS header (metadata) information (HTTP as payload in SSL traffic). The default setting is checked.
Check the Enable HTTPS metadatacache caching check box to enable the WAE to cache HTTPS header (metadata) information (HTTP as payload in SSL traffic). The default setting is checked.
For details on HTTP metadata caching, see About HTTP Metadata Caching.
Step 5![]() In the Maximum age of a Cache entry field, enter the maximum number of seconds to retain HTTP header information in the cache. The default is 86400 seconds (24 hours). Valid time periods range from 5–2592000 seconds (30 days).
In the Maximum age of a Cache entry field, enter the maximum number of seconds to retain HTTP header information in the cache. The default is 86400 seconds (24 hours). Valid time periods range from 5–2592000 seconds (30 days).
Step 6![]() In the Minimum age of a Cache entry field, enter the minimum number of seconds for which to retain HTTP header information in the cache. The default is 60 seconds. Valid time periods range from 5 to 86400 seconds (24 hours).
In the Minimum age of a Cache entry field, enter the minimum number of seconds for which to retain HTTP header information in the cache. The default is 60 seconds. Valid time periods range from 5 to 86400 seconds (24 hours).
Step 7![]() Check the Enable local HTTP 301 redirect messages check box to enable the WAE to cache and locally serve HTTP 301 messages. The default setting is checked.
Check the Enable local HTTP 301 redirect messages check box to enable the WAE to cache and locally serve HTTP 301 messages. The default setting is checked.
Step 8![]() Check the Enable local HTTP 401 Authentication-required messages check box to enable the WAE to cache and locally serve HTTP 401 messages. The default setting is checked.
Check the Enable local HTTP 401 Authentication-required messages check box to enable the WAE to cache and locally serve HTTP 401 messages. The default setting is checked.
Step 9![]() Check the Enable local HTTP 304 Not-Modified messages check box to enable the WAE to cache HTTP 200 and 304 messages and locally serve HTTP 304 messages. The default setting is checked.
Check the Enable local HTTP 304 Not-Modified messages check box to enable the WAE to cache HTTP 200 and 304 messages and locally serve HTTP 304 messages. The default setting is checked.
Step 10![]() To configure specific file extensions to which metadata caching is to be applied, enter the file extensions in the File extension filters field at the far right. Separate multiple extensions with a comma, for example, jpeg, gif, png, and do not include the dot at the beginning of the file extension.
To configure specific file extensions to which metadata caching is to be applied, enter the file extensions in the File extension filters field at the far right. Separate multiple extensions with a comma, for example, jpeg, gif, png, and do not include the dot at the beginning of the file extension.
By default, no file extension filters are defined and therefore, metadata caching applies to all file types.
Step 11![]() Check the Enable Pre-fetch Optimization check box to allow the edge WAAS device to prefetch data. This setting is not enabled by default.
Check the Enable Pre-fetch Optimization check box to allow the edge WAAS device to prefetch data. This setting is not enabled by default.
This optimization benefits Web browser-based Microsoft Office applications when they access Microsoft Office documents (MS Word and Excel only) hosted on a Microsoft SharePoint Server 2010. For viewing Word documents, the client must have Microsoft Silverlight installed.
By checking this check box, you are telling the edge WAAS device to prefetch the subsequent pages of the documents from the SharePoint server before the client actually requests them, and serve them from the cache when the request from the client arrives. You can now seamlessly scroll through the document without having to wait for the content to load.
Note![]() SharePoint prefetch optimization works with view in browser mode only.
SharePoint prefetch optimization works with view in browser mode only.
Step 12![]() Check the Suppress server compression for HTTP and HTTPS check box to configure the WAE to suppress server compression between the client and the server. The default setting is checked.
Check the Suppress server compression for HTTP and HTTPS check box to configure the WAE to suppress server compression between the client and the server. The default setting is checked.
By checking this check box, you are telling the WAE to remove the Accept-Encoding value from HTTP and HTTPS request headers, preventing the web server from compressing HTTP and HTTPS data that it sends to the client. This allows the WAE to apply its own compression to the HTTP and HTTPS data, typically resulting in much better compression than the web server for most files. For some file types that rarely change, such as.css and.js files, this setting is ignored and web server compression is allowed.
Step 13![]() Check the Enable DRE Hints for HTTP and HTTPS check box to send DRE hints to the DRE module for improved DRE performance. The DRE hint feature is enabled by default.
Check the Enable DRE Hints for HTTP and HTTPS check box to send DRE hints to the DRE module for improved DRE performance. The DRE hint feature is enabled by default.
The changes are saved to the device or device group.
To configure HTTP acceleration from the CLI, use the accelerator http global configuration command.
To show the contents of the metadata cache, use the show cache http-metadatacache EXEC command.
To clear the metadata cache, use the clear cache http-metadatacache EXEC command.
To enable or disable specific HTTP accelerator features for specific clients or IP subnets, use the HTTP accelerator subnet feature. For more details, see Using an HTTP Accelerator Subnet.
About HTTP Metadata Caching
The metadata caching feature allows the HTTP accelerator in the branch WAE to cache particular server responses and respond locally to clients. The following server response messages are cached:
- HTTP 200 OK (Applies to If-None-Match and If-Modified-Since requests)
- HTTP 301 redirect
- HTTP 304 not modified (Applies to If-None-Match and If-Modified-Since requests)
- HTTP 401 authentication required
Metadata caching is not applied in the following cases:
- Requests and responses that are not compliant with RFC standards
- URLs containing over 255 characters
- 301 and 401 responses with cookie headers
- Use of HEAD method
- Pipelined transactions
Note![]() The metadata caching feature is introduced in WAAS Version 4.2.1, but Version 4.2.1 is needed only on the branch WAE. This feature can interoperate with an HTTP accelerator on a data center WAE that has a lower version.
The metadata caching feature is introduced in WAAS Version 4.2.1, but Version 4.2.1 is needed only on the branch WAE. This feature can interoperate with an HTTP accelerator on a data center WAE that has a lower version.
Using an HTTP Accelerator Subnet
The HTTP accelerator subnet feature allows you to selectively enable or disable specific HTTP optimization features for specific IP subnets by using ACLs. This feature can be applied to the following HTTP optimizations: HTTP metadata caching, HTTPS metadata caching, DRE hints, and suppress server compression.
To define IP subnets, use the ip access-list global configuration command. Refer to this command in the Cisco Wide Area Application Services Command Reference for more information on configuring subnets. You can use both standard and extended ACLs.
To configure a subnet for an HTTP accelerator feature, follow these steps:
Step 1![]() Enable global configuration for all the HTTP accelerator features that you want to use.
Enable global configuration for all the HTTP accelerator features that you want to use.
Step 2![]() Create an IP access list to use for a subnet of traffic:
Create an IP access list to use for a subnet of traffic:
Step 3![]() Associate the ACL with a specific HTTP accelerator feature. Refer to the accelerator http global configuration command in Cisco Wide Area Application Services Command Reference for information on associating an ACL with an HTTP accelerator feature:
Associate the ACL with a specific HTTP accelerator feature. Refer to the accelerator http global configuration command in Cisco Wide Area Application Services Command Reference for information on associating an ACL with an HTTP accelerator feature:
In this example, the HTTP metadata cache feature applies to all the connections that match the conditions specified in the extended access-list md_acl.
In the following example, the HTTP suppress-server-encoding feature applies to all the connections that match the conditions specified in the standard access-list 10:
For the features (DRE hints and HTTPS metadata cache in this example) that do not have an ACL associated with them, global configuration is used and the features are applicable to all the connections.
Configuring MAPI Acceleration
The MAPI application accelerator accelerates Microsoft Outlook Exchange traffic that uses the Messaging Application Programming Interface (MAPI) protocol.
- For WAAS Version 5.3.x and later, Microsoft Outlook 2000–2013 clients are supported.
- For WAAS Version 5.2.x and earlier, Microsoft Outlook 2000–2010 clients are supported.
Clients can be configured with Outlook in cached or noncached mode; both modes are accelerated.
Secure connections that use message authentication (signing) are not accelerated, and MAPI over HTTP is not accelerated.
Note![]() Microsoft Outlook 2007 and 2010 have encryption enabled by default. You must disable encryption to benefit from the MAPI application accelerator.
Microsoft Outlook 2007 and 2010 have encryption enabled by default. You must disable encryption to benefit from the MAPI application accelerator.
The EPM application accelerator must be enabled for the MAPI application accelerator to operate. EPM is enabled by default. Additionally, the system must define an optimization policy of type EPM, specify the MAPI UUID, and have an Accelerate setting of MAPI. This policy, MAPI for the Email-and-Messaging application, is defined by default.
EPM traffic, such as MAPI, does not normally use a predefined port. If your Outlook administrator has configured Outlook in a nonstandard way to use a static port, you must create a new basic optimization policy that accelerates MAPI traffic with a class map that matches the static port that was configured for Outlook.
Note![]() If the WAE becomes overloaded with connections, the MAPI application accelerator continues to accelerate MAPI connections by using internally reserved connection resources. If the reserved resources are also exceeded, new MAPI connections are passed through until connection resources become available.
If the WAE becomes overloaded with connections, the MAPI application accelerator continues to accelerate MAPI connections by using internally reserved connection resources. If the reserved resources are also exceeded, new MAPI connections are passed through until connection resources become available.
To enable the MAPI accelerator, check the MAPI Accelerator check box in the Enabled Features section.
Note![]() When you enable MAPI acceleration, Encrypted MAPI acceleration is enabled by default.
When you enable MAPI acceleration, Encrypted MAPI acceleration is enabled by default.
To configure MAPI acceleration settings, follow these steps:
Step 1![]() From the WAAS Central Manager menu, choose Devices > device-name ( or Device Groups > device-group-name).
From the WAAS Central Manager menu, choose Devices > device-name ( or Device Groups > device-group-name).
Step 2![]() Choose Configure > Acceleration > MAPI Settings.
Choose Configure > Acceleration > MAPI Settings.
The MAPI Acceleration Settings window appears (Figure 12-2).
Figure 12-2 MAPI Acceleration Settings Window
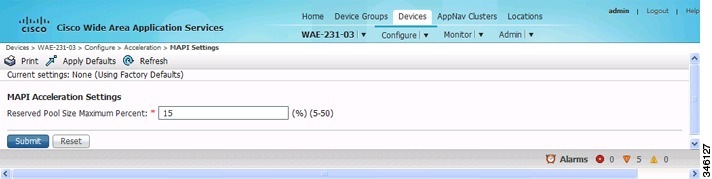
Step 3![]() In the Reserved Pool Size Maximum Percent field, enter the maximum percent of connections in order to restrict the maximum number of connections reserved for MAPI optimization during TFO overload. It is specified as a percent of the TFO connection limit of the platform. Valid percent ranges from 5 to 50 percent. The default is 15 percent, which reserves approximately 0.5 connection for each client-server Association Group (AG) optimized by the MAPI accelerator.
In the Reserved Pool Size Maximum Percent field, enter the maximum percent of connections in order to restrict the maximum number of connections reserved for MAPI optimization during TFO overload. It is specified as a percent of the TFO connection limit of the platform. Valid percent ranges from 5 to 50 percent. The default is 15 percent, which reserves approximately 0.5 connection for each client-server Association Group (AG) optimized by the MAPI accelerator.
The client maintains at least one AG per server it connects to with an average of about three connections per AG. For deployments that see a greater average number of connections per AG, or where TFO overload is a frequent occurrence, a higher value for reserved pool size maximum percent is recommended.
Reserved connections remain unused when the device is not under TFO overload. Reserved connections are released when the AG is terminated.
The changes are saved to the device or device group.
Configuring Encrypted MAPI Acceleration
The Encrypted MAPI acceleration feature provides WAN optimization for secure MAPI application protocols using Microsoft Kerberos security protocol and Microsoft Windows Active Directory identity for authentication of clients or servers or both in the domain.
MAPI Operating Considerations
Note![]() You must enable MAPI acceleration first for Encrypted MAPI acceleration to be enabled. Encrypted MAPI acceleration is enabled by default.
You must enable MAPI acceleration first for Encrypted MAPI acceleration to be enabled. Encrypted MAPI acceleration is enabled by default.
Terms Used with Microsoft Active Directory
The following terms are used with Microsoft Active Directory and Cisco Encrypted MAPI acceleration:
- Microsoft Active Directory—A set of directory-based and identity-based services developed by Microsoft for Windows domain networks. The Microsoft Active Directory Domain Services (DS) domain controller stores information about domain users and devices
- User Identity—An Active Directory user account. The Microsoft Active Directory employs the user identity to authenticate the user, and to grant appropriate access to domain resources.
- Machine Account Identity—A computer (machine) account used to authenticate the user's computer access to Microsoft Active Directory Domain Services. Each Windows Active Directory computer has a unique machine (computer) account.
For more information on Microsoft Active Directory, see the Microsoft Developer Network Active Directory pages.
Work flow for Configuring Encrypted MAPI
To configure Encrypted MAPI traffic acceleration, complete the tasks listed in Table 12-1 . These tasks must be performed on both data center and branch WAEs unless specified as Not Required or Optional.
|
|
|
|---|---|
Configure DNS Settings. |
To configure DNS settings, see Configuring the DNS Server in Chapter 6, “Configuring Network Settings.” |
Configure NTP Settings. |
To synchronize the time with Active Directory, see Configuring NTP Settings in Chapter 10, “Configuring Other System Settings.” |
Verify WAE devices are registered and online with the WAAS Central Manager. |
To verify WAE devices are registered and online with the WAAS Central Manager, see Devices Window in Chapter 15, “Monitoring Your WAAS System.” |
Configure SSL Peering Service. |
To configure SSL Peering Service, see Configuring SSL Peering Service. |
Verify WAN Secure mode is enabled. |
To verify WAN Secure mode is enabled, use the show accelerator wansecure EXEC command. |
(Optional) Configure windows domain settings and perform domain join. The domain join function automatically creates the machine account in Active Directory.
Note |
To configure Windows Domain Server Authentication settings, see Configuring Windows Domain Server Authentication Settings in Chapter 7, “Configuring Administrative Login Authentication, Authorization, and Accounting.” |
Configure domain identities (for machine account and optional user accounts). |
To configure a machine account identity, see Configuring a Machine Account Identity. (Optional) To create a user account and configure a user account identity, see Creating and Configuring a User Account. Note that configuring domain identities is not required on branch WAE devices. |
Enable Windows Domain Encrypted Service. |
To enable the Windows Domain Encrypted Service, navigate to the Configure > Security > Windows Domain > Encrypted Services page and check the Enable Encrypted Service check box. |
Enable Encrypted MAPI Traffic Optimization. |
To enable Encrypted MAPI Traffic, see Enabling and Disabling the Global Optimization Features. |
Configuring Encrypted MAPI Settings
To configure encrypted MAPI settings, follow these steps:
Step 1![]() Configure DNS settings.
Configure DNS settings.
The WAAS DNS server must be a part of the DNS system of Windows Active Directory domains to resolve DNS queries for traffic encryption.
For more information about configuring DNS settings, see Configuring the DNS Server in Chapter 6, “Configuring Network Settings.”
Step 2![]() Configure NTP settings to synchronize the time with the Active Directory.
Configure NTP settings to synchronize the time with the Active Directory.
The WAAS device has to be in synchronization with the Active Directory for Encrypted MAPI acceleration. The WAAS NTP server must share time synchronization with the Active Directory Domain Controllers’ domains for which traffic encryption is required. Out-of-sync time will cause Encrypted MAPI acceleration to fail.
For more information about synchronizing time with the Active Directory, see Configuring NTP Settings in Chapter 10, “Configuring Other System Settings.”
Step 3![]() Verify if WAE devices are registered and are online with the WAAS Central Manager.
Verify if WAE devices are registered and are online with the WAAS Central Manager.
For more information about verifying that WAE devices are registered and are online with the WAAS Central Manager, see Devices Window in Chapter 15, “Monitoring Your WAAS Network.”
Step 4![]() Configure the SSL Peering Service.
Configure the SSL Peering Service.
Note![]() The SSL accelerator must be enabled and in running state.
The SSL accelerator must be enabled and in running state.
For more information about configuring the SSL Peering Service, see Configuring SSL Peering Service.
Step 5![]() Verify if WAN Secure mode is enabled.
Verify if WAN Secure mode is enabled.
The default mode is Auto. You can verify the state of WAN Secure mode using the following EXEC command:
If necessary, you can change the state of WAN Secure using the following global configuration command:
accelerator mapi wansecure-mode {always | auto | none}
Step 6![]() (Optional on data center WAEs if only user accounts are used for domain identity configuration in Step 7.) Configure Windows domain settings and perform a domain join. (A domain join automatically creates the machine account in Active Directory.) It is sufficient to create any one identity account, either machine or user. Domain-join is required only for machine account used as an identity account.
(Optional on data center WAEs if only user accounts are used for domain identity configuration in Step 7.) Configure Windows domain settings and perform a domain join. (A domain join automatically creates the machine account in Active Directory.) It is sufficient to create any one identity account, either machine or user. Domain-join is required only for machine account used as an identity account.
Note![]() Performing a domain join of the WAE is not required on branch WAE devices.
Performing a domain join of the WAE is not required on branch WAE devices.
To configure Windows Domain Server Authentication settings, see Configuring Windows Domain Server Authentication Settings in Chapter 7, “Configuring Administrative Login Authentication, Authorization, and Accounting.”
Note![]() Kerberos and Windows NT LAN Manager (NTLM) authentication are used for Encrypted MAPI acceleration. For WAAS 5.3.1, encrypted NTLM traffic is supported for EMAPI, and the WAE device optimizes NTLM traffic for domains configured with NTLM authentication.
Kerberos and Windows NT LAN Manager (NTLM) authentication are used for Encrypted MAPI acceleration. For WAAS 5.3.1, encrypted NTLM traffic is supported for EMAPI, and the WAE device optimizes NTLM traffic for domains configured with NTLM authentication.
Step 7![]() Configure domain identities. (Not required for branch WAEs.)
Configure domain identities. (Not required for branch WAEs.)
As mentioned in Step 6, you must have at least one account, either user or machine, that is configured with a domain identity. Each device can support up to five domain identities, one machine account identity and four user account identities. This allows a WAAS device to accelerate up to five domain trees. You must configure a domain identity for each domain with an exchange server that has clients to be accelerated.
a.![]() Configure the machine account identity.
Configure the machine account identity.
A machine account for the core device is automatically created during the join process in the Windows Domain Server authentication procedure in Step 6. If you are using a machine account, a machine account identity must be configured for this account.
Each device supports only one machine account identity.
To configure a machine account identity, see Configuring a Machine Account Identity.
b.![]() Create and configure optional user accounts.
Create and configure optional user accounts.
You can utilize up to four optional user accounts for additional security. Multiple user accounts provide greater security than having all of the core devices using a single user account. You must configure a user account identity for each user account, whether you are utilizing an existing user account or creating a new one.
To create a user account and configure a user account identity, see Creating and Configuring a User Account.
Step 8![]() Enable Windows Domain Encrypted Service. (This is enabled by default.)
Enable Windows Domain Encrypted Service. (This is enabled by default.)
a.![]() From the WAAS Central Manager menu, choose Devices > device-name ( or Device Groups > device-group-name).
From the WAAS Central Manager menu, choose Devices > device-name ( or Device Groups > device-group-name).
b.![]() From the menu, choose Configure > Security > Windows Domain > Encrypted Services.
From the menu, choose Configure > Security > Windows Domain > Encrypted Services.
The Encrypted Services window appears.
c.![]() Check the Enable Encrypted Service check box.
Check the Enable Encrypted Service check box.
d.![]() Click Submit to save your changes.
Click Submit to save your changes.
Step 9![]() Enable Encrypted MAPI Traffic Optimization.
Enable Encrypted MAPI Traffic Optimization.
In the Enabled Features window, check the Encrypted MAPI Traffic Optimization check box (the MAPI Accelerator check box must also be checked), and click Submit. (Encrypted MAPI traffic optimization is enabled by default.)
For more information on the Enabled Features window, see Enabling and Disabling the Global Optimization Features.
Configuring a Machine Account Identity
Note![]() For definitions of machine account identity and other Microsoft Active Directory terms, see Terms Used with Microsoft Active Directory.
For definitions of machine account identity and other Microsoft Active Directory terms, see Terms Used with Microsoft Active Directory.
To configure an identity for a machine account, follow these steps:
Step 1![]() From the WAAS Central Manager menu, choose Devices > device-name ( or Device Groups > device-group-name).
From the WAAS Central Manager menu, choose Devices > device-name ( or Device Groups > device-group-name).
Step 2![]() From the menu, choose Configure > Security > Windows Domain > Encrypted Services.
From the menu, choose Configure > Security > Windows Domain > Encrypted Services.
The Encrypted Services window appears.
Step 3![]() Click the Add Domain Identity button.
Click the Add Domain Identity button.
The Domain Identity dialog box appears (Figure 12-3).
Note![]() Every WAAS device that has to be accelerated must have a domain identity.
Every WAAS device that has to be accelerated must have a domain identity.
Figure 12-3 Add Domain Identity—Machine Account
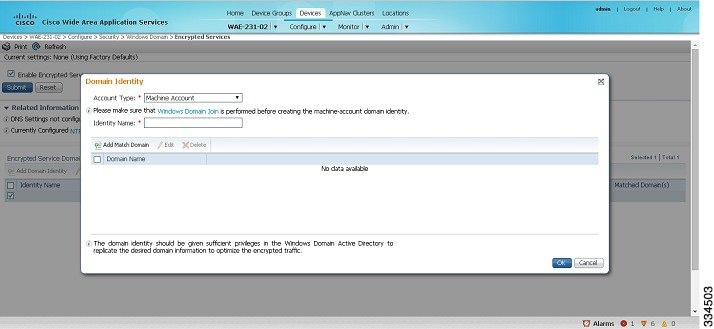
a.![]() In the Domain Identity dialog box that is displayed, choose Machine Account from the Account Type drop-down list.
In the Domain Identity dialog box that is displayed, choose Machine Account from the Account Type drop-down list.
Note![]() Windows domain join must be completed before creating the machine account domain identity. For more information, see Configuring Windows Domain Server Settings on a WAAS Device in Chapter 7, “Configuring Administrative Login Authentication, Authorization, and Accounting.”
Windows domain join must be completed before creating the machine account domain identity. For more information, see Configuring Windows Domain Server Settings on a WAAS Device in Chapter 7, “Configuring Administrative Login Authentication, Authorization, and Accounting.”
b.![]() Enter the identity name in the Identity Name field. Only alphanumeric characters are allowed. Space, ?, and | are not allowed. The length is not to exceed 32 characters.
Enter the identity name in the Identity Name field. Only alphanumeric characters are allowed. Space, ?, and | are not allowed. The length is not to exceed 32 characters.
Note![]() The domain identity must have sufficient privileges in the Windows Domain Active Directory to replicate the desired domain information to optimize encrypted traffic. To configure privileges, see Configuring Microsoft Active Directory.
The domain identity must have sufficient privileges in the Windows Domain Active Directory to replicate the desired domain information to optimize encrypted traffic. To configure privileges, see Configuring Microsoft Active Directory.
Step 4![]() Click the Add Match Domain button to add the child domains of the domain (with which the device is registered) for which the Domain Identity should optimize the encrypted traffic. You can add up to 32 child domains. If you do not want the Domain Identity to optimize the traffic for any of the child domains, you can delete the selected match domain items.
Click the Add Match Domain button to add the child domains of the domain (with which the device is registered) for which the Domain Identity should optimize the encrypted traffic. You can add up to 32 child domains. If you do not want the Domain Identity to optimize the traffic for any of the child domains, you can delete the selected match domain items.
Note![]() This is available only on devices running WAAS Version 5.4 and above.
This is available only on devices running WAAS Version 5.4 and above.
The domain identity appears in the Encrypted Services Domain Identities list (Figure 12-4).
Figure 12-4 Encrypted Services—Domain Identity
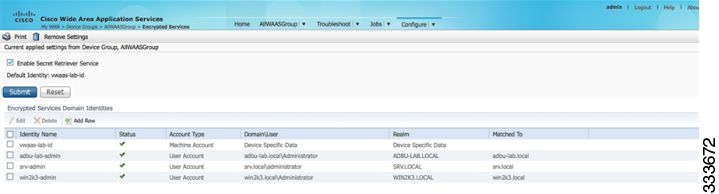
To configure and verify Encrypted Services Domain Identities from the CLI, use the windows-domain encrypted-service global configuration command and the show windows-domain encrypted-service EXEC command.
Creating and Configuring a User Account
Note![]() For definitions of user account, user account identity and other Microsoft Active Directory terms, see Terms Used with Microsoft Active Directory.
For definitions of user account, user account identity and other Microsoft Active Directory terms, see Terms Used with Microsoft Active Directory.
To create a user account and configure a user account identity, follow these steps:
Step 1![]() From the WAAS Central Manager menu, choose Devices > device-name ( or Device Groups > device-group-name).
From the WAAS Central Manager menu, choose Devices > device-name ( or Device Groups > device-group-name).
Step 2![]() From the menu, choose Configure > Security > Windows Domain > Encrypted Services.
From the menu, choose Configure > Security > Windows Domain > Encrypted Services.
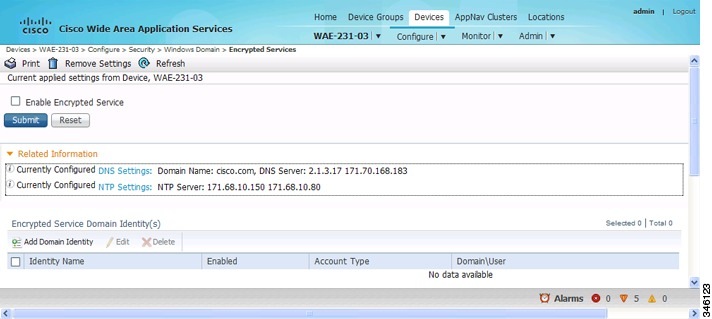
The Encrypted Services window appears (Figure 12-5).
Figure 12-5 Encrypted Services
Step 3![]() Click Add Domain Identity to add a user account domain identity.
Click Add Domain Identity to add a user account domain identity.
The Domain Identity window appears (Figure 12-6).
Figure 12-6 Add Domain Identity—User Account
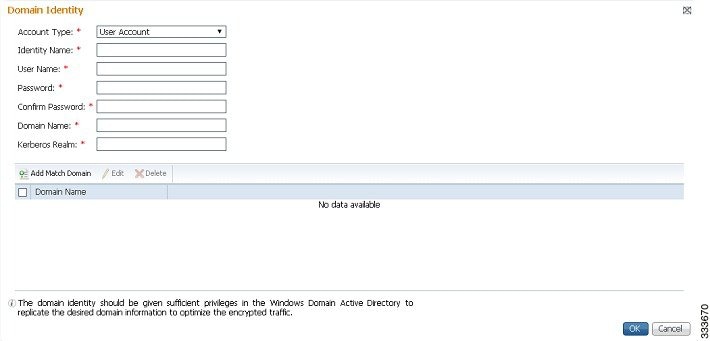
a.![]() Choose user account from the Account Type drop-down list.
Choose user account from the Account Type drop-down list.
b.![]() Enter the identity name in the Identity Name field. Only alphanumeric characters are allowed. Space, ?, and | are not allowed. The length is not to exceed 32 characters.
Enter the identity name in the Identity Name field. Only alphanumeric characters are allowed. Space, ?, and | are not allowed. The length is not to exceed 32 characters.
c.![]() Enter username and password.
Enter username and password.
f.![]() Click Add Match Domain to add the child domains of the selected domain, for which the Domain Identity should optimize the encrypted traffic. You can add up to 32 child domains. If you do not want the Domain Identity to optimize the traffic for any of the child domains, you can delete the selected match domain items.
Click Add Match Domain to add the child domains of the selected domain, for which the Domain Identity should optimize the encrypted traffic. You can add up to 32 child domains. If you do not want the Domain Identity to optimize the traffic for any of the child domains, you can delete the selected match domain items.
Note![]() The domain identity must have sufficient privileges in the Windows Domain Active Directory to replicate the desired domain information to optimize encrypted traffic. For information about configuring privileges, see Configuring Microsoft Active Directory.
The domain identity must have sufficient privileges in the Windows Domain Active Directory to replicate the desired domain information to optimize encrypted traffic. For information about configuring privileges, see Configuring Microsoft Active Directory.
The domain identity appears in the Encrypted Services Domain Identities list.
Note![]() Secure store encryption is used for the user account domain identity password. If secure store cannot be opened, an alarm is raised indicating that the configuration updates could not be stored on the device. After secure store can be opened and the configuration updates are successfully stored on the device, the alarm is cleared.
Secure store encryption is used for the user account domain identity password. If secure store cannot be opened, an alarm is raised indicating that the configuration updates could not be stored on the device. After secure store can be opened and the configuration updates are successfully stored on the device, the alarm is cleared.
To configure and verify Encrypted Services Domain Identities from the CLI, use the windows-domain encrypted-service global configuration command and the show windows-domain encrypted-service EXEC command.
Configuring Microsoft Active Directory
To grant Cisco WAAS permission to accelerate Microsoft Exchange-encrypted email sessions, follow these steps:
Step 1![]() Using an account with Domain Administrator privileges, launch the Active Directory Users and Computers application.
Using an account with Domain Administrator privileges, launch the Active Directory Users and Computers application.
Note![]() This group is for accounts that WAAS will use to optimize Exchange traffic. Normal users and computers should not be added to this group.
This group is for accounts that WAAS will use to optimize Exchange traffic. Normal users and computers should not be added to this group.
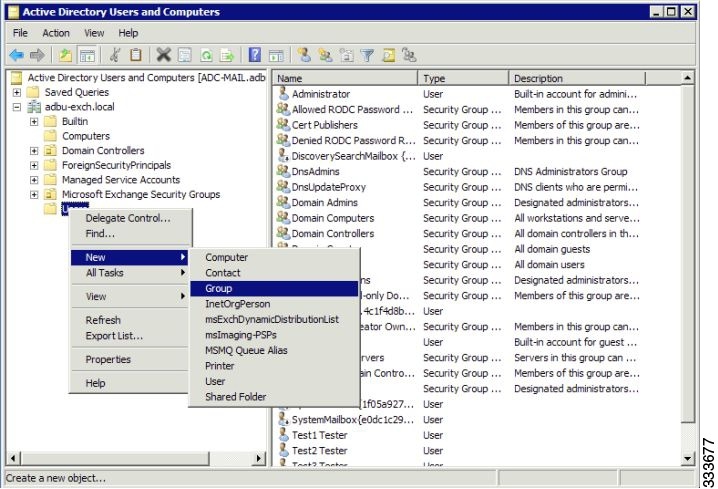
a.![]() Right-click the Unit to contain the new group and choose New > Group (Figure 12-7).
Right-click the Unit to contain the new group and choose New > Group (Figure 12-7).
Figure 12-7 Active Directory—Add Group
b.![]() Enter a name in the Group name field and select the following attributes:
Enter a name in the Group name field and select the following attributes:
Step 3![]() Configure the permissions required by WAAS.
Configure the permissions required by WAAS.
a.![]() In the Active Directory Users and Computers application window, choose View > Advanced Features from the menu bar.
In the Active Directory Users and Computers application window, choose View > Advanced Features from the menu bar.
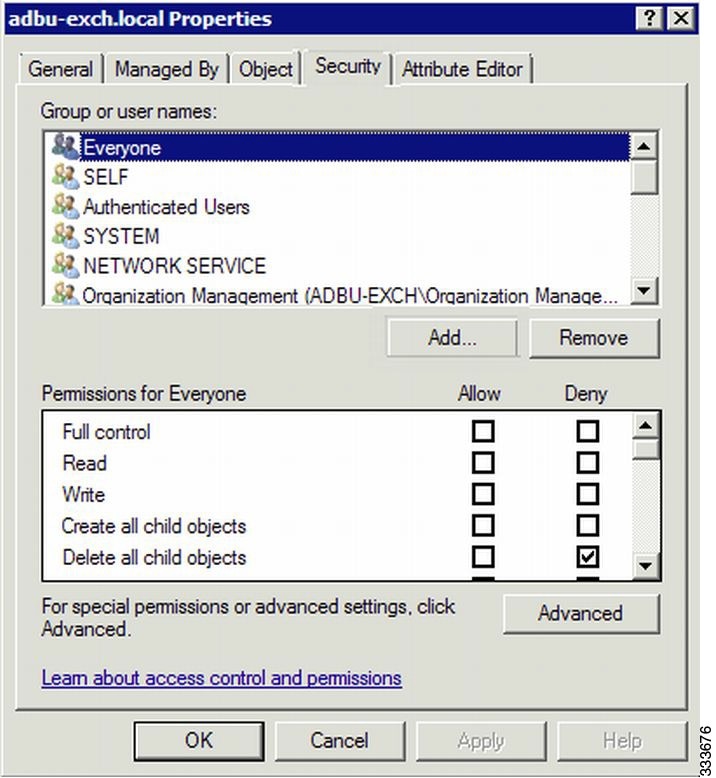
b.![]() Right-click the root of the domain and choose Properties.
Right-click the root of the domain and choose Properties.
c.![]() Click the Security tab (Figure 12-8).
Click the Security tab (Figure 12-8).
Figure 12-8 Active Directory—Security Tab
d.![]() Click Add in the Group or User Names section.
Click Add in the Group or User Names section.
e.![]() Enter the name of the new group in the Enter the object names to select field.
Enter the name of the new group in the Enter the object names to select field.
f.![]() Click OK to add the new group to the list.
Click OK to add the new group to the list.
g.![]() Check the check box adjacent to the new group in the Group or user names list and set the following permissions to Allow:
Check the check box adjacent to the new group in the Group or user names list and set the following permissions to Allow:
–![]() Replicating Directory Changes
Replicating Directory Changes
–![]() Replicating Directory Changes All
Replicating Directory Changes All
Step 4![]() Add an account to the group.
Add an account to the group.
User or workstation (computer) accounts must be added to the new group for WAAS Exchange Encrypted email optimization.
a.![]() Right-click on the account you want to add and select the Member Of tab.
Right-click on the account you want to add and select the Member Of tab.
c.![]() Choose the new group you created and click OK.
Choose the new group you created and click OK.
Active Directory permissions configuration is complete.
Managing Domain Identities and Encrypted MAPI State
Editing an Existing Domain Identity
You can modify the attributes of an existing domain identity on a WAAS device, if needed.
Note![]() If the password for a user account has been changed in the Active Directory, you must edit the user account domain identity on the WAAS device to match the new Active Directory password.
If the password for a user account has been changed in the Active Directory, you must edit the user account domain identity on the WAAS device to match the new Active Directory password.
The following restrictions apply:
- For a machine account identity, only the state of the domain identity (enabled or disabled) can be modified from a WAAS device.
- For a user account identity, only the state of the domain identity (enabled or disabled) and the password can be modified from a WAAS device.
To change the password for a user account domain identity on a WAAS device when the password for the account in the Active Directory has changed, follow these steps:
Step 1![]() From the WAAS Central Manager menu, choose Devices > device-name ( or Device Groups > device-group-name).
From the WAAS Central Manager menu, choose Devices > device-name ( or Device Groups > device-group-name).
Step 2![]() From the menu, choose Configure > Security > Windows Domain > Encrypted Services.
From the menu, choose Configure > Security > Windows Domain > Encrypted Services.
The Encrypted Services window appears.
Step 3![]() Select the user account domain identity to modify and click the Edit icon.
Select the user account domain identity to modify and click the Edit icon.
The Domain Identity window appears.
Step 4![]() Change the password in the Password field. The password should be the same as the password for the account in Active Directory.
Change the password in the Password field. The password should be the same as the password for the account in Active Directory.
Deleting an Existing Domain Identity
To delete a domain identity on a WAAS device, follow these steps:
Step 1![]() From the WAAS Central Manager menu, choose Devices > device-name ( or Device Groups > device-group-name).
From the WAAS Central Manager menu, choose Devices > device-name ( or Device Groups > device-group-name).
Step 2![]() From the menu, choose Configure > Security > Windows Domain > Encrypted Services.
From the menu, choose Configure > Security > Windows Domain > Encrypted Services.
The Encrypted Services window appears.
Step 3![]() Select one or more domain identities to delete and click the Delete icon to remove the domain identity configured on the WAAS device.
Select one or more domain identities to delete and click the Delete icon to remove the domain identity configured on the WAAS device.
A warning message appears if the domain identity is being used for optimizing encrypted traffic.
Step 4![]() Click OK to accept or Cancel to abort the procedure.
Click OK to accept or Cancel to abort the procedure.
Disabling Encrypted MAPI
To disable Encrypted MAPI, follow these steps:
Step 1![]() From the WAAS Central Manager menu, choose Devices > device-name ( or Device Groups > device-group-name).
From the WAAS Central Manager menu, choose Devices > device-name ( or Device Groups > device-group-name).
Step 2![]() Disable Encrypted Service.
Disable Encrypted Service.
a.![]() From the menu, choose Configure > Security > Windows Domain > Encrypted Services.
From the menu, choose Configure > Security > Windows Domain > Encrypted Services.
The Encrypted Services window appears.
b.![]() Uncheck the Enable Encrypted Service check box.
Uncheck the Enable Encrypted Service check box.
c.![]() Click Submit to save your changes.
Click Submit to save your changes.
Step 3![]() Disable Encrypted MAPI Traffic Optimization.
Disable Encrypted MAPI Traffic Optimization.
a.![]() From the menu, choose Configure > Acceleration > Enabled Features.
From the menu, choose Configure > Acceleration > Enabled Features.
The Enabled Features window appears.
b.![]() Uncheck the Encrypted MAPI Traffic Optimization check box.
Uncheck the Encrypted MAPI Traffic Optimization check box.
c.![]() Click Submit to save your changes.
Click Submit to save your changes.
Encrypted MAPI Acceleration Statistics
To view the statistics for Encrypted MAPI connections, see Using Predefined Reports to Monitor WAAS in Chapter 15, “Monitoring Your WAAS Network,” and see the MAPI acceleration reports.
Cisco WAAS MAPI RPC over HTTP(S)
RPC over HTTP allows Outlook clients to access Exchange servers from outside the enterprise network using HTTP or HTTPs as a transport for RPC protocol. It allows a client on the Internet to connect securely to a Microsoft Exchange Server without having to log into a virtual private network (VPN) first.
An RPC-HTTP (RPCH) module in WAAS, integrated into the existing WAAS MAPI optimizer will provide WAAS the ability to optimize MAPI over RPC-HTTP(S) traffic.
WAAS Version 6.2.x supports L7 optimization for RPCHTTP(S) traffic.
Microsoft Outlook and Exchange Versions Supported for Cisco WAAS MAPI RPC over HTTP(S)
Table 12-2 shows the clients and servers supporting WAAS MAPI RPC over HTTP(S):
Table 12-2 Clients and Servers Supporting WAAS MAPI RPC over HTTP(S)
|
|
|
|---|---|
Exchange 2013 |
|
Exchange 2010 |
|
Exchange 2013 and Exchange 2016 can be configured for MAPI over HTTP support. MAPI over HTTP traffic will not be optimized by MAPI accelerator. However, MAPI over HTTP traffic will get L4 optimization benefits from WAAS (THSDL).
Configuration pre-requisites for optimizing MAPI RPC over HTTP(S)
To enable optimization of MAPI RPC over HTTP(S), follow these steps:
Step 1![]() Ensure that the SSL, HTTP and MAPI accelerators are enabled. If you have enabled SSL Interposer (SSL Accelerator V2) on both branch and data center devices, MAPI over RPC HTTPS will use Smart-SSL and not SSL Accelerator V1.
Ensure that the SSL, HTTP and MAPI accelerators are enabled. If you have enabled SSL Interposer (SSL Accelerator V2) on both branch and data center devices, MAPI over RPC HTTPS will use Smart-SSL and not SSL Accelerator V1.
Step 2![]() Configure SSL acceleration. For more information, see Configuring SSL Acceleration. If you enable SSL Interposer (SSL Accelerator V2) on both branch and data center devices, MAPI over RPC HTTPS will use Smart-SSL and not SSL Accelerator V1.
Configure SSL acceleration. For more information, see Configuring SSL Acceleration. If you enable SSL Interposer (SSL Accelerator V2) on both branch and data center devices, MAPI over RPC HTTPS will use Smart-SSL and not SSL Accelerator V1.
Step 3![]() When you configure SSL acceleration, be sure to enable protocol chaining, by checking the Enable protocol chaining check box on the SSL Accelerated Services window.
When you configure SSL acceleration, be sure to enable protocol chaining, by checking the Enable protocol chaining check box on the SSL Accelerated Services window.
Note![]() If protocol chaining is not enabled, the WAAS device will only optimize SSL traffic on the specified IP address and port.
If protocol chaining is not enabled, the WAAS device will only optimize SSL traffic on the specified IP address and port.
Step 4![]() Configure a windows domain identity on the core device, for encrypted MAPI connections.
Configure a windows domain identity on the core device, for encrypted MAPI connections.
Step 5![]() Ensure encryption is enabled in MAPI accelerator. For more information, refer to Configuring Encrypted MAPI Settings
Ensure encryption is enabled in MAPI accelerator. For more information, refer to Configuring Encrypted MAPI Settings
MAPI Acceleration Charts for Cisco WAAS MAPI RPC over HTTP(S)
The MAPI Acceleration report displays MAPI acceleration statistics. For WAAS Version 5.5.3 and above, the following MAPI acceleration charts are added or modified:
- MAPI: Handled Traffic Pattern—A new pie diagram that shows the three different types of traffic handled by the MAPI AO. For more information, see MAPI: Handled Traffic Pattern in Chapter 15, “Monitoring Your WAAS Network.”
- MAPI: Connection Details—An existing chart for MAPI session connection statistics, MAPI: Connection Details now includes a new classification for optimized TCP and RPC-HTTP(S) MAPI connections. For more information, see MAPI: Connection Details in Chapter 15, “Monitoring Your WAAS Network.”
Configuring SMB Acceleration
The SMB application accelerator handles optimizations of file server operations. These optimizations apply to SMBv1, SMBv2 and SMBv3. It can be configured to perform the following file server optimizations:
- SMB Print Optimization—A centralized print deployment reduces management overhead and increases cost savings. SMB Print Optimization optimizes print traffic by utilizing a centralized printer server, which resides in the data center. This removes the need for local print servers in the branches. The three most common uses for a centralized printer server are: to print from branch client to branch printer, to print from branch client to data center printer, and to print from data center client to branch printer.
- Read Ahead Optimization—The SMB accelerator performs a read-ahead optimization (SMBv1 only) on files that use the oplocks feature. When a client sends a read request for a file, it is likely that the accelerator may issue more read requests for the same file. To reduce the use of network bandwidth to perform these functions over the WAN on the file server, the SMB accelerator performs read-ahead optimization by proactively reading more file data than what has been initially requested by the client.
- Directory Listing Optimization—A significant portion of the traffic on the network is for retrieving directory listings. The SMB accelerator optimizes directory listings from the file server by prefetching. For directory prefetching, a request from the client is expanded to prefetch up to 64 KB of directory listing content. The SMB accelerator buffers the prefetched directory listing data until the client has requested all the data. If the directory listing size exceeds 64 KB, a subsequent request from the client is expanded by the SMB accelerator again to prefetch content up to 64 KB. This continues until all the entries of the directory are returned to the client.
- Directory Browsing Optimization - The SMB accelerator optimizes directory browsing by prefetching SMBv2 data from the file server and caching it in the RAM infrastructure of the WAE. When directory query requests are made by the client, the data is fetched from the cached data. To accommodate multiple client requests, locking mechanisms are in place while accessing parent directory and child files. Additionally, because the infrastructure has limited memory, new requests are cached only when memory is available.
- Metadata Optimization—The SMB accelerator optimizes fetching metadata from the file server through metadata prefetching. Additional metadata requests are tagged along with the client request and are sent to the file server to prefetch more information levels than what was requested by the client.
- Named Pipe Optimization—The SMB accelerator optimizes frequent requests from Windows Explorer to the file server to retrieve share, server, and workstation information. Each of these requests involves a sequence of operations that include opening and binding to the named pipe, making the RPC request, and closing the named pipe. Each operation incurs a round trip to the file server. To reduce the use of network bandwidth to perform these functions over the WAN on the file server, the SMB accelerator optimizes the traffic on the network by caching named pipe sessions and positive RPC responses.
- Write Optimization—The SMB accelerator performs write optimization by speeding up the write responses to the client by acknowledging the Write requests to the client whenever possible and, at the same time, streaming the Write requests over the WAN to the server.
- Not-Found Metadata caching—Applications sometimes send requests for directories and files that do not exist on file servers. For example, Windows Explorer accesses the Alternate Data Streams (ADS) of the file it finds. With negative Not-Found (NF) metadata caching, the full paths to those nonexistent directories and files are cached so that further requests for the same directories and files get local denies to save the round trips of sending these requests to the file servers.
- DRE-LZ Hints—The SMB accelerator provides DRE hints to improve system performance and resources utilization. At the connection level, the SMB accelerator uses the BEST_COMP latency sensitivity level for all connections, because it gives the best compression. At the message level, the SMB accelerator provides message-based DRE hints for each message to be transmitted over the WAN.
- Microsoft Optimization—The SMB accelerator optimizes file operations for Microsoft applications by identifying lock request sequences for file name patterns supported by Microsoft Office applications.
- Invalid FID Optimization—The SMB accelerator optimizes SMB2 and SMB3 clients by locally denying attempts to access files with invalid file handle values instead of sending such requests to the file servers.
- Batch Close Optimization—The SMB accelerator performs asynchronous file close optimizations on all SMB traffic.
- Read Cache optimization—The SMB accelerator optimizes read operations in SMB2 by caching read response data so that files can be served locally.
- Write Optimization —The SMB accelerator improves system performances by performing asynchronous write operations.
- Signed Optimization — The SMB accelerator provides L7 optimization of all SMB traffic.
- SMB v3 Encrypted Optimization - The SMB accelerator provides L7 optimization of encrypted SMB v3 traffic.
To enable the SMB accelerator, check the SMB Accelerator check box in the Enabled Features window.
To configure the SMB acceleration settings, follow these steps:
Step 1![]() From the WAAS Central Manager menu, choose Devices > device-name (or Device Groups > device-group-name).
From the WAAS Central Manager menu, choose Devices > device-name (or Device Groups > device-group-name).
Step 2![]() Choose Configure > Acceleration > SMB Settings.
Choose Configure > Acceleration > SMB Settings.
The SMB Settings window appears (Figure 12-9).
Figure 12-9 SMB Accelerator Configuration Window
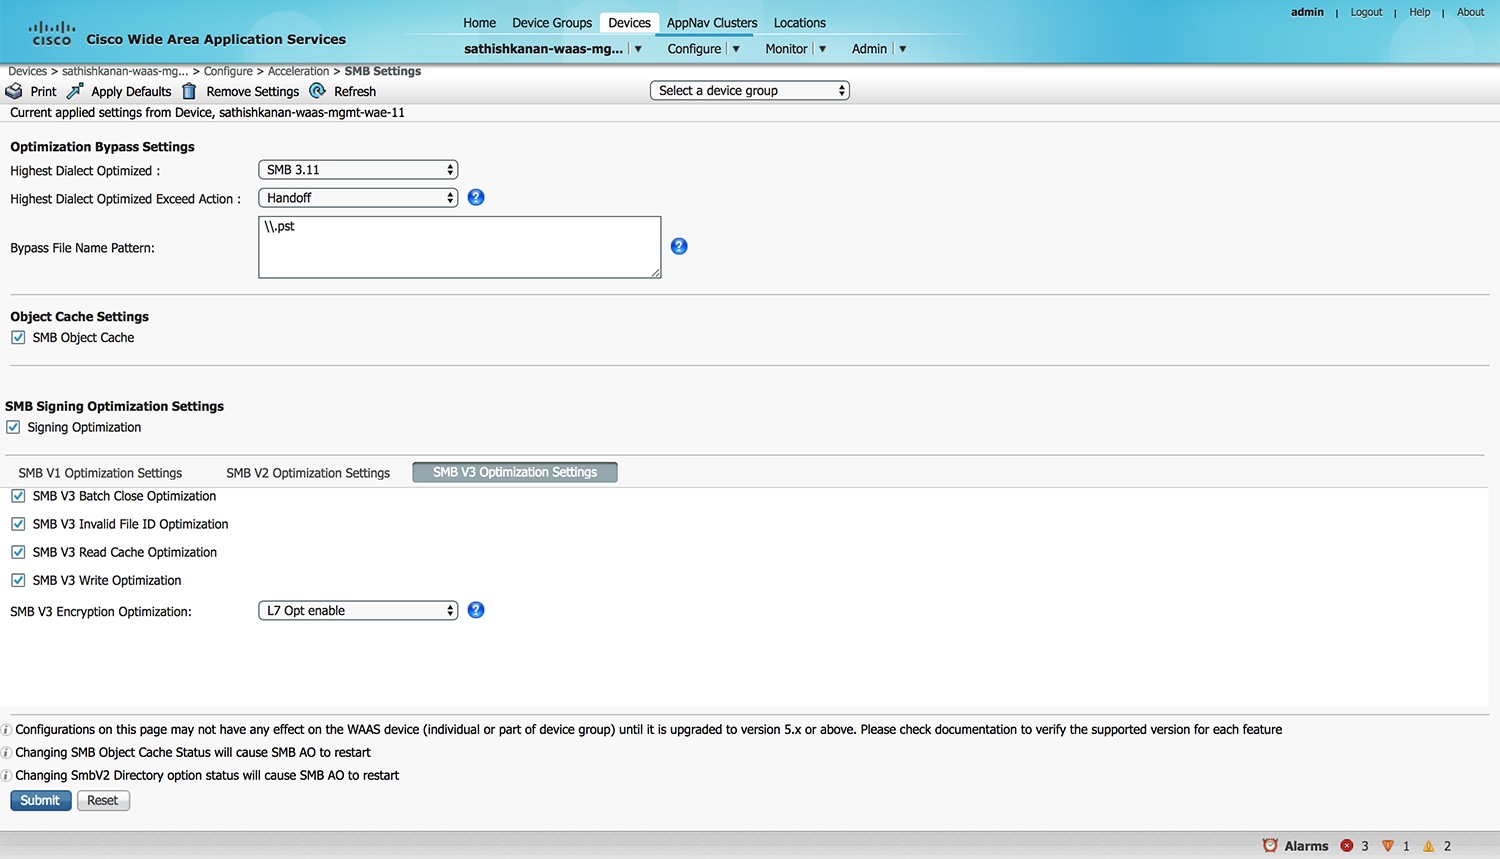
Step 3![]() From the Highest Dialect Optimized drop-down list, choose the highest dialect to optimize. The available options are:
From the Highest Dialect Optimized drop-down list, choose the highest dialect to optimize. The available options are:
Step 4![]() From the Highest Dialect Optimized Exceed Action drop-down list, choose the action for the dialects that are higher than the one chosen as the highest dialect to optimize:
From the Highest Dialect Optimized Exceed Action drop-down list, choose the action for the dialects that are higher than the one chosen as the highest dialect to optimize:
- Mute—The dialects higher than the one chosen as the highest dialect to optimize are removed from the negotiation list. This is the default selection.
Note![]() The Mute option of SMB AO is deprecated in dialects 3.x and 2.0 of SMB; muting within these versions has been found to be unsuccessful in terms of optimization.
The Mute option of SMB AO is deprecated in dialects 3.x and 2.0 of SMB; muting within these versions has been found to be unsuccessful in terms of optimization.
- Handoff—If the negotiated dialect is higher than the chosen highest dialect to optimize, the connection is handed off to the generic accelerator.
Note![]() For SMB 2.1 only, you must configure the Handoff parameter from the CLI using the accelerator smb smb2-1 exceed-action handoff global configuration command. If you use the Central Manager to select the Handoff parameter for SMB 2.1, the Highest Dialect Optimized Exceed Action will not take effect, and “Handoff” will not be displayed in commands like the show running-configuration command or the show accelerator smb command.
For SMB 2.1 only, you must configure the Handoff parameter from the CLI using the accelerator smb smb2-1 exceed-action handoff global configuration command. If you use the Central Manager to select the Handoff parameter for SMB 2.1, the Highest Dialect Optimized Exceed Action will not take effect, and “Handoff” will not be displayed in commands like the show running-configuration command or the show accelerator smb command.
Step 5![]() In the Bypass File Name Pattern field, enter the patterns for the file names that you want the SMB accelerator to bypass optimization for. The files whose names match the specified expressions are not optimized.
In the Bypass File Name Pattern field, enter the patterns for the file names that you want the SMB accelerator to bypass optimization for. The files whose names match the specified expressions are not optimized.
Step 6![]() Check the SMB Object Cache check box if you want to enable disk caching for SMB traffic.
Check the SMB Object Cache check box if you want to enable disk caching for SMB traffic.
Step 7![]() Check the Signing Optimization check box to enable optimization of signed SMB v2 and v3 traffic. This check box is checked by default.
Check the Signing Optimization check box to enable optimization of signed SMB v2 and v3 traffic. This check box is checked by default.
An SMB connection request can originate from the Branch office to the Data Center or vice-versa. For every connection, the WAE near the requestor, takes the Edge WAE’s role and WAE near the smb server takes the Core WAE’s role.
The following prerequisites, at the Core and Edge WAE, are necessary to ensure that a signed connection is optimized:
a.![]() On the Core WAE, configure a valid user-identity with administrator privileges to enable secret-retrieval to fetch and cache the long term service key of the smb server using the global configuration command:
On the Core WAE, configure a valid user-identity with administrator privileges to enable secret-retrieval to fetch and cache the long term service key of the smb server using the global configuration command:
(config)#windows-domain encryption-service identity [identity] user-account name [admin-username] domain <your.domain] realm [YOUR.DOMAIN] password
Verify the identity configuration by using the following EXEC Command.
sh windows-domain encryption-service identity detail
For Kerberos Authentication, ensure time synchronization between Client, Server, Core WAE and the Domain Controller.
If you want to verify if a connection is signed or not you can do so by looking into the SMBv2 Negotiate packet. The Signing Required field should be set to “True” in either the Negotiate Request or the Negotiate Response exchange.
These configurations are similar to the eMAPI configuration. For more information, see Step 6 of Configuring Encrypted MAPI Settings.
b.![]() Verify that the WAN Secure mode is enabled. WAN Secure’s secure connection enables the key to be transported to the Edge WAE.
Verify that the WAN Secure mode is enabled. WAN Secure’s secure connection enables the key to be transported to the Edge WAE.
The default recommended mode is Auto. You can verify the state of WAN Secure mode using the following EXEC command:
If necessary, you can change the state of WAN Secure using the following global configuration command:
accelerator smb wansecure-mode {always | auto | none}
c.![]() Verify if the WAE devices are registered and are online with the WAAS Central Manager.
Verify if the WAE devices are registered and are online with the WAAS Central Manager.
Step 8![]() Click the SMBV1 Optimization Settings tab to perform the following tasks:
Click the SMBV1 Optimization Settings tab to perform the following tasks:
–![]() Check the Meta Data Optimization check box to enable metadata optimization. This check box is checked by default.
Check the Meta Data Optimization check box to enable metadata optimization. This check box is checked by default.
–![]() Check the Microsoft Office Optimization check box to enable optimizations for all versions of Microsoft Office. The SMB accelerator does not perform read-ahead, write, and lock-ahead optimizations for Microsoft Office if this optimization is disabled. This check box is checked by default.
Check the Microsoft Office Optimization check box to enable optimizations for all versions of Microsoft Office. The SMB accelerator does not perform read-ahead, write, and lock-ahead optimizations for Microsoft Office if this optimization is disabled. This check box is checked by default.
–![]() Check the Named Pipe Optimization check box to enable named pipe optimization by caching named pipe sessions and positive RPS responses. This check box is checked by default.
Check the Named Pipe Optimization check box to enable named pipe optimization by caching named pipe sessions and positive RPS responses. This check box is checked by default.
–![]() Check the ‘Not Found’ Cache Optimization check box to enable caching pathnames of files not found. This check box is checked by default.
Check the ‘Not Found’ Cache Optimization check box to enable caching pathnames of files not found. This check box is checked by default.
–![]() Check the Print Optimization check box to enable SMB to configure a centralized print deployment. This check box is checked by default.
Check the Print Optimization check box to enable SMB to configure a centralized print deployment. This check box is checked by default.
–![]() Check the Read Ahead Optimization check box to enable the SMB to optimize the quantity of read-ahead data from the file. The SMB performs a read-ahead optimization only when the file is opened using the oplocks feature. This check box is checked by default.
Check the Read Ahead Optimization check box to enable the SMB to optimize the quantity of read-ahead data from the file. The SMB performs a read-ahead optimization only when the file is opened using the oplocks feature. This check box is checked by default.
–![]() Check the Write Optimization check box to enable the write optimization by speeding up the write responses to the client. This check box is checked by default
Check the Write Optimization check box to enable the write optimization by speeding up the write responses to the client. This check box is checked by default
Click SMBV2 Optimization Settings tab to perform the following tasks:
–![]() Check the Batch Close Optimization check box to enable asynchronous files close optimizations. This check box is checked by default.
Check the Batch Close Optimization check box to enable asynchronous files close optimizations. This check box is checked by default.
–![]() Check the Invalid FID Optimization check box to enable optimization of files with invalid file handle values. This check box is checked by default.
Check the Invalid FID Optimization check box to enable optimization of files with invalid file handle values. This check box is checked by default.
–![]() Check the SMBV2 Read Cache Optimization check box to enable read response caching. This check box is checked by default.
Check the SMBV2 Read Cache Optimization check box to enable read response caching. This check box is checked by default.
–![]() Check the SMBV2 Write Optimization check box to enable asynchronous write operations. This check box is checked by default.
Check the SMBV2 Write Optimization check box to enable asynchronous write operations. This check box is checked by default.
–![]() Check the Directory Service Optimization check box to enable optimization of directory browsing performance for SMB v2 traffic. The check box is checked by default. Directory service optimization is available only on devices or device groups running software image 6.1.1.
Check the Directory Service Optimization check box to enable optimization of directory browsing performance for SMB v2 traffic. The check box is checked by default. Directory service optimization is available only on devices or device groups running software image 6.1.1.
Click SMBV3 Optimization Settings tab to perform the following tasks:
–![]() Check the SMB v3 Batch Close Optimization check box to enable asynchronous files close optimizations. This check box is checked by default.
Check the SMB v3 Batch Close Optimization check box to enable asynchronous files close optimizations. This check box is checked by default.
–![]() Check the SMB v3 Invalid FID Optimization check box to enable optimization of files with invalid file handle values. This check box is checked by default.
Check the SMB v3 Invalid FID Optimization check box to enable optimization of files with invalid file handle values. This check box is checked by default.
–![]() Check the SMB v3 Read Cache Optimization check box to enable read response caching. This check box is checked by default.
Check the SMB v3 Read Cache Optimization check box to enable read response caching. This check box is checked by default.
–![]() Check the SMB v3 Write Optimization check box to enable asynchronous write operations. This check box is checked by default.
Check the SMB v3 Write Optimization check box to enable asynchronous write operations. This check box is checked by default.
–![]() Select the type of optimization you want from the SMB v3 Encryption Optimization drop down box - L7 Optimization, L4 only optimization or disable SMB v3 encrypted optimization. L7 optimization is selected by default.
Select the type of optimization you want from the SMB v3 Encryption Optimization drop down box - L7 Optimization, L4 only optimization or disable SMB v3 encrypted optimization. L7 optimization is selected by default.
Step 9![]() Click Submit to save the changes.
Click Submit to save the changes.
To configure SMB acceleration from the CLI, use the accelerator smb global configuration command.
Configuring ICA Acceleration
The Independent Computing Architecture (ICA) application accelerator provides WAN optimization on a WAAS device for ICA traffic that is used to access a virtual desktop infrastructure (VDI). This is done through a process that is both automatic and transparent to the client and server.
ICA acceleration is enabled on a WAAS device by default.
To enable the ICA accelerator, check the ICA Accelerator check box in the Enabled Features window (Figure 12-10).
To configure the ICA acceleration settings, follow these steps:
Step 1![]() From the WAAS Central Manager menu, choose Devices > device-name ( or Device Groups > device-group-name).
From the WAAS Central Manager menu, choose Devices > device-name ( or Device Groups > device-group-name).
Step 2![]() Choose Configure > Acceleration > ICA Settings.
Choose Configure > Acceleration > ICA Settings.
The ICA Acceleration Configuration window appears.
Figure 12-10 ICA Acceleration Configuration Window
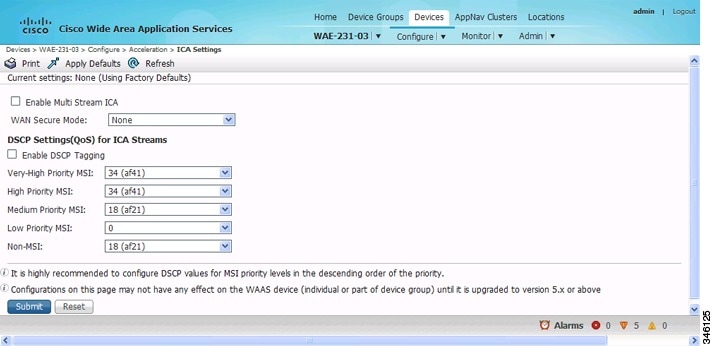
Step 3![]() Check the Enable Multi Stream ICA check box to allow the client and server up to three additional TCP connections that optimize multistream ICA traffic.
Check the Enable Multi Stream ICA check box to allow the client and server up to three additional TCP connections that optimize multistream ICA traffic.
Step 4![]() From the WAN Secure Mode drop-down list, choose the mode. The options are:
From the WAN Secure Mode drop-down list, choose the mode. The options are:
Note![]() The state of WAN Secure mode in both Branch WAE and Data Center WAE must match for connections to get optimized with the ICA accelerator.
The state of WAN Secure mode in both Branch WAE and Data Center WAE must match for connections to get optimized with the ICA accelerator.
Step 5![]() In the DSCP Settings (QoS) under ICA Streams section, check the Enable DSCP Tagging check box to configure DSCP values for MSI priority levels. These values override the defaults. The valid range is from 0 to 63.
In the DSCP Settings (QoS) under ICA Streams section, check the Enable DSCP Tagging check box to configure DSCP values for MSI priority levels. These values override the defaults. The valid range is from 0 to 63.
Note![]() Configure DSCP values for MSI priority levels in the descending order of the priority.
Configure DSCP values for MSI priority levels in the descending order of the priority.
a.![]() Very High-Priority MSI—Typically real-time traffic, such as audio. The default is af41.
Very High-Priority MSI—Typically real-time traffic, such as audio. The default is af41.
b.![]() High-Priority MSI—Typically interactive traffic. The default is af41.
High-Priority MSI—Typically interactive traffic. The default is af41.
c.![]() Medium-Priority MSI—Typically bulk data. The default is af21.
Medium-Priority MSI—Typically bulk data. The default is af21.
d.![]() Low-Priority MSI—Typically background traffic, such as printing. The default is 0—best effort.
Low-Priority MSI—Typically background traffic, such as printing. The default is 0—best effort.
e.![]() Non-MSI—(the default is af21)
Non-MSI—(the default is af21)
Note![]() MSI priority configuration might not apply to devices earlier than WAAS Version 5.1.x.
MSI priority configuration might not apply to devices earlier than WAAS Version 5.1.x.
The changes are saved to the device or device group.
To configure ICA acceleration from the CLI, use the accelerator ica global configuration command.
To verify the status of WAN Secure mode from the CLI, use the show accelerator wansecure EXEC command.
Configuring ICA over Socket Secure (SOCKS) Server
In a typical deployment where NetScaler is deployed as a SOCKS proxy, the connections from the client go to the SOCKS server instead of the XenApp server.
Since the ICA optimizer accepts and intercepts only ICA and CGP packets, the packets with SOCKS headers are not recognized and the connection is handed off. The ICA traffic does not get optimized in such scenarios.
From software version 6.3.1, the WAAS software supports optimizing ICA traffic redirected over SOCKS proxy servers.
To support optimizing ICA over SOCKS, you must perform the following steps:
Step 1![]() Make the necessary changes in the NetScaler Gateway to enable the SOCKS proxy (Cache redirection server) and also make the equivalent/required changes on the StoreFront server along with updates to the default.ica file. Refer to Citrix NetScaler documentation for more information.
Make the necessary changes in the NetScaler Gateway to enable the SOCKS proxy (Cache redirection server) and also make the equivalent/required changes on the StoreFront server along with updates to the default.ica file. Refer to Citrix NetScaler documentation for more information.
Step 2![]() From the WAAS Central Manager menu, choose Devices > device-name (or Device Groups > device-group-name). Next choose Configure > Acceleration > Optimization Class-Map.
From the WAAS Central Manager menu, choose Devices > device-name (or Device Groups > device-group-name). Next choose Configure > Acceleration > Optimization Class-Map.
Step 3![]() Edit the class-map named Citrix and add the required port number using the Add Match Condition option.
Edit the class-map named Citrix and add the required port number using the Add Match Condition option.
The port number added in the class-map should be the same as the one configured for the SOCKS proxy, on the NetScaler gateway. Note that in case the SOCKS proxy port is running on ICA or CGP ports i.e. 1494 or 2498, then the existing configuration need not be modified.
Step 4![]() Select the branch device and make the necessary changes for the port number.
Select the branch device and make the necessary changes for the port number.
Alternately use the class-map type match-any citrix global configuration command to make these changes.
Limitations
ICA over SOCKS optimization has the following limitations. The NetScaler gateway does not support:
- non-default ports configured with Multi-Port Policy on XenApp for Multi-Stream ICA (MSI)
- SOCKS with ICA over SSL
Additionally, the NetScaler gateway does not support SOCKS v4. so the current functionality supports only SOCKS v5.
Configuring ICA over SSL
The WAAS software supports optimizing ICA over SSL. This allows the client and server to use the ICA protocol over an encrypted connection. To support optimizing ICA over SSL, you must perform the following steps:
- Configure ICA acceleration. See Configuring ICA Acceleration.
- Configure SSL acceleration. See Configuring SSL Acceleration.
Note![]() When you are configuring SSL acceleration, be sure to enable protocol chaining. If protocol chaining is not enabled, the WAAS device will only optimize SSL traffic on the specified IP Address and Port.
When you are configuring SSL acceleration, be sure to enable protocol chaining. If protocol chaining is not enabled, the WAAS device will only optimize SSL traffic on the specified IP Address and Port.
Configuring SSL Acceleration
The SSL (Secure Sockets Layer) application accelerator optimizes traffic on SSL encrypted connections. If SSL acceleration is not enabled, the WAAS software DRE optimizations are not very effective on SSL-encrypted traffic. The SSL application acceleration enables WAAS to decrypt and apply optimizations while maintaining the security of the connection.
Note![]() On a WAAS Express device, only SSL cipher list, SSL certificate authorities, and SSL peering service configuration are supported.
On a WAAS Express device, only SSL cipher list, SSL certificate authorities, and SSL peering service configuration are supported.
Note![]() The SSL accelerator does not optimize protocols that do not start their SSL/TLS handshake from the very first byte. The only exception is HTTPS that goes through a proxy (where the HTTP accelerator detects the start of SSL/TLS). In this case, both HTTP and SSL accelerators optimize the connection.
The SSL accelerator does not optimize protocols that do not start their SSL/TLS handshake from the very first byte. The only exception is HTTPS that goes through a proxy (where the HTTP accelerator detects the start of SSL/TLS). In this case, both HTTP and SSL accelerators optimize the connection.
The SSL application accelerator supports SSL Version 3 (SSLv3) and Transport Layer Security Version 1 (TLSv1) protocols. If a TLSv1.1 or TLSV1.2 client request is received, negotiation will not occur. Manual bypass of TLSv1.1 or TLSv1.2 packets is required in order to make these client/server connections.
Table 12-3 provides an overview of the steps you must complete to set up and enable SSL acceleration.
|
|
|
|---|---|
Prepare for configuring SSL acceleration. |
Identifies the information that you need to gather before configuring SSL acceleration on your WAAS devices. For more information, see Prerequisites for Configuring SSL Acceleration. |
Enable secure store, the Enterprise License, and SSL acceleration. |
Describes how to set up Central Manager secure store, how to enable the Enterprise License, and how to enable SSL acceleration. Secure store mode is required for secure handling of the SSL encryption certificates and keys. For more information, see Enabling Secure Store Encryption on the WAAS CM and Enabling Enterprise Licenses on the WAAS CM and WAEs. |
Enable SSL application optimization. |
Describes how to activate the SSL acceleration feature. For more information, see Enabling and Disabling the Global Optimization Features. |
Configure SSL acceleration settings. |
(Optional) Describes how to configure the basic setup of SSL acceleration. For more information, see Configuring SSL Global Settings. |
Create and manage cipher lists. |
(Optional) Describes how to select and set up the cryptographic algorithms used on your WAAS devices. For more information, see Working with Cipher Lists. |
Set up CA certificates. |
(Optional) Describes how to select, import, and manage certificate authority (CA) certificates. For more information, see Working with Certificate Authorities. |
Configure SSL management services. |
(Optional) Describes how to configure the SSL connections used between the Central Manager and WAE devices. For more information, see Configuring SSL Management Services. |
Configure SSL peering service. |
(Optional) Describes how to configure the SSL connections used between peer WAE devices for carrying optimized SSL traffic. For more information, see the Configuring SSL Peering Service. |
Configure and enable SSL-accelerated services. |
Describes how to add, configure, and enable services to be accelerated by the SSL application optimization feature. For more information, see Using SSL Accelerated Services. |
Prerequisites for Configuring SSL Acceleration
This section contains the following topics for tasks to complete before you configure SSL acceleration:
Confirming Your Network Information
Before you configure SSL acceleration, you should know the following information about your network:
- The services that you want to be accelerated on the SSL traffic
- The server IP address and port information
- The public key infrastructure (PKI) certificate and private key information, including the certificate common name and CA-signing information
- The cipher suites supported
- The SSL versions supported
Figure 12-11 shows how the WAAS software handles SSL application optimization.
Figure 12-11 SSL Acceleration Block Diagram

When you configure SSL acceleration, you must configure SSL-accelerated service on the server-side (Data Center) WAE devices. The client-side (Branch) WAE should have its secure store initialized and unlocked or opened, but does not have to have the SSL-accelerated service configured. However, the SSL accelerator must be enabled on both Data Center and Branch WAEs for SSL acceleration services to work. The WAAS Central Manager provides SSL management services and maintains the encryption certificates and keys.
Enabling Secure Store Encryption on the WAAS CM
Before you can use SSL acceleration on your WAAS system, you must enable secure store encryption on the WAAS CM. For more information on this procedure, see Configuring Secure Store Settings in Chapter 10, “Configuring Other System Settings.”
Enabling Enterprise Licenses on the WAAS CM and WAEs
Before you can use SSL acceleration on your WAAS system, you must enable the Enterprise license. For more information on this procedure, see Managing Software Licenses in Chapter 10, “Configuring Other System Settings.”
Enabling SSL Acceleration on WAAS Devices
Before you can use SSL acceleration on your WAAS system, you must enable SSL acceleration on WAAS devices. For more information on this procedure, see Enabling and Disabling the Global Optimization Features.
Note![]() If the SSL accelerator is already running, you must wait for two datafeed poll cycles to be completed when registering a new WAE with a Central Manager before making any configuration changes. Otherwise the changes may not take effect.
If the SSL accelerator is already running, you must wait for two datafeed poll cycles to be completed when registering a new WAE with a Central Manager before making any configuration changes. Otherwise the changes may not take effect.
Configuring SSL Global Settings
To configure the SSL acceleration global settings, follow these steps:
Step 1![]() From the WAAS Central Manager menu, choose Devices > device-name ( or Device Groups > device-group-name).
From the WAAS Central Manager menu, choose Devices > device-name ( or Device Groups > device-group-name).
Step 2![]() Choose Configure > Security > SSL > Global Settings.
Choose Configure > Security > SSL > Global Settings.
The SSL Global Settings window appears (Figure 12-12).
Figure 12-12 SSL Global Settings Window
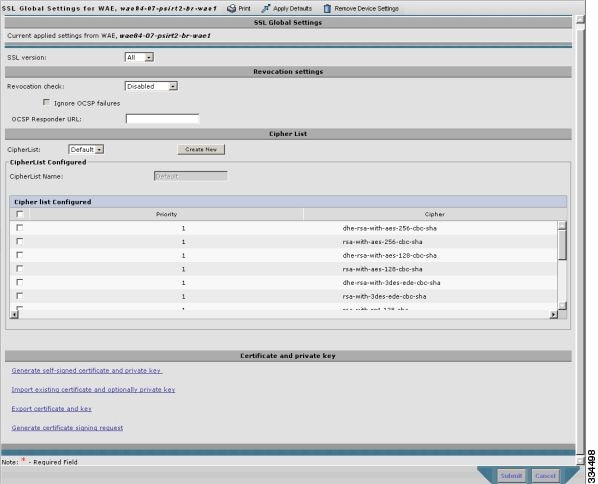
Step 3![]() To configure a device to use the SSL settings from a particular device group, choose the device group from Select a Device Group drop-down list located in the SSL global settings toolbar. A device can either use its own SSL settings, or SSL settings from a device group. However, it is not possible to configure a device to use SSL settings from multiple device groups.
To configure a device to use the SSL settings from a particular device group, choose the device group from Select a Device Group drop-down list located in the SSL global settings toolbar. A device can either use its own SSL settings, or SSL settings from a device group. However, it is not possible to configure a device to use SSL settings from multiple device groups.
Note![]() If you have configured the device with specific SSL Accelerated Services and assigned it to a Device Group, those configurations are lost when you click on the Override Group Settings on the Device Group > Configure > Security > SSL > Global Settings page.
If you have configured the device with specific SSL Accelerated Services and assigned it to a Device Group, those configurations are lost when you click on the Override Group Settings on the Device Group > Configure > Security > SSL > Global Settings page.
Step 4![]() From the SSL version drop-down list, choose the type of SSL protocol to use. Choose SSL3 for the SSL Version 3 protocol, choose TLS1 for the Transport Layer Security Version 1 protocol, or choose All to accept both SSL3 and TLS1 SSL protocols.
From the SSL version drop-down list, choose the type of SSL protocol to use. Choose SSL3 for the SSL Version 3 protocol, choose TLS1 for the Transport Layer Security Version 1 protocol, or choose All to accept both SSL3 and TLS1 SSL protocols.
Step 5![]() (Optional) Set the Online Certificate Status Protocol (OCSP) parameters for certificate revocation:
(Optional) Set the Online Certificate Status Protocol (OCSP) parameters for certificate revocation:
a.![]() From the OCSP Revocation check drop-down list, choose the OCSP revocation method.
From the OCSP Revocation check drop-down list, choose the OCSP revocation method.
Choose ocsp-url SSL accelerator to use OCSP responder specified in the OCSP Responder URL field to check the revocation status of certificates. Choose ocsp-cert-url to use the OCSP responder URL specified in the Certificate Authority.
b.![]() If the Ignore OCSP failures check box is enabled, the SSL accelerator will treat the OCSP revocation check as successful if it does not get a definite response from the OCSP responder.
If the Ignore OCSP failures check box is enabled, the SSL accelerator will treat the OCSP revocation check as successful if it does not get a definite response from the OCSP responder.
Step 6![]() From the Cipher List drop-down list, choose a list of cipher suites to be used for SSL acceleration. For more information, see Working with Cipher Lists.
From the Cipher List drop-down list, choose a list of cipher suites to be used for SSL acceleration. For more information, see Working with Cipher Lists.
Step 7![]() Choose a certificate/key pair method (Figure 12-13).
Choose a certificate/key pair method (Figure 12-13).
Figure 12-13 Configuring Service Certificate and Private Key
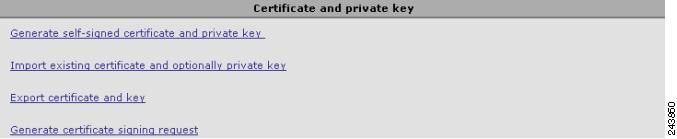
- Click Generate Self-signed Certificate Key to have the WAAS devices use a self-signed certificate/key pair for SSL.
- Click Import Existing Certificate Key to upload or paste an existing certificate/key pair.
- Click Export Certificate Key to export the current certificate/key pair.
- Click Generate Certificate Signing Request to renew or replace the existing certificate/key pair. The certificate signing request is used by the CA to generate a new certificate.
Note![]() The file that you import or export must be in either a PKCS12 format or a PEM format.
The file that you import or export must be in either a PKCS12 format or a PEM format.
- Click Import existing client certificate and optionally private key to use the client configured certificate.
For information about service certificate and private key configuration, see Configuring a Service Certificate and Private Key.
Configuring a Service Certificate and Private Key
To configure a service certificate and private key, follow these steps:
Step 1![]() To generate a self-signed certificate and private key (Figure 12-14), follow these steps:
To generate a self-signed certificate and private key (Figure 12-14), follow these steps:
Figure 12-14 Self-Signed Certificate and Private Key
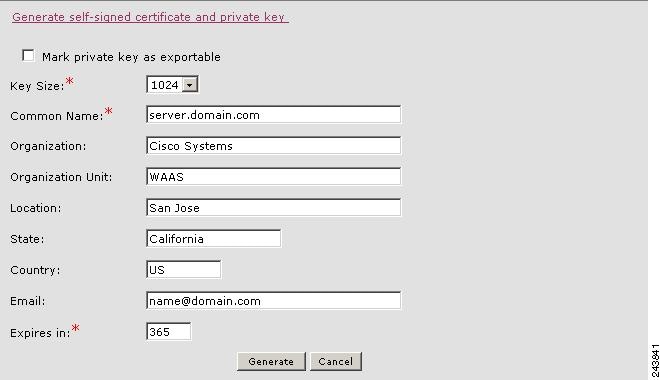
a.![]() Check the Mark private key as exportable check box to export this certificate/key in the WAAS Central Manager and device CLI later.
Check the Mark private key as exportable check box to export this certificate/key in the WAAS Central Manager and device CLI later.
b.![]() Fill in the certificate and private key fields.
Fill in the certificate and private key fields.
c.![]() Operating Considerations for Key Size field:
Operating Considerations for Key Size field:
- For WAAS Version 6.1.x and earlier, the Key Size drop-down list values are 512, 768, 1024, 1536, and 2048.
Note A self-signed certificate on WAAS Version 6.1.x or earlier with an RSA modulus size of 512 is not compatible with Mozilla FireFox Version 39 and later, or with Google Chrome Version 48 and later. A self-signed certificate on WAAS Version 6.1.x or earlier with an RSA modulus size of 512 is compatible with Internet Explorer 8 and later.
If you have previously configured the RSA modulus size as 512: to access the WAAS CM with Mozilla FireFox Version 39 and later, or with Google Chrome Version 48 and later, you must regenerate the self-signed certificate with an RSA modulus size of 2048, and then upgade to the specified version of Mozilla FireFox or Google Chrome.
- For WAAS Version 6.2.x and later, the Key Size drop-down list values are 768, 1024, 1536, and 2048. The key size 512 is not used with WAAS Version 6.2.x and later.
Step 2![]() To import an existing certificate or certificate chain and, optionally, private key (Figure 12-15), follow these steps:
To import an existing certificate or certificate chain and, optionally, private key (Figure 12-15), follow these steps:
Note![]() The Cisco WAAS SSL feature only supports RSA signing/encryption algorithm and keys.
The Cisco WAAS SSL feature only supports RSA signing/encryption algorithm and keys.
Figure 12-15 Importing Existing Certificate or Certificate Chain
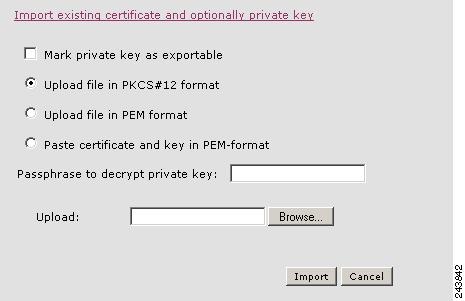
a.![]() Check the Mark private key as exportable check box to export this certificate/key in the WAAS Central Manager and device CLI later.
Check the Mark private key as exportable check box to export this certificate/key in the WAAS Central Manager and device CLI later.
b.![]() To import existing certificate or certificate chain and private key, perform one of the following tasks:
To import existing certificate or certificate chain and private key, perform one of the following tasks:
- Upload the certificate and key in PKCS#12 format (also as known Microsoft PFX format)
- Upload the certificate and private key in PEM format
- Paste the certificate and private key PEM content
If the certificate and private key are already configured, you can update only the certificate. In this case, the Central Manager constructs the certificate and private key pair using the imported certificate and current private key. This functionality can be used to update an existing self-signed certificate to one signed by the CA, or to update an expiring certificate.
The Central Manager allows importing a certificate chain consisting of an end certificate that must be specified first, a chain of intermediate CA certificates that sign the end certificate or intermediate CA certificate, and end with a root CA.
The Central Manager validates the chain and rejects it if the validity date of the CA certificate is expired, or the signing order of certificates in the chain is not consequent.
c.![]() Enter a pass-phrase to decrypt the private key, or leave this field empty if the private key is not encrypted.
Enter a pass-phrase to decrypt the private key, or leave this field empty if the private key is not encrypted.
Step 3![]() To export a configured certificate and private key (Figure 12-16), follow these steps:
To export a configured certificate and private key (Figure 12-16), follow these steps:
Figure 12-16 Export Certificate and Key
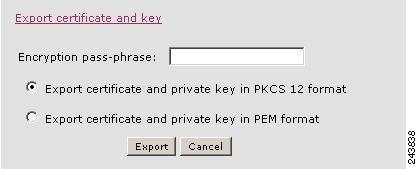
a.![]() Enter the encryption pass-phrase.
Enter the encryption pass-phrase.
b.![]() Export current certificate and private key in either PKCS#12 or PEM formats. In the case of PEM format, the both certificate and private key are included in single PEM file.
Export current certificate and private key in either PKCS#12 or PEM formats. In the case of PEM format, the both certificate and private key are included in single PEM file.
Note![]() Central Manager will not allow the export of certificate and private key if the certificate and key were marked as nonexportable when they were generated or imported.
Central Manager will not allow the export of certificate and private key if the certificate and key were marked as nonexportable when they were generated or imported.
Step 4![]() To generate a certificate-signing request from a current certificate and private key ( Figure 12-17), follow these steps:
To generate a certificate-signing request from a current certificate and private key ( Figure 12-17), follow these steps:
Figure 12-17 Generate Certificate-Signing Request

Step 5![]() To update the current certificate with one signed by the Certificate Authority:
To update the current certificate with one signed by the Certificate Authority:
a.![]() Generate PKCS#10 certificate signing request.
Generate PKCS#10 certificate signing request.
b.![]() Send generated certificate signing request to Certificate Authority to generate and sign certificate.
Send generated certificate signing request to Certificate Authority to generate and sign certificate.
c.![]() Import certificate received from the Certificate Authority using the Importing existing certificate and optionally private key option.
Import certificate received from the Certificate Authority using the Importing existing certificate and optionally private key option.
Note![]() The size of the key for a generated certificate request is the same as the size of the key in the current certificate.
The size of the key for a generated certificate request is the same as the size of the key in the current certificate.
Step 6![]() To import an existing client certificate or certificate chain and, optionally, private key (Figure 12-18), follow these steps:
To import an existing client certificate or certificate chain and, optionally, private key (Figure 12-18), follow these steps:
Figure 12-18 Import existing client certificate and optionally private key
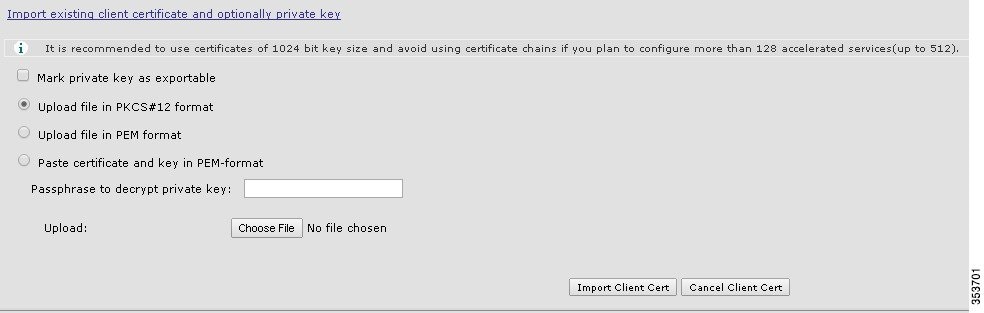
a.![]() Check the Mark private key as exportable check box to export this certificate/key in the WAAS Central Manager and device CLI later.
Check the Mark private key as exportable check box to export this certificate/key in the WAAS Central Manager and device CLI later.
b.![]() To import existing client certificate and private key, perform one of the following:
To import existing client certificate and private key, perform one of the following:
- Upload certificate and key in PKCS#12 format (also as Microsoft PFX format)
- Upload certificate and private key in PEM format
- Paste certificate and private key PEM content
If the certificate and private key are already configured, you can update the certificate only. In this case, the Central Manager constructs the certificate and private key pair using the imported client certificate and current private key. This functionality can be used to update an existing self-signed certificate to one signed by the Certificate Authority, or to update an expiring certificate.
The Central Manager allows importing a certificate chain consisting of an end certificate that must be specified first, a chain of intermediate CA certificates that sign the end certificate or intermediate CA certificate, and end with a root CA.
c.![]() Enter a pass-phrase to decrypt the private key, or leave this field empty if the private key is not encrypted.
Enter a pass-phrase to decrypt the private key, or leave this field empty if the private key is not encrypted.
d.![]() Click Choose File to navigate to the client configured certificate and Import Client Cert to successfully import the above certificate.
Click Choose File to navigate to the client configured certificate and Import Client Cert to successfully import the above certificate.
Working with Cipher Lists
Cipher lists are sets of cipher suites that you can assign to your SSL acceleration configuration. A cipher suite is an SSL encryption method that includes the key exchange algorithm, the encryption algorithm, and the secure hash algorithm.
For dual-sided deployments that use SMART-SSL acceleration, only rsa-with-aes-256-cbc-sha is supported.
To configure a cipher list, follow these steps:
Step 1![]() From the WAAS Central Manager menu, choose Devices > device-name ( or Device Groups > device-group-name).
From the WAAS Central Manager menu, choose Devices > device-name ( or Device Groups > device-group-name).
Step 2![]() Choose Configure > Security > SSL > Cipher Lists.
Choose Configure > Security > SSL > Cipher Lists.
The SSL Cipher Lists window appears (Figure 12-19).
Note![]() For a WAAS Express device, the SSL Cipher Lists window shows the same name and cipher fields, but in a slightly different format.
For a WAAS Express device, the SSL Cipher Lists window shows the same name and cipher fields, but in a slightly different format.
Figure 12-19 SSL Cipher Lists Window
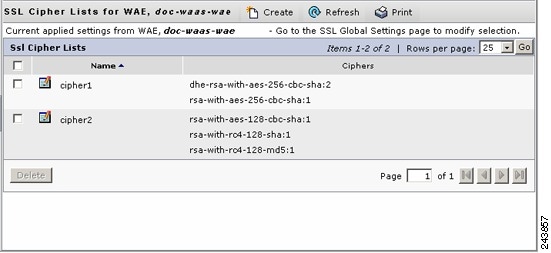
Step 3![]() Click Create to add a new cipher list.
Click Create to add a new cipher list.
The Creating New SSL Cipher List window appears (Figure 12-20).
Note![]() For a WAAS Express device, click Add Cipher List to add a new cipher list.
For a WAAS Express device, click Add Cipher List to add a new cipher list.
Figure 12-20 Creating New SSL Cipher List Window
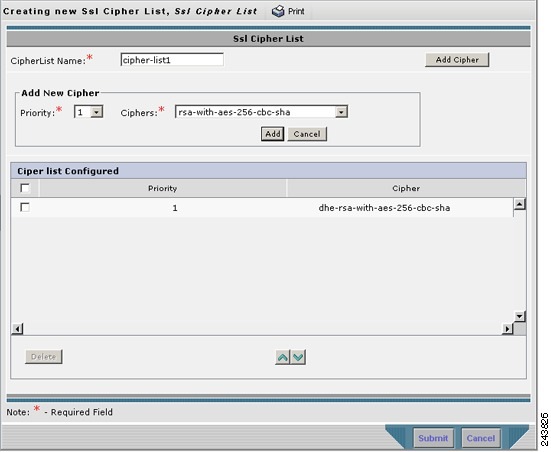
Step 4![]() Type a name for your cipher list in the Cipher List Name field.
Type a name for your cipher list in the Cipher List Name field.
Step 5![]() Click Add Cipher to add cipher suites to your cipher list.
Click Add Cipher to add cipher suites to your cipher list.
Note![]() For a WAAS Express device, select the ciphers you wish to add, skip to Step 12.
For a WAAS Express device, select the ciphers you wish to add, skip to Step 12.
Step 6![]() From the Ciphers drop-down list, choose the cipher suite that you want to add.
From the Ciphers drop-down list, choose the cipher suite that you want to add.
Note![]() If you are establishing an SSL connection to a Microsoft IIS server, do not select a DHE-based cipher suite.
If you are establishing an SSL connection to a Microsoft IIS server, do not select a DHE-based cipher suite.
Step 7![]() Choose the priority for the selected cipher suite in the Priority field.
Choose the priority for the selected cipher suite in the Priority field.
Note![]() When SSL peering service is configured, the priority associated with a cipher list on a core device takes precedence over the priority associated with a cipher list on an edge device.
When SSL peering service is configured, the priority associated with a cipher list on a core device takes precedence over the priority associated with a cipher list on an edge device.
Step 8![]() Click Add to include the selected cipher suite on your cipher list, or click Cancel to leave the list as it is.
Click Add to include the selected cipher suite on your cipher list, or click Cancel to leave the list as it is.
Step 9![]() Repeat Step 5 through Step 8 to add more cipher suites to your list as desired.
Repeat Step 5 through Step 8 to add more cipher suites to your list as desired.
Step 10![]() (Optional) To change the priority of a cipher suite, check the cipher suite check box and then use the up or down arrow buttons located below the cipher list to prioritize.
(Optional) To change the priority of a cipher suite, check the cipher suite check box and then use the up or down arrow buttons located below the cipher list to prioritize.
Note![]() The client-specified order for ciphers overrides the cipher list priority assigned here if the cipher list is applied to an accelerated service. The priorities assigned in this cipher list are only applicable if the cipher list is applied to SSL peering and management services.
The client-specified order for ciphers overrides the cipher list priority assigned here if the cipher list is applied to an accelerated service. The priorities assigned in this cipher list are only applicable if the cipher list is applied to SSL peering and management services.
Step 11![]() (Optional) To remove a cipher suite from the list, check the cipher suite’s box and then click Delete.
(Optional) To remove a cipher suite from the list, check the cipher suite’s box and then click Delete.
Step 12![]() Click Submit when you are done configuring the cipher list.
Click Submit when you are done configuring the cipher list.
Note![]() For a WAAS Express device, click OK to save the cipher list configuration.
For a WAAS Express device, click OK to save the cipher list configuration.
SSL configuration changes will not be applied on the device until the security license has been enabled on the device.
Working with Certificate Authorities
The WAAS SSL acceleration feature allows you to configure the CA certificates used by your system. You can use one of the many well-known CA certificates included with WAAS, or import your own CA certificate.
To manage your CA certificates, follow these steps:
Step 1![]() From the WAAS Central Manager menu, choose Devices > device-name ( or Device Groups > device-group-name).
From the WAAS Central Manager menu, choose Devices > device-name ( or Device Groups > device-group-name).
Step 2![]() Choose Configure > Security > SSL > Certificate Authorities.
Choose Configure > Security > SSL > Certificate Authorities.
The SSL CA Certificate List window appears (Figure 12-21).
Note![]() For a WAAS Express device, the SSL CA Certificate List window shows the same Name, Issued To, Issuer, and Expiry Date fields, but in a slightly different format.
For a WAAS Express device, the SSL CA Certificate List window shows the same Name, Issued To, Issuer, and Expiry Date fields, but in a slightly different format.
There is also an Aggregate Settings field configurable as Yes or No. To finish the procedure for WAAS Express, skip to Step 4.
Figure 12-21 SSL CA Certificate List Window
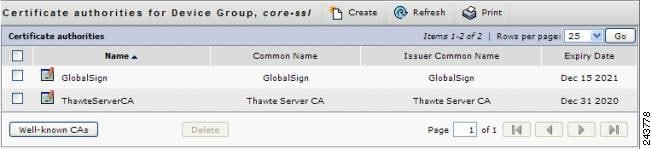
Step 3![]() Add one of the preloaded CA certificates that is included with WAAS as follows:
Add one of the preloaded CA certificates that is included with WAAS as follows:
b.![]() Choose the pre-existing CA certificate you want to add and click Import. The CA certificate that you selected is added to the list on the SSL CA Certificate List display.
Choose the pre-existing CA certificate you want to add and click Import. The CA certificate that you selected is added to the list on the SSL CA Certificate List display.
Step 4![]() Add your own CA certificate as follows:
Add your own CA certificate as follows:
The Creating New CA Certificate window appears (Figure 12-22).
Note![]() For a WAAS Express device, click Add CA to add your own CA certificate. Enter the name and the URL, and then click Get CA Certificate. After this, skip to Step 6.
For a WAAS Express device, click Add CA to add your own CA certificate. Enter the name and the URL, and then click Get CA Certificate. After this, skip to Step 6.
Figure 12-22 Creating New CA Certificate Window
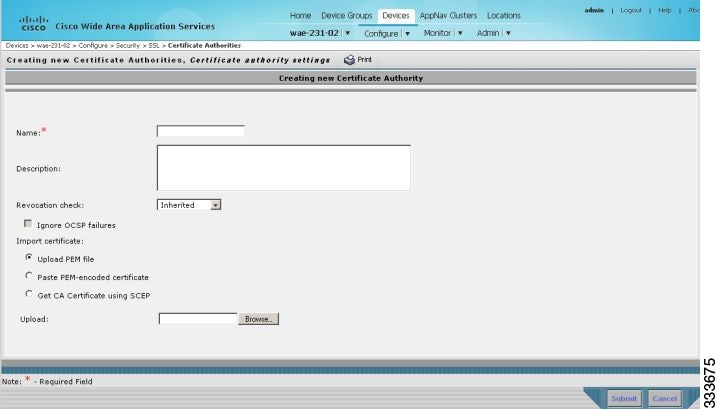
b.![]() Type a name for the certificate in the Certificate Name field.
Type a name for the certificate in the Certificate Name field.
c.![]() (Optional) Type a description of the CA certificate in the Description field.
(Optional) Type a description of the CA certificate in the Description field.
d.![]() From the Revocation check drop-down list, choose Disable to disable OCSP revocation of certificates signed by this CA. Check the Ignore OCSP failures check box to mark revocation check successful if the OCSP revocation check failed.
From the Revocation check drop-down list, choose Disable to disable OCSP revocation of certificates signed by this CA. Check the Ignore OCSP failures check box to mark revocation check successful if the OCSP revocation check failed.
e.![]() Add the certificate information by choosing one of the following methods:
Add the certificate information by choosing one of the following methods:
If you are uploading a file, it must be in a PEM format. Browse to the file that you want to use and click Upload.
–![]() Paste PEM-encoded Certificate
Paste PEM-encoded Certificate
If you are pasting the CA certificate information, paste the text of the PEM format certificate into the Paste PEM-encoded certificate field.
–![]() Get CA Certificate using SCEP
Get CA Certificate using SCEP
This option automatically configures the certificate authority using Simple Certificate Enrollment Protocol (SCEP). If you are using the automated certificate enrollment procedure, enter the CA URL and click Get Certificate. The contents of the certificate are displayed in text and PEM formats.
To complete the automated certificate enrollment procedure, configure the SSL auto enrollment settings in Configuring SSL Auto Enrollment.
f.![]() Click Submit to save your changes.
Click Submit to save your changes.
Step 5![]() (Optional) To remove a CA from the list, select it and then click the Delete icon located in the toolbar.
(Optional) To remove a CA from the list, select it and then click the Delete icon located in the toolbar.
Step 6![]() Click Submit after you are done configuring the CA certificate list.
Click Submit after you are done configuring the CA certificate list.
Note![]() For a WAAS Express device, click OK to save the CA certificate configuration.
For a WAAS Express device, click OK to save the CA certificate configuration.
Configuring SSL Auto Enrollment
The WAAS SSL acceleration feature allows you to enroll certificates automatically for a device (or device group) using SCEP. After the CA certificate is obtained, configure the SSL auto enrollment settings.
Note![]() You must configure the CA authority before configuring auto enrollment settings.
You must configure the CA authority before configuring auto enrollment settings.
To configure SSL auto enrollment settings, follow these steps:
Step 1![]() From the WAAS Central Manager menu, choose Devices > device-name ( or Device Groups > device-group-name).
From the WAAS Central Manager menu, choose Devices > device-name ( or Device Groups > device-group-name).
Step 2![]() Choose Configure > Security > SSL > Auto Enrollment.
Choose Configure > Security > SSL > Auto Enrollment.
The SSL Auto Enrollment Settings window appears (Figure 12-23).
Figure 12-23 SSL Auto Enrollment Settings Window
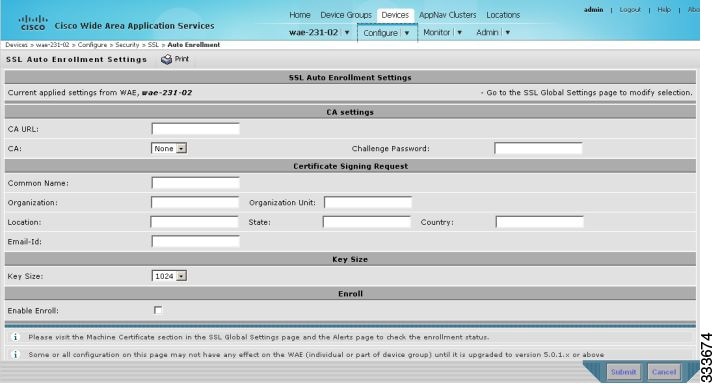
Step 3![]() Configure the following CA settings:
Configure the following CA settings:
Note![]() CA, CA URL, and Challenge Password are mandatory for enabling SSL auto enrollment.
CA, CA URL, and Challenge Password are mandatory for enabling SSL auto enrollment.
Step 4![]() Configure the following Certificate Signing Request settings:
Configure the following Certificate Signing Request settings:
Step 5![]() From the Key Size drop-down list, choose the key size. Valid values are 512, 768, 1024, 1536, or 2048.
From the Key Size drop-down list, choose the key size. Valid values are 512, 768, 1024, 1536, or 2048.
Step 6![]() Check the Enable Enroll box.
Check the Enable Enroll box.
You can then check the enrollment status in the Machine Certificate section on the SSL Global Settings page and on the Alerts page.
Configuring SSL Management Services
SSL management services are the SSL configuration parameters that affect secure communications between the Central Manager and the WAE devices (Figure 12-11). The certificate/key pairs used are unique for each WAAS device. Therefore, SSL management services can only be configured for individual devices, not device groups.
To configure SSL management services, follow these steps:
Step 1![]() From the WAAS Central Manager menu, choose Devices > device-name.
From the WAAS Central Manager menu, choose Devices > device-name.
Step 2![]() Choose Configure > Security > Management Service.
Choose Configure > Security > Management Service.
The Management Services window appears (Figure 12-24).
Figure 12-24 SSL Management Services Window
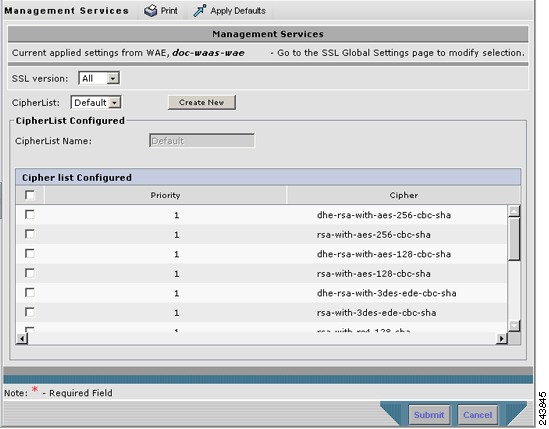
Step 3![]() From the SSL version drop-down list, choose the type of SSL protocol to use. Choose SSL3 for the SSL version 3 protocol, TLS1 for the Transport Layer Security version 1 protocol, or All to use both SSL3 and TLS1 SSL protocols.
From the SSL version drop-down list, choose the type of SSL protocol to use. Choose SSL3 for the SSL version 3 protocol, TLS1 for the Transport Layer Security version 1 protocol, or All to use both SSL3 and TLS1 SSL protocols.
Note![]() Management-service SSL version and cipher settings configured for the WAAS Central Manager are also applied to SSL connections between the WAAS Central Manager and the browser of the user.
Management-service SSL version and cipher settings configured for the WAAS Central Manager are also applied to SSL connections between the WAAS Central Manager and the browser of the user.
Primary and standby Central Managers must share a common management service version or cipher list. Changing the management service version and cipher list settings may result in a loss of connectivity between the primary Central Manager and the standby Central Manager and WAE devices.
The following cipher lists are supported in SSL Acceleration (Legacy SSL Acceleration).
- dhe-rsa-with-aes-256-cbc-sha
- rsa-with-aes-256-cbc-sha
- dhe-rsa-with-aes-128-cbc-sha
- rsa-with-aes-128-cbc-sha
- dhe-rsa-with-3des-ede-cbc-sha
- rsa-with-3des-ede-cbc-sha
- rsa-with-rc4-128-sha
- rsa-with-rc4-128-md5
- dhe-rsa-with-des-cbc-sha
- rsa-export1024-with-rc4-56-sha
- rsa-export1024-with-des-cbc-sha
- dhe-rsa-export-with-des40-cbc-sha
- rsa-export-with-des40-cbc-sha
- rsa-export-with-rc4-40-md5
- rsa-with-des-cbc-sha
Note![]() In case you need to configure additional ciphers, see the supported ciphers in Preparing to use SMART-SSL acceleration/ SSL Accelerator v2.
In case you need to configure additional ciphers, see the supported ciphers in Preparing to use SMART-SSL acceleration/ SSL Accelerator v2.
Note![]() All browsers support SSLv3 and TLSv1 protocols, but TLSv1 may not be enabled by default on certain browsers. Therefore, you must enable it in your browser.
All browsers support SSLv3 and TLSv1 protocols, but TLSv1 may not be enabled by default on certain browsers. Therefore, you must enable it in your browser.
Configuring ciphers or protocols that are not supported in your browser will result in connection loss between the browser and the Central Manager. If this occurs, configure the Central Manager management service SSL settings to the default in the CLI to restore the connection.
Some browsers, such as Internet Explorer, do not correctly handle a change of SSL version and cipher settings on the Central Manager, which can result in the browser showing an error page after you submit the changes. If this occurs, reload the page.
Step 4![]() In the Cipher List pane, choose a list of cipher suites to be used for SSL acceleration. See Working with Cipher Lists for additional information.
In the Cipher List pane, choose a list of cipher suites to be used for SSL acceleration. See Working with Cipher Lists for additional information.
Configuring SSL Admin Service
You can export the SSL CA signed certificate to enable trusted SSL communication between the WAAS Central Manager and the web browser. The default certificate for enabling SSL communication is the WAAS Central Manager self signed certificate. However, if you would like to use a different certificate, you need to configure it.
To configure the SSL certificate, follow these steps:
Step 1![]() From the WAAS Central Manager menu, choose Devices>CM>Configure> Security> SSL Admin Service.
From the WAAS Central Manager menu, choose Devices>CM>Configure> Security> SSL Admin Service.
The default certificate is displayed.
Step 2![]() Select the PKI operation
Select the PKI operation
a.![]() Click Import Existing Certificate Key to upload or paste an existing certificate/key pair.
Click Import Existing Certificate Key to upload or paste an existing certificate/key pair.
b.![]() Click Export Certificate Key to export the current certificate/key pair.
Click Export Certificate Key to export the current certificate/key pair.
The file that you import or export must be in either a PKCS12 format or a Privacy Enhanced Mail (PEM) format.
c.![]() Click Generate Self-signed Certificate Key to have the Central Manager and WAAS device use a self-signed certificate/key pair for SSL.
Click Generate Self-signed Certificate Key to have the Central Manager and WAAS device use a self-signed certificate/key pair for SSL.
Operating Considerations for Key Size field:
- For WAAS Version 6.1.x and earlier, the Key Size drop-down list values are 512, 768, 1024, 1536, and 2048.
Note A self-signed certificate on WAAS Version 6.1.x or earlier with an RSA modulus size of 512 is not compatible with Mozilla FireFox Version 39 and later, or with Google Chrome Version 48 and later. A self-signed certificate on WAAS Version 6.1.x or earlier with an RSA modulus size of 512 is compatible with Internet Explorer 8 and later.
If you have previously configured the RSA modulus size as 512: to access the WAAS CM with Mozilla FireFox Version 39 and later, or with Google Chrome Version 48 and later, you must regenerate the self-signed certificate with an RSA modulus size of 2048, and then upgade to the specified version of Mozilla FireFox or Google Chrome.
- For WAAS Version 6.2.x and later, the Key Size drop-down list values are 768, 1024, 1536, and 2048. The key size 512 is not used with WAAS Version 6.2.x and later.
Step 3![]() Click Submit to register the certificate.
Click Submit to register the certificate.
The Central Manager now uses the selected certificate for SSL communication.
Configuring SSL Peering Service
SSL peering service configuration parameters control the secure communications established by the SSL accelerator between WAE devices while optimizing SSL connections (Figure 12-11). The peering service certificate and private key is unique for each WAAS device and can only be configured for individual devices, not device groups.
To configure SSL peering service, follow these steps:
Step 1![]() From the WAAS Central Manager menu, choose Devices > device-name.
From the WAAS Central Manager menu, choose Devices > device-name.
Step 2![]() Choose Configure > Security > Peering Service.
Choose Configure > Security > Peering Service.
The Peering Service window appears (Figure 12-25).
Note![]() For a WAAS Express device, the Peering Service window shows a subset of the fields in the standard Peering Service window in a slightly different format.
For a WAAS Express device, the Peering Service window shows a subset of the fields in the standard Peering Service window in a slightly different format.
The cipher list Priority setting and the Disable revocation check of peer certificates options are not applicable to WAAS Express.
Figure 12-25 SSL Peering Service Window
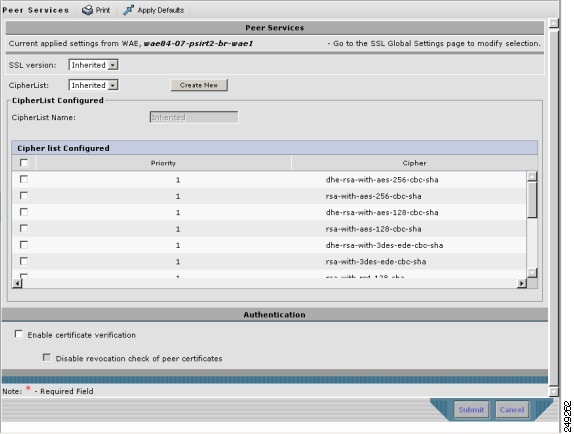
Step 3![]() From the SSL Version drop-down list, choose the type of SSL protocol to use, or choose Inherited to use the SSL protocol configured in global SSL settings. Choose SSL3 for the SSL version 3 protocol, TLS1 for the Transport Layer Security version 1 protocol, or All to use both SSL3 and TLS1 SSL protocols.
From the SSL Version drop-down list, choose the type of SSL protocol to use, or choose Inherited to use the SSL protocol configured in global SSL settings. Choose SSL3 for the SSL version 3 protocol, TLS1 for the Transport Layer Security version 1 protocol, or All to use both SSL3 and TLS1 SSL protocols.
For dual-sided deployments that use SMART-SSL acceleration, SSLv3, TLS1.0, TLS1.1, TLS1.2 is supported.
Note![]() In a WAAS Express device, only SSL3 and TLS1 are supported for the SSL version.
In a WAAS Express device, only SSL3 and TLS1 are supported for the SSL version.
Step 4![]() To enable verification of peer certificates, check the Enable Certificate Verification check box. If certificate verification is enabled, WAAS devices that use self-signed certificates will not be able to establish peering connections to each other and, thus, not be able to accelerate SSL traffic.
To enable verification of peer certificates, check the Enable Certificate Verification check box. If certificate verification is enabled, WAAS devices that use self-signed certificates will not be able to establish peering connections to each other and, thus, not be able to accelerate SSL traffic.
For dual-sided deployments that use SMART-SSL acceleration, you can use your certificate or use the peer certificate.
Step 5![]() Check the Disable revocation check for this service check box to disable OCSP certificate revocation checking.
Check the Disable revocation check for this service check box to disable OCSP certificate revocation checking.
Note![]() In a WAAS Express device, this option is not available.
In a WAAS Express device, this option is not available.
Step 6![]() In the Cipher List pane, choose a list of cipher suites to be used for SSL acceleration between the WAE device peers, or choose Inherited to use the cipher list configured in SSL global settings.
In the Cipher List pane, choose a list of cipher suites to be used for SSL acceleration between the WAE device peers, or choose Inherited to use the cipher list configured in SSL global settings.
For dual-sided deployments that use SMART-SSL acceleration, only rsa-with-aes-256-cbc-sha is supported.
Note![]() In a WAAS Express device, the list of cipher suites to be used for SSL acceleration is shown in the Cipher List pane.
In a WAAS Express device, the list of cipher suites to be used for SSL acceleration is shown in the Cipher List pane.
For more information, see Working with Cipher Lists.
Note![]() In a WAAS Express device, SSL configuration changes will not be applied on the device until the security license has been enabled on the device.
In a WAAS Express device, SSL configuration changes will not be applied on the device until the security license has been enabled on the device.
Using SSL Accelerated Services
After you have enabled and configured SSL acceleration on your WAAS system, you must define at least one service to be accelerated on the SSL path. To configure SSL-accelerated services, follow these steps:
Step 1![]() From the WAAS Central Manager menu, choose Devices > device-name ( or Device Groups > device-group-name).
From the WAAS Central Manager menu, choose Devices > device-name ( or Device Groups > device-group-name).
Step 2![]() Choose Configure > Acceleration > SSL Accelerated Services.
Choose Configure > Acceleration > SSL Accelerated Services.
Step 3![]() To delete an accelerated service, select the service and click Delete.
To delete an accelerated service, select the service and click Delete.
Step 4![]() Click Create to define a new accelerated service. A maximum of 512 accelerated services are allowed.
Click Create to define a new accelerated service. A maximum of 512 accelerated services are allowed.
The Basic SSL Accelerated Services Configuration window appears (Figure 12-26).
Figure 12-26 SSL-Accelerated Services—Basic Window
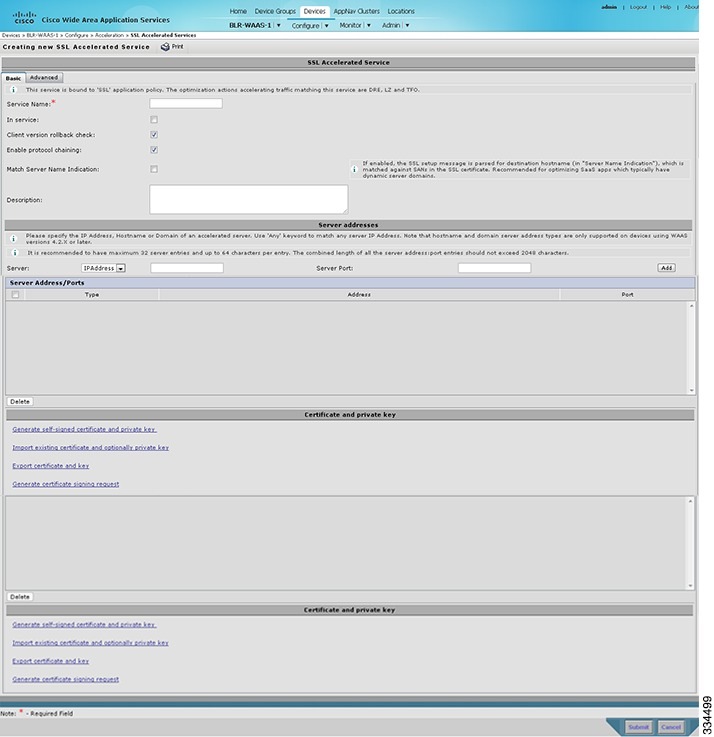
Step 5![]() Enter a name for the service in the Service Name field.
Enter a name for the service in the Service Name field.
Step 6![]() To enable this accelerated service, check the In service check box.
To enable this accelerated service, check the In service check box.
Step 7![]() To enable client version rollback check, check the Client version rollback check check box.
To enable client version rollback check, check the Client version rollback check check box.
Enabling the client version rollback check does not allow connections with an incorrect client version to be optimized.
Step 8![]() To match subject alternative names, enable the Match Server Name Indication check box. For more information, see Configuring SSL Acceleration for SaaS Applications.
To match subject alternative names, enable the Match Server Name Indication check box. For more information, see Configuring SSL Acceleration for SaaS Applications.
Step 9![]() To enable protocol chaining, check the Enable protocol chaining check box.
To enable protocol chaining, check the Enable protocol chaining check box.
Enabling protocol chaining allows other protocols to be optimized over SSL.
Step 10![]() (Optional) Type a description of the service in the Description field.
(Optional) Type a description of the service in the Description field.
Step 11![]() From the Server drop-down list, choose IP Address, Hostname, or Domain as the SSL service endpoint type.
From the Server drop-down list, choose IP Address, Hostname, or Domain as the SSL service endpoint type.
Step 12![]() Type the server IP address (or proxy IP address), hostname, or domain of the accelerated server. Use the keyword Any to specify any server IP address.
Type the server IP address (or proxy IP address), hostname, or domain of the accelerated server. Use the keyword Any to specify any server IP address.
Note![]() A maximum of 32 IP addresses, 32 hostnames, and 32 domains are allowed.
A maximum of 32 IP addresses, 32 hostnames, and 32 domains are allowed.
Note![]() Hostname and domain server address types are supported only when using WAAS software Version 4.2.x or later. Server IP address keyword Any is supported only when using WAAS Software Version 4.2.x or later.
Hostname and domain server address types are supported only when using WAAS software Version 4.2.x or later. Server IP address keyword Any is supported only when using WAAS Software Version 4.2.x or later.
Step 13![]() Enter the port associated with the service to be accelerated.
Enter the port associated with the service to be accelerated.
Step 14![]() Click Add to add each address. If you specify a server hostname, the Central Manager resolves the hostname to the IP address and adds it to the Server IP/Ports table.
Click Add to add each address. If you specify a server hostname, the Central Manager resolves the hostname to the IP address and adds it to the Server IP/Ports table.
Step 15![]() To remove an IP address from the list, click Delete.
To remove an IP address from the list, click Delete.
Step 16![]() Choose a certificate and key pair method (Figure 12-27).
Choose a certificate and key pair method (Figure 12-27).
Figure 12-27 Configuring Service Certificate and Private Key
Note![]() In case of SaaS applications, the certificate should have the Subject Alternative Name (SAN) information.
In case of SaaS applications, the certificate should have the Subject Alternative Name (SAN) information.
The file that you import or export must be in either PKCS12 format or PEM format.
- Click Import existing client certificate and optionally private key to use the client configured certificate.
For service certificate and private key configuration steps, see Configuring a Service Certificate and Private Key.
Note![]() If you change the certificate or key for an existing SSL-accelerated service, you must uncheck the In service check box and click Submit to disable the service, and then wait 5 minutes and check the In service check box and click Submit to re-enable the service. Alternatively, in the WAE, you can use the no inservice SSL-accelerated service configuration command, wait a few seconds, and then use the inservice command. If you are changing the certificate or key for multiple SSL-accelerated services, you can restart all the accelerated services by disabling and then re-enabling the SSL accelerator.
If you change the certificate or key for an existing SSL-accelerated service, you must uncheck the In service check box and click Submit to disable the service, and then wait 5 minutes and check the In service check box and click Submit to re-enable the service. Alternatively, in the WAE, you can use the no inservice SSL-accelerated service configuration command, wait a few seconds, and then use the inservice command. If you are changing the certificate or key for multiple SSL-accelerated services, you can restart all the accelerated services by disabling and then re-enabling the SSL accelerator.
Step 17![]() Click the Advanced Settings tab to configure SSL parameters for the service.
Click the Advanced Settings tab to configure SSL parameters for the service.
The Advanced SSL Accelerated Services Configuration window appears (Figure 12-28).
Figure 12-28 SSL Accelerated Services—Advanced Window
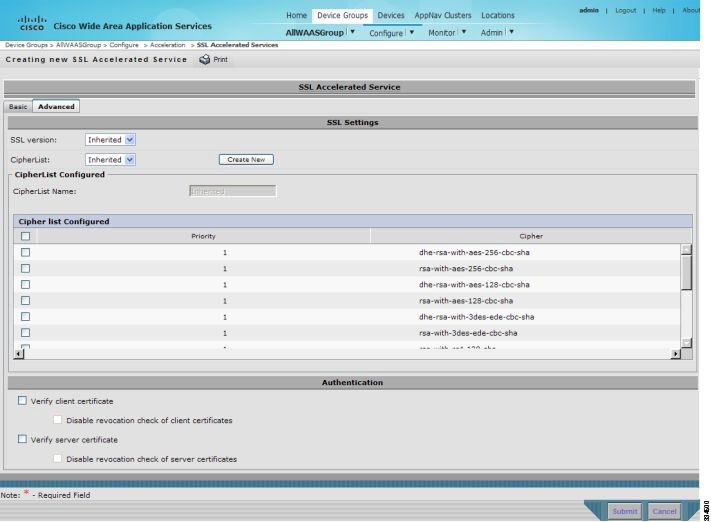
Step 18![]() (Optional) From the SSL version drop-down list, choose the type of SSL protocol to use, or choose Inherited to use the SSL protocol configured in global SSL settings. Choose SSL3 for the SSL Version 3 protocol, TLS1 for the Transport Layer Security Version 1 protocol, or All to use both SSL3 and TLS1 SSL protocols.
(Optional) From the SSL version drop-down list, choose the type of SSL protocol to use, or choose Inherited to use the SSL protocol configured in global SSL settings. Choose SSL3 for the SSL Version 3 protocol, TLS1 for the Transport Layer Security Version 1 protocol, or All to use both SSL3 and TLS1 SSL protocols.
Step 19![]() (Optional) From the Cipher List drop-down list, choose a list of cipher suites to be used for SSL acceleration between the WAE device peers, or choose Inherited to use the cipher list configured in SSL global settings. For more information, see Working with Cipher Lists.
(Optional) From the Cipher List drop-down list, choose a list of cipher suites to be used for SSL acceleration between the WAE device peers, or choose Inherited to use the cipher list configured in SSL global settings. For more information, see Working with Cipher Lists.
Step 20![]() (Optional) To set the OCSP parameters for certificate revocation, follow these steps:
(Optional) To set the OCSP parameters for certificate revocation, follow these steps:
a.![]() To enable the verification of client certificate check, check the Verify client certificate check box.
To enable the verification of client certificate check, check the Verify client certificate check box.
b.![]() Check the Disable revocation check for this service check box to disable OCSP client certificate revocation checking.
Check the Disable revocation check for this service check box to disable OCSP client certificate revocation checking.
c.![]() To enable verification of server certificate check, check the Verify server certificate check box.
To enable verification of server certificate check, check the Verify server certificate check box.
d.![]() Check the Disable revocation check for this service check box to disable OCSP server certificate revocation checking.
Check the Disable revocation check for this service check box to disable OCSP server certificate revocation checking.
Note![]() If the server and client devices are using self-signed certificates and certificate verification is enabled, WAAS devices will not be able to accelerate SSL traffic.
If the server and client devices are using self-signed certificates and certificate verification is enabled, WAAS devices will not be able to accelerate SSL traffic.
Step 21![]() Click Submit after you have finished configuring the SSL accelerated service.
Click Submit after you have finished configuring the SSL accelerated service.
Updating a Certificate/Key in a SSL Accelerated Service
If at some point you need to update a certificate or key in a SSL Accelerated Service, follow these steps:
Step 1![]() From the WAAS Central Manager menu, choose Devices > device-name ( or Device Groups > device-group-name).
From the WAAS Central Manager menu, choose Devices > device-name ( or Device Groups > device-group-name).
Step 2![]() Choose Configure > Acceleration > SSL Accelerated Services.
Choose Configure > Acceleration > SSL Accelerated Services.
Step 3![]() Click Edit SSL Accelerated Service button in the Name column for the service in question.
Click Edit SSL Accelerated Service button in the Name column for the service in question.
Step 4![]() Choose a certificate and key pair method (Figure 12-27) to either re-generate a self-signed certificate and private key or to import an updated certificate and/or key.
Choose a certificate and key pair method (Figure 12-27) to either re-generate a self-signed certificate and private key or to import an updated certificate and/or key.
Step 5![]() Depending on the chosen method fill out the required details, then click Generate or Import and next click Submit.
Depending on the chosen method fill out the required details, then click Generate or Import and next click Submit.
Note![]() When you update a certificate for a SSL Accelerated Service and want it to be used by it, it is important to stop and start the configured SSL Accelerated Service. This step is required because the existing certificate and key are stored in memory on the accelerators. Updating the certificate/key via the steps described above is insufficient because it does not update the certificate/key in memory.
When you update a certificate for a SSL Accelerated Service and want it to be used by it, it is important to stop and start the configured SSL Accelerated Service. This step is required because the existing certificate and key are stored in memory on the accelerators. Updating the certificate/key via the steps described above is insufficient because it does not update the certificate/key in memory.
To ensure the updated certificate for the SSL Accelerated Service is used, make sure to follow the steps below as well.
Step 6![]() Click the Edit SSL Accelerated Service button in the Name column for the service in question.
Click the Edit SSL Accelerated Service button in the Name column for the service in question.
Step 7![]() Remove the check mark for In service, then click Submit.
Remove the check mark for In service, then click Submit.
Step 8![]() Click the Edit SSL Accelerated Service button in the Name column for the service in question for one last time.
Click the Edit SSL Accelerated Service button in the Name column for the service in question for one last time.
Step 9![]() Enable the check mark for In service then click Submit.
Enable the check mark for In service then click Submit.
Configuring SSL Acceleration for SaaS Applications
SaaS applications are typically served from multiple SSL server farms, with multiple hosts spanning several data centers. For SSL services hosted in the enterprise data center, the IT administrator knows and controls the SSL server IP and can provide it to the data center WAAS. But for a SSL service that is hosted at a third-party SaaS provider in the cloud, the SSL server IP address is not controlled by the IT administrator because the cloud provider uses multiple Content Delivery Networks (CDNs) and data centers. Even for a single SaaS service, there might be multiple server IP addresses that can change dynamically. This leads to inadvertent errors due to namespace/certificate mismatch for SaaS applications.
To avoid these errors and to ensure that these applications are optimized, follow these steps to configure the SSL-accelerated services for SaaS applications:
Step 1![]() Create an SSL-accelerated service for a SaaS application using Step 1 through Step 8 outlined in Using SSL Accelerated Services.
Create an SSL-accelerated service for a SaaS application using Step 1 through Step 8 outlined in Using SSL Accelerated Services.
Step 2![]() To match subject alternative names, check the Match Server Name Indication check box. Alternately, use the match sni command on the core WAAS device.
To match subject alternative names, check the Match Server Name Indication check box. Alternately, use the match sni command on the core WAAS device.
If enabled, the SSL accelerator parses the initial SSL connection setup message for the destination hostname (in the SSL protocol extension called Server Name Indication) and uses that to match it with the Subject Alternate Names list in the SSL certificate on the WAAS device.
Note![]() We recommend this setting for optimizing cloud-based SaaS applications to avoid namespace/certificate mismatch errors that are caused due to the changing nature of the SaaS server domains and IP addresses.
We recommend this setting for optimizing cloud-based SaaS applications to avoid namespace/certificate mismatch errors that are caused due to the changing nature of the SaaS server domains and IP addresses.
Note![]() Most modern browsers provide Server Name Indication (SNI) support. Ensure that you use a browser that supports SNI.
Most modern browsers provide Server Name Indication (SNI) support. Ensure that you use a browser that supports SNI.
Note![]() The Match Server Name Indication option is available only on devices running WAAS 5.3.5 or later.
The Match Server Name Indication option is available only on devices running WAAS 5.3.5 or later.
Step 3![]() Use the keyword Any to specify the server IP address of the accelerated server.
Use the keyword Any to specify the server IP address of the accelerated server.
Step 4![]() Direct all SSL traffic for SAAS applications to port 443.
Direct all SSL traffic for SAAS applications to port 443.
The above configuration overrides any wildcard configuration.
Note![]() If you have configured port 443 for traffic other than SaaS applications, you should review and reconfigure it appropriately.
If you have configured port 443 for traffic other than SaaS applications, you should review and reconfigure it appropriately.
Step 5![]() Click Import Existing Certificate Key to upload or paste a certificate/key pair. The certificate should be specifically used for the SaaS-accelerated service and should contain the Subject Alternate Names for the server domains that need to be optimized. Identify the server domains that need to be added for optimizing SaaS applications, by following the steps outlined in Determining Server Domains Used by SaaS Applications.
Click Import Existing Certificate Key to upload or paste a certificate/key pair. The certificate should be specifically used for the SaaS-accelerated service and should contain the Subject Alternate Names for the server domains that need to be optimized. Identify the server domains that need to be added for optimizing SaaS applications, by following the steps outlined in Determining Server Domains Used by SaaS Applications.
Note![]() You must create a new certificate with the missing server domain names derived from the list at regular intervals to ensure that the connections are optimized.
You must create a new certificate with the missing server domain names derived from the list at regular intervals to ensure that the connections are optimized.
Step 6![]() Click Submit to complete configuring the SSL-accelerated service for the SaaS application.
Click Submit to complete configuring the SSL-accelerated service for the SaaS application.
Determining Server Domains Used by SaaS Applications
When you check the Match Server Name Indication check box, you can log in to the core WAAS device and use the sh crypto ssl services accelerated-service service-name command to view the list of server domain names that do not match the existing SSL certificate and hence are not optimized. If you want to optimize any of these server domain names, select and add them to your certificate by performing the following steps below.
The server domain names list contains a maximum of 128 server names.
Step 1![]() Identify the relevant servers to be added. Use the sh crypto ssl services accelerated-service service-name to see additional details regarding the count and last seen information of the server name.
Identify the relevant servers to be added. Use the sh crypto ssl services accelerated-service service-name to see additional details regarding the count and last seen information of the server name.
If you need additional information to view the IP address and hostnames, use the debug accelerator ssl sni command to enable SNI debugs.
Step 2![]() Log in to the Microsoft Management Console(MMC), OpenSSL, or any other available customer tool to create a new Certificate Signing Request (CSR) with the relevant server domain names of the SaaS applications in the subject alternative names extension of the certificate. Refer to the highlighted area in the example certificate below.
Log in to the Microsoft Management Console(MMC), OpenSSL, or any other available customer tool to create a new Certificate Signing Request (CSR) with the relevant server domain names of the SaaS applications in the subject alternative names extension of the certificate. Refer to the highlighted area in the example certificate below.
Note![]() When you add the SAN to the certificate, domain names should be separated by a comma. Note that a list of hostnames on a domain can be secured with a single certificate. For example, a.b.c.com and c.b.com can be added as *.b.c.com. However, for a new hostname on another domain, you have to make a new entry. For example, for b.c.com you have to add it as b.c.com or *.c.com. Additionally, you can also secure hostnames on different base domains in the same certificate, for example a.b.com and a.b.net.
When you add the SAN to the certificate, domain names should be separated by a comma. Note that a list of hostnames on a domain can be secured with a single certificate. For example, a.b.c.com and c.b.com can be added as *.b.c.com. However, for a new hostname on another domain, you have to make a new entry. For example, for b.c.com you have to add it as b.c.com or *.c.com. Additionally, you can also secure hostnames on different base domains in the same certificate, for example a.b.com and a.b.net.
Step 3![]() Submit the certificate to the Enterpise CA.
Submit the certificate to the Enterpise CA.
Step 4![]() Import the signed certificate from the Enterprise CA to the Trusted Root Certification Authorities store.\
Import the signed certificate from the Enterprise CA to the Trusted Root Certification Authorities store.\
Note![]() The Enterprise root CA should be present in browser as trusted root CA.
The Enterprise root CA should be present in browser as trusted root CA.
Step 5![]() Uncheck the In service checkbox and click Submit to disable the accelerated service.
Uncheck the In service checkbox and click Submit to disable the accelerated service.
Step 6![]() Upload the new certificate and re-enable the service.
Upload the new certificate and re-enable the service.
Configuring SMART-SSL Accelerator
SMART-SSL is an encryption service that enables L7 application network services ( e.g. ftp, http, dns) to optimize traffic on SSL/TLS encrypted applications. It enables content caching for SSL/TLS applications (http object cache for https traffic) in both single-sided and dual-sided deployment.
With the evolution of cloud services, there is a critical need to provide application optimization. Starting with release 6.4.1, SMART-SSL optimization, is enabled using both single-sided and dual-sided mode.
In a single-sided deployment, the interposing device does not require a peer device to process the SMART-SSL traffic flow. SMART-SSL traffic flows directly to the edge device without having to go through the core device.
The dual-sided deployment uses the same configuration procedure as in case of SSL acceleration V1. Hence the SSL accelerator service configuration is done at the core device in the data center. Dual-sided deployments for SMART-SSL (or SSL Accelerator V2), use TLS1.2 as the SSL version and rsa-with-aes-256-cbc-sha as the cipher suit. You can either use your own certificate or use the peering device’s certificate to configure the SMART-SSL acceleration. For more information see Configuring SSL Peering Service.
To ensure this optimization, you need to enable the SMART-SSL (SSL Accelerator v2) accelerator.
The table below provides an overview of the steps you must complete to set up and enable SMART-SSL acceleration.
Table 12-4 Checklist for Configuring SSL v2 Acceleration
|
|
|
|---|---|
Prepare to configure SMART-SSL acceleration. |
Identifies the information that you need to gather before configuring SMART-SSL acceleration on your WAAS devices. For more information, see Preparing to use SMART-SSL acceleration. |
Set up to use existing Enterprise Root CA certificates |
(Optional) Describes how to create, import, and manage existing Enterprise Root certificate authority (CA) certificates. For more information, see Using existing Root CA to sign WAAS accelerated service exported certificate. |
Enable SMART-SSL application optimization. |
Describes how to activate the SMART-SSL acceleration feature. For more information, see Enabling and Disabling the Global Optimization Features. |
Set up accelerated service certificates. |
Describes how to create, import, and use certificates for SMART-SSL acceleration. For more information, see Creating Single-Sided SMART-SSL Accelerated Service Certificate. |
Configure and enable SSL-accelerated services. |
Describes how to add, configure, and enable services to be accelerated by the SMART-SSL application optimization feature. For more information, see Configuring and enabling SMART-SSL accelerated services on single-sided device group. |
Preparing to use SMART-SSL acceleration
Before you configure SMART-SSL acceleration, you should know the following information:
- The services that you want to be accelerated on the SMART-SSL traffic. You will need to create a certificate to optimize these services using their urls or domain names, for e.g. www.google.com, *.google.com.
- The server IP address and port information. Optionally if the url or domain cannot be used, you can choose to specify a server ip. If you have specified a url, you can still specify a port. In case you have specified a URL you can still specify a port.
- The public key infrastructure (PKI) certificate and private key information, including the certificate common name and CA-signing information.
- The SSL versions supported.
SSLv3, TLS1.0, TLS1.1, TLS1.2 are supported with this release. - Supported ciphers
The following lists the twenty seven supported ciphers:
TLS_RSA_WITH_3DES_EDE_CBC_SHA, /* 0x000A */ TLS_DHE_RSA_WITH_3DES_EDE_CBC_SHA,/* 0x0016 */ TLS_RSA_WITH_AES_128_CBC_SHA, /* 0x002F */ TLS_DHE_RSA_WITH_AES_128_CBC_SHA, /* 0x0033 */ TLS_RSA_WITH_AES_256_CBC_SHA, /* 0x002F */ TLS_DHE_RSA_WITH_AES_256_CBC_SHA, /* 0x0039 */ TLS_RSA_WITH_AES_128_CBC_SHA256, /* 0x003C */ TLS_RSA_WITH_AES_256_CBC_SHA256, /* 0x003D */ TLS_RSA_WITH_CAMELLIA_128_CBC_SHA,/* 0x0041 */ TLS_DHE_RSA_WITH_CAMELLIA_128_CBC_SHA, /* 0x0045 */ TLS_DHE_RSA_WITH_AES_128_CBC_SHA256, /* 0x0067 */ TLS_DHE_RSA_WITH_AES_256_CBC_SHA256, /* 0x006B */ TLS_RSA_WITH_CAMELLIA_256_CBC_SHA, /* 0x0084 */ TLS_DHE_RSA_WITH_CAMELLIA_256_CBC_SHA, /* 0x0088 */ TLS_RSA_WITH_SEED_CBC_SHA, /* 0x0096 */ TLS_DHE_RSA_WITH_SEED_CBC_SHA, /* 0x009A */ TLS_RSA_WITH_AES_128_GCM_SHA256, /* 0x009C */ TLS_RSA_WITH_AES_256_GCM_SHA384, /* 0x009D */ TLS_DHE_RSA_WITH_AES_128_GCM_SHA256, /* 0x009E */ TLS_DHE_RSA_WITH_AES_256_GCM_SHA384, /* 0x009F */ TLS_ECDHE_RSA_WITH_3DES_EDE_CBC_SHA, /* 0xC012 */ TLS_ECDHE_RSA_WITH_AES_128_CBC_SHA, /* 0xC013 */ TLS_ECDHE_RSA_WITH_AES_256_CBC_SHA, /* 0xC014 */ TLS_ECDHE_RSA_WITH_AES_128_CBC_SHA256, /* 0xC027 */ TLS_ECDHE_RSA_WITH_AES_256_CBC_SHA384, /* 0xC028 */ TLS_ECDHE_RSA_WITH_AES_128_GCM_SHA256, /* 0xC02F TLS_ECDHE_RSA_WITH_AES_256_GCM_SHA384 /* 0xC030 */
Using existing Root CA to sign WAAS accelerated service exported certificate
A root SSL certificate is a certificate issued by a trusted certificate authority and is in turn trusted by domain clients. This is used to sign all the certificated that are to be used by WAAS for SSL interposing during client and server SSL handshake for optimizing the applications or the URLs. This CA needs to be capable of accepting certificate signing requests (CSRs) that include subject alternative names and generate certificates that include subject alternative names. The subject alternative name is an extension to the X.509 protocol that allows various values to be associated with a security certificate (SSL certificate). Subject alternative names can include IP addresses, email addresses, universal resource identifiers (URIs), alternative common Domain Name System (DNS) names, alternatives to the distinguished name, and other information.You can install this on all machines that will be communicating with services using SSL certificates generated by this root certificate.
Step 1![]() If your organization already has a well known root CA, you can use it. You can also import a new CA using the WAAS Central Manager GUI. For more information, see Working with Certificate Authorities.
If your organization already has a well known root CA, you can use it. You can also import a new CA using the WAAS Central Manager GUI. For more information, see Working with Certificate Authorities.
Alternately, if you need to create a new CA, use a Linux machine with openssl version of 1.0.1e or greater to create these certificates. Create the root CA key. This signs all issued certificates.
Step 2![]() Create the self-signed root CA certificate, with the key generated above.
Create the self-signed root CA certificate, with the key generated above.
Step 3![]() Verify the root certificate.
Verify the root certificate.
Step 4![]() Import the certificate from the Enterprise CA to the Trusted Root Certification Authorities store on the client browser and install the root CA certificate and intermediate CA certificate.
Import the certificate from the Enterprise CA to the Trusted Root Certification Authorities store on the client browser and install the root CA certificate and intermediate CA certificate.
Creating Single-Sided SMART-SSL Accelerated Service Certificate
To create the certificate to be used with the accelerated service, follow the steps below:
Step 1![]() Create a new encryption key pair using open ssl.
Create a new encryption key pair using open ssl.
Step 2![]() Create a Certificate Signing Request (CSR) and key pair and other needed attributes such as Common Name, Company and SubjAltName for the application you are trying to optimize. For example, in case of youtube, make sure the subjectAltNames have all the URLs that YouTube servers include in their certificate that you would like to optimize.
Create a Certificate Signing Request (CSR) and key pair and other needed attributes such as Common Name, Company and SubjAltName for the application you are trying to optimize. For example, in case of youtube, make sure the subjectAltNames have all the URLs that YouTube servers include in their certificate that you would like to optimize.
Alternately, if you want to create a CSR from the CM GUI, you can follow the steps in Configuring a Service Certificate and Private Key.
Step 3![]() Create new proxy server certificate by signing the above generated CSR with your existing Enterprise Root CA, or the one created above. This will generate.crt or.pem certifcate file.
Create new proxy server certificate by signing the above generated CSR with your existing Enterprise Root CA, or the one created above. This will generate.crt or.pem certifcate file.
Note that the CA certificate used to sign this accelerated service certificate should be present in the client browser root CA store for the accelerated service proxy certificate created to be authenticated and accepted by the client browser.
- IE or Chrome: settings- advanced settings - certificates - import - add the root ca -into trusted root authorities. Clear the browser cache and reload the browser for the cloud application and it should pick up the new certificate.
- Mozilla: options - advanced - Certificates> View certificates > Import - click all the three for the trusted zones and import the certificate. Clear the browser cache and reload the browser for the cloud application and it should pick up the new certificate.
Step 4![]() WAAS allows importing certificates with pkcs12 format. To generate the pcks12 format from the certificate file and your private key use the open ssl command.
WAAS allows importing certificates with pkcs12 format. To generate the pcks12 format from the certificate file and your private key use the open ssl command.
Step 5![]() Import this certificate into the WAAS device group using crypto import EXEC command and thereafter be used in the accelerated server configuration as server-cert-key.
Import this certificate into the WAAS device group using crypto import EXEC command and thereafter be used in the accelerated server configuration as server-cert-key.
for e.g.
WAE#crypto import pkcs12 youtube.p12 pkcs12 disk youtube_newcert.p12
Step 6![]() It is important to note that the CA cert used to sign this ASVC cert will need to exist in the browser rootCA store for the accelerated service proxy certificate create to be authenticated and accepted by the browser.
It is important to note that the CA cert used to sign this ASVC cert will need to exist in the browser rootCA store for the accelerated service proxy certificate create to be authenticated and accepted by the browser.
Note![]() The WAAS CM CA repository does not include the 'CN=GTE CyberTrust Global Root' certificate. You will need to manually import and configure it from the Central Manager or the device to use it to validate o365 certificates.
The WAAS CM CA repository does not include the 'CN=GTE CyberTrust Global Root' certificate. You will need to manually import and configure it from the Central Manager or the device to use it to validate o365 certificates.
Configuring and enabling SMART-SSL accelerated services on single-sided device group
The following are prerequisites for using Cisco WAAS to optimize SMART-SSL traffic:
- The Central Manager and WAE’s must be running software version 6.2.x.
- A new device group that will support single-sided acceleration. To create a device group, see Creating a Device Group in Chapter 3, “Using Device Groups and Device Locations.”
After you have created an accelerated service certificate for WAN optimization, to enable the SMART-SSL settings on this group follow these steps:
Step 1![]() From the WAAS Central Manager menu, choose Device Groups > device-group-name, to select the device group created above. Add only branch devices to this group.These devices will optimize the SSL traffic as it passes through them.
From the WAAS Central Manager menu, choose Device Groups > device-group-name, to select the device group created above. Add only branch devices to this group.These devices will optimize the SSL traffic as it passes through them.
Step 2![]() Choose Configure > Acceleration > Enabled Features.
Choose Configure > Acceleration > Enabled Features.
Step 3![]() Check the SSL Interposer (SSL Accelerator V2) check box to enable SMART-SSL acceleration.
Check the SSL Interposer (SSL Accelerator V2) check box to enable SMART-SSL acceleration.
Step 4![]() Create an SSL accelerated service for the device group. Choose Acceleration > SSL Accelerated Services and click the Create button. The Creating new SSL Accelerated Service page opens.
Create an SSL accelerated service for the device group. Choose Acceleration > SSL Accelerated Services and click the Create button. The Creating new SSL Accelerated Service page opens.
Step 5![]() In the SSL Accelerated Service section, name your service, and select In service box. You can also provide a short description.
In the SSL Accelerated Service section, name your service, and select In service box. You can also provide a short description.
Step 6![]() In the Server Addresses section, enter “any” in the IP Address box and “443” in the Server Port box. Then click Add.
In the Server Addresses section, enter “any” in the IP Address box and “443” in the Server Port box. Then click Add.
Step 7![]() In the Certificate and Private Key section, click Import Existing Certificate and Optionally Private Key and select Upload File in PKCS#12 Format. Supply the password used to export the certificate ( Using the Browse button, locate the certificate. Then click the Import button.
In the Certificate and Private Key section, click Import Existing Certificate and Optionally Private Key and select Upload File in PKCS#12 Format. Supply the password used to export the certificate ( Using the Browse button, locate the certificate. Then click the Import button.
A confirmation screen with the certificate information appears.
Step 8![]() Click Submit to complete configuring the SSL-accelerated service to use single sided optimization.
Click Submit to complete configuring the SSL-accelerated service to use single sided optimization.
Alternatively, if you want to automate the entire process using a script, we recommend that you get in touch with the Cisco Technical Assistance Center (TAC).
Step 9![]() Monitor the SMART-SSL accelerated service optimization statistics using the Cisco WAAS Central Manager and the command-line interface (CLI) using the show statistics encryption-services exec command.
Monitor the SMART-SSL accelerated service optimization statistics using the Cisco WAAS Central Manager and the command-line interface (CLI) using the show statistics encryption-services exec command.
Alternately, to enable SMART-SSL acceleration from the CLI, use the (config) crypto encryption-service enable global configuration command.
The SSL accelerator and the SMART-SSL accelerator use the same configuration commands. However, for the SMART-SSL configuration, only a limited set of keywords are supported. The following table elaborates the supported keywords.
|
|
|
|---|---|
office365 optimization using Azure vWAAS
Microsoft Office365 supports various business critical applications like email, office online, skype for business etc. Office365 as SaaS has become very popular in the past few years. As enterprises are moving towards SaaS applications like office365; performance and user experience of these applications become more and more critical.
WAAS support for Office365 traffic acceleration and optimization was introduced in release 5.3.5, but it was limited to optimization between the on-premise data center to the customer branch. The traffic between the customer data center to office365 was not optimized.
With release 6.2.1, traffic to office365 can be optimized till it reaches the cloud by implementing a solution that comprises of the following:
Prerequisites
Before you create an o365 accelerated service on the WAAS Central Manger, you must have completed the following:
- Deployed Virtual Network in Azure
- Deployed CSR 1000v for secure network extension and DNAT
- Deplpyed Azure vWAAS
- Configured Azure Route tables
- Configured Azure CSR
- Registered the Azure vWAAS device with the WAAS Central Manager.
The table below provides an overview of the steps you must complete to set up and enable o365 accelerationn from the WAAS Central Manager.
Table 12-5 Checklist for Configuring o365 Acceleration
|
|
|
|---|---|
Prepare for configuring SSL acceleration. |
Identifies the information that you need to gather before configuring SSL acceleration on your WAAS devices. For more information, see Prerequisites for Configuring SSL Acceleration. |
Set up Root CA certificates |
(Optional) Describes how to create, import, and manage certificate authority (CA) certificates. For more information, see Create a Root CA certificate. |
Enable SSL application optimization. |
Describes how to activate the SSL acceleration feature. For more information, see Enabling and Disabling the Global Optimization Features. |
Set up accelerated service certificates. |
Describes how to create, import, and use certificates for o365 acceleration. For more information, see Creating o365 Accelerated Service Certificate. |
Configure and enable o365 accelerated services. |
Describes how to add, configure, and enable o365 accelerated service through the WAAS Central Manager For more information, see Configuration for o365 acceleration from the WAAS Central Manager. |
Create a Root CA certificate
A root SSL certificate is a certificate issued by a trusted certificate authority and is in turn trusted by domain clients. This is used to sign all issued certificates. This CA needs to be capable of accepting certificate signing requests (CSRs) that include subject alternative names and generate certificates that include subject alternative names. The subject alternative name is an extension to the X.509 protocol that allows various values to be associated with a security certificate (SSL certificate). Subject alternative names can include IP addresses, email addresses, universal resource identifiers (URIs), alternative common Domain Name System (DNS) names, alternatives to the distinguished name, and other information.You can install this on all machines that will be communicating with services using SSL certificates generated by this root certificate. If your organization already has a root CA for its internal use, you can use it instead of a new root CA. If not, use a Linux machine with openssl version of 1.0.1e or greater to create these certificates.
Step 1![]() Create the root CA key. This signs all issued certificates.
Create the root CA key. This signs all issued certificates.
Step 2![]() Create the self-signed root CA certificate, with the key generated above.
Create the self-signed root CA certificate, with the key generated above.
Step 3![]() Verify the root certificate.
Verify the root certificate.
Import the certificate from the Enterprise CA to the Trusted Root Certification Authorities store on the client browser and install the root CA certificate and intermediate CA certificate.
Creating o365 Accelerated Service Certificate
To create the certificate to be used with the accelerated service, follow the steps below:
Step 1![]() Log in to the Microsoft Management Console(MMC), OpenSSL, or any other available customer tool to create a new Certificate Signing Request (CSR) with the relevant server domain names of the o365 application in the subject alternative names extension of the certificate. Refer to the highlighted area in the example certificate below.
Log in to the Microsoft Management Console(MMC), OpenSSL, or any other available customer tool to create a new Certificate Signing Request (CSR) with the relevant server domain names of the o365 application in the subject alternative names extension of the certificate. Refer to the highlighted area in the example certificate below.
Step 2![]() Submit the certificate to the Enterpise CA.
Submit the certificate to the Enterpise CA.
Step 3![]() Import the signed certificate from the Enterprise CA to the Trusted Root Certification Authorities store.\
Import the signed certificate from the Enterprise CA to the Trusted Root Certification Authorities store.\
Note![]() The Enterprise root CA should be present in browser as trusted root CA.
The Enterprise root CA should be present in browser as trusted root CA.
Step 4![]() Ensure that the CA certificate used to sign this accelerated service certificate should be present in the client browser root CA store for the accelerated service proxy certificate created to be authenticated and accepted by the client browser.
Ensure that the CA certificate used to sign this accelerated service certificate should be present in the client browser root CA store for the accelerated service proxy certificate created to be authenticated and accepted by the client browser.
- IE or Chrome: settings- advanced settings - certificates - import - add the root ca -into trusted root authorities. Clear the browser cache and reload the browser for the cloud application and it should pick up the new certificate.
- Mozilla: options - advanced - Certificates> View certificates > Import - click all the three for the trusted zones and import the certificate. Clear the browser cache and reload the browser for the cloud application and it should pick up the new certificate.
Configuration for o365 acceleration from the WAAS Central Manager
Step 1![]() Register your Azure vWAAS device with the WAAS Central Manager. If the Central Manager is in a different network add routes for reachability.
Register your Azure vWAAS device with the WAAS Central Manager. If the Central Manager is in a different network add routes for reachability.
Step 2![]() Create an o365 accelerated service for the device group. Choose Acceleration > SSL Accelerated Services and click the Create button. The Creating New SSL Accelerated Service page opens.
Create an o365 accelerated service for the device group. Choose Acceleration > SSL Accelerated Services and click the Create button. The Creating New SSL Accelerated Service page opens.
Step 3![]() In the SSL Accelerated Service section, name your service “o365”, and select both In Service and Match Server Name Indication boxes. You can also provide a short description.
In the SSL Accelerated Service section, name your service “o365”, and select both In Service and Match Server Name Indication boxes. You can also provide a short description.
Step 4![]() In the Server Addresses section, enter “any” in the IP Address box and “443” in the Server Port box. Then click Add.
In the Server Addresses section, enter “any” in the IP Address box and “443” in the Server Port box. Then click Add.
Step 5![]() In the Certificate and Private Key section, click Import Existing Certificate and Optionally Private Key and select Upload File in PKCS#12 Format to upload the multi-domain certificate created earlier. Supply the password used to export the certificate Using the Browse button, locate the certificate created earlier. Then click the Import button.
In the Certificate and Private Key section, click Import Existing Certificate and Optionally Private Key and select Upload File in PKCS#12 Format to upload the multi-domain certificate created earlier. Supply the password used to export the certificate Using the Browse button, locate the certificate created earlier. Then click the Import button.
A confirmation screen with the certificate information appears.
Step 6![]() Click Submit to complete configuring the o365 accelerated service.
Click Submit to complete configuring the o365 accelerated service.
Alternately, you could use the CLI to copy the o365 certificate ( o365.pfx) to the data center WAE and import the certificate using the crypto import pkcs12 Azure_o365.p12 pkcs12 disk office365.pfx EXEC command. Instead of importing multi-domain certificate from device disk, you can use remote methods (such as ftp, http) to import the certificate from servers. You can also configure the application accelerated service in th WAE with the importedcertificate using the crypto ssl services accelerated-service Azure_o365 EXEC command.
Step 7![]() Monitor the accelerated service optimization statistics using the Cisco WAAS Central Manager and the command-line interface (CLI) using the show statistics connections optimized EXEC command
Monitor the accelerated service optimization statistics using the Cisco WAAS Central Manager and the command-line interface (CLI) using the show statistics connections optimized EXEC command
Cisco Support for Microsoft Windows Update
Cisco support for Microsoft Windows Update enables caching of objects used in Windows OS and application updates. Cisco support for Microsoft Windows Update is enabled by default, and enabled only for specific sites.
This section contains the following topics:
- Benefits of Cisco Support for Microsoft Windows Update
- Viewing Statistics for Cisco Support for Microsoft Windows Update
- Cisco Support for Microsoft Windows Update and Akamai Cache Engine
Benefits of Cisco Support for Microsoft Windows Update
The Microsoft OS and application updates are managed by update clients such as Microsoft Update. Microsoft Update downloads the updates via HTTP, often in combination with BITS (Background Intelligent Transfer Service) to help facilitate the downloads. Clients use HTTP range request to fetch updates.
The objects that comprise the updates, such as.cab files, are typically cacheable, so that HTTP object cache is a significant benefit for this process.
For example, for Windows 7 and 8 OS updates—via direct Internet or WSUS (Windows Server Update Services), versions 2012 and 2012R2— more than 98% of the update files, such as.cab,.exe, and.psf files, are served from cache on subsequent updates. Cisco support for Microsoft Windows Update reduces the volume of WAN offload bytes and reduces response time for subsequent Windows updates.
Viewing Statistics for Cisco Support for Microsoft Windows Update
There are two ways to view data generated by Cisco support for Microsoft Windows Update:
- The Top Sites report, described in Chapter 15, “Monitoring Your WAAS Network” provides information including WAN response time and WAN offload bytes.
- For WAAS Version 6.1.1x and later, the cache engine access log file has two additional fields for Microsoft Windows Update statistics:
–![]() rm-w (range miss, wait)—The main transaction, a cache miss, which waited for the sub-transaction to fetch the needed bytes.
rm-w (range miss, wait)—The main transaction, a cache miss, which waited for the sub-transaction to fetch the needed bytes.
–![]() rm-f (range miss, full)—The sub-transaction, a cache write of the entire document.
rm-f (range miss, full)—The sub-transaction, a cache write of the entire document.
Example 1 contains two log lines, the main transaction and sub-transaction, when a range is requested on an object that is not in cache:
Example 2 shows a cache hit when a range is requested on an object that is either completely in cache, or in the process of being downloaded. If it is in the process of being downloaded, then the main transaction has latched onto a sub-transaction like the one shown in Example 1.
Cisco Support for Microsoft Windows Update and Akamai Cache Engine
Cisco support for Microsoft Windows Update enables Akamai Cache Engine to support Windows Update caching in two ways:
- Download and cache full objects even when ranges within objects that not in cache are requested.
- Future range requests on the objects can be served out of cache.
There is a limit, set by OTT metadata during the Akamai Connect registration process, from the start of the object—the number of bytes or the percent of file length—where the download functionality is triggered. A request of a size above the set limit does not initiate a full object download, and the request is forwarded to the origin as is.

If you want to disable Cisco Support for Microsoft Windows Update, you must disable OTT caching. To do this, uncheck the Over the Top Cache check box. However, note that unchecking the Over the Top Cache check box disables all OTT functionality, both global and custom OTT configurations.
For more information on the Akamai Connect registration process, see Activating the Akamai Connect License in Chapter 13, “Configuring Cisco WAAS with Akamai Connect.”
Creating a New Traffic Optimization Policy
Table 12-6 provides an overview of the steps that you must complete to create a new traffic optimization policy.
|
|
|
|---|---|
Prepare for creating an optimization policy. |
Provides the tasks you need to complete before creating a new optimization policy on your WAAS devices. For more information, see Preparing to Create an Optimization Policy. |
Create an application definition. |
Identifies general information about the application you want to optimize, such as the application name and whether the WAAS Central Manager collects statistics about this application. For more information, see Creating an Application Definition. |
Create an optimization policy. |
Determines the type of action your WAAS device or device group performs on specific application traffic. This step requires you to do the following:
For more information, see Creating an Optimization Policy. |
Preparing to Create an Optimization Policy
Before you create a new optimization policy, complete the following tasks:
- Review the list of optimization policies on your WAAS system and make sure that none of these policies already cover the type of traffic you want to define. To view a list of the predefined policies that come bundled with the WAAS system, see Appendix A, “Predefined Optimization Policy.”
- Identify a match condition for the new application traffic. For example, if the application uses a specific destination or source port, you can use that port number to create a match condition. You can also use a source or destination IP address for a match condition.
- Identify the device or device group that requires the new optimization policy. We recommend that you create optimization policies on device groups so that the policy is consistent across multiple WAAS devices.
Creating an Application Definition
The first step in creating an optimization policy is to set up an application definition that identifies general information about the application, such as the application name and whether you want the WAAS Central Manager to collect statistics about the application. You can create up to 255 application definitions on your WAAS system.
To create an application definition, follow these steps:
Step 1![]() From the WAAS Central Manager menu, choose Configure > Acceleration > Applications.
From the WAAS Central Manager menu, choose Configure > Acceleration > Applications.
The Applications window appears, which displays a list of all the applications on your WAAS system. It also lists the device or device group from which it gets the settings.
Step 2![]() From this window, perform the following tasks:
From this window, perform the following tasks:
- Select an application and click the Edit icon in the task bar to modify the definition, or click the Delete icon in the task bar to delete.
- Determine if your WAAS system is collecting statistics on an application. The Enable Statistics column displays Yes if statistics are being collected for the application.
- Create a new application, as described in the steps that follow.
Step 3![]() Click the Add Application icon in the taskbar.
Click the Add Application icon in the taskbar.
The Application window appears.
Step 4![]() Enter a name for this application.
Enter a name for this application.
The name cannot contain spaces and special characters.
Step 5![]() (Optional) Enter a comment in the Comments field.
(Optional) Enter a comment in the Comments field.
The comment you enter appears in the Applications window.
Step 6![]() Check the Enable Statistics check box to allow the WAAS Central Manager to collect data for this application. To disable data collection for this application, uncheck this check box.
Check the Enable Statistics check box to allow the WAAS Central Manager to collect data for this application. To disable data collection for this application, uncheck this check box.
The WAAS Central Manager GUI can display statistics for up to 25 applications and 25 class maps. An error message is displayed if you try to enable more than 25 statistics for either. However, you can use the WAAS CLI to view statistics for all the applications that have policies on a specific WAAS device. For more information, refer to the Cisco Wide Area Application Services Command Reference.
Note![]() If you are collecting statistics for an application, and decide to disable statistics collection, and then reenable statistics collection at a later time, the historical data is retained, but a gap in data will exist for the period when statistics collection was disabled. An application cannot be deleted if there is an optimization policy using it. However, if you delete an application that you had collected statistics for, and then later recreate the application, the historical data for the application is lost. Only data collected since the re-creation of the application is displayed.
If you are collecting statistics for an application, and decide to disable statistics collection, and then reenable statistics collection at a later time, the historical data is retained, but a gap in data will exist for the period when statistics collection was disabled. An application cannot be deleted if there is an optimization policy using it. However, if you delete an application that you had collected statistics for, and then later recreate the application, the historical data for the application is lost. Only data collected since the re-creation of the application is displayed.
Note![]() The WAAS Central Manager does not start collecting data for this application until you finish creating the entire optimization policy.
The WAAS Central Manager does not start collecting data for this application until you finish creating the entire optimization policy.
The application definition is saved and is displayed in the application list.
Creating an Optimization Policy
After you create an application definition, create an optimization policy that determines the action a WAAS device takes on the specified traffic. For example, you can create an optimization policy that makes a WAAS device apply TCP optimization and compression to all application traffic that travels over a specific port or to a specific IP address. You can create up to 512 optimization policies on your WAAS system.
The traffic-matching rules are present in the application class map. These rules, known as match conditions, use Layer 2 and Layer 4 information in the TCP header to identify traffic.
To create an optimization policy, follow these steps:
Step 1![]() From the WAAS Central Manager menu, choose Devices > device-name ( or Device Groups > device-group-name).
From the WAAS Central Manager menu, choose Devices > device-name ( or Device Groups > device-group-name).
Step 2![]() Choose Configure > Acceleration > Optimization Policies.
Choose Configure > Acceleration > Optimization Policies.
The Optimization Policies window appears (Figure 12-29).
Note![]() In a WAAS Express device, the Optimization Policies window shows a subset of the fields in the standard Optimization Policies window.
In a WAAS Express device, the Optimization Policies window shows a subset of the fields in the standard Optimization Policies window.
Enable Service Policy option, DSCP option, and the Protocol column in the list of policy rules are not applicable to WAAS Express.
Note![]() When Cisco WAAS Express is used on the Cisco Integrated Services Router Generation 2 (ISR G2) with the Cisco VPN Internal Service Module (VPN-ISM) or with Group Encrypted Transport (GETVPN) enabled, the WAAS Express does not optimize FTP data.
When Cisco WAAS Express is used on the Cisco Integrated Services Router Generation 2 (ISR G2) with the Cisco VPN Internal Service Module (VPN-ISM) or with Group Encrypted Transport (GETVPN) enabled, the WAAS Express does not optimize FTP data.
To ensure that FTP data is optimized when WAAS Express is used with the Cisco ISR G2, use the ISR G2's IOS crypto map software.
Figure 12-29 Optimization Policies Window
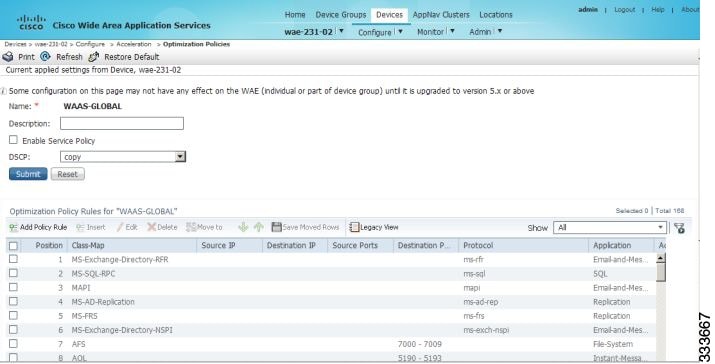
This window displays information about all the optimization policies that reside on the selected device or device group and the position of each policy. The position determines the order in which WAAS refers to that policy when determining how to handle application traffic. To change the position of a policy, see Modifying the Position of an Optimization Policy. This window also displays the class map, source and destination IP addresses, source and destination ports, protocol, application, action, and accelerates assigned to each policy.
Note![]() If there are WAAS Version 4.x devices, you can click the Legacy View taskbar icon to view the policies as they appear in a WAAS Version 4.x device.
If there are WAAS Version 4.x devices, you can click the Legacy View taskbar icon to view the policies as they appear in a WAAS Version 4.x device.
Note![]() All new devices (or devices that have been configured with ‘restore factory default settings’) have their own polices and class maps. Such devices that are not assigned to any device group within two data feeds continue to have their own policies even after being registered with the WAAS Central Manager.
All new devices (or devices that have been configured with ‘restore factory default settings’) have their own polices and class maps. Such devices that are not assigned to any device group within two data feeds continue to have their own policies even after being registered with the WAAS Central Manager.
Once these devices are assigned to device groups, the Force Device Group Settings icon appears on the Optimization Policies page in device group level.
From the Optimization Policies window, you can perform the following tasks:
- Configure a description, configure the Enable Service Policy setting, and configure the DSCP setting. This DSCP setting field configures DSCP settings at the device (or device group) level.
Note![]() The device will only use this policy setting to determine what optimizations are performed if Enable Service Policy is set.
The device will only use this policy setting to determine what optimizations are performed if Enable Service Policy is set.
- Select one or more optimization policies that you want to delete, and click the Delete icon to delete the selected policies.
- Select an optimization policy and click the Edit icon to modify the checked policy.
- Restore predefined policies and class maps. For more information, see Restoring Optimization Policies and Class Maps.
- Create an optimization policy, as described in the steps that follow.
Step 3![]() Click the Add Policy Rule icon in the taskbar to create a new optimization policy.
Click the Add Policy Rule icon in the taskbar to create a new optimization policy.
The Optimization Policy Rule pop-up window appears (Figure 12-30).
Figure 12-30 Add Optimization Policy Rule Window
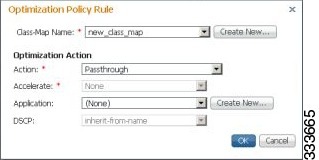
Step 4![]() From the Class-Map Name drop-down list, select an existing class map for this policy, or click Create New to create a new class map for this policy. For information on creating a new class map, see Creating an Optimization Class Map.
From the Class-Map Name drop-down list, select an existing class map for this policy, or click Create New to create a new class map for this policy. For information on creating a new class map, see Creating an Optimization Class Map.
Step 5![]() From the Action drop-down list, choose the action that your WAAS device should take on the defined traffic. Table 12-7 describes each action.
From the Action drop-down list, choose the action that your WAAS device should take on the defined traffic. Table 12-7 describes each action.
Note![]() For a WAAS Express device, only a subset of actions are available: Passthrough, TFO Only, TFO with LZ, TFO with DRE, and TFO with DRE and LZ.
For a WAAS Express device, only a subset of actions are available: Passthrough, TFO Only, TFO with LZ, TFO with DRE, and TFO with DRE and LZ.
|
|
|
|---|---|
Prevents the WAAS device from optimizing the application traffic defined in this policy by using TFO, DRE, or compression. Traffic that matches this policy can still be accelerated if an accelerator is chosen from the Accelerate drop-down list. |
|
Applies a variety of transport flow optimization (TFO) techniques to matching traffic. TFO techniques include BIC-TCP, window size maximization and scaling, and selective acknowledgement. For a more detailed description of the TFO feature, see Transport Flow Optimization in Chapter 1, “Introduction to WAAS.” |
|
Applies both TFO and DRE with adaptive caching to matching traffic. |
|
Applies both TFO and DRE with unidirectional caching to matching traffic. |
|
Applies both TFO and DRE with bidirectional caching to matching traffic. |
|
Applies both TFO and the LZ compression algorithm to matching traffic. LZ compression functions similarly to DRE, but uses a different compression algorithm to compress smaller data streams and maintains a limited compression history. |
|
Applies TFO, DRE with adaptive caching, and LZ compression to matching traffic. |
|
Applies TFO, DRE with unidirectional caching, and LZ compression to matching traffic. |
|
Applies TFO, DRE with bidirectional caching, and LZ compression to matching traffic. |
|
1.When configuring a device running a WAAS version prior to 4.4.1, options that include Unidirectional or Adaptive caching are not shown in the Action list. |
Note![]() When ICA acceleration is enabled, all the connections are processed with the DRE mode as unidirectional, and acceleration type is shown as TIDL (TCP optimization, ICA acceleration, DRE, and LZ).
When ICA acceleration is enabled, all the connections are processed with the DRE mode as unidirectional, and acceleration type is shown as TIDL (TCP optimization, ICA acceleration, DRE, and LZ).
Note![]() When configuring optimization policies on a device group, if the device group contains devices running a WAAS version prior to 4.4.1 and you are configuring an action that includes Unidirectional or Adaptive caching, the caching mode is converted to bidirectional. Similarly, when devices running a WAAS version prior to 4.4.1 join a device group that is configured with optimization policies that use Unidirectional or Adaptive caching, the caching mode is converted to bidirectional. In such cases, we recommend that you upgrade all the devices to the same software version or create different device groups for devices with incompatible versions.
When configuring optimization policies on a device group, if the device group contains devices running a WAAS version prior to 4.4.1 and you are configuring an action that includes Unidirectional or Adaptive caching, the caching mode is converted to bidirectional. Similarly, when devices running a WAAS version prior to 4.4.1 join a device group that is configured with optimization policies that use Unidirectional or Adaptive caching, the caching mode is converted to bidirectional. In such cases, we recommend that you upgrade all the devices to the same software version or create different device groups for devices with incompatible versions.
Step 6![]() From the Accelerate drop-down list, choose one of the following additional acceleration actions that your WAAS device should take on the defined traffic:
From the Accelerate drop-down list, choose one of the following additional acceleration actions that your WAAS device should take on the defined traffic:
- None —No additional acceleration is done.
- MS PortMapper —Accelerate using the Microsoft Endpoint Port Mapper (EPM).
- SMB Adaptor —Accelerate using the SMB Accelerators.
- HTTP Adaptor —Accelerate using the HTTP Accelerator.
- MAPI Adaptor —Accelerate using the MAPI Accelerator.
- ICA Adaptor —Accelerate using the ICA Accelerator.
Note![]() For a WAAS Express device, HTTP Express is available as an accelerator.
For a WAAS Express device, HTTP Express is available as an accelerator.
Step 7![]() Specify the application that you want to associate with this policy by performing either of the following:
Specify the application that you want to associate with this policy by performing either of the following:
- From the Application drop-down list, choose an existing application such as the one that you created, as described in Creating an Application Definition. This list displays all the predefined and new applications on your WAAS system.
- Click New Application to create an application. You can specify the application name and enable statistics collection. After specifying the application details, click OK to save the new application and return to the Optimization Policy window. The new application is automatically assigned to this device or device group.
Step 8![]() (Optional) Choose a value from the DSCP Marking drop-down list. You can choose copy, which copies the DSCP value from the incoming packet and uses it for the outgoing packet. If you choose inherit-from-name from the drop-down list, the DSCP value defined at the application or global level is used.
(Optional) Choose a value from the DSCP Marking drop-down list. You can choose copy, which copies the DSCP value from the incoming packet and uses it for the outgoing packet. If you choose inherit-from-name from the drop-down list, the DSCP value defined at the application or global level is used.
DSCP is a field in an IP packet that enables different levels of service to be assigned to network traffic. Levels of service are assigned by marking each packet on the network with a DSCP code and associating a corresponding level of service. DSCP is the combination of IP Precedence and Type of Service (ToS) fields. For more information, see RFC 2474.
DSCP marking does not apply to pass-through traffic.
Note![]() In a WAAS Express device, the DSCP Marking drop-down list is not shown.
In a WAAS Express device, the DSCP Marking drop-down list is not shown.
For the DSCP marking value, you can choose to use the global default values (see Defining Default DSCP Marking Values) or select one of the other defined values. You can choose copy, which copies the DSCP value from the incoming packet and uses it for the outgoing packet.
The new policy appears in the Optimization Policies window (Figure 12-29).
Creating an Optimization Class Map
You can create an optimization class map in two ways:
- In the device context, choose Configure > Acceleration > Optimization Class-Map, and then click the Add Class-Map taskbar icon.
- While adding or editing a policy rule, as described in Creating an Optimization Policy, click Create New next to the Class-Map Name drop-down list.
The Optimization Class-Map pane is displayed for both of these methods.
To define an optimization class map for an optimization policy, follow these steps:
Step 1![]() Enter a name for this application class map. The name cannot contain spaces or special characters.
Enter a name for this application class map. The name cannot contain spaces or special characters.
Note![]() You must create a unique class map name across all types. For example, you cannot use the same name for an optimization class map and an AppNav class map.
You must create a unique class map name across all types. For example, you cannot use the same name for an optimization class map and an AppNav class map.
Note![]() In WAAS Express, the class map name cannot contain the following prefixes (case sensitive): class, optimize, passthrough, application, accelerate, tfo, dre, lz, or sequence-interval. Existing class map names containing any of these prefixes must be changed manually.
In WAAS Express, the class map name cannot contain the following prefixes (case sensitive): class, optimize, passthrough, application, accelerate, tfo, dre, lz, or sequence-interval. Existing class map names containing any of these prefixes must be changed manually.
Step 2![]() (Optional) Enter a description.
(Optional) Enter a description.
Step 3![]() From the Type drop-down list, choose the class map type. Choose Application Affinity unless you want to match all the TCP traffic, in which case you should choose Any TCP Traffic.
From the Type drop-down list, choose the class map type. Choose Application Affinity unless you want to match all the TCP traffic, in which case you should choose Any TCP Traffic.
Once you have chosen the type, you can enter the match conditions.
Step 4![]() Click the Add Match Condition icon to enter the conditions (Figure 12-31).
Click the Add Match Condition icon to enter the conditions (Figure 12-31).
Note![]() For a WAAS Express device, Protocol and EPM Custom UUID settings are not applicable.
For a WAAS Express device, Protocol and EPM Custom UUID settings are not applicable.
Figure 12-31 Adding a New Match Condition Window
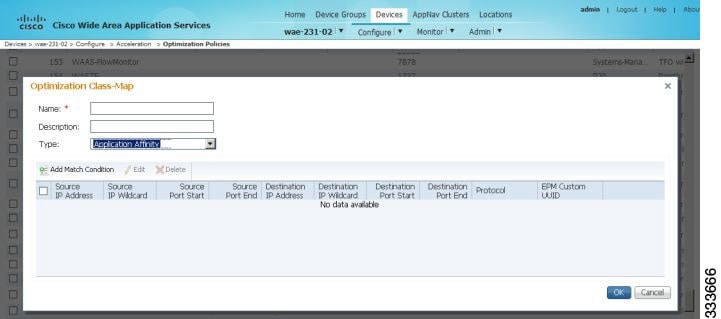
Step 5![]() Enter a value in one of the destination or source condition fields to create a condition for a specific type of traffic.
Enter a value in one of the destination or source condition fields to create a condition for a specific type of traffic.
For example, to match all the traffic going to IP address 10.10.10.2, enter that IP address in the Destination IP Address field.
Note![]() To specify a range of IP addresses, enter a wildcard subnet mask in either the destination or source IP Wildcard field in dotted decimal notation, such as 0.0.0.255 for /24.
To specify a range of IP addresses, enter a wildcard subnet mask in either the destination or source IP Wildcard field in dotted decimal notation, such as 0.0.0.255 for /24.
To match traffic that uses dynamic port allocation, choose the corresponding application identifier from the Protocol drop-down list. For example, to match Microsoft Exchange Server traffic that uses the MAPI protocol, choose mapi. To enter a custom EPM UUID, choose epm-uuid and enter the UUID in the EPM Custom UUID field.
Note![]() If you try to create a class map with an EMP UUID match condition that is already being used, that class map is removed and an error message is displayed stating that a class map already exists with the same EPM UUID match condition.
If you try to create a class map with an EMP UUID match condition that is already being used, that class map is removed and an error message is displayed stating that a class map already exists with the same EPM UUID match condition.
Step 6![]() Add additional match conditions, as needed. If any one of the conditions is matched, the class is considered as matched.
Add additional match conditions, as needed. If any one of the conditions is matched, the class is considered as matched.
Step 7![]() Click OK to save the class map.
Click OK to save the class map.
Managing Application Acceleration
This section contains the following topics:
- Modifying the Accelerator Load Indicator and CPU Load-Monitoring Threshold
- Viewing a List of Applications
- Viewing a Policy Report
- Viewing a Class Map Report
- Restoring Optimization Policies and Class Maps
- Monitoring Applications and Class Maps
- Defining Default DSCP Marking Values
- Modifying the Position of an Optimization Policy
- Modifying the Acceleration TCP Settings
Modifying the Accelerator Load Indicator and CPU Load-Monitoring Threshold
High CPU utilization can adversely affect current optimized connections. To avoid CPU overload, you can enable CPU load monitoring and set the load monitoring threshold. When the average CPU utilization on the device exceeds the set threshold for 2 minutes, the device stops accepting new connections and passes new connections, if any, through. When the average CPU utilization falls below the threshold for 2 minutes, the device resumes accepting optimized connections.
This section contains the procedures for modifying the accelerator load threshold and CPU load monitoring.
Note![]() When a CPU overload condition occurs, the polling interval is reduced to an interval of 2 seconds. Although the average CPU utilization may fall below the threshold during this time and the overload condition cleared, the CPU alarm may still be present. The CPU alarm is only cleared when the overload condition does not reappear in the next 2-minute-interval poll.
When a CPU overload condition occurs, the polling interval is reduced to an interval of 2 seconds. Although the average CPU utilization may fall below the threshold during this time and the overload condition cleared, the CPU alarm may still be present. The CPU alarm is only cleared when the overload condition does not reappear in the next 2-minute-interval poll.
To modify the accelerator load indicator threshold and cpu load monitoring for a WAE device, follow these steps:
Step 1![]() From the WAAS Central Manager menu, choose Devices > device-name ( or Device Groups > device-group-name).
From the WAAS Central Manager menu, choose Devices > device-name ( or Device Groups > device-group-name).
Step 2![]() Choose Configure > Acceleration > Accelerator Threshold.
Choose Configure > Acceleration > Accelerator Threshold.
The Accelerator Threshold window appears.
Step 3![]() To enable CPU Load Monitoring, check the Enable check box. (The default is enabled.)
To enable CPU Load Monitoring, check the Enable check box. (The default is enabled.)
Step 4![]() In the Accelerator Load Indicator Threshold field, enter a percent value between 80 and 100. The default is 95.
In the Accelerator Load Indicator Threshold field, enter a percent value between 80 and 100. The default is 95.
Step 5![]() In the CPU Load Higher Monitoring Threshold field, enter a percent value between 1 and 100. The default is 98.
In the CPU Load Higher Monitoring Threshold field, enter a percent value between 1 and 100. The default is 98.
Step 6![]() In the In the CPU Load Lower Monitoring Threshold field, enter a percent value between 1 and 100. The default is 90.
In the In the CPU Load Lower Monitoring Threshold field, enter a percent value between 1 and 100. The default is 90.
Step 7![]() In the Window Size field enter a value between 1 to 16. The default value is 4.
In the Window Size field enter a value between 1 to 16. The default value is 4.
Step 8![]() In the Sampling Intervals Avg Time field enter a value between 1 and 120. The default is 10.
In the Sampling Intervals Avg Time field enter a value between 1 and 120. The default is 10.
Step 9![]() In the Overloaded State Time field, enter a value between 1to 120. The default value is 10.
In the Overloaded State Time field, enter a value between 1to 120. The default value is 10.
If the device group has the 6.x software image, you can configure additional settings to monitor the cpu load for the device group.
Step 11![]() To enable CPU Load Monitoring, check the Enable check box. (The default is enabled.)
To enable CPU Load Monitoring, check the Enable check box. (The default is enabled.)
Step 12![]() To enable softirq monitoring, check the Enable softirq Monitoring checkbox.
To enable softirq monitoring, check the Enable softirq Monitoring checkbox.
Step 13![]() In the Accelerator Load Indicator Threshold field, enter a percent value between 80 and 100. The default is 95.
In the Accelerator Load Indicator Threshold field, enter a percent value between 80 and 100. The default is 95.
Step 14![]() In the CPU Load Monitoring Threshold field, enter a percent value between 80 and 100. The default is 95.
In the CPU Load Monitoring Threshold field, enter a percent value between 80 and 100. The default is 95.
Step 15![]() In the CPU Load Higher Monitoring Threshold field, enter a percent value between 1 and 100. The default is 98.
In the CPU Load Higher Monitoring Threshold field, enter a percent value between 1 and 100. The default is 98.
Step 16![]() In the In the CPU Load Lower Monitoring Threshold field, enter a percent value between 1 and 100. The default is 90.
In the In the CPU Load Lower Monitoring Threshold field, enter a percent value between 1 and 100. The default is 90.
Step 17![]() In the Window Size field enter a value between 1 to 16. The default value is 4.
In the Window Size field enter a value between 1 to 16. The default value is 4.
Step 18![]() In the Sampling Intervals Avg Time field enter a value between 1 and 120. The default is 10.
In the Sampling Intervals Avg Time field enter a value between 1 and 120. The default is 10.
Step 19![]() In the Overloaded State Time field, enter a value between 1to 120. The default value is 10.
In the Overloaded State Time field, enter a value between 1to 120. The default value is 10.
Viewing a List of Applications
To view a list of applications that reside on a WAE device or device group, follow these steps:
Step 1![]() From the WAAS Central Manager menu, choose Devices > device-name ( or Device Groups > device-group-name).
From the WAAS Central Manager menu, choose Devices > device-name ( or Device Groups > device-group-name).
Step 2![]() Choose Configure > Acceleration > Optimization Policies.
Choose Configure > Acceleration > Optimization Policies.
The Optimization Policies window appears.
Step 3![]() Click the Application column header to sort the column by application name so that you can locate a specific application more easily.
Click the Application column header to sort the column by application name so that you can locate a specific application more easily.
Note![]() If there are WAAS Version 4.x devices, click the Legacy View taskbar icon to view the policies as they appear in a WAAS Version 4.x device.
If there are WAAS Version 4.x devices, click the Legacy View taskbar icon to view the policies as they appear in a WAAS Version 4.x device.
To edit an optimization policy, check the box next to the application and click the Edit taskbar icon.
If you determine that one or more policies are not needed, check the check box next to each of these applications and click the Delete taskbar icon.
If you determine that a new policy is needed, click the Add Policy Rule taskbar icon (see Creating an Optimization Policy).
Viewing a Policy Report
To view a report of a policy residing on each WAE device or device group, follow these steps:
Step 1![]() From the WAAS Central Manager menu, choose Configure > Acceleration > Optimization Policy Report (Figure 12-32).
From the WAAS Central Manager menu, choose Configure > Acceleration > Optimization Policy Report (Figure 12-32).
The Policy Report for Devices tab appears. This report lists each device (or device group) and the overall policy count on the device (or device group) referencing this application. It includes both active policies (those in use by the device or device group), and backup policies (those not in use by the device when the device gets its configuration from a device group). When the device is deassigned from the device group, the backup policies are applied back to the device and become active again.
An application cannot be deleted unless the No. of Policies field is 0.
Figure 12-32 Optimization Policy Report
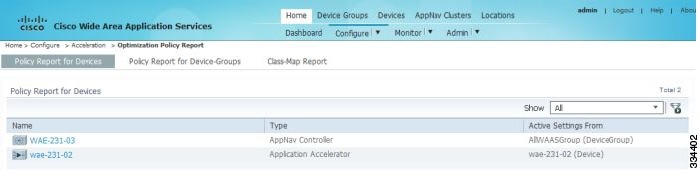
Step 2![]() Click the Policy Report for Device-Groups tab to view the number of devices per device group and the number of active policies in the device group.
Click the Policy Report for Device-Groups tab to view the number of devices per device group and the number of active policies in the device group.
Step 3![]() To see the optimization policies that are defined on a particular device or group, click the corresponding device or device group. The policies are displayed in the Optimization Policies window.
To see the optimization policies that are defined on a particular device or group, click the corresponding device or device group. The policies are displayed in the Optimization Policies window.
For information about viewing a class map report, see Viewing a Class Map Report.
Viewing a Class Map Report
To view a report of the class maps that reside on each WAE device or device group, follow these steps:
Step 1![]() From the WAAS Central Manager menu, choose Configure > Acceleration > Optimization Policy Report.
From the WAAS Central Manager menu, choose Configure > Acceleration > Optimization Policy Report.
The Policy Report for Devices tab appears.
Step 2![]() Click the Class-Map Report tab to view a report of the devices and device groups on which the class map is configured.
Click the Class-Map Report tab to view a report of the devices and device groups on which the class map is configured.
Step 3![]() Select the class map and click the View icon to see the devices or device groups on which the class maps reside.
Select the class map and click the View icon to see the devices or device groups on which the class maps reside.
Restoring Optimization Policies and Class Maps
The WAAS system allows you to restore the predefined policies and class maps that shipped with the WAAS system. For a list of the predefined policies, see Appendix A, “Predefined Optimization Policy.”
If you made changes to the predefined policies that have negatively impacted how a WAAS device handles application traffic, you can override your changes by restoring the predefined policy settings.
To restore predefined policies and class maps, follow these steps:
Step 1![]() From the WAAS Central Manager menu, choose Devices > device-name ( or Device Groups > device-group-name).
From the WAAS Central Manager menu, choose Devices > device-name ( or Device Groups > device-group-name).
Step 2![]() Choose Configure > Acceleration > Optimization Policies.
Choose Configure > Acceleration > Optimization Policies.
The Optimization Policies window appears.
Step 3![]() Click the Restore Default taskbar icon to restore over 150 policies and class maps that shipped with the WAAS software and remove any new policies that were created on the system. If a predefined policy has been changed, these changes are lost and the original settings are restored.
Click the Restore Default taskbar icon to restore over 150 policies and class maps that shipped with the WAAS software and remove any new policies that were created on the system. If a predefined policy has been changed, these changes are lost and the original settings are restored.
Monitoring Applications and Class Maps
After you create an optimization policy, you should monitor the associated application to make sure your WAAS system is handling the application traffic as expected.
To monitor an application, you must have enabled statistics collection for that application, as described in the Creating an Application Definition.
To monitor a class map, from the WAAS Central Manager menu, choose Configure > Acceleration > Monitor Classmaps. Select the class map on which to enable statistics and click the Enable button.
The WAAS Central Manager GUI can display statistics for up to 25 applications and 25 class maps. An error message is displayed if you try to enable more than 25 statistics for either. However, you can use the WAAS CLI to view statistics for all the applications that have policies on a specific WAAS device. For more information, refer to the Cisco Wide Area Application Services Command Reference.
You can use the TCP Summary report to monitor a specific application. For more information, see the TCP Summary Report in Chapter 15, “Monitoring and Troubleshooting Your WAAS Network.”
Most charts can be configured to display Class Map data by clicking the chart Edit icon and choosing the Classifier series.
Defining Default DSCP Marking Values
According to policies that you define in an application definition and an optimization policy, the WAAS software allows you to set a DSCP value on packets that it processes.
A DSCP value is a field in an IP packet that enables different levels of service to be assigned to the network traffic. The levels of service are assigned by marking each packet on the network with a DSCP code and associating a corresponding level of service. The DSCP marking determines how packets for a connection are processed externally to WAAS. DSCP is the combination of IP Precedence and Type of Service (ToS) fields. For more information, see RFC 2474. DSCP values are predefined and cannot be changed.
This attribute can be defined at the following levels:
- Global—You can define global defaults for the DSCP value for each device (or device group) in the Optimization Policies page for that device (or device group). This value applies to the traffic if a lower level value is not defined.
- Policy—You can define the DSCP value in an optimization policy. This value applies only to traffic that matches the class maps defined in the policy and overrides the application or global DSCP value.
Defining the Default DSCP Marking Value
To define the global default DSCP marking value, follow these steps:
Step 1![]() From the WAAS Central Manager menu, choose Devices > device-name ( or Device Groups > device-group-name).
From the WAAS Central Manager menu, choose Devices > device-name ( or Device Groups > device-group-name).
Step 2![]() Choose Configure > Acceleration > Optimization Policies.
Choose Configure > Acceleration > Optimization Policies.
The Optimization Policies window appears.
Step 3![]() Choose a value from the DSCP drop-down list. The default setting is copy, which copies the DSCP value from the incoming packet and uses it for the outgoing packet.
Choose a value from the DSCP drop-down list. The default setting is copy, which copies the DSCP value from the incoming packet and uses it for the outgoing packet.
Step 4![]() Click OK to save the settings.
Click OK to save the settings.
Modifying the Position of an Optimization Policy
Each optimization policy has an assigned position that determines the order in which a WAAS device refers to the policy in an attempt to classify traffic. For example, when a WAAS device intercepts traffic, it refers to the first policy in the list to try to match the traffic to an application. If the first policy does not provide a match, the WAAS device moves on to the next policy in the list.
You should consider the position of policies that pass through traffic unoptimized because placing these policies at the top of the list can cancel out optimization policies that appear farther down the list. For example, if you have two optimization policies that match traffic going to IP address 10.10.10.2, and one policy optimizes this traffic and a second policy in a higher position passes through this traffic, then all traffic going to 10.10.10.2 will go through the WAAS system unoptimized. For this reason, you should make sure that your policies do not have overlapping matching conditions, and you should monitor the applications you create to make sure that WAAS is handling the traffic as expected. For more information on monitoring applications, see Chapter15, “Monitoring Your WAAS Network”
To modify the position of an optimization policy, follow these steps:
Step 1![]() From the WAAS Central Manager menu, choose Devices > device-name ( or Device Groups > device-group-name).
From the WAAS Central Manager menu, choose Devices > device-name ( or Device Groups > device-group-name).
Step 2![]() Choose Configure > Acceleration > Optimization Policies.
Choose Configure > Acceleration > Optimization Policies.
The Optimization Policies window appears (Figure 12-33).
Note![]() For a WAAS Express device, all policies are grouped under the waas_global category.
For a WAAS Express device, all policies are grouped under the waas_global category.
For a list of predefined policies, see Appendix A, “Predefined Optimization Policy.”
Figure 12-33 Optimization Policies Window
Step 3![]() Modify the position of the optimization policy in any of the following ways:
Modify the position of the optimization policy in any of the following ways:
- Select the policy you want to move and use the up and down arrow (
 ) icons in the taskbar to move that policy higher or lower in the list.
- Select the policy you want to move and click Move To to specify the exact position.
- Select the policy and drag and drop it into the desired position
Note![]() The Save Moved Rows icon must be clicked to save the new policy positions.
The Save Moved Rows icon must be clicked to save the new policy positions.
You can also create a new optimization policy at a particular position by selecting the policy above the location and then clicking Insert.
If a device goes through all the policies in the list without making a match, the WAAS device passes through the traffic unoptimized.
Note![]() For a WAAS Express device, the class default policy should be last. This policy cannot be modified or deleted.
For a WAAS Express device, the class default policy should be last. This policy cannot be modified or deleted.
Step 4![]() Click the Save Moved Rows icon to save changes, if any, that you made to policy positions.
Click the Save Moved Rows icon to save changes, if any, that you made to policy positions.
Step 5![]() If you determine that a policy is not needed, follow these steps to delete the policy:
If you determine that a policy is not needed, follow these steps to delete the policy:
a.![]() Select the policy you want to delete.
Select the policy you want to delete.
b.![]() Click the Delete icon in the taskbar.
Click the Delete icon in the taskbar.
Note![]() A default policy that maps to a default class map matching any traffic cannot be deleted.
A default policy that maps to a default class map matching any traffic cannot be deleted.
Step 6![]() If you determine that a new policy is needed, click the Add Policy taskbar icon to create the policy (see Creating an Optimization Policy).
If you determine that a new policy is needed, click the Add Policy taskbar icon to create the policy (see Creating an Optimization Policy).
Modifying the Acceleration TCP Settings
In most cases, you do not need to modify the acceleration TCP settings because your WAAS system automatically configures the acceleration TCP settings based on the hardware platform of the WAE device. WAAS automatically configures the settings only under the following circumstances:
- When you first install the WAE device in your network.
- When you enter the restore factory-default command on the device. For more information about this command, see the Cisco Wide Area Application Services Command Reference.
The WAAS system automatically adjusts the maximum segment size (MSS) to match the advertised MSS of the client or server for each connection. The WAAS system uses the lower of 1432 or the MSS value advertised by the client or server.
If your network has high BDP links, you may need to adjust the default buffer settings automatically configured for your WAE device. For more information, see Calculating the TCP Buffers for High BDP Links.
If you want to adjust the default TCP adaptive buffering settings for your WAE device, see Modifying the TCP Adaptive Buffering Settings.
To modify the acceleration TCP settings, follow these steps:
Step 1![]() From the WAAS Central Manager menu, choose Devices > device-name ( or Device Groups > device-group-name).
From the WAAS Central Manager menu, choose Devices > device-name ( or Device Groups > device-group-name).
Step 2![]() Choose Configure > Acceleration > TCP Settings. The Acceleration TCP Settings window appears.
Choose Configure > Acceleration > TCP Settings. The Acceleration TCP Settings window appears.
Step 3![]() Check the Send TCP Keepalive check box. (By default, this check box is checked.)
Check the Send TCP Keepalive check box. (By default, this check box is checked.)
Checking the Send TCP Keepalive check box allows this WAE device or group to disconnect the TCP connection to its peer device if no response is received from the TCP keepalive exchange. In this case, the two peer WAE devices will exchange TCP keepalives on a TCP connection, and if no response is received for the keepalives for a specific period, the TCP connection will be torn down. When the keepalive option is enabled, any short network disruption in the WAN will cause the TCP connection between peer WAE devices to be disconnected.
If the Send TCP Keepalive check box is not checked, TCP keepalives will not be sent and connections will be maintained unless they are explicitly disconnected.
Step 4![]() Modify the TCP acceleration settings, as needed. See Table 12-8 for a description of these settings.
Modify the TCP acceleration settings, as needed. See Table 12-8 for a description of these settings.
For information on how to calculate these settings for high BDP links, see Calculating the TCP Buffers for High BDP Links.
Step 5![]() If you are deploying the WAE across a high Bandwidth-Delay-Product (BDP) link, you can set recommended values for the send and receive buffer sizes by clicking Set High BDP recommended values. For more information about calculating TCP buffers for high BDP links, see Calculating the TCP Buffers for High BDP Links.
If you are deploying the WAE across a high Bandwidth-Delay-Product (BDP) link, you can set recommended values for the send and receive buffer sizes by clicking Set High BDP recommended values. For more information about calculating TCP buffers for high BDP links, see Calculating the TCP Buffers for High BDP Links.
Note![]() If the original and optimized maximum segment sizes are set to their default values and you configure a jumbo MTU setting, the segment sizes are changed to the jumbo MTU setting minus 68 bytes. If you have configured custom maximum segment sizes, their values are not changed if you configure a jumbo MTU. For more information on jumbo MTU, see Configuring a Jumbo MTU in Chapter 6, “Configuring Network Settings.”
If the original and optimized maximum segment sizes are set to their default values and you configure a jumbo MTU setting, the segment sizes are changed to the jumbo MTU setting minus 68 bytes. If you have configured custom maximum segment sizes, their values are not changed if you configure a jumbo MTU. For more information on jumbo MTU, see Configuring a Jumbo MTU in Chapter 6, “Configuring Network Settings.”
To configure TCP keepalives from the CLI, use the tfo tcp keepalive global configuration command.
To configure TCP acceleration settings from the CLI, use the following global configuration commands: tfo tcp optimized-mss, tfo tcp optimized-receive-buffer, tfo tcp optimized-send-buffer, tfo tcp original-mss, tfo tcp original-receive-buffer, and tfo tcp original-send-buffer.
To show the TCP buffer sizes, use the show tfo tcp EXEC command.
Calculating the TCP Buffers for High BDP Links
WAAS software can be deployed in different network environments, involving multiple link characteristics such as bandwidth, latency, and packet loss. All WAAS devices are configured to accommodate networks with maximum Bandwidth-Delay-Product (BDP) of up to the values listed below:
- WAE-512—Default BDP is 32 KB
- WAE-612—Default BDP is 512 KB
- WAE-674—Default BDP is 2048 KB
- WAE-7341—Default BDP is 2048 KB
- WAE-7371—Default BDP is 2048 KB
- All WAVE platforms—Default BDP is 2048 KB
If your network provides higher bandwidth, or higher latencies are involved, use the following formula to calculate the actual link BDP:
BDP [Kbytes] = (link BW [Kbytes/sec] * Round-trip latency [Sec])
When multiple links 1..N are the links for which the WAE is optimizing traffic, the maximum BDP should be calculated as follows:
MaxBDP = Max (BDP(link 1),..,BDP(link N))
If the calculated MaxBDP is greater than the DefaultBDP for your WAE model, the Acceleration TCP settings should be modified to accommodate that calculated BDP.
After you calculate the size of the Max BDP, enter a value that is equal to or greater than twice the Max BDP in the Send Buffer Size and Receive Buffer Size fields for the optimized connection on the Acceleration TCP Settings window.
Note![]() These manually configured buffer sizes are applicable only if TCP adaptive buffering is disabled. TCP adaptive buffering is normally enabled, and allows the WAAS system to dynamically vary the buffer sizes. For more information on TCP adaptive buffering, see Modifying the TCP Adaptive Buffering Settings.
These manually configured buffer sizes are applicable only if TCP adaptive buffering is disabled. TCP adaptive buffering is normally enabled, and allows the WAAS system to dynamically vary the buffer sizes. For more information on TCP adaptive buffering, see Modifying the TCP Adaptive Buffering Settings.
Modifying the TCP Adaptive Buffering Settings
In most cases, you do not need to modify the acceleration TCP adaptive buffering settings because your WAAS system automatically configures the TCP adaptive buffering settings based on the network bandwidth and delay experienced by each connection. Adaptive buffering allows the WAAS software to dynamically vary the size of the send and receive buffers to increase performance and more efficiently use the available network bandwidth.
To modify the acceleration TCP adaptive buffering settings, follow these steps:
Step 1![]() From the WAAS Central Manager menu, choose Devices > device-name ( or Device Groups > device-group-name).
From the WAAS Central Manager menu, choose Devices > device-name ( or Device Groups > device-group-name).
Step 2![]() Choose Configure > Acceleration > TCP Adaptive Buffering Settings.
Choose Configure > Acceleration > TCP Adaptive Buffering Settings.
The TCP Adaptive Buffering Settings window appears.
Step 3![]() To enable TCP adaptive buffering, check the Enable check box. (By default, this is enabled.)
To enable TCP adaptive buffering, check the Enable check box. (By default, this is enabled.)
Step 4![]() In the Send Buffer Size and Receive Buffer Size fields, enter the maximum size, in kilobytes, of the send and receive buffers.
In the Send Buffer Size and Receive Buffer Size fields, enter the maximum size, in kilobytes, of the send and receive buffers.
To configure the TCP adaptive buffer settings from the CLI, use the tfo tcp adaptive-buffer-sizing global configuration command:
To disable TCP adaptive buffering from the CLI, use the no tfo tcp adaptive-buffer-sizing enable global configuration command.
To show the default and configured adaptive buffer sizes, use the show tfo tcp EXEC command.
 Feedback