- Index
- Preface
- Introduction to Cisco WAAS
- Planning Your WAAS Network
- Using Device Groups and Device Locations
- Configuring Traffic Interception
- Configuring Network Settings
- Configuring Administrative Login Authentication, Authorization, and Accounting
- Creating and Managing Administrator User Accounts and Groups
- Creating and Managing IP Access Control Lists for WAAS Devices
- Configuring Other System Settings
- Using the WAE Device Manager GUI
- Configuring Wide Area File Services
- Configuring Application Acceleration
- Configuring and Managing WAAS Print Services
- Configuring Virtualization
- Maintaining Your WAAS System
- Monitoring and Troubleshooting Your WAAS Network
- Configuring SNMP Monitoring
- Default Application Policies
- About Application Acceleration
- Enabling and Disabling the Global Optimization Features
- Creating a New Traffic Application Policy
- Managing Application Acceleration
Configuring Application Acceleration
This chapter describes how to configure the application policies on your WAAS system that determine the types of application traffic that is accelerated over your WAN.

Note Throughout this chapter, the term WAAS device is used to refer collectively to the WAAS Central Managers and WAEs in your network. The term WAE refers to WAE appliances and WAE Network Modules (the NME-WAE family of devices).
About Application Acceleration
The WAAS software comes with over 150 default application policies that determine the type of application traffic your WAAS system optimizes and accelerates. These default policies cover the most common type of application traffic on your network. For a list of the default policies, see Appendix A, “Default Application Policies.”
Each application policy contains the following elements:
- Application definition—Identifies general information about a specific application, such as the application name, the differentiated services code point (DSCP) marking value that is applied to the traffic, and whether the WAAS Central Manager collects statistics about this application.
- Classifier—Contains a matching condition that identifies specific types of traffic. For example, the default HTTP classifier matches all traffic going to ports 80, 8080, 8000, 8001, and 3128. You can create up to 512 classifiers and 1024 matching conditions.
- Policy—Combines the application definition and classifier into a single policy. This policy also determines what optimization and acceleration features (if any) a WAAS device applies to the defined traffic. You can create up to 512 policies. A policy can also contain a DSCP marking value that is applied to the traffic and that overrides a DSCP value set at the application or global level.
You can use the WAAS Central Manager GUI to modify the default policies and to create additional policies for other applications. For more information on creating application policies, see the “Creating a New Traffic Application Policy” section. For more information on viewing reports, restoring policies, monitoring applications, and other functions, see the “Managing Application Acceleration” section.
Enabling and Disabling the Global Optimization Features
The global optimization features determine if TFO Optimization, Data Redundancy Elimination (DRE), and Persistent Compression are enabled on a device or device group. By default, all of these features are enabled. If you choose to disable one of these features, the device will be unable to apply the full WAAS optimization techniques to the traffic that it intercepts.
In addition, the global optimization features include each of the following application accelerators: EPM, CIFS, HTTP MAPI, NFS, and video. By default, all of the application accelerators are enabled. The application accelerators also require specific licenses to operate. For information on installing licenses, see the “Managing Software Licenses” section.
You must enable the accelerator on both of the peer WAEs at either end of a WAN link for all application accelerators to operate.
To enable or disable a global optimization feature, follow these steps:
Step 1 From the WAAS Central Manager GUI navigation pane, choose My WAN > Manage Devices ( or Manage Device Groups ).
Step 2 Click the Edit icon next to the device or device group for which you want to change the global optimization features.
Step 3 From the navigation pane, choose Configure > Acceleration > Enabled Features .
The Enabled Features window appears. (See Figure 12-1.)
Figure 12-1 Modifying the Global Optimization Features
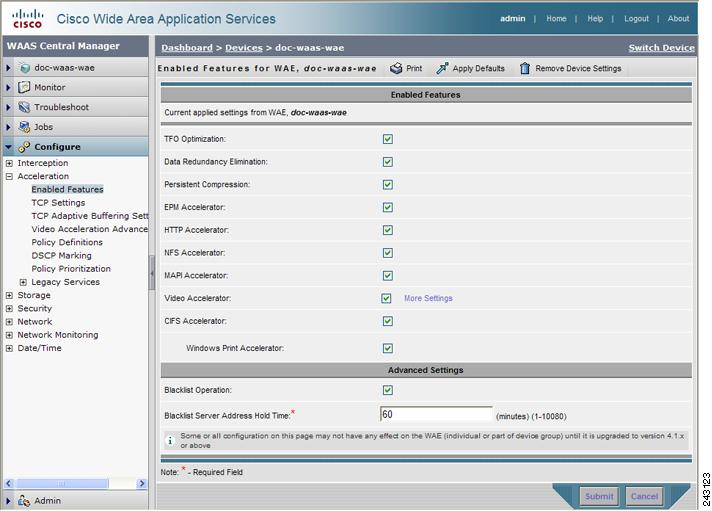
Step 4 Place a check next to the optimization features that you want to enable, and uncheck the features that you want to disable. For a description of each of the optimization features, see the “Key Services of Cisco WAAS” section.
Step 5 If you check the Video Accelerator check box, you can click the More Settings link as a shortcut to the Video Acceleration Configuration window. For more information, see the “Configuring Video Acceleration” section.
Step 6 If you check the CIFS Accelerator check box, you have the following option:
– Windows Print Accelerator—Check this box to accelerate print traffic between clients and a Windows print server. This accelerator is enabled by default when you enable the CIFS accelerator.
Note If you are changing from WAFS legacy mode to the CIFS accelerator, you must disable the WAFS legacy mode before you can enable the CIFS accelerator. To disable WAFS legacy mode, you must disable Core and Edge file services. For WAFS configuration information, see Chapter11, “Configuring Wide Area File Services”
Note Do not disable Windows Print Acceleration during a client session as this can interfere with the client's use of print services. If you must disable Windows Print Acceleration, disconnect and then reestablish the client session.
Step 7 In the Advanced Settings area, uncheck the Blacklist Operation feature if you want to disable it. This feature allows a WAE to better handle situations in which TCP setup packets that have options are blocked or not returned to the WAE device. This behavior can result from network devices (such as firewalls) that block TCP setup packets that have options, and from asymmetric routes. The WAE can keep track of origin servers (such as those behind firewalls) that cannot receive optioned TCP packets and learns not to send out TCP packets with options to these blacklisted servers. WAAS is still able to accelerate traffic between branch and data center WAEs in situations where optioned TCP packets are dropped. We recommend leaving this feature enabled.
Step 8 If you want to change the default Blacklist Server Address Hold Time of 60 minutes, enter the new time in minutes in the Blacklist Server Address Hold Time field. The valid range is 1 minute to 10080 minutes (1 week).
When a server IP address is added to the blacklist, it remains there for configured hold time. After that time, subsequent connection attempts will again include TCP options so that the WAE can redetermine if the server can receive them. It is useful to retry sending TCP options periodically because network packet loss may cause a server to be erroneously blacklisted.
You can shorten or lengthen the blacklist time by changing the Blacklist Server Address Hold Time field.
The changes are saved to the device or device group.
To configure TFO optimization, DRE, and persistent compression from the CLI, use the tfo optimize global configuration command.
To configure EPM acceleration from the CLI, use the accelerator epm global configuration command.
To configure HTTP acceleration from the CLI, use the accelerator http global configuration command.
To configure NFS acceleration from the CLI, use the accelerator nfs global configuration command.
To configure MAPI acceleration from the CLI, use the accelerator mapi global configuration command.
To configure video acceleration from the CLI, use the accelerator video global configuration command.
To configure CIFS acceleration from the CLI, use the accelerator cifs and accelerator cifs preposition global configuration commands.
To configure Windows print acceleration from the CLI, use the accelerator windows-print global configuration command.
To configure the Blacklist Operation feature from the CLI, use the tfo auto-discovery global configuration command.
To display status and statistics on the application accelerators from the CLI, use the show accelerator and show statistics accelerator EXEC commands. To display statistics on the Windows print accelerator, use the show statistics windows-print requests EXEC command.
For details on using individual application accelerators, see the following sections:
Configuring HTTP Acceleration
The HTTP application accelerator accelerates HTTP traffic.
The default Web application policy is defined to send traffic to the HTTP accelerator. The Web application policy uses the HTTP classifier, which matches traffic on ports 80, 8080, 8000, 8001, and 3128. If you expect HTTP traffic on other ports, add the other ports to the HTTP classifier.
Configuring MAPI Acceleration
The MAPI application accelerator accelerates Microsoft Outlook Exchange traffic that uses the Messaging Application Programming Interface (MAPI) protocol. Microsoft Outlook 2000–2007 clients are supported. Clients can be configured with Outlook in cached or noncached mode; both modes are accelerated.
Secure connections that use message authentication (signing) or encryption are not accelerated, and MAPI over HTTP is not accelerated.
Note Microsoft Outlook 2007 has encryption enabled by default. You must disable encryption to benefit from the MAPI application accelerator.
The EPM application accelerator must be enabled for the MAPI application accelerator to operate. EPM is enabled by default. Additionally, the system must define an application policy of type EPM, specify the MAPI UUID, and have an Accelerate setting of MAPI. This policy, MAPI for the Email-and-Messaging application, is defined by default.
EPM traffic, such as MAPI, does not normally use a predefined port. If your Outlook administrator has configured Outlook in a nonstandard way to use a static port, you must create a new basic application policy that accelerates MAPI traffic with a classifier that matches the static port that was configured for Outlook.
Note The MAPI application accelerator is not supported on a branch WAE device with the Cisco WAE Inline Network Adapter, where multiple inline devices are deployed in series. All MAPI connections must go through the same WAE. Outlook clients may receive errors in this case.
Configuring Video Acceleration
The video application accelerator accelerates Windows Media live video broadcasts that use RTSP over TCP. The video accelerator automatically splits one source video stream from the WAN into multiple streams to serve multiple clients on the LAN.
The video accelerator automatically causes the client that is requesting a UDP stream to do a protocol rollover to use TCP (if both the client and server allow TCP).
The default RTSP classifier for the Streaming application policy is defined to send traffic to the video accelerator.
By default, the video accelerator sends any unaccelerated video traffic to be handled by the configured standard TCP optimization policy unless the video accelerator is explicitly configured to drop such traffic.
To enable the video accelerator, check the Video Accelerator check box in the Enabled Features window (see Figure 12-1).
To configure the video acceleration settings, follow these steps:
Step 1 From the WAAS Central Manager GUI navigation pane, choose My WAN > Manage Devices ( or Manage Device Groups ).
Step 2 Click the Edit icon next to the device or device group for which you want to change the video acceleration configuration.
Step 3 From the navigation pane, choose Configure > Acceleration > Video Acceleration Advanced Settings .
The Video Acceleration Configuration window appears. (See Figure 12-2.)
Figure 12-2 Modifying the Video Acceleration Configuration
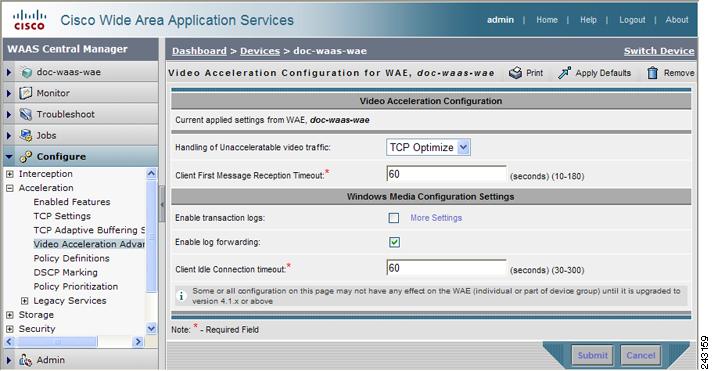
Step 4 In the Un-accelerated video traffic handling field, choose how to handle video traffic that is not being accelerated due to unsupported transport or format, or overload. Choose TCP Optimize (the default) to handle such connections with the configured TCP optimization policy, or choose Drop to drop the traffic. If you choose Drop, all Windows Media video-on-demand traffic and all non-Windows Media RTSP traffic is dropped.
Step 5 In the Maximum Initial Setup Delay field, enter the number of seconds to wait for the first message from the client and the first response from the server, after the connection is accepted by the video accelerator, before timing out the connection. Valid values range from 10–180 seconds. The default is 60.
Step 6 Check the Enable transaction logs check box to enable transaction logging. This feature will generate a large amount of logging data. This box is unchecked by default.
Step 7 Check the Enable log forwarding check box to enable forwarding of Windows Media logs to the upstream Windows Media Server. This box is checked by default.
Step 8 In the Client Idle Connection timeout field, enter the maximum number of seconds to wait after the initial client request, while the client connection is idle, before timing out the connection. Valid values range from 30–300 seconds. The default is 60.
The changes are saved to the device or device group.
Creating a New Traffic Application Policy
Table 12-1 provides an overview of the steps that you must complete to create a new traffic application policy.
Prepare for creating an application policy. |
Provides the tasks you need to complete before creating a new application policy on your WAAS devices. For more information, see the “Preparing to Create an Application Policy” section. |
Create an application definition. |
Identifies general information about the application you want to optimize, such as the application name and whether the WAAS Central Manager collects statistics about this application. This step also allows you to assign the application definition to a device or device group. For more information, see the “Creating an Application Definition” section. |
Create an application policy. |
Determines the type of action your WAAS device or device group performs on specific application traffic. This step requires you to do the following:
For more information, see the “Creating an Application Policy” section. |
Preparing to Create an Application Policy
Before you create a new application policy, complete the following preparation tasks:
- Review the list of application policies on your WAAS system and make sure that none of these policies already cover the type of traffic you want to define. To view a list of the default policies that come bundled with the WAAS system, see Appendix A, “Default Application Policies.”
- Identify a match condition for the new application traffic. For example, if the application uses a specific destination or source port, you can use that port number to create a match condition. You can also use a source or destination IP address for a match condition.
- Identify the device or device group that requires the new application policy. We recommend you create application policies on device groups so the policy is consistent across multiple WAAS devices.
Creating an Application Definition
The first step in creating an application policy is to set up an application definition that identifies general information about the application, such as the application name and whether you want the WAAS Central Manager to collect statistics about the application. After creating the application definition, you assign it to a device or device group. You can create up to 255 application definitions on your WAAS system.
To create an application definition, follow these steps:
Step 1 From the WAAS Central Manager GUI navigation pane, choose Configure > Acceleration > Applications .
The Applications window appears, which displays a list of all applications on your WAAS system. From this window, you can perform the following tasks:
- Click the Edit icon next to an application to modify or delete the definition.
- Determine if your WAAS system is collecting statistics on an application. The Monitor Enabled column displays Yes if statistics are being collected for the application.
- Create a new application as described in the steps that follow.
Click the Create New Application icon in the taskbar. The Creating Application window appears. (See Figure 12-3.)
Figure 12-3 Creating a New Application
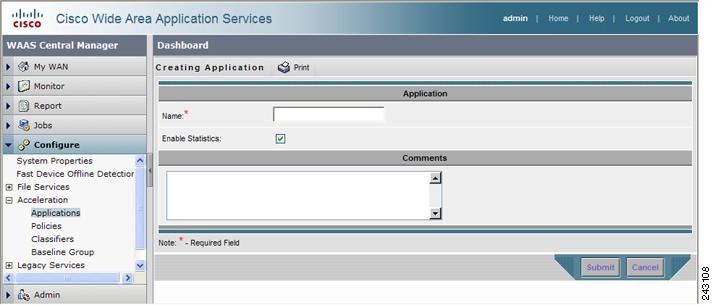
Step 2 Enter a name for this application.
The name cannot contain spaces and special characters.
Step 3 Check the Enable Statistics check box to allow the WAAS Central Manager to collect data for this application. To disable data collection for this application, uncheck this box.
The WAAS Central Manager GUI can display statistics for up to 20 applications, and an error message is displayed if you try to enable statistics for the twenty-first application. However, you can use the WAAS CLI to view statistics for all applications that have policies on a specific WAAS device. For more information, refer to the Cisco Wide Area Application Services Command Reference .
If you are collecting statistics for an application and decide to disable statistics collection, then reenable statistics collection at a later time, the historical data will be retained, but a gap in data will exist for the time period when statistics collection was disabled. However, if you delete an application that you are collecting statistics for, then later recreate the application, the historical data for the application will be lost. Only data since the recreation of the application will be displayed.
Note The WAAS Central Manager does not start collecting data for this application until you finish creating the entire application policy.
Step 4 (Optional) Enter a comment in the Comments field.
The comment you enter appears in the Applications window shown in Figure 12-3.
The application definition is saved, and options appear in the navigation pane that allow you to assign the application to a device or device group.
Step 6 From the navigation pane, click one of the following options:
The Device Groups Assignments window or the WAE Assignments window appears depending on the selected option.
Step 7 Choose the devices or device groups that you want to assign to this application. To select the devices, use one of the following procedures:
 in the taskbar to assign all available WAAS devices or device groups.
 next to each WAAS device or device group that you want to assign. The icon changes to
  when selected. To unassign a device or device group, click the icon again.
The icon next to the selected devices changes to  , showing that the application has been successfully assigned to the devices.
Creating an Application Policy
After you create an application definition, you need to create an application policy that determines the action a WAAS device takes on the specified traffic. For example, you can create an application policy that makes a WAAS device apply TCP optimization and compression to all application traffic that travels over a specific port or to a specific IP address. You can create up to 512 application policies on your WAAS system.
The traffic matching rules are contained in the application classifier. These rules, known as match conditions, use Layer 2 and Layer 4 information in the TCP header to identify traffic.
To create an application policy, follow these steps:
Step 1 From the WAAS Central Manager GUI navigation pane, choose My WAN > Manage Devices ( or Manage Device Groups ).
Step 2 Click the Edit icon next to the device or device group on which you want to create an application policy.
The Device Dashboard window or the Modifying Device Group window appears.
Step 3 From the navigation pane, choose Configure > Acceleration > Policy Definitions .
The Application Policies window appears. (See Figure 12-4.)
Figure 12-4 Application Policies Window
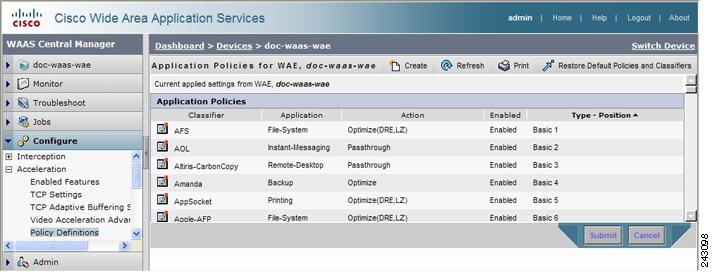
This window displays information about all the application policies that reside on the selected device or device group. The last column shows the type of policy (Basic, WAFS transport, Port Mapper, or Other) and the position of the policy within that type. The position determines the order in which WAAS refers to that policy when determining how to handle application traffic. To change the position of a policy, see the “Modifying the Position of an Application Policy” section. This window also displays the classifier, application definition, and action assigned to each policy.
From the Application Policies window, you can perform the following tasks:
- Click the Edit icon next to an application policy to modify or delete that policy.
- Restore default policies and classifiers. For more information, see the “Restoring Application Policies and Classifiers” section.
- Create a new application policy as described in the steps that follow.
Step 4 Click the Create New Policy icon in the taskbar to create a new application policy.
The Creating New Application Policy window appears. (See Figure 12-5.)
Figure 12-5 Creating a New Application Policy
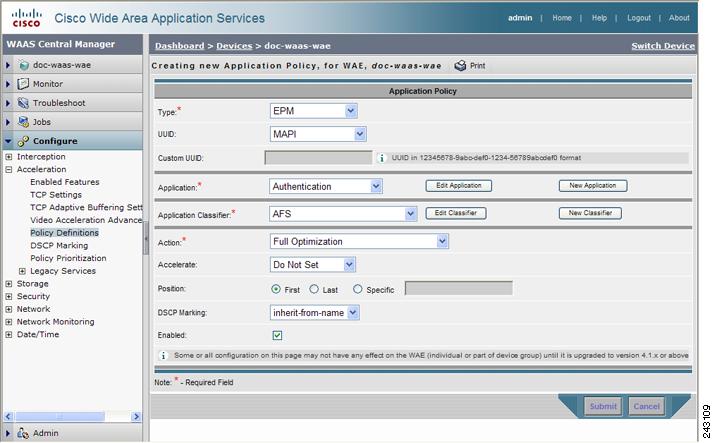
Step 5 From the Type drop-down list, choose the type of application policy.
Table 12-2 describes the types of application policies.
Standard type of application policy. Choose this option if none of the other types apply. |
|
When you enable wide area file services (WAFS), all CIFS traffic going between a branch WAE and a data center WAE is optimized. Choose the WAFS Transport option to specify another action (such as passthrough) for CIFS traffic traveling between branch and data center WAEs. For more information on enabling file services, see Chapter11, “Configuring Wide Area File Services” |
|
Type of policy for EPM-based applications. EndPoint Mapper (EPM) is a service that dynamically allocates server ports to certain applications. Unlike most applications that always use the same port, applications that rely on the EPM service can be assigned a different port at every request. Because EPM applications do not use a static port, you must specify the application’s UUID as a way to identify the application traffic to your WAAS system. When you select the EPM option, the UUID field is enabled so that you can select a preconfigured EPM application or enter the UUID for a custom application. |
Step 6 If you chose EPM for the policy type, choose one of the following EPM applications from the UUID drop-down list:
- MAPI —Uses the predefined UUID associated with the MAPI application, which is a4f1db00-ca47-1067-b31f-00dd010662da.
- MS-SQL-RPC —Uses the predefined UUID associated with the SQL Session Manager application, which is 3f99b900-4d87-101b-99b7-aa0004007f07.
- MS-AD-Replication —Uses the predefined UUID associated with the Active Directory application, which is e3514235-4b06-11d1-ab04-00c04fc2dcd2.
- MS-FRS —Uses the predefined UUID associated with the file replication service, which is f5cc59b4-4264-101a-8c59-08002b2f8426.
- Custom —Allows you to enter the UUID for a custom EPM application in the Custom UUID field.
Step 7 Specify the application that you want to be associated with this policy by doing either of the following:
- From the Application drop-down list, choose an existing application like the one that you created in the “Creating an Application Definition” section. This list displays all default and new applications on your WAAS system.
To modify an existing application, choose the application from the drop-down list and click Edit Application . You can then change the application’s name, add or remove comments, and enable or disable statistics collection for the application. After making the necessary changes, click Submit to save your changes and return to the Application Policy window.
- Click New Application to create a new application. You can specify the application name, enable statistics collection, and specify the DSCP marking value. For the DSCP marking, you can choose to use the global default values (see the “Defining Default DSCP Marking Values” section) or select one of the other defined values. See Table 11-4 for a description of the supported DSCP marking values. In addition to the values listed in Table 11-4 , you can choose copy, which copies the DSCP value from the incoming packet and uses it for the outgoing packet. After specifying the application details, click Submit to save the new application and return to the Application Policy window. The new application is automatically assigned to this device or device group.
Step 8 Choose the classifier from the Application Classifier drop-down list to select an existing classifier for this policy.
To modify an existing classifier, select the classifier from the drop-down list and click Edit Classifier . You can then change classifier’s name, add or remove comments, create a new match condition, or edit the existing match condition. After making the necessary changes, click Submit to save your changes and return to the Application Policy window.
Step 9 Click New Classifier to create a new classifier for this policy.
The Creating New Application Classifier window then appears so that you can create a new classifier. Complete the following steps to create a new classifier:
a. Enter a name for this application classifier. The name cannot contain spaces or special characters.
b. (Optional) Enter a comment that will appear on the Application Policies window shown in Figure 12-4.
c. In the Configure Match Conditions section, click the Create New Match Condition icon. (If you get a dialog box asking if you want to navigate away from the page, click OK .) The Creating New Match Condition window appears. (See Figure 12-6.)
Figure 12-6 Creating a New Match Condition
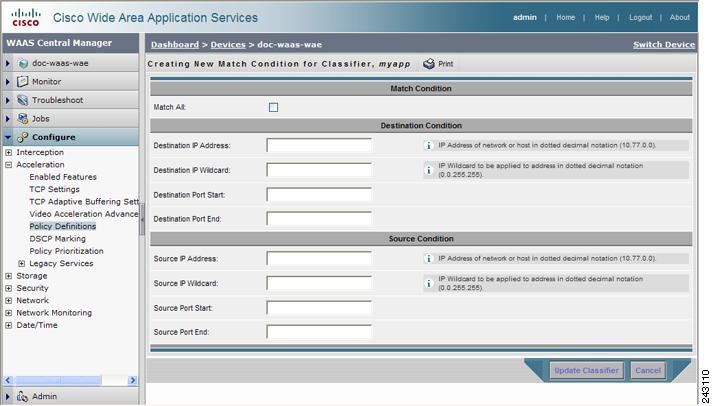
d. Check the Match All check box to create a condition that matches all traffic. Checking the Match All check box automatically disables all other fields in the window.
e. Enter a value in one of the destination or source condition fields to create a condition for a specific type of traffic.
For example, to match all traffic going to IP address 10.10.10.2, enter that IP address in the Destination IP Address field.
Note To specify a range of IP addresses, enter a wildcard subnet mask in either the destination or source IP Wildcard field.
f. Click Update Classifier . You return to the Creating New Application Classifier window. The new match condition appears at the bottom of this window.
g. Click Submit . You return to the Creating New Application Policy window.
Step 10 From the Action drop-down list, choose the action that your WAAS device should take on the defined traffic. Table 12-3 describes each action.
Prevents the WAAS device from optimizing the application traffic defined in this policy by using TFO, DRE, or compression. Traffic that matches this policy can still be accelerated if an accelerator is chosen from the Accelerate drop-down list. |
|
Applies a variety of transport flow optimization (TFO) techniques to matching traffic. TFO techniques include BIC-TCP, window size maximization and scaling, and selective acknowledgement. For a more detailed description of the TFO features, see the “TFO Optimization” section. |
|
Applies both TFO and data redundancy elimination (DRE) to matching traffic. DRE removes redundant information before sending the shortened data stream over the WAN. DRE operates on large data streams (tens to hundreds of bytes or more). |
|
Applies both TFO and the LZ compression algorithm to matching traffic. LZ compression functions similarly to DRE but uses a different compression algorithm to compress smaller data streams and maintains a limited compression history. |
|
Step 11 From the Accelerate drop-down list, choose one of the following additional acceleration actions that your WAAS device should take on the defined traffic:
- Do Not Set —No additional acceleration is done.
- MS Port Mapper —Accelerate using the Microsoft Endpoint Port Mapper (EPM).
- CIFS —Accelerate using the CIFS Accelerator.
- HTTP —Accelerate using the HTTP Accelerator.
- NFS —Accelerate using the NFS Accelerator.
- MAPI —Accelerate using the MAPI Accelerator.
- VIDEO —Accelerate using the Video Accelerator.
Step 12 Choose one of the following positions for this application policy by click the appropriate Position radio button:
- First —Places this policy at the top of the position list so that the WAAS device tries to classify traffic using this policy before moving onto the second policy in the list. If you already have a policy in the first position, that policy moves down to number two in the list.
- Last —Places this policy at the bottom of the position list, making it the last policy that the WAAS device uses to classify traffic. If you already have a policy in the last position, that policy becomes the second to last in the list.
If a device goes through all the policies in the list without making a match, then the WAAS device passes through the traffic unoptimized.
Step 13 (Optional) Select a value from the DSCP Marking drop-down list and see Table 11-4 for a description of the supported values. In addition to the values listed in Table 11-4 , you can choose copy, which copies the DSCP value from the incoming packet and uses it for the outgoing packet. If you choose inherit-from-name from the drop-down list, the DSCP value defined at the application or global level is used.
DSCP is a field in an IP packet that enables different levels of service to be assigned to network traffic. Levels of service are assigned by marking each packet on the network with a DSCP code and associating a corresponding level of service. DSCP is the combination of IP Precedence and Type of Service (ToS) fields. For more information, see RFC 2474.
DSCP marking does not apply to pass-through traffic.
The DSCP value set at the application level applies to all classifiers associated with the application. If you set a DSCP value in a policy, it overrides the DSCP value set at the application or global level.
Step 14 Check the Enabled check box to activate this policy. To disable this policy, uncheck this box.
The new policy appears in the Application Policies window. (See Figure 12-4.)
Managing Application Acceleration
This section contains the following topics:
- Viewing a List of Applications
- Viewing a Policy Report
- Viewing a Classifier Report
- Restoring Application Policies and Classifiers
- Monitoring Applications
- Defining Default DSCP Marking Values
- Modifying the Position of an Application Policy
- Modifying the Acceleration TCP Settings
Viewing a List of Applications
To view a list of applications that reside on a WAE device or device group, follow these steps:
Step 1 From the WAAS Central Manager GUI navigation pane, choose My WAN > Manage Devices ( or Manage Device Groups ).
Step 2 Click the Edit icon next to the device or device group on which you want to view applications.
Step 3 From the navigation pane, choose Configure > Acceleration > Policy Definitions . The Application Policies window appears.
Step 4 Click the Application column header to sort the column by application name so you can more easily locate a specific application.
Viewing a Policy Report
To view a report of the policies that reside on each WAE device or device group, follow these steps:
Step 1 From the WAAS Central Manager GUI navigation pane, choose Configure > Acceleration > Policies .
The policy report appears. It lists each device or device group and the number of active policies on the device or device group.
Step 2 Click the Edit icon next to a device or group to see the application policies that are defined on it.
Viewing a Classifier Report
To view a report of the classifiers that reside on each WAE device or device group, follow these steps:
Step 1 From the WAAS Central Manager GUI navigation pane, choose Configure > Acceleration > Classifiers .
The classifier report appears. It lists each classifier that is defined, and the number of devices on which it is configured.
Step 2 Click the View icon next to a classifier to see a report of the devices and device groups on which the classifier is configured.
Step 3 Click the Edit icon next to a device or group to see the application policies that are defined on it.
Restoring Application Policies and Classifiers
The WAAS system allows you to restore the default policies and classifiers that shipped with the WAAS system. For a list of the default policies, see Appendix A, “Default Application Policies.”
If you made changes to the default policies that have negatively impacted how a WAAS device handles application traffic, you can override your changes by restoring the default policy settings.
To restore default policies and classifiers, follow these steps:
Step 1 From the WAAS Central Manager GUI navigation pane, choose My WAN > Manage Devices ( or Manage Device Groups ).
Step 2 Click the Edit icon next to the device or group on which you want to restore policies.
Step 3 From the navigation pane, choose Configure > Acceleration > Policy Definitions .
The Application Policies window appears.
Step 4 Click the Restore Default Policies and Classifiers taskbar icon to restore over 150 policies and classifiers that shipped with the WAAS software and remove any new policies that were created on the system. If a default policy has been changed, these changes are lost and the original settings are restored.
Monitoring Applications
After you create an application policy, you should monitor the associated application to make sure your WAAS system is handling the application traffic as expected. To monitor an application, you must have enabled statistics collection for that application, as described in the “Creating an Application Definition” section.
You can use the Network Traffic Application Mix report to monitor a specific application. For more information, see the “Using Predefined Reports to Monitor WAAS” section.
Defining Default DSCP Marking Values
According to policies that you define in an application definition and an application policy, the WAAS software allows you to set a DSCP value on packets that it processes.
A DSCP value is a field in an IP packet that enables different levels of service to be assigned to the network traffic. The levels of service are assigned by marking each packet on the network with a DSCP code and associating a corresponding level of service. The DSCP marking determines how packets for a connection are processed externally to WAAS. DSCP is the combination of IP Precedence and Type of Service (ToS) fields. For more information, see RFC 2474. DSCP values are predefined and cannot be changed.
This attribute can be defined at the following levels:
- Global—You can define global defaults for the DSCP value. This value applies to the traffic if a lower level value is not defined.
- Application—You can define the DSCP value in an application definition at the device or device group level but not at the global application definition level. This value applies to all traffic associated with the application on a particular device or device group and overrides the global default.
- Policy—You can define the DSCP value in an application policy. This value applies only to traffic that matches the classifiers defined in the policy and overrides the application or global DSCP value.
Defining the Default DSCP Marking Value
To define the global default DSCP marking value, follow these steps:
Step 1 From the WAAS Central Manager GUI navigation pane, choose My WAN > Manage Devices ( or Manage Device Groups ).
Step 2 Click the Edit icon next to the device or group where you want to define the default DSCP marking value.
Step 3 From the navigation pane, choose Configure > Acceleration > DSCP Marking . The Global DSCP Settings window appears.
Step 4 Choose a value from the Global Default DSCP Marking drop-down list and see Table 11-4 for a description of the supported values. In addition to the values listed in Table 11-4 , the default setting is copy, which copies the DSCP value from the incoming packet and uses it for the outgoing packet.
Step 5 Click Submit to save the settings.
Modifying the Position of an Application Policy
Each application policy has an assigned position that determines the order in which a WAAS device refers to the policy in an attempt to classify traffic. For example, when a WAAS device intercepts traffic, it refers to the first policy in the list to try to match the traffic to an application. If the first policy does not provide a match, the WAAS device moves on to the next policy in the list.
For information on how to assign a position to a new policy, see the “Creating an Application Policy” section.
You should consider the position of policies that pass through traffic unoptimized because placing these policies at the top of the list can cancel out optimization policies that appear farther down the list. For example, if you have two application policies that match traffic going to IP address 10.10.10.2, and one policy optimizes this traffic and a second policy in a higher position passes through this traffic, then all traffic going to 10.10.10.2 will go through the WAAS system unoptimized. For this reason, you should make sure that your policies do not have overlapping matching conditions, and you should monitor the applications you create to make sure that WAAS is handling the traffic as expected. For more information on monitoring applications, see Chapter16, “Monitoring and Troubleshooting Your WAAS Network”
To modify the position of an application policy, follow these steps:
Step 1 From the WAAS Central Manager GUI navigation pane, choose My WAN > Manage Devices ( or Manage Device Groups ).
Step 2 Click the Edit icon next to the device or group that contains the application policy to modify.
Step 3 From the navigation pane, choose Configure > Acceleration > Policy Prioritization .
Step 4 The Application Policies window appears. This window categorizes policies into these categories: Basic, Other, Port Mapper, and WAFS.
Step 5 Click the arrow next to the appropriate category to display the list of applications for that category. (See Figure 12-7.)
In most cases, the application you want to change the position for will be located under the Basic Policies category because that category contains a majority of the default applications that shipped with the WAAS system. For a list of these default policies, see Appendix A, “Default Application Policies.”
Figure 12-7 Modifying the Position of Application Policies
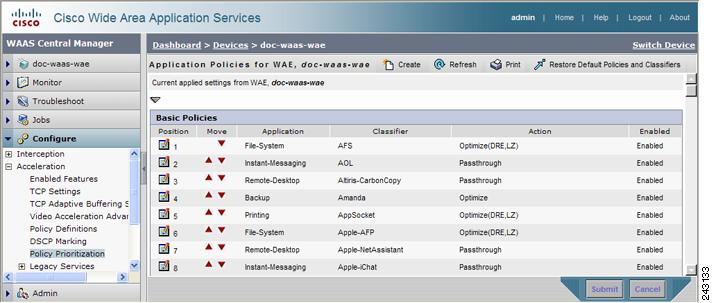
Step 6 Click the arrow next to the policy category to view the list of applications for that category.
Step 7 Use the up and down arrows ( ) next to a policy to move that policy higher or lower in the list.
Step 8 If you determine that a policy is not needed, follow these steps to delete the policy:
a. Click the Edit icon next to the policy you want to delete.
The Modifying Application Policy window appears.
b. Click the Delete icon in the taskbar.
Modifying the Acceleration TCP Settings
In most cases, you do not need to modify the acceleration TCP settings because your WAAS system automatically configures the acceleration TCP settings based on the hardware platform of the WAE device. WAAS automatically configures the settings only under the following circumstances:
- When you first install the WAE device in your network.
- When you enter the restore factory-default command on the device. For more information about this command, see the Cisco Wide Area Application Services Command Reference .
The WAAS system automatically adjusts the maximum segment size (MSS) to match the advertised MSS of the client or server for each connection. The WAAS system uses the lower of 1432 or the MSS value advertised by the client or server.
If your network has high BDP links, you may need to adjust the default buffer settings automatically configured for your WAE device. For more information, see the “Calculating the TCP Buffers for High BDP Links” section.
If you want to adjust the default TCP adaptive buffering settings for your WAE device, see the “Modifying the TCP Adaptive Buffering Settings” section.
To modify the acceleration TCP settings, follow these steps:
Step 1 From the WAAS Central Manager GUI navigation pane, choose My WAN > Manage Devices ( or Manage Device Groups ).
Step 2 Click the Edit icon next to the device or device group for which you want to change the acceleration TCP settings.
Step 3 From the navigation pane, choose Configure > Acceleration > TCP Settings . The Acceleration TCP Settings window appears.
Step 4 Keep the Send TCP Keepalive check box checked.
Note Enabling TCP keepalives between the branch and data center WAEs impacts the WAAS system’s ability to accommodate network disruptions.
Checking the Send TCP Keepalive check box allows this WAE device or group to disconnect the TCP connection to its peer device if no response is received from the TCP keepalive exchange. In this case, the two peer WAE devices will exchange TCP keepalives on a TCP connection and if no response is received for the keepalives for a specific period, the TCP connection will be torn down. When the keepalive option is enabled, any short network disruption in the WAN will cause the TCP connection between peer WAE devices to be disconnected.
If the Send TCP Keepalive check box is not checked, TCP keepalives will not be sent and connections will be maintained unless they are explicitly disconnected. By default, this setting is enabled.
Step 5 Modify the TCP acceleration settings as needed. See Table 12-4 for a description of these settings.
For information on how to calculate these settings for high BDP links, see the “Calculating the TCP Buffers for High BDP Links” section.
Step 6 If you are deploying the WAE across a high Bandwidth-Delay-Product (BDP) link, you can set recommended values for the send and receive buffer sizes by clicking the Set High BDP recommended values button. For more information about calculating TCP buffers for high BDP links, see the “Calculating the TCP Buffers for High BDP Links” section.
Calculating the TCP Buffers for High BDP Links
WAAS software can be deployed in different network environments, involving multiple link characteristics such as bandwidth, latency, and packet loss. All WAAS devices are configured to accommodate networks with maximum Bandwidth-Delay-Product (BDP) of up to the values listed below:
- WAE-511/512—Default BDP is 32 KB
- WAE-611/612—Default BDP is 512 KB
- WAE-674 —Default BDP is 2048 KB
- WAE-7326 —Default BDP is 2048 KB
- WAE-7341 —Default BDP is 2048 KB
- WAE-7371 —Default BDP is 2048 KB
- WAVE-274 —Default BDP is 2048 KB
- WAVE-474 —Default BDP is 2048 KB
- WAVE-574—Default BDP is 2048 KB
If your network provides higher bandwidth or higher latencies are involved, use the following formula to calculate the actual link BDP:
BDP [Kbytes] = (link BW [Kbytes/sec] * Round-trip latency [Sec])
When multiple links 1..N are the links for which the WAE is optimizing traffic, the maximum BDP should be calculated as follows:
MaxBDP = Max (BDP(link 1),..,BDP(link N))
If the calculated MaxBDP is greater than the DefaultBDP for your WAE model, the Acceleration TCP settings should be modified to accommodate that calculated BDP.
Once you calculate the size of the Max BDP, enter that value in the Send Buffer Size and Receive Buffer Size for the optimized connection on the Acceleration TCP Settings window.
Note These manually configured buffer sizes apply only if TCP adaptive buffering is disabled. TCP adaptive buffering is normally enabled, and allows the WAAS system to dynamically vary the buffer sizes. For more information on TCP adaptive buffering, see the “Modifying the TCP Adaptive Buffering Settings” section.
Modifying the TCP Adaptive Buffering Settings
In most cases, you do not need to modify the acceleration TCP adaptive buffering settings because your WAAS system automatically configures the TCP adaptive buffering settings based on the network bandwidth and delay experienced by each connection. Adaptive buffering allows the WAAS software to dynamically vary the size of the send and receive buffers to increase performance and more efficiently use the available network bandwidth.
To modify the acceleration TCP adaptive buffering settings, follow these steps:
Step 1 From the WAAS Central Manager GUI navigation pane, choose My WAN > Manage Devices (or Manage Device Groups ).
Step 2 Click the Edit icon next to the name of the device (or device group) for which you want to configure the TCP adaptive buffering settings.
Step 3 In the navigation pane, choose Configure > Acceleration > TCP Adaptive Buffering Settings . The TCP Adaptive Buffering Settings window appears.
Step 4 To enable TCP adaptive buffering, check the Enable check box. The default is enabled.
Step 5 In the Send Buffer Size and Receive Buffer Size fields, enter the maximum size in kilobytes of the send and receive buffers.
To configure the TCP adaptive buffer settings from the CLI, use the tfo tcp adaptive-buffer-sizing global configuration command:
To disable TCP adaptive buffering from the CLI, use the no tfo tcp adaptive-buffer-sizing enable global configuration command.
To show the default and configured adaptive buffer sizes, use the show tfo tcp EXEC command.
 Feedback