- Preface
- Introduction to Cisco vWAAS
- Configuring Cisco vWAAS and Viewing vWAAS Components
- Cisco vWAAS on Cisco ISR-WAAS
- Cisco vWAAS on VMware ESXi
- Cisco vWAAS on Microsoft Hyper-V
- Cisco vWAAS on RHEL KVM, KVM on CentOS, and KVM in SUSE Linux
- Cisco vWAAS on Cisco ENCS 5400-W Series
- Cisco vWAAS on Cisco CSP 5000-W Series
- Cisco vWAAS with Cisco Enterprise NFVIS
- Cisco vWAAS with Akamai Connect
- Cisco vWAAS in Cloud Computing Systems
- Troubleshooting Cisco vWAAS
- Cisco vWAAS on Cisco ENCS 5400-W Series
- Cisco vWAAS Bundled Image Install Procedure
- Strong Password Enforcement
- Shared LOM Support
- CLI Commands Used with Cisco vWAAS on Cisco ENCS 5400-W
- System Requirements for Cisco vWAAS on Cisco ENCS 5400-W with Akamai Connect
- Registering and Deploying Cisco vWAAS on a Cisco ENCS 5400-W Device
- Adding or Removing RAID-1 for Cisco ENCS 5400-W Series
- Fail-to-Wire on vWAAS on ENCS 5400-W
- About Fail-to-Wire on Cisco vWAAS on Cisco ENCS 5400-W Series
- Fail-to-Wire Traffic Interception Modes
- Fail-to-Wire Failure Handling
- CLI Commands for Port Channel and Standby Interfaces
- Configuring Inline Interception for Fail-to-Wire on a Cisco ENCS 5400-W Device
- Fail-to-Wire Upgrade and Downgrade Guidelines
- Upgrade and Downgrade Guidelines for Cisco vWAAS on Cisco ENCS 5400-W
Cisco vWAAS on Cisco ENCS 5400-W Series
This chapter describes Cisco vWAAS on the Cisco Enterprise Network Compute System 5400-W Series (Cisco ENCS 5400-W Series) appliance.
- Cisco vWAAS on Cisco ENCS 5400-W Series
- Cisco vWAAS Bundled Image Install Procedure
- Strong Password Enforcement
- Shared LOM Support
- CLI Commands Used with Cisco vWAAS on Cisco ENCS 5400-W
- System Requirements for Cisco vWAAS on Cisco ENCS 5400-W with Akamai Connect
- Registering and Deploying Cisco vWAAS on a Cisco ENCS 5400-W Device
- Adding or Removing RAID-1 for Cisco ENCS 5400-W Series
- Fail-to-Wire on vWAAS on ENCS 5400-W
- Upgrade and Downgrade Guidelines for Cisco vWAAS on Cisco ENCS 5400-W
Cisco vWAAS on Cisco ENCS 5400-W Series
This section contains the following topics:
- About the Cisco ENCS 5400-W and ENCS 5400 Series
- Cisco vWAAS as VM on Cisco ENCS 5400-W Series
- Cisco ENCS 5400-W Models that Replace EOL/EOS Cisco WAVE Devices
- Cisco ENCS 5400-W Hardware Features and Specifications
About the Cisco ENCS 5400-W and ENCS 5400 Series
The Cisco Enterprise Network Compute Series (ENCS) is used to host the Cisco Enterprise Network Functions Virtualization (NFV) solution. Cisco ENCS is also used to deploy the Cisco NFV Infrastructure Software (NFVIS), and Cisco and third party VNFs on Cisco Enterprise NFV.
For more information on Cisco NFVIS, see the chapter “Cisco vWAAS with Cisco Enterprise NFVIS” .
Table 7-1 describes how the Cisco ENCS 5400 Series and the Cisco ENCS 5400-W Series (used with vWAAS) are used with Cisco Enterprise NFV. For more information, see the Cisco 5400 Enterprise Network Compute System Data Sheet.
Table 7-1 Cisco ENCS 5400 Series and ENCS 5400-W Series
Cisco vWAAS as VM on Cisco ENCS 5400-W Series
For vWAAS with Cisco Enterprise NFVIS on ENCS, vWAAS operates as a VM to provide WAN and application optimization, and, optionally, application optimization with Akamai Connect.
Cisco vWAAS with Cisco Enterprise NFVIS runs on Cisco ENCS 5400-W Series, which is a Cisco x86 hardware platform for branch deployment for routing and hosted applications.
Table 7-2 shows supported Cisco vWAAS models for Cisco ENCS 5406-W, 5408-W, and 5412-W.
Table 7-2 Supported Cisco vWAAS Models for Cisco ENCS 5400-W Series
|
|
|
|
|
|
|---|---|---|---|---|
Cisco ENCS 5400-W Models that Replace EOL/EOS Cisco WAVE Devices
Cisco WAVE appliances have end-of-sale (EOS) and end-of-life (EOL) dates, highlighted in the End-of-Sale and End-of-Life Announcement for the Cisco WAVE 294, 594, 694, 7541, 7571 and 8541.
Table 7-3 shows the Cisco ENCS 5400-W Series models that replace the EOS/EOL WAVE models, and the supported Cisco vWAAS models for each Cisco ENCS 5400-W model.
Table 7-3 Cisco ENCS 5400-W Series Replacment Models for Cisco WAVE Devices
|
|
|
|
|
|---|---|---|---|
Cisco ENCS 5400-W Hardware Features and Specifications
Table 7-4 shows features and specifications that apply to all three Cisco ENCS 5400-W Series models. For views of the Cisco ENCS 5400-W Series and further information, see the Cisco 5400 Enterprise Network Compute System Data Sheet.
Table 7-4 Cisco ENCS 5400-W Series Features and Specifications
|
|
|
|---|---|
Two DDR4 dual in-line memory module (DIMM) slots for ENCS models with the following capacities: |
|
Two Gigabit Ethernet ports: For each RJ45 port, there is a corresponding fiber optic port. At a given time, you can use either the RJ45 connection or the corresponding fiber optic port. |
|
One Network Interface Module (NIM) expansion slot: You can install a NIM in the NIM slot, or, if the slot is not needed, you can remove the NIM from the NIM module. Each ENCS 5400 model supports one NIM slot for a Cisco 4-port 1 G fail-to-wire NIM card. |
|
Ethernet management port for Cisco Integrated Management Controller (CIMC), which monitors the health of the entire system. |
|
Although there are two hot-swappable HDD slots, we do not recommend HDD storage for the ENCS 5400-W Series. |
|

Note |
|
Optional crypto module to provide offload capabilities to optimize CPU resources such as VM-to-VM traffic and to maintain open software support. |
Cisco vWAAS Bundled Image Install Procedure
- Verify that the specified Cisco ENCS 5400-W Series chassis (Cisco ENCS 5406-W, Cisco 5408-W, or Cisco 5412-W) is already installed and powered up. For information on how to install a Cisco ENCS 5400-W Series device, see the Cisco 5400 Enterprise Network Compute System Hardware Installation Guide.
- If you need to add or remove RAID-1 for your system, see Adding or Removing RAID-1 for Cisco ENCS 5400-W Series. Note that the RAID-1 option is available for Cisco vWAAS in WAAS Version 6.4.1a and later.
To install Cisco vWAAS with NFVIS on a Cisco ENCS 5400-W Series device on your Cisco WAAS system, follow these steps:
Step 1![]() Copy the Cisco vWAAS bundled image file: An ISO file that contains the NFVIS 3.10.1 image (file format “Cisco_NFVIS...”) and Cisco WAAS 6.4.3a image (file format “WAAS-APPLIANCE...”) on your laptop.
Copy the Cisco vWAAS bundled image file: An ISO file that contains the NFVIS 3.10.1 image (file format “Cisco_NFVIS...”) and Cisco WAAS 6.4.3a image (file format “WAAS-APPLIANCE...”) on your laptop.
For information on how to upgrade to Cisco NFVIS 3.10.1, see the section Upgrading to Cisco Enterprise NFVIS 3.10.1 for Cisco WAAS Version 6.4.3a in the chapter “Cisco vWAAS with Cisco Enterprise NFVIS.”
Step 2![]() Connect your laptop’s Ethernet port to the Cisco ENCS device’s Cisco Integrated Management Controller (CIMC) port.
Connect your laptop’s Ethernet port to the Cisco ENCS device’s Cisco Integrated Management Controller (CIMC) port.
Step 3![]() Configure your laptop with a static IP address, for example, 192.168.1.3.
Configure your laptop with a static IP address, for example, 192.168.1.3.
Note![]() By default, the IP address on the Cisco ENCS-W device’s CIMC port is configured as 192.168.1.2.
By default, the IP address on the Cisco ENCS-W device’s CIMC port is configured as 192.168.1.2.
Step 4![]() Open your web browser and enter https://192.168.1.2.
Open your web browser and enter https://192.168.1.2.
The CIMC console login page appears.
Step 5![]() Log in with your user name and password.
Log in with your user name and password.
The default user name is admin.
The default password is password.
Note![]() The Change Password dialog box appears only when you log in to the CIMC console for the first time. Change the password as needed and click Save.
The Change Password dialog box appears only when you log in to the CIMC console for the first time. Change the password as needed and click Save.
The CIMC home page is displayed.
Step 7![]() In the CIMC home page, choose Home > Compute > BIOS > Configure Boot Order.
In the CIMC home page, choose Home > Compute > BIOS > Configure Boot Order.
The Configure Boot Order dialog box appears.
Step 8![]() From the Device Type drop-down list, choose CD/DVD Linux Virtual CD/DVD. Click Add.
From the Device Type drop-down list, choose CD/DVD Linux Virtual CD/DVD. Click Add.
Step 9![]() From the Device Type drop-down list, choose HDD. Click Add.
From the Device Type drop-down list, choose HDD. Click Add.
Step 10![]() Using the Up and Down options, set the boot order sequence.
Using the Up and Down options, set the boot order sequence.
CD/DVD Linux Virtual CD/DVD must be the first listing in the boot order.
Step 11![]() To complete the boot order setup, click Apply.
To complete the boot order setup, click Apply.
Step 12![]() Launch the KVM console. You can launch the KVM console from the CIMC home page or the Remote Management area.
Launch the KVM console. You can launch the KVM console from the CIMC home page or the Remote Management area.
Step 13![]() In the KVM console, after the KVM console is initialized, map the Cisco vWAAS bundled image by choosing Server > Remote Presence > Virtual Media tab on the KVM console.
In the KVM console, after the KVM console is initialized, map the Cisco vWAAS bundled image by choosing Server > Remote Presence > Virtual Media tab on the KVM console.
Step 14![]() To load the mapped image, use the Power Cycle System [cold boot] option under the KVM Console Power tab to power off and then power on the device.
To load the mapped image, use the Power Cycle System [cold boot] option under the KVM Console Power tab to power off and then power on the device.
Note![]() When the server reboots, the KVM Console will automatically install the Cisco Enterprise NFVIS from the virtual CD/DVD drive. The entire installation may take 30 minutes to one hour to complete.
When the server reboots, the KVM Console will automatically install the Cisco Enterprise NFVIS from the virtual CD/DVD drive. The entire installation may take 30 minutes to one hour to complete.
Step 15![]() With the installation running in the background, use your laptop to connect to the CIMC default IP address.
With the installation running in the background, use your laptop to connect to the CIMC default IP address.
After the installation is successful, the Cisco ENCS-W device reboots.
The Cisco ENCS-W device boots up and displays options to install Cisco vWAAS. Depending on your Cisco ENCS-W model, one of the following choices is displayed:
- For Cisco ENCS 5406-W: vWAAS 200 and vWAAS-750 are displayed.
Select one Cisco vWAAS model for Cisco ENCS 5406-W. - For Cisco ENCS 5408-W: vWAAS-1300 is the only choice displayed.
Cisco vWAAS-1300 is automatically selected for Cisco ENCS 5408-W. - For Cisco ENCS 5412-W: vWAAS-2500 and vWAAS-6000-R are displayed.
Select one model for Cisco ENCS 5412-W.
In the following example, a vWAAS-6000-R is selected for an ENCS 5412-W:
Table 7-5 shows the installation times required, by Cisco vWAAS model and number of connections:
Table 7-5 Installation Times Required, by Cisco vWAAS Model and Number of Connections
|
|
|
Installation Time |
Installation Time |
Installation Time |
|---|---|---|---|---|
After installation is complete, the Cisco WAAS login prompt appears.
The new Cisco OE-ENCS device is displayed in the Cisco WAAS Central Manager Devices > All Devices listing table.
You can view detailed information on the new Cisco OE-ENCS device by choosing Devices > DeviceName > Dashboard
Strong Password Enforcement
Consider the following guidelines for administrator account passwords for different Cisco WAAS versions:
For Cisco WAAS Version 6.4.3d and earlier: Changing the password of the administrator account is recommended but optional after your initial login.
For Cisco WAAS Version 6.4.3e and later: Changing the password of the administrator account to a strong password is required after your initial login, regardless of device mode (Application Accelerator, Appnav or Central Manager).
The Cisco WAAS administrator account username is admin and the password is initially set to default.
Note![]() For how to change the Cisco WAAS administrator account username and password, see the chapter “Creating and Managing Administrator User Accounts and Groups” in the Cisco Wide Area Application Services Configuration Guide.
For how to change the Cisco WAAS administrator account username and password, see the chapter “Creating and Managing Administrator User Accounts and Groups” in the Cisco Wide Area Application Services Configuration Guide.
Note![]() Strong password enforcement is applicable only to the Administrator account with the username admin.
Strong password enforcement is applicable only to the Administrator account with the username admin.
Consider the following guidelines for strong password enforcement:
- After the Cisco WAAS administrator account password has been changed, it is pushed to the NFVIS admin user account as well, so that the WAAS and NFVIS admin users have the same password.
Note![]() For the strong password enforcement to take effect for vWAAS on the Cisco ENCS 5400-W series or the Cisco CSP 5000-W series, you must do a fresh installation of Cisco WAAS 6.4.3e.
For the strong password enforcement to take effect for vWAAS on the Cisco ENCS 5400-W series or the Cisco CSP 5000-W series, you must do a fresh installation of Cisco WAAS 6.4.3e.
- At the first login after the fresh deployment of Cisco WAAS Version 6.4.3e or later, the default username and password are shown in the following list.
You must change the username and password using the following parameters:
–![]() At least one lowercase character (a-z)
At least one lowercase character (a-z)
–![]() At least one uppercase character (A-Z)
At least one uppercase character (A-Z)
–![]() At least one special character
At least one special character
–![]() A password length of 8 to 31 characters
A password length of 8 to 31 characters
- Before the device is registered to the Cisco WAAS Central Manager, the WAAS and NFVIS admin user will have the same password. After the device is registered to the Cisco WAAS Central Manager, the WAAS and NFVIS admin user will have the same password as the WAAS admin user.
- Changing the WAAS admin user password will also change the NFVIS admin user.
- If you run the restore factory-default preserve basic-config command or run the restore factory-default command, the WAAS admin user password is set to default, and you will be prompted again to change it to a strong password.
Shared LOM Support
Cisco vWAAS running on ENCS 5400-W Series appliances with WAAS version 6.4.3e and later provides Shared LAN on Motherboard (Shared LOM) support.
The Shared LOM feature helps to re-use existing on-board Ethernet LAN interfaces on Cisco ENCS 5400-W series appliances by providing IP connectivity to Cisco Integrated Management Controller (CIMC) for remote management and health monitoring though SNMP and Syslog, while the same interfaces configured for traffic optimization
Note![]() Shared LOM does not work when a Port-channel interface is configured on Cisco vWAAS running on ENCS 5400-W Series appliances
Shared LOM does not work when a Port-channel interface is configured on Cisco vWAAS running on ENCS 5400-W Series appliances
Using the CIMC CLI to Enable Shared LOM Support
Consider the following guidelines for enabling Shared LOM support:
- Verify that the IP address used for the CIMC management and on-board interfaces belongs to the same VLAN or subnet.
- The Enable/Disable function of Shared LOM configuration should be executed from the CIMC Serial Console interface.
- The CIMC console supports a speed of 9600 only.
The following example configuration shows the steps to enable Shared LOM on Gig 0/1 interface.
Changes to the network settings are applied immediately.
You may lose connectivity to the CIMC and may have to log in again:
Using the CIMC CLI to Disable Shared LOM Support
The following example configuration shows the steps to disable Shared LOM:
Changes to the network settings are applied immediately.
You may lose connectivity to the CIMC and may have to log in again.
CLI Commands Used with Cisco vWAAS on Cisco ENCS 5400-W
Table 7-6 shows the CLI commands used to display information about Cisco vWAAS on Cisco ENCS 5400-W Series.
Table 7-6 CLI Commands Used with Cisco vWAAS on Cisco ENCS 5400-W Series
System Requirements for Cisco vWAAS on Cisco ENCS 5400-W with Akamai Connect
Table 7-7 shows memory and disk requirements for Cisco vWAAS on Cisco ENCS 5400-W with Akamai Connect, by Cisco vWAAS model.
Table 7-7 Memory and Disk Requirements for Cisco vWAAS on Cisco ENCS 5400-W with Akamai Connect
Registering and Deploying Cisco vWAAS on a Cisco ENCS 5400-W Device
This section contains the following procedures:
- Registering Cisco vWAAS on a Cisco ENCS 5400-W Device
- Deploying Cisco vWAAS with Cisco NFVIS on a Cisco ENCS 5400-W Device
- Registering Cisco vWAAS on a Cisco ENCS 5400-W Device with the Cisco WAAS Central Manager
Registering Cisco vWAAS on a Cisco ENCS 5400-W Device
Before you begin, verify the following:
- The disk is already mounted.
- Gigabit Ethernet port 0/0 can be used for Cisco vWAAS management or data.
- Gigabit Ethernet port 0/1 can be used for Cisco vWAAS management or data.
- The existing LAN-net and SR-IOV will be used.
To register Cisco vWAAS on Cisco ENCS 5400-W, follow these steps:
Step 1![]() Power on the Cisco ENCS 5400-W device.
Power on the Cisco ENCS 5400-W device.
The Cisco vWAAS automatically starts up when the Cisco ENCS 5400-W device is powered on.
Step 2![]() Using an Ethernet cable, connect your laptop to the MGMT port of the Cisco ENCS 5400-W device.
Using an Ethernet cable, connect your laptop to the MGMT port of the Cisco ENCS 5400-W device.
Step 3![]() Verify that the WiFi is disabled on your laptop.
Verify that the WiFi is disabled on your laptop.
Step 4![]() Perform the following steps on a MAC system:
Perform the following steps on a MAC system:
a.![]() Choose Preferences > Network > Thunderbolt.
Choose Preferences > Network > Thunderbolt.
b.![]() From the Configure IPv4 drop-down list, choose Manually.
From the Configure IPv4 drop-down list, choose Manually.
c.![]() In the IP Address field, enter an IP address.
In the IP Address field, enter an IP address.
d.![]() In the Subnet Mask field, enter 255.255.255.0.
In the Subnet Mask field, enter 255.255.255.0.
e.![]() Open the terminal and use SSH to connect to the device (192.168.1.1). Use admin for login and password credentials.
Open the terminal and use SSH to connect to the device (192.168.1.1). Use admin for login and password credentials.
Step 5![]() Run the shell script (mfg.sh), which registers, installs, and checks the status of the vWAAS instance.
Run the shell script (mfg.sh), which registers, installs, and checks the status of the vWAAS instance.
Deploying Cisco vWAAS with Cisco NFVIS on a Cisco ENCS 5400-W Device
To deploy Cisco vWAAS with NFVIS on Cisco ENCS 5400-W, follow these steps:
Step 1![]() Perform the steps described in Registering Cisco vWAAS on a Cisco ENCS 5400-W Device.
Perform the steps described in Registering Cisco vWAAS on a Cisco ENCS 5400-W Device.
Step 2![]() Copy the vWAAS KVM tar.gz file to a directory on your laptop, for example, /downloads.
Copy the vWAAS KVM tar.gz file to a directory on your laptop, for example, /downloads.
Step 3![]() Navigate to the directory that you have created.
Navigate to the directory that you have created.
Step 4![]() Start an HTTP server on your laptop to upload and register the image.
Start an HTTP server on your laptop to upload and register the image.
Step 5![]() Connect the Ethernet port of your laptop to the Management port of the Cisco ENCS 5400-W device.
Connect the Ethernet port of your laptop to the Management port of the Cisco ENCS 5400-W device.
Step 6![]() Configure the laptop with static IP, for example, 192.168.1.2.
Configure the laptop with static IP, for example, 192.168.1.2.
By default, the Management port on the Cisco ENCS 5400-W device is 192.168.1.1.
Step 7![]() On your laptop, start the manufacturing script from the directory you have created.
On your laptop, start the manufacturing script from the directory you have created.
a.![]() Connect to the Cisco ENCS 5400-W device.
Connect to the Cisco ENCS 5400-W device.
The following status messages is displayed:
Trying to connect to ENCS Device
NFVIS server up and running
Reconfiguring the LAN bridge.......
Reconfiguring the WAN bridge.......
Cleaning existing vWAAS instance.......
Checking disk health.......
Following vWAAS images are available:
list of images
b.![]() At the Enter the image number: prompt, enter your image number.
At the Enter the image number: prompt, enter your image number.
The following status messages is displayed:
Preparing for WAAS installation
Progress: ############ 100%
Installation is in progress.......
Progress: ############ 100%
Installation is completed!!!
Step 8![]() Registration and installation are complete.
Registration and installation are complete.
Registering Cisco vWAAS on a Cisco ENCS 5400-W Device with the Cisco WAAS Central Manager
You must register the Cisco vWAAS instance or the Cisco WAAS appliance running in accelerator mode with the Cisco WAAS Central Manager.
To register Cisco vWAAS with Cisco NFVIS on Cisco ENCS 5400-W with the Cisco WAAS Central Manager, these steps:
Step 1![]() At the Cisco vWAAS instance or the Cisco WAAS appliance that you want to register, enter the following Cisco WAAS Central Manager IP address information:
At the Cisco vWAAS instance or the Cisco WAAS appliance that you want to register, enter the following Cisco WAAS Central Manager IP address information:
Step 2![]() At the Cisco vWAAS instance or the Cisco WAAS appliance that you want to register, enable the Cisco Centralized Management System (Cisco CMS) service:
At the Cisco vWAAS instance or the Cisco WAAS appliance that you want to register, enable the Cisco Centralized Management System (Cisco CMS) service:
Step 3![]() In the Cisco WAAS Central Manager, choose Devices > All Devices.
In the Cisco WAAS Central Manager, choose Devices > All Devices.
The Cisco WAAS appliance will be displayed in the Device Type column as OE-ENCS.
Adding or Removing RAID-1 for Cisco ENCS 5400-W Series
Note![]() The RAID-1 option is available for Cisco vWAAS in Cisco WAAS Version 6.4.1a and later.
The RAID-1 option is available for Cisco vWAAS in Cisco WAAS Version 6.4.1a and later.
This section contains the following topics:
- Migrating Equipment from No RAID and One SSD to RAID-1 and Two SSDs
- Migrating Equipment from RAID-1 and Two SSDs to No RAID and One SSD
For further information on RAID and the Cisco ENCS 5400-W Series, see the Cisco 5400 Enterprise Network Compute System Hardware Installation Guide.
Migrating Equipment from No RAID and One SSD to RAID-1 and Two SSDs
Note![]() The RAID-1 option is available for Cisco vWAAS in Cisco WAAS Version 6.4.1a and later.
The RAID-1 option is available for Cisco vWAAS in Cisco WAAS Version 6.4.1a and later.
–![]() SAS + HDD + SATA HDD: Allowed.
SAS + HDD + SATA HDD: Allowed.
–![]() SAS + SSD + SATA SSD: Allowed.
SAS + SSD + SATA SSD: Allowed.
–![]() Use either all SAS or all SATA drives in a RAID group.
Use either all SAS or all SATA drives in a RAID group.
–![]() Use the same capacity for each drive in the RAID group.
Use the same capacity for each drive in the RAID group.
–![]() Never mix HDDs and SSDs in the same RAID group.
Never mix HDDs and SSDs in the same RAID group.
- Before creating the virtual disk, both drives must be in Unconfigured Good state. If a drive is in other status, use the CIMC Web GUI or Cisco WAAS CLI and do the following:
a.![]() Click the Storage tab > Physical Drive Info tab.
Click the Storage tab > Physical Drive Info tab.
b.![]() In the Actions area, choose Set State as Unconfigured Good.
In the Actions area, choose Set State as Unconfigured Good.
c.![]() Confirm that the disk is in Unconfigured Good state.
Confirm that the disk is in Unconfigured Good state.
If disk is in Foreign Config state:
a.![]() Click the Storage tab > Controller Info tab.
Click the Storage tab > Controller Info tab.
b.![]() In the Actions area, choose Clear Foreign Config.
In the Actions area, choose Clear Foreign Config.
c.![]() In the Actions area, choose Unconfigured Good.
In the Actions area, choose Unconfigured Good.
d.![]() Confirm that the disk is in Unconfigured Good state.
Confirm that the disk is in Unconfigured Good state.
To create the virtual disk, follow these steps:
Step 1![]() Log in to the CIMC console.
Log in to the CIMC console.
Step 2![]() In the CIMC console left pane, click the Storage tab.
In the CIMC console left pane, click the Storage tab.
Step 3![]() In the CIMC console middle pane, click the Controller Info tab.
In the CIMC console middle pane, click the Controller Info tab.
Step 4![]() In the Action area, click Create Virtual Drive from Unused Physical Drives.\
In the Action area, click Create Virtual Drive from Unused Physical Drives.\
The Create Virtual Drive from Unused Physical Drives Wait dialog box is displayed.
a.![]() At the RAID Level drop-down box, choose 1.
At the RAID Level drop-down box, choose 1.
b.![]() In the Create Drive Groups area, select physical drives for your system from the Physical Drives pane and click >> to add these to the Drive Groups pane.
In the Create Drive Groups area, select physical drives for your system from the Physical Drives pane and click >> to add these to the Drive Groups pane.
c.![]() In the Virtual Drive Properties area:
In the Virtual Drive Properties area:
The Virtual Drive Name field displays the automatically assigned name.
The value for the Size drop-down list automatically filled.
1. From the Strip Size drop-down list, choose the strip size (default is 64k).
2. From the Write Policy drop-down list, choose the Write policy (default is Write Through)
3. From the Access Policy drop-down list, choose the Access policy (default is Read Write).
4. From the Read Policy drop-down list, choose the Read policy (default is No Read Ahead).
5. From the Cache Policy drop-down list, choose the Cache policy (default is Direct IO)
6. From the Disk Cache Policy drop-down list, choose the Disk Cache policy (default is Unchanged).
Step 5![]() Click Create Virtual Drive.
Click Create Virtual Drive.
Migrating Equipment from RAID-1 and Two SSDs to No RAID and One SSD
Note![]() The RAID-1 option is available for vWAAS for WAAS Version 6.4.1a and later.
The RAID-1 option is available for vWAAS for WAAS Version 6.4.1a and later.
- You must wait for the disk to be completely shut down before you physically remove the disk from the Cisco WAE device. After the RAID removal process is complete, WAAS generates a disk failure alarm and trap. In addition, a syslog error message is displayed.
- If the removal event occurs while the RAID array is in the rebuild process, the RAID removal process may take up to 1 minute to complete. The duration of this process depends on the size of the disk.
If you administratively shut down the disk during the RAID rebuild process, a RAID rebuild abort alarm is generated instead.
To remove a RAID-1 disk, follow these steps:
Step 1![]() To manually shut down the disk, run the disk disk-name diskxx shutdown global configuration command:
To manually shut down the disk, run the disk disk-name diskxx shutdown global configuration command:
Step 2![]() Wait for the disk to be completely shut down before you physically remove the disk from the Cisco WAE device.
Wait for the disk to be completely shut down before you physically remove the disk from the Cisco WAE device.
Step 3![]() After the RAID removal process is complete, Cisco WAAS generates a disk failure alarm and trap. In addition, a syslog error message is displayed.
After the RAID removal process is complete, Cisco WAAS generates a disk failure alarm and trap. In addition, a syslog error message is displayed.
Note![]() We recommend that you disable the disk error-handling reload option if it is enabled because it is not necessary to power down the system to remove a disk.
We recommend that you disable the disk error-handling reload option if it is enabled because it is not necessary to power down the system to remove a disk.
Fail-to-Wire on vWAAS on ENCS 5400-W
This section contains the following topics:
- About Fail-to-Wire on Cisco vWAAS on Cisco ENCS 5400-W Series
- Fail-to-Wire Traffic Interception Modes
- Fail-to-Wire Failure Handling
- CLI Commands for Port Channel and Standby Interfaces
- Configuring Inline Interception for Fail-to-Wire on a Cisco ENCS 5400-W Device
- Fail-to-Wire Upgrade and Downgrade Guidelines
About Fail-to-Wire on Cisco vWAAS on Cisco ENCS 5400-W Series
Fail-to-Wire (FTW) is a physical layer (Layer 1) bypass that allows interface port pairs to go into bypass mode: so that the hardware forwards packets between these port pairs without software intervention. FTW provides network connectivity when there are software or hardware failures.
The following are the operating guidelines for FTW on Cisco vWAAS on Cisco ENCS 5400-W:
- FTW is available for Cisco vWAAS in Cisco WAAS Version 6.4.3 and later.
- Hardware bypass is supported for a fixed set of ports. For example, you can pair Port 1 with Port 2, or Port 3 with Port 4, but you cannot pair Port 1 with Port 4.
- Configuring a standby and port channel in an on-board interface is supported; configuring standby over port channel in an on-board interface is not supported.
- Configuring a standby, port channel, and standby over port channel in an FTW interface is supported.
Fail-to-Wire Traffic Interception Modes
FTW uses two traffic interception modes: inline interception and WCCP.
–![]() Interception Mode: The NIM ports are in interception mode. Two inline groups are created for the four-port NIM card in Cisco vWAAS. The NIM card ports will use fail-to-wire after a failover timeout.
Interception Mode: The NIM ports are in interception mode. Two inline groups are created for the four-port NIM card in Cisco vWAAS. The NIM card ports will use fail-to-wire after a failover timeout.
–![]() Bypass Mode: You can shut down the inline group, putting the corresponding pair of ports in bypass mode. In bypass mode, traffic coming into Port 0 is redirected to Port 1, and traffic coming into Port 1 is redirected to Port 0.
Bypass Mode: You can shut down the inline group, putting the corresponding pair of ports in bypass mode. In bypass mode, traffic coming into Port 0 is redirected to Port 1, and traffic coming into Port 1 is redirected to Port 0.
–![]() Bypass All Mode: If the system reloads or if the software experiences an unexpected event, all the inline groups can be put in bypass mode; no Ethernet connection can be established between the devices.
Bypass All Mode: If the system reloads or if the software experiences an unexpected event, all the inline groups can be put in bypass mode; no Ethernet connection can be established between the devices.
–![]() Standalone Mode: Each port in the NIM can be used separately. Cisco WAAS can use this mode to enable WCCP interception. The ports of the NIM card do not use fail-to-wire in this mode, and the watchdog timer remains disabled.
Standalone Mode: Each port in the NIM can be used separately. Cisco WAAS can use this mode to enable WCCP interception. The ports of the NIM card do not use fail-to-wire in this mode, and the watchdog timer remains disabled.
Fail-to-Wire Failure Handling
Here is how FTW handles the following system failure scenarios:
- Disk issue: NFVIS detects the disk issue and puts the NIM into bypass mode.
- NFVIS unexpected event: FTW detects that the Cisco vWAAS keepalive messages have stopped, and FTW puts the NIM to pass-through FTW.
- WAAS reload: The Cisco vWAAS puts the FTW card into FTW mode immediately.
- WAASnet restarts or experiences an unexpected event: The FTW NIM card on the vWAAS goes into FTW mode immediately. After the WAASnet datapath is restored, the vWAAS returns the FTW ports to inline mode.
CLI Commands for Port Channel and Standby Interfaces
Show Commands Used with Port Channel and Standby Interfaces
Table 7-8 show Commands Used with Port Channel and Standby Interfaces
Creating, Removing, and Showing Port Channel Interfaces
The following example shows how to create a port channel with the interface portchannel global configuration command:
The following example shows how to remove a port channel with the no interface portchannel global configuration command:
Note![]() The interface port channel and no interface port channel global configuration commands will be saved across reloads if you run the copy running-config startup-config command or the write-mem command.
The interface port channel and no interface port channel global configuration commands will be saved across reloads if you run the copy running-config startup-config command or the write-mem command.
The following example shows a show running config command for a port channel interface:
Creating, Removing, and Showing Standby Interfaces
The following example shows how to create a standby interface with the interface standby global configuration command:
The following example shows how to remove a standby interface with the no interface portchannel global configuration command:
Note![]() The interface standby and no interface standby global configuration commands are saved across reloads if you run the copy running-config startup-config command or the write-mem command.
The interface standby and no interface standby global configuration commands are saved across reloads if you run the copy running-config startup-config command or the write-mem command.
The following example shows a show running config command for a standby interface:
Configuring Inline Interception for Fail-to-Wire on a Cisco ENCS 5400-W Device
Configuring Inline Interception for Fail-to-Wire with the Cisco WAAS Central Manager
To configure inline interception for FTW with the Cisco WAAS Central Manager, follow these steps:
Step 1![]() Choose Devices > DeviceName > Configure > Interception > Interception Configuration (Figure 7-1).
Choose Devices > DeviceName > Configure > Interception > Interception Configuration (Figure 7-1).
Figure 7-1 Cisco WAAS Central Manager Interception Method Configuration Window
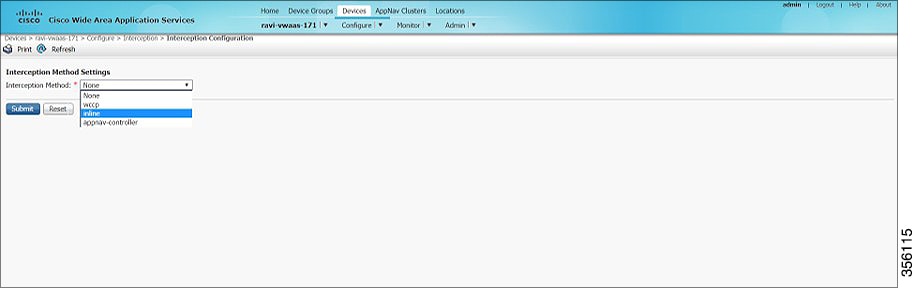
Step 2![]() At the Interception Method drop-down list, choose Inline.
At the Interception Method drop-down list, choose Inline.
Step 4![]() Choose Devices > DeviceName > Configure > Network > Network Interfaces (Figure 7-2).
Choose Devices > DeviceName > Configure > Network > Network Interfaces (Figure 7-2).
Figure 7-2 WAAS Central Manager Network Interfaces Window
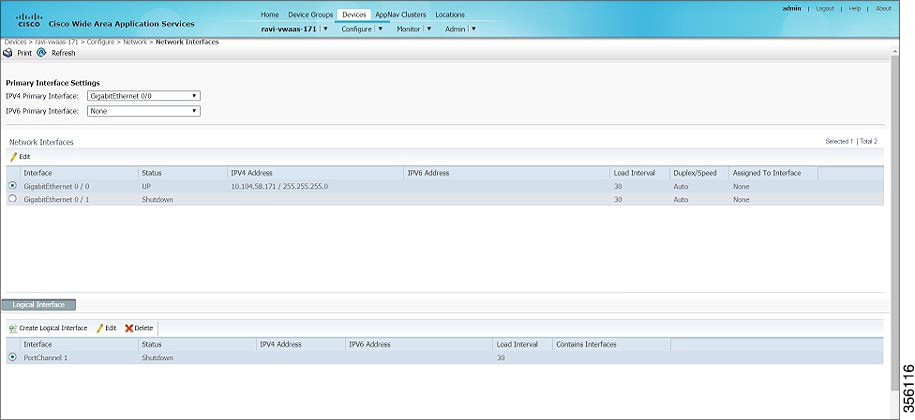
Step 5![]() In the Primary Interface Settings area, from the IPv4 Primary Interface drop-down list, choose the interface that should be the primary interface.
In the Primary Interface Settings area, from the IPv4 Primary Interface drop-down list, choose the interface that should be the primary interface.
Step 6![]() From the IPv6 Primary Interface drop-down list, choose None.
From the IPv6 Primary Interface drop-down list, choose None.
- For information on the Network Interface table listing or the Logical Interface table listing, see the “Configuring Network Interfaces” section in the “Configuring Network Settings” chapter of the Cisco Wide Area Application Services Configuration Guide.
Configuring Inline Interception for Fail-to-Wire with the Cisco WAAS CLI
Table 7-9 shows the Cisco WAAS CLI commands used to configure inline interception for FTW on a Cisco ENCS 5400-W device.
Table 7-9 Cisco WAAS CLI Commands for Inline Interception
Fail-to-Wire Upgrade and Downgrade Guidelines
Consider the following for upgrading or downgrading a Cisco WAAS device with FTW:
Upgrade and Downgrade Guidelines for Cisco vWAAS on Cisco ENCS 5400-W
Consider the following for upgrading or downgrading a Cisco vWAAS device on Cisco ENCS 5400-W:
- You can use the Cisco WAAS Central Manager or the CLI to upgrade a Cisco vWAAS on a Cisco ENCS 5400-W device to the following Cisco WAAS and Cisco NFVIS versions:
–![]() Cisco WAAS Version 6.4.3a and Cisco NFVIS 3.10.1
Cisco WAAS Version 6.4.3a and Cisco NFVIS 3.10.1
–![]() Cisco WAAS Version 6.4.3 and Cisco NFVIS 3.9.1
Cisco WAAS Version 6.4.3 and Cisco NFVIS 3.9.1
–![]() Cisco WAAS Version 6.4.1x and Cisco NFVIS 3.71
Cisco WAAS Version 6.4.1x and Cisco NFVIS 3.71
Note![]() If you are running nfvis-371-waas-641a or nfvis-371-waas-641b on a Cisco ENCS 5400-W device, before upgrading Cisco NFVIS, upgrade to Cisco WAAS Version 6.4.3.
If you are running nfvis-371-waas-641a or nfvis-371-waas-641b on a Cisco ENCS 5400-W device, before upgrading Cisco NFVIS, upgrade to Cisco WAAS Version 6.4.3.
- You can use the Cisco WAAS Central Manager to upgrade from the device level and the device group level. To use the Cisco WAAS Central Manager to upgrade a Cisco vWAAS on a Cisco ENCS 5400-W device:
1.![]() Use Telnet to reach the Cisco vWAAS device.
Use Telnet to reach the Cisco vWAAS device.
2.![]() Update the Cisco WAAS Central Manager’s IP address.
Update the Cisco WAAS Central Manager’s IP address.
3.![]() Log in to the Cisco WAAS Central Manager.
Log in to the Cisco WAAS Central Manager.
For example, if you are downgrading a device group that has a physical Cisco WAE, a virtual Cisco WAE, and a Cisco ENCS 5400-W platform to a version earlier than Cisco WAAS Version 6.4.1, the Cisco WAAS Central Manager initiates the downgrade process only for the physical and virtual Cisco WAEs, but not for the Cisco ENCS 5400-W platform.
- For upgrade and downgrade guidelines for Cisco vWAAS with Cisco NFVIS, see the Upgrade Guidelines for Cisco Enterprise NFVIS section in the chapter “Cisco vWAAS with Cisco Enterprise NFVIS.”
 Feedback