Configuring Intrusion Prevention System on the RV34x Series Router
Available Languages
Objective
The objective of this document is to show you how to configure the Intrusion Prevention System (IPS) on RV34x series routers.
Introduction
The Intrusion Prevention System scans traffic to look for known attack patterns to block. It watches packets and sessions as they flow through the router and scans each packet to match any of the Cisco IPS signatures. When it detects suspicious activity, it is designed to log or block it. It is important to update the IPS and Antivirus databases and definitions. These can be updated manually or automatically.
Check out these videos on Cisco Intrusion Prevention System:
However, IPS can impact the router’s performance. In general, it doesn’t impact the total throughput for Hypertext Transfer Protocol (HTTP) and File Transfer Protocol (FTP) traffic, but it can drop the maximum number of concurrent connections somewhat dramatically.
Important Note: If the router is currently under a heavy workload, this may exacerbate the issue.
The table below gives expected statistics for performance under various configurations. These values should be used as a guide, as real world performance may differ due to a number of factors.
| Concurrent Connections | Connection Rate | HTTP throughput | FTP throughput | |
| Default Settings | 40000 | 3000 | 982MB/sec | 981MB/sec |
| Enable APP control | 15000-16000 | 1300 | 982MB/sec | 981MB/sec |
| Enable Antivirus | 16000 | 1500 | 982MB/sec | 981MB/sec |
| Enable IPS | 17000 | 1300 | 982MB/sec | 981MB/sec |
| Enable App Control Antivirus & IPS | 15000-16000 | 1000 | 982MB/sec | 981MB/sec |
The following fields are defined as:
Concurrent Connections – The total number of concurrent connections. For example, if you are downloading a file from one site, that’s one connection, streaming audio from Spotify that will be another connection, making it two concurrent connections.
Connection Rate – The number of connections request / second it can process.
HTTP/FTP Throughput – The HTTP and FTP throughput are the download rates in MB/sec.
Security licenses have been updated to include IPS protection in addition to existing application and web filtering. A smart account is required in order to have a security license. If you do not already have an active smart account, section 1 of this document will be required.
To learn how to configure Antivirus on RV34x, click here.
Applicable Devices
· RV34x
Software Version
· 1.0.03.x
Table of Contents
2. Configuring Intrusion Prevention System
3. Intrusion Prevention System Signatures
4. Intrusion Prevention System Signature Table
5. IPS Status
7. Conclusion
Smart Licensing
If you do not have an active smart account, you will need to proceed with the steps below.
If you run into any troubles or issues while configuring your Smart License account, our support team will help sort out potential issues and can be reached through multiple methods. Feel free to use your preferred method to reach out.
· Router Community: Cisco Small Business Support Community
· FAQ about RV34x Series: RV34x Series Router FAQs
· Smart License Overview: Smart Software Licensing
· FAQ about Smart Licenses: Smart Licensing and Smart Accounts FAQ for Partners, Distributors and Customers
· Submit a case: Support Case Manager
· US/Canada Support Phone Number: 1-866-606-1866 or Small Business TAC Contacts
· Licensing Email: licensing@cisco.com
Step 1. If you have created or visited your Cisco.com account recently, you’re greeted by a message to create your own Smart License account. If you haven’t, you can click here to be taken to the Smart License account creation page. You may need to log in.
Note: For additional details on the steps involved in requesting your Smart Account, click here.

Step 2. When purchasing a smart license for a router, the vendor needs to make a process which moves the unique license ID to your Smart License account. The below is a table of the necessary information that will be asked for when purchasing the bundles.
Note: IPS and Antivirus are part of the security license used for Web Filtering and Application Filtering.
| Information Required | Locating the information |
| Cisco.com User ID | Located in your account profile, or you can click here. |
| Smart License Account Name | It is best to have created your smart account prior to purchasing the license. This should be step 8 of the Smart License Account Creation article. |
| Smart License SKU | The product identification code for the device. Ex. RV340-K9-NA |
Note: If you have purchased a license and it’s not appearing in your virtual account, you should either follow up with the reseller to request they make the transfer or reach out to us.
To make the process as expedient as possible, you should have your License Invoice, Cisco Sales Order Number, and a screenshot of your Smart Account License page (to share with our team).
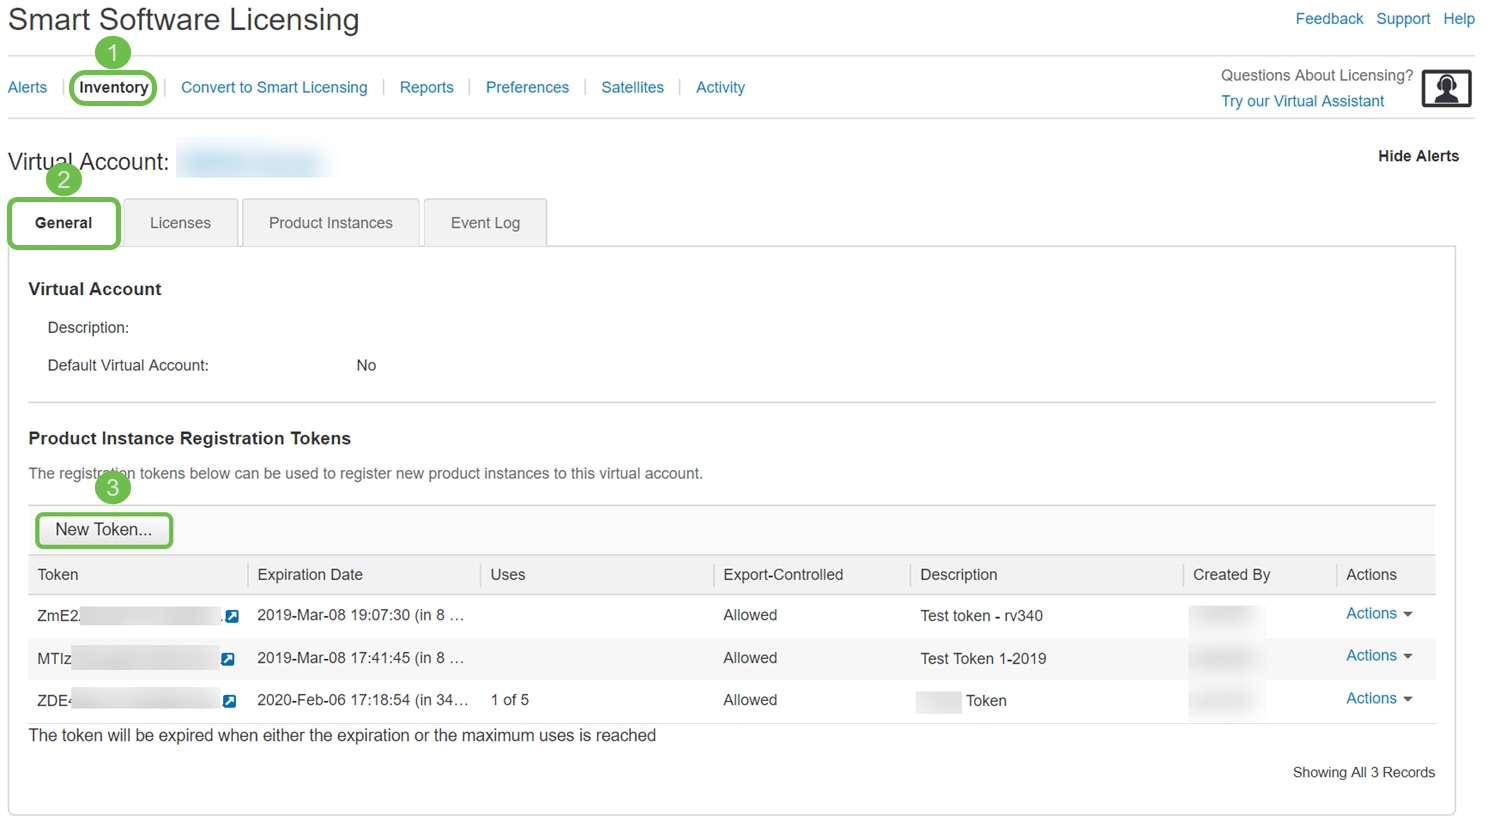
Step 3. To generate a token, navigate to your Smart Software License account. Then click Inventory > General Tab. Click on the New Token… button.
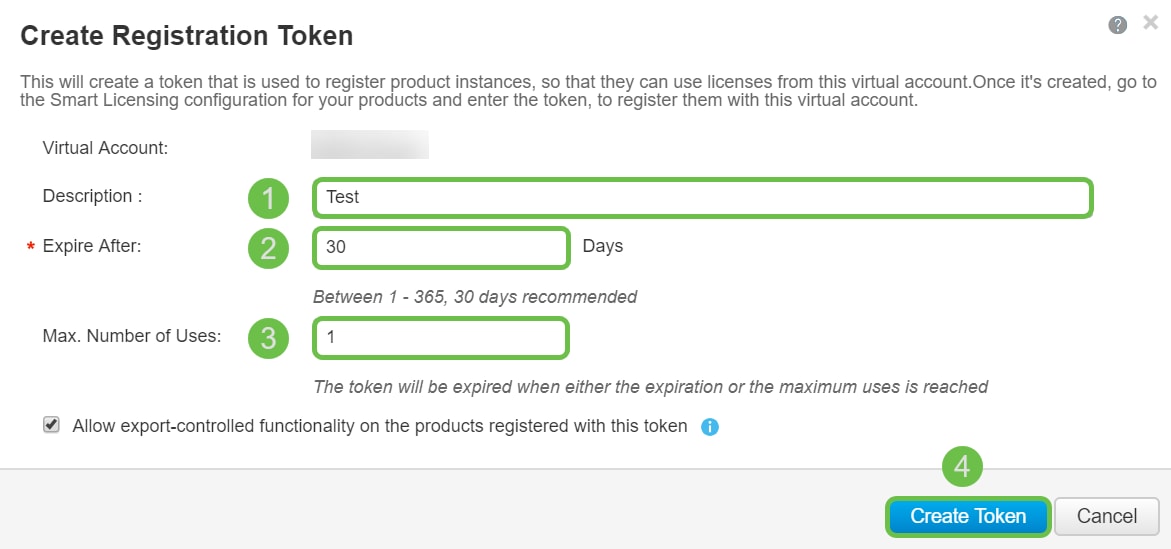
Step 4. A Create Registration Token window opens. Enter a Description, Expire After, and Max. Number of Uses. Then press the Create Token button.
Note: 30 days for Expire After is recommended.
Step 5. Once the token is generated, you can click the Token link (blue box with a white arrow) button to the right of your recently created token.

Step 6. A Token window should appear with the full token for you to copy. Highlight the token, right click the token and click Copy or you can hold down the ctrl button on your keyboard and click c at the same time to copy the text.

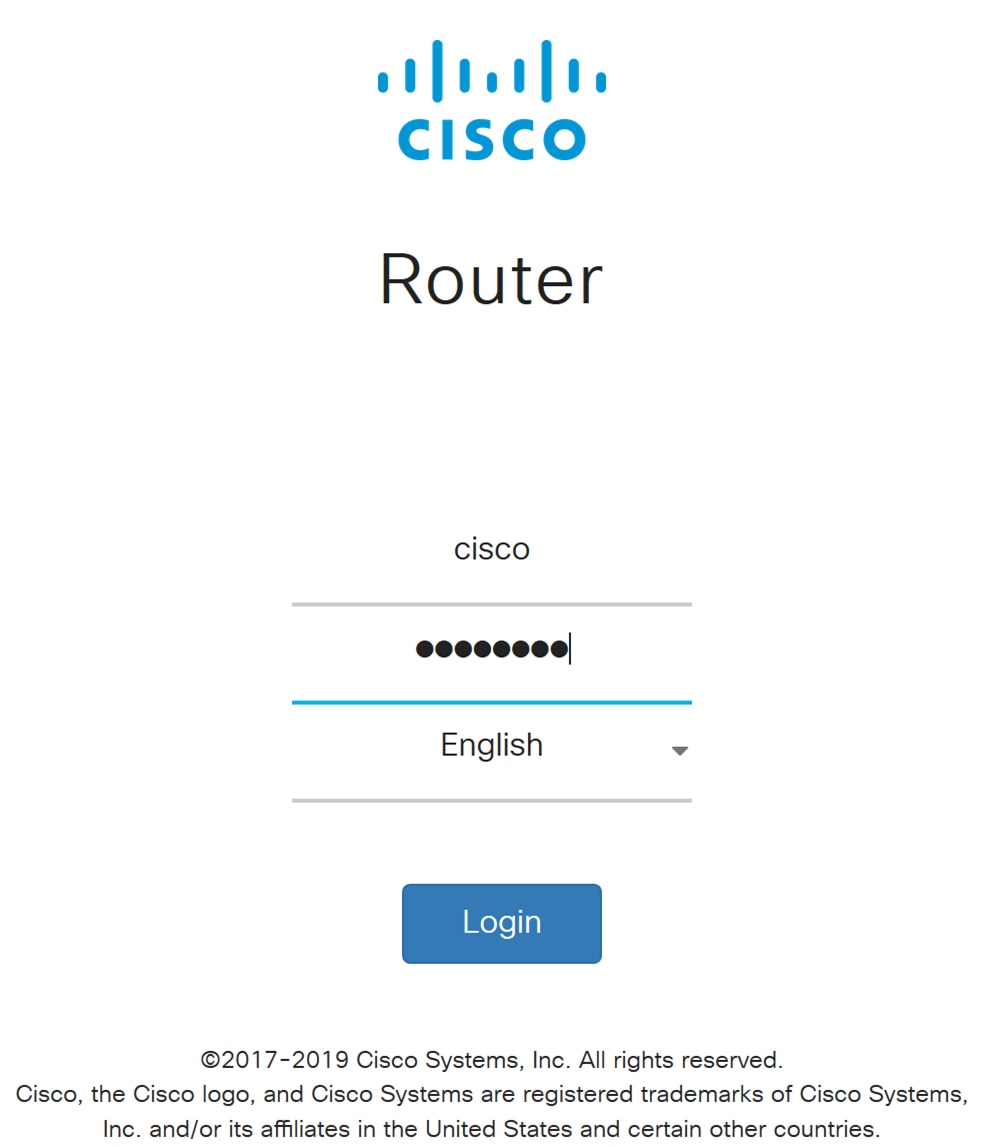
Step 7. Once you have copied your token, you will need to log into the device and upload the token key. Log in to the web configuration page of the router.
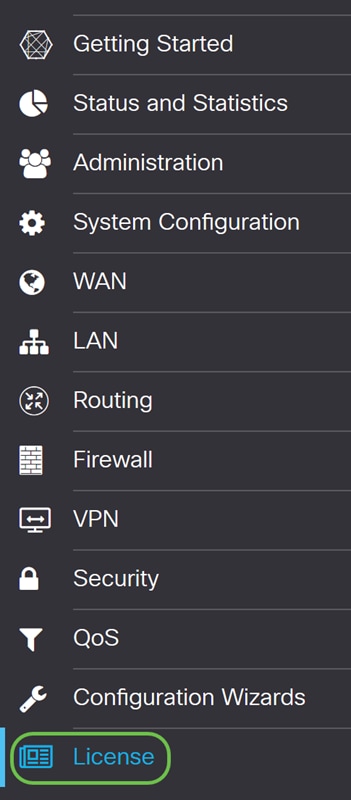
Step 8. Navigate to License.
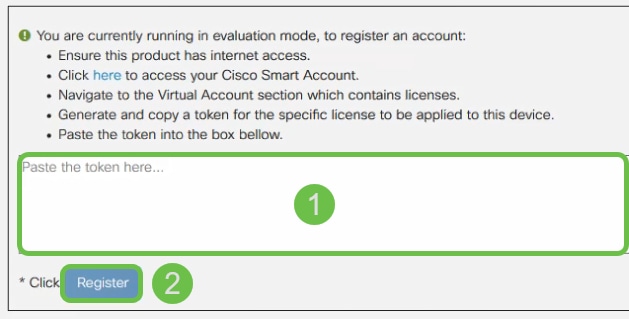
Step 9. If your device is unregistered, your License Authorization Status will be listed as Evaluation Mode. Paste the token (Step 6 of this section) that you have generated from the Smart Licensing Manager page. Then click Register.
Note: The registration process may take some time, please wait for it to finish.
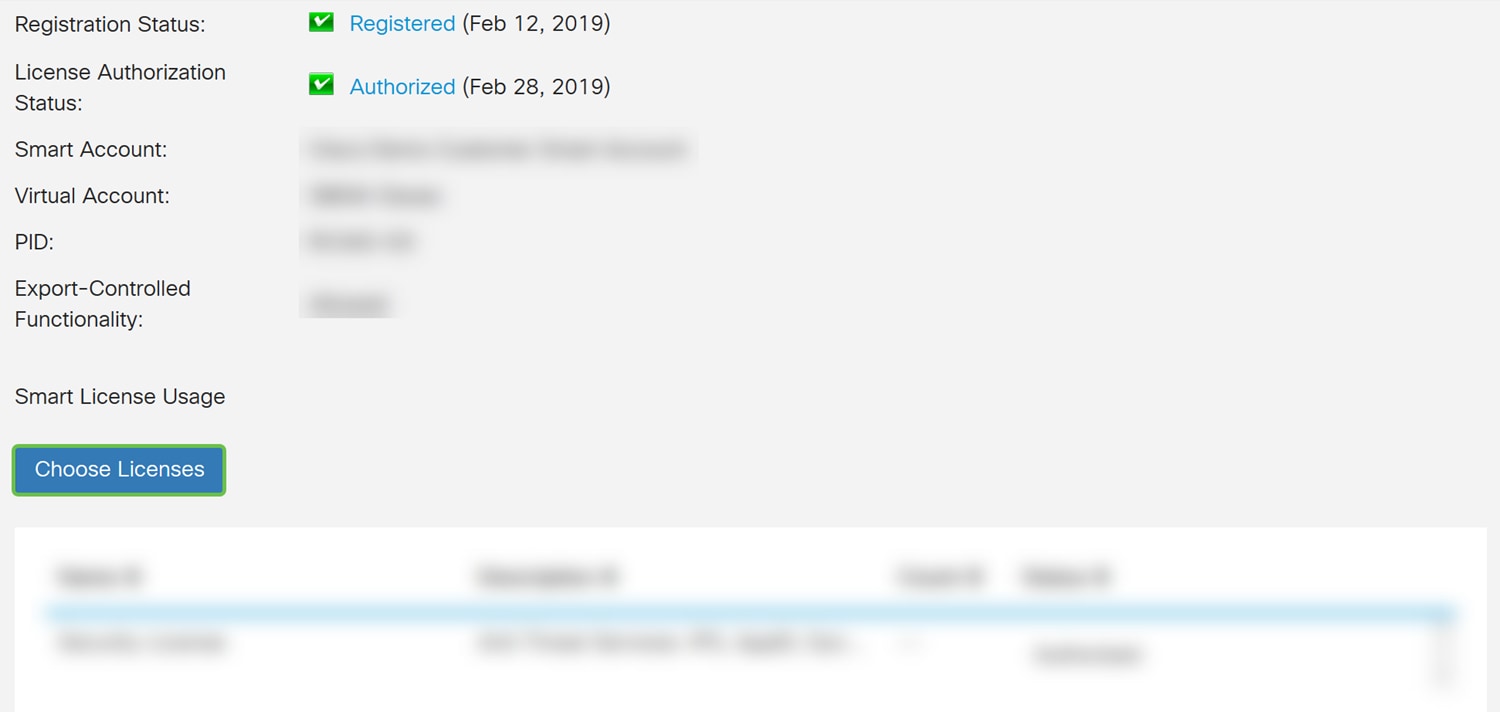
Step 10. Once the token is registered, you will need to allocate the license. Click the Choose Licenses button.
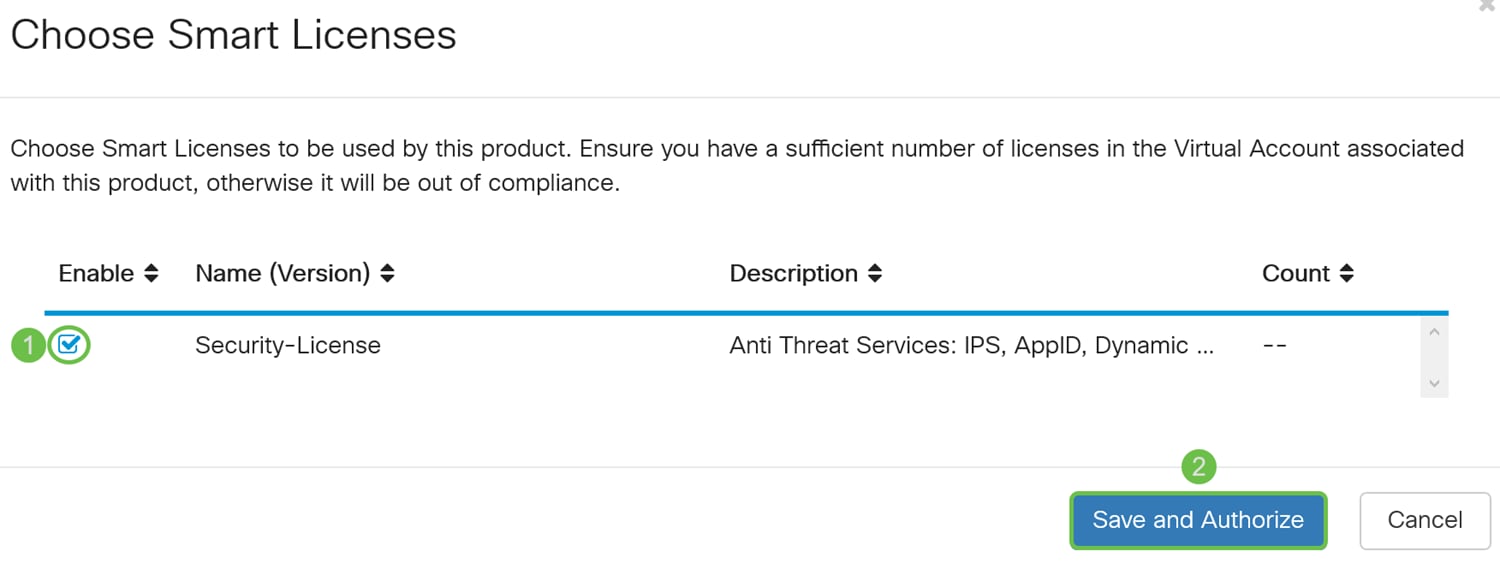
Step 11. The Choose Smart Licenses window should appear. Check the Security-License and then press Save and Authorize.
Step 12. The Status of your Security-License should be Authorized now.

You should now be able to proceed with configuring Intrusion Prevention System.
Configuring Intrusion Prevention System
Step 1. If you haven’t logged into the router yet, log in to the web configuration page of the router.

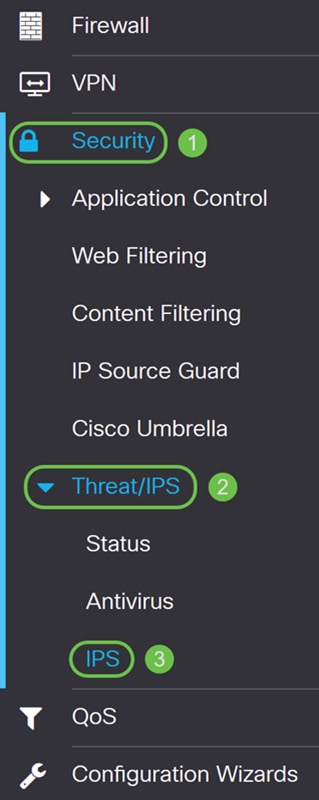
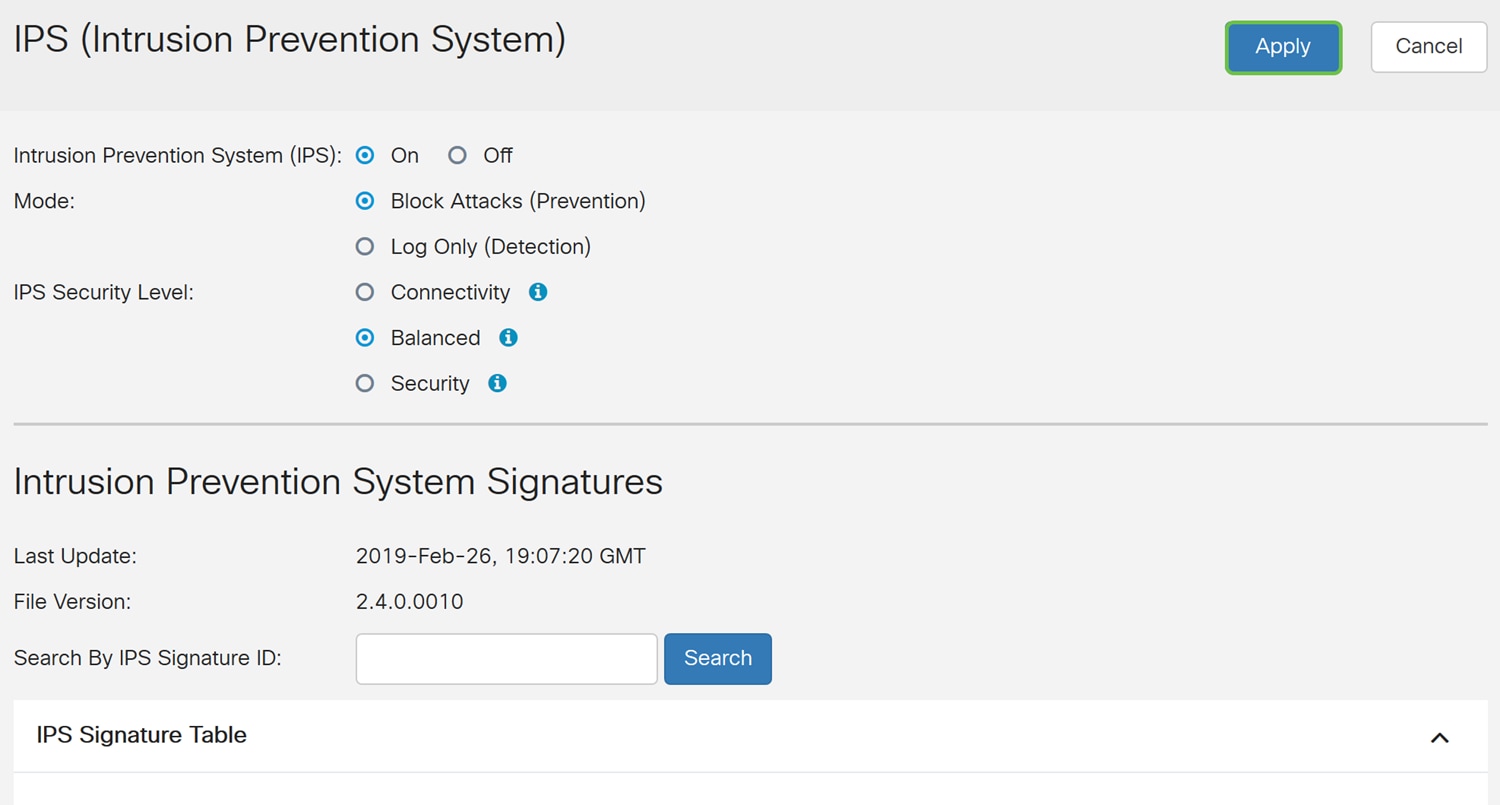
Step 2. Navigate to Security > Threat/IPS > IPS.
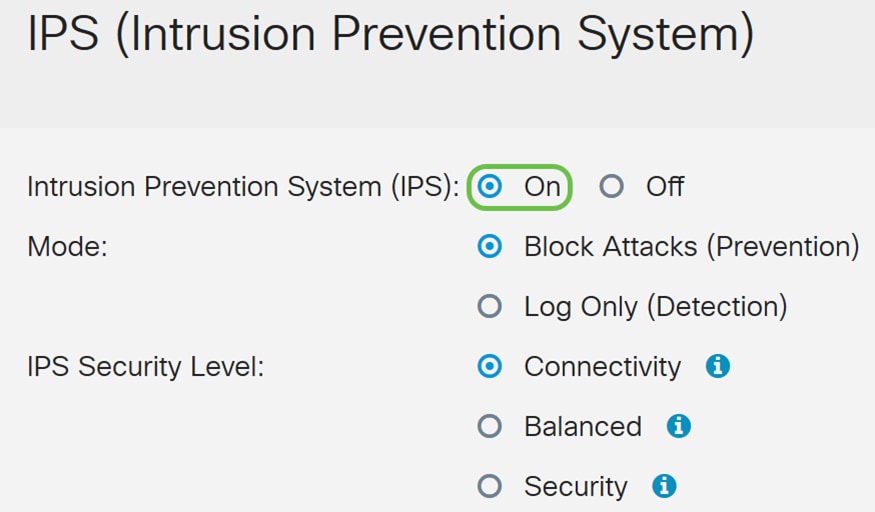
Step 3. Select On to enable the Intrusion Prevention System feature. If you want to turn it off, select Off.
We will be selecting On in this example.
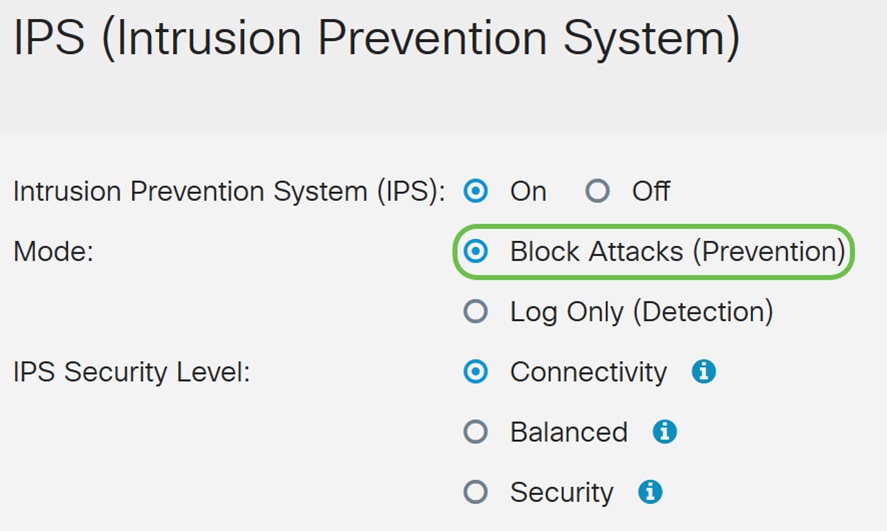
Step 4. Select either Block Attacks (Prevention) or Log Only. In this example, we will be selecting Block Attacks (Prevention). The following options are defined below.
· Block Attacks (Prevention) – Select to block all the attacks. It also logs the anomaly.
· Log Only – This option will generate the log only (with client information, signature ID, etc.) when the anomalies are identified. It does not impact the connection.
Step 5. Select the IPS security level that you want to use. The following options are defined as:
· Connectivity – This mode will detect the most critical attacks. This provides the least protection: only (high severity) risk attacks are detected. This is the least secure option.
· Balanced – The selected mode will detect severe attacks along with the critical attacks. This provides medium protection: (high + medium severity) are inspected, by passing low risk signatures. This is mid-level security for IPS.
· Security – Security mode will detect the normal attacks along with the severe and critical attacks. This provides the most protection: All rules (high + medium + low severity) are inspected. This is the highest security level for IPS.
Note: The higher security level you choose, the more attacks are being monitored, the bigger the impact on system performance that may be experienced.
We will be selecting Balanced for this demonstration.

Intrusion Prevention System Signatures
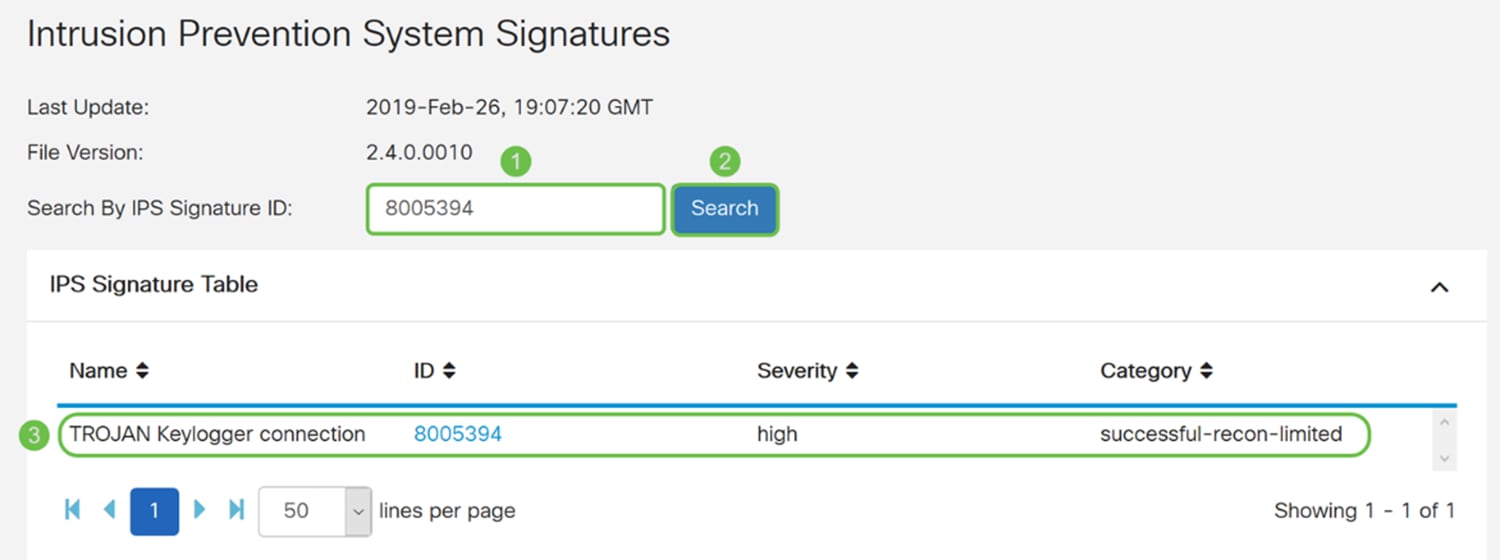
Step 6. In the Last Update field, it will display the date and time of the last updated signature.

Step 7. The File Version displays the signature version which is being used.

Step 8. To search for a signature ID, enter the Signature ID in the Search by IPS Signature ID field and click Search to check whether the signature is supported or not. If the signature ID is supported, the table will update with the result like shown below.
Note: If the signature ID is not supported, nothing will appear in the table.
Intrusion Prevention System Signature Table
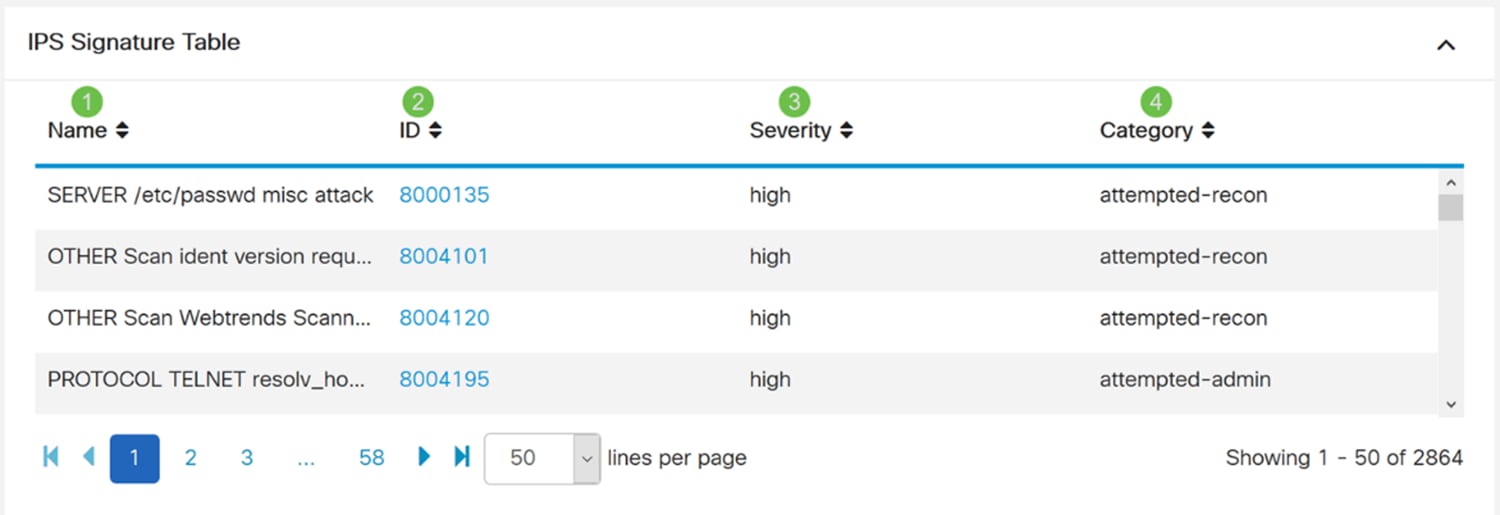
Step 9. In the IPS Signature Table, the following fields are defined as:
· Name – Name of the signature.
· ID – The unique identifier of the signature. Clicking the ID will open a window for you to view the complete details for the selected signature.
· Severity – Severity level denotes the security impact.
· Category – The category that the signature belongs to.
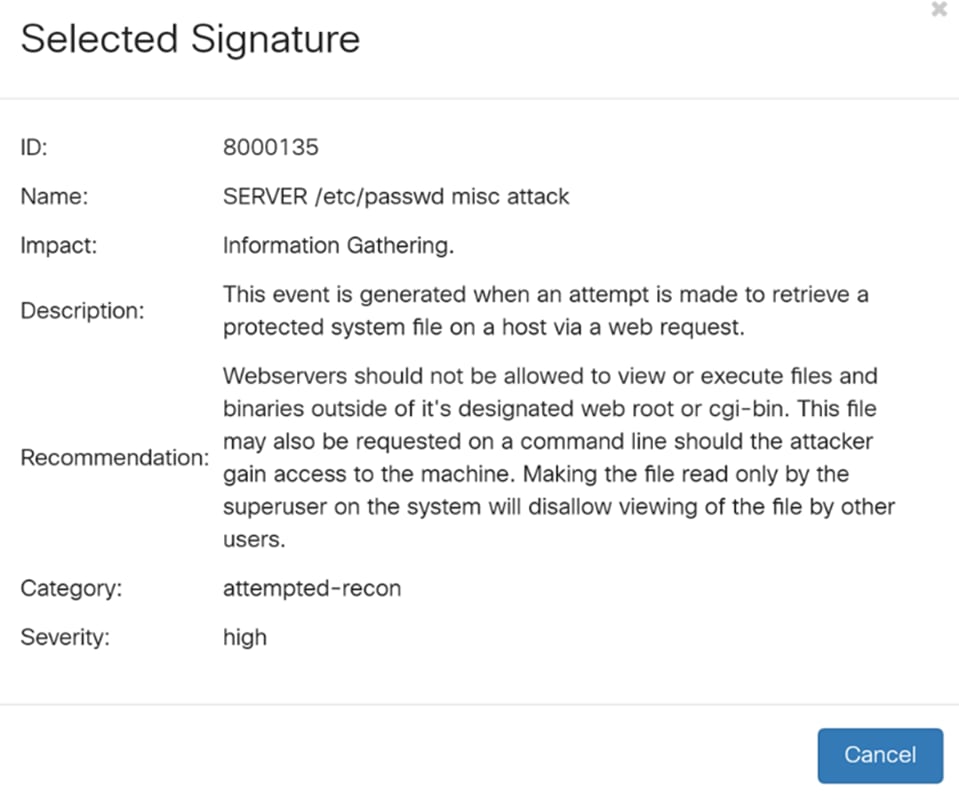
Step 10. (Optional) If you clicked on the signature ID in the IPS Signature Table, a window will appear to show you the complete details for the selected signature.
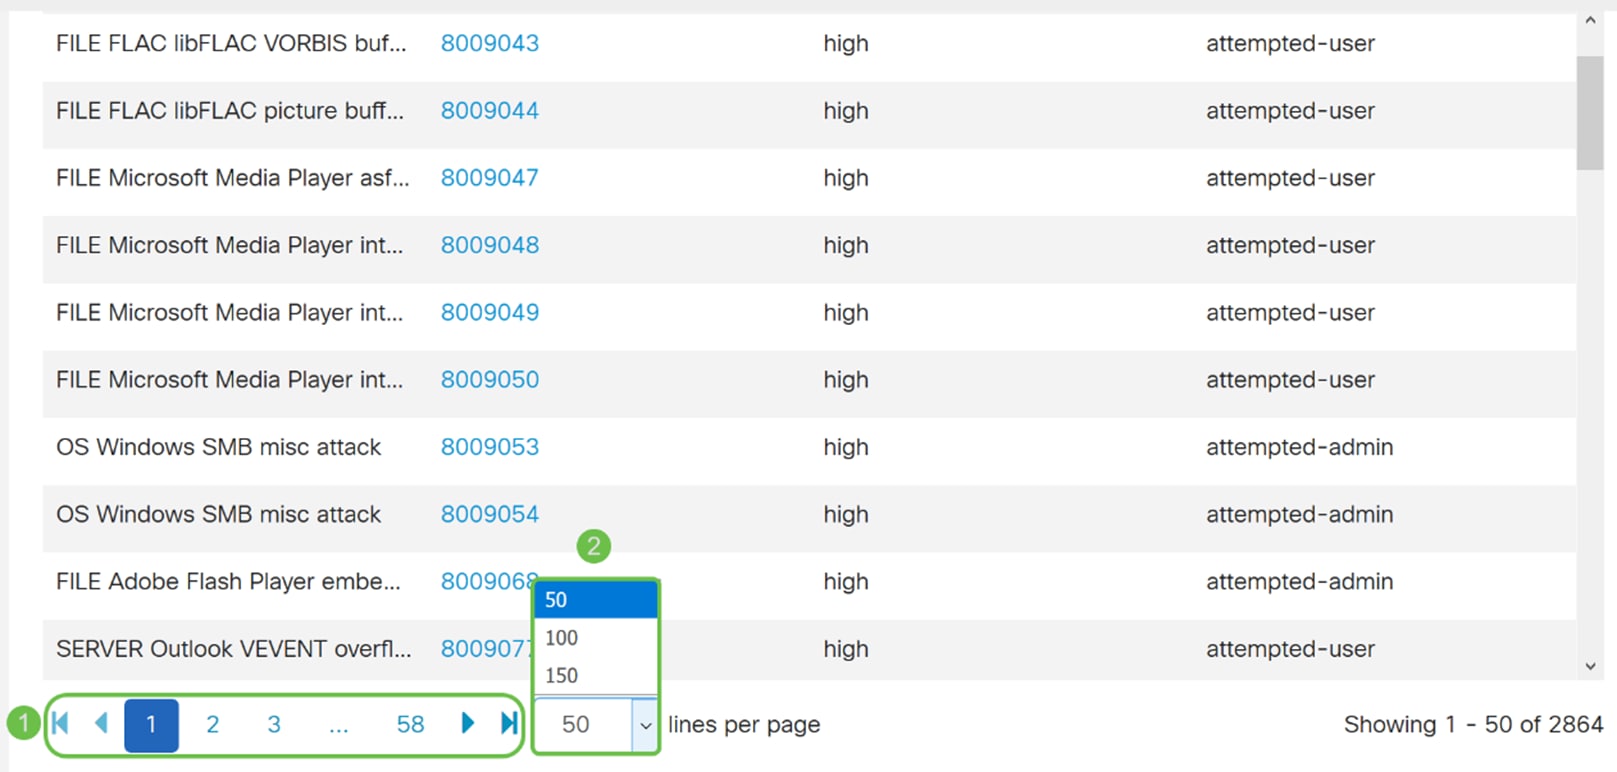
Step 11. At the bottom of the IPS Signature Table, select the arrows as well as the numbers to navigate back and forth on the table. You can also select the amount of lines (50, 100, or 150) per page in the lines per page drop-down list.
Step 12. Click Apply to save your changes to the running configuration file.
Note: All configurations that the router is using are currently in the running configuration file which is volatile and is not retained between reboots. In order to retain your configuration between reboots, copy your running configuration file to the startup configuration file.
In the next few steps, we will show you how to copy your running configuration to the startup configuration.
Step 13. Click the Floppy Disk (Save) icon at the top of the page. This will redirect you to the Configuration Management to save your running configuration to the startup configuration.

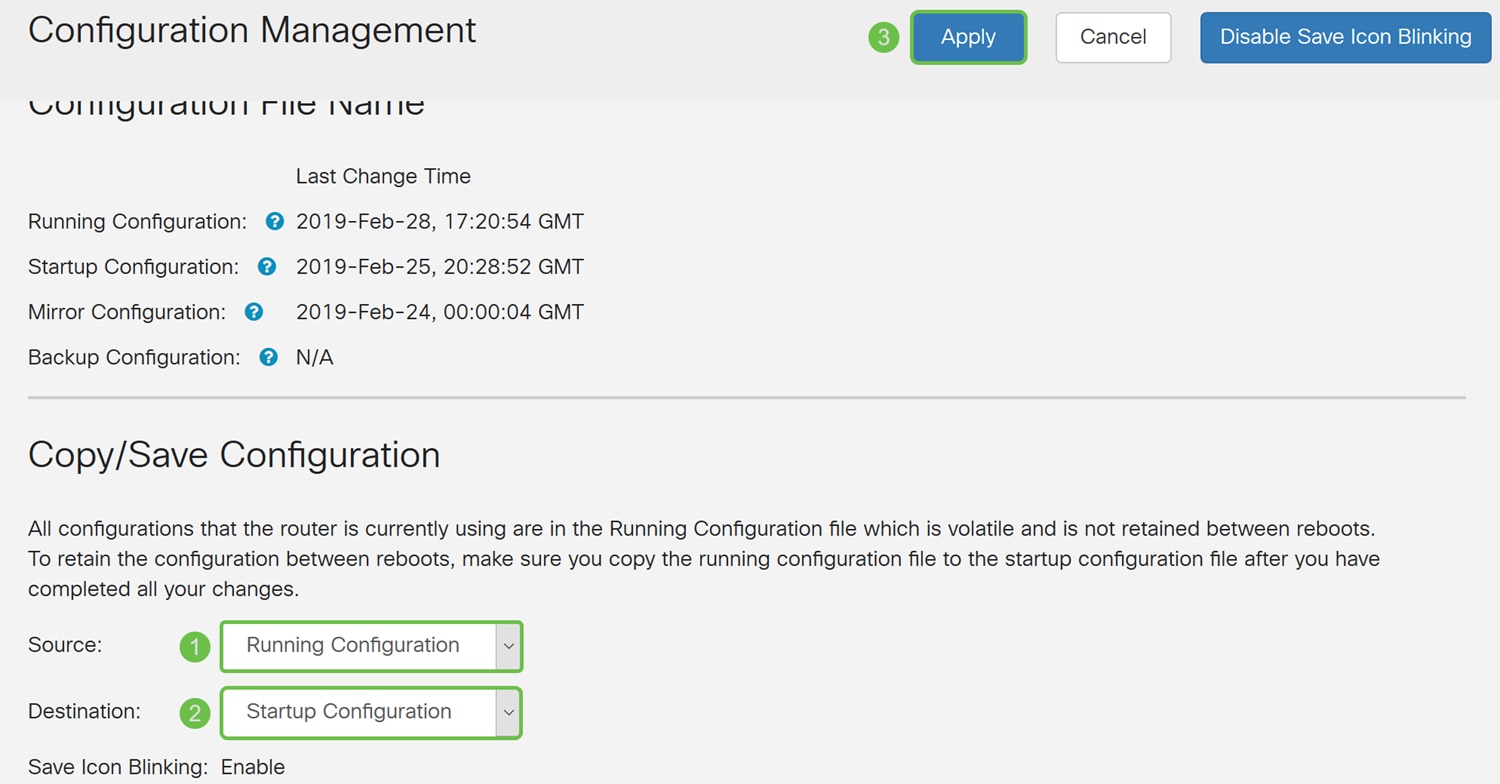
Step 14. In the Configuration Management, scroll down to the Copy/Save Configuration section. Ensure that the Source is Running Configuration and the Destination is Startup Configuration. Click Apply. This will copy the running configuration file to the startup configuration file to retain the configuration between reboots.
IPS Status
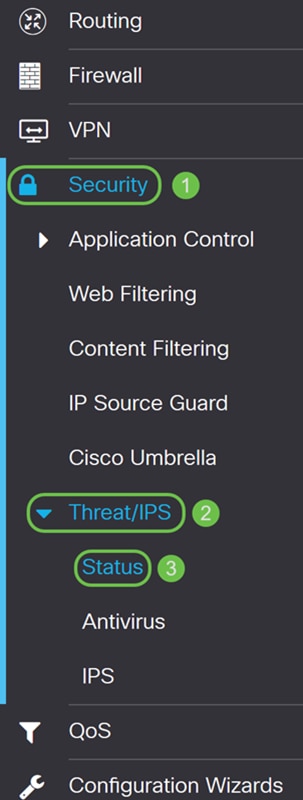
Step 1. Navigate to Security > Threat/IPS > Status.
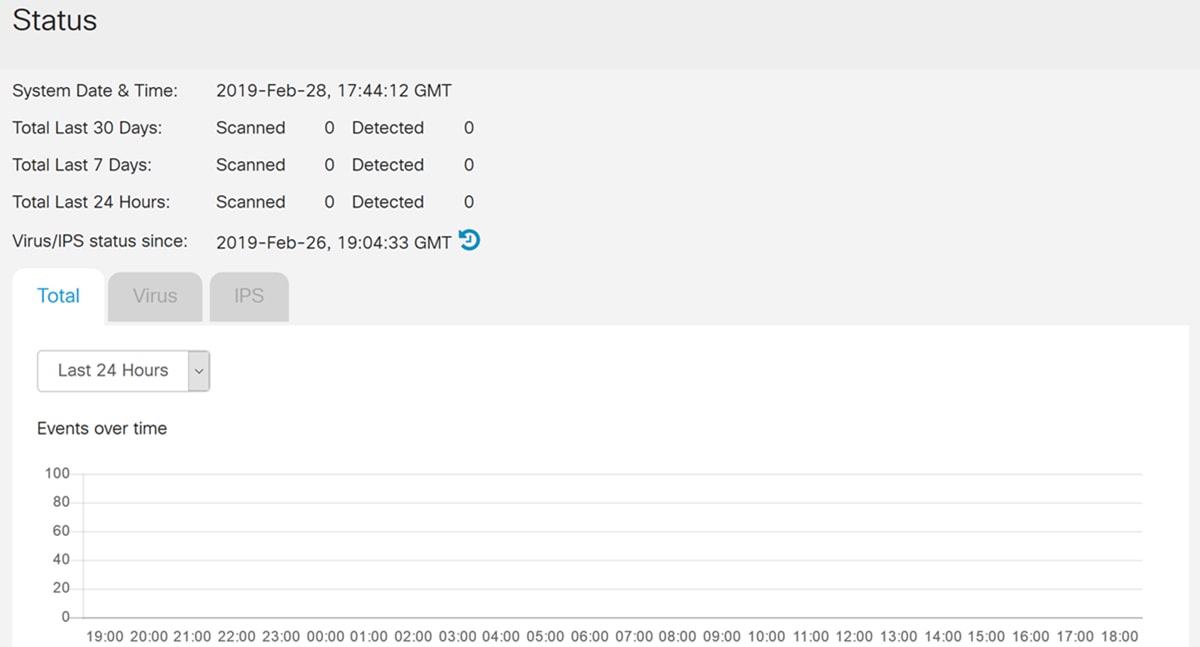
Step 2. The Status page displays the details of the threats and attacks when the Anti Threat and IPS features are configured. The dashboard gives you a view of the entire events summary, and detailed information of threats and attacks detected as per selection such as day, week, and month.
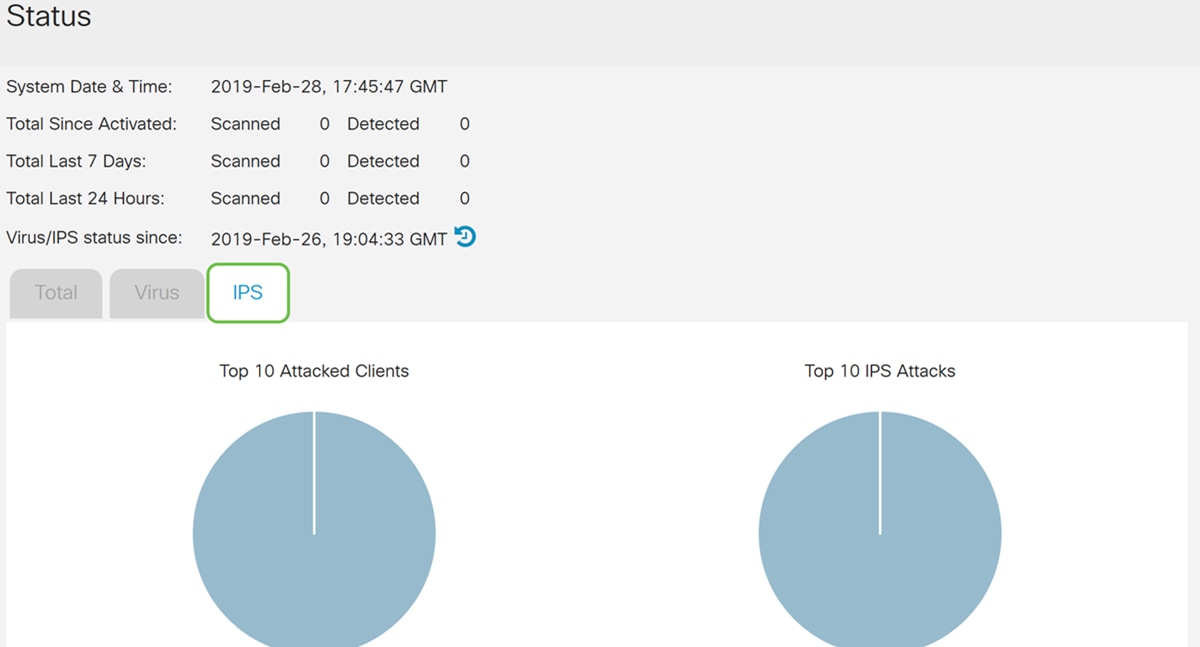
Step 3. Click the IPS tab. This will display the top 10 attacked clients as well as the top 10 IPS attacks.
Updating IPS Definitions
You can update the IPS definition either manually or automatically. Steps 1-2 will show you how to update the IPS definition manually while Steps 3-6 will show you how to update the IPS definition automatically.
Best Practice: It is recommended to update the security signatures automatically on a weekly basis.
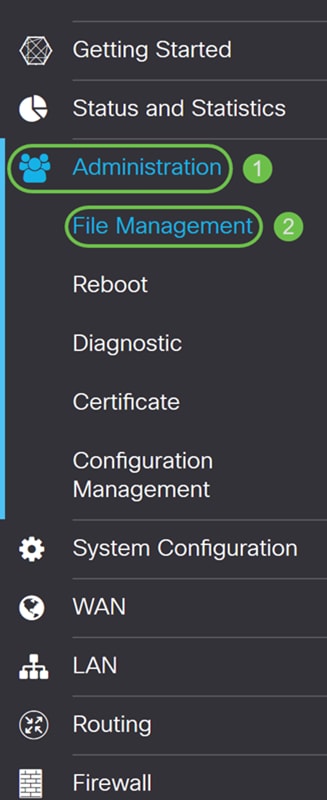
Step 1. To manually update IPS definitions, navigate to Administration > File Management.
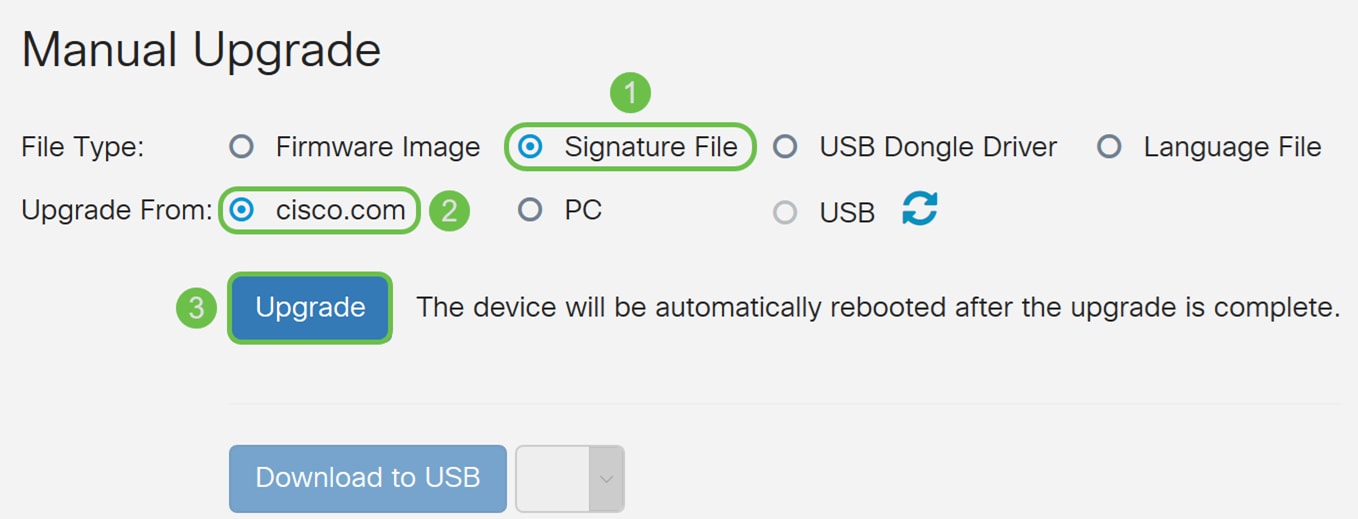
Step 2. Scroll down to the Manual Upgrade section in the File Management page. Choose Signature File for File Type and cisco.com for Upgrade From. Then press Upgrade. This will download the latest security signature and install it.
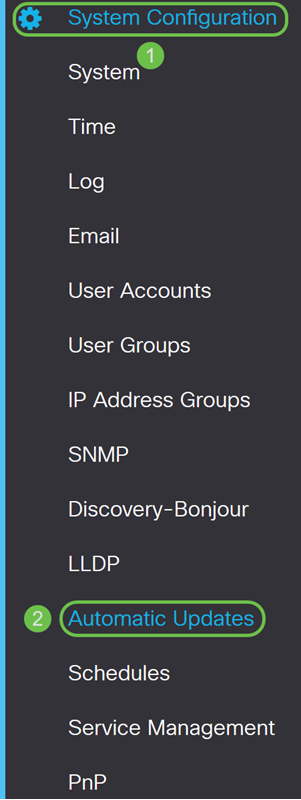
Step 3. To automatically update the IPS definitions, navigate to System Configuration > Automatic Updates.
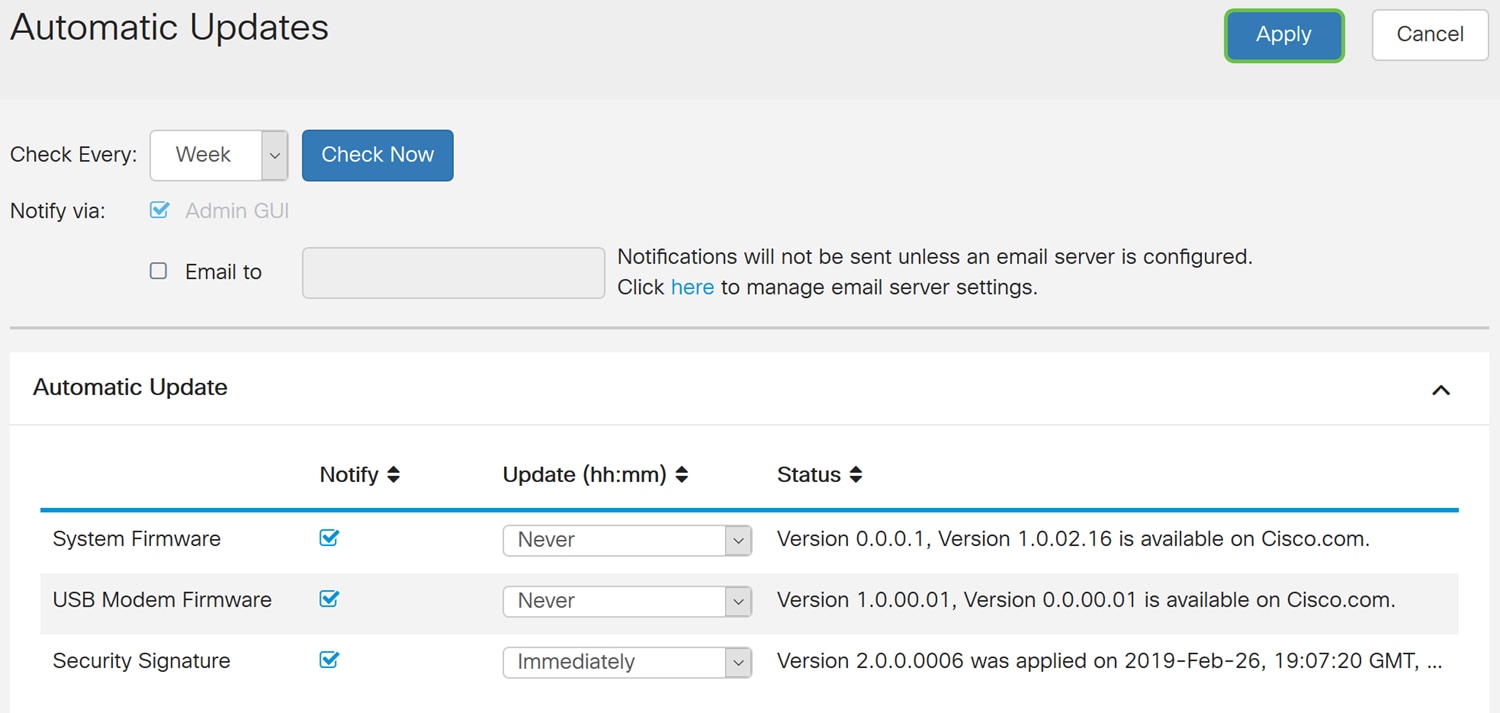
Step 4. The Automatic Updates page opens. You have the option of checking for updates either on a weekly or monthly basis. You can have the router notify via email or the Web UI. In this example, we will be selecting to check every week.
Note: It is recommended to update security signatures automatically on a weekly basis.

Step 5. Scroll down to the Automatic Update section and look for the Security Signature field. In the Security Signature Update drop-down list, select the time that you want to automatically update. In this example, we will be selecting Immediately.

Step 6. Click Apply to save the changes to the running configuration file.
Note: Remember to click the Floppy Disk icon on the top to navigate to the Configuration Management page to copy your running configuration file to the startup configuration file. This will help retain your configurations between reboots.
Conclusion
You should now have successfully configured Intrusion Prevention System on the RV34x series router.
Revision History
| Revision | Publish Date | Comments |
|---|---|---|
1.0 |
19-Mar-2019 |
Initial Release |
 Feedback