Integrate and Troubleshoot Cisco XDR with Secure Firewall
Available Languages
Download Options
Bias-Free Language
The documentation set for this product strives to use bias-free language. For the purposes of this documentation set, bias-free is defined as language that does not imply discrimination based on age, disability, gender, racial identity, ethnic identity, sexual orientation, socioeconomic status, and intersectionality. Exceptions may be present in the documentation due to language that is hardcoded in the user interfaces of the product software, language used based on RFP documentation, or language that is used by a referenced third-party product. Learn more about how Cisco is using Inclusive Language.
Contents
Introduction
This document describes the steps required to integrate, verify, and troubleshoot Cisco XDR with Secure Firewall.
There are two methods to Integrate Secure Firewal and XDR, and each Integration provides different results.
The first method describes how to Integrate Secure Firewal, Security Services Exchange (SSX), Security Cloud Control, XDR-Analytics and XDR to enrich Investigations.
The second method describes how to integrate Secure Firewal, SSX, Security Cloud Control, XDR-A, SAL Cloud and XDR, to enrich Incidents.
Prerequisites
Requirements
Cisco recommends that you have knowledge of these topics:
- Cisco Firewall Management Center (FMC)
- Cisco Secure Firewall Threat Defense
- Optional Virtualization of images
- Cisco Defense Orchestrator
- Security Services Exchange
- Security Cloud Control
Components Used
- Secure Firewall - 7.2
- Firepower Management Center (FMC) - 7.2
- Security Services exchange (SSX)
- Cisco XDR
- Smart License Portal
- Cisco Defense Orchestrator
- Security Cloud Control
The information in this document was created from the devices in a specific lab environment. All of the devices used in this document started with a cleared (default) configuration. If your network is live, ensure that you understand the potential impact of any command.
Configure
Licensing
These Licensing steps are described for Secure Firewall versions 7.2.x and bellow, if your Secure Firewall is on a higer version you can go to Link your accounts to SSX and register the devices section.
Virtual Account Roles:
Only the Virtual Account Admin or the Smart Account Admin has the privilege to link the smart account with the SSX account.
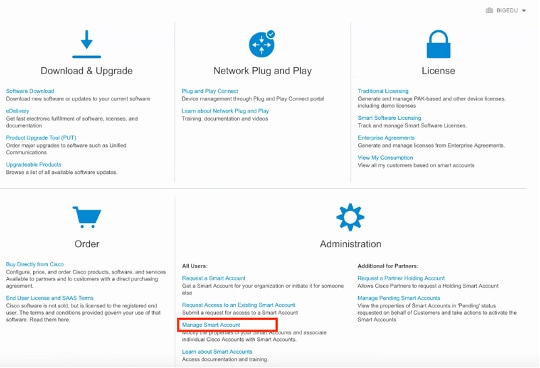
Step 1. In order to validate the smart account role, navigate to software.cisco.com and under the Administration Menu, select Manage Smart Account.
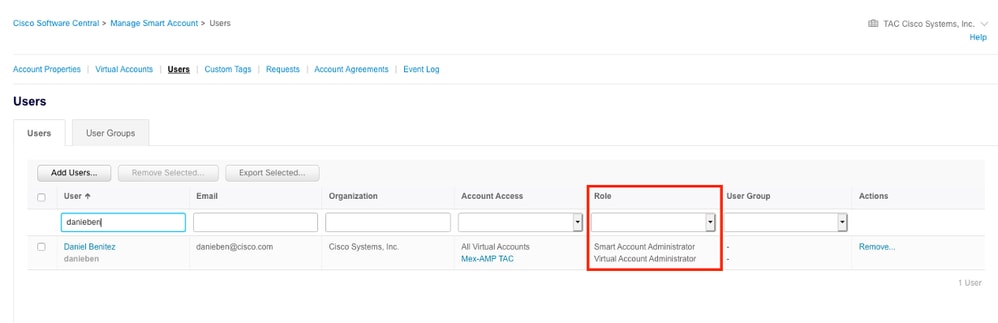
Step 2. In order to validate the user role, navigate to Users, and validate that under Roles the accounts are set to have Virtual Account Administrator, as shown in the image.
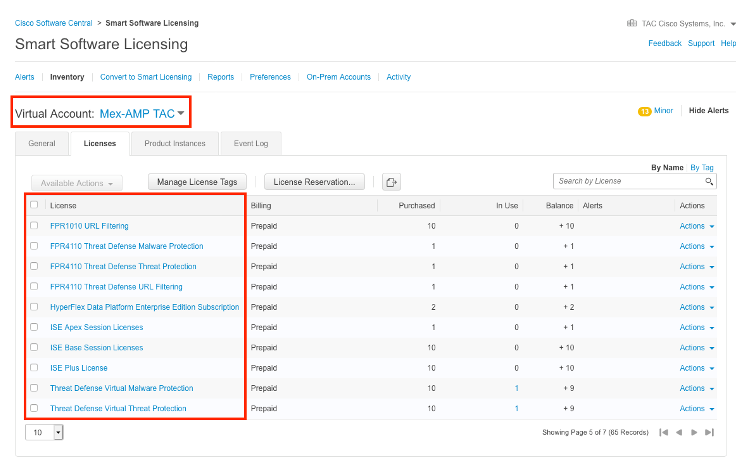
Step 3. Ensure the Virtual Account that is selected to link on SSX contains the license for the security devices if an account that does not contain the security license is linked on SSX, the security devices and the event does not appear on the SSX portal.
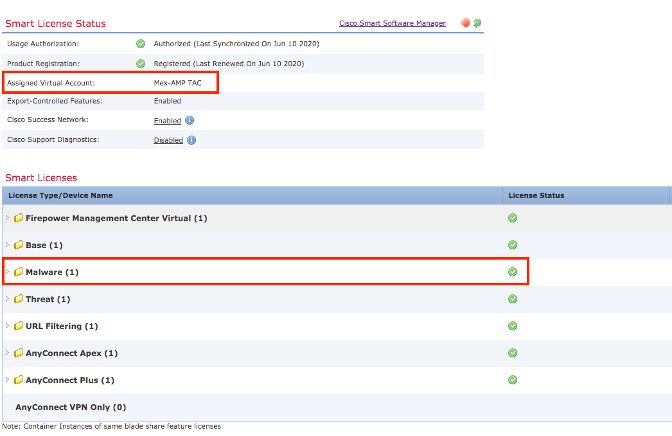
Step 4. In order to validate that the FMC was registered to the correct Virtual Account, Navigate to System > Licenses > Smart License:
Link your accounts to SSX and register the devices.
Step 1. When you logon to your SSX account, you have to link your smart account to your SSX account, for that you need to click tools icon and select Link Smart/Virtual Accounts.

Once the account is linked you see the Smart Account with all the Virtual Accounts on it.
Method 1 (Half Integration): Enrich Investigations
Register the devices to SSX
Step 1. Ensure these URLs are allowed on your environment:
US Region
-
api-sse.cisco.com
-
mx*.sse.itd.cisco.com
-
dex.sse.itd.cisco.com
-
eventing-ingest.sse.itd.cisco.com
-
registration.us.sse.itd.cisco.com
-
defenseorchestrator.com
-
edge.us.cdo.cisco.com
EU Region
-
api.eu.sse.itd.cisco.com
-
mx*.eu.sse.itd.cisco.com
-
dex.eu.sse.itd.cisco.com
-
eventing-ingest.eu.sse.itd.cisco.com
-
registration.eu.sse.itd.cisco.com
-
defenseorchestrator.eu
-
edge.eu.cdo.cisco.com
APJC Region
- api.apj.sse.itd.cisco.com
- mx*.apj.sse.itd.cisco.com
- dex.apj.sse.itd.cisco.com
- eventing-ingest.apj.sse.itd.cisco.com
- registration.apj.sse.itd.cisco.com
- apj.cdo.cisco.com
- edge.apj.cdo.cisco.com
Australia region:
-
api.aus.sse.itd.cisco.com
-
mx*.aus.sse.itd.cisco.com
-
dex.au.sse.itd.cisco.com
-
eventing-ingest.aus.sse.itd.cisco.com
-
registration.au.sse.itd.cisco.com
-
aus.cdo.cisco.com
India region:
-
api.in.sse.itd.cisco.com
-
mx*.in.sse.itd.cisco.com
-
dex.in.sse.itd.cisco.com
-
eventing-ingest.in.sse.itd.cisco.com
-
registration.in.sse.itd.cisco.com
-
in.cdo.cisco.com
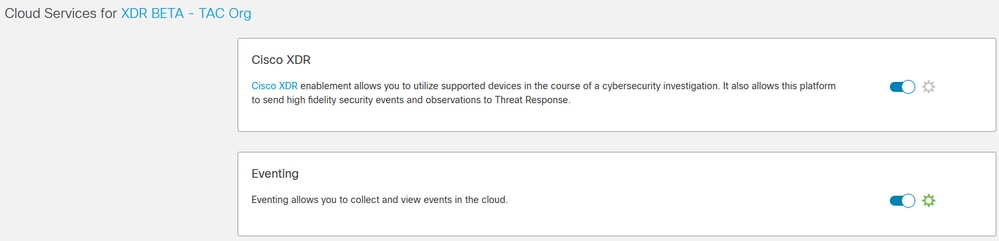
Step 2. Log in to the SSX portal with this URL https://admin.sse.itd.cisco.com, navigate to Cloud Services, and enable both options Cisco Cisco XDR and Eventing, as shown in the image.
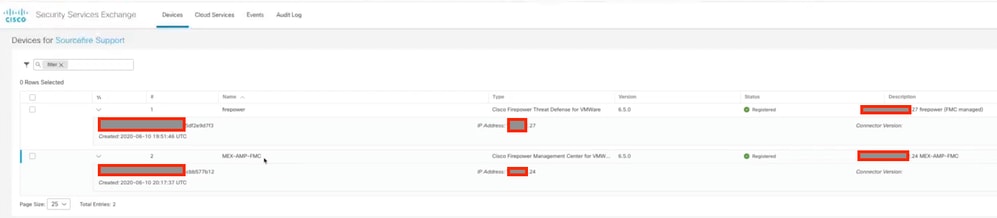
Step 3. You can validate that now you can see the devices enrolled on SSX:
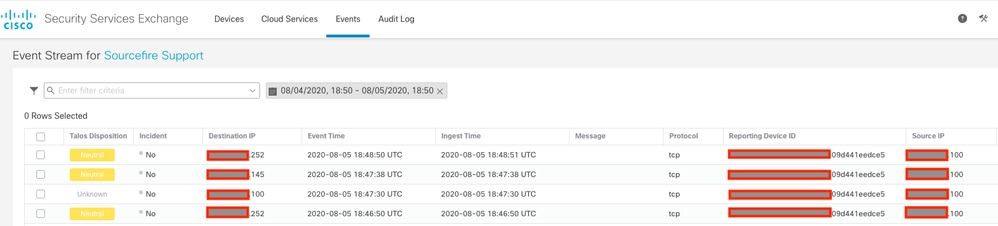
The Events are sent by the Secure Firewall devices, navigate to the Events on the SSX portal to verify the events sent by the devices to SSX, as shown in the image.
Register the devices to Security Cloud Control (SCC/CDO)
Step 1. Ensure the these URLS are allowed on your environment
US Region:
-
defenseorchestrator.com
- edge.us.cdo.cisco.com
EU Region
-
defenseorchestrator.eu
- edge.eu.cdo.cisco.com
APJC Region
-
apjc.cdo.cisco.com
- edge.apjc.cdo.cisco.com
Australia region:
-
aus.cdo.cisco.com
India region:
-
in.cdo.cisco.com
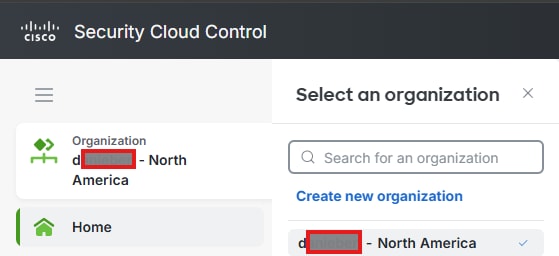
Step 2. Navigate to Security Cloud Control (link can vary depending on your Region) this directs you to select your Security Cloud Control Organization.
Step 3. Once you have selected the appropriate org, navigate to Products > Firewall, verify if your device is already there, if not, you can Onboard it to Security Cloud Control (Cisco Defense Orchestrator), for this, under Overall Inventory, click VIew all Devices.
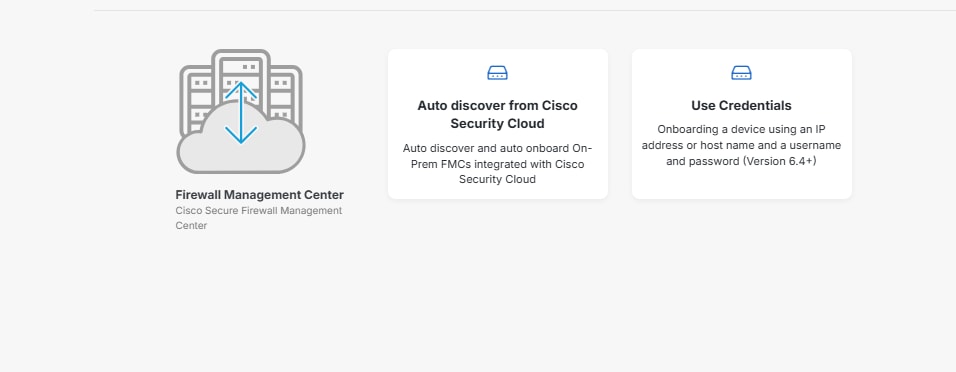
Step 4. Navigate to Administration > Firewall Management Center, a list of your FMCs integrated into SCC is presented, if you do not see your Firewall Management Center, click on the plus icon.
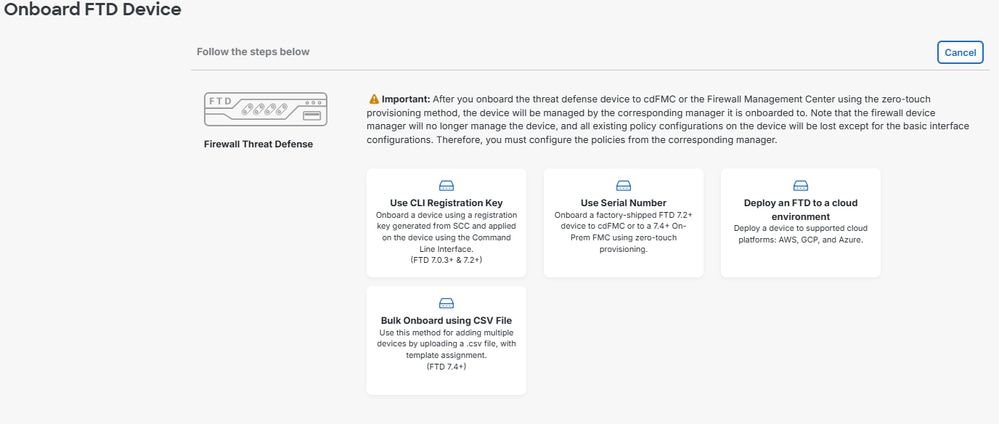
Step 4.1. Normally, Secure Firewalls are automatically onboarded, if not, select the device you want to onboard (FTD) and your preferred onboarding method.
Step 4.2. Under the Security Devices section click the plus icon, select Onboard Secure Firewall Device and your preferred

Step 5. Once you have onboarded your devices in Security Cloud Control, you can able to visualize it in the inventory.
Step 6. Make sure your CDO Organization is linked to your SSX Organization, for this, navigate to Security Services Exchange, click the Tools Menu Icon, click Link CDO Account.

Integrate Secure Firewall
From 7.2.x to 7.4.x with Cisco XDR
Step 1. In your Secure Firewall Management Center, navigate to Integration > SecureX

Step 2. Choose the right region, and click Enable SecureX.

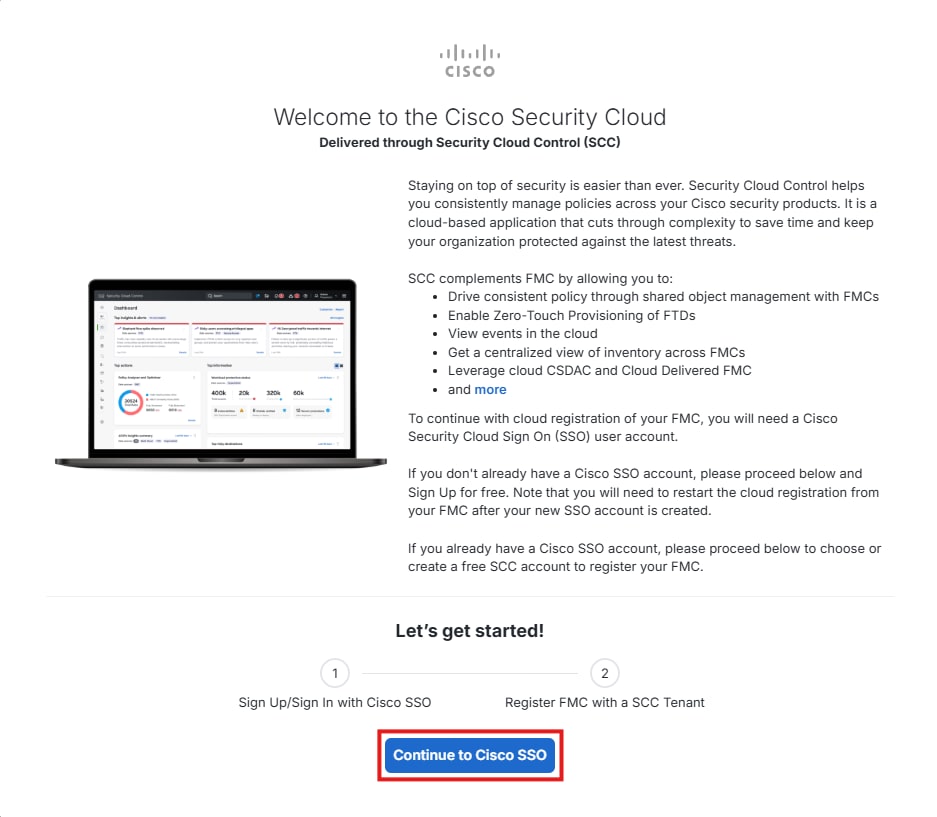
Step 3. After you click Enable SecureX, it redirects you to Cisco Defense Orchestrator Authentication Page (which leverages Security Cloud Sign On), click Continue to Cisco SSO.
Note:
From 7.6.x and later with Cisco XDR
Step 1. In your Secure Firewall Management Center, navigate to Integration > Cisco Seucurity Cloud
Step 2. Choose the right region, and click Enable Cisco Security Cloud.
Step 3. After you click Enable Cisco Security Cloud, it redirects you to Cisco Defense Orchestrator Authentication Page (which leverages Security Cloud Sign On), click Continue to Cisco SSO.
Step 4. You can either select a preexisting Security Cloud Control Tenant or create a new one.
Step 5. Select the appropriate Tenant and ensure that the code you are receiving in this page matches the code you are receiving in FMC, if they match, click Authorize FMC.


Step 6. Input your Security Cloud Sign On credentials and authorize the integration, once completed, a confirmation that FMC was authorized to register with Cisco Security Cloud is presented.

Step 7. After the authorization is completed, you can naviagte back to your FMC, and select which events you want to Send to the Cloud and once you finish this, click Save.
Step 8. You can select to Enable SecureX Orchestration (XDR Automate)

Step 9. Navigate to XDR > Administration > On Premises Appliance and search for your appliances, they must be automatically registered.
Step 10. Navigate to XDR > Administration > Integrations and enable the Secure Firewall Integration.

Step 10.1. Assign a name to your Integration, click +Add.

This integration allows you to enrich Investigations within XDR
Method 2 (Full Integration): Enrich Incidentes in XDR
Note: In order to ensure seamless integration between Secure Firewall, XDR, Cisco Defense Orchestrator (CDO), Security Services Exchange (SSX), and Security Analytics and Logging (SAL), manual mapping is required. This process involves contacting Cisco TAC to perform the necessary configurations and mappings.
Step 1. Your CDO account must have a Security Analytics and Logging license to forward events to Cisco XDR.
Step 2. Please use the steps previously described to register your appliances in SSX and Security Cloud Control.
Step 3. Once you have finished, please reach out to TAC with these details and request to link Security Cloud Control/SAL to XDR Analytics.
- CDO Tenant ID
- CDO Name
- XDR Org ID
- SSX Tenant ID
- SSX Name
- SCA Org ID
Step 4. Make sure your CDO account is linked to XDR Analytics Portal.
Before you link your CDO portal to XDR Analytics, it looks like this:

After the link is completed, you can see the option to navigate to your XDR Analytics Portal.

Step 5. Once your XDR Analytics account is linked to your Security Cloud Control Portal (CDO), you need to make sure your XDR Analytics is Integrated with XDR, for this, in XDR Analytics, navigate to Settings > Integrations > XDR, look for XDR Integration and make sure there is a green check and that the Integration module points to your correct XDR Org.

Verify
Validate that the Secure Firewalls generate events (malware or intrusion), for intrusion events navigate to Analysis >Files >Malware Events, for intrusion events navigate to Analysis > Intrusion > Events.
Validate the events are registered on the SSX portal as mentioned on the Register the devices to SSX section step 4.
Validate that information is displayed on the Cisco XDR dashboard or check the API logs so you can see the reason for a possible API failure.
Validate that all tenants are correctly linked together, if you have issues, open a TAC Case and provide these details:
- CDO Tenant ID
- CDO Name
- XDR Org ID
- SSX Tenant ID
- SSX Name
- SCA Org ID
Troubleshoot
Detect Connectivity Problems
You can detect generic connectivity problems from the action_queue.log file. In cases of failure you can see such logs present in the file:
ActionQueueScrape.pl[19094]: [SF::SSE::Enrollment] canConnect: System (/usr/bin/curl -s --connect-timeout 10 -m 20 -L --max-redirs 5 --max-filesize 104857600 --capath /ngfw/etc/sf/keys/fireamp/thawte_roots -f https://api.eu.sse.itd.cisco.com/providers/sse/api/v1/regions) Failed, curl returned 28 at /ngfw/usr/local/sf/lib/perl/5.10.1/SF/System.pmline 10477.
In this case exit code 28 means operation timed out and we must check connectivity to the Internet. You must also see exit code 6 which means problems with DNS resolution
Connectivity Problems due to DNS Resolution
Step 1. Check that the connectivity works properly.
root@ftd01:~# curl -v -k https://api-sse.cisco.com
* Rebuilt URL to: https://api-sse.cisco.com/
* getaddrinfo(3) failed for api-sse.cisco.com:443
* Couldn't resolve host 'api-sse.cisco.com'
* Closing connection 0
curl: (6) Couldn't resolve host 'api-sse.cisco.com'
This output shows that the device is unable to resolve the URL https://api-sse.cisco.com, in this case, we need to validate that the proper DNS server is configured, it can be validated with a nslookup from the expert CLI:
root@ftd01:~# nslookup api-sse.cisco.com
;; connection timed out; no servers could be reached
This output shows that the DNS configured is not reached, in order to confirm the DNS settings, use the show network command:
> show network
===============[ System Information ]===============
Hostname                  : ftd01
DNS Servers               : x.x.x.10
Management port           : 8305
IPv4 Default route
Gateway                   : x.x.x.1

======================[ eth0 ]======================
State                     : Enabled
Link                      : Up
Channels                  : Management & Events
Mode                      : Non-Autonegotiation
MDI/MDIX                  : Auto/MDIX
MTU                       : 1500
MAC Address               : x:x:x:x:9D:A5
----------------------[ IPv4 ]----------------------
Configuration             : Manual
Address                   : x.x.x.27
Netmask                   : 255.255.255.0
Broadcast                 : x.x.x.255
----------------------[ IPv6 ]----------------------
Configuration             : Disabled

===============[ Proxy Information ]================
State                     : Disabled
Authentication            : Disabled
In this example the wrong DNS server was used, you can change the DNS settings with this command:
> configure network dns x.x.x.11
After this connectivity can be tested again and this time, the connection is successful.
root@ftd01:~# curl -v -k https://api-sse.cisco.com
* Rebuilt URL to: https://api-sse.cisco.com/
* Trying x.x.x.66...
* Connected to api-sse.cisco.com (x.x.x.66) port 443 (#0)
* ALPN, offering http/1.1
* Cipher selection: ALL:!EXPORT:!EXPORT40:!EXPORT56:!aNULL:!LOW:!RC4:@STRENGTH
* successfully set certificate verify locations:
* CAfile: none
CApath: /etc/ssl/certs
* TLSv1.2 (OUT), TLS header, Certificate Status (22):
* TLSv1.2 (OUT), TLS handshake, Client hello (1):
* TLSv1.2 (IN), TLS handshake, Server hello (2):
* TLSv1.2 (IN), TLS handshake, Certificate (11):
* TLSv1.2 (IN), TLS handshake, Server key exchange (12):
* TLSv1.2 (IN), TLS handshake, Request CERT (13):
* TLSv1.2 (IN), TLS handshake, Server finished (14):
* TLSv1.2 (OUT), TLS handshake, Certificate (11):
* TLSv1.2 (OUT), TLS handshake, Client key exchange (16):
* TLSv1.2 (OUT), TLS change cipher, Client hello (1):
* TLSv1.2 (OUT), TLS handshake, Finished (20):
* TLSv1.2 (IN), TLS change cipher, Client hello (1):
* TLSv1.2 (IN), TLS handshake, Finished (20):
* SSL connection using TLSv1.2 / ECDHE-RSA-AES128-GCM-SHA256
* ALPN, server accepted to use http/1.1
* Server certificate:
* subject: C=US; ST=California; L=San Jose; O=Cisco Systems, Inc.; CN=api -sse.cisco.com
* start date: 2019-12-03 20:57:56 GMT
* expire date: 2021-12-03 21:07:00 GMT
* issuer: C=US; O=HydrantID (Avalanche Cloud Corporation); CN=HydrantID S SL ICA G2
* SSL certificate verify result: self signed certificate in certificate c hain (19), continuing anyway.
> GET / HTTP/1.1
> Host: api-sse.cisco.com
> User-Agent: curl/7.44.0
> Accept: */*
>
< HTTP/1.1 403 Forbidden
< Date: Wed, 08 Apr 2020 01:27:55 GMT
< Content-Type: text/plain; charset=utf-8
< Content-Length: 9
< Connection: keep-alive
< Keep-Alive: timeout=5
< ETag: "5e17b3f8-9"
< Cache-Control: no-store
< Pragma: no-cache
< Content-Security-Policy: default-src 'self'
< X-Content-Type-Options: nosniff
< X-XSS-Protection: 1; mode=block
< Strict-Transport-Security: max-age=31536000; includeSubdomains;
Registration issues to SSX Portal
Both FMC and Secure Firewall need a connection to the SSX URLs on their management interface, to test the connection, enter these commands on the Firepower CLI with root access:
curl -v https://api-sse.cisco.com/providers/sse/services/registration/api/v2/clients --cacert /ngfw/etc/ssl/connectorCA.pem
curl -v https://est.sco.cisco.com --cacert /ngfw/etc/ssl/connectorCA.pem

curl -v https://eventing-ingest.sse.itd.cisco.com --cacert /ngfw/etc/ssl/connectorCA.pem
curl -v https://mx01.sse.itd.cisco.com --cacert /ngfw/etc/ssl/connectorCA.pem
The certificate check can be bypassed with this command:
root@ftd01:~# curl -v -k https://api-sse.cisco.com
* Rebuilt URL to: https://api-sse.cisco.com/
* Trying x.x.x.66...
* Connected to api-sse.cisco.com (x.x.x.66) port 443 (#0)
* ALPN, offering http/1.1
* Cipher selection: ALL:!EXPORT:!EXPORT40:!EXPORT56:!aNULL:!LOW:!RC4:@STRENGTH
* successfully set certificate verify locations:
* CAfile: none
CApath: /etc/ssl/certs
* TLSv1.2 (OUT), TLS header, Certificate Status (22):
* TLSv1.2 (OUT), TLS handshake, Client hello (1):
* TLSv1.2 (IN), TLS handshake, Server hello (2):
* TLSv1.2 (IN), TLS handshake, Certificate (11):
* TLSv1.2 (IN), TLS handshake, Server key exchange (12):
* TLSv1.2 (IN), TLS handshake, Request CERT (13):
* TLSv1.2 (IN), TLS handshake, Server finished (14):
* TLSv1.2 (OUT), TLS handshake, Certificate (11):
* TLSv1.2 (OUT), TLS handshake, Client key exchange (16):
* TLSv1.2 (OUT), TLS change cipher, Client hello (1):
* TLSv1.2 (OUT), TLS handshake, Finished (20):
* TLSv1.2 (IN), TLS change cipher, Client hello (1):
* TLSv1.2 (IN), TLS handshake, Finished (20):
* SSL connection using TLSv1.2 / ECDHE-RSA-AES128-GCM-SHA256
* ALPN, server accepted to use http/1.1
* Server certificate:
* subject: C=US; ST=California; L=San Jose; O=Cisco Systems, Inc.; CN=api -sse.cisco.com
* start date: 2019-12-03 20:57:56 GMT
* expire date: 2021-12-03 21:07:00 GMT
* issuer: C=US; O=HydrantID (Avalanche Cloud Corporation); CN=HydrantID S SL ICA G2
* SSL certificate verify result: self signed certificate in certificate c hain (19), continuing anyway.
> GET / HTTP/1.1
> Host: api-sse.cisco.com
> User-Agent: curl/7.44.0
> Accept: */*
>
< HTTP/1.1 403 Forbidden
< Date: Wed, 08 Apr 2020 01:27:55 GMT
< Content-Type: text/plain; charset=utf-8
< Content-Length: 9
< Connection: keep-alive
< Keep-Alive: timeout=5
< ETag: "5e17b3f8-9"
< Cache-Control: no-store
< Pragma: no-cache
< Content-Security-Policy: default-src 'self'
< X-Content-Type-Options: nosniff
< X-XSS-Protection: 1; mode=block
< Strict-Transport-Security: max-age=31536000; includeSubdomains;
Note: You get the 403 Forbidden message as the parameters sent form the test is not what SSX expects but this proves enough to validate connectivity.
Verify SSEConnector state
You can verify the connector properties as shown.
# more /ngfw/etc/sf/connector.properties
registration_interval=180
connector_port=8989
connector_fqdn=api-sse.cisco.com
In order to check the connectivity between the SSConnector and the EventHandler you can use this command, this is an example of a bad connection:
root@firepower:/etc/sf# netstat -anlp | grep EventHandler_SSEConnector.sock
unix 2 [ ACC ] STREAM LISTENING 3022791165 11204/EventHandler /ngfw/var/sf/run/EventHandler_SSEConnector.sock
In the example of an established connection you can see that the stream status is connected:
root@firepower:/etc/sf# netstat -anlp | grep EventHandler_SSEConnector.sock
unix 2 [ ACC ] STREAM LISTENING 382276 7741/EventHandler /ngfw/var/sf/run/EventHandler_SSEConnector.sock
unix 3 [ ] STREAM CONNECTED 378537 7741/EventHandler /ngfw/var/sf/run/EventHandler_SSEConnector.soc
Verify data sent to the SSX portal and CTR
In order to send events from the Secure Firewall device to SSX a TCP connection needs to be established with https://eventing-ingest.sse.itd.cisco.com This is an example of a connection not established between the SSX portal and the Secure Firewall:
root@firepower:/ngfw/var/log/connector# lsof -i | grep conn
connector 60815 www 10u IPv4 3022789647 0t0 TCP localhost:8989 (LISTEN)
connector 60815 www 12u IPv4 110237499 0t0 TCP firepower.cisco.com:53426->ec2-100-25-93-234.compute-1.amazonaws.com:https (SYN_SENT)
In the connector.log logs:
time="2020-04-13T14:34:02.88472046-05:00" level=error msg="[firepower.cisco.com][events.go:90 events:connectWebSocket] dial tcp x.x.x.246:443: getsockopt: connection timed out"
time="2020-04-13T14:38:18.244707779-05:00" level=error msg="[firepower.cisco.com][events.go:90 events:connectWebSocket] dial tcp x.x.x.234:443: getsockopt: connection timed out"
time="2020-04-13T14:42:42.564695622-05:00" level=error msg="[firepower.cisco.com][events.go:90 events:connectWebSocket] dial tcp x.x.x.246:443: getsockopt: connection timed out"
time="2020-04-13T14:47:48.484762429-05:00" level=error msg="[firepower.cisco.com][events.go:90 events:connectWebSocket] dial tcp x.x.x.234:443: getsockopt: connection timed out"
time="2020-04-13T14:52:38.404700083-05:00" level=error msg="[firepower.cisco.com][events.go:90 events:connectWebSocket] dial tcp x.x.x.234:443: getsockopt: connection timed out"
Note: Noticed that the IP addresses displayed x.x.x.246 and 1x.x.x.246 belong to https://eventing-ingest.sse.itd.cisco.com must change, this is why the recommendation is to allow the traffic to SSX Portal based on URL instead of IP addresses.
If this connection is not established, the events are not sent to the SSX portal. This is an example of an established connection between the Secure Firewall and the SSX portal:
root@firepower:# lsof -i | grep conn
connector 13277   www   10u  IPv4 26077573      0t0  TCP localhost:8989 (LISTEN)
connector 13277   www   19u  IPv4 26077679      0t0  TCP x.x.x.200:56495->ec2-35-172-147-246.compute-1.amazonaws.com:https (ESTABLISHED)
Device (FTD) cannot be enrolled to Security Cloud Control
If your device cannot be enrolled into Security Cloud Control, make sure it has connectivity to the appropriate CDO tenant.
To verify the correct URL, navigate to Administration > Firewall Management Center, select Cloud Delivered FMC, at the top right hand side of your screen you can see the hostname.
admin@MexAmpFTD:~$ nc -vz xxxxxxxx.app.us.cdo.cisco.com 443
Connection to xxxxxxxx.app.us.cdo.cisco.com 443 port [tcp/https] succeeded!
If you are still facing issues to connect to CDO, ensure Port 8305 is opened, this is an example of a connection issue.
admin@AMP-DMZ-FPR:~$ sudo tail /ngfw/var/log/messages
Jan 25 18:48:56 AMP-DMZ-FPR SF-IMS[20448]: [1465] sftunneld:sf_peers [INFO] Peer xxxxxxxx.app.us.cdo.cisco.com needs a single connection
Jan 25 18:48:56 AMP-DMZ-FPR SF-IMS[20448]: [1465] sftunneld:sf_ssl [INFO] Connect to xxxxxxxx.app.us.cdo.cisco.com on port 8305 - management0
Jan 25 18:48:56 AMP-DMZ-FPR SF-IMS[20448]: [1465] sftunneld:sf_ssl [INFO] Initiate connection using resolved_ip_list having [2] entries on list [1] (via management0)
Jan 25 18:48:56 AMP-DMZ-FPR SF-IMS[20448]: [1465] sftunneld:sf_ssl [INFO] Initiate IPv6 type connection
Jan 25 18:48:56 AMP-DMZ-FPR SF-IMS[20448]: [1465] sftunneld:sf_ssl [INFO] Initiate IPv4 type connection
Jan 25 18:48:56 AMP-DMZ-FPR SF-IMS[20448]: [1465] sftunneld:sf_ssl [INFO] Initiate IPv4 connection from resolved_ip_list to x.x.x.51 (via management0)
Jan 25 18:48:56 AMP-DMZ-FPR SF-IMS[20448]: [1465] sftunneld:sf_ssl [INFO] Initiating IPv4 connection to x.x.x.51:8305/tcp
Jan 25 18:48:56 AMP-DMZ-FPR SF-IMS[20448]: [1465] sftunneld:sf_ssl [INFO] Wait to connect to 8305 (IPv4): x.x.x.51
Jan 25 18:48:56 AMP-DMZ-FPR SF-IMS[20448]: [1465] sftunneld:sf_ssl [INFO] Connect to x.x.x.51 failed on port 8305 socket 8 (Connection refused)
Device Enrolled to wrong SSX tenant
You can verify to which SSX tenant your FMC is enrolled.
admin@fmc01:~$ curl localhost:8989/v1/contexts/default/tenant

{"registeredTenantInfo":{"companyId":"689xxxxx-eaxx-5bxx-b1xx-a7662axxxxx","companyName":"XDR BETA - TAC Org","id":"7487917c-2ead-471b-b521-caxxxxxxxxxa","spId":"SXSO"},"tenantInfo":[{"companyId":"689xxxxx-eaxx-5bxx-b1xx-a7662axxxxx","companyName":"XDR BETA - TAC Org","id":"7487917c-2ead-471b-b521-caxxxxxxxxxa","spId":"SXSO"}]}admin@fmc01:~$
If the SSX tenant is incorrect, you need to re-do the steps to enroll your appliances in SSX
If the SSX tenant is correct, but the CDO tenant is not linked to the appropriate SSX Organization, please reach out to TAC with these details:
- SSX Tenant ID
- CDO Tenant ID
Related Information
Revision History
| Revision | Publish Date | Comments |
|---|---|---|
2.0 |
06-May-2025
|
Update with both methods available for the XDR - Secure Firewall integration. |
1.0 |
30-Jul-2023
|
Initial Release |
Contributed by Cisco Engineers
- Daniel BenitezTAC Technical Leader
- Nik KaleTAC Principal Engineer
- Uriel MonteroTAC Engineer
 Feedback
Contact Cisco
- Open a Support Case

- (Requires a Cisco Service Contract)