Send Events to the Cloud Directly

About Direct Integration

Starting from threat defense release 6.4, you can configure your threat defense devices to send supported firewall events directly to the Cisco Security Cloud. The devices send events to the Security Services Exchange, from where the events can be promoted to various cloud services, including Cisco XDR, to improve your event analysis and investigations.

Requirements for Direct Integration

Requirement Type

Requirement

Secure Firewall Version

  • Threat Defense version 6.4 or later for US cloud.

  • Threat Defense version 6.5 or later for Europe, APJC, India, and Australia clouds.

  • Management Center version from 7.0.2 to 7.0.x, or version 7.2.0 and later.

Licensing

  • Your firewall deployment must be licensed to generate the events that you want to send to Cisco Security Cloud

    For details, see Cisco Secure Firewall Licensing Information.

  • Your environment cannot be using a Cisco Smart Software Manager On-Prem server (formerly known as Smart Software Satellite Server) or be deployed in an air-gapped environment.

  • Cisco XDR is a separately licensed product. It requires an additional subscription beyond the licenses for Cisco Secure Firewall products. For more information, see Cisco XDR Licenses.

  • If you were already sending events to the Cisco Security Cloud using a SecureX subscription, you can continue to send events to Cisco XDR. However, if you now register your management center to the cloud tenancy using your Security Cloud Control account, your Security Cloud Control account must have a Security Analytics and Logging license to send events to Cisco XDR.

Connectivity

The management center and the managed devices must be able to connect outbound on port 443 to the Cisco Security Cloud at the following addresses:

  • US region:

    • api-sse.cisco.com

    • mx*.sse.itd.cisco.com

    • dex.sse.itd.cisco.com

    • eventing-ingest.sse.itd.cisco.com

    • registration.us.sse.itd.cisco.com

    • us.manage.security.cisco.com

  • EU region:

    • api.eu.sse.itd.cisco.com

    • mx*.eu.sse.itd.cisco.com

    • dex.eu.sse.itd.cisco.com

    • eventing-ingest.eu.sse.itd.cisco.com

    • registration.eu.sse.itd.cisco.com

    • eu.manage.security.cisco.com

  • Asia (APJC) region:

    • api.apj.sse.itd.cisco.com

    • mx*.apj.sse.itd.cisco.com

    • dex.apj.sse.itd.cisco.com

    • eventing-ingest.apj.sse.itd.cisco.com

    • registration.apj.sse.itd.cisco.com

    • apj.manage.security.cisco.com

  • Australia region:

    • api.aus.sse.itd.cisco.com

    • mx*.aus.sse.itd.cisco.com

    • dex.au.sse.itd.cisco.com

    • eventing-ingest.aus.sse.itd.cisco.com

    • registration.au.sse.itd.cisco.com

    • aus.manage.security.cisco.com

  • India region:

    • api.in.sse.itd.cisco.com

    • mx*.in.sse.itd.cisco.com

    • dex.in.sse.itd.cisco.com

    • eventing-ingest.in.sse.itd.cisco.com

    • registration.in.sse.itd.cisco.com

    • in.manage.security.cisco.com

General

Your firewall deployment is generating events as expected.

High Availability Deployment and Cisco Security Cloud Integration

The following describes the guidelines for integrating firewall high availability deployment with Cisco Security Cloud.

  • To integrate threat defense high availability or cluster deployment with Cisco Security Cloud, you must integrate all peers with Security Services Exchange.

  • Security Services Exchange integration requires all threat defense devices in the high availability deployment to have connectivity to the internet.

  • When integrating a management center high availability deployment with Cisco Security Cloud, you must enable Cisco Security Cloud integration in the active peer.

  • If you promote the standby management center peer to the active role, the Cisco Security Cloud integration gets transferred between the active and standby peers.

  • If you break management center high availability deployment, both the peers remain integrated with Cisco Security Cloud.

For more information about configuring and managing a high availability deployment, see the High Availability section in Cisco Secure Firewall Management Center Administration Guide.

How to Send Events Directly to the Cisco Security Cloud and Integrate with Cisco XDR

Do This

More Information

Step 1

Decide the following:

  • Types of events you want to send to the cloud.

  • The method of sending events.

  • The regional cloud to use for sending the events.

See About Secure Firewall Threat Defense and Cisco XDR Integration.

Step 2

Meet the requirements for direct integration.

See Requirements for Direct Integration.

Step 3

Access Security Services Exchange, the cloud portal that you will use for managing devices and filtering events for the Cisco XDR integration.

See Access Security Services Exchange.

Step 4

In Security Services Exchange, enable the eventing service.

Click Cloud Services and enable the following options:

  • Cisco SecureX threat response or Cisco XDR

  • Eventing

Step 5

If you are using Security Cloud Control to manage configurations on your threat defense device or to register your devices with Cisco Security Cloud, merge your Security Cloud Control account with the Security Services Exchange account you use for this integration.

See Link Your Security Cloud Control and Security Services Exchange Accounts.

Step 6

If you are using Smart Licensing account to register your devices with Cisco Security Cloud, link your Smart Licensing account with the Security Services Exchange account you use for this integration.

See Link Smart Licensing Accounts with Security Services Exchange.

Step 7

In your firewall manager, enable integration with the Cisco Security Cloud.

Step 8

In Security Services Exchange, configure the system to automatically promote significant events.

Important


If you do not automate event promotion, you may need to manually review and promote events in order to view them in Security Services Exchange.

For more information, see About Promoting Events to Incidents in the Security Services Exchange Online Help

Step 9

(Optional) In Security Services Exchange, configure automatic deletion of certain non-significant events.

For more information, see Events in the Security Services Exchange Online Help

Step 10

Verify that your integration is set up correctly. If necessary, troubleshoot issues.

See:

Step 11

In Cisco XDR, verify that promoted events appear as expected in the Incident Manager.

For instructions, see Cisco XDR Help Center.

Link Your Security Cloud Control and Security Services Exchange Accounts

If your register your threat defense device with Cisco Security Cloud using Security Cloud Control account and you want to send events to Security Services Exchange, you must link your Security Cloud Control account with the Security Services Exchange account.

Note that only one Security Cloud Control account can be linked with one Security Services Exchange account. If you have tenant accounts on more than one regional cloud, you must link tenant accounts separately for each regional cloud.


Note


This operation is not reversible.


Before you begin

  • You must be able to sign in to Security Cloud Control and to the applicable regional cloud with your Security Cloud Sign On account.

  • Your Security Cloud Control account must have Admin or Super Admin privileges.

  • Your Security Services Exchange account must have Admin privileges.

Procedure


Step 1

Sign in to the Security Cloud Control account that contains the tenant you wish to link with Security Services Exchange.

Step 2

Choose the tenant to link with Security Services Exchange.

Step 3

Generate a new API token for your account:

  1. From the user menu on the top-right corner of the window, select Settings.

  2. In the My Tokens section, click Generate API Token or Refresh.

  3. Copy the token.

For more information about API tokens, see API Tokens.

Step 4

In Security Services Exchange, click the Tools () icon on the top-right and click Link CDO Account.

Step 5

Paste the token that you copied from Security Cloud Control.

Step 6

Verify that you are linking the tenant that you intended to link.

Step 7

Click Link CDO Account.

Step 8

Sign out of your Security Cloud Control account, and then sign back in.


What to do next

  • Events generated by devices before linking tenants will have a different device ID than events generated by the same device after linking tenants.

  • If you do not need to map events to the devices that generated them, you can delete the "Unregistered" device entries for devices that are now associated with the linked tenant.

Link Smart Licensing Accounts with Security Services Exchange

To integrate products registered under different Smart Licensing accounts into a single view in the cloud, you must link those Smart Licensing accounts to the Security Services Exchange tenant.

Before you begin

To link Smart Licensing accounts, you must have administrator-level privileges for all of the Smart Licensing accounts and the Security Services Exchange tenant that you are using for this integration.

Procedure


Step 1

In the top right corner of any page in Security Services Exchange, click the Tools button (Tools button) and choose Link Smart/Virtual Accounts.

Step 2

Click Link more accounts.

Step 3

Select the accounts to integrate with this cloud account.

Step 4

Click Link Smart/Virtual Accounts.

Step 5

Click OK.


Configure the Device Manager to Send Events Directly


Note


Available options depend on your device manager version. Skip any step that is not applicable to your version. For example, the ability to select region and event types are version-dependent.


Before you begin

  • Register the device with cloud services before you continue with this procedure. For more information, see Configuring Cloud Services section in Cisco Secure Firewall Device Manager Configuration Guide.

  • If you are using Security Cloud Control register your device with cloud services, link your Security Cloud Control account with the Security Services Exchange tenant. For more information, see Link Your Security Cloud Control and Security Services Exchange Accounts.

  • If you are using Smart License to register your device with cloud services, link your Smart Licensing account with the Security Services Exchange tenant. For more information, see Link Smart Licensing Accounts with Security Services Exchange

  • In the device manager:

    • Make sure that your device has a unique name. If not, click Devices > System Settings > Hostname and assign a name.

    • Verify that the threat defense device is successfully generating events.

  • Make sure you have your Cisco Security Cloud Sign On credentials and can sign in to the regional cloud on which your account was created.

Procedure


Step 1

In the device manager: Click Device, then click the System Settings > Cloud Services link.

Step 2

Click Enable for the Send Events to the Cisco Cloud option.

Step 3

Select the types of events to send to the cloud and click OK. Later, you can change the event selection by clicking Edit next to the list of selected events.

If you choose to send connection events, only security-related connection events are used in this integration.

Step 4

Verify that your device has registered successfully in Security Services Exchange:

  1. If you do not already have device manager open in a browser window, see Access Security Services Exchange.

  2. In Security Services Exchange, click Devices.

  3. Verify that your threat defense device appears in the list.

    Note


    The description shown for the threat defense device in the Devices list is the serial number, which matches the serial number shown if you run the show running-config command in the command-line interface of the device.


Configure Management Center to Send Events Directly

Sending firewall events to the cloud allows you to use external tools to investigate the firewall incidents. The devices send firewall events to the Security Services Exchange, from where they can be forwarded to various cloud services to unify visibility and enhance your threat investigations.

To allow your devices to send firewall events to Cisco Security Cloud, you must either register the management center with the smart license (System (system gear icon) > Smart License) or integrate with Cisco Security Cloud. Integrating with Cisco Security Cloud associates the management center with your Security Cloud Control account and brings your secure firewall deployment onboard to the Cisco cloud tenancy, allowing it to connect to Cisco's integrated security cloud services.


Note


Your management center must be between version 7.0.2 and 7.0.x, or version 7.2 and later to integrate management center with Cisco Security Cloud.

For more information about integrating management center with Cisco Security Cloud, see Integrate Management Center With Cisco Security Cloud.


Integrate Management Center With Cisco Security Cloud

This procedure describes how to integrate the management center with Cisco Security Cloud. By enabling Cisco Security Cloud integration, your management center gets registered to the Cisco cloud tenancy. This allows you to send firewall events to the Cisco cloud and use the various cloud services, such as Cisco XDR, to view and analyze the events.

Before you begin
  • Security Cloud Control uses Security Cloud Sign On as its identity provider and Duo for multifactor authentication. Ensure that you have your Security Cloud Sign On credentials and can sign in to the Cisco regional cloud where your account was created. For the regional cloud URLs, refer to Regional Clouds.

  • You need a Security Cloud Control tenant to integrate the management center with Cisco Security Cloud. If you do not already have a Security Cloud Control tenant, request one. For more information, refer to Request a Security Cloud Control Tenant.

  • Link your Security Cloud Control tenant, the one you want to use for onboarding the management center, to your Security Services Exchange account. For more information, refer to Link Your Security Cloud Control and SecureX or Cisco XDR Tenant Accounts.

  • Ensure that you are modifying the configuration from the global domain.

  • Ensure that Cisco SecureX threat response or Cisco XDR and Eventing services are enabled in Security Services Exchange. Verify this setting under Cloud Services.

  • Your management center must be between version 7.0.2 and 7.0.x, or version 7.2 and later to perform this procedure.

Procedure

Step 1

Depending on the version of your management center:

  • Click Integration > SecureX if your management center is between versions 7.0.2 and 7.0.x, or between versions 7.2.0 and 7.4.x.

  • Click Integration > Cisco Security Cloud if your management center version is between 7.6.0 and 7.7.x.

Step 2

(Optional) Choose a Cisco regional cloud from the Current Region drop-down list.

Note

 
  • The regional cloud you choose here is also used for the Cisco Success Network and Cisco Support Diagnostics capabilities. This setting also governs the cloud region for the Secure Network Analytics cloud using Security Analytics and Logging (SaaS).

  • If you have already registered the management center with Smart License, the region selected by default will correspond to your Smart Licensing region. In such scenario, you don't have to change the region.

Step 3

Depending on the version of your management center:

  • Click Enable SecureX for management center versions between 7.0.2 and 7.0.x, or between versions 7.2.0 and 7.4.x.

  • Click Enable Cisco Security Cloud for management center version between 7.6.0 and 7.7.x.

A separate browser tab opens to log you in to your Security Cloud Control account. Make sure this page is not blocked by a pop-up blocker.

Step 4

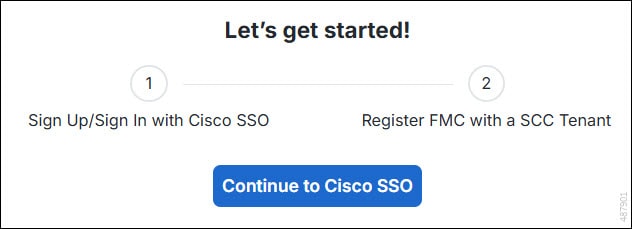
Click Continue to Cisco SSO.

Figure 1. Cisco Security Cloud Welcome Page
A screen capture of Cisco Security Cloud welcome page displaying two steps of the integration workflow.

Step 5

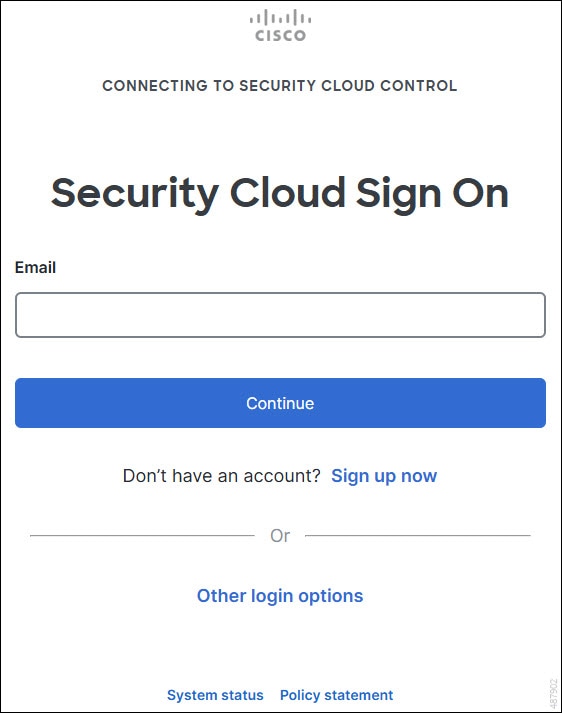
Log in to your Security Cloud Control account.

Figure 2. Cisco Security Cloud Sign On
A screen capture of Security Cloud Control sign on page prompting to enter email address.

If you do not have a Security Cloud Sign On account to log in to Security Cloud Control and you want to create one, click Sign up now in the Security Cloud Sign On page. Refer to Create a New Cisco Security Cloud Sign On Account.

Step 6

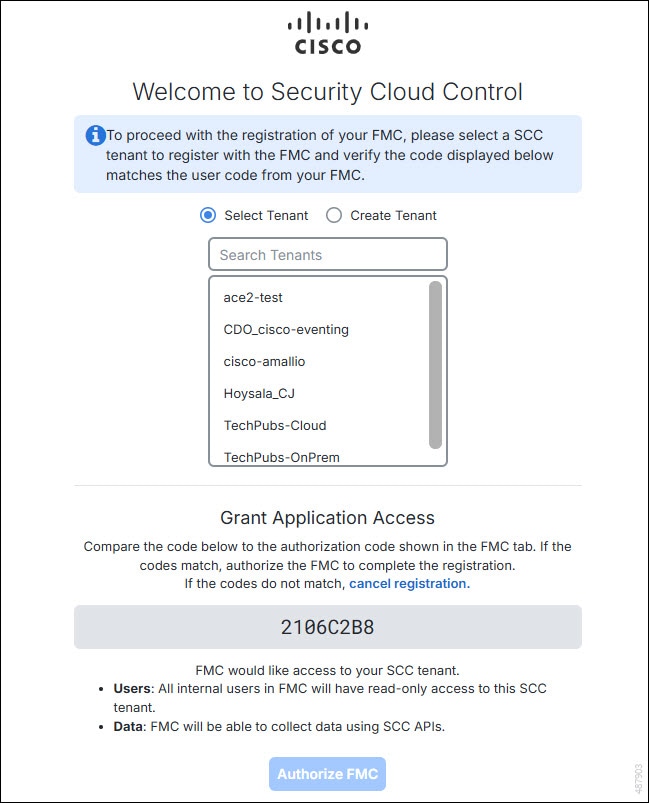
Choose a Security Cloud Control tenant that you want to use for this integration. The management center and the managed devices get onboarded to the Security Cloud Control tenant that you choose here.

Figure 3. Choose the Security Cloud Control Tenant
A screen capture of CDO page for selecting the CDO tenant to which the management center can be associated.

If you do not already have a Security Cloud Control tenant or if you want to use a new tenant for this integration, create a new tenant. See Request a Security Cloud Control Tenant for more information.

Step 7

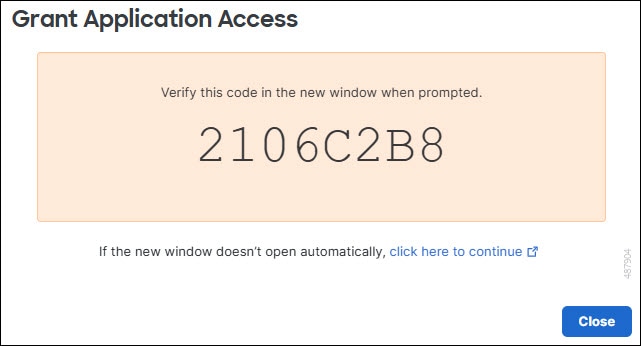
Verify that the code displayed in the Security Cloud Control login page matches the code provided by the management center.

Figure 4. Verification Code in the Management Center
A screen capture of the verification code displayed in the management center.

Step 8

Click Authorize FMC.

Step 9

In the management center UI, click Save to save the configuration.

You can view the task progress under Notifications > Tasks.

The registration task can take up to 90 second to complete. If you must use management center while the registration task is in progress, open the management center in a new window.


Enable Sending Events to the Cloud

Configure your management center to have the managed devices send events directly to Cisco Security Cloud. The cloud region and event types that you configure in this page can be used for multiple integrations when applicable and enabled.

Before you begin
  • In the management center:

    • Go to the System > Configuration page and give your management center a unique name to clearly identify it in the Devices list in the cloud.

    • Add your threat defense devices to the management center, assign licenses to them, and ensure that the system is working correctly. Ensure that you have created necessary policies and the generated events are displayed as expected in the management center UI under the Analysis menu.

    • Register the management center with the Smart License or enable Cisco Security Cloud integration.

  • Determine the Cisco regional cloud you want to use for sending firewall events. For more information, see Guidelines and Limitations for Choosing a Regional Cloud.

  • If you are using Cisco Security Cloud integration to register your devices with cloud services, you must link your Security Cloud Control account with the Security Services Exchange tenant. For more information, see Link Your Security Cloud Control and Security Services Exchange Accounts.


    Important


    If you were already sending events to Cisco Security Cloud using a SecureX subscription, you can continue to send events to Cisco XDR. However, if you now register your management center to the cloud tenancy using your Security Cloud Control account, your Security Cloud Control account must have a Security Analytics and Logging license to forward events to Cisco XDR.


  • If you are using Smart License to register your devices with cloud services, you must link your Smart Licensing account with the Security Services Exchange tenant. For more information, see Link Smart Licensing Accounts with Security Services Exchange.

  • Ensure that you can sign-in to the regional cloud using your Security Cloud Sign On credentials.

  • Link your smart account or the Security Cloud Control tenant to your Security Services Exchange account.

  • Disable sending events to the cloud using syslog to avoid duplication.

Procedure

Step 1

Depending on the version of your management center:

  • Click Integration > SecureX if your management center is between versions 7.0.2 and 7.0.x, or between versions 7.2.0 and 7.4.x.

  • Click Integration > Cisco Security Cloud if your management center version is between 7.6.0 and 7.7.x.

Step 2

(Optional) Choose a regional cloud from the Current Region drop-down list.

Step 3

Check the Send events to the cloud check box.

Step 4

Choose the event types that you want to send to the cloud.

Note

 
Events that you send to the cloud can be used for multiple integrations, as shown in the following table.

Integration

Supported Event Options

Notes

Security Analytics and Logging (SaaS)

All

High priority connection events include:

  • Security-related connection events.

  • Connection events related to file and malware events.

  • Connection events related to intrusion events.

Cisco XDR

Depending on your version:

  • Security-related connection events.

  • Intrusion events.

  • File and malware events.

Even if you send all connection events, Cisco XDR support only security-related connection events.

Note


Cisco XDR is a separately licensed product. It requires an additional subscription beyond the licenses required for Cisco Secure Firewall products. For more information, see Cisco XDR Licenses.

Note

 
  • When you enable Intrusion Events, the management center device sends the event along with the impact flag.

  • If you enable File and Malware Events, in addition to the events sent from the threat defense devices, the management center sends retrospective events.

Step 5

Click Save.


Analyze and Respond to Threats Using Cisco XDR Automation

Enable this setting to allow the automated workflows created by Cisco XDR users to interact with your management center resources.

Cisco XDR automation provides a no-to-low code approach for building automated workflows and they can be set to run in response to different schedules and events. Cisco XDR automation helps you to automate data collection and incident generation. You can rectify threats using automation and guided response recommendations across all relevant control points.

For more information about the Cisco XDR automation capabilities, see the Cisco XDR documentation.

Procedure

Step 1

Click Integration > Cisco Security Cloud.

Step 2

Check the Enable Cisco XDR Automation check box.

Step 3

Choose the management center user role that you want to assign to the Cisco XDR automation workflows.

The Access Admin role is set as the default, allowing access to access control policy and associated functionality in the Policies menu.

Step 4

Click Save.


Access Security Services Exchange

Before you begin

In your browser, disable pop-up blocking.

Procedure


Step 1

In a browser window, go to the Security Services Exchange admin portal using the URL: https://admin.sse.itd.cisco.com.

Step 2

Sign in using the credentials for your Cisco security cloud sign on, Secure Endpoint , Secure Malware Analytics, or Cisco Security account.

Note that your account credentials are specific to the regional cloud.


Verify that Events Reach Security Services Exchange Using Direct Connection

Before you begin

Verify that the events you expect appear in device as expected.

Procedure


Step 1

Login to your Security Services Exchange account. For more information, see Access Security Services Exchange.

Step 2

In Security Services Exchange, click Events.

Step 3

Look for events from your device.

If you do not see expected events, see Troubleshoot a Direct Integration.


Troubleshoot a Direct Integration

Problems accessing the cloud

  • If you activate your cloud account immediately before attempting to configure this integration and you encounter problems implementing this integration, wait for an hour or two and then log in to your cloud account.

  • Make sure you are accessing the correct URL for the regional cloud associated with your account.

Device managed by the Management Center is not listed correctly on the Security Services Exchange Devices page

(Releases earlier than 6.4.0.4) Manually give the device a unique name: Click the Edit icon for each row in the Devices list. Suggestion: Copy the IP address from the Description.

This change is valid only for this Devices list; it does not appear anywhere in your deployment.

(Releases from 6.4.0.4 to 6.6) Device name is sent from the management center to Security Services Exchange only at initial registration to Security Services Exchange and is not updated on Security Services Exchange if the device name changes in the management center.

Expected events are missing from the Events list

  • Make sure you are looking at the correct regional cloud and account.

  • Make sure that your devices can reach the cloud and that you have allowed traffic through your firewall to all required addresses.

  • Click the Refresh button on the Events page to refresh the list and verify that the expected events appear.

  • Check your configurations for automatic deletion (filtering out events) in the Eventing settings on the Cloud Services page in Security Services Exchange.

  • For more troubleshooting tips, see the online help in Security Services Exchange.

Some events are missing

  • If you send all connection events to the cloud, Cisco XDR uses only security connection events.

  • If you are using custom Security Intelligence objects in the management center including global block or allow lists and threat intelligence director, you must configure Security Services Exchange to auto-promote events that are processed using those objects. For more information, see the Security Services Exchange online help.

Failed to save the Cisco Security Cloud configuration

If the management center page fails to save the Cisco Security Cloud configuration,

  • Verify that the management center has connectivity to the cloud.

  • Ensure that you modify Cisco Security Cloud configuration from the global domain.

Cisco Security Cloud integration failed due to timeout

After starting the configuration, management center page waits 15 minutes to receive the authorization before it times out. Ensure that you complete the authorization within 15 minutes. Click EnableCisco Security Cloud to start a new authorization request after a timeout.

Failed to register Firewall devices to Security Services Exchange using the Security Cloud Control Account

When management center fails to register managed devices to Security Services Exchange using the Security Cloud Control account, a message appears under Notification > Tasks. The management center restores the original configuration. When device registration fails, verify the following:

  • Your Security Cloud Control account has administrator privileges.

  • Management Center has connectivity to Security Services Exchange.

Disable and enable the Cisco Security Cloud configuration to register firewall devices to Security Services Exchange again.