-
Cisco Unified IP Phone Model 7905G and 7912G Administration Guide for Cisco Unified CallManager Release 4.2 and later
-
Index
-
Preface
-
Overview of the Cisco Unified IP Phone
-
Preparing to Install the Cisco Unified IP Phone on Your Network
-
Setting Up the Cisco Unified IP Phone
-
Configuring Network Settings on the Cisco Unified IP Phone
-
Configuring Features, Services, Templates, and Users
-
Viewing Status, Statistics, Model, and Firmware Information on the Cisco Unified IP Phone
-
Troubleshooting the Cisco Unified IP Phone
-
Additional Configuration Methods and Parameters
-
Providing Information to Users Via a Website
-
Supporting International Users
-
Updating Firmware for the Cisco Unified IP Phone
-
Changing the Graphic on the Cisco Unified IP Phone Screen
-
Technical Specifications
-
 Feedback
Table Of Contents
An Overview of the Cisco Unified IP Phone
Understanding the Cisco Unified IP Phone 7905G and 7912G
What Networking Protocols Are Used?
What Features are Supported on the Cisco Unified IP Phone 7905G and 7912G?
Configuring Telephony Features
Configuring Network Features Using the Cisco Unified IP Phone
Providing Users with Feature Information
Overview of Configuring and Installing the Cisco Unified IP Phone 7905G and 7912G
Configuring Cisco Unified IP Phones in Cisco Unified CallManager
Checklist for Configuring the Cisco Unified IP Phone in Cisco Unified CallManager
Installing Cisco Unified IP Phones
Checklist for Installing the Cisco Unified IP Phone
Unlocking and Locking Configuration Options
An Overview of the Cisco Unified IP Phone
The Cisco Unified IP Phone provides voice communication over an Internet Protocol (IP) network. It functions much like a traditional analog telephone, allowing you to place and receive phone calls and to access features such as mute, hold, transfer, and speed dial. In addition, because the phone is connected to your data network, it offers enhanced IP telephony features, including access to network information and customizeable features.
This manual describes the Cisco Unified IP Phone 7905G and 7912G. The Cisco Unified IP Phone 7905G and 7912G include softkeys and an phone screen. The Cisco Unified IP Phone 7912G adds an internal Ethernet switch.
All phone models support G.711, G.729, G.729a, G.729b, and G.729ab audio compression.
A Cisco Unified IP Phone must be configured and managed like other network devices.
This chapter includes the following topics:
•
Understanding the Cisco Unified IP Phone 7905G and 7912G
•
•
•
•
Caution
Understanding the Cisco Unified IP Phone 7905G and 7912G
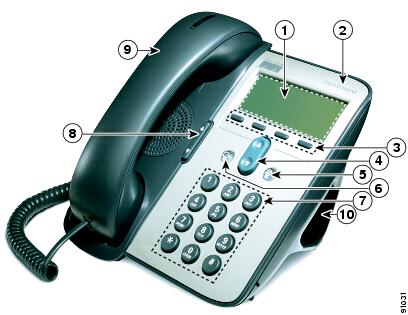
The Cisco Unified IP Phone 7905G and 7912G are basic IP phones that address the voice communication needs of employees who engage in low to medium telephone use. The phones provide a pixel display and dynamic softkeys for easy access to a core set of business features. They support a maximum of two calls and one directory number, and inline power for receiving power through and Ethernet connection. The Cisco Unified IP Phone 7912G includes an integrated 10/100 Ethernet switch for connecting a PC.
Note
Figure 1-1 shows the main components of the Cisco Unified IP Phone 7905G and 7912G.
Figure 1-1 Cisco Unified IP Phone 7905G and 7912G Features
What Networking Protocols Are Used?
Cisco Unified IP Phones support several industry-standard and Cisco networking protocols for voice communication. Table 1-1 provides an overview of the networking protocols that the Cisco Unified IP Phone 7905G and 7912G support.
Related Topics
•
•
•
•
•
What Features are Supported on the Cisco Unified IP Phone 7905G and 7912G?
The Cisco Unified IP Phone 7905G and 7912G function much like traditional analog phones, allowing you to place and receive telephone calls. In addition to traditional telephony features, the Cisco Unified IP Phones include features that enable you to administer and monitor the phone as a network device.
This section includes the following topics:
•
•
•
Feature Overview
Cisco Unified IP Phones provide traditional telephony functionality, such as call forwarding and transferring, redialing, speed dialing, conference calling, and voice messaging system access. Cisco Unified IP Phones also provide a variety of other features. For an overview of the telephony features that the Cisco Unified IP Phone 7905G and 7912G support, see the "Telephony Features Using Cisco Unified CallManager Administration" section on page 5-2.
Like other network devices, you must configure the Cisco Unified IP Phones to prepare them to access Cisco Unified CallManager and the rest of the IP network. Using DHCP, you have fewer settings to modify, but you can choose to assign a static IP if your network requires it. For instructions on configuring the network settings on the Cisco Unified IP Phones, see Chapter 4, "Configuring Network Settings on the Cisco Unified IP Phone."
The Cisco Unified IP Phone 7905G and 7912G can integrate with the corporate Lightweight Directory Access Protocol 3 (LDAP3) standard directory to enable users to search for co-workers contact information directly from their IP phones. For information about configuring this feature, see the "Configuring the Corporate Directory" section on page 5-13.
Because the Cisco Unified IP Phone is a network device, you can obtain detailed status information about it. This information can assist you in troubleshooting problems that users might encounter when using their IP phones. See Chapter 7, "Troubleshooting the Cisco Unified IP Phone" for tips on using this information.
Related Topics
•
•
•
Configuring Telephony Features
You can modify additional settings on the Cisco Unified IP Phone from the Cisco Unified CallManager Administration application. Use this web-based application to set up phone registration criteria and calling search spaces, to configure corporate directories, and to modify phone button templates, among other tasks. For more information, see Chapter 5, "Configuring Features, Services, Templates, and Users."
In some places, this manual provides partial instructions for procedures that involve Cisco Unified CallManager Administration. These instructions are intended to point you to the appropriate page in the Cisco Unified CallManager application and to provide some initial guidance.
For more information about the Cisco Unified CallManager Administration application, refer to Cisco Unified CallManager documentation, including Cisco Unified CallManager Administration Guide. You can also use the context-sensitive help that is available within the application. Access context-sensitive help by choosing Help > For this screen from the main menu bar.
You can access the complete Cisco Unified CallManager documentation suite at this location:
http://www.cisco.com/univercd/cc/td/doc/product/voice/c_callmg/index.htm
Related Topic
•
Configuring Network Features Using the Cisco Unified IP Phone
You can locally configure features such as DHCP, TFTP, and IP settings on the phone itself. You can also obtain statistics about a current call or firmware versions on the phone.
For more information about configuring features and viewing statistics from the phone, see Chapter 4, "Configuring Network Settings on the Cisco Unified IP Phone" and see "Viewing Status, Statistics, Model and Firmware Information on the Cisco Unified IP Phone."
Related Topics
•
•
Providing Users with Feature Information
If you are a system administrator, you are likely the primary source of information for Cisco Unified IP Phone users in your network or company. To ensure that you distribute the most current feature and procedural information, familiarize yourself with Cisco Unified IP Phone documentation. Make sure to visit the Cisco Unified IP Phone web site:
http://www.cisco.com/univercd/cc/td/doc/product/voice/c_ipphon/index.htm
From this site, you can view and order various user guides, including wallet cards. For complete ordering information, see the "Obtaining Documentation" section on page xvi.
In addition to providing documentation, it is important to inform users of available Cisco Unified IP Phone features—including features specific to your company or network—and of how to access and customize those features, if appropriate.
For a summary of some of the key information that phone users need their system administrators to provide, see "Providing Information to Users Via a Website."
Related Topic
•
Overview of Configuring and Installing the Cisco Unified IP Phone 7905G and 7912G
When deploying a new IP telephony system, system administrators and network administrators must complete several initial configuration tasks to prepare the network for IP telephony service. For information and a checklist for setting up and configuring a complete Cisco Unified IP telephony network, refer to the "System Configuration Overview" chapter in the Cisco Unified CallManager System Guide.
After you have set up the IP telephony system and configured system-wide features in Cisco Unified CallManager, you can add IP phones to the system.
The following topics provide an overview of procedures for adding Cisco Unified IP Phones to your network:
•
•
Configuring Cisco Unified IP Phones in Cisco Unified CallManager
To add phones to the Cisco Unified CallManager database, you can use:
•
•
•
•
For more information about these choices, see the "Methods for Adding Phones to the Cisco Unified CallManager Database" section on page 2-9.
For general information about configuring phones in Cisco Unified CallManager, refer to the "Cisco Unified IP Phone" chapter in the Cisco Unified CallManager System Guide.
Related Topic
Checklist for Configuring the Cisco Unified IP Phone in Cisco Unified CallManager
Checklist for Configuring the Cisco Unified IP Phone in Cisco Unified CallManager
Table 1-2 provides an overview and checklist of configuration tasks for the Cisco Unified IP Phone 7905G/7912G in Cisco Unified CallManager Administration. The list presents a suggested order to guide you through the phone configuration process. Some tasks are optional, depending on your system and user needs. For detailed procedures and information, refer to the sources in the list.
Note
Table 1-2 Checklist for Configuring Cisco Unified IP Phone 7905G/7912G in Cisco Unified CallManager
1. Gather the following information about the phone:
•
•
•
•
•
•
•
•
•
Provides list of configuration requirements for setting up phones.
Identifies preliminary configuration that you need to perform before configuring individual phones, such as phone softkey templates.
Refer to the Cisco Unified CallManager System Guide,
Cisco Unified IP Phone chapter.See the "Telephony Features Using Cisco Unified CallManager Administration" section on page 5-2.
2. Add and configure the phone by completing these required fields in the Phone Configuration window:
•
•
•
•
•
•
•
•
Adds the device with its default settings to the Cisco Unified CallManager database.
Refer to the Cisco Unified CallManager Administration Guide, Cisco Unified IP Phone Configuration chapter.
For information about Product Specific Configuration fields, refer to "I" Button Help in the Phone Configuration window.
3. Add and configure the directory number on the phone by completing these required fields in the Directory Number Configuration window.
•
•
•
•
•
Adds primary and secondary directory numbers and features associated with directory numbers to the phone.
Refer to the Cisco Unified CallManager Administration Guide, Cisco Unified IP Phone Configuration chapter:
"Adding a Directory Number" section
"Creating a Cisco Unity Voice Mailbox" section.See the "Telephony Features Using Cisco Unified CallManager Administration" section on page 5-2.
4. Customize softkey templates (optional).
Adds, deletes, or changes order of softkey features that display on the user's phone to meet feature usage needs.
Refer to the Cisco Unified CallManager Administration Guide,
Softkey Template Configuration chapter.See the "Configuring Softkey Templates" section on page 5-14.
5. Configure speed-dial (optional).
Adds speed-dial numbers.
Note
Refer to the Cisco Unified CallManager Administration Guide, Cisco Unified IP Phone Configuration chapter,
"Configuring Speed-Dial Buttons" section.6. Configure Cisco Unified IP Phone services and assign services (optional).
Provides IP Phone services.
Note
Refer to the Cisco Unified CallManager Administration Guide, Cisco Unified IP Phone Services Configuration chapter.
7. Assign services to phone (optional).
Provides access to an IP phone service or URL.
Refer to the Cisco Unified CallManager Administration Guide, Cisco Unified IP Phone Configuration chapter,
"Adding a Cisco Unified IP Phone Service to a Phone Button" section.8. Add user information by configuring required fields: (optional).
•
•
•
•
Adds user information to the global directory for Cisco Unified CallManager.
Note
Cisco Unified CallManagerRefer to the Cisco Unified CallManager Administration Guide,
Adding a New User chapter.See the "Adding Users to Cisco Unified CallManager" section on page 5-15.
9. Associate a user with a phone (optional).
Provides users with control over their phone such as forwarding calls or adding speed-dial numbers or services.
Note
Refer to the Cisco Unified CallManager Administration Guide,
Adding a New User chapter, "Associating Devices to a User" section.
Installing Cisco Unified IP Phones
After you have added the phones to the Cisco Unified CallManager database, you can complete the phone installation. You (or the phone users) can install the phone at the users's location. The Cisco Unified IP Phone Installation Guide that ships in the box with each phone provides directions for connecting the phone handset, cables, and other accessories.
After the phone is connected to the network, the phone startup process begins and the phone registers with Cisco Unified CallManager. To finish installing the phone, configure the network settings on the phone depending on whether you enable or disable DHCP service.
If you used auto-registration, you need to update the specific configuration information for the phone such as associating the phone with a user, changing the softkey template, or directory number.
Note
http://www.cisco.com/pcgi-bin/tablebuild.pl/ip-7900serRelated Topic
Checklist for Installing the Cisco Unified IP Phone
Checklist for Installing the Cisco Unified IP Phone
Table 1-3 provides an overview and checklist of installation tasks for the Cisco Unified IP Phone 7905G/7912G. The list presents a suggested order to guide you through the phone installation. Some tasks are optional, depending on your system and user needs. For detailed procedures and information, refer to the sources in the list.
Table 1-3 Checklist for Installing the Cisco Unified IP Phone 7905G/7912G
1. Choose the power source for the phone:
•
•
Determines how the phone receives power.
See the "Providing Power to the Cisco Unified IP Phone" section on page 2-7.
2. Assemble the phone, adjust phone placement, and connect the network cable.
Locates and installs the phone in the network.
See the "Network and Access Ports" section.
3. Monitor the Phone StartUp Process.
Verifies that phone is configured properly.
4. Configure these network settings on the phone by choosing Settings > Network Configuration.
Note
To enable DHCP:
•
•
Enter IP address for TFTP Server 1.To disable DHCP:
•
•
•
•
•
•
Enter IP address for TFTP Server 1.Using DHCP—The IP address is automatically assigned and the Cisco Unified IP Phone is directed to a TFTP Server.
Note
Without DHCP—You must configure the IP address, TFTP server, subnet mask, domain name, and default router locally on the phone.
See the "Configuring Startup Network Settings" section.
See the "Configuring Network Settings on the Cisco Unified IP Phone" section on page 4-1.
5. Make calls with the Cisco Unified IP Phone.
Verifies that the phone and features work correctly.
Refer to the Cisco Unified IP Phone Guide 7905G/7912G.
6. Provide information to end users about how to use their phones and how to configure their phone options.
Ensures that users have adequate information to successfully use their Cisco Unified IP Phones.
Unlocking and Locking Configuration Options
To prevent users from making changes that could affect the operation of a phone, Configuration options in the Network Configuration menu and in the Security Configuration menu are locked by default. You must unlock these options before you can change them and perform many of the procedures that are described in this manual.
When options are inaccessible for modification, a locked padlock
icon appears on the Network Configuration Menu. When options are unlocked and accessible for modification, an unlocked padlock
icon appears on this menu, as shown below.
To unlock or lock options in the Network Configuration menu or in the Security Configuration, press **# before you display the menu or while the menu i s displayed. This action either locks or unlocks the options, depending on the previous state.
Make sure to lock options after you have made your changes.
Caution
Related Topics
•
•
•